Rize Liberty User manual

!
Owner’s Manual

Contents
Welcome """"…………….…………………………………………………………………………………… 1#
Safety Check""""…………….…………………………………………………………………………………… 2$
Maintenance """ …………….…………………………………………………………………………………… 3#
Assembly""""…………….…………………………………………………………………………………… 4#
Battery Charging"""…………….…………………………………………….……………………………………… 7#
LCD Screen""""…………….…………………………………………………………………………………… 8#
Headlight and Taillight"" …………….…………………………………………………………………………………… 8#
Walk Assistance Mode"" …………….…………………………………………………………………………………… 9#
Settings Mode"""…………….…………………………………………………………………………………… 9#
Error Code Definition"" …………….…………………………………………………………………………………… 11#
Cleaning and Tips"""…………….…………………………………………………………………………………… 12#
Legal Requirement"""…………….…………………………………………………………………………………… 12#
Serial Number"""…………….…………………………………………………………………………………… 13#
Warranty""""…………….…………………………………………………………………………………… 13#
Help Center""""…………….…………………………………………………………………………………… 14#

Congratulations on purchasing your new Rize Bike! You have chosen a bike that will give you an unreal riding experience,
and you have chosen wisely.
Please read this manual carefully before using your bike. It will help you assemble your bike properly and keep your bike
in top condition. More importantly, this will ensure your safety while using the bike.
If you don’t feel comfortable assembling the bike on your own, it is highly recommended that you have your bike
assembled by a bicycle mechanic.
If you have questions regarding assembly or any other questions, please refer to the Rize Bikes Help Center or contact us
directly.
Help Center: help.rizebikes.com
Email: [email protected]
Thank you for choosing Rize Bikes!
1

Safety Check Before First Use#
Please check the following components: handlebar, stem, pedals, crank, wheels. Ensure they are properly installed and
tightened. While some of the components are pre-assembled, it is still important to make sure every component is
tightened at the indicated torque value. Failing to notice a loose component may cause it to detach during use and lead to
serious injury.
•Wheels: A critical part of assembling your bike is securing the front and rear wheels and checking the tightness of
the wheel axle nuts. Properly installed wheels are essential to the safe use of the bike. #
•Tires: Both tires must be inflated as specified in the manual. Failing to do so will reduce performance, increase tire
wear, and compromise your safety.#
•Crank: Ensure the crank (pedal arm) is tightened at the indicated torque value. (required tools: 8mm hex key,
recommended torque 40-42 N.m)
•Brakes: Ensure brakes are working correctly and properly secured. When braking, apply the rear brake first, then the
front brake. If brakes are not correctly applied, they may lock up and you may lose control.#
It is recommended to perform the above safety checks every (200 - 300 km) / (120 - 180 miles) or if the bike is not used
for 3 weeks.#
For Your Safety
Users must become accustomed to the power controls before riding. It is highly recommended that you ride your new
bike in an open area and set the power assist level to “0”. Once you feel confident operating your bike, increase the
power assist gradually.#
Keeping your hands over the brake levers is good practice. The brake levers have motor inhibitors that will shut down
the motor power when applied. If for any reason you lose control, apply the brake levers immediately to shut down the
motor power. Do not try to stop your bike using your feet, as this may cause the user to lose balance.#
2

When walking or carrying your bike, turn off the power to avoid accidentally switching on the motor. If the motor is
accidentally switched on, immediately apply the brakes to cut off the power to the motor.
Throttle: The throttle mechanism allows partial or full motor power to be activated. Unfamiliarized users should be more
cautious when first pushing the throttle. The throttle function is deactivated when the pedal assist level is set to “0”.#
Pedal Assist (Cadence Sensor): The cadence sensor activates the motor when the crank is in motion and will cause the
bike to suddenly boost forward.#
Pedal Assist (Torque Sensor): The torque sensor activates the motor when pressure is applied to the pedals, causing
the bike a sudden forward movement.#
Maintenance
It is important to perform proper maintenance and often fine-tune your bike to ensure optimal performance and safe riding.
Regularly lubricate your chain, gear shifter, sprocket, and all moving parts.
Always check the condition of your bike before riding and make sure that it is well maintained. When in doubt, consult a
bicycle mechanic for assistance.!
Warning: If you do not have the experience, skill, or tools to complete maintenance or adjustment of your bike, it is highly
recommended to have a bicycle mechanic check your bike and ensure it is safe to ride.!
!
Liability Disclaimer
There are risks associated with the use of any bike over time which cannot be predicted or avoided and are the sole
responsibility of the rider. You are responsible for your own actions while using an electric bike. Rize Bikes is not
responsible nor liable for any accidents or injuries (whether caused by you or others) that may occur during your use. We
recommend contacting your insurance provider to determine if your current insurance policy would cover you in the
event of an accident.!
3

Assembly
(A) Handlebar (required tools: 5mm hex key)
Do not carry the bike or move the fork during the handlebar
assembly process. The fork must be fully inserted into the
frame.#
1. Unscrew the retainer from the head tube.
2. Remove the silver spacer from the head tube.
3. Insert the handlebar stem into the head tube and tighten
the retainer. (recommended torque 8 N.m)
4. Align the handlebar with the front wheel and tighten the
two bolts on the side of the stem. (recommended torque 12
N.m)
(B) Front Wheel (required tools: 15mm wrench, recommended torque 35 N.m)
1. Remove the brake pad protector located between the brake pads.
2. Remove the nuts and washers from the wheel axle.
3. Assemble the wheel by inserting the disc brake rotor between the brake pads, then insert the fork end onto the wheel
axle.
4. Insert the washer into the wheel axle and tighten the nut.
(C) Rear Wheel (required tools: 18mm wrench, recommended torque 40 N.m)
Ensure the rear wheel is tightened at the recommended torque value.
4
2. Remove silver
spacers
1. Unscrew !
retainer
3. Tighten
4. Tighten

(D) Tire Pressure
Inflate the tires to (35 PSI). Recommended tire pressure is indicated on the tire sidewall. Do not over-inflate or under-
inflate tires.
(E) Fender (Required tools: 5mm hex key, 15mm wrench)
1. Insert the fender hook into the fork arch.#
2. Insert the bolt into the headlight holder and fender hook, and tighten on the fork arch.#
3. Insert the fender stays into the wheel axle and tighten the nut.#
#
(F) Rear Rack Taillight
Wire extension is required to mount the taillight on the rear rack. Wire extension is found
in the owner’s manual box.
(G) Bottle Holder
Use the screws provided to assemble the bottle holder. The bottle holder can be mounted
underneath the seat.
(H) Hydraulic Brake Lever Adjustment (required tools: 2mm hex key)
1. Tighten the indicated bolt to extend the brake lever reach.
2. Loosen the indicated bolt to shorten the brake lever reach."
5

(I) Pedals (Required tools: 15mm wrench, recommended torque 35-40 N.m.)
The right and left pedals are marked with an "R" or "L" on the end of the thread. The right pedal axle has a smooth
surface whereas the left pedal axle has grooves.!
The pedal and crank threads must line up easily. Ensure that you tighten the pedals with your hand first. It should be easy
for the first few turns. Do not force if tightening is hard. Stop immediately as the pedal thread is not aligned and continuing
to do so will damage the thread of the crank.
1. Apply a small amount of grease onto the pedal thread axle.
2. Insert the right pedal into the right crank. Carefully thread the pedal clockwise onto the crank by hand slowly and
then tighten.
3. Insert the left pedal into the left crank. Carefully thread the pedal counter-clockwise onto the crank by hand slowly
and then tighten.
Warning: Inserting the pedal into the wrong angle or not tightening it firmly will tear and strip the crank thread and will
cause the pedal to detach.
(J) Removing The Battery
The battery keys are attached on the handlebar. Insert the key into the key port, turn clockwise, and pull the battery or
battery lever.
Warning: Failure to carry out proper assembly, operation, and maintenance can result in serious injury."
6

Battery Charging
Ensure the battery is fully charged before your first ride. The charger will show a red light indicating that the battery is
charging. Once fully charged the light will turn green.
Remove the charger from the battery within one hour after it has been completely charged. The charger will automatically
stop charging when the battery is full, however, unnecessary damage to the charging components could occur if the
charger is left attached to the battery and power source.
The battery can be charged after each use. Charging the battery after short rides will not cause damage.
Warning:!
•Charge the battery on a non-inflammable surface with a smoke/fire detector in place. Do not charge the battery in a
wet and humid place or anywhere exposed to strong sunlight.
•Always charge your battery where temperatures are between 10 - 25 °C.
•Charge the battery with the supplied charger. Do not attempt to use another charger as it may damage the battery or
cause a fire or an explosion.
•Do not leave the battery unattended while charging.#
Failure to follow proper charging procedures can result in damage to your battery, charger, and other personal property.
Battery Storage
•Keep the battery indoors during extreme weather.
•Avoid storing the battery in places of high temperature or high humidity.
•Charge the battery to 70% if not used for two months. The battery will slowly discharge overtime. When the battery
reaches 20% charge it again to 70%.
7
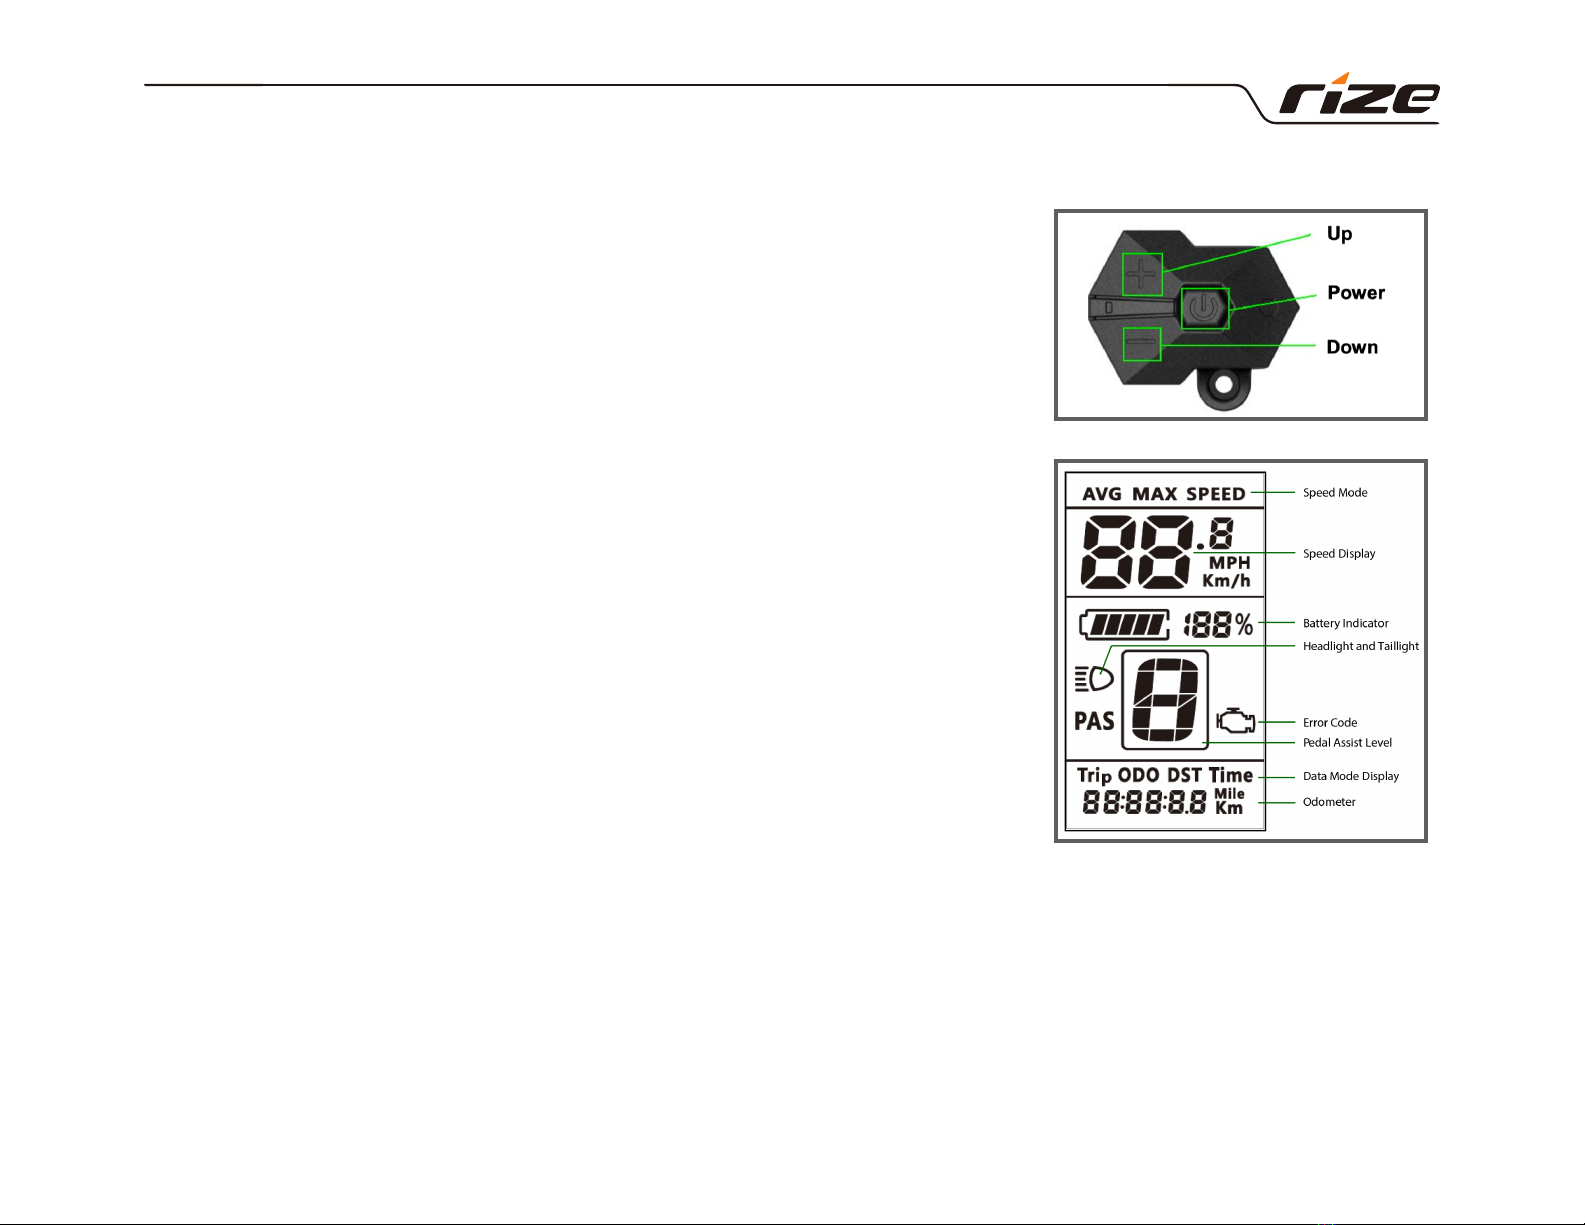
Switching the Power ON/OFF
1. Press and hold the power button for one second. The LCD display will turn on
and the bike is ready to start.
2. To switch off, press and hold the power button for one second.
To enable LCD secure lock, refer to the LCD advanced settings (option 15).
Power Assist Level
The level of assist determines the motor’s input while pedalling. By default, there
are 1-7 levels of power assist, 1 being the lowest, and 7 the highest. If you wish to
ride with no power assist, select 0.#
Press the +(up) / -(down) button to the select the level of power assist.
Throttle (Accelerator) and Cruise Control
The throttle is enabled as soon as the LCD display is switched on. If you wish to
switch off the throttle, select power assist level “0”.
To activate the cruise control, refer to the LCD advanced settings (option 13).
Switching ON/OFF the Headlight, Taillight, and Flashing Mode
1. Press and hold the +(up) button for one second to switch on the lights.
2. Press and hold the +(up) button again to switch the taillight to flashing mode.#
3. Press and hold the +(up) button again to switch off the lights.
8
Walk Assistance Mode
Press and hold the -(down) button to start the walking mode. This feature will operate the motor at a relatively low speed
to assist you to walk the bike.
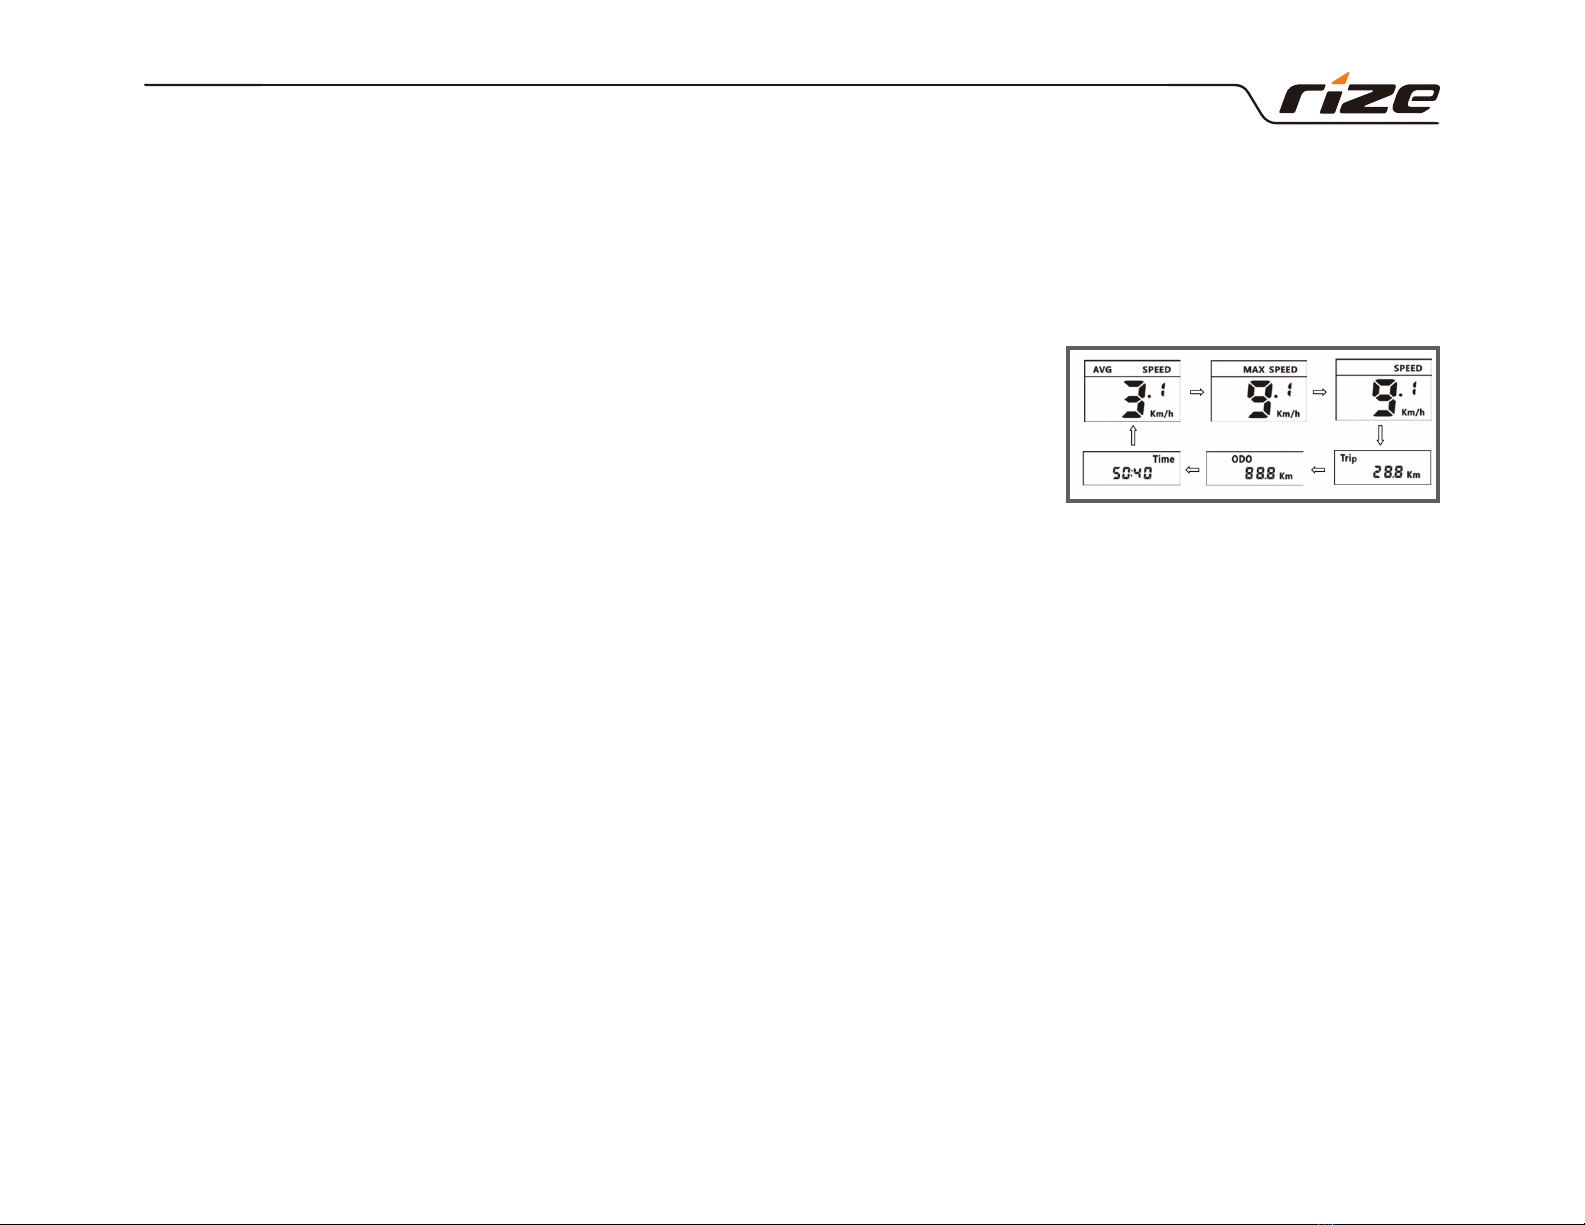
Data Mode Display
Short-press the power button to change the data mode display. Press again to
change to the next mode. The mode sequence:
Average Speed > Max Speed > Current Speed > Single Trip > Odometer > Time
Settings Mode
-Quick double-press the power button to enter the settings mode.
-Press the power button to navigate through the settings options.#
-Press +(up) or -(down) buttons to make changes and then the power button to confirm.
-To exit the settings mode, double-press the power button.
!
If no action is taken for 6 seconds on the settings mode, you will be redirected to the home screen.
The sequence of the settings option: Cr > S7 > bL1 > OFF > Wd > bU0 > PSd (advanced settings) > SPL > SAs > Sdr >
PAs > EnP > Hd6 > Sdd > dPd > PPd
1. Cr =Clear temporary data (trip reset)!
Select “y” to clear the temporary data (average speed, max speed, current speed, single trip, time).
2. S7 = Speed KM / Miles. Switch speed mode to kilometer or mile.
3. bL1 = Backlight brightness (1 - 5)
9

4. OFF = Auto off LCD screen (1 - 15) minutes!
The LCD screen switches OFF automatically when not in use. Select from 1 to 15 minutes.
5. Wd = Wheel diameter (20, 26, 27.5) (20F, 26F specific for 4” fat tires)!
The wheel diameter must be set according to the tire size. Wrong tire size will cause inaccuracy in the speed readout.
6. PSd = Advance settings!
Enter the password 1919 to access the advance settings.
Advance settings
7. SPL = Speed limit (default 32 km / 20 miles)!
Set the maximum speed limit.
8. Sdr = Motor responsiveness (default 2)!
Enables you to adjust motor responsiveness from gradual to instance. 0 - 3 (gradual to quick response).
9. PAs = Pedal assist levels (default 1-7)!
Enables you to change the number of power assist levels between (1-3, 1-5, 1-7, 1-9).
10. EnP = Battery percentage indicator (0 disabled, 1 enabled)
11. Hd6 = Cruise control (0 disabled, 1 enabled)!
To start the cruise control, push and hold the throttle at the desired speed for 8 seconds. Do not pedal while starting
the cruise control.
12. Sdd = Taillight flashing mode (0 disabled, 1 enabled)
13. dPd = LCD secure lock feature (0 disabled, 1 enabled) (default password 0000)!
This feature will lock the LCD screen and will require a password to unlock and use the electrical system.
14. PPd = Set password for LCD secure lock
10

Error Code Definition
Whenever an error is detected, the LCD display shows the sign with an error code.
Error codes range from 21 to 30:
-Error 21: Current abnormal
-Error 22: Throttle error
-Error 23: Motor phase lost
-Error 24: Motor hall error
-Error 25: Brake error
-Error 30: Controller communication error
11

Cleaning:
•Clean your bike after a wet ride and store in a dry place to avoid rust and corrosion.
•Always remove the battery when cleaning or servicing your bike.#
•Clean the battery and the battery housing with a slightly damp rag if necessary. Do not spray with water as this may
damage the battery or cause a short circuit.!
Tips
•Regularly check the tires’ pressure and ensure that they are inflated with appropriate air volume. Recommended air
pressure is (40 PSI) for regular tires and (20 PSI) for fat tires. However, this may vary depending on riding conditions
and your weight.#
•Lube your chain frequently every 150 km. Use a special bike lube to maximize performance and get a smooth ride.
•Park your bike indoors during wet conditions. Just like a regular bike, it requires proper maintenance to ensure that all
electrical systems are working correctly, and to prevent your bike from becoming rusty and corroded.
•Avoid transporting your bike on a vehicle rack during rain, as this may allow water to infiltrate the electrical
components.
Legal Requirements:
Electric bicycles are regulated, and regulations vary depending on your country/state/province/city. It is your responsibility
to stay informed of local laws and to comply with them. You may contact local authorities, electrical bicycle shops or
bicycle associations to acquire further information on legal requirements.
You are required to wear a helmet for your own safety. Use front and rear lights after sunset for increased visibility.
12

Serial Number
It is important to keep a record of your serial number as this will be required by the police in case of theft. Rize Bikes does
not keep any records of the serial numbers of bikes sold. It is your sole responsibility to take note of the serial number
upon receiving your bike.
Warranty
Our bikes are built using durable frames and quality parts supplied by solid brands. Each bike comes with a 12-month
warranty against defects from the manufacturer.#
Electrical Parts
Electrical parts Include the LCD screen, throttle, controller, pedal assist sensor, motor, and battery. These parts are user-
friendly and can be easily replaced by the user. If an electrical problem is found, our team will provide the necessary
support to resolve the problem. Parts that defective beyond repair will be replaced and shipping costs will be covered.
Mechanical Parts
Mechanical parts that are found damaged upon receiving the bike are covered by the warranty. The warranty does not
cover mechanical parts that are damaged as a result of using the product, including tires, brakes, gears, and pedals.
WARRANTY DOES NOT COVER:#
•Normal wear and tear
•Damage resulting from improper assembly and of the bike
•Damage or failure as a result of abuse, neglect, lack of maintenance, misuse, or accidents
•Damage resulting from improper charging of the battery or use of any charger not supplied by Rize Bikes
•Replacing headlights and taillights
Installation of any electrical components not originally supplied by Rize Bikes will void the warranty."
13

If you have any other questions please refer to the Rize Bikes Help Center or contact us.
Help Center: help.rizebikes.com
Email: [email protected]
Thank you for choosing Rize Bikes!"
14

Other manuals for Liberty
1
Table of contents


