RKIN ONLISOFT PRO User manual

ONLISOFT PRO SALT-FREE WHOLE HOUSE WATER TREATMENT SYSTEM
MODELS: OPX8, OPX9, OPX10, OPX13
The OnliSoft Pro 5 Stage Salt-Free Water Conditioning System removes impurities in your water
and prevents hardness build-up throughout your home.
The RKIN technology ensures that your water has the most contact time with filtration media
inside the tank, ensuring the best possible filter media utilization.
CUSTOMER SERVICE IS AVAILABLE MON-FRI 9AM-5PM EST 1-800-803-4551
www.RKIN.com

Table of Contents
Product Specs 2
Installation Overview 3
Complete Parts List 4
Carbon Filter Soak Instructions 5
OnliSoft Salt-Free Conditioner Soak Instructions 7
Carbon Rinse Instructions 8
OnliSoft Rinse Instructions 9
Pre-Filter Setup / Installation 10
Complete Install 12
Maintenance 13
Premium Whole House Water Filter 13
Sediment Filter 13
Replacing the Sediment Filter 14
Troubleshooting 15
Warranty Information 16
⚠ CAUTION:
Do not install on well water without checking with RKIN customer representative first.
© 2019 RKIN Water Systems Customer Service MON-FRI 9AM-5PM EST 1-800-803-4551 1

Product Specs
Specification
Description
OPX8
OPX9
OPX10
OPX13
Bathrooms
1-3
2-5
4-6
7+
Carbon Media
Capacity
500K Gallons or
5 Years
1 Million Gallons
or 5 Years
1 Million Gallons
or 5 Years
1 Million Gallons
or 5 Years
ZEE PRO
Pre-Filter
Replacement
Every 6-9
Months
Every 6 Months
Every 6 Months
Every 6 Months
Tank Width
8”
9”
10”
13”
Tank Height
with Head
48”
52”
58”
58”
Connection
Size
1”
1”
1”
1”
Operating
Temperatures
36°F-120°F
36°F-120°F
36°F-120°F
36°F-120°F
Operating
Pressure
25-80 PSI
25-80 PSI
25-80 PSI
25-80 PSI
Flow Rate
9 GPM Service /
12 GPM Peak
11 GPM Service
/ 17 GPM Peak
15 GPM Service
/ 23 GPM Peak
28 GPM Service
/ 41 GPM Peak
pH Range
6-11
6-11
6-11
6-11
© 2019 RKIN Water Systems Customer Service MON-FRI 9AM-5PM EST 1-800-803-4551 2

Installation Overview
© 2019 RKIN Water Systems Customer Service MON-FRI 9AM-5PM EST 1-800-803-4551 3
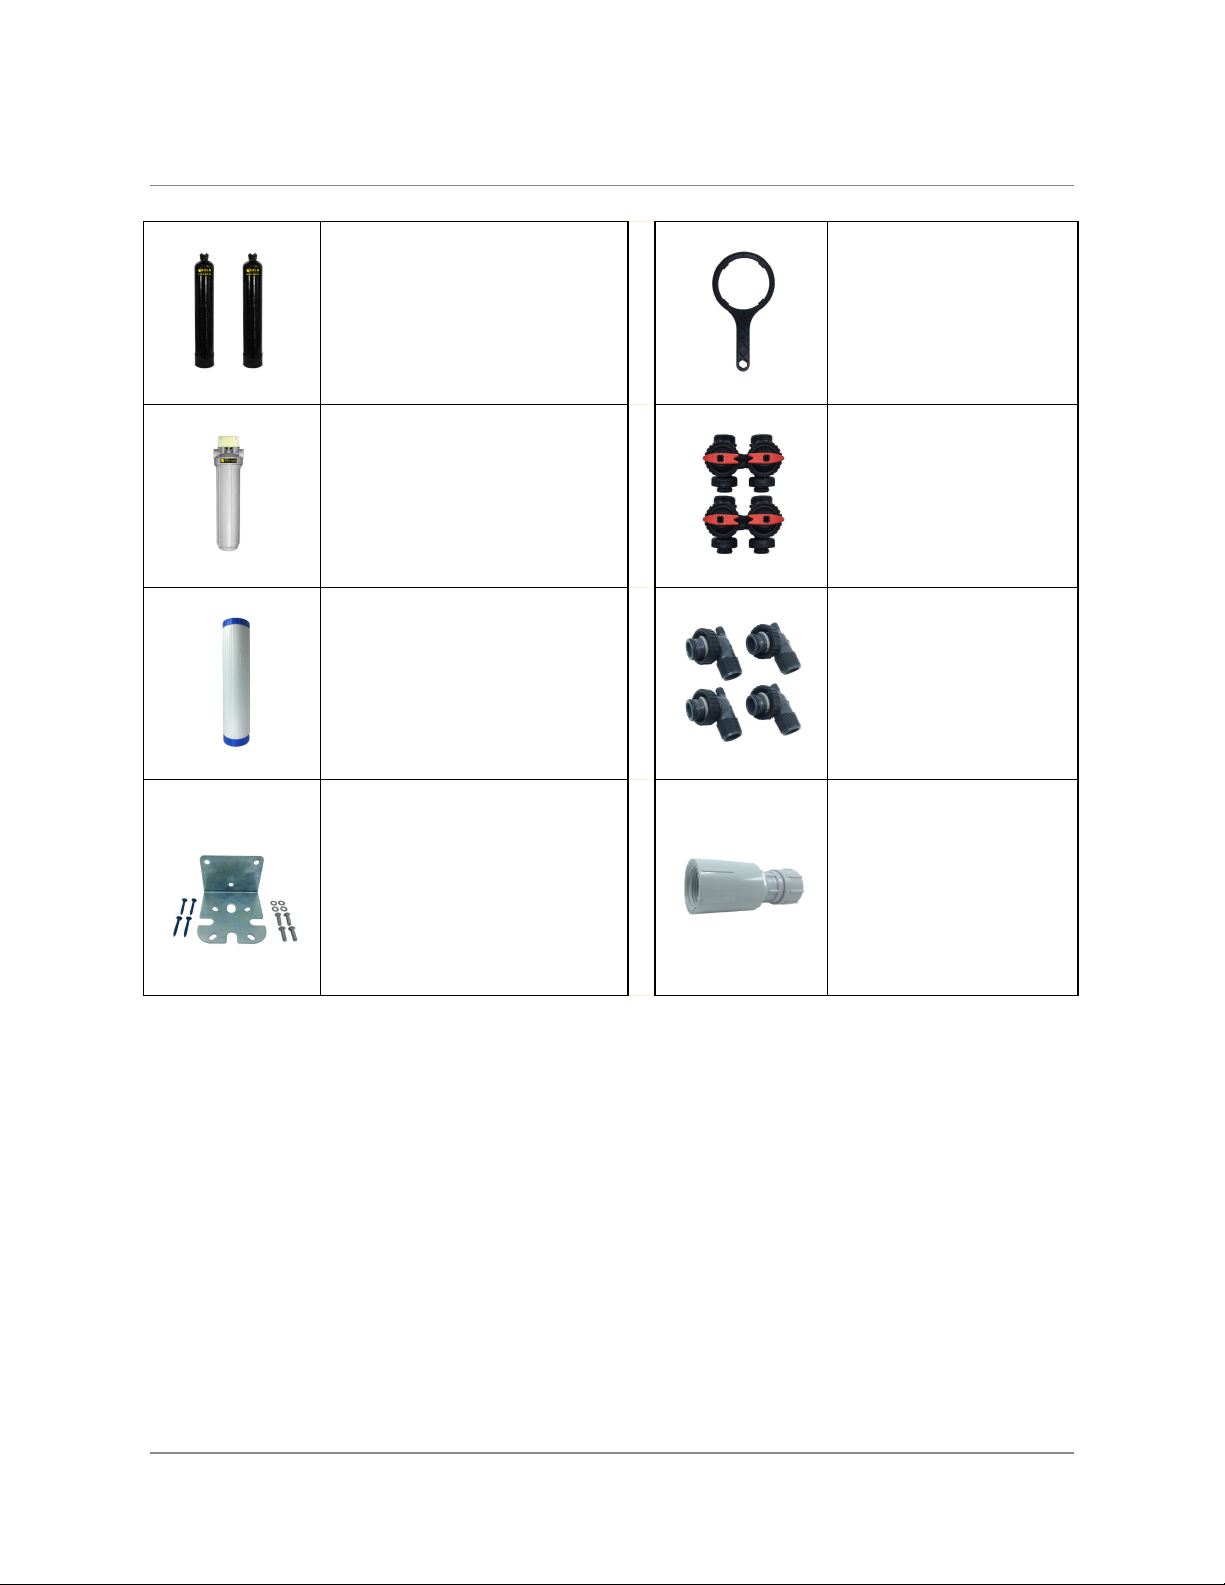
Complete Parts List
Carbon and OnliSoft Tanks
Sediment Filter
Wrench
ZEE Pro Pre-filter Housing
Bypass Valve (2)
ZEE Pro Sediment Filter
1” MNPT PVC Elbow
Fittings (4)
Mounting Kit for Pre-filter
Housing:
● Mounting Bracket
● Philips Head Screws
(4)
● Bolt Head Screws (4)
● Washers (4)
Hose Bib Assembly
⚠ CAUTION:
The system must be installed on the main water supply line.
If this system is installed into a metal (electrically conductive) plumbing system such as, copper
or galvanized metal, the water treatment system will interrupt the electrical ground continuity of
the plumbing system. This will result in the ineffectiveness of the metal plumbing system to be
used as an electrical ground for errant electricity from improperly grounded appliances or
potential galvanic activity. There are building codes which encourage the grounding of electrical
appliances through the plumbing system. If your home is built in accordance to such building
code, you must first install either a bypass consisting of the same conductive material as the
existing plumbing, or a grounded "jumper wire" that bridges the equipment and re-establishes
the continuity and the conductive nature of the plumbing system before using the water
treatment system.
© 2019 RKIN Water Systems Customer Service MON-FRI 9AM-5PM EST 1-800-803-4551 4
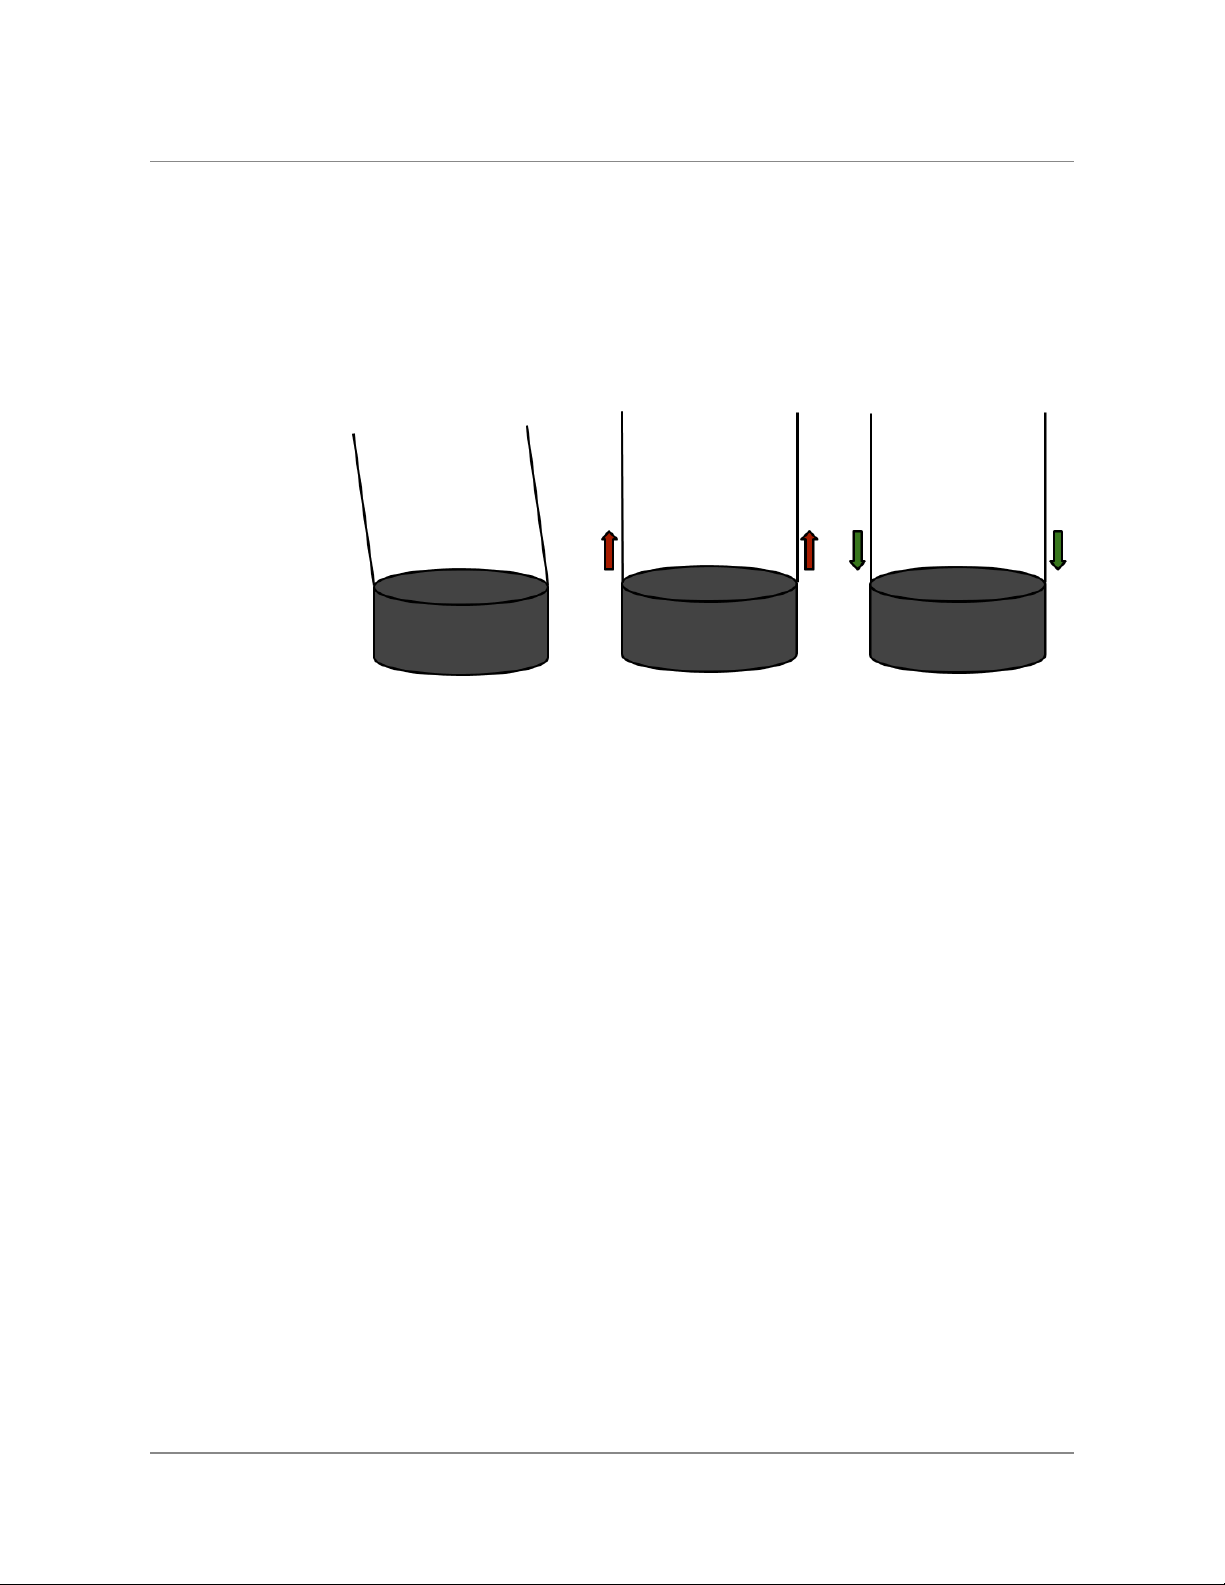
Tank Boot Adjustment
The tanks sit in a “boot” and may need to be adjusted after shipping.
Leaning Tank ⇨
Tank Boot ⇨
(Needs Alignment)
(Correct Position)
If either tank is not standing perfectly straight up and down, lift the tank up 6 inches and
carefully tap it on the ground. Repeat this until the tank stands vertically straight and sits firmly
into the tank boot.
The bottom of the tank is round and the boot allows the tank to stand upright.
© 2019 RKIN Water Systems Customer Service MON-FRI 9AM-5PM EST 1-800-803-4551 5

Carbon Filter Soak Instructions
⚠ IMPORTANT!
Before installation, soak the carbon media inside the tank in water for a MINIMUM of 2 days.
Set the tank on a level surface.
Note: The area around the tank may get wet.
Install the bypass valve with red arrows to the head of the
tank by hand-tightening quick connects.
Install PVC elbow to the inlet side of the bypass valve by
hand-tightening the quick connect.
Connect the hose bib assembly to the inlet side.
Hand-tighten. Connect a water hose to the opposite end of
the hose bib assembly. Put the bypass valve in service
mode (with the red arrows parallel to each other).
Slowly turn the water on about halfway. Wait until the water
fills the tank and overflows from the outlet side and then turn
the water off. Put the bypass valve in bypass mode (with the
red arrows forming a straight line) and disconnect the hose.
Finally, set the tank aside in a safe place for 2 days.
© 2019 RKIN Water Systems Customer Service MON-FRI 9AM-5PM EST 1-800-803-4551 6
OnliSoft Salt-Free Conditioner Soak Instructions
⚠ IMPORTANT!
Before installation, soak the media inside the tank in water for a MINIMUM of 2 days.
Set the tank on a level surface.
Note: The area around the tank may get wet.
Install the bypass valve with red arrows to the head of the
tank by hand-tightening quick connects.
Install PVC elbow to the inlet side of the bypass valve by
hand-tightening the quick connect.
Connect hose bib assembly to the inlet side. Hand-tighten.
Connect a water hose to the opposite end of the hose bib
assembly. Put the bypass valve in service mode (with the
red arrows parallel to each other).
Slowly turn the water on about halfway. Wait until the water
fills the tank and overflows from the outlet side and then turn
the water off. Put the bypass valve in bypass mode (with the
red arrows forming a straight line) and disconnect the water
hose. Finally, set the tank aside in a safe place for 2 days.
© 2019 RKIN Water Systems Customer Service MON-FRI 9AM-5PM EST 1-800-803-4551 7

Carbon Rinse Instructions
This process removes most of the excess carbon dust out of the carbon bed. Residual dust may
remain, which can be seen in toilets and sinks but will clear within a day or two.
After the carbon has soaked for 2 days, take the tank outside
to rinse excess carbon dust out of the filter.
Connect the hose to the inlet side of the bypass valve using
the bib assembly and the PVC elbow. Put the bypass valve
in service mode (with the red arrows parallel to each other).
Slowly turn the water on halfway and allow the water to run
and overflow for 15 to 20 minutes.
Turn the water off and disconnect the water hose. Connect
the water hose to the outlet side.
Slowly turn the water on to full strength. Allow the water to
run and overflow for 5 minutes.
Disconnect the hose and connect to the inlet side.
Slowly turn the water on halfway and allow the water to run
and overflow for 10 minutes.
Disconnect the hose bib assembly.
© 2019 RKIN Water Systems Customer Service MON-FRI 9AM-5PM EST 1-800-803-4551 8

OnliSoft Rinse Instructions
After the OnliSoft media has soaked for 2 days, take the
tank outside to rinse excess media fines out of the filter.
Connect the hose to the inlet side of the bypass valve using
the bib assembly and the PVC elbow. Put the bypass valve
in service mode (with the red arrows parallel to each other).
Slowly turn the water on halfway and allow the water to run
and overflow for 5 minutes.
Turn the water off and disconnect the water hose. Connect
the water hose to the outlet side.
Slowly turn the water on to full strength. Allow the water to
run and overflow for 5 minutes.
Disconnect the hose bib assembly.
© 2019 RKIN Water Systems Customer Service MON-FRI 9AM-5PM EST 1-800-803-4551 9

Pre-Filter Setup / Installation
1. At this point, you will need to shut the main water supply off to adapt your plumbing in
and through the system.
2. We recommend you plumb a shut off valve to the pipe leading to the pre-filter housing.
3. Locate an area on your wall where you would like the system to be installed. Locate the
aluminum pre-filter mounting bracket with hex bolts and washers.
4. Mount the pre-filter bracket to the wall using the hex bolts and washers.
Note: The aluminum bracket should be screwed into a concrete wall or into studs in the wall to
support the weight of the soaked pre-filter, which will weigh approximately 24 pounds.
© 2019 RKIN Water Systems Customer Service MON-FRI 9AM-5PM EST 1-800-803-4551 10

While the aluminum mounting bracket is mounted on the
wall, attach the pre-filter housing head to the mounting
bracket with the hex bolts and washers provided.
Plumb the main water supply into the Inlet side of the
pre-filter head (follow the in and out stickers indicating water
flow).
Note: The pre-filter housing head inlet and outlet takes 1”
male fittings.
Unwrap pre-filter and install it in the housing by setting the
filter onto the pipe stand inside. (Usually, the prefilter
cartridge is shipped pre installed. So, this step may not be
necessary.)
Screw the pre-filter housing to the head as tight as you can
by hand and then tighten it further with the wrench. (Usually,
the prefilter cartridge is shipped pre installed. So, this step
may not be necessary.)
© 2019 RKIN Water Systems Customer Service MON-FRI 9AM-5PM EST 1-800-803-4551 11

Complete Install
Once the plumbing is complete, it's time to test the system:
1. Double-check all connections. The valve nuts should only be hand-tighten.
2. Slowly turn the main water supply on and check for leaks.
3. If there are no leaks, slowly turn the bypass valve to the in-service mode (with red
arrows parallel to each other).
4. Go to a faucet inside and slowly turn the cold water on about halfway and let it run for
about 5 minutes.
5. Turn off the faucet. If everything is working properly, you have completed the install.
CONGRATULATIONS:
You can now enjoy your new RKIN OnliSoft Pro Whole House Water Treatment System!
© 2019 RKIN Water Systems Customer Service MON-FRI 9AM-5PM EST 1-800-803-4551 12

Maintenance
Premium Whole House Water Filter Carbon Media
Your OnliSoft Pro Whole House Water Treatment System requires care and cleaning after a
period of 5 years. Replacement media and instructions can be ordered on-line at www.rkin.com
or by calling 800-803-4551. Model numbers for replacement media are WHRMC8, WHRMC9,
WHRMC10, and WHRMC13.
Sediment Filter
It is recommended that the Sediment Filter be replaced every 6-9 months depending on the
amount of sediment present in the water supply. If the system has been working properly and
the pressure is slowing, it may be time to change the Sediment Filter. Check the Sediment Filter
and replace if necessary. Replacement sediment filters can be ordered on-line at www.rkin.com
or by calling 800-803-4551. The model number for the sediment filter is WHRCZEEPRO.
Replacing the Sediment Filter
1. Turn off the main water supply to the Sediment Filter System and put the bypass valve of
all the tanks on bypass mode (with the red arrows forming a straight line).
2. Turn on a faucet (cold water) inside the house to relieve air pressure. (Leave the faucet
on)
3. Using the supplied Filter Wrench, unscrew the Pre-filter Housing clockwise.
4. Remove the existing Sediment Filter and discard.
5. Remove the O-ring and wipe the groove clean. Lubricate the new O-Ring with a coating
of the LubriKit provided. Replace O-Ring and press the new O-Ring down into the
groove.Note: Changing the O-ring is recommended to ensure water tightness throughout
the life of the housing. If replacing the O-ring is not possible, we highly recommend
lubricating the O’ring every time the Pre-filter housing is separated from the head.
6. Place a new Sediment Filter onto the Stand Pipe in the Pre-filter Housing.
7. Screw the Pre-filter Housing onto the Filter Cover and hand-tighten it. Carefully snug the
pre-filter with the filter wrench without over-tightening.
© 2019 RKIN Water Systems Customer Service MON-FRI 9AM-5PM EST 1-800-803-4551 13

8. Slowly turn on the main water supply and allow the Sediment Filter System to fill with
water and push out air pressure from the water lines. Put tanks back in service mode,
out of bypass.
9. Check for leaks.
© 2019 RKIN Water Systems Customer Service MON-FRI 9AM-5PM EST 1-800-803-4551 14

Troubleshooting
Problem
Solution
There is a water leak at the top of the
tank around the head.
You may need to turn the head to tighten it:
1. Put the bypass valve on bypass mode.
2. Disconnect the bypass valve from the tank.
3. Turn the head snug. (The tank head is
pre-installed hand-tight, do not overtighten the
head).
4. Install the Bypass Valve back on the tank.
The tank leans to one side or is
standing vertically level.
If the tank is not standing perfectly straight up and
down:
1. Lift the tank up 6 inches and carefully tap it on
the ground.
2. Repeat this until the tank stands vertically
straight and sits firmly into the tank boot.
The bottom of the tank is round and the boot allows
the tank to stand upright.
The water pressure is slowing
It is recommended that the Sediment Filter be
replaced every 6-9 months depending on the amount
of sediment present in the water supply, If the system
has been working properly and the pressure is
slowing, it may be time to change the Sediment Filter.
Check the Sediment Filter and replace if necessary.
The water coming out appears grey or
cloudy.
Right after installation, the water output may appear
grey or cloudy due to the remaining extra carbon dust
exiting the system. This is completely normal and
should clear after a week or so.
The water pressure is slowing
immediately after installation.
This could be due to a blockage inside the system
caused by insufficiently soaked carbon sticking to the
top part of the tank. To prevent this from happening,
avoid using water outlets with high flow rates such as
bathtubs, utility sinks, hose bibs, and multi-headed
showers for the first 72 hours of installation.
If you suspect a carbon blockage inside the system
due to high flow rate use within the first 72 hours of
installation, turn off all running water for 10 minutes.
This will help the carbon to settle and clear the
blockage. You can then resume using water at low or
normal flow rates.
© 2019 RKIN Water Systems Customer Service MON-FRI 9AM-5PM EST 1-800-803-4551 15

Warranty Information
For more information on our warranty, please visit www.rkin.com/onlisoft-pro-warranty/
© 2019 RKIN Water Systems Customer Service MON-FRI 9AM-5PM EST 1-800-803-4551 16
This manual suits for next models
4
Table of contents
Popular Water Dispenser manuals by other brands

IBC Water
IBC Water AST0715MP-960 Installation & operating instructions

Lancaster Water Treatment
Lancaster Water Treatment X FACTOR LX15 Series Installation, operating and service manual

Elkay
Elkay EMABF8 Series Installation & use manual

Oasis
Oasis Osmosis Home installation manual

Monarch Water
Monarch Water ULTIMATE MINI AQUA HE install guide

Haier
Haier HLM-109B instruction manual


