Robert Sorby Eccentric Chuck User manual

Instruction/Data Sheet
In this booklet we will take an in-depth look at the Robert Sorby Eccentric Chuck with all its
component parts and make 4 different projects. The four projects are of varying complexity and use all
of the Eccentric Chuck’s various holding methods.
The first project will be an Off-set Stem Goblet. The second will be a 3 sided bowl with a cloverleaf
centre detail. The next will be a Cabriole Candlestick and we will finish this presentation with a
scallop lidded box.
The Robert Sorby Eccentric Chuck uses three methods for holding the wood.
These are :
1. Screw chuck
2. Faceplate
3. Hexagonal Ball drive and socket.
The Robert Sorby Eccentric Chuck is the most comprehensive multi-centre chuck available.
The unique eccentric boss provides easy and accurate adjustment with its bi-heaxagonal locating
socket for each of the holding components. This allows for each component to be located at any
of the 12 positions.
The eccentric boss is marked 0-35 on its outside diameter, which can be seen through the viewing
window in the main body.
These markings are the amount the holding component held in the eccentric boss can be offset
from centre.
Zero being on the centre axis of the lathe. At this position the work piece will run concentrically to the
rotatation of the lathe.
Any number other than zero will then offset the work-piece by the amount shown in the viewing
window. The combination of the amount of offset of the eccentric boss & the position in the
bi-hexagonal socket means this is the most versatile Eccentric Chuck available.
The Robert Sorby Eccentric Chuck weighs around 51/2 lbs (2.5kgs). It is designed this way
to counterbalance the weight of the work piece when it is offset. This gives more stability than any
other offset system where the main components are offset from the centre as well as the work piece,
adding far more weight and creating a greater imbalance. This would substantially reduce its capability
increasing the risk of damage or injuiry.
Using and insterted adaptor system with a large variety of thread sizes the Robert Sorby
Eccentric Chuck can be fitted to virtually any lathe in the world.
The insert, screws into the main body of the chuck and is tightened using the large wrench supplied.
The chuck can be easily mounted onto the lathe and is tightened using the wrench supplied.
The Robert Sorby Eccentric Chuck is also supplied with comprehensive 12 page instructional
manual. It describes the chuck and its component parts as well as instructions how to use each of the
holding methods. A CD video to accompany this booklet is also available. It shows all the procedures
described with full step by step commentry.
Page 1
Robert Sorby
Instruction/Data Sheet
ECCENTRIC CHUCK PROJECTS

Instruction/Data Sheet
Use and care of the Eccentric Chuck
Turning eccentrically or off-centre as it is more commonly known is exciting and different but it is this
difference to concentric turning that we have to be aware of. Because the wood is turning off-centre
the lathe speeds have to be dramatically reduced and far higher awareness of the rotating wood has
to be observed. At the end of each project section there is a detailed drawing with sizes and
descriptions of particular points that are mentioned in the step by step instructions. This is a good
reference guide whilst turning each project. All the measurements and conversions are approximate
and are intended as a guide to producing each project using the wood detailed in the relevant
instructions.
The Robert Sorby Eccentric Chuck is a precisely engineered product and should be well
maintained. When not in use keep the chuck and all its components clean and store them in a carry
case provided. A thin film of light oil or silicon spray will keep all parts in top condition.
Health and Safety
The safe toolrest position
In this booklet we will mention the “safe toolrest position” prior to and whenever any turning is going to
be done, The following procedure should be made at all times. Slide the toolrest, as close to the
work-piece that is safely possible ensuring there is enough room for full rotation of the wood without
any inteference. Check this by rotating the wood or work piece by hand before switching the lathe on.
Safety equipment
As with all woodworking, sufficient safety equipment should be worn. A very minimum of a pair of
safety glasses and a dust mask is essential but when turning off-centre,a face shield is highly
recommended. Please read the step by step instructions very carefully attempting any of the projects.
Caution
Robert Sorby have take extra care to explain correct and safe working techniques
throughout this booklet. However it must be stressed that eccentric woodturning like all woodworking
tools and machinery use can be inherently dangerous and can cause damage and/or serious injury is
used incorrectly.
Neither Robert Sorby nor any of its dealers can accept any liability for any injury or damage that
might be caused as a result of using any of the techniques shown in this presentation. Anyone using
these techniques does so at their own risk.
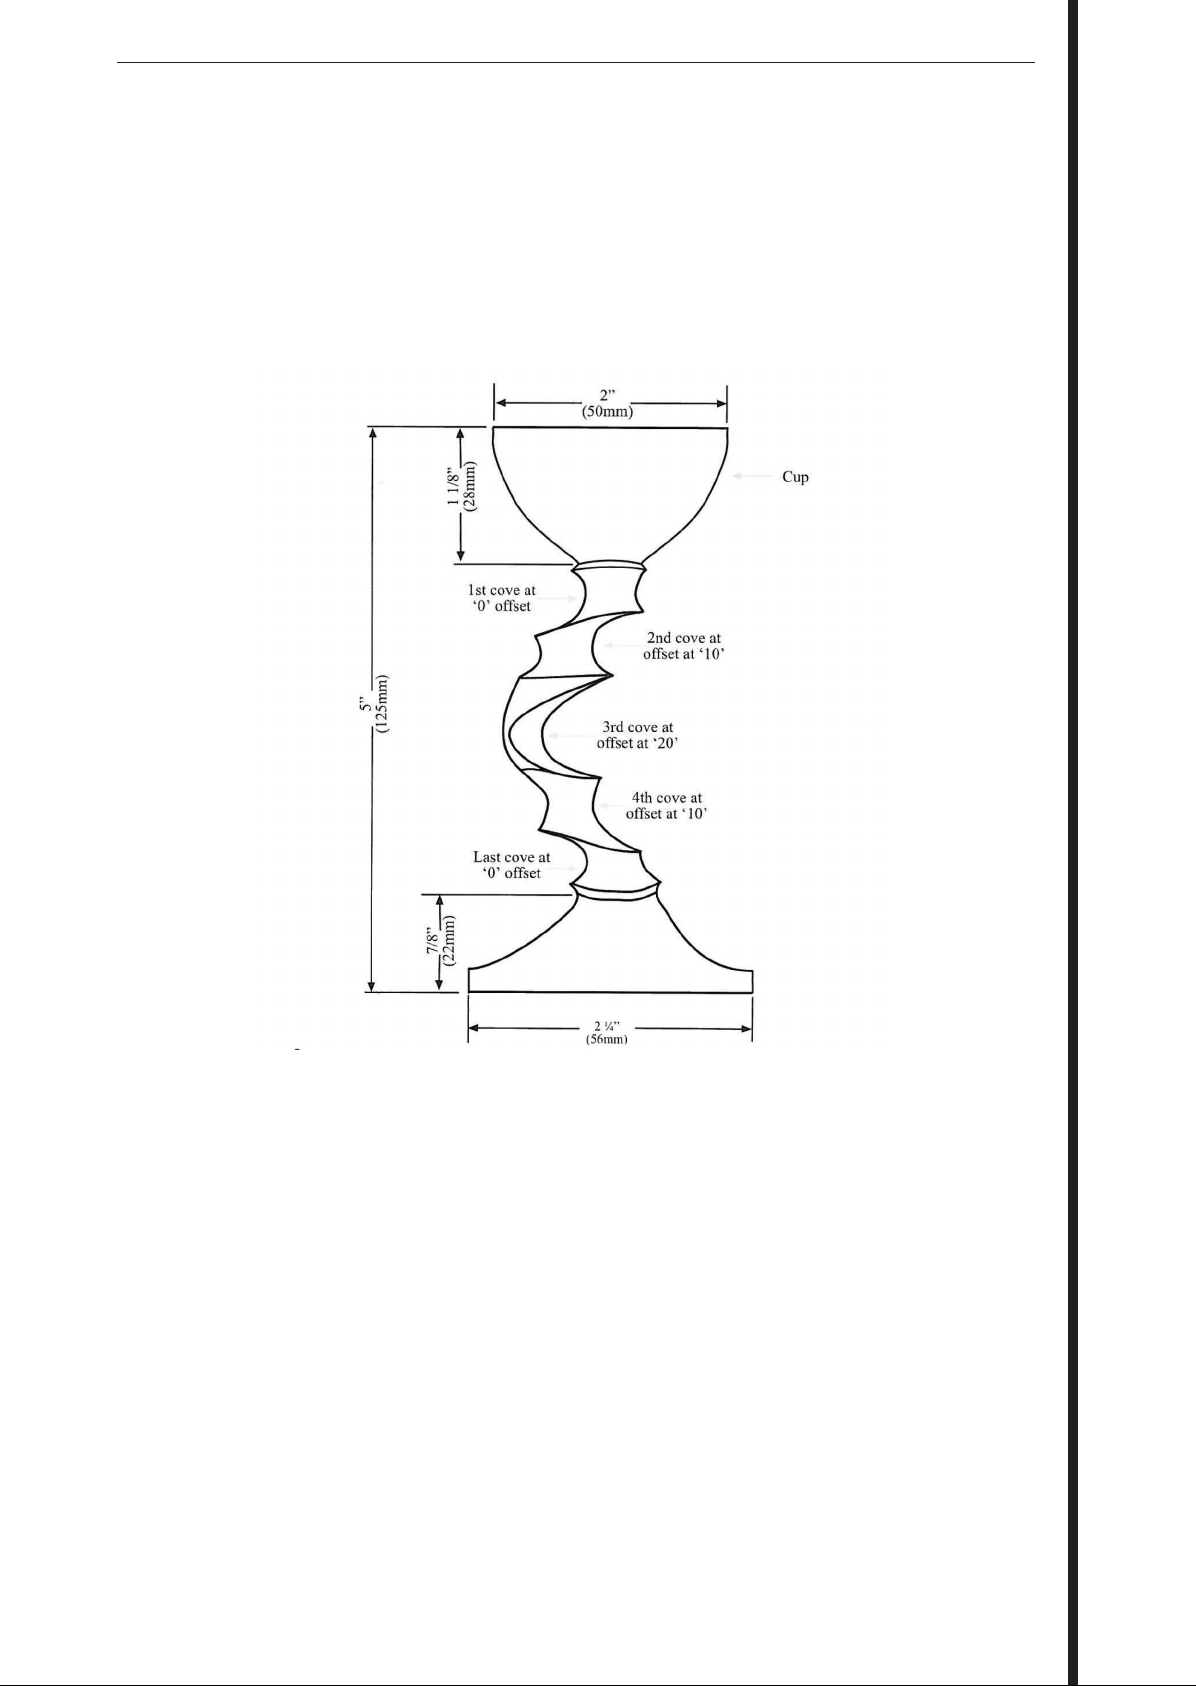
Off-set Stem Goblet
For this project we are going to use the screw chuck attachment
which is fitted into the eccentric boss and held in place by the ma-
chine screw and washer. We are using a iece of close grain hardwood
approx 2 1/2” (63mm) square x 7” (178mm) long, which has a hole
drilled in one end 21/64” (8mm) diameter and 1” (25mm) deep.
When marking the wood for the final parting off it it advisable to allow
for a little clearance of the depth of the screw chuck. Now screw the
main body of the chuck onto the lathe and ensure it is
tight by using the wrench.
Page 2
Robert Sorby
Instruction/Data Sheet
ECCENTRIC CHUCK PROJECTS

Instruction/Data Sheet
Page 3
Place the eccentric boss into the main body and rotate it so that ‘0 is visible in the sight window. The wood will
run concentrically at this position and retighten the eccentric boss screws.
Carefully screw the wood onto the screw-chuck making sure it is tight against the body of the chuck and inline
with the lathe.
Turn the lathe on a safe speed appropriate to the capabilities of the lathe and using a roughing gouge, turn the
outside of the wood down to the round.
Switch the lathe off to check that the entire square has been removed and you have a round piece of wood.
Now mark 1 1/8” (28mm) from the end for final parting as mentioned earlier to give clearance for the screw
chuck.
Next put the toolrest in the ‘safe toolrest position’ and hollow out the cup shape of the goblet with a hollowing
tool to a depth of approx 1” (25mm).
Switch off lathe, check, switch on lathe, sand and finish.
Return the toolrest to the ‘safe toolrest position’ along the length of the wood and turn the outside of the cup,
following the internal profile using a 3/8” (10mm) fingernail spindle gouge.
Switch the lathe off, check for a clean cut, switch lathe back on, sand and finish.
Now using a 3/8” cove cutter or similar tool turn the first cove at at the base of the bowl. Mark the cutter/tool to
ensure all the coves will be the same depth.
Switch off the lathe, check for a clean cut, switch lathe back on, sand and finish.
Now undo the two eccentric boss screws in the side of the main body and rotate the boss so that ‘10’ is visible
in the viewing window.
Place the tool rest in the “safe toolrest position”
As the wood is now off centre we will reduce the speed of the lathe for safety. It can be increased with
confidence and experience.
Switch the lathe on and watch the wood spin to understand what the wood is doing now it is rotating off centre.
* Care must be taken when turning off centre work. Approach the wood very carefully and allow for the fact that
you will only touch the wood in one place on every rotation.*
Place the cove cutter level with the left hand side of the first cove and create the second cove adjacent to the
first to the depth mark on the tool.
Switch off the lathe, check the cove, then sand and finish by hand as before.
Now undo the screws and move the eccentric boss to position ‘20’ and re-tighten.
Move the tool rest to a new “safe toolrest position” and slow the lathe down, as the wood is now more off centre.
As with the previous cove, place the tool on the left hand side of cove No.2 and create cove No.3 to the same
depth as before.
Switch off the lathe, check the cove, then sand and finish by hand.
Now undo the screws and move the boss back to position ‘10’ and re-tighten.
Move the tool rest to a new “safe toolrest position” and switch on the lathe.
As before, place the tool on the left hand side of cove No.3 and create cove No.4 to the same depth as before.
Switch off the lathe, check the cove, then sand and finish by hand.
Now undo the screws and move the boss back to position ‘0’ and re-tightened move toolrest to “safe toolrest
position”
Place the tool on the left hand side of cove No.4 and create cove No.5 to the same depth as before and again
switch off the lathe, check the cove, then sand and finish by hand.
Now turn the lathe speed back up as the work piece is now running on centre. Turn the base from the outside
diameter to flow into the last cove using the spindle gouge.
Robert Sorby
Instruction/Data Sheet
ECCENTRIC CHUCK PROJECTS
Instruction/Data Sheet
Page 4
Sand and finish the base with the desired finished.
Now the completed goblet can be removed from the waste wood using the parting tool.
Ensure that when you part off it isn to the right hand side of the original safety mark.
*Be careful when parting off that the goblet does not come loose. Only part all the way
through if you have experience and confidence to do so, if not part a small way through and
finish with a saw *
Check and finish the base and proudly display your Off-set Stem Goblet.
Robert Sorby
Instruction/Data Sheet
ECCENTRIC CHUCK PROJECTS
Instruction/Data Sheet
Page 5
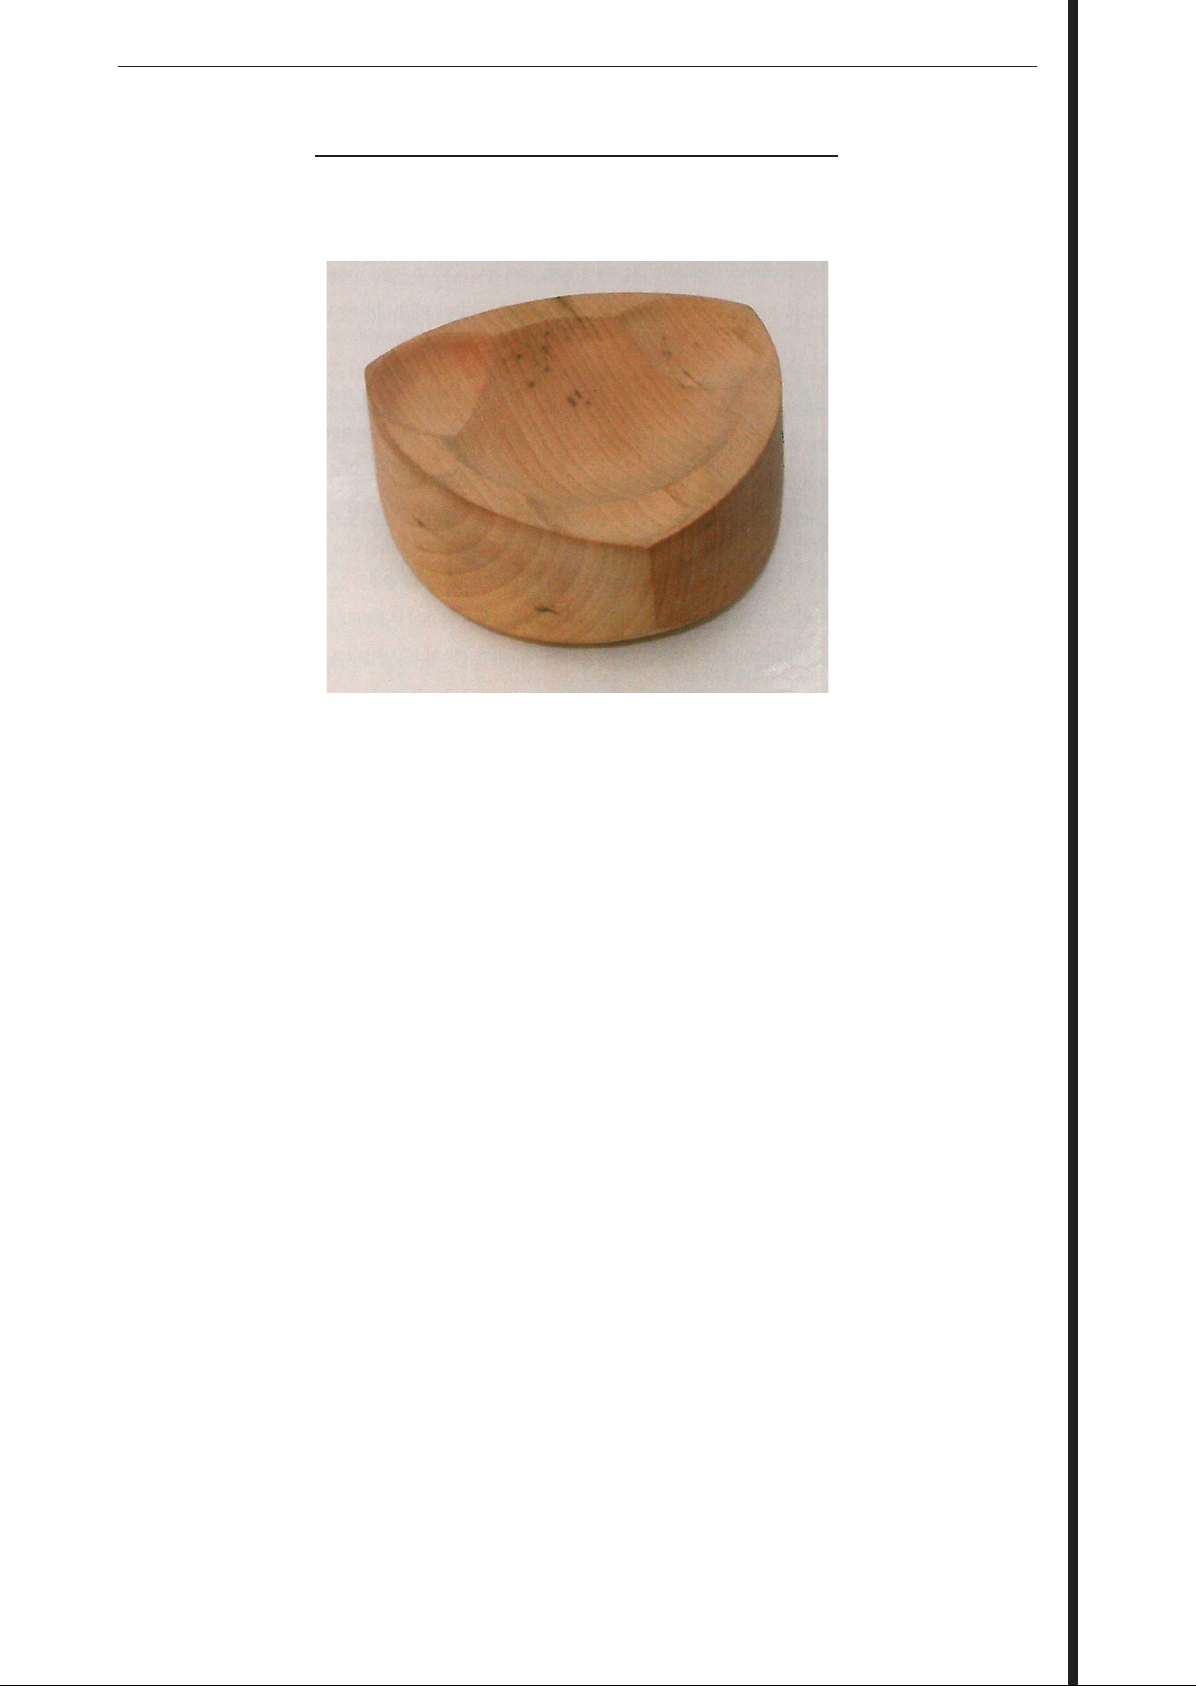
The second project we are going to make in the presentation is a 3-sided bowl with a clover leaf centre.
We will use a bowl blank of approx 5” (125mm) diameter and approx 2 1/2” (62.5mm) thick. Using
a blank of this diameter your lathe will need to have a swing over the bed bars of more than 5 1/2”
(140mm). If it does not, then use a smaller bowl blank.
Mark the centre and screw the faceplate into place using woodscrews.
Place the hexagonal stem of the faceplate into the bi-hexagonal locating socket of the eccentric boss
and tighten the machine screw and washer.
Place the eccentric boss into the main body and set to ‘0’ in sight window.
Tighten the boss screws and place the toolrest at the face of the blank in the “safe toolrest position”
Turn the face of the blank flat.
Place the toolrest at the “safe toolrest position” at the outside of the blank.
Turn the face with a small bowl shape curve on the blank.
Now loosen the boss screws and remove the eccentric boss.
Undo and remove the machine screw and washer and remove the faceplate from eccentric boss.
Unscrew the wood screws and remove the blank from the faceplate.
Turn the blank over so that the face that has just been turned is facing up.
Now using an angle protractor mark 3 ines radiating out at 120 degrees apart and number them
1,2 and 3.
Place the faceplate in the centre of the bowl blank and secure using the woodscrews.
Now fix the faceplate to the eccentric boss using the machine screw and washer.
Place the boss back into the main body.
Three sided bowl with a Cloverleaf centre detail
Robert Sorby
Instruction/Data Sheet
ECCENTRIC CHUCK PROJECTS

Instruction/Data Sheet
Page 6
Place the toolrest at the “safe toolrest position”
Turn the outside diameter of the bowl blank so that it is perfectly round.
Now place the toolrest in the “safe toolrest position” at the face of the blank and true up.
Mark the centre with a pencil.
Undo the eccentric boss screws and rotate it so that ‘35’ is visible in the sight window.
Retighten the screws and transfer a mark at position “I” onto the main chuck body for the reference
point for the rest of the marking out.
Move the toolrest to a new “safe toolrest position” as the wood is now considerably off-centre.
Reduce the lathe speed as slow as possible and switch on. Take a minute to
watch the wood spinning to get an idea of how it looks when it is spinning this far
off-centre. Increase to a safe speed where the lathe is running without any vibration.
Mark a new centre number ‘1’.
Loosen the screws and remove the eccentric boss.
Undo and remove the machine screw & washer and very carefully remove the faceplate from the
bi-hexagonal locating socket and turn it through 120 degrees, which is 4 positions in the socket.
Replace it back into the socket and re-tighten the machine screw and washer.
Replace the eccentric boss back into the main body.
Set to position ‘35’ in the sight window and re-tighten the boss screws.
Now the line marking ‘2’ will be in line with the reference mark on the chuck body.
Move the toolrest to the “safe toolrest position” at the face of the blank.
Switch on the lathe and mark a new centre No. ‘2’.
Switch off the lathe and loosen the boss screws to remove the eccentric boss.
Undo and remove the machine screw & washer and very carefully remove the faceplate from the
bi-hexagonal locating socket and turn it through 120 degrees.
Replace it back into the socket and re-tighten the machine screw and washer.
Replace the eccentric boss back into the main body, set to position ‘35’ in the sight window and
re-tighten the screws.
Now the line marked ‘3’ will be in line with the reference mark on the chuck body.
Move the toolrest to the “safe toolrest position” at the face of the wood.
Switch on the lathe and mark a new centre No. ‘3’.
You will now have 4 centres marked on the face, one true centre and three offset centres.
Next mark an arc using compasses from each offset centre to just inside the outer diameter of the
bowl blank. These marks will give a guide to the outside shape and size of the finished 3-sided bowl.
Robert Sorby
Instruction/Data Sheet
ECCENTRIC CHUCK PROJECTS

Instruction/Data Sheet
Page 7
Now draw 3 circles from each centre ensuring that there is a 1/2” (13mm) gap between the circle and
the arc.
These circles will indicate the position of the 3 parts of the cloverleaf.
Now mark the size and position of the centre circle of the bowl.
Loosen the screws and remove the eccentric boss.
Undo and remove the machine screw & washer. Carefully remove the faceplate form the bi-hexagonal
locating socket and turn it through 120 degrees again to get it back to the original position.
Replace it back into the socket and re-tighten the machine screw and washer.
Replace the eccentric boss back into the main body.
Set to position ‘35’ in the sight window and ensure that line ‘1’ is in-line with the reference mark, then
re-tighten the boss screws.
Then move the toolrest to the “safe toolrest position” at the face of the wood.
Turn the first small dish outlined by the circle marked 1.
* Do not go too deep as there would be a danger of breaking through to the fixing screws *
Switch off the lathe. Check the tool finish, sand and finish the dish by hand.
Move the “safe toolrest position” at the outside of the wood.
Ensure the lathe is still set to a very low speed.
Switch on the lathe and watch the wood for a short while before starting to turn.
* Once again care must be taken when turning off centre. Approach the wood very
carefully and allow for the fact that you will only touch a third of the wood on each
rotation *
Take very small cuts with a 3/8” (10mm) bowl gouge to begin with and as experience and confidence
are gained the lathe speed and size of cut can be increased.
Regularly switch off the lathe to check for clean cut and how much more needs to be removed until
the arc is reached.
Once the outside is turned down to the mark, switch off the lathe and check there is a clean finish from
the tool. Then sand and finish this side by hand.
Loosen the boss screws and remove the eccentric boss.
Undo and remove the machine screw & washer and very carefully remove the faceplate from the
bi-hexagonal locating socket and turn it through 120 degrees as before.
Replace it back into the socket and re-tighten the machine screw and washer.
Replace the eccentric boss back into the main body.
Set to position ‘35’ in the sight window and re-tighten the boss screws.
Robert Sorby
Instruction/Data Sheet
ECCENTRIC CHUCK PROJECTS

Instruction/Data Sheet
Page 8
Now the line marked ‘2’ will be in line with the reference mark on the chuck body.
Now move the toorest to the “safe toolrest position” at the face of the wood.
Turn the second small dish outlined by the small circle with the centre marked ‘2’.
* Remembering to only go as deep as the previous dish *
Switch off the lathe. Check the tool finish, sand and finish the dish by hand.
Move the toolrest back to the “safe toolrest position” at the outside of the blank.
Now turn the second arc. Regulary switch off the lathe and check as before.
Once the outside is turned down to the mark, switch off the lathe and check there is a clean finish
from the tool. Then sand and finish this side by hand.
Loosen the boss screws and remove the eccentric boss.
Undo and remove the machine screw & washer and carefully remove the faceplate from the
bi-hexagonal locating socket and turn it through 120 degrees.
Replace it back into the socket and re-tighten the machine screw and washer.
Replace the eccentric boss back into the main body and set to position ‘35’ in the sight window
and re-tighten the boss screws.
Now the line marked ‘3’ will be in line with the reference mark on the chuck body.
Next move the toolrest to the “safe toolrest position” at the face of the wood.
Turn the third small dish outlined by the small circle with the centre marked ‘3’.
* Remembering to only go as deep as the previous 2 dishes *
Switch off the lathe. Check, sand and finish as before.
Move the toolrest back to the “safe toolrest position” at the outside of the blank.
Now turn the third arc. Regularly switch off the lathe and check as before.
Robert Sorby
Instruction/Data Sheet
ECCENTRIC CHUCK PROJECTS

Instruction/Data Sheet
Page 9
Once the outside is turned down to the mark, switch off the lathe. Check, sand and finish as with
the previous sides.
Loosen the boss screws and turn the boss so that ‘0’ is visible in the sight window and re-tighten
the screws.
Switch the lathe back on and turn the centre dish. Then sand and finish as required.
Loosen the boss screws and remove the eccentric boss.
Undo the machine screw and washer and remove the faceplate from the eccentric boss.
Undo the woodscrews from the faceplate, remove the bowl, sand and finish the base.
We now have a 3-sided bowl with a cloverleaf design in the centre.
Robert Sorby
Instruction/Data Sheet
ECCENTRIC CHUCK PROJECTS

Instruction/Data Sheet
Page 10
The next project project we are going to make is a
Cabriole Candlestick.
We will use a piece of hardwood approx 9.5”
(240mm) long and approx 3” (75mm) square.
We will use the hexagonal Ball & Socket for this
project.
Mark the centre of each end of the wood.
Drill a 1” (25mm) diameter by 1” (25mm) deep hole
in one end. This will take the candle in the finished
piece.
Now drill 21/64” (8.5mm) diameter by 1/2” (13mm)
deep hole in the other end to take the pin of the
ball and socket.
Push the pin into the hole and screw 2 small
woodscrews into the holes to hold in place.
Place the hexagonal stem into the bi-hexagonal
locating socket of the eccentric boss and tighten
with the machine screw and washer.
Place the boss into the main body and set to ‘0’ in
the sight window and tighten the boss screws.
Now locate the hexagonal socket onto the ball
joint.
Pull up the tailstock and using a standard
60 degree revolving live centre wind in the tailstock
and lock, to hold the wood in place.
Cabriole Candlestick
Place the tool rest in the “safe toolrest position”.
Set the speed of the lathe appropriate for the size of wood and the capabilities of the lathe.
Switch the lathe on and turn the wood down to the round, ensuring that only the minimum is removed.
Now place the tool rest to the “safe toolrest position” at the face of the wood.
Switch the lathe on and trim the face flat using the 3/8” (10mm) fingernail spindle gouge.
Now turn a small cove approximately 1/8” (3mm) from the outside diameter and the inner lip of the
drilled hole.
Switch off the lathe and check for a clean finish.
Once this is done, return the tool rest to the ‘safe tool rest position along the length of the wood.
Now mark the wood at 1 1/2” (38mm), 5 1/2 “ (140mm) and 6 3/4 (172mm).
Switch on the lathe and complete the marks round the diameter.
The cup of the candlestick can be turned approx 1 1/2” (38mm) long to the first mark.
Increase the lathe speed as appropriate.
Robert Sorby
Instruction/Data Sheet
ECCENTRIC CHUCK PROJECTS

Instruction/Data Sheet
Page 11
Using a fine parting tool part down at the first mark leaving approximately 1/2” (13mm) stem for the
neck of the cup.
The cup of the candlestick can be turned approx 1 1/2” (38mm) long to the first mark.
Increase the lathe speed as appropriate.
Ensure that the waste material is removed to allow for the spindle gouge to get down to the neck
without any interference.
Move the tool rest away and sand the cup.
Undo the eccentric boss screws and offset to ‘25’ in the sight window.
Re-tighten the boss screws.
Place the toolrest in the “safe tool rest position”.
Extra care should be taken as the wood is now off-centre. Slow the lathe speed down to very slow
before switching the lathe on, then increase to a safe and comfortable speed if desired.
Using the spindle gouge, turn an elongated egg shape from the second mark to the neck of the cup.
Switch off lathe and check for a clean cut.
Now switch lathe back on and move along to the third mark and turn a large V-shape.
Switch off the lathe and check for a clean cut.
Now switch lathe back on and move along to the third mark and turn a large V-shape.
Switch off the lathe and sand by hand to finish.
Holding the wood with one hand, push back the tailstock so that it is clear.
Now very carefully remove the hexagonal stem from the socket and turn through 180 degrees.
Replace back into the socket at that position.
Pull the tailstock back up and gently apply tension and lock the tailstock into place.
Place the toolrest in the “safe tool rest position”.
Now turn the fine cove following the outside shape of the initial egg shape.
Sweep from the outer edge of the large section of the egg shape to the neck of the cup.
Switch off the lathe. check and sand as required.
Switch the lathe back on and move along to turn the second V-shape at the third mark.
Switch off the lathe, sand and apply the desired finish.
Move the tool rest away and undo the eccentric boss screws.
Turn the boss so that ‘0’ is visible in the sight window and retighten the boss screws.
Place the tool rest back into the “safe tool rest position”.
Robert Sorby
Instruction/Data Sheet
ECCENTRIC CHUCK PROJECTS

Instruction/Data Sheet
Page 12
The lathe speed can now be increased as the wood is turning concentrically. But remember that the
main parts of the candlestick are turning off centre so keep fingers well clear.
Switch the lathe on.
Take a clearance cut a well as a parting cut and allow for the holding screws when parting the
candlestick from the waste wood.
Do not part all the way through, allow a small nib in the middle that can be removed with a fine saw.
Switch off the lathe and remove the candlestick from the waste, then sand and finish as required.
Finish the piece with a suitable finish and proudly display your Carbriole Candlestick.
Robert Sorby
Instruction/Data Sheet
ECCENTRIC CHUCK PROJECTS
Instruction/Data Sheet
Page 13
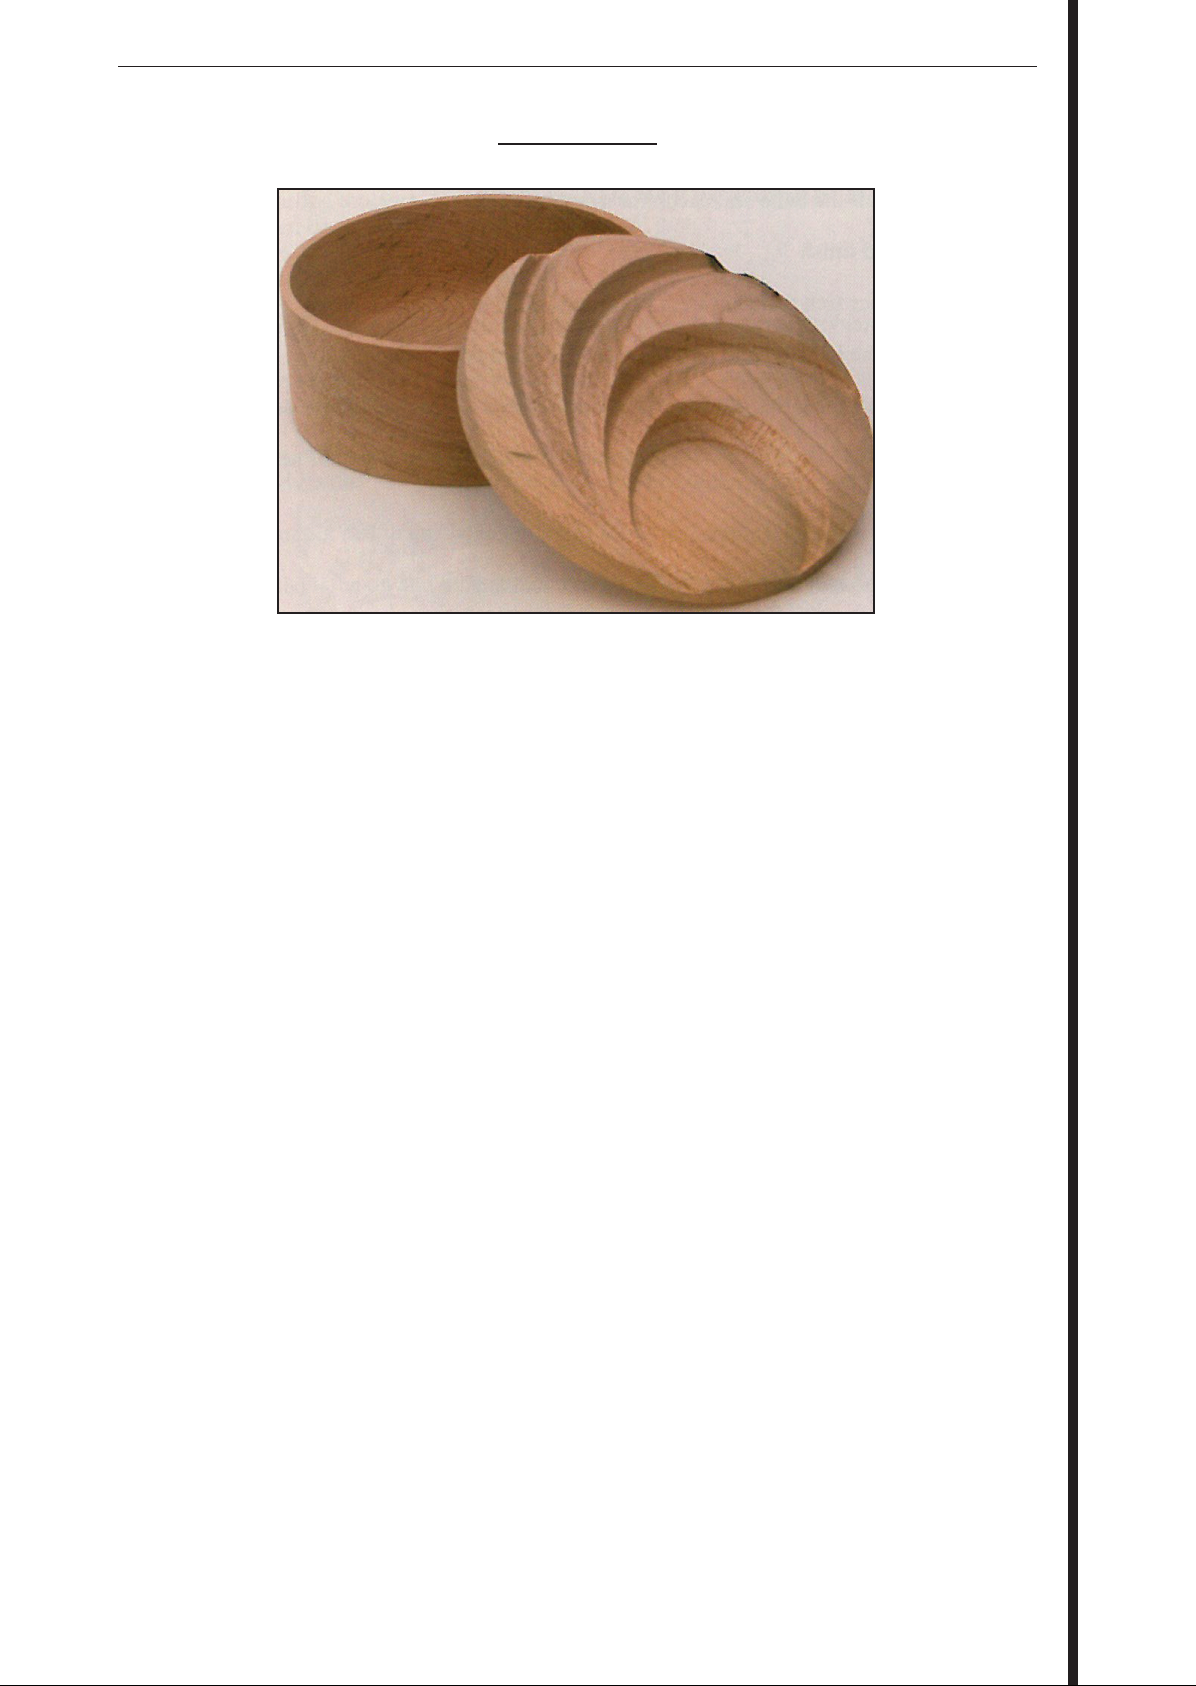
Scallop lid box
The last project we will make a box with a scallop detailed lid.
For this project we will use the facceplate.
We are going to use a bowl blank of hardwood approx 4 1/2” (152mm) diameter and approx 3 1/2”
(89mm) thick.
Place the faceplate over the centre of the bowl blank and secure with woodscrews.
Note the mark on the edge.
Line up this mark with the dot on the face of the boss.
Locate the hexagonal stem of the faceplate into the socket of the Eccentric boss.
And secure with the machine screw and washer.
Place the eccentric boss into the main body so that ‘0’ is visible in the sight window.
Now tighten the boss screws and put tool rest in “safe tool res position”.
Adjust the lathe speed as appopriate and switch the lathe on.
Using the 3/8” bowl gouge turn the bowl blank down to the round.
Switch off the lathe and check for smooth finish.
Sand and finish.
Now place tool rest in `’safe tool rest position” at face of blank.
Switch the lathe on and turn the face to a slight dome shape.
Switch off the lathe, sand and finish as required.
Slacken the eccentric boss screws and rotate the boss so that “35” is now visible in the sight window.
Re-tighten the boss screws.
Robert Sorby
Instruction/Data Sheet
ECCENTRIC CHUCK PROJECTS

Instruction/Data Sheet
Page 14
Return the tool rest to the “safe tool rest position”.
Slow the lathe to its slowest speed.
The wood is now at full off centre so extra care has to be taken while turning as
before.
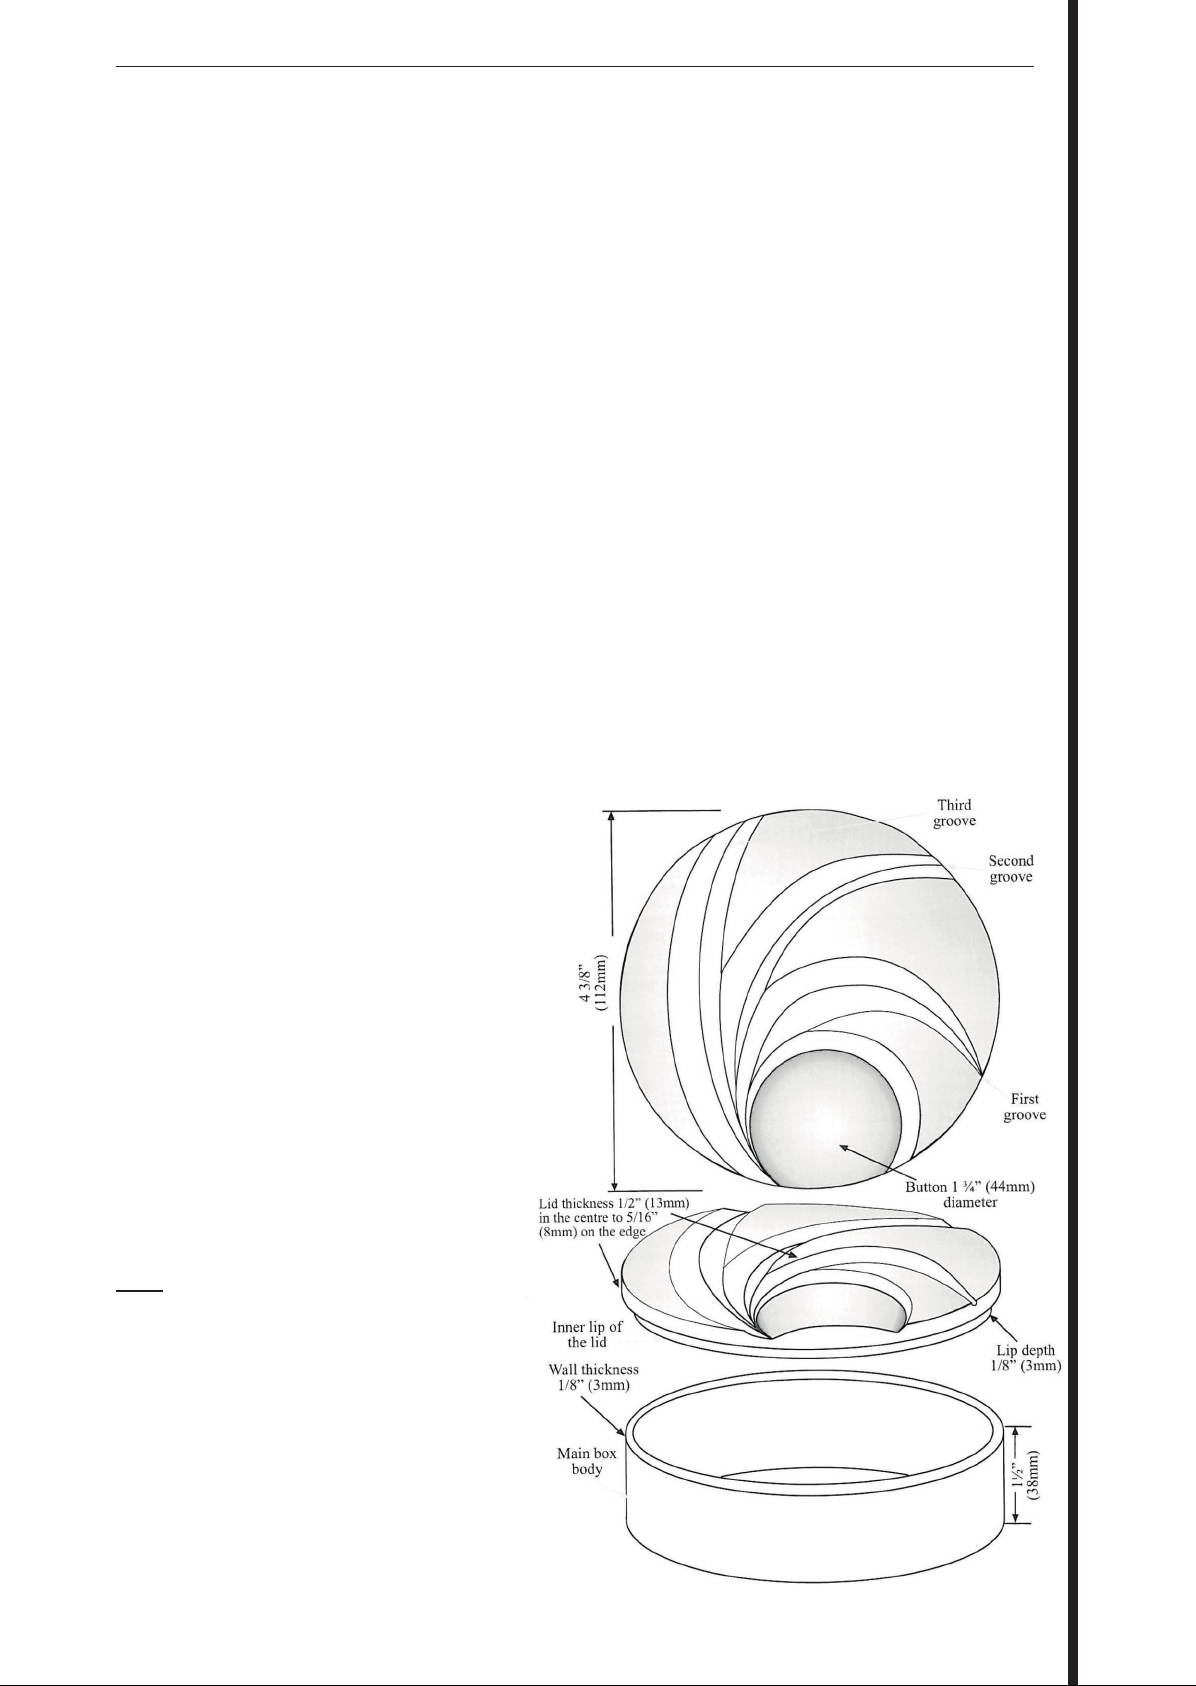
Now turn a small button shape, some of which will overlap the edge of the lid.
Switch off the lathe.
Check the surface finish and sand as required.
Loosen the eccentric boss screws and remove the boss from the main body.
Undo the machine screw and washer. Now very carefully index the hexagonal stem 1 position
clockwise and replace into the socket.
Re-tighten the machine screw and washer.
Replace the boss back into the main body with “35” visible in the sight window and re-tighten the
screws.
Place the tool rest in the “safe tool rest position”.
Switch the lathe on and look for the outer edge of the initially turned bottom.
Turn the first groove starting from the outer edge of the button.
A fine parting tool or a pencil can be used to mark the position of the groove. It can be turned using
the 3/8” fingenail gouge.
Switch off the lathe, sand and finish.
Loosen the eccentric boss screws and remove the boss from the main body.
Undo the machine screw and washer and once very carefully index the hexagonal stem 1 position and
replace into the hexagonal socket.
Re-tighten the machine screw and washer and replace the boss back into the main body with “35”
visible in the sight window”.
Place the tool rest in the “safe tool rest position”.
Switch the lathe on and look for the outer edge of the initially turned bottom.
Mark the edge of the first groove with the parting tool or pencil and turn the second groove.
Switch off the lathe and sand as before.
Again loosen the eccentric boss screws and remove the boss from the main body.
Undo the machine screw and washer and very carefully index the hexagonal stem another 1 position
and replace into the hexagonal socket.
Re-tighten the machine screw and washer.
Replace the boss back into the main body with “35” visible in the sight window and re-tighten the
screws.
Robert Sorby
Instruction/Data Sheet
ECCENTRIC CHUCK PROJECTS
Instruction/Data Sheet
Page 15
Place the tool rest in the “safe tool rest position”.
Switch the lathe on and look for the outer edge of the second groove.
Mark and turn the third groove strating at the edge of the second groove as before.
Switch lathe off.
Check the surface finish and sand as before.
We now have a finished Scallop detail lid.
Now make the inner lip for the lid to locate into the box body.
Using the fine parting tool make several cuts. One as the parting cut, one to allow for clearance
and one as the guide for the hollowing of the main box at the same point as the inner lid lip.
Part down, leaving a small nib in the centre.
Switch off the lathe and remove the lid. wCheck and sand.
Place the tool rest at the “safe tool rest position”,
Switch on the lathe and hollow out the inside of the box allowing rooms at the bottom for the holding
screws and parting off.
The outer limit of the hollow will be the guide left from the inner lip when parted off.
Switch off lathe and offer the lid up to check
for a good fit.
When the box has been hollowed, sand and
apply a finish as required.
Now move the tool rest to the “safe tool rest
position” at the side of the box.
Using the fine parting tool part off the box in the
same way that the lid was removed.
Ensure that enough clearance is left for the
fixing screws.
We have our complete box with Scallop
detail lid.
Note
The drawing has been shaded to give an
impression of the 3 dimensional look of the
finished Scallop detail.
Robert Sorby
Instruction/Data Sheet
ECCENTRIC CHUCK PROJECTS

Instruction/Data Sheet
Page 16
NOTES
Robert Sorby
Instruction/Data Sheet
ECCENTRIC CHUCK PROJECTS
Instruction/Data Sheet
Page 17
The Robert Sorby Eccentric Chuck is just one of many unique and innovative products that we
manufacture in our factory in Sheffield, England. Listed below are just a few of the more specialised
tools and products that are available. Please read on the back page for further information on our
renown catalogue and website.
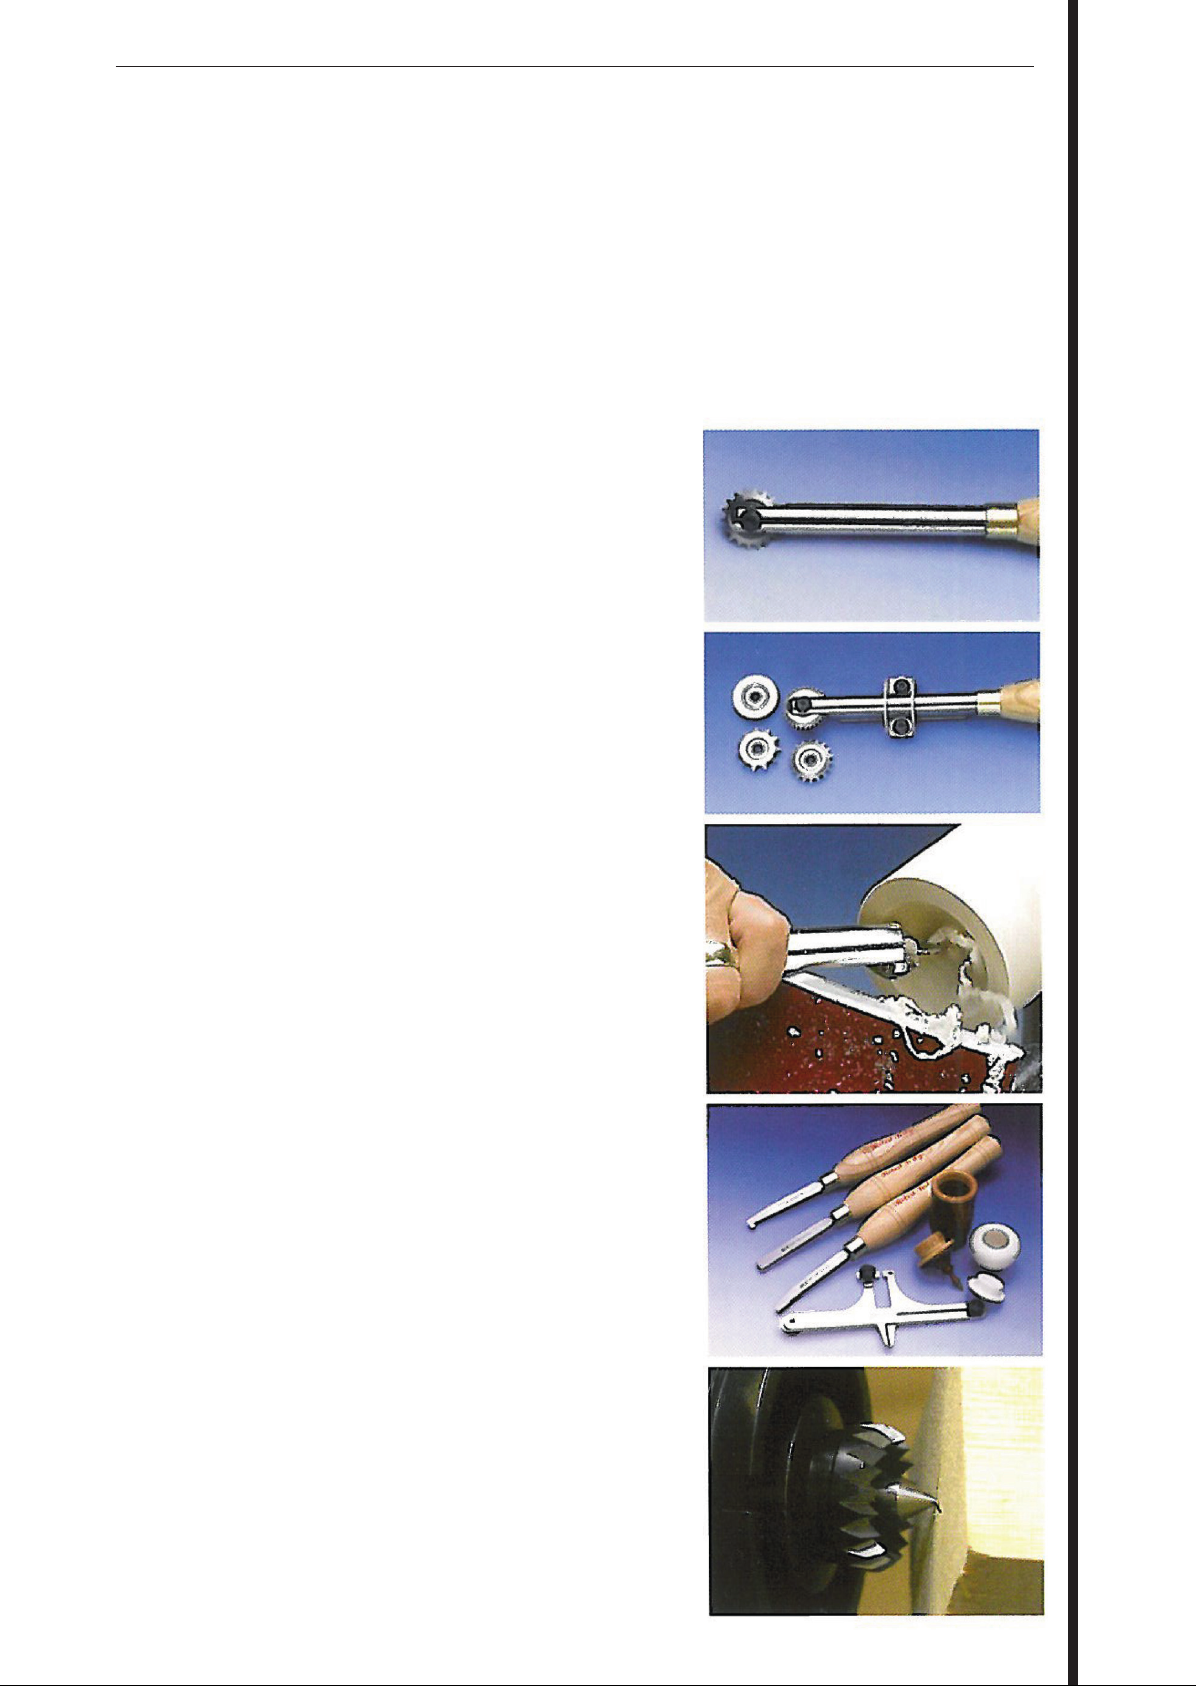
The texturing tool is used to produce beautiful textures and patterns such as the very popular orange
peel effect on most turned work. It can change the look of an ordinary piece to an eye catching piece
of art.
The Spiralling and Texturing system can enhance any turned piece with a variety of spirals from the 3
different sized spiral cutters included. These can be used on the outside of bowls and to apply spirals
on candlesticks and goblet stems. It also contains the texture cutter as described.
One of the most versatile tools available. The Multi-Tip
Hollowing Tool is fitted with a 3/4” (19mm) wide half-round
shank which makes it he most user friendly hollowing tool on
the market. It is supplied with three cutters. One for under
shoulder hollowing and one for straight box cutting. The other
cutter is tear-drop shaped and is used for shear scraping.
The Robert Sorby thread cutting tools are available in
three thread sizes. These are 10,16 and 20 threads per inch
(TPI). The thread sizing gauge is a must have for anybody
wanting to make accurate threaded boxes. There is also
available a Tool Rest and a relief tool to assist in the internal
thread cutting.
The range of Stebcentres includes the original version
available in 1MT & 2MT with 1/2”,7/8” and 1 1/4” heads sizes.
There is also a revolving, live version that fits into the tailstock
for simple eccentric work. The Steb Drive has all the same
benefits as the original version but with advantage that it will fit
directly into a four
jaw scroll chuck.
Robert Sorby
Instruction/Data Sheet
ECCENTRIC CHUCK PROJECTS
Other Robert Sorby Tools manuals

Popular Tools manuals by other brands


Sealey
Sealey WK025 instructions

American Legend
American Legend AL18 Super Legend 2019 Maintenance manual

ACCU-SYSTEMS
ACCU-SYSTEMS DD manual

Hitachi
Hitachi KC18DBL - HXP Lithium-Ion Cordless 4-Tool... parts list

King Industrial
King Industrial K-1500 instruction manual

Power Craft
Power Craft 26189 instruction manual

Beta
Beta 1842 15-H05/LED Instructions for use

SCANGRIP
SCANGRIP CANVIK CENTER operating instructions

Sumake
Sumake ST-2561 quick start guide

EIBENSTOCK
EIBENSTOCK PLD 450.1 B Original instructions

ITC
ITC Stow & Glo 86475-30-BL-04-001 installation instructions

WOHLHAUPTER
WOHLHAUPTER DigiBore 501 Series operating instructions