RoboLabs ROBOJETFLOSS User manual

tm2627 Jan-20
2
Table of contents
Safety requirements...........................................................................................3
1. Overview........................................................................................................4
1.1. Designation.............................................................................................4
1.2. Technical specifications ..........................................................................4
1.3. Delivery set .............................................................................................4
1.4. Ambient conditions..................................................................................5
1.5. Power supply requirements.....................................................................5
1.6. Protectors and lockups............................................................................5
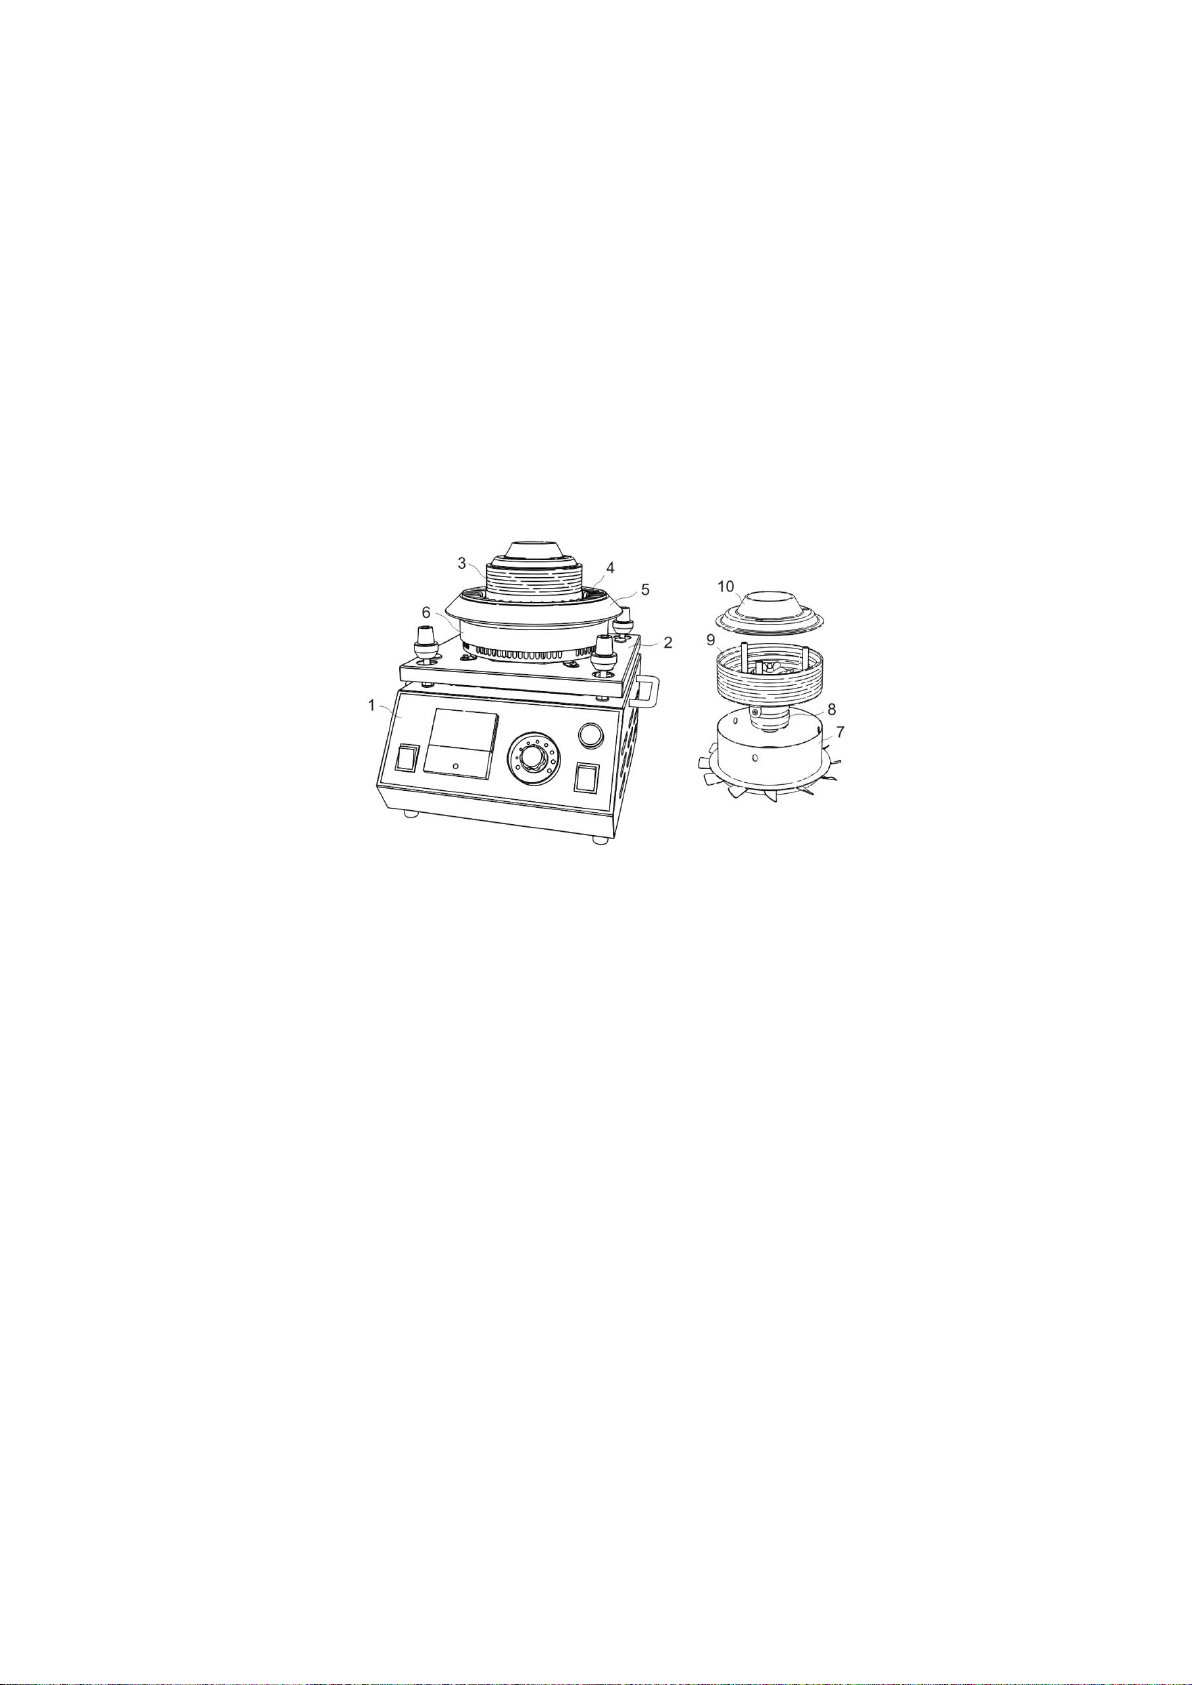
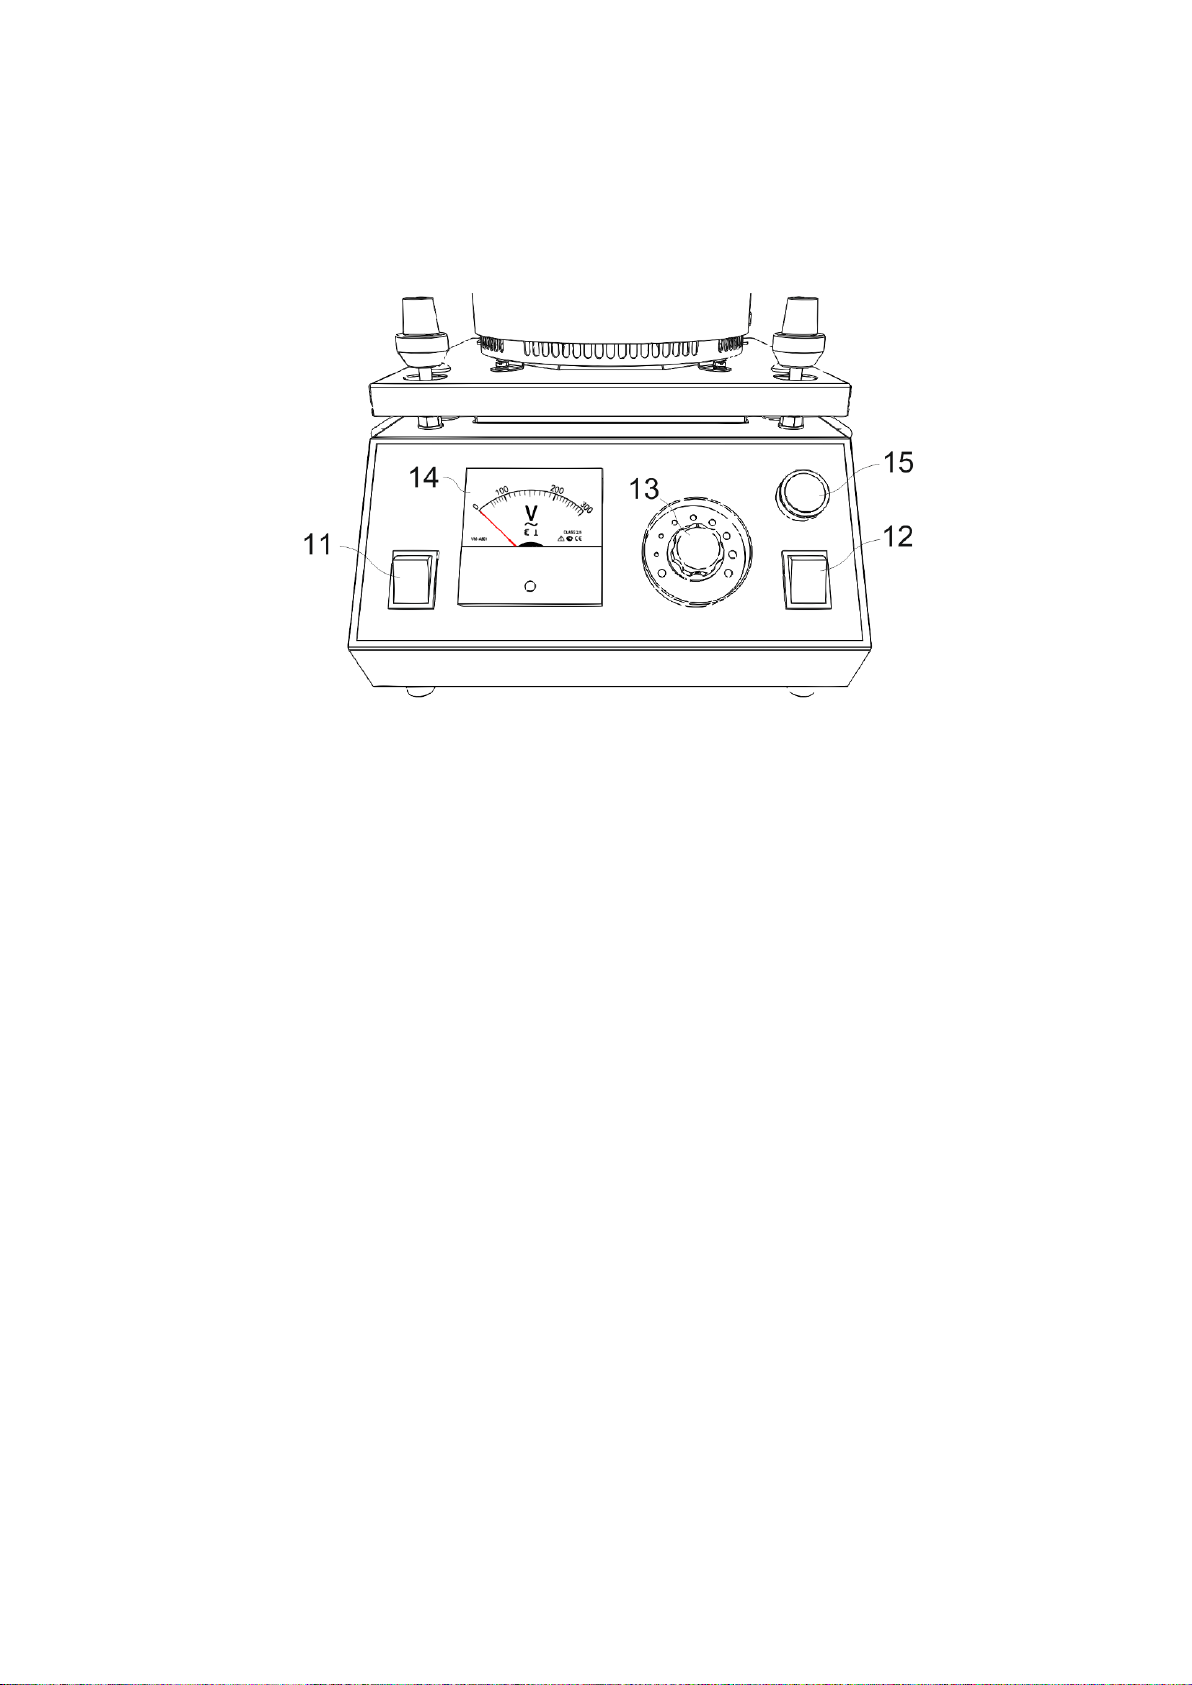
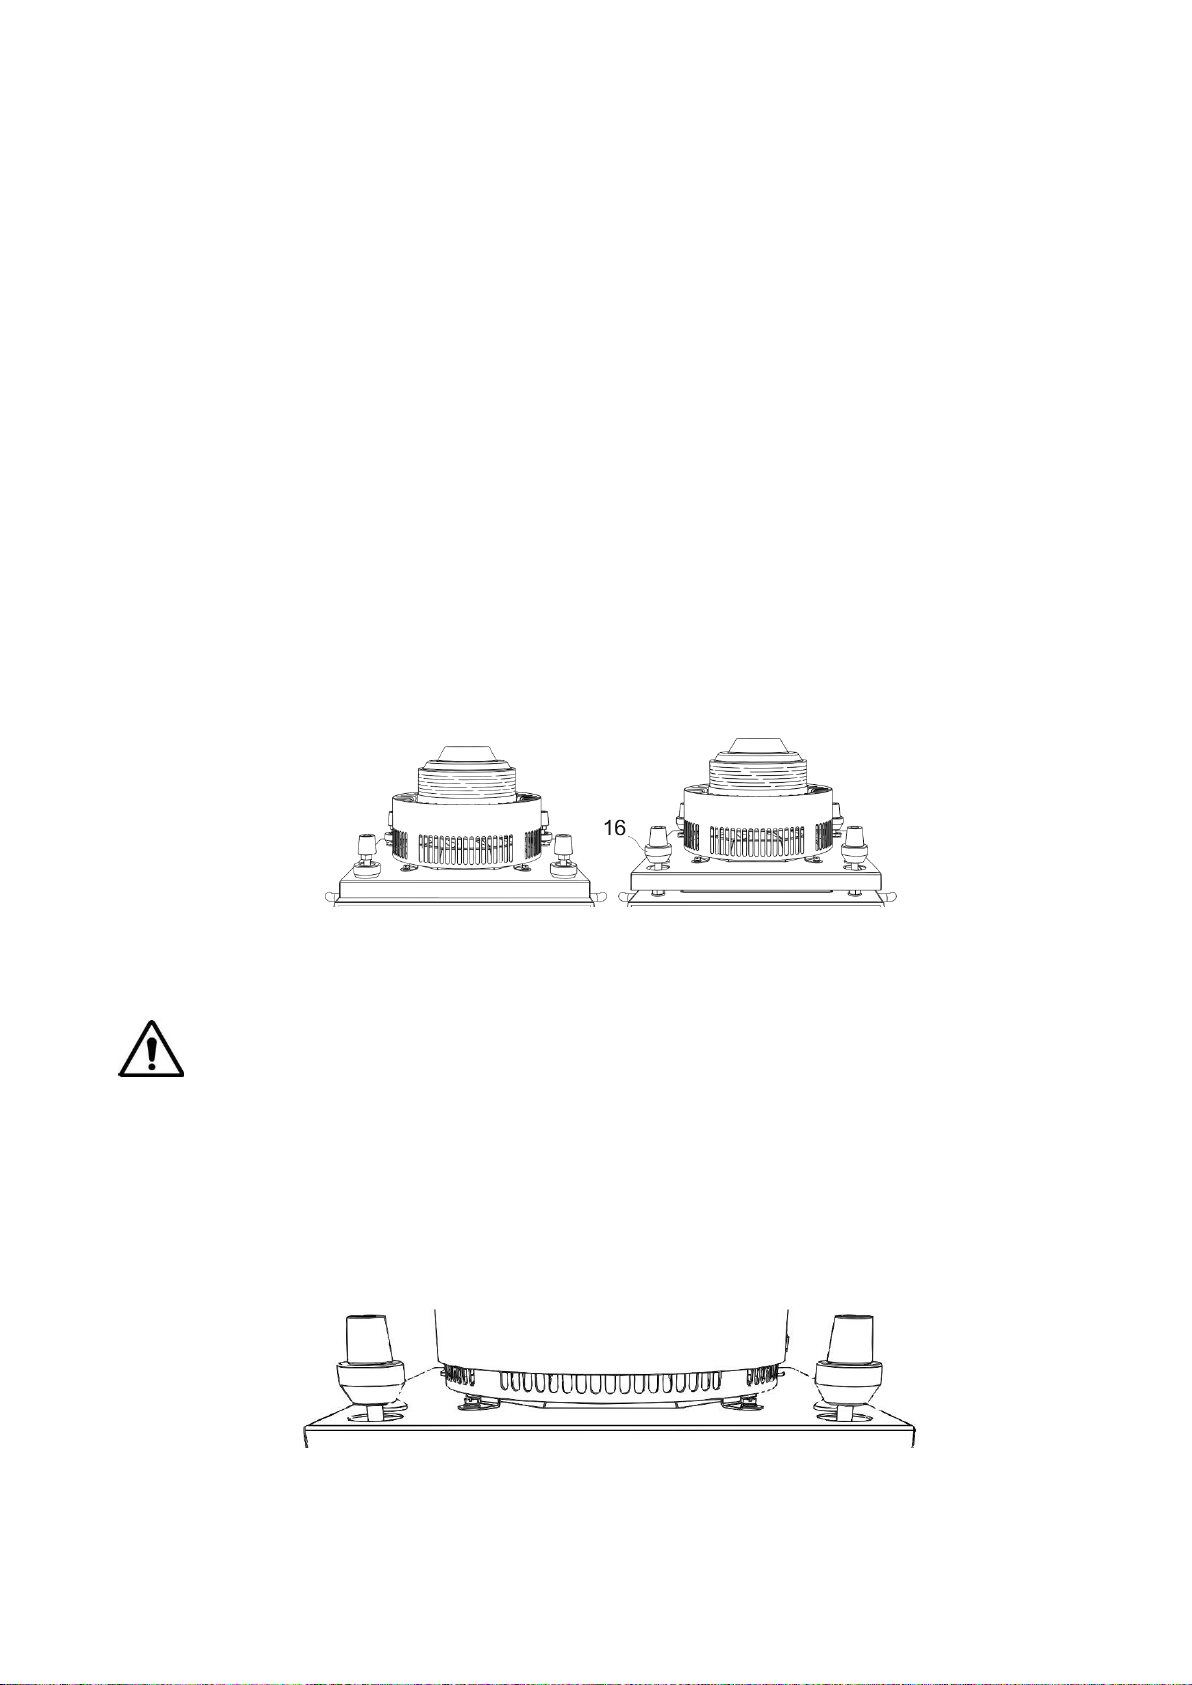
1.7. Machine design and operation principle ..................................................6
2. Intended use..................................................................................................8
2.1. Raw material requirements......................................................................8
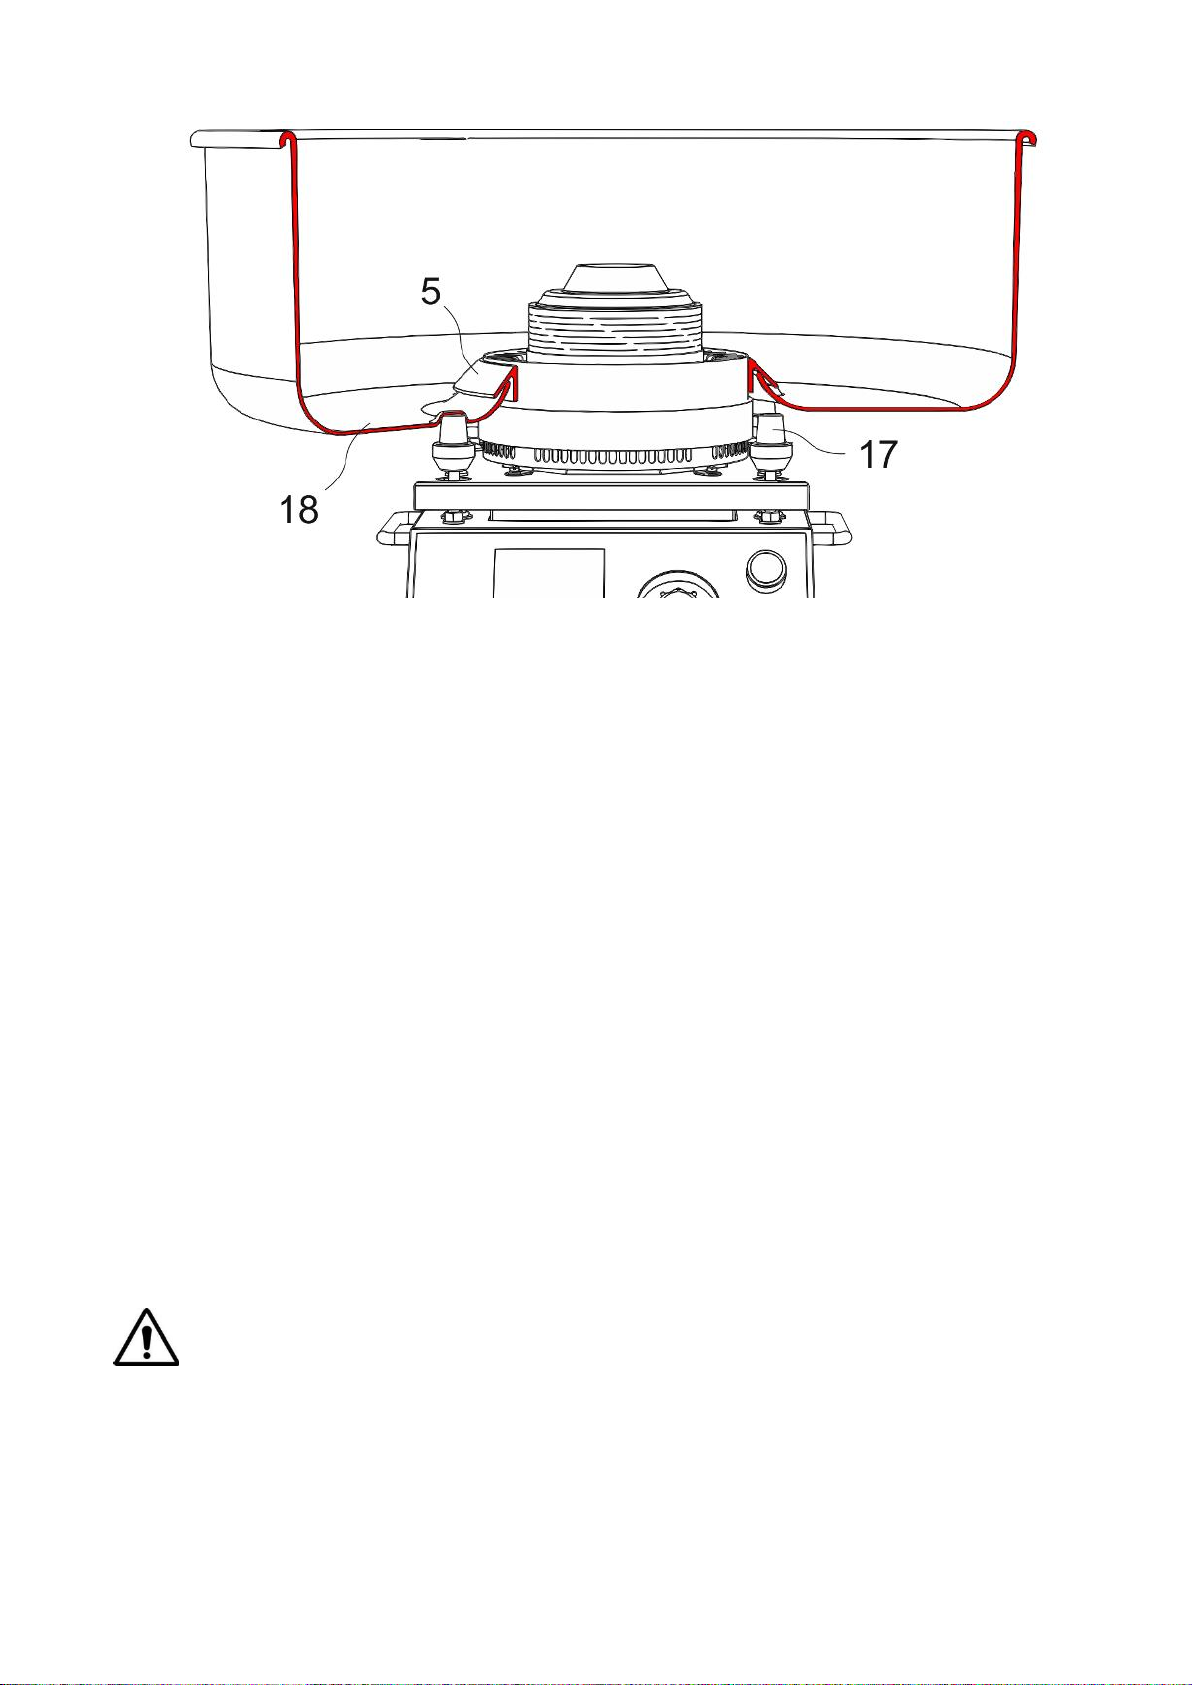
2.2. Getting started.........................................................................................8
2.3. Operation................................................................................................9
3. Technical maintenance................................................................................16
3.1. General instructions ..............................................................................16
3.2. Safety measures ...................................................................................16
3.3. Cleaning instructions.............................................................................16
3.4. Storage .................................................................................................19
3.5. Troubleshooting ....................................................................................19
4. Transportation and storage..........................................................................20
5. Acceptance certificate..................................................................................20
6. Warranty obligations....................................................................................21
7. Manufacturer details....................................................................................21
Annex A. Electric components list....................................................................22
Annex B. Parts list ...........................................................................................23

tm2627 Jan-20
3
Safety requirements
READ THE ENTIRE MANUAL BEFORE OPERATING!
ONLY ALLOW TRAINED PERSONNEL TO OPERATE THE ROBO JETFLOSS!
1. DO NOT TURN ON until transport fastening nuts are fully RAISED.
2. DO NOT OVERFILL spinning head
with flossugar.
3. WEAR eye protection during
operation.
4. DO NOT TOUCH head while it is still rotating.
5. Spinning head remains HOT after use - DO NOT TOUCH until cool.
6. Avoid OVERHEATING, motor should rest 15 min. per hour of operation.
7. Do not MODIFY the design of the machine.
8. UNPLUG the power cord before cleaning or servicing.
In accordance to EN 60335-1:2012 standard the machine can be used by
children aged 8 years and above and persons with reduced physical, sensory or
mental capabilities or lack of experience and knowledge if they have been given
supervision or instruction concerning use of the appliance in a safe way and
understand the hazards involved. Children shall not play with the appliance.
Cleaning and user maintenance shall not be made by children without
supervision.

tm2627 Jan-20
4
1. Overview
1.1. Designation
ACB-09-120 is intended to produce cotton candy using sugar with or without
added flossine. Due to the patented design, this model allows operation under
high ambient temperature and relative humidity. Candy floss leaves the
machine vertically, producing servings up to 6 feet in diameter. With practice,
you can move up to 16 feet away from the machine and continue to make
candy as the stream will follow you in a continuous trail!
1.2. Technical specifications
MODEL
ROBOJETFLOSS
ACB-09-120
ROBOJETFLOSS PRO
ACB-09-120-PRO
ROBOJETFLOSS RENT
ACB-09-120-R
Productivity
up to 11 lbs/hr
up to 11 lbs/hr
up to 11 lbs/hr
‘Cold start’ time
60 sec
20 sec
60 sec
Spinning rate
3300 rpm
3300 rpm
3300 rpm
Rated current, not more
16 A
16 A
12 A
Rated voltage
120V/60Hz
120V/60Hz
120V/60Hz
Dimensions (machine only)
15x16x15 in
15x16x15 in
15x16x15 in
Dimensions (pan included)
26x26x19 in
26x26x19 in
26x26x19 in
Weight, not more
33 lbs
33 lbs
33 lbs
Ingress protection
IP22
IP22
IP22
1.3. Delivery set
Cotton candy machine
1 pc
Plastic/aluminum floss pan1
1 pc
‘No-Snow’ tool
1 pc
Silicone sealing collar
1 pc
Silicone adjustment ring
2 pcs
Power supply cord
1 pc
Operation manual
1 pc
1
ACB-09-120-R machine delivery set includes aluminum pan

tm2627 Jan-20
5
THE FLOSS PAN IS AN INTEGRAL PART OF THE MACHINE AND MUST BE INSTALLED FOR SAFE
OPERATION!
Plastic/Aluminum floss pans measure: 27” x 27” x 10” - and weigh 3.3/4.4 lbs respectively.
1.4. Ambient conditions
The Robo JetFloss will produce results at ambient temperatures up to 104°F
(41°C) with relative humidity no greater than 50%. As relative humidity
increases the maximum operating temperature decreases. For example, with a
RH of 90% the maximum recommended temperature decreases to 68°F.
As temperature and humidity increase above these ranges, cotton candy can
still be produced, but it will be very dense and heavy. Importantly, being a sugar
product, it may begin to melt shortly after beginning production.
Altitude above sea level should not exceed 3280 ft.
1.5. Power supply requirements
Input current does not exceed 16 A (12A for ACB-09-120-R machine).
The machine is equipped with 6 ft power cord with NEMA 5-20 standard plug or
NEMA 5-15 plug (for ACB-09-120-R only).
The machine requires standard 120V power supply. Voltage tolerance of +/-
10% of nominal voltage is allowed.
MACHINE MUST ONLY BE CONNECTED TO A GROUNDED OUTLET!
CAUTION! –RISK OF FIRE AND ELECTRIC SHOCK!
REPLACE ONLY WITH MANUFACTURER’S CORD SET, PART NO. PF52012C1972 or
PF51514C1972 (for ACB-09-120-R ONLY!)
1.6. Protectors and lockups
Four nuts secure the spring-loaded chassis during transportation in order to
prevent damage to the motor. They are located on the threaded support studs
at each corner of the deck.
Rubber legs and a spring suspension support the chassis in order to minimize
vibration and allow the spinning floss head to balance itself at high speed.

tm2627 Jan-20
6
The stator prevents operators and objects from coming into contact with the
rapidly rotating impeller.
There is a 16A circuit breaker provided for short circuit protection.
1.7. Machine design and operation principle
The RoboJetFloss includes the following main components: Housing (1);
Chassis (2) with electric motor and Spinning Head (3). The spinning head and
electric motor are mounted on the chassis, which itself is connected to the
housing by four spring-mounted supports. These spring supports dampen
vibrations and allow the motor to self-balance during operation.
Plastic/Aluminum floss pans (18) are not shown.
An electric motor drives the spinning head at a high rate of speed (see
Technical Specifications). A Stator (4) is mounted on the chassis to direct air
flow in an upward spiral. It is fitted with a silicone Sealing Collar (5) which seals
the gap between the floss pan and the stator in order to prevent sugar from
falling onto the chassis. An adjustable Silicone Ring (6) covers the intake grill in
order to regulate air flow.
The Spinning Head has the following main parts: Impeller (7); Base-plate (8);
Sidewall with heating element (9) and Cover (10).
Operating principle
The spinning head rotates with the sugar mix inside where the heating element
warms the sugar up. When the sugar rises above 160°C/320°F, it starts to melt.
Due to centrifugal force, the melted sugar escapes through laser cut slits in the
sidewall, where it instantly cools and crystallizes turning into candy floss.
An attached impeller rotates along with the spinning head, producing a powerful
upward airflow. Air enters from below, through the axial grills of the stator, which

tm2627 Jan-20
7
can be restricted by the silicon collar.
The airflow can lift the cotton candy several feet in the air. Sugar particles that
are too heavy will collect in the floss pan (not shown).
The front panel has the following controls: Switch (11) turns on the electric
motor which rotates the spinning head; Switch (12) turns on the heating
element; Adjustment Knob (13) regulates power to the heating element and
thus controls its temperature; Voltmeter (14) indicates actual voltage supplied to
the heating element.
The ‘PRO’ version includes a ‘Quick Start’ button (15) which temporarily sends
maximum power to the heating element, even when the electric motor is not
running.
See the figure above for ACB-09-120 front panel. Appearance may vary
depending on your specific model.

tm2627 Jan-20
8
2. Intended use
2.1. Raw material requirements
Use only 100% pure sugar (beet or cane) with flossine or ready to use
flossugar. Do not use sugars with starch, dextrose or similar additives as they
can result in poor quality floss and/or clog the heater coil assembly.
2.2. Getting started
Unpack machine and save materials for future shipping needs.
Place the machine on a stable table or cart.
Before attaching power cord, fully raise all four transportation fastening nuts
(16) until they reach the rubber floss pan supports.
Transportation position
Operation position
TURNING ON THE MACHINE WITHOUT RAISING FASTENING NUTS WILL RESULT IN MACHINE
FAILURE!
Wash silicone ring and silicone collar with dish soap. Carefully install silicone
ring on the stator. Adjust the exposed gap on the stator intake to regulate
airflow depending on ambient conditions.
For indoor operation (70° F and 50% RH) minimize airflow by exposing no more
than ½ inch of the intake grill
Next, remove the thin protective film from the Floss Pan and wash with dish
soap. Place the pan on the machine making sure the indentations rest on the
four rubber support legs.

tm2627 Jan-20
9
Floss pan indentations (shown above) should fit rubber support legs (17).
carefully install silicone collar (5) on the stator with the collar edge overlapping
the pan.
2.3. Operation
Before turning on the machine, first add 1½ cup flossugar to the spinning head,
or approximately ¾ full. The minimum recommendation is 1/3 full at all times.
Manually rotate the head in order to distribute the sugar evenly.
You will need sticks, rods or cones to spin above the machine to collect the
cotton floss as it is produced. These can be made of wood, paper or plastic.
The longer the sticks, the larger the servings of cotton you can create. For the
Robo JetFloss the ideal length is 1 ½ ft – 2 ft.
Wood sticks and plastic straws should be soaked in water first in order to create
better adhesion for the floss.
Turn main power switch (11) ON and the spinning head will begin to rotate.
VIBRATION OF THE SPRING MOUNTED CHASSIS DURING FLOSS HEAD ACCELLERATION AND
DECELLERATION IS NORMAL.

tm2627 Jan-20
10
Next, turn on the heater coil power switch (12), and use the adjustment knob
(13) to set voltmeter
2
(14) to between 70-80 V.
Depending on conditions, it will take about 1 minute to warm up the head to
operating temperature. You will usually smell the candy aroma between 10 to
15 seconds before production begins.
Cotton floss will fly out upwards in a vertical column or “sleeve.” This sleeve can
be wrapped around a stick by rapidly turning or spinning the stick with your
fingers in a counter-clockwise direction (see below).
You will usually want to collect floss between 8” to 14” above the spinning head,
though you can adjust for conditions and the size of the serving.
If you find airflow is too strong or weak, turn off the machine and adjust silicone
band on the stator (see Air flow adjustment section below).
‘Cold start’ Procedure
When the machine has been off for more than 15 minutes, it will take at least 60
2
When setting up at a new location, the power level must be adjusted according to the
environmental conditions. If cotton candy comes out too slow, increase the voltage slightly.
Alternatively, decreasing voltage will slow production. When you change locations or if the
temperature or humidity changes later in the day (if working outdoors) then you may need to
make additional adjustments.

tm2627 Jan-20
11
seconds before the heating coil has warmed enough for the production of floss
to begin. If the machine has been off for a brief time, such as to add more
flossugar, this time will be reduced substantially.
Users of the ‘Pro’ version can press and hold the ‘Quick start’ button (15) for 10
- 15 seconds. This will send full power to the heating element and can be done
even if the main power switch is off. This will also substantially reduce the time
required to begin candy production.
Owners of the standard version can achieve a similar result by manually
adjusting the voltage regulator. After switching on both the motor (11) and
heating element (12), an experienced operator can adjust the voltage regulator
to the maximum (13). But, again for only 10 –15 seconds, and then decreasing
the voltage back to the recommended operating range between 70-80 V and
proceeding as normal from there.
However, in neither case above should maximum voltage be applied for more
than 10 –15 seconds as you risk overheating the flossugar. If this occurs, the
cotton candy would then be produced in a narrow rope that is difficult to
capture. In an extreme scenario, the floss would be burnt and ejected as
irregular flakes and sugar dust that would create a mess covering everything in
the immediate area.
The figure below shows an example of mildly overheated heating element.
Notice the cotton candy is rising more like a ‘rope’ than a wide “sleeve.”
Keep in mind that once the heating element and sidewall have reached such a
high temperature, reducing the voltage will not immediately produce the desired
effect. Due to thermal lag, any changes in voltage will only slowly take effect
over the next 15 to 30 seconds (or longer, depending on ambient temperatures)
so it is very important to avoid overheating the element in the first place.

tm2627 Jan-20
12
‘No-Snow’ Tool
In the production of cotton candy, “snow” includes flakes, flecks, small filaments
and sugar dust that are all too small to be collected in the normal winding
process of producing a cotton candy serving.
There are four situations when “snow” will be emitted from the head:
At the very beginning of operation.
During the end of production.
When there there is not enough flossugar remaining.
If the coil and sidewall are overheated.
In both the beginning and ending of operation, snow is produced as the heating
element crosses the temperature threshold at which it can evenly and uniformly
melt the flossugar in the head into quality candy floss.
The same is true when there is not enough flossugar left in the head, because
the remaining sugar will not be evenly distributed and this will cause some of
the material to overheat. Keeping the floss head at least 1/3 full at all times will
prevent this from occurring.
Finally, if the coil and sidewall become extremely overheated then burnt sugar
flecks and dust will be produced instead. Paying attention to Voltage regulation
and not excessively preheating the coil during cold startup will ensure this does
not happen.
Regardless of the cause, you can prevent the distribution of snow (which can
create a mess) by placing the ‘No-Snow’ tool (26) over the spinning head,
where it will capture the snow as it is ejected.
However, you should not leave the ‘No-Snow’ tool in place for long periods of
time as it will eventually become filled with floss which will then collect on the
spinning head itself.
To help prevent this, the inside of the “No Snow” tool should be wiped off in

tm2627 Jan-20
13
between each use to prevent excess accumulation of spent flossugar.
If you do notice melted or burnt sugar accumulating on top or lip of the spinning
head cover, or excessive buildup on the sidewall, then this should be scraped
off before proceeding.
This can be done using a wooden bamboo skewer or stick (never metal) while
the head is spinning. Gently put the tip of a stick into the inner right-side edge of
the cover and allow the rotation of the head against the stick to scrape off any
sugar accumulation. This can be repeated on the outside of the sidewall as well,
again only on the right-side of the spinning head.
Scraping should not be done when customers are nearby as small pieces of
sugar could fly some distance posing a risk to the face and eyes.
Air Flow Adjustment
When operating indoors, air flow should kept to a minimum. The silicone band
should cover the stator intake grill almost completely, exposing only 1/3” – 1/2”
at the base per the figure below.
As you expose more of the intake grill, the intensity of the airflow will increase.
This is useful for performing tricks and also for outdoor operation where
humidity will make for denser and heavier cotton candy and to overcome any
wind that may also be present.
However, with increased airflow it becomes more difficult to make control the
sleeve of candy being produced. There is no “correct” setting as it will depend
entirely on how you wish to operate the machine and control the production.
During setup some experimentation will be required as local conditions vary.
Removing the sleeve entirely is common when working outdoors in warm and
humid weather, as pictured below.

tm2627 Jan-20
14
Vertical flow machine operation recommendation
ACB-09-120 is intended for prolonged operation at a high production rate.
Only vertical flow machines allow you to perform entertaining tricks when
making cotton candy. The most common technique is forcing the candy sleeve
to follow you several feet away from the machine like a “snake” or animated
rope.
The “snake” trick requires plenty of space, and note that if there is wind present
you will have to have the floss follow you down-wind.
Once you have made a small cloud on the stick, pull it smoothly away from the
machine (see the figure below). Keep winding the cotton candy, and do not let it
to fall below the floss pan. Be careful, as winding too rapidly might break the
sleeve.
By moving your hands up and down and changing the angle of the stick, you
will find that you can modify the shape of the snake.
Once you have the hang of it, you will be able to step away from the machine,
as far as 10' to 15' (depending on conditions) and the snake will follow you if
you continue the proper winding rate.

tm2627 Jan-20
15
You can find more information at www.flyingcottoncandy.com
Shutting Down
When shutting down for periods of less than 24 hours, you may leave any
remaining flossugar in the spinning head.
Turn off power to the heating element switch (12) and capture the remaining
cotton candy as the head cools down. When the coil cools to the point that
“snow” is produced, then cover the head with the “No Snow” tool and allow the
head spin for 5-7 minutes to fully cool down before turning off the main power
switch (11).
Once cool to the touch, wipe out the inside of the “No Snow” tool, and put it
back over the spinning head for protection. You can also cover this with a paper
or plastic bag to protect the flossugar from dust, debris and insects.
The machine and Floss Pan should be wiped down with a damn cloth to remove
excess flossugar as needed.
If you are shutting down for longer than one day, then you should perform a
complete cleaning of the spinning head as described in the Technical
Maintenance section below.
Do not leave unused flossugar in the spinning head for more than a day or two
as it can harden/caramelize and effect the balance of the head during future
sessions, which could ultimately result in failure of the machine.
During transportation always secure the chassis using the transportation lock-
down nuts. This will prevent possible damage of the machine and prolong its
life.

tm2627 Jan-20
16
3. Technical maintenance
3.1. General instructions
ATTENTION! THIS PART OF OPERATION MANUAL IS INTENDED ONLY FOR TRAINED PERSONNEL
EXPERIENCED WITH ELECTRICAL EQUIPMENT.
The purpose of technical maintenance is extend the working life of the machine
while fulfilling all safety requirements.
The following schedule
3
is recommended:
PROCEDURE
PERIOD
Cleaning machine and pan surfaces removing sugar and cotton candy
Once a day
Sidewall and heater cleaning
Twice a month
Brush unit maintenance
Every 6 months
3.2. Safety measures
DO NOT CLEAN THE SPINNING HEAD OR COMPONENTS WITH SHARP OR METAL PARTS. HOT
WATER, A SPONGE OR SOFT BRISTLE BRUSH IS ALL THAT IS REQUIRED OR PERMITTED!
DISCONNECT THE POWER SUPPLY BEFORE CLEANING OR PERFORMING TECHNICAL
MAINTENANCE!
3.3. Cleaning instructions
Spinning head cleaning
During long-term operation, the heating element and sidewall slits can become
clogged with sugar and carbon deposits. This may significantly reduce both
productivity and the quality of the cotton candy produced.
To clean the sidewall and heating element it is necessary to disassemble the
spinning head, remove the heating element and sidewall and wash them
carefully with hot water.
3
Technical maintenance may be required sooner if individual parts become fouled prior to
scheduled service.

tm2627 Jan-20
17
To disassemble the spinning head:
1. Remove all sugar from the head, turning upside-down if necessary.
2. Detach floss head cover (10) by removing three flat-head screws (23).
3. If the cover is ‘glued’ to the sidewall, gently tap with the screwdriver handle in
order to loosen the parts.
Note that the cover is made from aluminum and can be damaged by excessive
tightening of the screws, by throwing, or by heavy impact.
4. Remove central wing nut (21), steel washer (20), plastic holding washer (19).
Then, using a 7mm nut driver or wrench, remove the nuts that are securing the
wire ends to the terminal posts (26). Remove the nuts, lock washers, terminal
ends and washers and you can then lift off the sidewall with heating element (9)
as one unit.
5. Wash the sidewall and heating element with very hot water in order to melt
the flossugar. When the bulk of the flossugar is removed, carefully separate the
heater coil from the sidewall to clean the areas where they contact one another.
DO NOT IMMERSE HEATING ELEMENT TERMINAL LEADS IN WATER AS THIS MAY CAUSE
FAILURE!
6. The sidewall and heating element must be dry before reinstalling.
ABRASIVE OR MECHANICAL CLEANING OF HEATING ELEMENT AND SIDEWALL IS PROHIBITED!
Re-assembly of the spinning head is done in the reverse order. Once
completed, turn on the motor and power to the heating coil for approximately 30
seconds in order to spin off any remaining moisture.

tm2627 Jan-20
18
Brush unit maintenance
As with most electrical motors, the Robo JetFloss utilizes brushes and slip rings
which are subject to wear and require inspection, maintenance and eventual
replacement.
To inspect and maintain the brush unit it is necessary to take off the stator (4)
by removing the four fastening screws. Next remove the impeller (7) by
removing three fastening screws.
Inspect the slip rings (24) for bumps and color changes. The rings should fit
closely to insulators and should not show excessive wear.
Slip rings are made of high-grade brass and will last years if properly serviced.
If the slip rings are excessively worn or are covered with bumps, they need to
be replaced by qualified service staff.
To replace brush units (25) first remove the screws securing the brush unit.
Remove the unit carefully and inspect the carbon brushes. If the brushes are
worn more than half of the length, they should be replaced.
AFTER BRUSH UNITS ARE REPLACED, REMOVE ALL DUST, DEBRIS AND TARNISH FROM THE
SLIP RINGS (24).
After installing new brushes, allow the motor to run for 15 minutes before
turning on the heating element. This will allow the brushes to conform to the slip
rings, avoiding the potential for arcing under load.

tm2627 Jan-20
19
3.4. Storage
If the unit is not used for a prolonged period of time, then the routine
maintenance must be performed before it is placed back into service.
3.5. Troubleshooting
DISCONNECT THE POWER SUPPLY BEFORE DIAGNOSTICS AND REPAIR. EMI FILTER MUST BE
DISCHARGED BY CLOSING ALL THE PINS IN THE PLUG!
FAILURE
POSSIBLE CAUSE
REMEDY
Machine doesn’t turn on when
power switch is activated.
No power at the wall
socket.
Use a tester to check the voltage on all phases. Provide
power in the wall socket.
Power supply cord is
damaged.
Use a tester to check the cord for breakage, replace
defective cord.
Blown fuse
Use a tester to check the fuse, replace if necessary.
Motor is spinning, but the
machine doesn’t produce cotton
candy.
Power regulator is
out of order.
If voltmeter pointer doesn’t move upon adjustment knob
action, then replace the power regulator.
The heating element
is out of order.
Use a tester to check the heating element, replace if
necessary.
Brush unit damage.
Check the brush unit. Brushes must fit closely to the slip
rings, without sparking. Replace the brush unit if
necessary.
Low productivity.
Caramel sticking on
the sidewall.
Clean the sidewall and heating element in accordance
with instructions.
Low voltage from the
outlet.
Check the voltage from the outlet or extension cord. Low
voltage is a frequent cause of low productivity.
Smoke from the spinning head.
Sidewall
overheating.
Reduce the voltage on the heating element with
adjustment knob.
Power regulator is
out of order.
If the pointer of voltmeter doesn’t move during adjusting,
replace the power regulator.
Significant vibration of the
machine.
Spinning head
imbalance.
Fill in the head at least ¾ full with flossugar and rotate
the head manually to spread sugar evenly.
Check the head for foreign objects.
Check the head for caramel stuck on the heating
element. Clean the sidewall and heating element in
accordance with instructions.

tm2627 Jan-20
20
4. Transportation and storage
The equipment may be transported by any kind of covered vehicle, in
accordance with local regulations.
Ambient temperature during the transportation and storage must be between -
13° F and +131° F.
5. Acceptance certificate
ACCEPTANCE CERTIFICATE
_____________
Product Name
_____________
Serial No.
The equipment is made with accordance to mandatory requirements of the state standards, actual technical
documentation, and approved for use.
QC Engineer
STAMP HERE
_________________
Signature
_________________
DD.MM.YYYY
_________________
Full Name
Other manuals for ROBOJETFLOSS
1
This manual suits for next models
5
Table of contents
Other RoboLabs Kitchen Appliance manuals

RoboLabs
RoboLabs Grand Robopop 220 User manual

RoboLabs
RoboLabs TWISTER-M2 User manual

RoboLabs
RoboLabs ROBOJETFLOSS ACB-09-120 User manual

RoboLabs
RoboLabs Robopop 75 User manual

RoboLabs
RoboLabs ROBOMIX MINI User manual

RoboLabs
RoboLabs Vortex Popcorn Robopop 60 Operating manual

RoboLabs
RoboLabs ROBOPOP 60 User manual

RoboLabs
RoboLabs VPM-RGM2 User manual

RoboLabs
RoboLabs SUGARLIPS 20 User manual

RoboLabs
RoboLabs MINI ROBOPOP 25 User manual