RoboMaster ESC Center Board 2 User manual

RoboMaster
ESC Center Board 2
v1.0 2020.01
User Guide
使用说明
ユーザーガイド

1
EN
Disclaimer
Thank you for purchasing the ROBOMASTERTM ESC Center Board 2 (hereinafter
referred to as “Center Board”). Please read this entire document and all safe and
lawful practices DJITM provided carefully before use. Failure to read and follow
instructions and warnings may result in serious injury to yourself or others, damage
to your DJI product, or damage to other objects in the vicinity. By using this product,
you hereby signify that you have read this disclaimer and warning carefully and that
you understand and agree to abide by the terms and conditions herein. You agree
that you are solely responsible for your own conduct while using this product, and
for any consequences thereof. DJI accepts no liability for damage, injury or any
legal responsibility incurred directly or indirectly from the use of this product.
DJI is a trademark of SZ DJI TECHNOLOGY CO., LTD. (abbreviated as “DJI”)
and its afliated companies. Names of products, brands, etc., appearing in this
document are trademarks or registered trademarks of their respective owner
companies. This product and document are copyrighted by DJI with all rights
reserved. No part of this product or document shall be reproduced in any form
without the prior written consent or authorization of DJI.
This document and all other collateral documents are subject to change at
the sole discretion of DJI. For up to date product information, visit http://www.
robomaster.com and click on the product page for this product.
This disclaimer is available in various languages. In the event of divergence
among different versions, the English version shall prevail.
Warning
1. Connect the cables correctly by following the instructions in this document.
Otherwise, the cables or the center board may be seriously damaged.

2
2. Make sure to use the product in strict accordance with the specications
listed in this document. Failure to do so may reduce the product service life
or even lead to permanent damage.
3. To avoid physical damage, make sure to assemble the center board correctly.
4. DO NOT open the silicone case. Otherwise, foreign objects may fall inside
and short circuit the center board.
5. Insert the rubber plug to prevent foreign objects from entering the center
board and causing a short circuit when the power port is out of use.
Introduction
The RoboMaster ESC Center Board 2 is a highly integrable expansion board
that consists of multiple power output ports and CAN bus ports, which can
provide power to several components at the same time. The center board
boasts a compact design, while the new silicone case improves reliability.
Interface Description
1
2
3
3
3
2
2
2
2
2
2
45

3
1. XT60 Power Input Port
Used for 24V power input, with a rated input current of 30A and peak input
current of 60A.
2. XT30 Power Output Port
Used for 24V power output. One XT30 power output port has a rated output
current of 15A and peak output current of 30A. There are seven ports
connected in parallel, with the input current provided by the power input port.
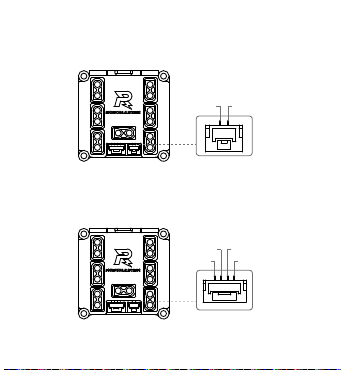
3. CAN Bus Port (2-pin port on the side)
There are three 2-pin CAN bus ports on either side of the center board. They
are connected in parallel to each other, and also in parallel to other CAN bus
ports on the center board. The pin sequence is as below.
CANL CANH
4. CAN Bus Port (2-pin port on the top)
There is a 2-pin CAN bus port on the top of the center board, which is
connected in parallel to other CAN bus ports on the center board. The pin
sequence is as below.

4
CANL
CANH
N/A
GND
5. CAN Bus Port (4-pin port on the top)
There is a 4-pin CAN bus port on the top of the center board, which is
connected in parallel to other CAN bus ports on the center board. The pin
sequence is as below.
CANH CANL

3.0
4.6
14.0
5
Mounting the Center Board
Refer to the dimensions in the gure below when mounting the center board.
Unit: mm
4- 5.0
4- 2.7
36
41
41
36

6
Specications
Rated Input Current 30 A
Rated Output Current (Single Port) 15 A
No. of XT60 Input Ports 1
No. of XT30 Output Ports 7
No. of CAN Bus Ports 8
Dimensions 41×41×14 mm
Weight 28 g
Operating Temperature Range 0° to 55° C (0° to 131° F)
For more information, scan the QR code or go to https://www.robomaster.com/
en-US/products/components/detail/2496.

7
CHS
免责声明
感谢您购买 RoboMasterTM 电调中心板 2(以下简称 “中心板 ”)。使用本产品之
前,请仔细阅读并遵循本文及大疆 TM 创新(DJITM)提供的所有安全指引,否则
可能会给您和周围的人带来伤害,损坏本产品或其它周围物品。一旦使用本产品,
即视您已经仔细阅读本免责声明与警告,理解、认可和接受本声明全部条款和内
容。您承诺对使用本产品以及可能带来的后果负全部责任。大疆创新(DJI)对
于直接或间接使用本产品而造成的损坏、伤害以及任何法律责任不予负责。
DJI 是深圳市大疆创新科技有限公司及其关联公司的商标。本文出现的产品名称、
品牌等,均为其所属公司的商标。本产品及手册为大疆创新版权所有。未经许可,
不得以任何形式复制翻印。
本文档及本产品所有相关的文档最终解释权归大疆创新所有。如有更新,恕不另
行通知。请访问 www.robomaster.com 官方网站以获取最新的产品信息。
产品使用注意事项
1. 请按照本说明使用合适的线材,以免损坏中心板。
2. 请在规定的工作环境(如电流、温度等参数)下使用中心板,否则可能影响产
品寿命。
3. 请使用正确的方式固定中心板,避免中心板受到物理损坏。
4. 使用时,请不要掀开硅胶外壳,避免异物进入中心板造成短路。
5. 当电源输入接口不使用时,请盖上胶塞,避免异物进入中心板造成短路。
简 介
RoboMaster 电调中心板 2是一款专为实现电源及 CAN Bus 通信接口扩展的转接
板。中心板具有结构紧凑、接口集成度高等特性,可同时驱动 7套动力系统;采
用硅胶外壳设计提高了防护等级,保障产品可靠运行。

8
接口说明
1. 电源输入接口(XT60)
24V 电源输入接口,额定输入电流 30A,峰值输入电流 60A。
2. 电源输出接口(XT30)
24V 电源输出接口,单个接口额定输出电流 15A,峰值输出电流 30A。
7 个接口并联,由电源输入接口提供输入电流。
3. CAN 总线接口(侧面 2-pin)
2-pin CAN 总线接口,两侧共 6个接口并联,同时与中心板上其它 CAN 总线
接口并联。引脚线序如下所示:
CANL CANH
1
2
3
3
3
2
2
2
2
2
2
45
4. CAN 总线接口(顶部 2-pin)
2-pin CAN 总线接口,与中心板上其它 CAN 总线接口并联。
引脚线序如下所示:
5. CAN 总线接口(顶部 4-pin)
4-pin CAN 总线接口,与中心板上其它 CAN 总线接口并联。
引脚线序如下所示:
CANL
CANH
N/A
GND
9
CANH CANL
Table of contents
Other RoboMaster Controllers manuals

Popular Controllers manuals by other brands

Digiplex
Digiplex DGP-848 Programming guide

YASKAWA
YASKAWA SGM series user manual

Sinope
Sinope Calypso RM3500ZB installation guide

Isimet
Isimet DLA Series Style 2 Installation, Operations, Start-up and Maintenance Instructions

LSIS
LSIS sv-ip5a user manual

Rockwell Automation
Rockwell Automation 1769-L31 installation instructions


