RockJam RJ5061 User manual

Page | 1
Important Information
Be sure to obey the following information so as not to harm yourself or others or damage this instrument
or other external equipment.
Power adapter:
•
Please use only the specified AC adapter supplied with the product. An incorrect or faulty
adapter can cause damage to the electronic keyboard.
•
Do not place the AC adapter or power cord near to any source of heat such as radiators or
other heaters.
•
To avoid damaging the power cord, please ensure that heavy objects are not placed on it
and that it is not subject to stress or over bending.
•
Check the power plug regularly and ensure it is free from surface dirt. Do not insert or
unplug the power cord with wet hands.
Do not open the body of the electronic keyboard:
•
Do not open the electronic keyboard or try to disassemble any part of it. If the device is not
functioning correctly, please stop using it and send it to a qualified service agent for repair.
Use of the electronic keyboard:
•To avoid damaging the appearance of the electronic keyboard or damaging the internal parts
please do not place the electronic keyboard in a dusty environment, in direct sunlight or in
places where there are very high or very low temperatures.
•Do not place the electronic keyboard on an uneven surface. To avoid damaging internal parts
do not place any vessel holding liquid onto the electronic keyboard as spillage may occur.
Maintenance:
•To clean the body of the electronic keyboard wipe it with a dry, soft cloth only.
Connection:
•To prevent damage to the speaker of the electronic keyboard please adjust the volume of any
peripheral device to the lowest setting and gradually adjust the volume accordingly to an
appropriate level once the music is playing.
During operation:
•Do not use the keyboard at the loudest volume level for a long period.
•Do not place heavy objects onto the keyboard or press the keyboard with undue force.
•The packaging should be opened by a responsible adult only and any plastic packaging should
be stored or disposed of appropriately.
Specification
•Specifications are subject to change without notice.

Page | 2
Contents
Important Information ................................................................................................................................... 1
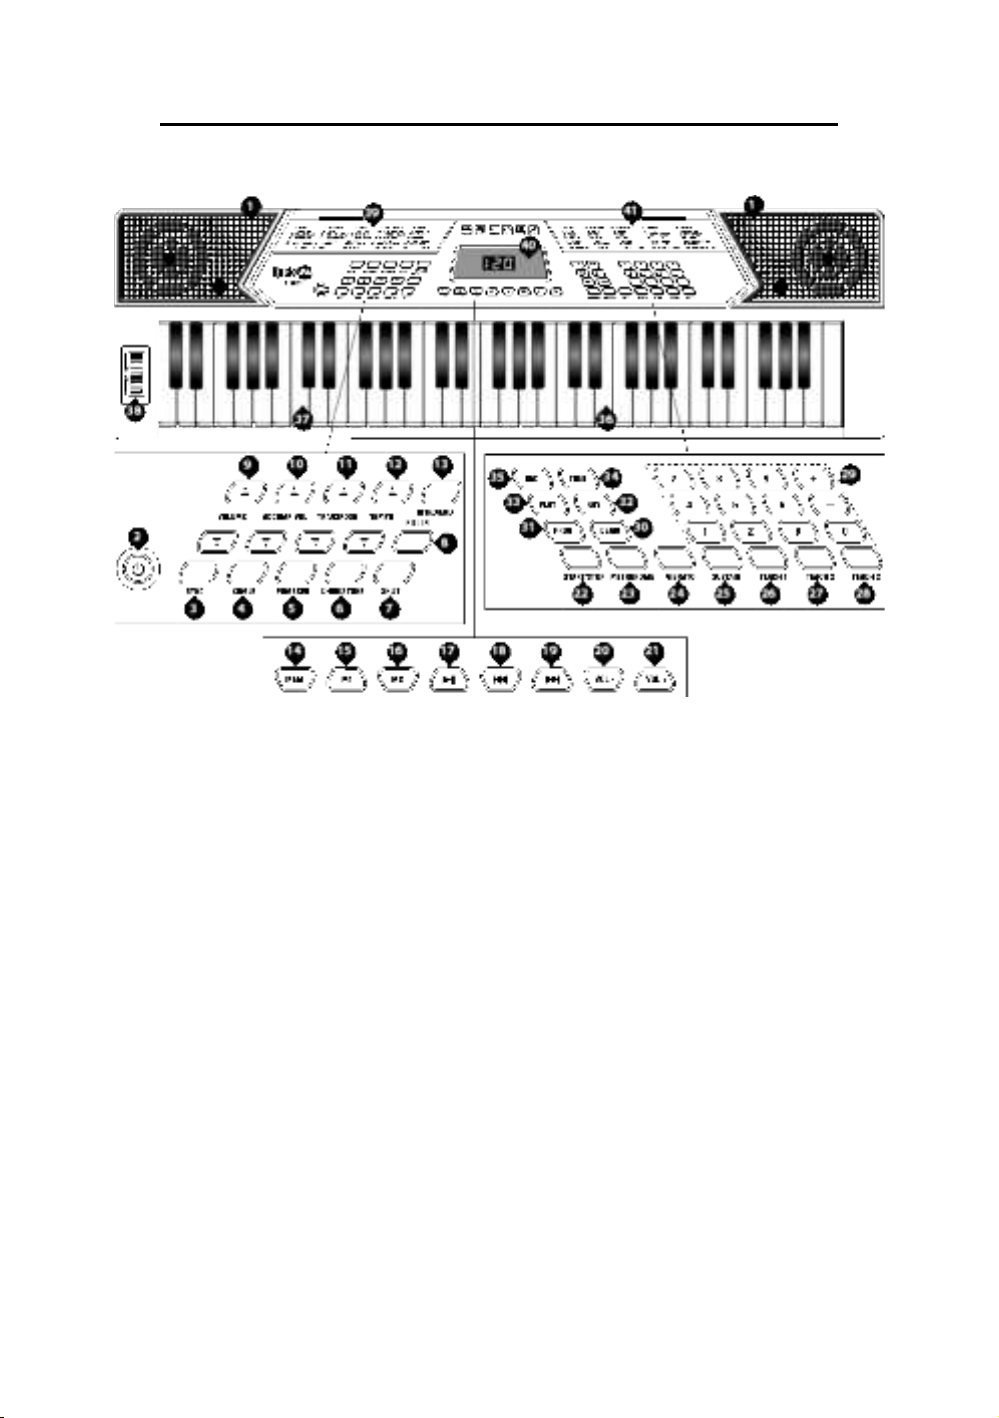
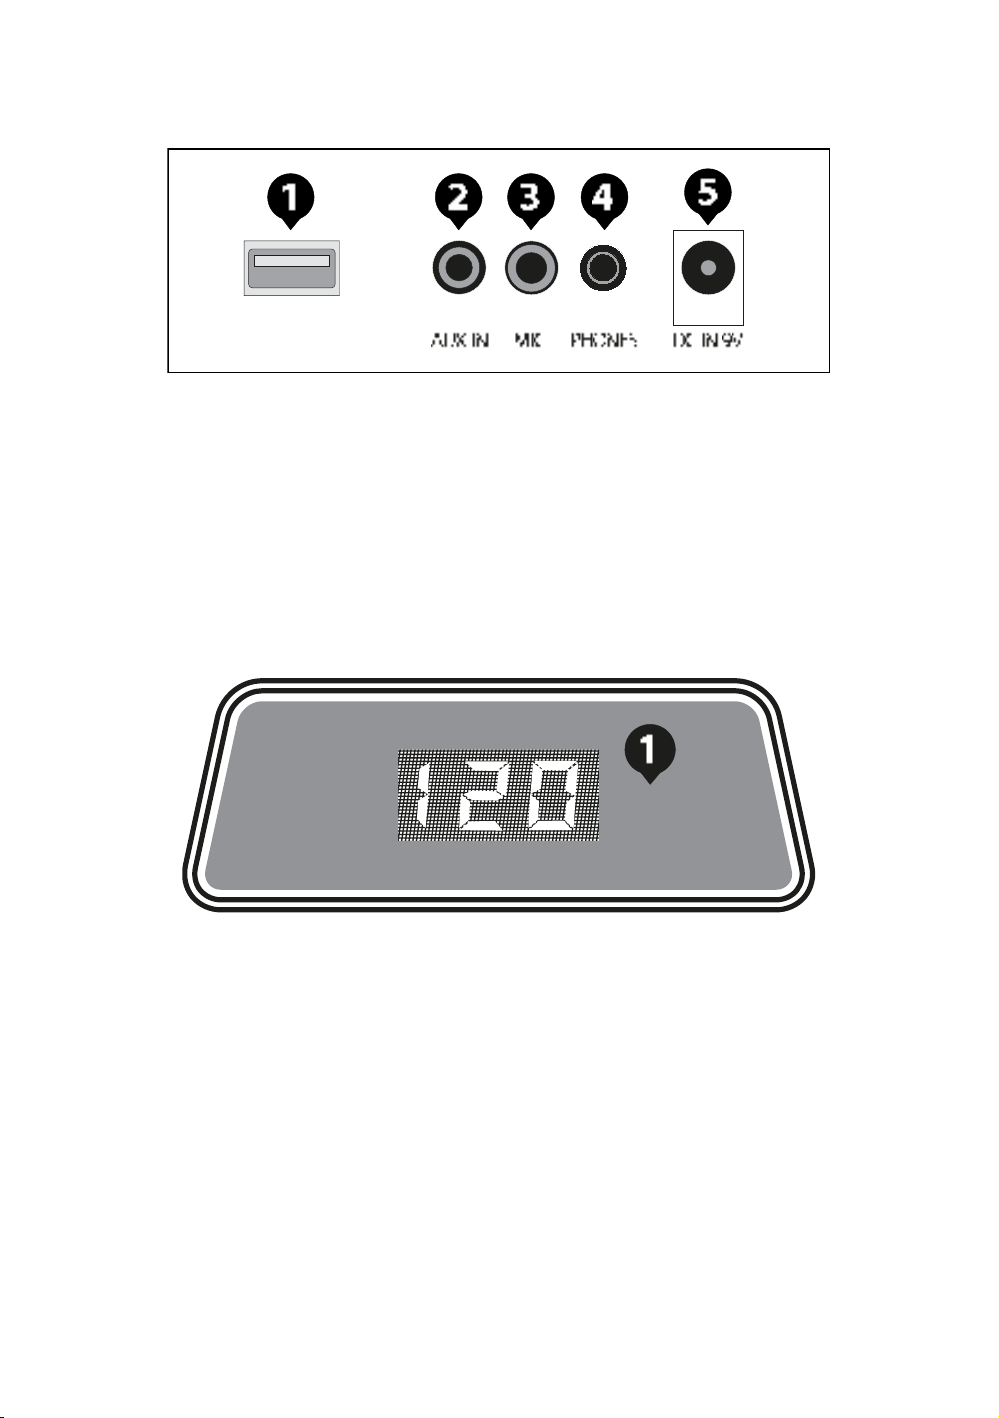
Controls, Indicators and External Connections ............................................................................................ 4
Front Panel .............................................................................................................................................. 4
External Connections............................................................................................................................... 5
LED Display ............................................................................................................................................. 5
Preparation Before First Use ........................................................................................................................ 6
Stand Assembly....................................................................................................................................... 6
Power....................................................................................................................................................... 7
Use of AC/DC power adapter: ............................................................................................................ 7
Battery operation:................................................................................................................................ 7
Auto power off:.................................................................................................................................... 7
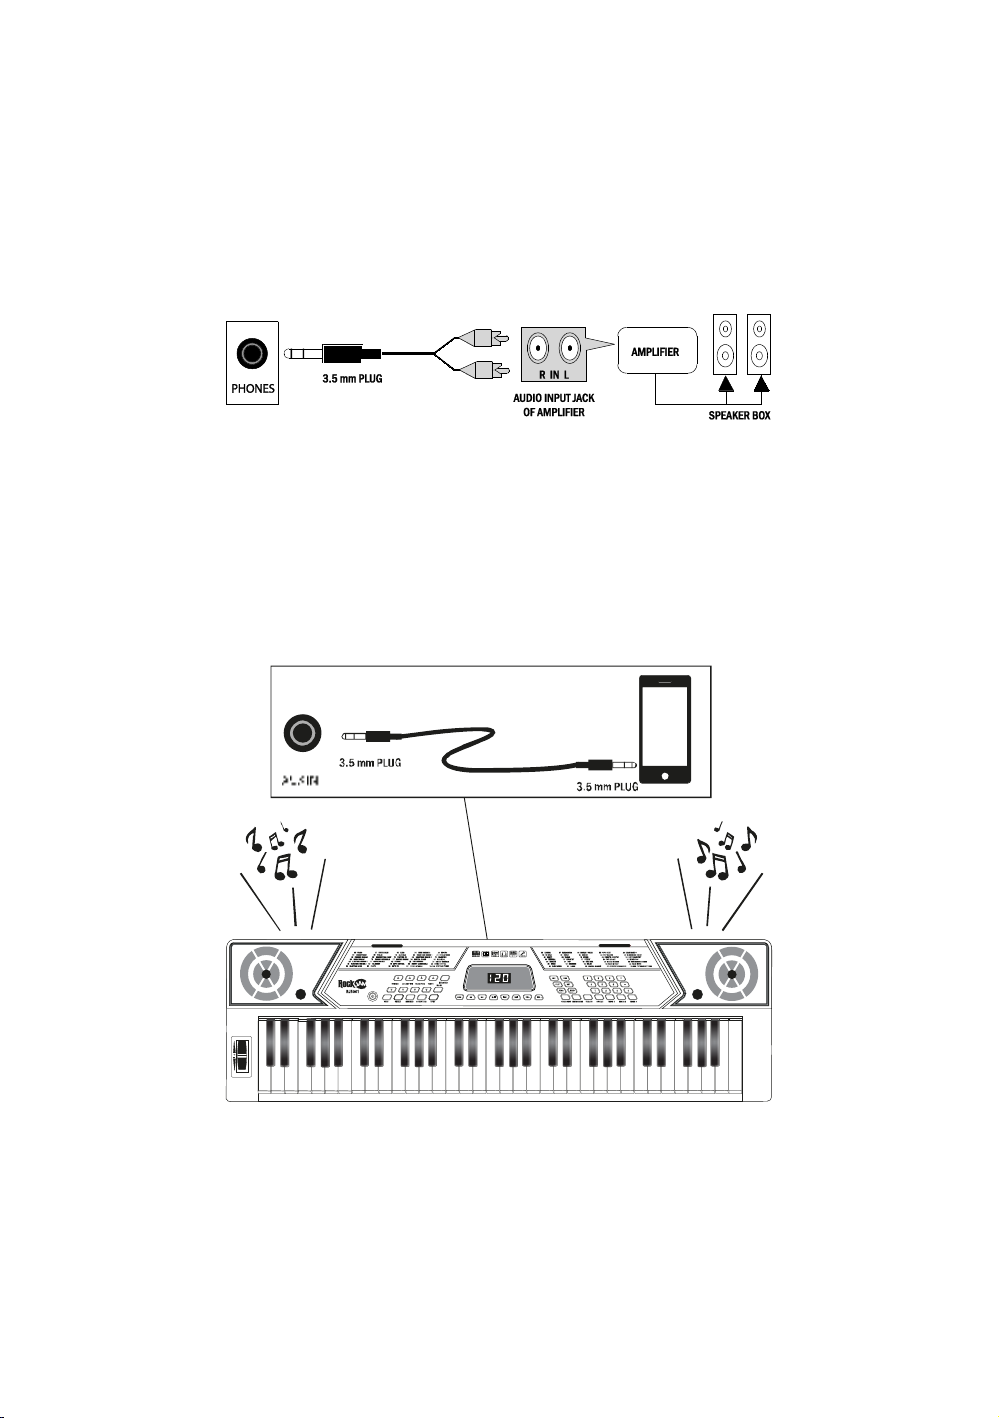
Jacks and Accessories ............................................................................................................................ 7
Using headphones: ............................................................................................................................. 7
Connecting an Amplifier or Hi-Fi Equipment:...................................................................................... 8
Connecting a phone or audio device to the AUX Input to play music through the keyboard:............. 8
Connecting a Microphone: .................................................................................................................. 9
Playing MP3 Music Files from a USB Memory Stick:.......................................................................... 9
Keyboard Operation ................................................................................................................................... 10
Power and Volume ................................................................................................................................ 10
Power control: ................................................................................................................................... 10
Adjustment of the Master Volume:.................................................................................................... 10
Tone....................................................................................................................................................... 11
Tone Selection: ................................................................................................................................. 11
Effect & Control...................................................................................................................................... 11
Split Keyboard:.................................................................................................................................. 11
Sustain: ............................................................................................................................................. 12
Vibrato:.............................................................................................................................................. 12
Transpose: ........................................................................................................................................ 12
Metronome:....................................................................................................................................... 13
Panel Percussion Instruments: ......................................................................................................... 13
Using the Pitch Wheel:...................................................................................................................... 14
Rhythm .................................................................................................................................................. 15

Page | 3
Selecting the rhythm: ........................................................................................................................ 15
Start / Stop: ....................................................................................................................................... 15
Sync: ................................................................................................................................................. 15
Fill in:................................................................................................................................................. 16
Accompaniment Volume Adjustment: ............................................................................................... 16
Tempo Adjustment:........................................................................................................................... 16
Chord Accompaniment .......................................................................................................................... 17
Single Finger Chords: ....................................................................................................................... 17
Fingered Chords: .............................................................................................................................. 17
Chord Tone: ...................................................................................................................................... 17
Intro / Ending ......................................................................................................................................... 18
Recording Function................................................................................................................................ 18
Rhythm Programming............................................................................................................................ 19
Demo Songs .......................................................................................................................................... 19
Setting Memories M1 and M2................................................................................................................ 19
Teaching Modes .................................................................................................................................... 20
Beginner Course: .............................................................................................................................. 20
Intermediate Course: ........................................................................................................................ 20
Advanced Course: ............................................................................................................................ 20
Progressive Learning: ....................................................................................................................... 21
Appendix I. Percussion Instruments ........................................................................................................... 21
Appendix II. Rhythm Table ......................................................................................................................... 22
Appendix III. Tone Table ............................................................................................................................ 22
Appendix IV. Demo Song Table ................................................................................................................. 23
Appendix V. Troubleshooting ..................................................................................................................... 24
Appendix VI. Chord Tables......................................................................................................................... 25
Single Finger Chords ............................................................................................................................. 25
Fingered Chords .................................................................................................................................... 26
Appendix VII. Technical Specification......................................................................................................... 27
FCC Compliance Statement....................................................................................................................... 28
FCC Class B Part 15 ............................................................................................................................. 28
Product Disposal Instructions (European Union)........................................................................................ 28

Page | 4
Controls, Indicators and External Connections
Front Panel
1. Stereo Speakers
2. Power Switch
3. Sync
4. Single Finger Chords
5. Fingered Chords
6. Chord Tone
7. Split keyboard
8. Fill In
9. Main Volume +/-
10. Accompaniment Volume +/-
11. Transpose +/-
12. Tempo [Fast/Slow]
13. Intro/Ending
14. Memory
15. Memory Storage 1
16. Memory Storage 2
17. Play/Pause
18. Previous Track
19. Next Track
20. Music Volume -
21. Music Volume +
22. Start/Stop
23. Metronome
24. Vibrato
25. Sustain
26. Teach 1
27. Teach 2
28. Teach 3
29. Number Buttons
30. Demo
31. Program
32. Rhythms
33. Playback
34. Tones
35. Record
36. Keyboard Playing Area
37. Chord Keyboard Area
38. Pitch Wheel
39. Tones List
40. LED Screen
41. Rhythms List

Page | 5
External Connections
LED Display
1. 3-Digit LED Display
1. USB Input (For MP3 Playback)
2. AUX IN (For Music Playback)
3. MIC Input (For Electret Microphone)
4. Headphone Output
5. DC 9V Power Input

Page | 6
Preparation Before First Use
Stand Assembly
Please first assemble the stand using the screws and allen key supplied. The keyboard can then be
secured to the stand using the straps and screws connected to the top bars.

Page | 7
Power
Use of AC/DC power adapter:
Please use the AC/DC power adapter that came with the electronic keyboard or a power adapter with DC
9V output voltage and 500mA output current with a centre positive plug. Connect the DC plug of the
power adapter into the DC 9V power socket on the rear of the keyboard and then connect the other end
into the mains wall socket and switch on.
USA / Canada UK
Caution: When the keyboard is not in use you should unplug the power adapter from the mains power
socket.
Battery operation:
Open the battery lid on the underneath of the electronic keyboard and insert 6 x 1.5V Size AA alkaline
batteries. Ensure the batteries are inserted with the correct polarity and replace the battery lid.
Caution: Do not mix old and new batteries. Do not leave batteries in the keyboard if the keyboard is not
going to be used for any length of time. This will avoid possible damage caused by leaking batteries.
Auto power off:
The keyboard has a power save function that switches the keyboard off after a period of around 4 to 5
minutes when not being played. Press the power on / off button to switch back on.
Jacks and Accessories
Using headphones:
Connect the 3.5mm headphone plug into the [PHONES] jack on the rear of the keyboard. The internal
speaker will cut off automatically once headphones are connected.

Page | 8
Connecting an Amplifier or Hi-Fi Equipment:
This electronic keyboard has a built in speaker system but it can be connected to an external amplifier or
other hi-fi equipment. First turn off the power to the keyboard and any external equipment you are looking
to connect. Next insert one end of a stereo audio cable (not included) into the LINE IN or AUX IN socket
on the external equipment and connect the other end into the [PHONES] jack on the rear of the electronic
keyboard.
Connecting a phone or audio device to the AUX Input to play music through the keyboard:
This keyboard has a built-in speaker system that can be used to play music from your phone or mobile
device. Insert one end of a stereo audio cable into the AUX IN socket on the back of the keyboard and
connect the other end into your phone or audio device. Make sure the keyboard is switched on. Use the
volume control of the phone to control the music volume. AUX in cable not included.

Page | 9
Connecting a Microphone:
Connect the 3.5mm microphone plug into the [MIC] jack on the rear of the keyboard. Note that the
keyboard requires an electret or condenser microphone, not supplied.
Playing MP3 Music Files from a USB Memory Stick:
Insert the USB memory stick into the USB input at the rear of the keyboard. Press the PLAY/PAUSE key
to start and stop the music playback. Once the music has started playing you can skip forward and
backward through the MP3 tracks by pressing the control buttons. Adjust the volume of the music
playback with the VOL –and + keys. Use the keys on the keyboard to play along.

Page | 10
Keyboard Operation
Power and Volume
Power control:
Press the [POWER] button to turn the power on and again to turn the power off. The LED display will light
to indicate power on.
Adjustment of the Master Volume:
The keyboard has 16 levels of volume from V00(off) - V15. To change the volume, press the [VOLUME
▲/▼] buttons. The volume level is indicated by the LED display. Pressing both the [VOLUME ▲/▼]
buttons at the same time will make the Main Volume return to the default level (level V10). The main
volume level will revert to level V10 after power off and on.

Page | 11
Tone
Tone Selection:
When the keyboard is switched on the default TONE is ‘’t00’’ Grand Piano. To change the tone, press the
[TONE] button first and then directly input the number code on the keypad by pressing the corresponding
digits 0-9. The tones can also be changed by using the + / - buttons. Refer to Appendix III for a list of the
available tones.
Effect & Control
Split Keyboard:
To switch on Split Keyboard mode press the [SPLIT] button, the LED will show [SPL]. The keyboard will
split into two keyboards at the 24th key from the left. You can adjust the TONE of the right hand side of
the keyboard by pressing the corresponding digits 0-9 on the numerical keypad. The TONE of the left
hand side of the keyboard will remain set to the tone chosen before the Split Keyboard mode was entered.
In Split Keyboard mode the pitch of the left hand keys are raised by one octave and the right hand keys
lowered by one octave. Press the [SPLIT] button again to exit Split Keyboard mode.

Page | 12
Sustain:
Press the [SUSTAIN] button to enter Sustain mode. The LED display will briefly display [SUS] to indicate
sustain is on. Once this mode is selected the sound of each note played is prolonged. Pressing the
[SUSTAIN] button again will turn the sustain feature off and exit this mode.
Vibrato:
Press the [VIBRATO] button to enter Vibrato mode. The LED display will briefly display [Vib] to indicate
that vibrato is on. Once this mode is selected each time a note is played a trembling effect is added to the
the note. Pressing the [VIBRATO] button again will turn the Vibrato feature off and exit this mode.
Transpose:
Pressing the [TRANSPOSE ▲/▼] buttons alters the musical scale of the note being played. You can
adjust the scale by 6 levels upwards or downwards. Pressing both the [TRANSPOSE ▲/▼] buttons at
the same time will make the musical scale revert to 00. The transpose level will be reset to 00 after power
off and on.

Page | 13
Metronome:
Press the [METRONOME] button to start the tick-tock beat. There are four beats to choose from.
Depending on what the performance needs, you can press the [TEMPO ▲/▼] buttons to speed up or
slow down. Press the [METRONOME] button repeatedly to cycle through to the required beat pattern. The
LED display will indicate the beat you have chosen. The metronome effect is added to the music once you
start playing. To exit this mode press the [START/STOP] or [METRONOME] button again.
Panel Percussion Instruments:
To access the Percussion sounds, press the [TONE] button first and then select tone number 128 on the
keypad. Once the tone has been selected the keyboard’s keys turn into percussion instruments and play
the percussion sounds accourdingly. Refer to Appendix I. for a table showing the percussion sounds
available.

Page | 14
Using the Pitch Wheel:
Use the Pitch bend wheel to adjust the pitch of a note up or down for a continuous pitch variation between
notes. This feature can help recreate an authentic playing sound for sounds such as strings and trombone
where the original instrument can slide up between notes. It is also a common tool used for synthesiser
compositions.

Page | 15
Rhythm
Selecting the rhythm:
You can choose from any of the 200 built in rhythms. Please refer to Appendix II. for the detailed rhythm
table. Press the [RHY] button to enter the rhythm selection function. The LED display will show the current
rhythm number. You can select the rhythm you require by pressing the corresponding digits on the
numerical keypad or by pressing the + / - buttons.
Start / Stop:
Press the [START / STOP] button to play the rhythm selected. Press the [START / STOP] button again to
stop the rhythm playback
Sync:
Press the [SYNC] button to select the sync accompaniment function. Pressing any of the first 19 keys on
the left hand side of the keyboard will start the rhythm playing. Press the [START / STOP] button to stop
the rhythm and exit the sync function.

Page | 16
Fill in:
You can fill in a length of interlude if you press the [FILL IN] button during the rhythm playback. After the
fill in, the rhythm will continue playing as normal.
Accompaniment Volume Adjustment:
The Accompaniment Volume can be adjusted by pressing the [ACCOMP VOLUME ▲/▼] buttons. The
LED display will show the volume as you are adjusting it. The adjustment range has 16 levels which are
displayed as 000 –015 and indicated by the LED display. Pressing both the [ACCOMP VOLUME ▲/▼]
buttons at the same time will make the Accompaniment Volume return to the default level (level 010). The
Main Volume control will also affect the output level of the accompaniment. At power on the
acccompaniment volume will reset to the default level.
Tempo Adjustment:
Pres and hold the [TEMPO ▲/▼] buttons to adjust the playing tempo of the rhythm, metronome and
demo song. The adjustment range is 30-240 bpm. Pressing both the [TEMPO ▲/▼] buttons at the same
time will make the tempo revert to the default tempo for the rhythm selected. At power on the tempo will
revert to 120 bpm.

Page | 17
Chord Accompaniment
Single Finger Chords:
Press the [SINGLE] button to activate the single finger chord function. The LED screen will display [C-1]
Chords are played by pressing certain keys in the chord area on the left hand side of the keyboard (keys
1-19). The finger patterns required are shown in Appendix VI. Press the [START / STOP] button to start or
stop the chord accompaniment. Press the [SINGLE] button again to exit single finger chord mode.
Fingered Chords:
Press the [FINGERED] button to activate the fingered chord function. The LED screen will display [C-2]
Chords are played by pressing certain keys in the chord area on the left hand side of the keyboard (keys
1-19). The finger patterns required are shown in Appendix VI. Press the [START / STOP] button to start or
stop the chord accompaniment. Press the [FINGERED] button again to exit fingered chord mode.
Note that no sound will be produced unless the correct finger patterns are formed.
Chord Tone:
In either fingered or single finger chord mode, press the [CHORD TONE] button repeatedly to select the
desired chord tone. There are 7 chord tones to choose from, indicated on the LCD as [00] to [06]. The
chord tone is reset to [00] after power off / on.

Page | 18
Intro / Ending
Press the [INTRO / END] button to enable the intro section, the disply will show [int]. When the intro
finishes playing, accompaniment shifts to the main section. Press [INTRO / END] button again to enable
the ending section, the display will show [End]. When the ending is finished, the auto accompaniment
stops automatically.
Recording Function
Press the [REC] button to enter the recording mode. The LED will indicate that the recording function is on
by showing [rEC] on the LED display. Press any key to start recording. The maximum recording capacity
is 46 notes. When the recording capacity is full the LED display will show [FUL]. Each time you press the
[REC] button, the previous memory will be cleared and the keyboard will enter the recording mode again.
Press the [PLAY] button to play back the recorded notes.

Page | 19
Rhythm Programming
Press the [PROG] button to activate the Rhythm Program mode. The LED will indicate that the rhythm
program function is on by showing [Pr9]. You can then play the keyboard and record your percussion
track (up to 46 percussion beats). To listen to your piece press the [PLAY] button and the keyboard will
playback your edited percussions. You can then play along to your recorded percussion. You can also
adjust the speed of the playback using the [TEMPO ▲/▼] buttons. To cancel the Programming mode,
press the [PROG] button again.
Demo Songs
Press the [DEMO] button to play a demo song. The LED display will show [dXX] where XX is the number
of the demo song, from 00 to 39. By pressing the + and - button on the numerical keypad you can choose
the demo song you require. There are 40 demo songs to choose from in total. The keyboard will finish the
chosen song and then play the next song. Press the [DEMO] button again to exit the demo mode. Refer to
Appendix IV. for a list of the available Demo songs.
Setting Memories M1 and M2
The keyboard has two built in memories for saving specific tones, rhythms, and tempos. Before
performing, select the TONE, RHYTHM and TEMPO you wish to use. While holding the [MEM] button,
press the [M1] or [M2] button to store the settings, the LED display will show [S1] or [S2] and this will save
the keyboard settings to that memory. You can access the stored settings by pressing the [M1] or [M2]
buttons before performing, the LED display will show [n1] or [n2].
Note that the M1 and M2 memories will be cleared after the keyboard is switched off and back on
again.
Table of contents
Other RockJam Musical Instrument manuals