Rockville RMP-XLR User manual

OWNER’S MANUAL
Who reads manuals?
Instead, go to vimeo.com/495776773 or scan
the QR code and watch a short video, which
shows you how to set this item up and how
to use it.
RMP-XLR
PROFESIONAL DYNAMIC WIRED VOCAL MICROPHONE

2
Included in Kit
• Wired mic
• Mic cable, XLR to XLR, 100% OFC Copper
• Mic clip
• Mic pouch
• Owner’s manual
• Warranty card
Thank you for purchasing the Rockville RMP-XLR Professional Dynamic Wired
Vocal Microphone. We are very proud to bring you what we consider to be the ab-
solute best value in pro audio products. We have spared no expense in manufac-
turing this wired dynamic vocal microphone to meet the highest quality standards.
With proper care and installation this microphone will provide you with the high-
est levels of quality. We hope that this unit will bring you years of performance and
reliability. Please read this guide carefully for proper use of your Rockville RMP-
XLR Professional Dynamic Wired Vocal Microphone. Should you need assistance
please call our technical help line at 1-646-758-0144, Monday through Thursday,
9am to 10pm EST., and Friday, 9am to 3pm, EST.
• Do not cover any part of the microphone grill with your hand, as this will
adversely affect microphone performance.
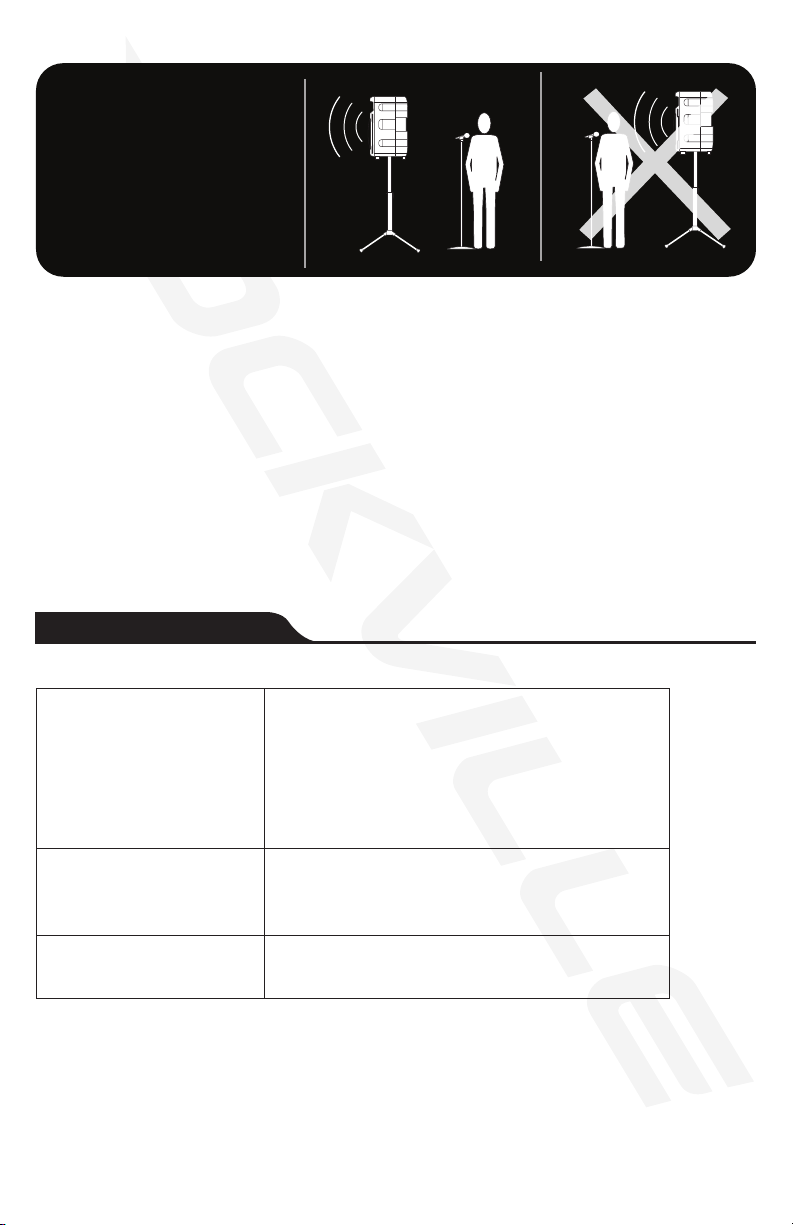
• Aim the microphone toward the desired sound source (such as the talker, sin-
ger, or instrument) and away from unwanted sources.
• Place the microphone as close as practical to the desired sound source.
• Use only one microphone to pick up a single sound source.
• For better gain before feedback, use fewer microphones.
• Keep the distance between microphones at least three times the distance from
each microphone to its source (“three to one rule”).
• Place microphones as far as possible from reective surfaces.
• Add a windscreen when using the microphone outdoors.
• Avoid excessive handling to minimize pickup of mechanical noise and vibration.
Handling Instructions

3
Specs
Microphone
Cable
Mic Clip
• Dynamic vocal microphone
• M-06 Cartridge
• Ergonomic body with rugged construction
• Type: dynamic
• Non-Neodymium magnet
• Steel mesh grill
• On/Off switch
• Polar Pattern: uni-directional
• Natural sound reproduction
• Beautiful black nish
• Frequency Response: 125 - 9Khz
• Impedance: 600 Ohms ± 30%
• Sensitivity: -78 ± 3dB
• Male XLR to female XLR Cable
• 10 Feet
• 100% OFC oxygen free copper
• Cable delivers crystal clear distortion free signal
• Cable is 5mm thick with cover (22 AWG standard mic cable)
• XLR cable connectors are very solid and durable
• Heavy duty standard size microphone clip
• Stand mountable
• Solid plastic construction with copper inside
• Black color

4
The RMP-XLR microphone connects via a 3-pin balanced XLR connector.
The closer you are to the microphone, the deeper and richer your voice will sound.
When your mouth is two inches or less from the microphone there is a signicant
increase to low frequencies giving your voice a bass heavy sound. This is known
as the proximity effect.
Singing directly into the microphone will pick-up on your breathing as well as
overemphasize certain sounds when speaking or singing. To achieve a well bal-
anced sound, sing or talk to one side of or above and across the microphone’s
top. This will give your voice a well-balanced, natural sound.
Feedback means that the sound from a speaker is picked up by the microphone,
sent back to the amplier and then out through the speakers. At certain volume
levels the system will make undesired noises. In order to increase gain before
feedback, this microphone has a supercardioid pattern. This means that its sen-
sitivity to sound is at its highest when the sound comes from the front of the mi-
crophone (facing you). This also minimizes pick-up of sounds from the sides or rear.
This microphone can be used for balanced and unbalanced applications. For bal-
anced XLR connections use an XLR cable. For unbalanced connections use a 1/4˝
TS jack plug to a female XLR cable. Be aware that when using a run longer than
16ft you may encounter humming caused by stray magnetic elds from power
cables, lighting cables, and other electric appliances.
Connections
Proper Microphone Usage
1 = ground / shield
2 = hot (+ve)
3 = cold (-ve)
1 2
3

5
PROBLEM
No sound
Distortion
Dull sound
SOLUTION
1. Ensure power mixer or amplier is on.
2. Check that the master volume is not set to 0.
3. Check all connections to ensure everything
is properly connected.
4. Check cables for cuts, nicks, or any other defects.
1. Gains not set properly.
2. Mixer input sensitivity is too high.
1. Clean internal and external windscreens.
Feedback can also be caused by the acoustics of the venue. In these instances
the proximity effect may cause feedback. In most cases, simply moving a little
away from the microphone may resolve the issue.
Avoid having more than two people sharing a microphone. Singing into the micro-
phone at an angle wider than 30° may require bringing up the microphone fader
level high enough to cause feedback.
Troubleshooting
Tip:
To minimize feed-
back avoid operating
the microphones in
close proximity of or
in front of speakers.

6
Notes

7

Visit us at:
RockvilleAudio.com
Due to constant improvements, these specifications are subject to
change without notice.
Copyright 2021
Table of contents