Rockwell 1771-P3 User manual

,$"+"'& 0 )!
Cat. No. 1771–P3, –P4, –P5 and –P5E
Use this document as a guide when installing the catalog number
1771-P3, -P4, -P5 or -P5E power supplies.
%(')+&+ *) &')%+"'&
)"&*+$$+"'& '&*")+"'&*
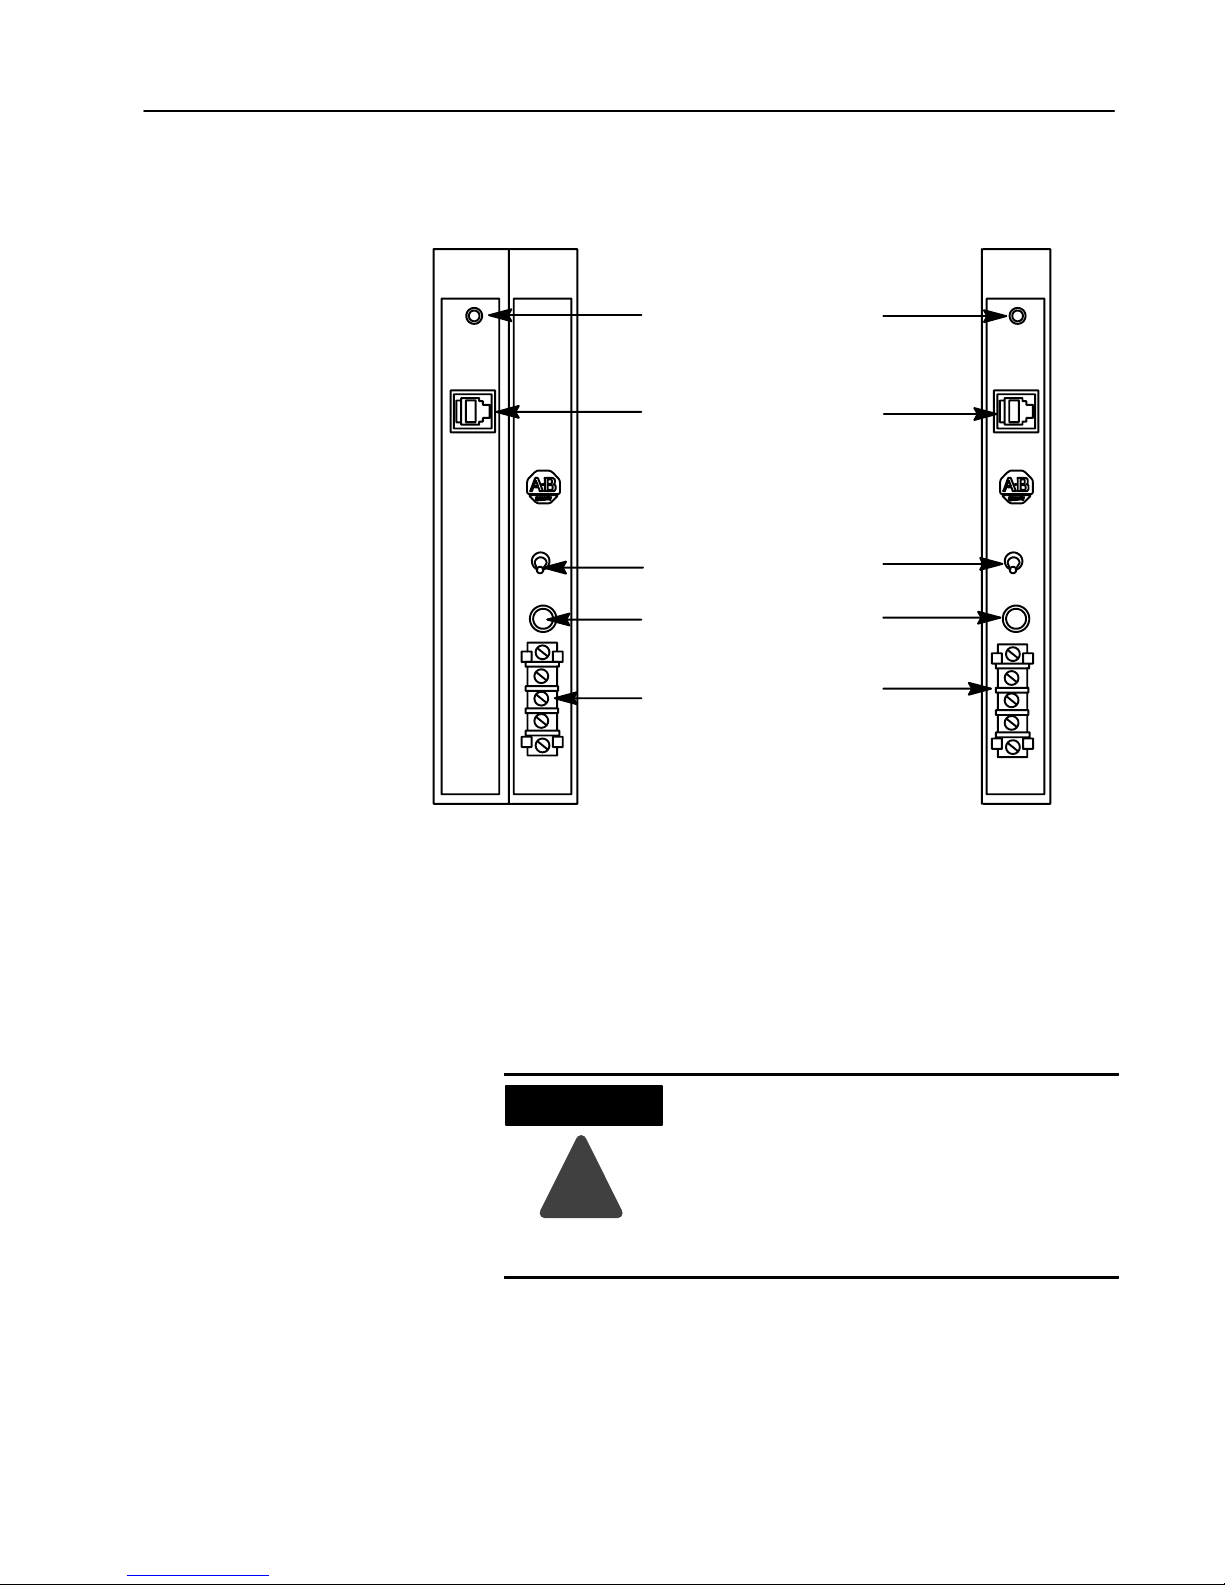
'&&+"& &(,+ '.)
++"& +! '.) '** "% $/ 0 '&$/
&*+$$"& +! '.) ,(($/
#"& &(,+ '.) '&&+"'&*
)$$$"& '.) ,(($"*
++,* &"+')*
)',$*!''+"&
+/ (()'-$*
(""+"'&*
Because of the variety of uses for the products described in this
publication, those responsible for the application and use of these
products must satisfy themselves that all necessary steps have been
taken to assure that each application and use meets all performance
and safety requirements, including any applicable laws, regulations,
codes and standards. In no event will Allen–Bradley be responsible
or liable for indirect or consequential damage resulting from the use
or application of these products.
Any illustrations, charts, sample programs, and layout examples
shown in this publication are intended solely for purposes of
example. Since there are many variables and requirements associated
with any particular installation, Allen–Bradley does not assume
responsibility or liability (to include intellectual property liability)
for actual use based upon the examples shown in this publication.
Allen–Bradley publication SGI–1.1, Safety Guidelines for
Application, Installation, and Maintenance of Solid–State Control
(available from your local Allen–Bradley office), describes some
important differences between solid–state equipment and
electromechanical devices that should be taken into consideration
when applying products such as those described in this publication.
Installation Instructions

Power Supply Modules2
Reproduction of the contents of this copyrighted publication, in
whole or part, without written permission of Rockwell Automation,
is prohibited.
Throughout this publication, notes may be used to make you aware
of safety considerations. The following annotations and their
accompanying statements help you to identify a potential hazard.
avoid a potential hazard, and recognize the consequences of a
potential hazard.
!
WARNING Identifies information about practices or
circumstances that can cause an explosion in a
hazardous environment, which may lead to
personal injury or death, property damage, or
economic loss.
ATTENTION
!
Identifies information about practices or
circumstances that may lead to personal injury
or death, property damage, or economic loss.
IMPORTANT Identifies information that is critical for
successful application and understanding of the
product.

Power Supply Modules 3
ATTENTION
!
Environment and Enclosure
This equipment is intended for use in a Pollution
Degree 2 industrial environment, in overvoltage
Category II applications (as defined in IEC
publication 60664–1), at altitudes up to 2000
meters without derating.
This equipment is considered Group 1, Class A
industrial equipment according to IEC/CISPR
Publication 11. Without appropriate precautions,
there may be potential difficulties ensuring
electromagnetic compatibility in other
environments due to conducted as well as
radiated disturbance.
This equipment is supplied as “open type”
equipment. It must be mounted within an
enclosure that is suitably designed for those
specific environmental conditions that will be
present, and appropriately designed to prevent
personal injury resulting from accessibility to
live parts. The interior of the enclosure must be
accessible only by the use of a tool. Subsequent
sections of this publication may contain
additional information regarding specific
enclosure type ratings that are required to comply
with certain product safety certifications.
See NEMA Standards publication 250 and IEC
publication 60529, as applicable, for
explanations of the degrees of protection
provided by different types of enclosures. Also,
see the appropriate sections in this publication, as
well as the Allen–Bradley publication 1770–4.1,
(“Industrial Automation Wiring and Grounding
Guidelines”), for additional installation
requirements pertaining to this equipment.

Power Supply Modules4
!
ATTENTION Preventing Electrostatic Discharge
This equipment is sensitive to electrostatic
discharge, which can cause internal damage and
affect normal operation. Follow these guidelines
when you handle this equipment:
•Touch a grounded object to discharge
potential static.
•Wear an approved grounding wriststrap.
•Do not touch connectors or pins on
component boards.
•Do not touch circuit components inside the
equipment.
•If available, use a static–safe workstation.
•When not in use, keep modules in appropriate
static–safe packaging.

Power Supply Modules 5
' &"! * $
Chassis Compa ibili y
The 1771-P3 power supply is a single-slot module, and the 1771-P4,
-P5 and -P5E power supplies are 2-slot modules. These power
supply modules can be used in both series A and B 1771 I/O chassis,
as shown below.
Table A
1771 I/O Chassis Power Supply Placemen Requiremen s
Chassis Primary Supply Secondary Supply
$"'# "& $"'# "&
&"'& !&$ %'## ) "&% "&%
1771-A4 Series A "&% "&%
& !&$ %'## )
"& ##
$"'# "&
& !&$ %'## )
"& ##
$"'# "&
1771
-
A2
Series A
& !&$ %'## )
"& ##
$"'# "&
1771
-
A2
Series A
& !&$ %'## )
"& ##
$"'# "&
!) % "& (#& !) % "& (#& "$ !)
% "&% ( '!
1771 All
Series B "& ## !) % "&% ( '! !) % "& (#& "$ !)
% "&% ( '!
!) % "&% ( '! !) % "&% ( '!
!
ATTENTION The 1771–P5 and –P5E are designed to operate in
parallel with another 1771–P5 or –P5E. Do not
parallel 1771–P5 or –P5E with other ac power
supplies. Limit adjacent slot module power
dissipation for all supplies to 10W maximum.
Preins alla ion
Considera ions

Power Supply Modules6
Publi ation 1771ĆIN073A-EN-P - Mar h 2002
Proc ssor Compatibility
Compatibility of power supplies with selected processors is shown
below. Processors with an integrated power supply as shown below
can support only one additional ac power supply.
Tabl B
Pow r Supply and Proc ssor Compatibility
Pow r Supply
Cat. No.
1772ĆLSP1
1772ĆLWP1
1772ĆLXP1
1771ĆAL
1771ĆAR2
1771ĆASB
1771ĆAS
1772ĆLN1,
ĆLN2, ĆLN3,
ĆLV
1772ĆLS
1772ĆLW
1772ĆLX
1771ĆP3 Compatible Compatible Series B
Chassis only
Not
ompatilbe
Compatible
1771ĆP4
Chassis only
ompatilbe
1771ĆP5, ĆP5E Not
Compatible
Wh r :
1Power supply and ba kup battery in luded
2Swit h 7 of I/O hassis must be turned on. Refer to Remote I/O Adapter Module publi ation 1771Ć2.17.
!
ATTENTION Do not parallel 1771–P5 or –P5E with other ac
power supplies. Limit adjacent slot module power
dissipation for all supplies to 10W maximum.
Pow r Supply Curr nt Capacity
Table C shows the current capacity of various configurations of
power supplies When paralleling power supplies, use the power
supply paralleling cable, cat. no. 1771–CT.
Tabl C
Pow r Supply Modul Curr nt Capabiliti s
Pow r Total Availabl Backplan Curr nt for I/O Modul s
Supply/Proc ssor Non 1771ĆP3 1771ĆP4 1771ĆP5 1771ĆP5E
1771ĆP3 3A 6A 11A
1771ĆP4 8A 11A 16A
1771ĆP5, ĆP5E18A 16A 16A
1772ĆLSP 2A 5A 10A
1772ĆLXP 4A 7A 12A
1772ĆLWP 4A 7A 12A
1 The 1771ĆP5 or ĆP5E power supply is designed to operate in parallel only with another 1771ĆP5 power supply.
The total urrent apability would be 16A.

Power Supply Modules 7
$# % "
!
ATTENTION The 1771–P5 and –P5E are designed to operate in
parallel with another 1771–P5 or –P5E. Do not
parallel 1771–P5 or –P5E with other ac power
supplies. Limit adjacent slot module power
dissipation for all supplies to 10W maximum.
!
ATTENTION Power supply modules have a controlled
“soft-start” feature to enhance power supply
reliability. During power-up or power-down
periods, outputs of certain discrete modules may
momentarily change operating state. These
modules are:
•Isolated AC (120V) Output Module, cat. no.
1771-OD series A or B
•Isolated AC (220V) Output Module, cat. no.
1771-OR series A
•Contact Output Module cat. no. 1771-OY
series A or B
•Contact Output Module cat. no. 1771-OZ
series A or B
•DC (5V) Multiplexer Input Module cat no.
1771-IS
Later series of these modules do not change state
during power-up or power-down.
The 1771-P3, -P4, -P5 and -P5E power supply modules require
power from an external power source. Refer to Table D for input
voltage requirements and output current capability for the individual
power supply modules.
Table D
Power Supply Module Input Voltage Requirements
Power Supply Module Input Current and Voltage
Requirements
Output Current
%
% $! #
% $! #
% $! #
Refer to the following pages for input power connections.
Connecting Input Power

Extended $#)% #&& '! +
Standard $#)% #&& '! +
bottom of
power supply module
Power Supply Modules8
( '#" , %
Setting the Power Loss Time Dela (1771ĆP5E onl )
Power loss time delay is the time period from when the power
supply input voltage drops below 20.5V dc to when the power
supply resets the processor enable signal on the I/O backplane.
When this signal is reset, the resident PLCprocessor or adapter
module stops processing data to/from the modules in the I/O chassis.
You set the configuration jumper as follows:
Set the jumper
to this position
For this power loss
time dela
- '"%
'#%+ ( ' $#&'#" !& ± !&
- *'" !&
If your input modules and power supply use power from the same
source and the input module time delay is greater than the power loss
time delay of the power supply module, input module data integrity
is preserved. If using 2 power supplies, do not exceed the specified
isolation voltage (see Specifications).
!
ATTENTION Exercise care when you configure your system for
possible power loss. You should consider:
•input module time delay
•power loss time delay
•incoming power quality
•control system response to input information

Power Supply Modules 9
#" $ !
Figure 1
Features of the Power Supply Mo ules
Status In icator - Keeps you
informe of mo ule operating
con itions.
P/S Parallel - Makes paralleling
connections between 2 power
supplies easy.
Power Switch - Turns the power
supply on or off.
Input Fuse - Protects
supply from overloa
Terminal Strip - Make input
power connections at this
terminal strip.
P/S
Parallel
24V
DC
24V c
POWER
ON
P/S
ACTIVE
5A 32V
NORM BLOW
P/S
Parallel
120V
AC
120V ac
POWER
ON
P/S
ACTIVE
1A 125V
SLOW BLOW
" $ $ " $
The power supplies are modular components of the 1771 I/O system.
They must be properly installed in a system chassis. Refer to
publication 1771–IN075 for information on acceptable chassis
installation and proper grounding requirements.
To install the power supply module in the I/O chassis, proceed as
follows:
!
WARNING If you insert or remove the module while
backplane power is on or attach or remove
wiring to the terminal block, an electrical arc can
occur. This could cause an explosion in
hazardous location installations. Be sure that
power is removed or the area is nonhazardous
before proceeding.
Installing the Power
Supply

Power Supply Modules10
!
ATTENTION Turn the power supply off before inserting into the
chassis. Turn off power to the I/O chassis before
inserting into the chassis.
•Failure to remove power from the backplane
could cause module damage, degradation of
performance, or injury.
•Failure to remove power from the backplane
could cause injury or equipment damage due to
possible unexpected operation.
1. Turn off power to the I/O chassis
2. Turn the power supply module power switch OFF.
3. Identify the slot location of the chassis into which the power
supply will be installed.
4. Place the printed circuit board on the rear of the module into the
plastic tracks on the top and bottom of the I/O chassis which
guide the module into the chassis.
5. Do not force the module into the backplane connectors. Apply
firm, even pressure on the module to seat it properly.
6. Snap the chassis latch over the top of the module to secure its
position.
7. Make power connections as described in “Making Input Power
Connections” below.
Making Input Power Connections
When making input power connections, use 14AWG, 75oC copper
wire.
Connecting the 1771-P3 and -P4 Power Supplies
1. Remove the protective cover from the terminal block by
squeezing the prongs and lifting the protective cover.
2. Connect the L1 (high) line to the top (L1) connection on the
terminal block.
3. Connect the neutral (low) line to the middle (N) connection on
the terminal block.
4. Connect the bottom terminal labeled GND to the ground bus
(equipment ground).
5. Tighten terminal block screws to 7 pound–inches (0.5Nm).
6. Replace the protective cover on the terminal block.

Power Supply Modules 11
$# % !
120V
AC
$#!
Equi ment
Ground
Grounding
Electrode
Conductor
! $ $"
%
Connecting the 1771-P5 and -P5E Power Su lies
1. Remove the protective cover from the terminal block by
squeezing the prongs and lifting the protective cover.
2. Connect the positive dc line to the top terminal (DC).
3. Connect the negative dc line to the middle
terminal (COM).
4. Connect the bottom terminal (labeled GND) to the ground bus.
5. Tighten terminal block screws to 7 pound–inches (0.5Nm).
6. Replace the protective cover on the terminal block.
24V
DC
Connect central
ground bus to GND
dc Negative connects to COM
dc Positive
connects to DC
%

Power Supply Modules12
%$! ' "
The power supply modules are designed to operate in parallel with:
•another 1771-P3, -P4, -P5 or -P5E power supply (Note: The
1771-P5 and -P5E power supplies are designed to operate in
parallel only with another 1771-P5.) (Refer to Table A and
Table C.)
•a 1772-LSP, -LWP or -LXP processor (Refer to Table B.)
Note: Paralleling 2 modules, even when using different power
sources, does not provide redundancy.
If 2 power supplies are used, do not exceed specified isolation
voltages.
To parallel 2 modules, proceed as follows:
1. Make certain that both power supply module power switches are
off.
2. Connect the power supply paralleling cable (cat. no. 1771-CT)
from the P/S Parallel port on the first power supply module to the
P/S Parallel port on the second module as shown below. Note:
Route the cable around the top of the I/O chassis to avoid induced
voltages.
Paralleling Two Power Supply Modules
P/S
Parallel
24V
DC
24V dc
POWER
ON
P/S
ACTIVE
5A 32V
NORM BLOW
P/S
Para e
P/S
ACTIVE
!#$&
$&
"!% %#
Power Supp y
Para e ing Cab e
Cat. No. 1771ĆCT
24V dc
POWER
ON
5A 32V
NORM BLOW
24V
DC
Para e ing Power Supp ies

Power Supply Modules 13
-$#,#'& 1 *"
3. Turn on both power supplies simultaneously.
!
ATTENTION To avoid driving the first of two paralleled power
supplies into an overcurrent condition that would
shutdown the module, you must simultaneously
turn on both power supplies.
The power supply module has a green indicator light (labeled P/S
ACTIVE). It indicates the operating condition of the module, and
can be used for diagnosing faults.
The module monitors itself for:
•overvoltage
•undervoltage
•overcurrent
Any of these conditions will shut down the power supply. Following
a shutdown, turn the power supply off for at least 15 seconds (-P3
and -P4) or 45 seconds (-P5 and -P5E) before you turn it on again.
If the P/S ACTIVE
Indicator
Then: Corrective Action
#+ '& '*%$ '(*,#'& " #&#,'* $#!",+ + $'&!
+ ," %'-$ #+ +-(($# /#," ('/* .& # #,
#+ &', +, #& #,+ "++#+ +$',
'& *)-#*
#+ ' " %'-$ #+ ,-*& ' -*& ," %'-$ '&
,-*&+ ' " #&(-, .'$,! ,' ," +-(($0 '-$ $'/
• '* %+ '* 1 '* 1
('/* +-(($0
• '* %+ '* 1 '*
1 ('/* +-(($0
$$'/ #&(-, ('/* ,' *'.* ,'
• '* '. '* 1 '* 1 ('/*
+-(($0
• '* '. '* 1 '* 1 ('/*
+-(($0
,-*&+ ' & +"-,+ '/& " '-,(-, "+ & '.*.'$,! '*
'.*-**&, '&#,#'&
,-*&+ ' &
(*$$$ ('/* +-(($0
+"-,+ '/&
" #&(-, .'$,! ,' '& ' ," (*$$$
('/* +-(($#+ "+ #$ - ,' $''+ /#*
$'/& -+ '* ," +-(($0 "+ & +"-, '
1. -*& ," ('/* +-(($0 '
2. #, +'&+ 1 '* 1 '*
+'&+ '* 1 '* 1
3-*& ," ('/* +-(($0 '&
*%#&+ ' & , $+,
'& ('/* +-(($0 +"-,+
'/&
" +-(($#+ /* &', ,-*& '&
+#%-$,&'-+$0
3
.
-*&
,"
('/* +-((
$
0 '&
Module Indicators

Power Supply Modules14
)!($# . &
Follow the procedure below to isolate and correct possible faults.
1. Turn the power supply off and wait at least 15 seconds (-P3 and
-P4) or 45 seconds (-P5 and -P5E) before you turn it on again.
2. Turn the power supply on.
3. If the system operates properly, you are finished. If the indicator
does not turn on, turn the power supply off and wait 15 seconds
(-P3 and -P4) or 45 seconds (-P5 and -P5E).
4. Remove the paralleling cable (if equipped) to verify independent
operation of each power supply.
!
ATTENTION Remove input power to the I/O chassis before
removing the power supply module from the
chassis. Failure to do this may result in injury to
personnel and/or damage to equipment.
5. Pull the power supplies halfway out of the chassis to test them
under no load conditions.
6. Turn on one power supply.
If the P/S ACTIVE
indicator is: Then:
#
# $& "$& $ ( $!!$+# ' $)&&
. #%)( *$!( +' #$( +(# %(! !"('
. %!# ' $*&!$ $& ' '$&( &)( )% (
%!# )&&#(' $ !! "$)!' &- %$+& ')%%!- !"(' *
#$( # ,
. $& )!( # %&!!!# ! )'
. #(&#! %$+& ')%%!- $)! * )!(
&- (( #%)( *$!( ' +(# %(! !"(' #%)( *$!( '
$&&( &%! ( %$+& ')%%!-
7. If you have two power supplies in your chassis, repeat step 6 for
the other power supply.
Troubleshooting

Power Supply Modules 15
%$ ( "
8. If you have only one power supply in your chassis and it passed
step 7 (the P/S ACTIVE light turned on), verify that the power
supply is not overloaded by performing steps 9 through 11.
9. Turn the power supply off and wait 15 seconds (-P3 and -P4) or
45 seconds (-P5 and -P5E).
10. Firmly seat the power supply in the chassis.
11. Restore power to the I/O chassis, and turn the power supply
module on.
If the P/S ACTIVE
indicator is: Then:
! &" #%!!' # !"$ ""$' $ #'#$ # %
!"$ "'
! $ ! &" #%!!' % &$ & !"$
#%!!' #'#$ # % !"$ "'
Checking for Open or Shorted Paralleling Cable
Important: Continue with this procedure only if you are using two
power supply modules in the same chassis. This
procedure checks for an open or shorted 1771-CT
paralleling cable.
Before you begin, turn I/O chassis power off. Both power supply
modules should be turned off and partially pulled out of the chassis.
!
ATTENTION Remove input power to the I/O chassis before
removing the power supply module from the
chassis. Failure to do this may result in injury to
personnel and/or damage to equipment.
1. Test the 1771-CT paralleling cable by verifying the ground
connection between power supplies.
2. Test for a short circuit by performing steps 3 through 5.
3. Plug one end of the paralleling cable into one of the power supply
modules (the other end should not be connected).
4. Turn the power supply on. If the P/S ACTIVE indicator turns on
this end of the cable is okay.
5. Unplug the cable, and plug the other end of the cable into the
power supply.
If the P/S ACTIVE
indicator : Then:
%"# # $ # "$
# $ $%" !" # # "$ "%$ ! $

Power Supply Modules16
$# ' !
6. Perform steps 7 through 9 to test for an open circuit in the
paralleling cable.
7. Turn both power supply modules off. Connect the paralleling
cable to each supply.
8. Turn one power supply module on. The P/S ACTIVE indicators
on both supplies should not turn on.
9. Turn the first power supply off and the other power supply
module on. The P/S ACTIVE indicators on both supplies should
not turn on.
If either of the P/S ACTIVE indicators turn on, the paralleling
cable has an open circuit. Replace the cable.
10. To test for a paralleling fault, turn both power supply modules off
and wait 15 seconds (-P3 and -P4) or 45 seconds (-P5 and -P5E).
11. Verify that the paralleling cable is properly connected, and then
turn both power supplies on simultaneously. The P/S ACTIVE
indicators on both supplies should turn on.
12. If the P/S ACTIVE indicators on both supplies do not turn on,
replace both supplies, one at a time, with known good power
supplies in order to isolate the faulty power supply module.
13. If all tests have passed up to this point, turn both power supply
modules off simultaneously and wait 15 seconds (-P3 and -P4) or
45 seconds (-P5 and -P5E). Check for backplane loading by
performing steps 14, 15 and 16.
14. Firmly seat the power supplies in the chassis.
15. Restore power to the I/O chassis, and turn both power supply
modules on simultaneously.
If the P/S ACTIVE
indicator : Then:
$!" %! "$ & $" ! !# !!#& # "&"#
"$ !# !&
" # #$!
16. Check for proper dual power supply module operation. If
backplane loading is within acceptable limits and the P/S
ACTIVE indicators do not turn on, replace both power supply
modules, one at a time, with known good power supply modules
in order to isolate the faulty module. The system should operate
normally.

Power Supply Modules 17
4!+(" 3(.- = 1"'
Safety Appr vals
The f ll wing inf rmati n applies when perating this equipment in
hazard us l cati ns:
1.#4"32 , 1*$# : 1$ 24(3 !+$ %.1 42$ (- + 22 (5(2(.- 1.4/2
-# 9 1#.42 ." 3(.-2 -# -.-' 9 1#.42 +." 3(.-2 .-+8 "' /1.#4"3 (2 24//+($# 6(3'
, 1*(-&2 .- 3'$ 1 3(-& - ,$/+ 3$ (-#(" 3(-& 3'$ ' 9 1#.42 +." 3(.- 3$,/$1 341$ ".#$ '$- ".,!(-(-
&
/1.#4"32 6(3'(- 2823$, 3'$ ,.23 #5$12$ 3$,/$1 341$ ".#$ +.6$23 : -4,!$1 , 8 !$ 42$# 3.
'$+/ #$3$1,(-$ 3'$ .5$1 ++ 3$,/$1 341$ ".#$ .% 3'$ 2823$, .,!(- 3(.-2 .% $04(/,$-3 (- 8.41 2823$,
1$ 24!)$"3 3. (-5$23(& 3(.- !8 3'$ +." + 43'.1(38 5(-& 41(2#("3(.- 3 3'$ 3(,$ .% (-23 ++ 3(.-
!
WARNING EXPLOSION HAZARD -
•. -.3 #(2".--$"3 $04(/,$-3 4-+$22 /.6$1 ' 2 !$$- 1$,.5$# .1
3'$ 1$ (2 *-.6- 3. !$ -.-' 9 1#.42
•. -.3 #(2".--$"3 ".--$"3(.-2 3. 3'(2 $04(/,$-3 4-+$22 /.6$1
' 2 !$$- 1$,.5$# .1 3'$ 1$ (2 *-.6- 3. !$ -.-' 9 1#.42
$"41$ -8 $73$1- + ".--$"3(.-2 3' 3 , 3$ 3. 3'(2 $04(/,$-3 !8
42(-& 2"1$62 2+(#(-& + 3"'$2 3'1$ #$# ".--$"3.12 .1 .3'$1
,$ -2 /1.5(#$# 6(3' 3'(2 /1.#4"3
•4!23(343(.- .% ".,/.-$-32 , 8 (,/ (1 24(3 !(+(38 %.1 + 22
(5(2(.-
•% 3'(2 /1.#4"3 ".-3 (-2 ! 33$1($2 3'$8 ,423 .-+8 !$ "' -&$# (- -
1$ *-.6- 3. !$ -.-' 9 1#.42
Inf rmati ns sur l'utilisati n de cet équipement en envir nnements dangereux:
$2 /1.#4(32 , 104<2 -$ ".-5($--$-3 04$ 4-$ 43(+(2 3(.- $- $-5(1.--$,$-32
#$ + 22$ (5(2(.- 1.4/$2 # -&$1$47 $3 -.- # -&$1$47 ' 04$ /1.#4(3 $23 +(51<
5$" #$2 , 104 &$2 241 2 /+ 04$ #(#$-3(%(" 3(.- 04( (-#(04$-3 +$ ".#$ #$ 3$,/<1 341$ /.41 +$2
$-5(1.--$,$-32 # -&$1$47 .1204$ /+42($412 /1.#4(32 2.-3 ".,!(-<2 # -2 4- 2823<,$ +$ ".#$ #$
3$,/<1 341$ +$ /+42 #<% 5.1 !+$ ".#$ #$ 3$,/<1 341$ +$ /+42 % (!+$ /$43 $ 31$ 43(+(2< /.41 #<3$1,(-$1
+$ ".#$ #$ 3$,/<1 341$ &+.! + #4 2823<,$ $2 ".,!(- (2.-2 #$04(/$,$-32 # -2 +$ 2823<,$ 2.-3
24)$33$2 ; (-2/$"3(.- / 1 +$2 43.1(3<2 +." +$2 04 +(%(<$2 4 ,.,$-3 #$ +(-23 ++ 3(.-
!
AVERTISSEMENT RISQUE D'EXPLOSION -
•.4/$1 +$ ".41 -3 .4 2 2241$1 04$ +$-5(1.--$,$-3 $23 "+ 22<
-.- # -&$1$47 5 -3 #$ #<!1 -"'$1 +<04(/$,$-3
•.4/$1 +$ ".41 -3 .4 2 2241$1 04$ +$-5(1.--$,$-3 $23 "+ 22<
-.- # -&$1$47 5 -3 #$ #<!1 -"'$1 +$2 ".--$"3$412 (7$1 3.42
+$2 ".--$"3$412 $73$1-$2 1$+(<2 ; "$3 <04(/$,$-3 ; + (#$ #$ 5(2
+.04$32 ".4+(22 -32 ".--$"3$412 %(+$3<2 .4 431$2 ,.8$-2 %.41-(2
5$" "$ /1.#4(3
• 24!23(343(.- #$ ".,/.2 -32 /$43 1$-#1$ "$3 <04(/$,$-3
(- # /3< ; 4-$ 43(+(2 3(.- $- $-5(1.--$,$-3 #$ + 22$ (5(2(.-
• 2241$1 04$ +$-5(1.--$,$-3 $23 "+ 22< -.- # -&$1$47 5 -3 #$
"' -&$1 +$2 /(+$2

Power Supply Modules18
Publication 1771ĆIN073A-EN-P - arch 2002
odule Location 1 slot in a 1771
I/O chassis
2 adjacent slots in a 1771 I/O chassis
Nominal Input Voltage/Current 0.42A, 120V ac 0.88A, 120V ac 3.0A, 24V dc
Input Voltage Range 97 to 132V ac rms 20.5 to 30V dc
Input Power 23 Watts 57 Watts 57 Watts
Frequency Range 50/60Hz Not applicable
Isolation Voltage Tested to 2160V dc for 1s
Output Voltage 5.06(+3.8%)V dc
Output Current 3A @ 5V dc maximum 8A @ 5V dc maximum 8A @ 5V dc maximum
Fuse 1A 125V slow blow
Bussman DL1.0
Littelfuse 313001
IEC 127 Type T (blue)
1.5A 125V slow blow
Bussman DX1.5
Littelfuse 31301.5
IEC 127 Type T (blue)
5A 32V normal blow
Bussman TH5
Littelfuse 312005
IEC 127 Type (yellow)
Power Dissipation 8W maximum 4W maximum @ 2A
7W maximum @ 4A
12W maximum @ 6A
17W maximum @ 8A
Adjacent Slot Power Dissipation 10W maximum
Terminal Block Screw Torque 7 pound-inches (0.5Nm)
Conductors Wire Size
Insulation
Category
14AWG (2.5mm2) copper wire rated at 60oCor
greater
3/64 inch (1.2mm) insulation maximum
11
14AWG (2.5mm2) copper wire rated at 60oCor
greater
3/64 inch (1.2mm) insulation maximum
21
Branch Circuit Protection 15A maximum, user supplied
Power Loss Time Delay - Input
Power Loss to Processor Disable 13.6(+3.6ms)ms Adjustable
13.6(+3.6ms)ms or 60ms
Environmental Conditions
Operating Temperature IEC 60068-2-1 (Test Ad, Operating Cold)
IEC 60068-2-2 (Test Bd, Operating Dry Heat)
IEC 60068-2-14 (Test Nb, Operating Thermal Shock)
32 to 140°F(0to60°C)
Storage Temperature IEC 60068-2-1 (Test Ab, Unpackaged, Nonoperating Cold)
IEC 60068-2-2 (Test Bb, Unpackaged, Nonoperating Dry Heat)
IEC 60068-2-14 (Test Na, Unpackaged, Nonoperating Thermal Shock)
-40 to 185°F (-40 to 85°C)
Relative Humidity
IEC 60068-2-30 (Test Db, Unpackaged, Nonoperating Damp Heat)
5 to 95%, noncondensing
Enclosure Type Rating None (open style)
Weight 1.6 lbs (0.73 kg) 2.3 lbs (1.04 kg) 2.6 lbs (1.18 kg)
Paralleling Cable Cat. No. 1771ĆCT
Keying - right hand slot Between 12 and 14
Between 18 and 20
Between 12 and 14
Between 20 and 22
Between 12 and 14
Between 22 and 24
External Transformer (if used) 60VA 150VA Not applicable

Power Supply Modules 19
Publication 1771ĆIN073A-EN-P - March 2002
Agency
Certification
(when product is
marked)
UL UL Listed Industrial
Control Equipment
C A C A Certified
Process Control
Equipment
UL UL Listed Industrial
Control Equipment
C A C A Certified
Process Control
Equipment
C A C A Certified
Process Control
Equipment for Class
I, Division 2 Group
A, B, C, D
Hazardous
Locations
UL UL Listed Industrial
Control Equipment
C A C A Certified
Process Control
Equipment
C A C A Certified
Process Control
Equipment for Class
I, Division 2 Group
A, B, C, D
Hazardous
Locations
UL UL Listed Industrial
Control Equipment
C A C A Certified Process
Control Equipment
C A C A Certified Process
Control Equipment for
Class I, Division 2
Group A, B, C, D
Hazardous Locations
UL UL Listed Industrial Control
Equipment
C A C A Certified Process Control
Equipment
C A C A Certified Process Control
Equipment for Class I,
Division 2 Group A, B, C, D
Hazardous Locations
CE1European Union 89/336/EEC
EMC Directive, compliant
with:
EN 50081-2, Industrial
Emissions
EN 50082-2, Industrial
Immunity
European Union 73/23/EEC
LVD Directive, compliant with:
EN 61131-2, Programmable
Controllers
C-Tick1Australian
Radiocommunications Act,
compliant with:
A /NZ 2064, Industrial
Emissions
1Refer to Allen-Bradley publication 1770-4.1, Industrial Automation Wiring and Groundlines.
2ee the Product Certification link at www.ab.com for Declarations of Conformity, Certificates, and other certification details.
Derating Curve for the 1771-P5 and -P5E
0
1
2
3
4
5
6
7
8
9
010 203040 5060
48
Iout - Amperes
Temperature (oC)
5.5A

Power Supply Modules20
Publication 1771ĆI 073A-E -P - March 2002
AllenĆBradley, a Rockwell Automation Business, has been helping its customers improve
productivity and quality for more than 90 years. We design, manufacture and support a broad
range of automation products worldwide. They include logic processors, power and motion
control devices, operator interfaces, sensors and a variety of software. Rockwell is one of the
world's leading technology companies.
Worldwide representation.
Argentina•Australia •Austria •Bahrain •Belgium •Brazil •Bulgaria •Canada•Chile •China, PRC •Colombia •Costa Rica •Croatia •Cyprus •Czech Republic •Denmark •
Ecuador •Egypt •El Salvador •Finland •France •Germany •Greece •Guatemala •Honduras •Hong Kong •Hungary •Iceland •India •Indonesia •Ireland •Israel •Italy •
Jamaica •Japan •Jordan •Korea •Kuwait •Lebanon •Malaysia •Mexico •etherlands •ew Zealand •orway •Pakistan •Peru •Philippines •Poland •Portugal •Puerto
Rico •Qatar •Romania •Russia-CIS•Saudi Arabia •Singapore •Slovakia •Slovenia •South Africa, Republic •Spain •Sweden •Switzerland •Taiwan •Thailand •Turkey •
United Arab Emirates •United Kingdom •United States •Uruguay •Venezuela •Yugoslavia
AllenĆBradley Headquarters, 1201 South Second Street, Milwaukee, WI 53204 USA, Tel: (1) 414 382Ć2000 Fax: (1) 414 382Ć4444
Publication 1771ĆI 073A-E -P - March 2002
Supersedes Publication 1771-2.111 - February 1994
P 957536-41
Copyright 2001 AllenĆBradley Company, Inc. Printed in USA
This manual suits for next models
3
Table of contents
Popular Power Supply manuals by other brands

Manson Engineering Industrial
Manson Engineering Industrial HCS-3404 user manual

BEHLMAN
BEHLMAN BL10000 Series User's guide and technical reference manual

Conductix-Wampfler
Conductix-Wampfler 91008-111-3130923 operating instructions

Banner
Banner PSA-24 Specification sheet

Nortel
Nortel Passport 8600 Series Installation

KOHSEL ELEPHANT
KOHSEL ELEPHANT M40 installation guide

Fine Vu
Fine Vu FINE Safer S installation manual

Lucent Technologies
Lucent Technologies Galaxy Power System 4812 product manual

Sonics
Sonics FC instruction manual

RTS Systems
RTS Systems PS8 Technical manual

Bosch
Bosch NEV 400 LSN installation manual

Liebert
Liebert Ship-Ahead Input/Output Cabinet NXL installation manual