Rockwood 30554 User manual

MULTI-FUNCTION POWER PACK
INSTRUCTIONS
Item #30554
™

2Eastwood Technical Assistance: 800.544.5118 >> techelp@eastwood.com
The ROCKWOOD™ MULTI-FUNCTION POWER PACK is an amazingly powerful yet compact power
source fully capable of starting a vehicle repeatedly as well as providing power to recharge cell
phones, laptops, cameras and other electronic devices. The Lithium Ion Internal Battery provides
Super High Output and Long Life.
SPECIFICATIONS AND FEATURES
• Three output voltage modes: 12-volt, 16-volt or 19-volt + 5-volt USB output port.
• Heavy-duty cables and clamps fit top-post and side-terminal batteries.
• Maximum 12 volt starting current = 200 amps.
• Minimum battery voltage for jump feature to operate = 2.5 volts.
• Input power requirements = 110V AC, 60 Hz., 0.6 Amp.
• High-power, 3 mode LED lamp; On solid, flashing S.O.S. distress signal and steady strobe flash.
• Approximate charge time = 3 hours.
• Lithium Ion Internal Battery for High Output and Long Life.
INCLUDES
(1) Compact, 5-3/4” x 3-1/4” x 1” Power Bank (A)
(1) Plug-in, wall unit, 15 Volt charger with 4’ cord (B)
(1) 4-into-1 USB to Electronic Device Powering Cable (C)
(1) Laptop Interface Cable (D)
(1) 8 Laptop Interface Adapters (E)
(1) Power Port (lighter) 12V Charging Plug with 4’ cord (F)
(1) 12 Volt Battery Terminal Clamps and harness with plug (G)
A
B
C
D
E
G
F

To order parts and supplies: 800.345.1178 >> eastwood.com 3
READ INSTRUCTIONS
Thoroughly read and understand this manual before using the Rockwood
Multi-Function Pack. Save for future reference.
EXPLOSION HAZARD
• Do not use this Power Pack in the presence of flammable fumes or gases.
• The 12 Volt Battery Jumping Feature is designed to be used with 12-volt DC
battery systems only. Do Not connect to a 6-volt or 24-volt battery system.
• Do not smoke or use flammable items (matches, cigarette lighters, etc.) while
working on a vehicle’s battery system.
• Never charge a frozen battery, as it could explode.
• Do not expose battery to fire or intense heat, as it can explode.
• Perform all charging procedures in a dry, well-ventilated area.
Batteries may produce explosive gases during charging.
• Do not use the 12V Jump Start Cables for any purpose other than jump starting
a vehicle. The Power Pack is not designed to be used in place of a vehicle
battery or to be used as a vehicle battery charger. Remove Cables as soon
as engine starts.
• Do Not attempt to jump a vehicle longer than 10 seconds or overheating
and severe damage to the Power Pack could occur.
• Never touch Red and Black Power Bank clamps together or to a common piece
of metal. This will cause sparking and destroy the Multi-function Power Pack
which can result in explosion, personal injury and vehicle damage.
SAFETY INFORMATION
In this manual, on the labeling, and all other information provided with this product:
WARNING indicates a hazardous situation which, if not avoided, will result in death
or serious injury.
CAUTION used with the safety alert symbol, indicates a hazardous situation which,
if not avoided, could result in minor or moderate injury.

4Eastwood Technical Assistance: 800.544.5118 >> techelp@eastwood.com
CONTACT WITH BATTERY ACID CAN CAUSE
BLINDNESS AND SEVERE CHEMICAL BURNS
• Always wear protective eyewear when using this device.
• Keep clean, fresh water and soap nearby when working with batteries to clean
skin, eyes and clothing which may have contacted battery acid.
• Do not use Battery Charger function for charging dry-cell batteries that are
commonly used with home and portable appliances. These batteries may
burst and cause injury to persons and damage to property.
• In case of battery acid contact:
SKIN: Wash skin thoroughly and seek medical attention immediately.
EYES: Flush eyes with cool water for at least ten minutes.
Seek medical attention immediately.
ELECTRICAL SHOCK HAZARD
• Never operate or store unit in damp or wet conditions. Do not allow it to be
immersed in water or other liquids.
• Remove all jewelry or metal objects that could cause short circuits.
A 12-volt battery will produce a current high enough to weld rings, watches
or other similar objects to metal, causing a severe burn.
• Some late-model vehicle engine management systems may be adversely
affected when using the Jump-Starting feature. Read the specific vehicle’s
owner’s manual to confirm that external-starting assistance is allowable.
• Excessive engine cranking can overheat and damage a vehicle’s starter motor.
If an engine fails to start after a repeated number of attempts, discontinue
this engine starting procedure and begin a diagnosis of the cause.
• Keep Multi-function Power Pack out of reach of children.
• Do not open the Multi-function Power Pack. There are no user-serviceable
parts inside.

To order parts and supplies: 800.345.1178 >> eastwood.com 5
12 VOLT BATTERY JUMPING
1. Lift rubber panel from side of Power Bank (A) and insert the Battery Terminal Clamp harness
(G) plug
2. Attach Clamps to battery connections, per following procedure, ensuring a good connection.
3. Check and confirm polarity of battery terminals
Positive = ( +, POS, P)
Negative = ( –, NEG, N)
4. Determine which terminal of battery is grounded (connected) to the chassis. If negative
terminal is grounded to chassis (as in most vehicles), it is a negative ground system.
If positive terminal is grounded to the chassis, it is a positive ground system.
5. For negative-grounded vehicle, connect positive (RED) charger clamp from Power Bank to
positive ( +, POS, P) ungrounded terminal of battery. Connect negative (BLACK) charger
clamp to vehicle chassis or engine block away from battery. Do not connect clamps to
carburetor, fuel lines or sheet metal body parts. Connect only to heavy gauge metal part
of the frame or engine block.
6. For positive-grounded vehicle, connect negative (BLACK) charger clamp from Power Bank to
negative ( –, NEG, N) ungrounded terminal of battery. Connect positive (RED) charger clamp
to vehicle chassis or engine block away from battery. Do not connect jumping clamps to
carburetor, fuel lines or sheet metal body parts.
7. Connect only to a heavy gauge metal part of the frame or engine block.
8. Make sure all power draining components (A/C compressor, heater fan, lights, radio etc.)
are turned off.
9. Begin cranking the engine in 3-second intervals until the engine starts with a rest time of
4 minutes between each cranking interval to allow the starter to cool. Do not crank the
engine for more than 3 seconds at a time.
10. Once the engine starts, disconnect the cables and clamps in the reverse order in which they
were connected. Disconnect the first cable as far away from the battery as possible.
12V DC
Out
12V, 16V & 19V
Out
5V USB
Out
15V
Charging Port

6Eastwood Technical Assistance: 800.544.5118 >> techelp@eastwood.com
JUMP-START TROUBLESHOOTING
• ENGINE FAILS TO CRANK
-Unplug Mini Jump Pack/Portable Power Bank and check terminal condition and
connections. Remove and clean battery terminals and cable ends.
-Check Mini Jump Pack/Portable Power Bank Cable Clamp connections. Wiggle the camp
while holding onto terminal to allow clamp teeth to “bite” into terminal.
-Battery is excessively cold. Charge rate will increase significantly above 32°F.
-Ensure that the Mini Jump Pack/Portable Power Bank has sufficient charge.
-Make sure the battery voltage is at least 2.5 volts. Battery may be fully discharged and
will not accept boosting.
-Battery may be sulfated.
-Battery may be expired and internally shorted.
12V, 16V OR 19V LAPTOP/ELECTRONIC DEVICE
POWERING/CHARGING
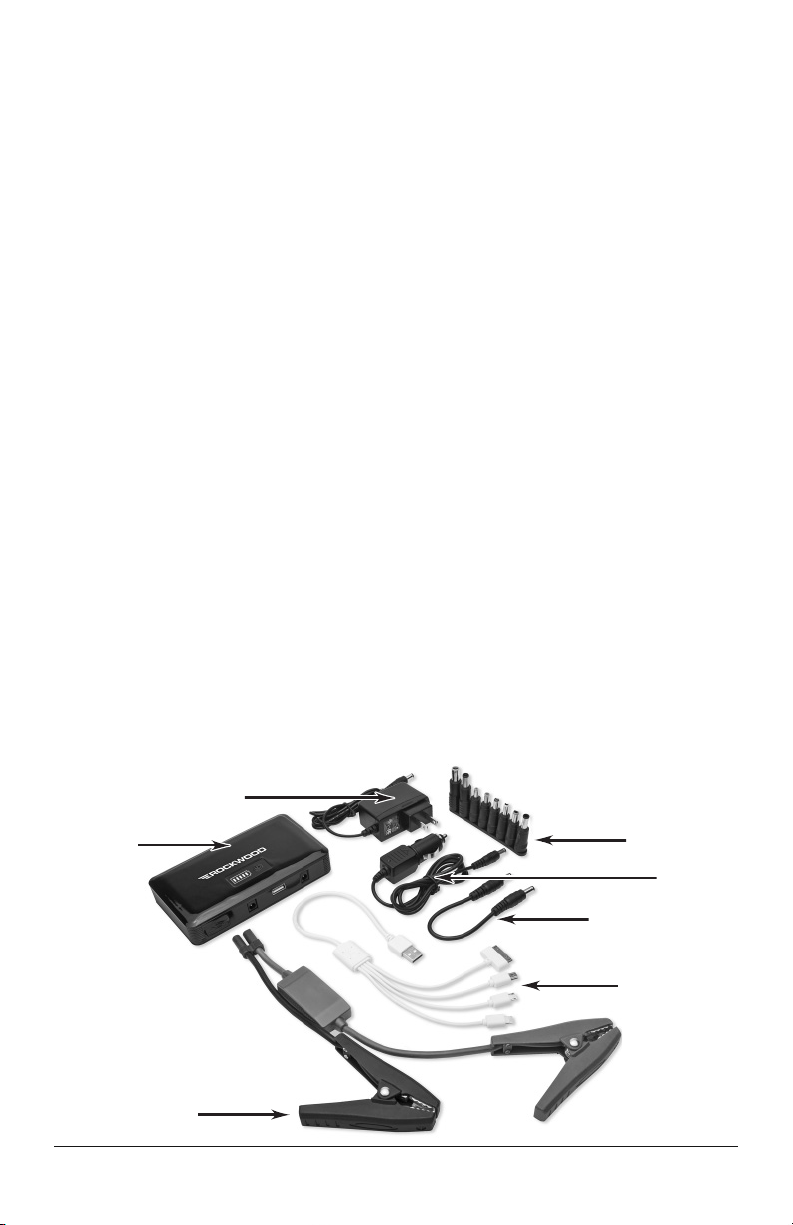
1. Insert Laptop Interface Cable (D) into “12V, 16V, 19V” port located on the side of Multi-func-
tion, Mobile Power Unit (A).
2. Select the Insert Laptop Interface Cable (D) fits your device then plug it into the end of the
Laptop Interface Cable (D).
3. Depress the “On” Button located on top of the Mini Jump Pack/Portable Power Bank (A) and
select the voltage compatible with the device you wish to power (12V, 16V or 19V).
NOTE: The Mini Jump Pack/Portable Power Bank will always default to 12V when turned on.
4. Plug the assembled Insert Laptop Interface Cable (D) and Laptop Interface Cable (D) into the
power port of your laptop or electronic device.
5V, 2A USB LAPTOP/ELECTRONIC DEVICE
POWERING/CHARGING
1. Insert 4-into-1 USB to Electronic Device Powering Cable (C), into “5V, 2A” USB port located on
the side of the Mini Jump Pack/Portable Power Bank (A).
2. Depress the “On” Button located on top of the Mini Jump Pack/Portable Power Bank (A).
NOTE: Mini Jump Pack/Portable Power Bank will always default to 12V when turned on.
3. Select the appropriate end of the 4-into-1 USB to Electronic Device Powering Cable (C) that
fits your device. NOTE: Some phone/personal device circuitry may reject the 4-into-1 USB to
Electronic Device Powering Cable. If this occurs, use a manufacturer-specific cable for your
particular phone/personal device.

To order parts and supplies: 800.345.1178 >> eastwood.com 7
LED LIGHT/EMERGENCY SIGNAL OPERATION
1. Depress and the “ON” Button located on top of the Mini Jump Pack/Portable Power Bank (A).
HOLD FOR 3 SECONDS. The LED will illuminate steadily.
2. Press the “ON” Button again and the LED will flash a repeating “S.O.S” signal in Morse Code
(3 short flashes, 3 long flashes, 3 short flashes).
3. Pressing “ON” Button again will switch the LED to a steady flashing sequence.
4. Pressing a 4th time will turn it off.
INTERNAL BATTERY CHARGE INDICATOR
Depressing and releasing the “ON” Button quickly will turn on the Mini Jump Pack/Portable
Power Bank and the Battery Level Indicator will glow Blue. The number of bars illuminated
(1 through 5) will indicate the level of battery charge.
CHARGING INTERNAL BATTERY
120 VOLT, HOUSE CURRENT CHARGING
1. Plug the wall unit, 15 Volt Charger (B) into a 120 Volt AC power outlet.
2. Insert the round plug of the 15 Volt Charger cable (B), into the “15V, 1A” port located on the
side of Mini Jump Pack/Portable Power Bank (A). Approximate charge time = 3 hours.
12 VOLT, VEHICLE POWER PORT CHARGING
1. Plug the Automotive Type Power Port (lighter) Charging Plug (F) into a vehicle 12 Volt power
port or cigarette lighter socket.
2. Insert the round plug of the 12 Volt 12V Charging Plug (F), into the “15V, 1A” port located on
the side of Mini Jump Pack/Portable Power Bank (A). Approximate charge time = 3 hours.

© Copyright 2015 Easthill Group, Inc. 5/15 Instruction item #30554Q Rev 1
If you have any questions about the use of this product, please contact
The Eastwood Technical Assistance Service Department: 800.544.5118 >> email: techelp@eastwood.com
PDF version of this manual is available online >> eastwood.com/30554manual
The Eastwood Company 263 Shoemaker Road, Pottstown, PA 19464, USA
US and Canada: 800.345.1178 Outside US: 610.718.8335
Fax: 610.323.6268 eastwood.com
Table of contents
Popular Power Pack manuals by other brands

Haug
Haug Static Line EN SL operating instructions

Tycon Power Systems
Tycon Power Systems TP-PP120-INV user guide

Camille Bauer
Camille Bauer SIRAX B 811-6 operating instructions

Hama
Hama Trip 077484 Operating instruction

Hama
Hama 00137487 operating instructions

MT Logic
MT Logic SO-1026MT instruction manual