Rockwood 31538 User manual

6” DUAL-ACTION
AIR SANDER
INSTRUCTIONS
Item #31538

2Eastwood Technical Assistance: 800.343.9353 >> techelp@eastwood.com
The ROCKWOOD 6” DUAL-ACTION “D/A” AIR SANDER is a heavy-duty professional quality tool
ruggedly designed for many years of reliable service. It features a high-efficiency, ball bearing motor
and eccentric drive assembly for smooth operation and long life. Speed is easily controlled with an
infinitely progressive throttled speed control and built-in speed regulator knob. A lockable output shaft
feature allows direct orbital rotation or random orbital action.
CONTENTS
(1) Dual-Action Air Sander
(1) 6” PSA Pad
(1) 1/4” NPT Air Inlet Coupling
REQUIRED FOR USE
• The inlet air supply should have a moisture separator capable of removing all moisture and
impurities from the air supply. Moisture and/or oil in the air supply will cause poor tool
performance and damage.
• A suitable regulator must be used to limit incoming air pressure to 90 PSI maximum.
Excessive air pressure can cause permanent damage to the unit and possible serious
personal injury from bursting.
• For best results, a compressor capable of providing a minimum of 6 CFM @ 90 PSI is required
for best performance. Less available CFM will negatively affect the performance of the Sander
and may overwork the compressor.
SPECIFICATIONS
Sanding Disc Size & Type: 6” [152mm] PSA Type
RPM: 10,000 free speed
Air Consumption: 6 CFM [170 L/min] @90 PSI [6.2 bar]
Inlet thread size: 1/4” FNPT
Replacement Backing Pad: 6” PSA or Hook and Loop with 5/16”-24 threaded post
(Minimum 10,000 RPM rating)

To order parts and supplies: 800.343.9353 >> eastwood.com 3
READ INSTRUCTIONS
• Thoroughly read and understand these product instructions before using
this tool. Failure to follow all warnings can result in tool damage or serious
physical injury.
• Keep these product instructions for future reference.
EYE INJURY HAZARD!
• Rapidly rotating surfaces can eject metal particles, dirt and debris at high
velocity. Always wear ANSI approved eye protection when operating this
tool.
HEARING DAMAGE HAZARD!
• This Rockwood Pneumatic Tool emits high sound levels while operating.
Use ANSI approved ear protection when operating.
BURSTING HAZARD!
• Do not exceed 90 psi (6.2 bar) of tool inlet pressure. Permanent tool
damage and/or bursting could occur and cause personal injury.
DANGER indicates a hazardous situation which, if not avoided, will result in death or serious injury.
WARNING indicates a hazardous situation which, if not avoided, could result in death or serious injury.
CAUTION used with the safety alert symbol, indicates a hazardous situation which, if not avoided,
could result in minor or moderate injury.
NOTICE is used to address practices not related to personal injury.
SAFETY INFORMATION
The following explanations are displayed in this manual, on the labeling, and on all other information
provided with this product:

4Eastwood Technical Assistance: 800.343.9353 >> techelp@eastwood.com
INJURY HAZARD!
• This tool has high-speed, abrasive surfaces which can quickly cause injury.
Keep fingers and hands away from moving parts when operating. Wear
thick, well-fitting work gloves and keep loose clothing, sleeves, cords,
jewelry and hair away from moving parts.
• This tool can eject sparks which can ignite flammable materials. Do not
operate near flammable materials and keep all persons and pets away
from the work area.
• Always make sure the workpiece is securely clamped or anchored to avoid
sudden movements which could result in injury.
• Always disconnect tool from air supply when changing Backing Pad or
Sanding Disc to prevent accidental tool starting and potential severe injury.
• Frequently inspect Backing Pad and tool condition. If cracks develop,
discontinue tool use immediately and replace damaged pad. ONLY USE
replacement Backing Pads rated for 10,000 RPM or greater otherwise
severe injury can result in the event of Pad failure.
VIBRATION INJURY HAZARD!
• This tool will vibrate during use! Repeated exposure to vibration may cause
physical injury.

To order parts and supplies: 800.343.9353 >> eastwood.com 5
SET-UP & CONNECTION
• Wrap white thread sealing tape (not included) around the threads of a 1/4” Male NPT quick dis-
connect fitting (not included) then thread it into the 1/4” NPT inlet threads of the Sander Body.
• Attach Air Supply to Inlet Fitting.
OPERATION
• To apply a PSA (pressure sensitive adhesive) Polishing and Sanding Disc, remove the protective
backing film, be certain the Disc is centered over the Backing Pad and press it in place with
no wrinkles or air bubbles.
• The PSA sanding Discs are
removed by gripping the edge
and pulling away from the
backing pad.
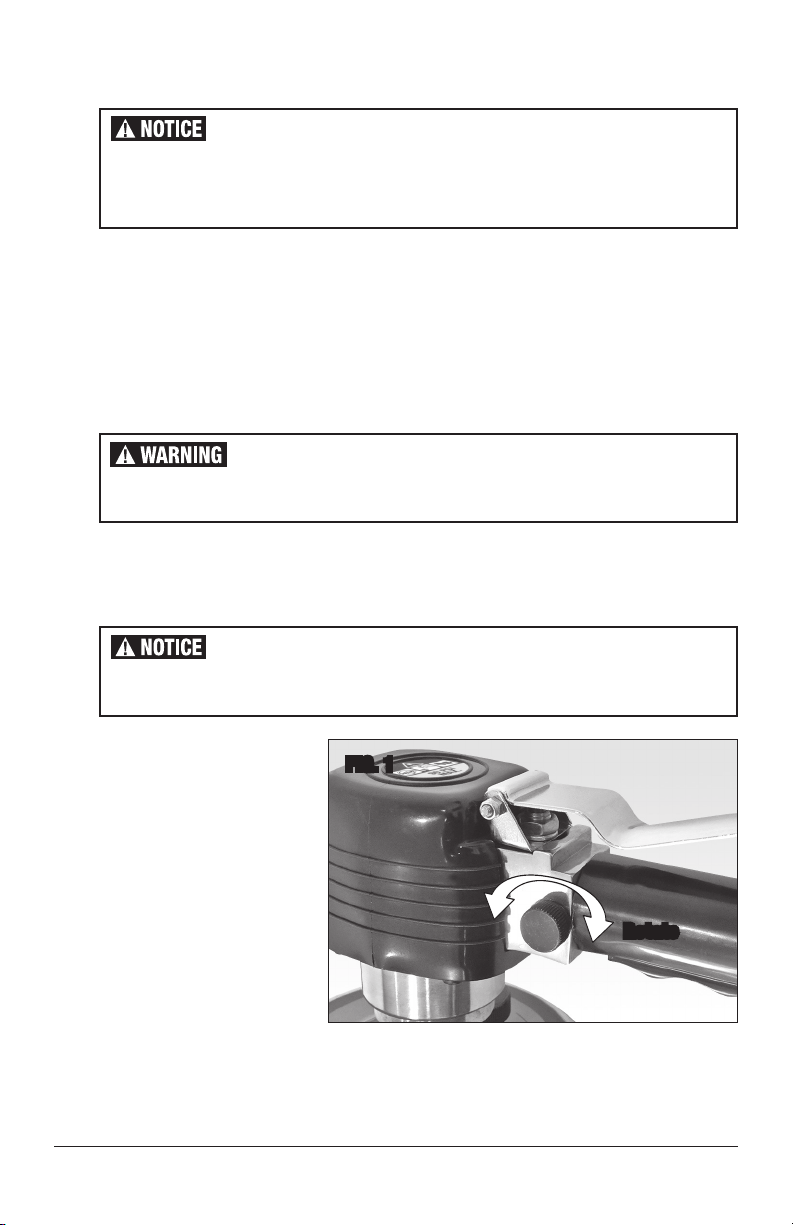
• Reconnect air supply; depress
the throttle to begin polishing
or sanding action. Speed is
controlled by pressure applied
to the Paddle while the Knob
mounted at the left side of the
body is used to regulate maxi-
mum speed. Rotating the Knob
Clockwise raises the speed
limit while rotating it Counter-
Clockwise lowers it (FIG 1).
FIG. 1
Be sure that the air supply to the tool is clean and dry. Moisture in the supply
line will quickly damage the air motor and valves.
A minimum 3/8” I.D. air line should be used for optimal performance.
INJURY HAZARD!
Disconnect air supply from the tool to prevent accidental starting and
potential injury while installing or removing Sanding Discs.
Sanding Discs must be centered over the backing pad or a dangerous out of
balance condition can occur.
Rotate

6Eastwood Technical Assistance: 800.343.9353 >> techelp@eastwood.com
SWITCHING SPINDLE BETWEEN DIRECT ORBITAL
ROTATION AND RANDOM ORBITAL ROTATION
To set the Arbor for
fixed orbital rotation
Grasp the serrated surfaces of the
Locking Wedge and rotate it so the
serrated surfaces face the flats of the
Arbor Shaft (FIG 2).
To set the Arbor for
random orbital rotation
Grasp the serrated surfaces of the
Locking Wedge and rotate it so the
flat surfaces face the flats of the
Arbor Shaft (FIG 3).
INJURY HAZARD!
Disconnect air supply from the tool to prevent accidental starting and
potential injury while making adjustments.
FIG. 2
FIG. 3

BACKING PAD REPLACEMENT
• To replace the 6” PSA (pres-
sure sensitive adhesive)
Backing Pad, place a 5/8”
Wrench (not included) on the
Hex of the Arbor Shaft (FIG 4)
while gripping the Backing Pad
in your fingers and loosen in a
counter-clockwise direction.
• Place replacement Backing Pad
threaded arbor into the 5/16”-
24 female threaded output
shaft then use a 5/8” Wrench
(not included) to hold the shaft
while the pad is tightened.
MAINTENANCE
• Before each use, add a few drops of a quality air tool oil (not included).
• If tool is to be unused for an extended period, add 10 drops of air tool oil directly to the
air inlet then store the tool, inlet up.
• With the air supply disconnected, periodically check that the backing pad is tight.
To order parts and supplies: 800.343.9353 >> eastwood.com 7
FIG. 4
INJURY HAZARD!
Disconnect air supply from the tool to prevent accidental starting and
potential injury while installing or removing Backing Pad.
Be sure the Backing Pad is securely tightened on the output shaft before
operating tool.

ADDITIONAL ITEMS
#16140 Replacement Eastwood 6” PSA Backing Pad
#16141 Eastwood 6” Hook and Loop Backing Pad
#70491 Eastwood Industrial Air Hose, 3/8” x 25’
#70492 Eastwood Industrial Air Hose, 3/8” x 50’
© Copyright 2018 Easthill Group, Inc. 1/18 Instruction item #31538Q Rev 1
If you have any questions about the use of this product, please contact
The Eastwood Technical Assistance Service Department: 800.343.9353 >> email: techelp@eastwood.com
PDF version of this manual is available at eastwood.com
The Eastwood Company 263 Shoemaker Road, Pottstown, PA 19464, USA
800.343.9353 eastwood.com
PROBLEM CAUSE CORRECTION
Tool Doesn’t
Respond to
Paddle De-
pression
Insufficient CFM
at tool inlet (6
CFM minimum
for best results)
Verify sufficient air supply to tool.
Tool contaminat-
ed by moisture Check for moisture in air line and tool air inlet.
Tool Perfor-
mance is Slow
or Sluggish
Insufficient CFM
at tool inlet (6
CFM minimum
for best results)
Verify sufficient air supply to tool.
Tool contaminat-
ed by moisture Check for moisture in air line and tool air inlet.
Tool Vibrates
Excessively
During Use
Cracked, broken
or loose backing
pad
Stop use immediately and check for cracked
or broken backing pad.
Check for loose backing pad.
Tool Emits
Excessive or
Unusual Noise
During Use
Lack of
lubrication
in air motor
Stop use immediately and add a quality
air tool oil.
TROUBLESHOOTING
Table of contents
Other Rockwood Sander manuals