Roksan Audio Attessa User manual

Set Up Guide and Product Manual
roksan.com

CONTENTS
WHAT’S IN THE BOX
34
5
6
7
89
10
2
1
Let’s get started
Attessa Turntable
Quick Start Guide
CONTENTS 1
WHAT’S IN THE BOX 1
UNPACKING 2
INTRODUCTION 3
ASSEMBLY & SETUP 3
INSTALLATION 6
Signal 6
Power 7
OPERATION 7
EU DIRECTIVES 8
MAINTENANCE 8
Cleaning 8
Changing the Oil 8
TROUBLESHOOTING 9
SPECIFICATION 10
1. Attessa Turntable with Dana Tonearm
and Dana Cartridge
2. Dust Cover
3. RCA Phono Cable
4. Anti Skate Weight
5. Spirit Level
6. Tracking Weight Scales
7. Platter & Mat
8. PowerSupplyandRegionSpecic
Adaptors
9. Quick Start Guide
10. Oil Kit
1Attessa Turntable

UNPACKING
The Attessa Turntable is carefully packed and is designed to withstand transportation
so you can enjoy your turntable as soon as you get home. Follow the steps below to
remove the components of the turntable from the packaging and place them out on a
tableoroorinpreparationforthenalassemblyoftheturntable.
1. Remove the dust cover in its packaging to reveal the assembled turntable. Remove
the transit card that holds the tonearm in place. Within the protection card you will
ndtheRCAcables.
Dust cover.
RCA cable & accessories stored
here.
2. Lift the turntable from the packaging - It might be easier to remove the side
sectionsofpackagingrst.Undertheturntableistheplatterandpowersupply.
Power supply and adaptors stored
here.
Remove card protector.
INTRODUCTION
The Roksan Attessa Turntable comes pre-assembled ready for use, with built in phono
stage, tonearm and cartridge.
There is a low voltage power supply with 4 mains plug region adaptors. Select the right
one for your country/ region.
ASSEMBLY & SETUP
1. Removetheturntablefromitsbagandplaceitinitsnallocation.
2. Ensure the belt is still in place between the motor and the sub platter.
3. Remove the platter from its bag and carefully locate its central hole over the main
bearingspindleandgentlylowerituntilthetwoarettedtogether.
NOTE: The main bearing is already charged with the correct type of oil and it is
important that the main bearing spindle is not removed from the bearing
housing. This will disperse some of the oil and necessitate charging the main
bearing with oil again. The main bearing requires cleaning with a cotton bud and
recharging with Roksan supplied bearing oil every 6-12 months. Consult your Roksan
appointed retailer/ distributor or contact Roksan for any assistance.
4. Fit the anti-skate weight’s O Ring (at the end of the thread) over the upper small
horizontal bar (anti-skate peg) on the side of the arm carrier. Push the O ring along
to the second or third groove. Drape the thread over the anti-skate hanger in front
of the anti-skate peg so that weight hangs freely. It will rise as the arm travels
towards the centre of a record.
32 roksan.com Attessa Turntable

5. Remove the orange tonearm clamp. Please keep this as it will be used to lock the
arm in place when the turntable is not in use.
6. The tracking weight will need to be set as the weight itself is in it’s transit position.
The tracking weight should be: 1.8 - 2.2 g (2.0 g standard). To begin, rotate the
counter weight so that it moves to about midway along the threaded bar.
Counter Weight
7. Place your stylus balance on the Turntable platter, remove the cartridge’s stylus
guard and check the tracking weight by gently lowering the stylus into the groove
over the desired tracking weight marker - 2.0g.
8. TherearoftheorangescalewiththeRoksanlogoshouldbeushwiththeblack
plastic housing.
O O
P
9. If the tracking weight is too heavy, raise the arm and adjust the counterweight back
a little. If it is too light, adjust the counterweight forward a little.
10. Repeat step 7 until the correct tracking weight (down-force) is achieved and then
return the arm to its rest and tighten the locking screw up on the counterweight.
11. Remove the scales but keep them to hand as they may be required again. Replace
the mat onto the platter if it was previously removed.
12. To check the azimuth of the arm you will need a record. Gently lower the arm and
cartridge onto the record about 1 or 2 cm’s from the beginning without switching
the turntable on.
13. Looking from the front down the length of the arm see if the head shell is parallel
left to right with the record surface.
14. If adjustment is required, return the arm to its rest and refer to the next step. If no
adjustment is needed your arm is set up and ready to use and continue to step 17.
54 roksan.com Attessa Turntable

15. Adjust the azimuth of the arm by loosening the locking screw and sliding the bar
left or right accordingly. Recheck by moving the arm back onto the record to see if
it is now parallel. Repeat this until the head shell is parallel with the record.
Azimuth Balance
16. When the head shell is parallel left to right, return the arm to its rest, close the clip
and tighten the azimuth weight’s thumb screw up.
17. If you wish to recheck arm height, cartridge alignment, azimuth and cartridge
tracking weight (down-force), please do.
INSTALLATION
Signal
Connect the supplied RCA phono cable from the outputs on the turntable to the inputs
onyouramplier.TheAttessahasabuiltinphonostage,soyoudonotneedtoconnect
ittothephonostageinputonyouramplier.Oneoftheotherstandardinputsshould
be used.
Ifyouwishtouseyouramplier’sphonostage,oraseparatephonostage,adjustthe
switch on the back of the turntable to the Passive position. Leaving it in the Active
position utilises the on-board phono stage.
Power
Assemblethecountryspecicmainsplugontothepowersupply.Connectthepower
supply to the Attessa Turntable and then to the wall outlet. Where applicable, turn on
the power supply at the mains outlet.
OPERATION
Now your turntable is ready for use, switch it on using the Power Button and ensure the
correct speed is selected by pressing the 33 or 45 buttons.
Power Button 33 RPM 45 RPM
Checktheampliervolumeissettoalowlevelandthatthecorrectinputforyour
turntable is selected. Gently increase the volume and check for any unwanted hum/
noise.Nowcheckthehumlevelwiththeamplierathighvolume.Thereshouldbeno
hum or very low level of hum audible (remember to lower the volume afterwards). If so,
gently lower the arm/ cartridge onto the track you want to listen to and enjoy the music.
Whennishedlisteningtotheturntable,replacetheorangetonearmclamp,ipthe
stylus guard down and place the dust cover over the deck.
76 roksan.com Attessa Turntable

EU DIRECTIVES
Roksan declares that the apparatus “Attessa Turntable” complies with the
essential requirements and other relevant provisions of Directive 1999/5/
EC”.
MAINTENANCE
Cleaning
To clean the turntable, belt and change the oil you will need:
• Some kitchen towel
• Amicrobrecloth
• Some Q-tips
• White spirit
• Wax-based furniture polish
• Roksan bearing oil kit (supplied).
Clean the groove in the motor pulley where the belt locates with a Q-tip dipped in white
spirit.
The belt is cleaned with the furniture polish by using some kitchen towel by gently
pullingitthroughthepaperbetweenthengers.
When cleaning the plinths, be careful of your stylus. We would recommend locking
the arm in place in addition to removing the stylus or at the very least using the stylus
guard.
NOTE: Always remove the platter before moving/ transporting the turntable.
Changing the Oil
To keep the turntable running at its optimum, the oil should be changed every 6
months.
To change the oil, have some kitchen towel ready and gently pull the central bearing
out. Wipe any oil off the shaft with the kitchen towel and clean the top of the bearing
housing in the plinth. Dip a Q-tip in some white spirit and clean out the old oil from the
main bearing reservoir. Repeat this process until there is no more oil and no white spirit
remaininginthereservoir.Leaveforvetotenminutestofullydryout.Whenthemale
andfemalepartsofthebearingarecleananddry,putvedropsofoilintothebearing
reservoir. Let the bearing shaft drop under its own weight in to the reservoir. If this takes
more than a couple of minutes, remove it and clean the oil off the shaft and see if it then
settles better. What you are looking for is the bearing to settle down completely with
just a little oil visible between the two plates of the male and female parts.
TROUBLESHOOTING
IfyoususpectthatyourAttessaturntableisnotworkingcorrectly,rstcheckallthe
connections. Pay particular attention to cartridge tag connections (channel & phase),
tonearm cable connections (phono RCA’s) and mains power supply connection. Below
are some commonly encountered problems with suggestions for possible cure. The list
is not exhaustive: If you have any unresolved problems, please consult Roksan or your
Roksan dealer.
SYMPTOM LIKELY CAUSE SUGGESTED REMEDY
• No power. • Power supply lead not
inserted properly
• Unit not switched on.
• Ensure power supply is
fully inserted
• Switch unit on.
• Wrong speed. • Incorrect speed selected. • Check playing speed of
record and select the
correct speed on the
turntable.
• Hum from
loudspeakers.
• Tonearm cable ground
not connected or incorrect
grounding.
• Check mains polarity
and grounding on all
connected equipment.
• Mis-tracking
and poor sound
quality.
• Alignment/ balance
problem.
• Check the tonearm/
cartridge set up.
98 roksan.com Attessa Turntable

SPECIFICATION
Material Specication
Plinth: Isolated single plinth design
Isolation: 1-level decoupling
Platter: High mass tempered 10mm glass trimmed with spun and anodised Aluminium
edging.
Platter weight: 1.82 Kg
Pulley: Machined high-grade aluminium
Main Bearing Spindle: Stainless steel (Grade 303)
Main Bearing Ball: Stainless Steel (Grade 316)
Main Bearing Housing: Brass (Grade CZ 121)
Removable Dust Cover: Bespoke moulded PMMA acrylic
Tonearm:
Tonearm Type: Unipivot
Tonearm Bearing: Single jewel.
Bearing: Stainless steel unipivot
Arm Material: Hybrid construction. Precision formed 5052 Aluminium top with
lightweight ABS bottom section.
Internal wiring: 0.08 OFC copper wire
Effective Mass: 14.9 g
Recommended Tracking Weight: 1.8-2.2 g (2.0 g standard)
Effective Length: 240 mm
Overhang: 17.5 mm
Headshell Offset Angle: 22.9 degrees
Cartridge:
Recommended Load Capacitance: 50-100 pF
RecommendedLoadImpedance:47kΩ
Vertical Tracking Angle: 23 degrees
Stylus Tip: Diamond titanium
DCResistance:800Ω±20%
CoilImpedance:3.2kΩ±20%@1kHz
OutputVoltage:3.5mV±3dB@1kHz
OutputBalance:1.5dBorless@1kHz
Frequency Response: Measurement point 10 kHz / 1 kHz + 1 dB ~ +7dB
Channel Separation: Measurement point 1 kHz over 22 dB
Turntable:
MaxSpeedVariation:+/-0.54%at33.3RPM
Rumble (silent groove, unweighted): -44.36 dB
Dimensions
Width: 432 mm
Height (inc. feet): 104.5 mm
Height (inc. feet and lid): 115 mm
Depth (inc. connectors ): 283 mm
Weight (unpacked): 6.32 Kg
Technical
Motor: 24 Pole synchronous
Speed Controller: Built in high precision digitally synthesised AC signal generator with
high current low distortion output
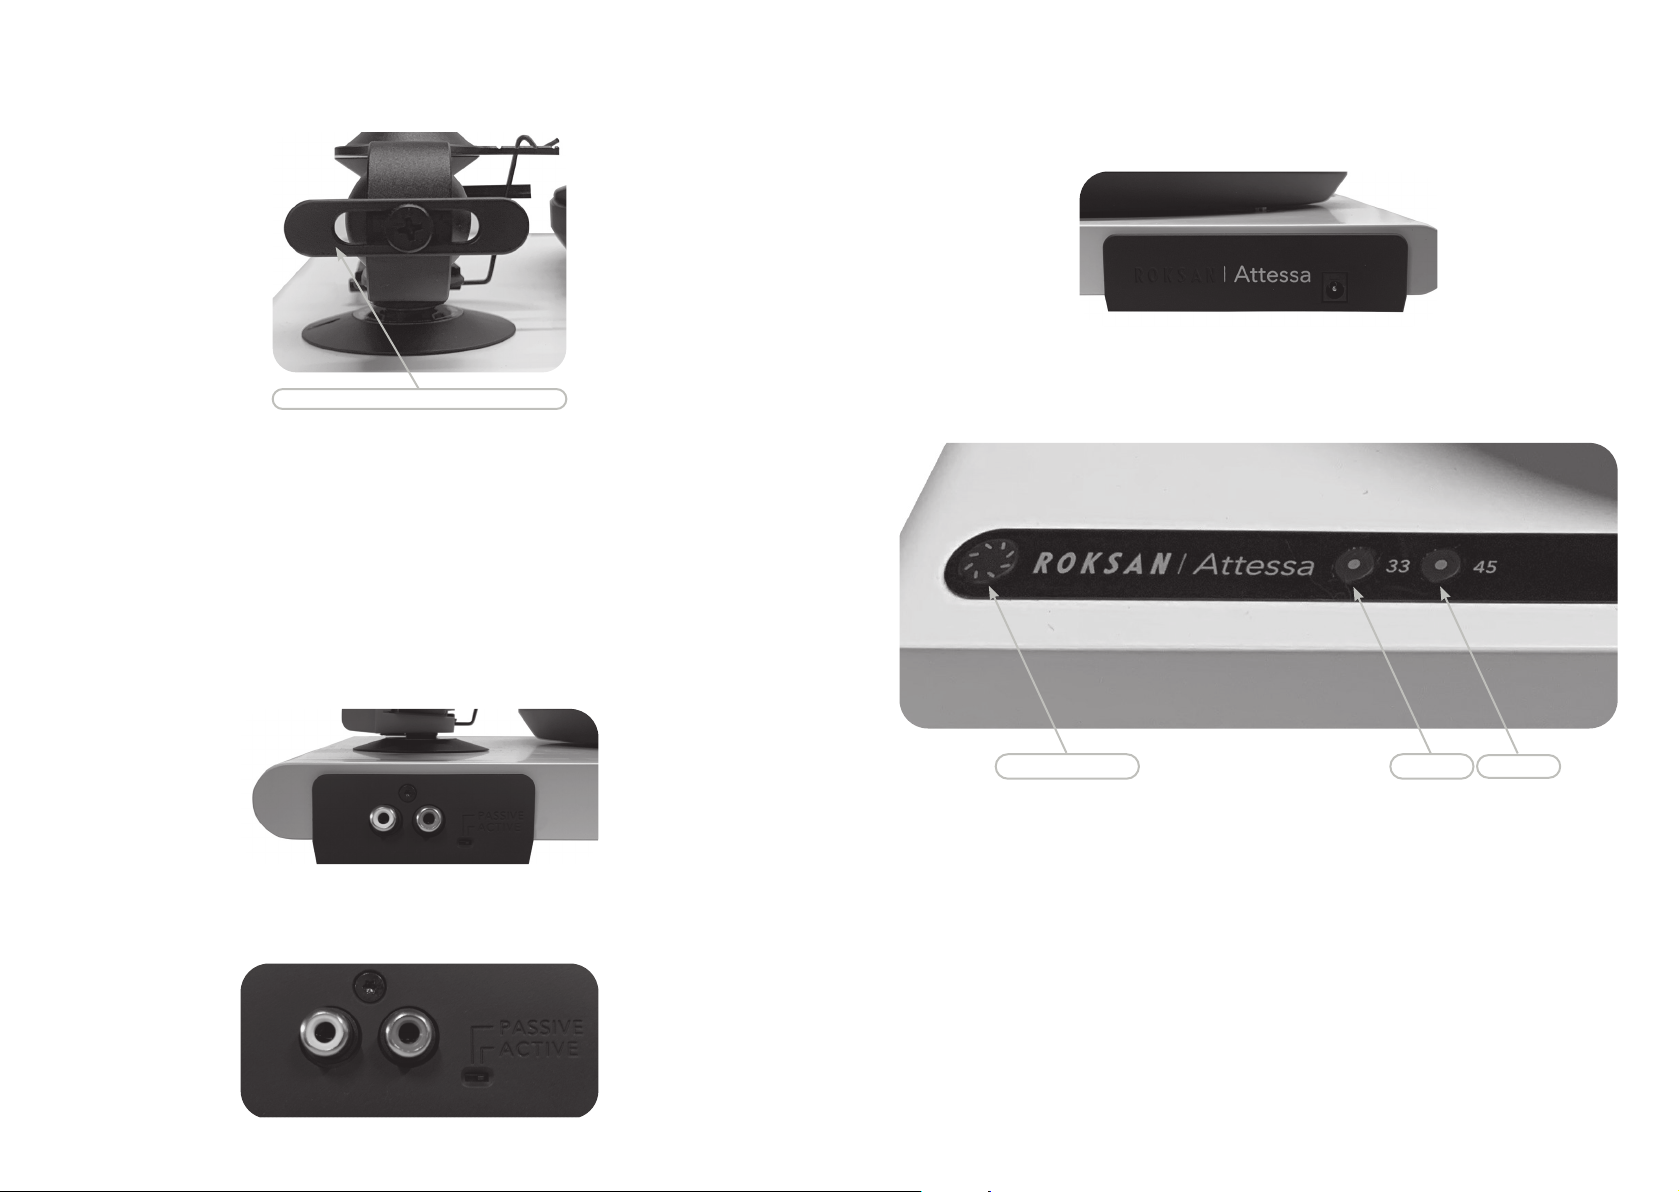
Speed: 33 RPM & 45 RPM (Switchable)
Phono Stage: Built in MM phono stage
Phono Stage Bypass: Yes, (switchable on rear)
Phono stage gain (1 kHz): 46 dB
Phono Stage Signal to Noise (5 mV, 1 kHz sine wave, A-weighted): 70 dB
THD+N(5mV,1kHzsinewave):0.04%
PhonoStageoutputimpedance:~56Ω
Outputs
Phono Output: Stereo RCA with supplied low capacitance phono cable
Power
Mains input: 5 V 1.5 A external SMPS (Operational down to 85 VAC)
Power consumption: <0.5 W in standby. Full Power: 25 W max
Allspecicationsareliabletochangewithoutpriornotice.E&O.E.
1110 roksan.com Attessa Turntable

Designed and built
in Great Britain.
Roksan.com
Version 1. 2021
Roksan
24 Brook Road,
Rayleigh, Essex
SS6 7XJ, UK
+44 (0)1268 798900
roksan.com
Other manuals for Attessa
5
Table of contents
Other Roksan Audio Turntable manuals

Roksan Audio
Roksan Audio TMS 3 User manual

Roksan Audio
Roksan Audio Xerxes.20plus User manual

Roksan Audio
Roksan Audio Shiraz User manual

Roksan Audio
Roksan Audio RADIUS 7 User manual

Roksan Audio
Roksan Audio Xerxes 20 Plus User manual

Roksan Audio
Roksan Audio RADIUS5 MkII User manual

Roksan Audio
Roksan Audio Corus2 Guide

Roksan Audio
Roksan Audio Dana Guide

Roksan Audio
Roksan Audio RADIUS5 User manual