manuals.online logo
Brands
  1. Home
  2. •
  3. Brands
  4. •
  5. Roksan Audio
  6. •
  7. Turntable
  8. •
  9. Roksan Audio RADIUS5 MkII User manual

Roksan Audio RADIUS5 MkII User manual

RADIUS5 MkII
Record Player
``
`
The Radius5 MkII is mains operated. DO NOT try to gain access to the inside of this unit. Refer all servicing to your
Roksan appointed retailer/distributor or contact Roksan Audio.
ASSEMBLY
PACKAGING
BRIEF
The design of the Radius5 record player has many special features not found in
other similar turntables. Drive mechanism utilises a custom synchronous motor fitted
with a precision-machined solid aluminium alloy pulley. The main bearing housing
and spindle are custom designed and machined from solid brass and solid stainless
steel to extremely high precision to ensure ultra smooth running and longevity. The
platter is machined from solid Acrylic to very high accuracy and ensures speed
stability. Main bearing, Platter and Tone Arm are mounted on the sub plinth and
three point de-coupled from the main plinth to maximise performance and minimise
acoustic break through. The motor assembly is mounted on the motor block and
then onto the main plinth and further decoupled to avoid motor noise break through.
Tone Arm cable is rigidly fixed to the main plinth that acts as a mechanical ground
and minimises interference with the sub plinth. The Radius5 has three custom made
adjustable spike feet to allow levelling and provide optimum coupling to the surface
that it sits on. Partnered with the NIMA tonearm, the Radius5 gives unparalleled
performance in its class.
Congratulations on your purchase of the Roksan Radius5 MkII record player.
This record player is designed and manufactured to the highest specification
and rigorously tested to reward you many years of listening pleasure.
Your Radius5 MkII record player is at the heart of your vinyl replay system. Its
correct installation, set-up and operation will have a profound influence on the
sonic performance of the entire hi-fi installation.
Please read the contents of this manual thoroughly. It will help you to
understand your record playing equipment better and enhance your listening
pleasure.
NIMA TONEARM
MAIN BEARING SPINDLE
MOTOR BLOCK
SUB - PLINTH
MAIN PLINTH
WARNING
The NIMA tonearm is shipped without its counterweight attached and locked in
transit position. It is also secured onto the arm rest with a releasable tie. Please
refer to the NIMA user manual for its correct installation and setup.
Your Radius5 MkII is carefully and thoughtfully packed so that the packaging can be
re-used whenever you need to transport it. Please store all the packaging material for
future use.
INFORMATION PACK
PLATTER
TONEARM CABLE
PLUG
RADIUS5 MkII
CARTON
BOTTOM PACKING TRAY
TOP PACKING TRAY
Adjust the feet using locknut to engage Radius
MkII in absolute level.
2
Remove the Drive Belt and gently place it around the platter and then onto the
pulley. Note position 1 is for 33 rpm and position 2 is for 45 rpm. It is important to
check that your mains supply frequency corresponds to the frequency specified
on the Radius5 MkII mains input label.
4
1) 33 rpm
2) 45 rpm
3
Remove the Platter, with the record label recess upper most, carefully locate its
central hole over the main bearing spindle and gently lower it until the two are
fitted together.
Finally, for assembling and fitting of your tonearm and cartridge, refer to the
manufacturer's user manual
The Main Bearing is already charged with correct type of oil & grease and it is important that the Main Bearing
Spindle is not removed from the bearing housing. This will disperse some of the oil and necessitate charging
the Main Bearing with oil again. The Main Bearing requires cleaning with a cotton bud and recharging with Roksan
supplied bearing oil every 6-12 months. Consult your Roksan appointed retailer/distributor or contact Roksan Audio
for any assistance.
NOTE:
IMPORTANT
!
BRIEF
The design of the Radius5 MkII record player has many special features not found
in other similar turntables. Driver mechanism utilises a custom synchronous motor
fitted with a precision-machined solid aluminium alloy pulley. The main bearing
housing and spindle are custom designed and machined from solid brass and solid
stainless steel to extremely high precision to ensure ultra smooth running and
longevity. The platter is machined from solid Acrylic to very high accuracy and
ensures speed stability. Main bearing, Platter and Tonearm are mounted on the
sub plinth and three point de-coupled from the main plinth to maximum
performance and minimise acoustic break through. The motor assembly is
mounted on the motor block and then onto the main plinth and further decoupled to
avoid motor noise break through. Tonearm cable is rigidly fixed to the main plinth
that acts as a mechanical ground and minimises interference with the sub plinth.
The Radius5MkII has three custom made adjustable feet to allow levelling and
provide optimum coupling to the surface that it sits on, partnered with the NIMA
tonearm. The Radius5MkII gives unparalleled performance in this class.
Remove the Radius5 MkII from its protective bag and check that the voltage label
indicates the correct voltage range and frequency for your mains supply. If the
Radius5 MkII is fitted with the NIMA tonearm, be extra careful not to damage the
arm while you are assembling the record player.
If in doubt, remove the tonearm. (Refer to the NIMA user manual)
1
Belt
SYMPTOM
LIKELY CAUSE
SUGGESTED REMEDY
No power
AC Mains lead not inserted
properly
Unit not switched on
Ensure AC Mains lead is fully
inserted
Switch unit on
Wrong speed
Mis-tracking and poor
sound quality
Incorrect pulley groove selected
Alignment
Check your mains supply frequency
and place drive belt in the correct
pulley groove
(see figure in assembly section)
Check arm/cartridge set-up (refer
to manufacturer's user manual)
Hum from speakers
Tonearm cable ground not
connected or Incorrect
Grounding
Connect tonearm cable ground lead
to phono amp ground terminal
Check mains polarity and
grounding on all connected
equipment
SPECIFICATIONS
GUARANTEE
INSTALLATION
OPERATION
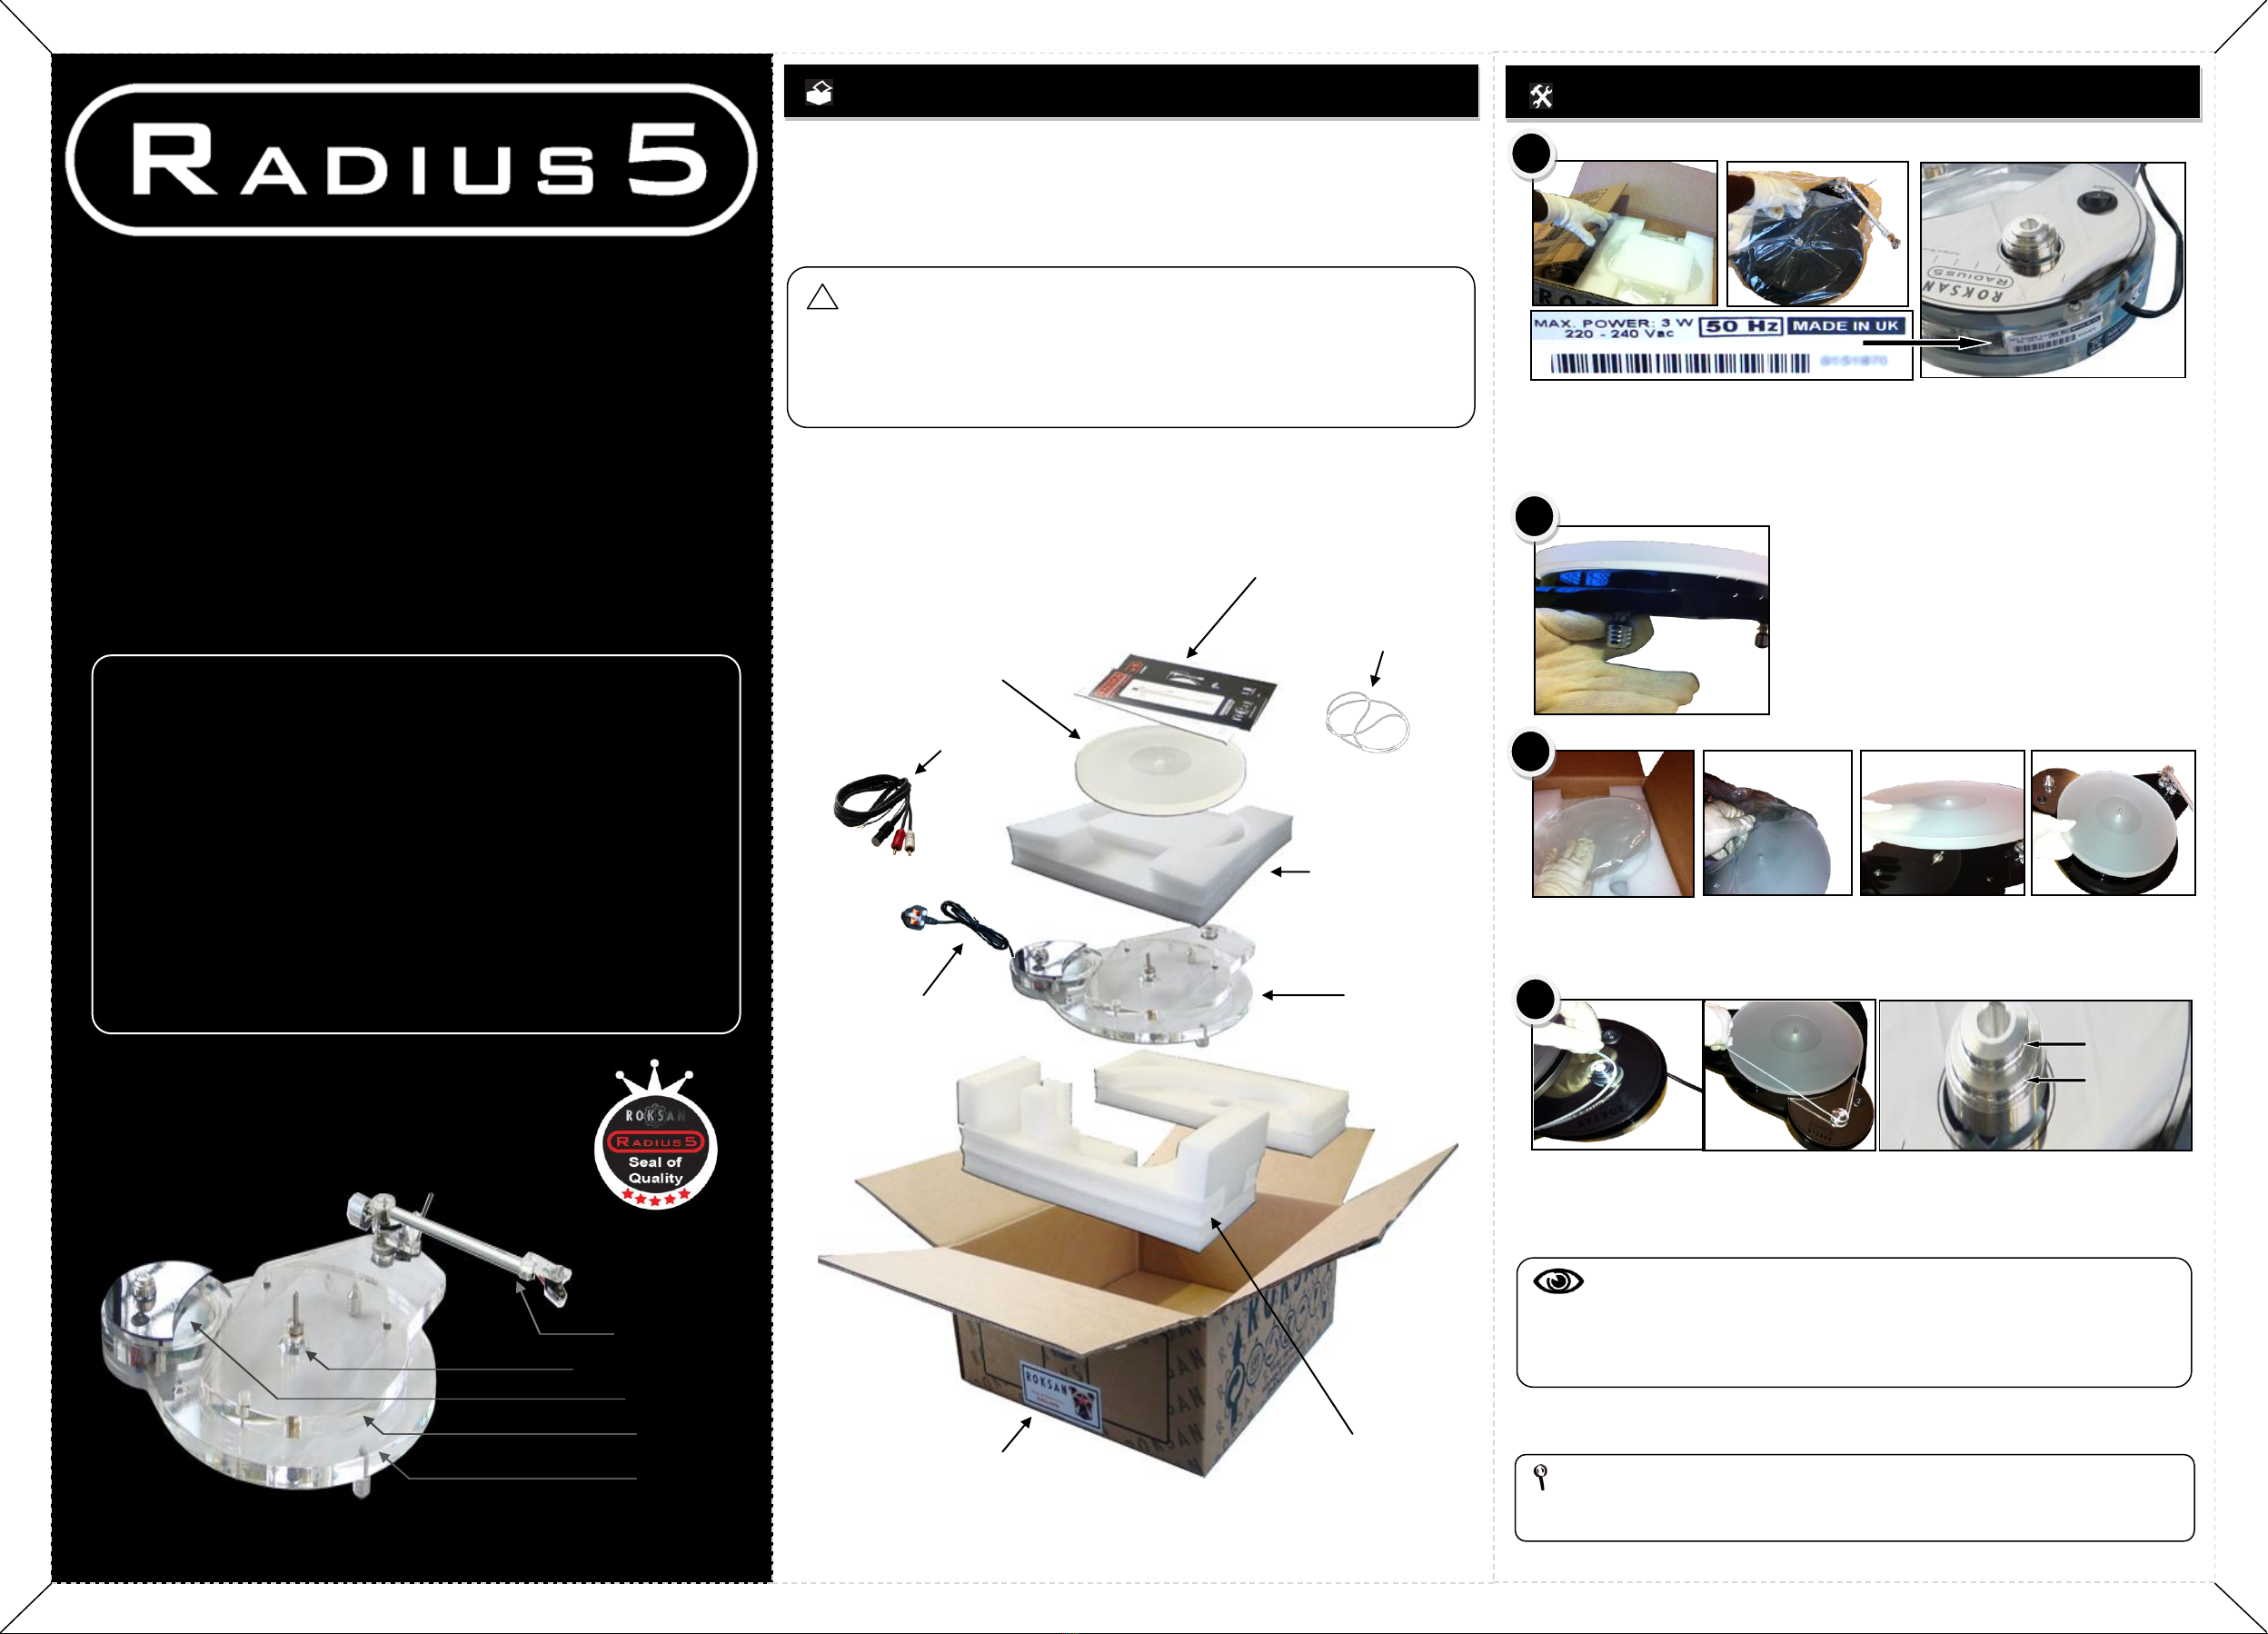
Place the Radius5 MkII on a rigid level surface. The arm cable should be securely
fixed into the base of the tonearm and connected to the phono input of the amplifier
without pulling on to the Radius5 MkII. It is important to ensure the phono input is
matched with the type of cartridge you are using and that the tonearm cable ground
lead is firmly attached to the phono input grounding point on the amplifier.
To ensure correct geometry, tracking weight and anti-skate force, the
cartridge/tonearm should be assembled according to manufacturer's instructions.
Connect the power lead to the correct voltage/frequency mains supply and switch the
Radius5 MkII on. The Radius5 MkII platter will start to rotate at the speed
corresponding to the position of the drive belt on the pulley. In most countries,220-
240Vac mains supplies are at 50Hz and 110-120Vac mains supplies are at 60Hz. If
you are unsure of your mains supply frequency, consult your local electricity supplier.
Please note that the motor body is de-coupled and it will oscillate back and forth while
it synchronises with the mains frequency and gets to the correct speed. This method
of mounting and isolating the motor ensures minimal motor noise break through and
stabilises the continuous running speed.
NOTE:
Always remove the platter before moving/transporting the Radius5 MkII. If
fitted with the NIMA; remove the counter weight assembly, lock the NIMA in
transit position and secure it with the releasable tie-wrap to its arm rest.
Your Radius5 MkII record player is now ready for use. With the drive belt in the
desired pulley groove switch the Radius5 MkII on. Check the amplifier volume is set to
low and that the correct input for phono is selected. Gently increase the volume and
check for any unwanted hum/noise. Now check the hum level with the amplifier at high
volume. There should be no hum or very low level of hum audible (Remember to lower
the volume afterwards). If so, then carefully place the record you wish to play onto the
platter, gently lower the arm/cartridge onto the track you want to listen to and enjoy the
music from your Radius5 MkII.
To select 45 or 33 rpm, switch the motor off and place the belt around the
corresponding pulley groove and start the motor again. The motor will at first rock
back and forth a few times to catch up with speed and synchronise. Once the motor
has settled down, place the record on the platter and play your desired track.
TROUBLESHOOTING
If you suspect that your Radius5 MkII record player is not working correctly, first check
all the connections. Pay particular attention to cartridge tag connections, (channel &
phase), tonearm cable connections (phono RCAs & ground) and mains lead
connection. Below are some commonly encountered problems with suggestions for
possible cure. The list is not exhaustive: If you have any unresolved problems, please
consult Roksan.
There are no user serviceable parts inside your Roksan Radius5 MkII Record Player.
If a fault should develop, refer any servicing to your appointed ROKSAN dealer,
distributor or ROKSAN approved service agent.
Your Roksan Radius5 MkII Record Player is guaranteed against any defect in
materials and workmanship for a period of five years from the date of purchase. This
guarantee only becomes effective if the Radius is warranty registered at Roksan.
Refer to user manual front cover.
This guarantee excludes:
1. Damage caused due to accident, misuse, neglect and incorrect installation,
adjustment or repair.
2. Liability for damage or loss during transit from the retailer or purchaser to
ROKSAN or its authorised distributor for the purposed for repair or inspection.
Carriage costs to ROKSAN shall be borne by the consignor.
All claims under this guarantee must be made through an authorised ROKSAN
retailer.
If equipment returned for repair to ROKSAN is found on inspection to comply with the
product specification ROKSAN reserves the right to make a charge for examination
and return carriage.
Main Bearing Spindle ................................. Precision machined stainless steel
Main Bearing Housing ..................................... Precision machined solid brass
Main Bearing Ball .............................................. Precision case hardened steel
Pulley ....................................................... Precision machined aluminium alloy
Platter ..................................................................... Precision machined acrylic
Motor ........................................................ Custom made 24 pole synchronous
Speed ............................................................................................ 33 & 45 rpm
Power ...................................................................... 110 or 220 Vac - 50/60 Hz
Rumble .................................................................................................. <-75dB
Wow & Flutter ........................................................................................ <0.04%
Dimension ...................................................... 400 x 350 x 150mm (W x D x H)
Weight ......................................................................................................... 7Kg
All specifications are liable to change without prior notice. E & O.E.
ROKSAN WARRANTY REGISTRATION
VISIT
http://www.roksan.co.uk/rw.php
In Case Of Difficulty
CALL: +44 (0)20 8900 6801
USERMANUAL
www.roksan.co.uk
Record Player
©2011 Roksan Audio Limited
RADIUS5 MkII
NOTE:
Clean the belt using only a slightly damped cloth.
NOTE: There is a peel of protective film on name plate
AC Mains Power Switch
AC Power Supply
Pulley Groove
Roksan Audio Ltd Jubilee Close Townsend Lane London NW9 8TR
Tel: +44 (0)20 8900 6801 Fax: +44 (0)20 82052644 Email: [email protected]
Facebook: http://www.facebook.com/roksan.audioltd
Twitter: https://twitter.com/roksan

Other Roksan Audio Turntable manuals

Roksan Audio Xerxes.20plus User manual

Roksan Audio

Roksan Audio Xerxes.20plus User manual

Roksan Audio Xerxes 20 Plus User manual

Roksan Audio

Roksan Audio Xerxes 20 Plus User manual

Roksan Audio TMS 3 User manual

Roksan Audio

Roksan Audio TMS 3 User manual

Roksan Audio Attessa User manual

Roksan Audio

Roksan Audio Attessa User manual

Roksan Audio RADIUS 7 User manual

Roksan Audio

Roksan Audio RADIUS 7 User manual

Roksan Audio Shiraz User manual

Roksan Audio

Roksan Audio Shiraz User manual

Roksan Audio Dana Guide

Roksan Audio

Roksan Audio Dana Guide

Roksan Audio Corus2 Guide

Roksan Audio

Roksan Audio Corus2 Guide

Roksan Audio RADIUS5 User manual

Roksan Audio

Roksan Audio RADIUS5 User manual

Popular Turntable manuals by other brands

Crosley CR8005D-TU instruction manual

Crosley

Crosley CR8005D-TU instruction manual

Akiyama DX-101 USB-R instruction manual

Akiyama

Akiyama DX-101 USB-R instruction manual

Kestrel KT-50 manual

Kestrel

Kestrel KT-50 manual

Pioneer PL-15D-II operating instructions

Pioneer

Pioneer PL-15D-II operating instructions

Akiyama DJ-1200 USB user manual

Akiyama

Akiyama DJ-1200 USB user manual

Gefen EXT-HD-DSP user manual

Gefen

Gefen EXT-HD-DSP user manual

LinearX LT360 Programming manual

LinearX

LinearX LT360 Programming manual

andover Spinbase Quick setup guide

andover

andover Spinbase Quick setup guide

VOSTERIO B-619 instruction manual

VOSTERIO

VOSTERIO B-619 instruction manual

Grace GDI-TW2SQ Specifications

Grace

Grace GDI-TW2SQ Specifications

Zennox D3939 Operation manual

Zennox

Zennox D3939 Operation manual

Micro Seiki DD-35 Service manual

Micro Seiki

Micro Seiki DD-35 Service manual

LENCO Classic Phono TCD-2570 user manual

LENCO

LENCO Classic Phono TCD-2570 user manual

Pyle Pro Vintage PVNTT1 Operating instructions manual

Pyle Pro

Pyle Pro Vintage PVNTT1 Operating instructions manual

Ricatech REVOLUTION BLACK RTT20 user manual

Ricatech

Ricatech REVOLUTION BLACK RTT20 user manual

Nagra CDP user manual

Nagra

Nagra CDP user manual

Technics SL-QD33 operating instructions

Technics

Technics SL-QD33 operating instructions

Audio Technica AT-LP120XBT-USB quick start guide

Audio Technica

Audio Technica AT-LP120XBT-USB quick start guide

manuals.online logo
manuals.online logoBrands
  • About & Mission
  • Contact us
  • Privacy Policy
  • Terms and Conditions

Copyright 2025 Manuals.Online. All Rights Reserved.