rollease acmeda ZIPSCREEN User manual

Page 1of 14
Zipscreen Installation Manual | v4.2| August 2019
2019 ©Copyright All Rights Reserved Rollease Acmeda
COVER ASSEMBLY
STEP 1 –DRILL CLEARANCE HOLES IN ‘END PLATE’ TO FACILITATE INSTALLATION FIXINGS
FACE FIX INSTALLATION OPTION
TOP FIX INSTALLATION OPTION
RECESS FIX INSTALLATION OPTION
NOTE: Holes are marked on end plate for drilling,
For balanced installation drill holes at corresponding opposite sides of plate.

Page 2of 14
Zipscreen Installation Manual | v4.2| August 2019
2019 ©Copyright All Rights Reserved Rollease Acmeda
BOX INSTALLATION
STEP 1 –INSTALL BOX TO WALL/CEILING
Note: Use appropriate fixings to suit application. Ensure Box is Aligned and Level.
COVER INSTALLATION
STEP 1 –INSTALL END PLATES TO WALL/CEILING USING APPROPRIATE FIXINGS TO SUIT APPLICATION
Note: 1. Use appropriate fixings to suit application. 2. Ensure End Plates are Aligned and Level. 3. Measure brackets end to end to confirm measurement is
correct

Page 3of 14
Zipscreen Installation Manual | v4.2| August 2019
2019 ©Copyright All Rights Reserved Rollease Acmeda
OPEN BRACKET INSTALLATION
STEP 1 –INSTALL BRACKETS TO WALL/CEILING USING APPROPRIATE FIXINGS TO SUIT APPLICATION
Note: 1. Use appropriate fixings to suit application. 2. Ensure brackets are Aligned and Level. 3. Measure brackets end to end to confirm measurement is
correct
BLIND INSTALLATION
STEP 1 –INSERT BLIND INTO BOX
User effort will be required to push the booster head/Idler pin into the adapter, a noticeable “click” will indicate that the component is correctly
located.

Page 4of 14
Zipscreen Installation Manual | v4.2| August 2019
2019 ©Copyright All Rights Reserved Rollease Acmeda
BLIND INSTALLATION
STEP 2 –INSERT RETAINER CLIP MKII ONTO IDLER ADAPTER
IDLER END CONTROL END
Ensure pin is clipped in securely SPRING ONLY: Insert Retainer Clip MKII at spring end
Tighten the Screw SPRING ONLY: Insert Retainer Clip MKII at spring end
and tighten the screw to secure.
STEP 3 –UNLOCK PRE-TENSION HEAD AT SPRING END STEP 4 –FEED THROUGH MOTOR CABLE
(FOR SPRING ONLY) (FOR MOTOR ONLY)

Page 5of 14
Zipscreen Installation Manual | v4.2| August 2019
2019 ©Copyright All Rights Reserved Rollease Acmeda
BLIND INSTALLATION
STEP 5 –RUN BLIND DOWN + CENTRE
STEP 6 –TEST BLIND OPERATION
For spring operation, blind should creep up slowly when pulled down.
If blind does not creep up, add more pre-turns. For motor operation,
ensure wiring is correct and motor is operating correctly.
For gear operation, ensure operation is smooth.
ADJUSTING PRE-TURNS (SPRING OPERATED BLINDS ONLY)
STEP 1 –TO ADJUST PRE-TURNS, LOCK STEP 2 –DISENGAGE THE SPRING HEAD
PRE-TENSION HEAD FROM ADAPTER
Note: Ensure spring is locked by lifting weight bar until fabric bunches up. Loosen the screw then lever the Retainer Clip MKII outwards.

Page 6of 14
Zipscreen Installation Manual | v4.2| August 2019
2019 ©Copyright All Rights Reserved Rollease Acmeda
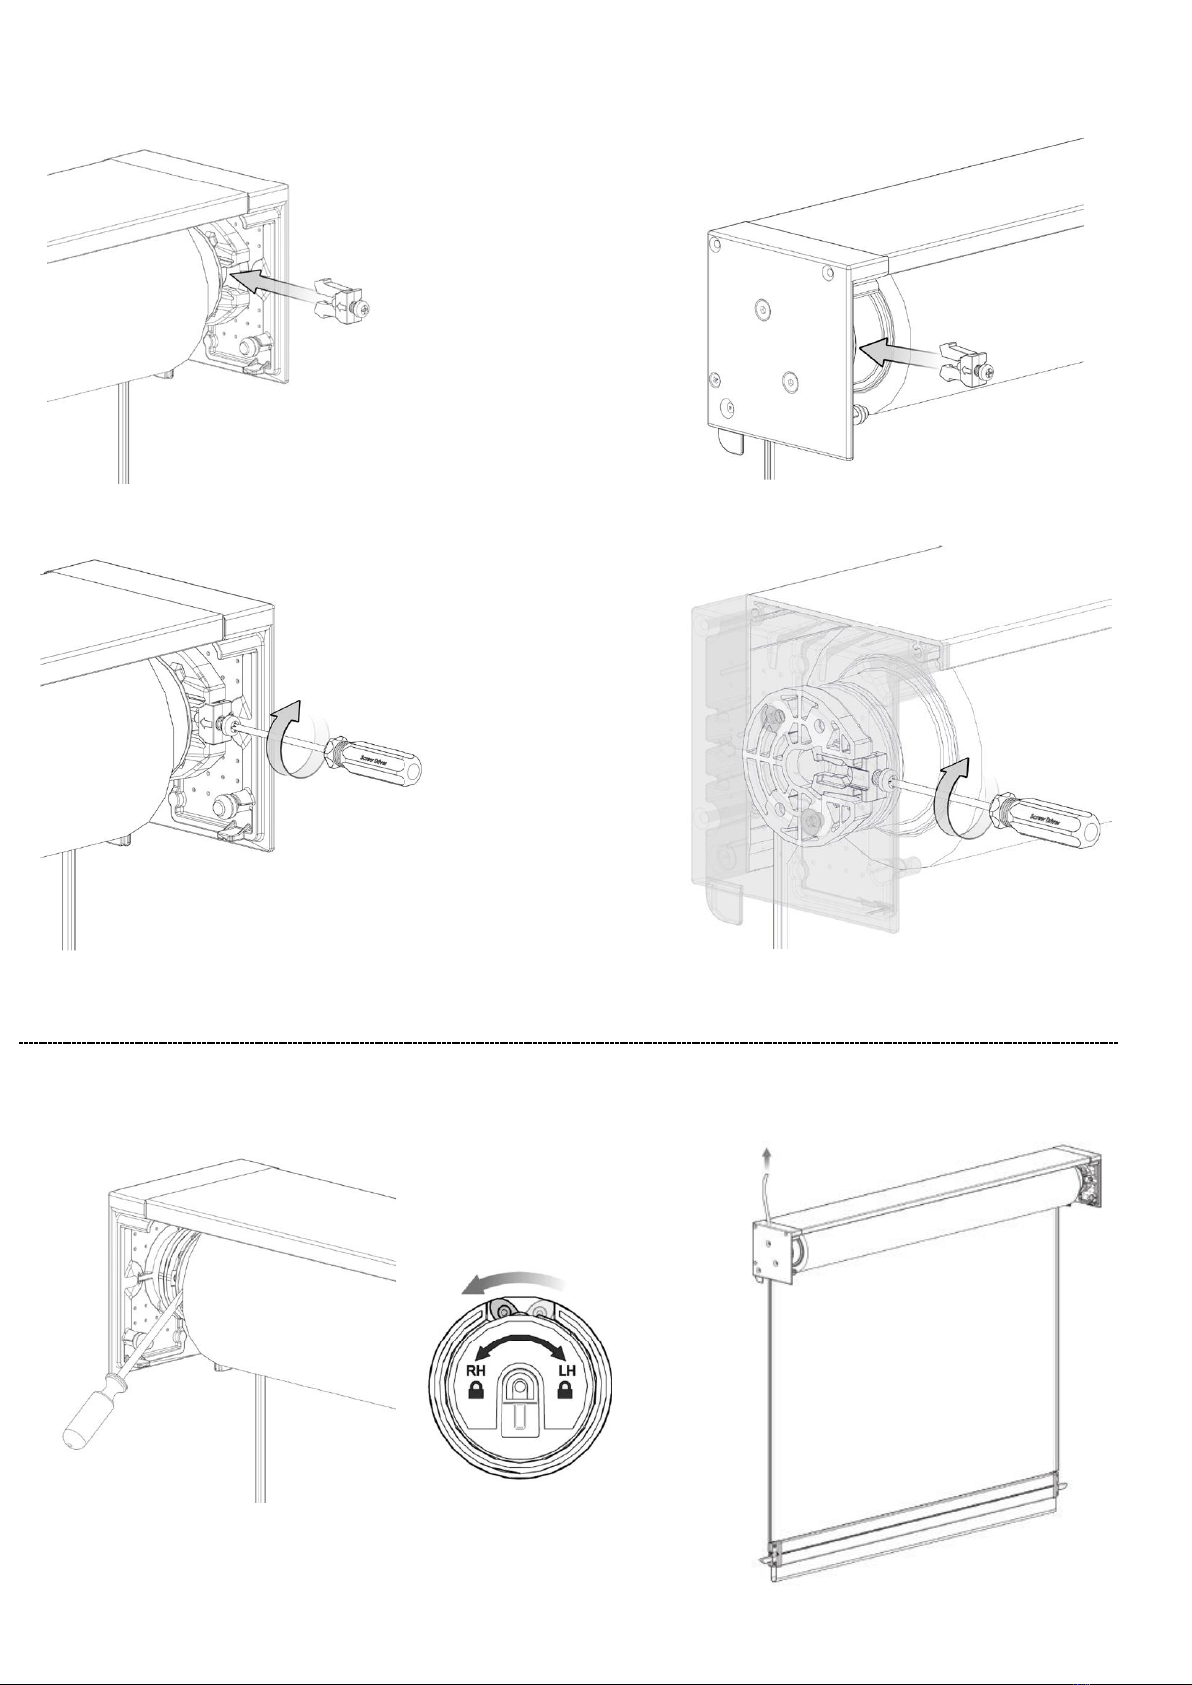
STEP 3 –ADD ADDITIONAL PRE-TURNS REQUIRED
Note: Gradually increase the number of pre-turns required. Only remove the pre-tension spanner when the spring tension is held by the internal
mechanism, immediately after a ‘click’ is heard.
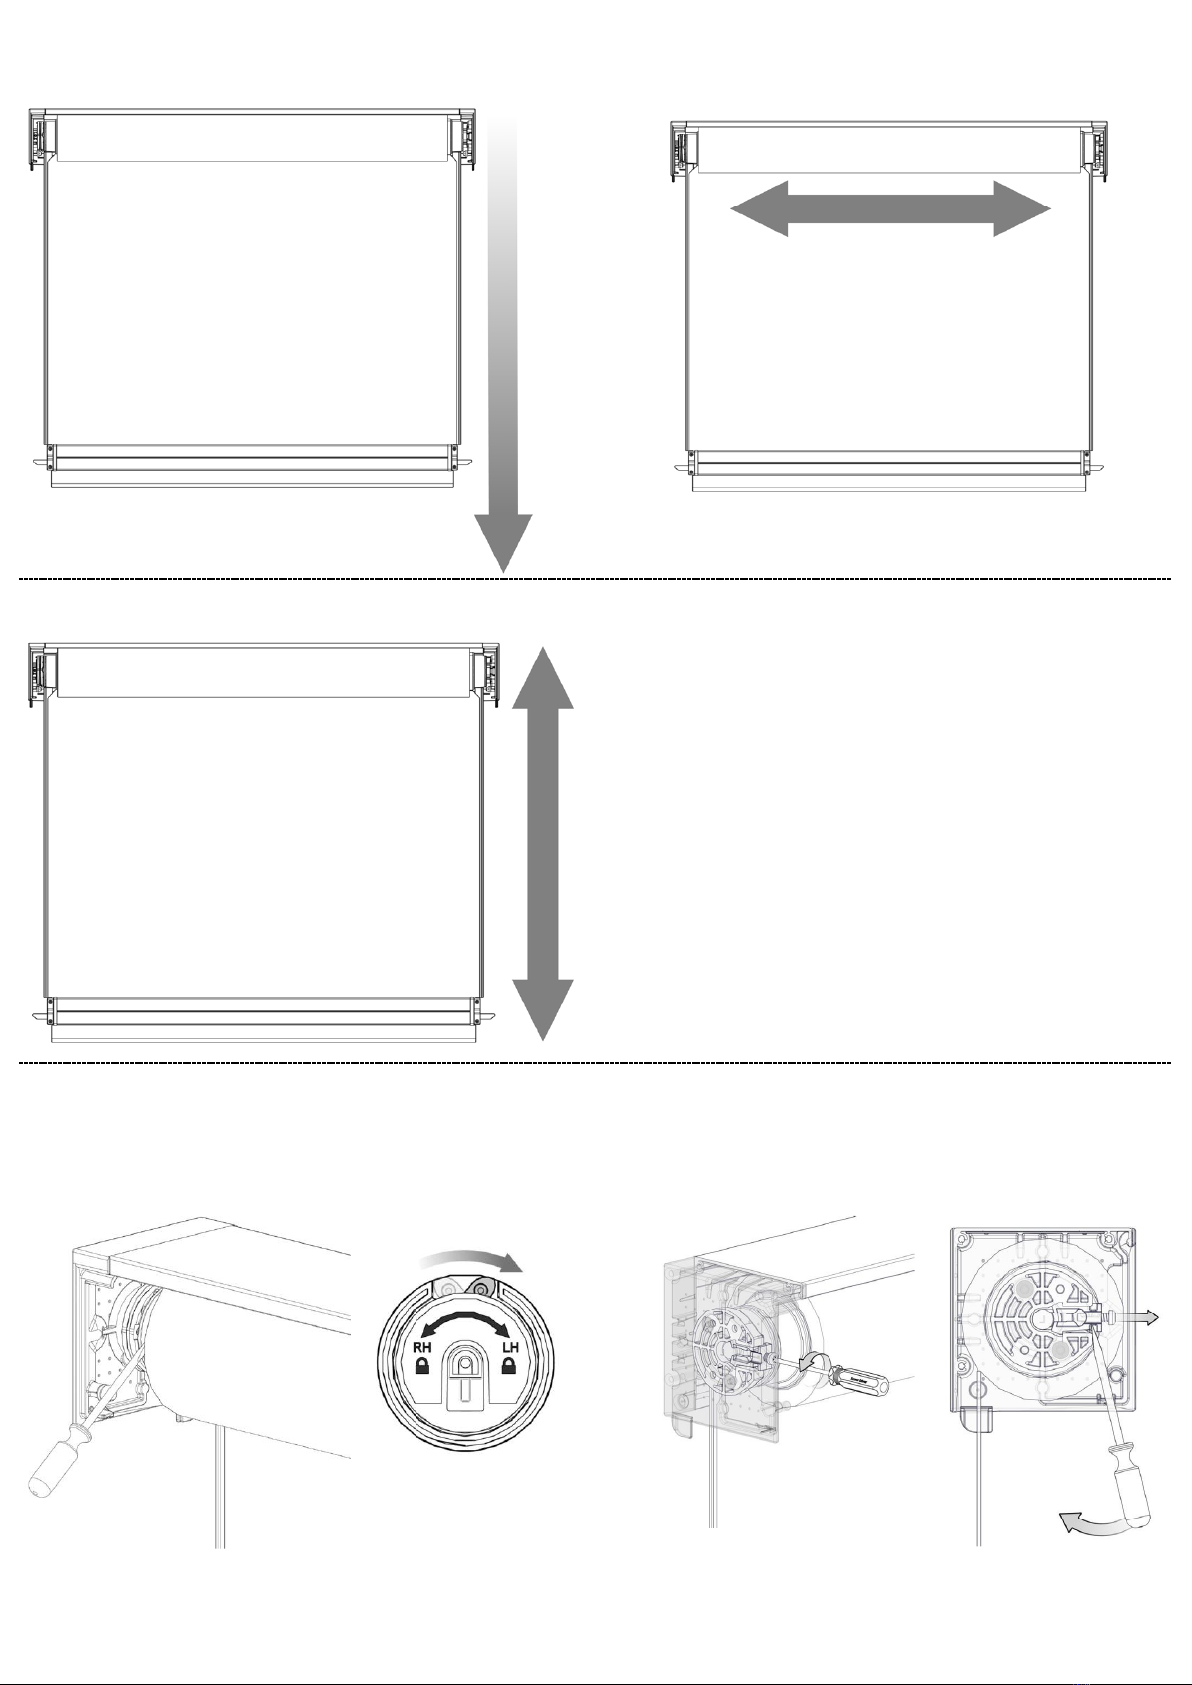
STEP 4 –UNLOCK PRE-TENSION HEAD STEP 5 –RE-INSTALL AND TEST BLIND
Note: When the weight bar is pulled down, the tension in
the spring will be released.
If too many pre-turns are added, the blind will automatically raise.
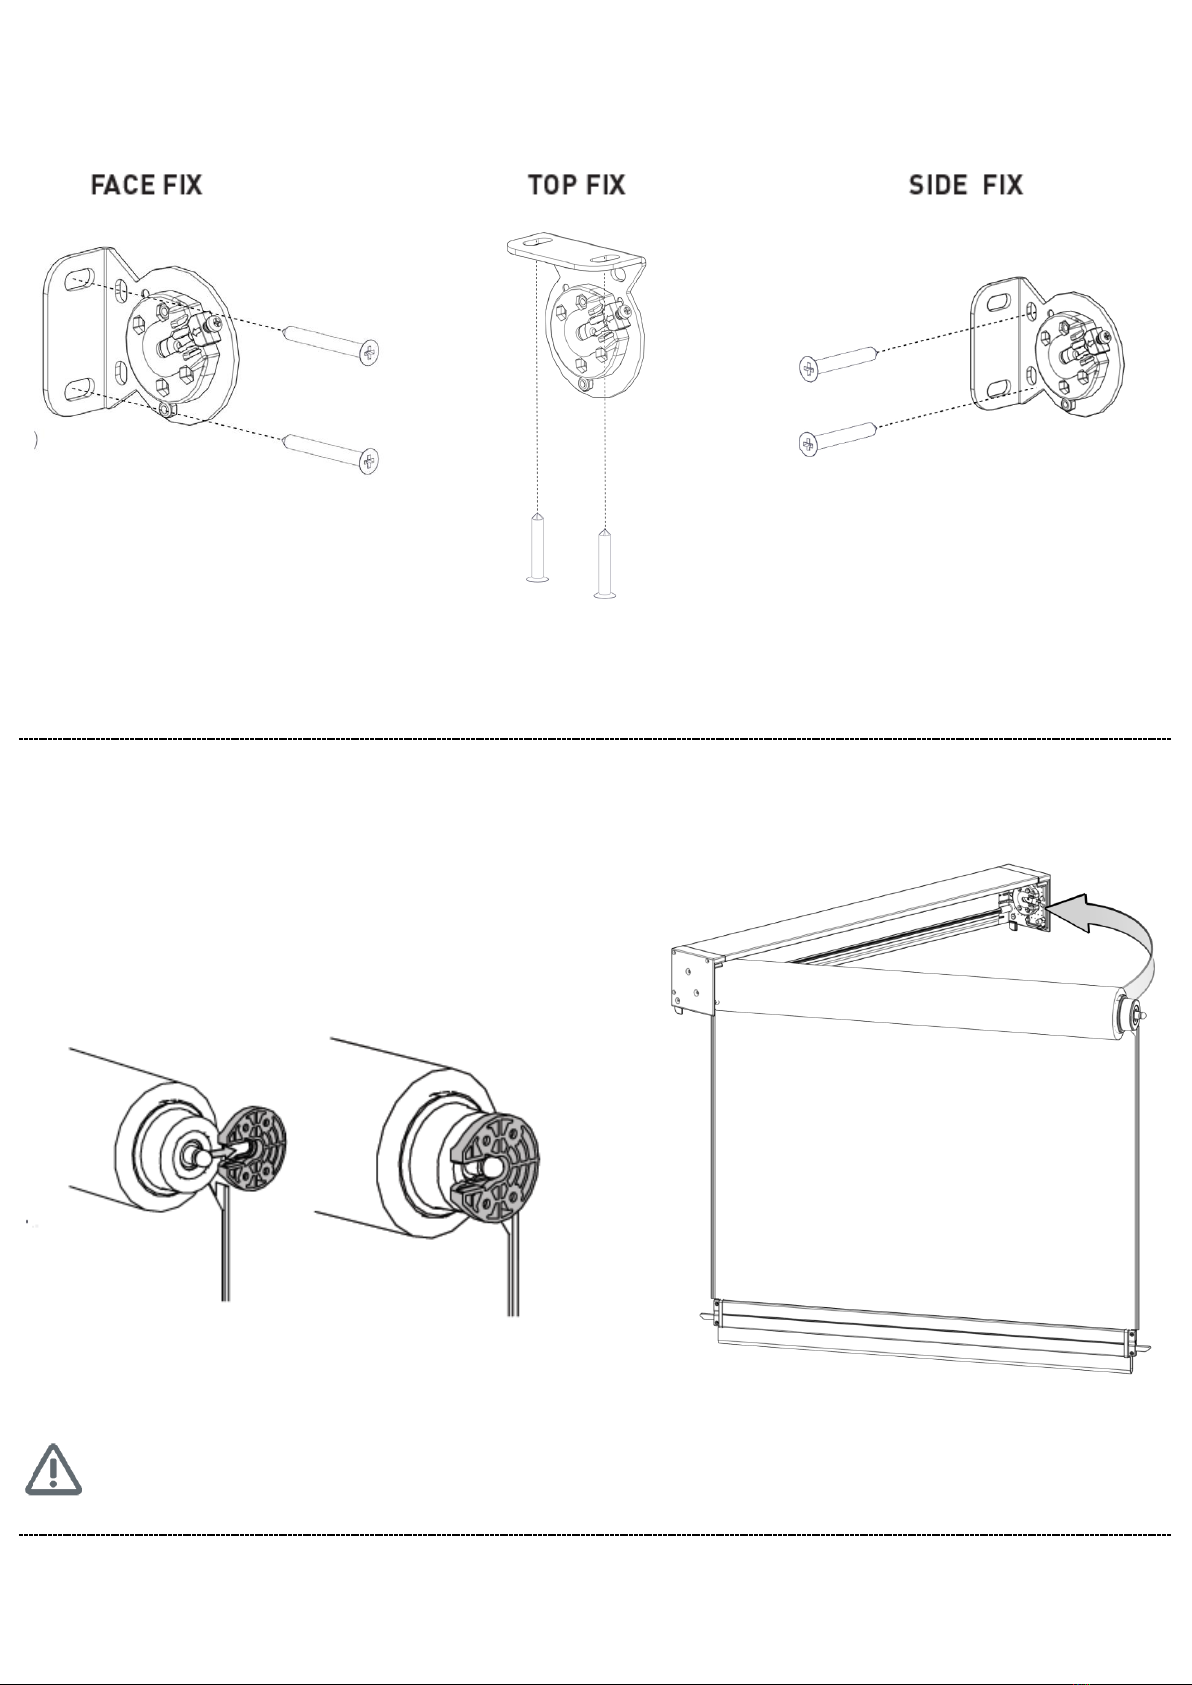
Note: Re-install and secure Retainer Clip when complete.
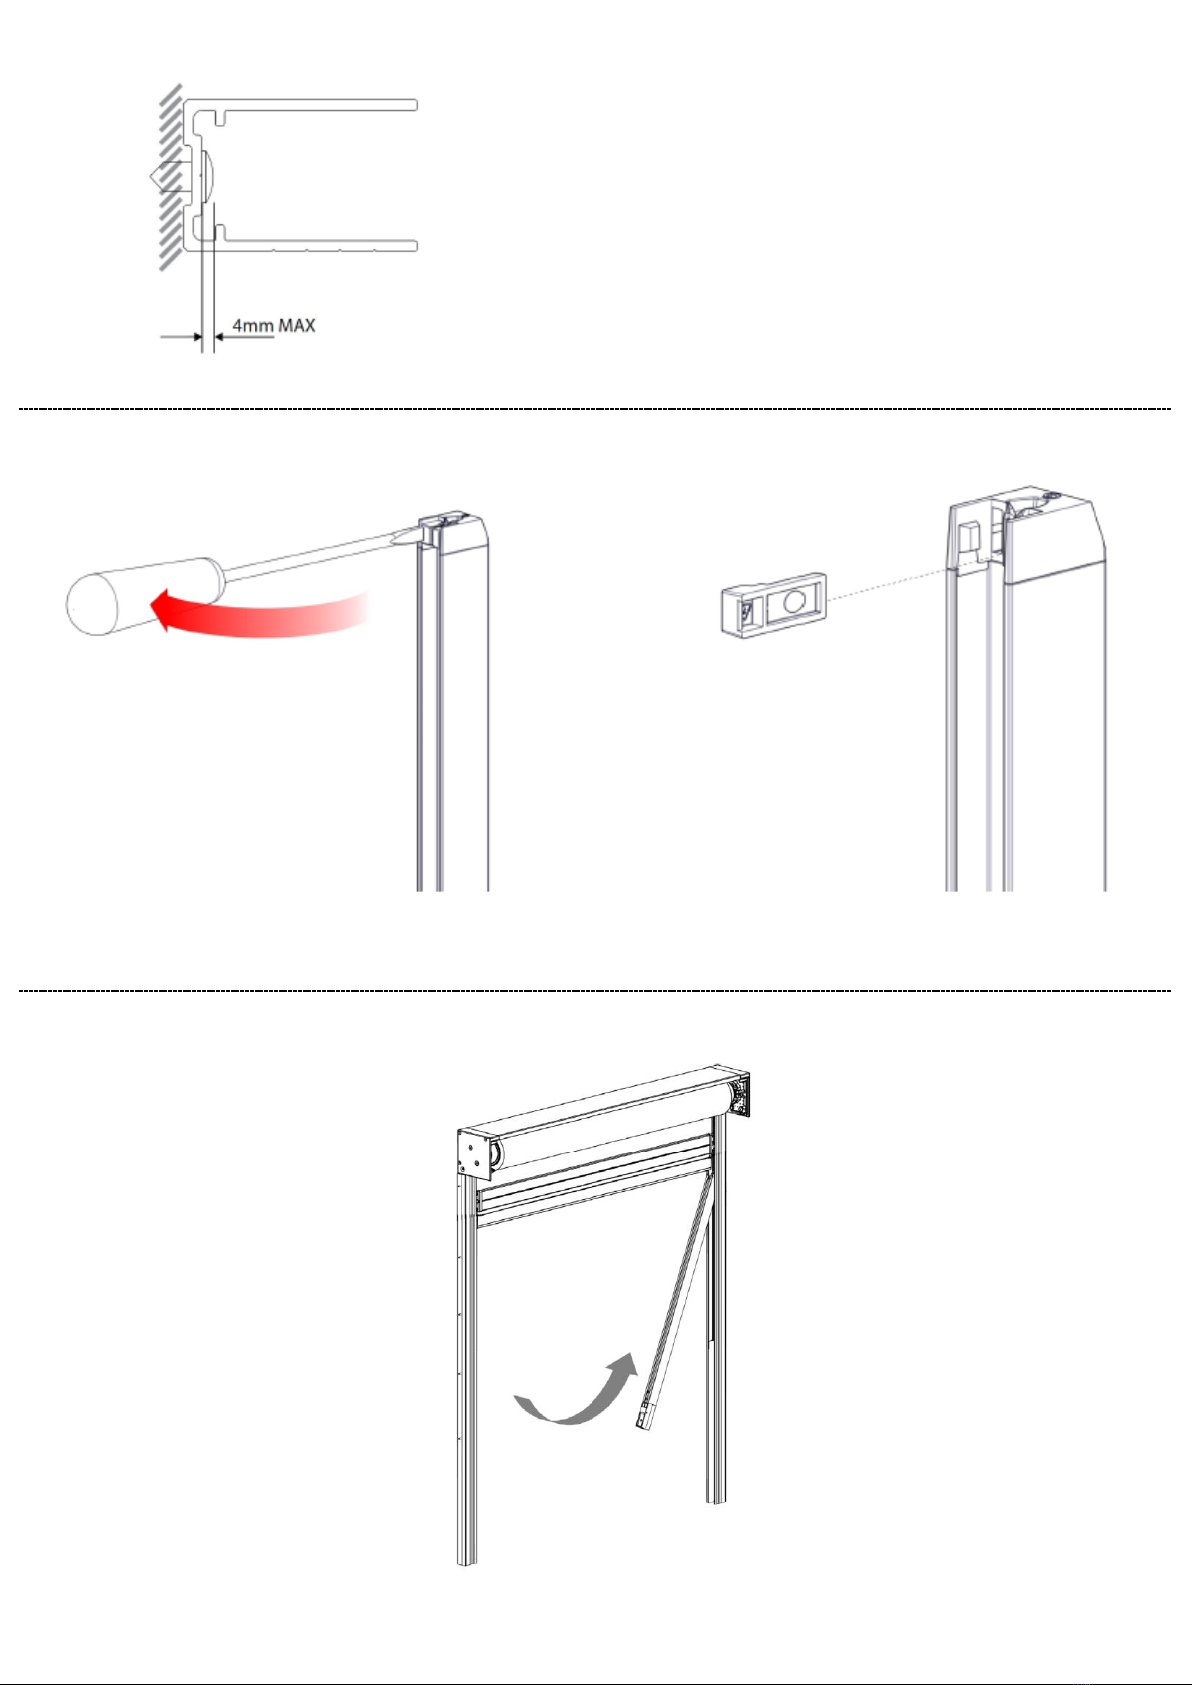
PART I –SIDE GUIDE INSTALLATION
STEP 1 –MARK OUT SIDE GUIDE POSITION AND ALIGN RAIL (FOR OPEN BRACKET ONLY)
Note: Use Open Bracket Template (RE01- Use thickness of Open Bracket Template Rail to sit flush to bracket
3012-033000) to assist

Page 7of 14
Zipscreen Installation Manual | v4.2| August 2019
2019 ©Copyright All Rights Reserved Rollease Acmeda
STEP 2 –MOUNT L-FIXING RAIL TO WALL ON BOTH SIDES (FOR FACE FIX ONLY)
STEP 3 –INSERT U-MOUNTING RAIL/FACE FIX U-MOUNTING RAIL
STEP 4 –SECURE U-MOUNTING RAIL TO SIDE FIX SURFACE OR L-FIXING RAIL
FACE FIX: L –FIXING RAIL

Page 8of 14
Zipscreen Installation Manual | v4.2| August 2019
2019 ©Copyright All Rights Reserved Rollease Acmeda
SIDE FIX
STEP 5 –REMOVE THE STOPS FROM THE FUNNEL IN THE INNER RAILS
Use flat head screw driver to pry both stops out.
STEP 6 –SWING INNER RAIL INTO THE U MOUNTING RAIL ON AN ANGLE ON BOTH SIDES
Ensure weight bar is 50-100mm from box
Feed zip into funnel

Page 9of 14
Zipscreen Installation Manual | v4.2| August 2019
2019 ©Copyright All Rights Reserved Rollease Acmeda
STEP 7 –PUT STOPS BACK INTO FUNNEL
If there is inadequate access to the back of the blind to attach stops, add only one to the front of the blind on both ends
STEP 8 –OPERATE BLIND MULTIPLE TIMES TO ALLOW INNER RAIL TO MOVE INTO NATURAL POSITION
The inner rail should sit parallel with the zip to avoid strain or jamming of blind during
operation.
Ensure the zip is running inside the inner rail on both sides.
When using the Ultra-Lock, the Latch Housings must be level with each other to ensure
the Ultra-Lock Pins lock simultaneously.
Adjust the position of the Inner Rails as required.
STEP 9 –SECURE THE INNER RAILS

Page 10 of 14
Zipscreen Installation Manual | v4.2| August 2019
2019 ©Copyright All Rights Reserved Rollease Acmeda
STEP 10 –TEST OPERATION AND APPEARANCE OF BLIND
STEP 11 –(NOT FOR ULTRA-LOCK) –SET MOTOR LIMITS (MOTOR CONTROL ONLY)

Page 11 of 14
Zipscreen Installation Manual | v4.2| August 2019
2019 ©Copyright All Rights Reserved Rollease Acmeda
WEIGHT BAR SB07 LATCH INSTALLATION
STEP 1 –BRING WEIGHT BAR TO DESIRED LOCKED POSITION
STEP 2 –SECURE LATCH TO U-MOUNTING RAIL
Align lip of latch to U-Mounting Rail
STEP 3 –ADD ADDITIONAL LATCHES (IF REQUIRED)

Page 12 of 14
Zipscreen Installation Manual | v4.2| August 2019
2019 ©Copyright All Rights Reserved Rollease Acmeda
INSERT BOX / COVER
STEP 1 –SWING BOX COVER INTO BOX STEP 2 –SECURE COVER AT BOTH ENDS
TOP AND CLIP INTO PLACE
IMPORTANT: Multiple Blinds installed Side by Side on Face Fit
Fit all box covers and L-Fixing Rail prior to any fixing of the U-Mounting Rail. This is to allow for it to be fixed to the
adjacent awning plus the L-fixing rail as per image below.
TROUBLESHOOTING
Troubleshooting continued…
NO. PROBLEM CAUSE SOLUTION
1 Prominent smile across fabric Not enough tension in side guides Cut new fabric skin and weld zip onto fabric ensuring
temperature is not too hot. Refer to Assembly manual for
welding tips.
Fabric is not installed straight Ensure fabric is assembled straight onto tube and weight
bar.
2 Ripples along sides of fabric Blind rolled up for extended This occurrence is inherent to roller systems and is more
period of time prevalent in some fabrics. Leave blind down for 1-4 hours –
most ripples should disappear
Fabric not central to system Remove rivets around the ripple area and reposition inner
rail and secure
Too much tension in inner rails Check fabric is centred with system. If the fabric is not centred
with the system, centre the fabric. The Side Rails may
need to be removed to correct. If fabric cannot be centred,
check scallop in fabric is large enough for installation
(refer to Assembly manual for scallop sizes). If the fabric at
the scallop is flush with the edge of the tube and the fabric
cannot move sideways any further, increase size of scallop
in fabric.
Fabric is too wide for installation Check actual installation width dimension matches the
measured blind width.
If the installation width does not match the measured blind
width:
• Correct installation width to match measured blind width
or
• Correct fabric width to correct size (based on actual
installation width)
Note: Tube and weight bar may also require correcting.
If the installation width matches the measured blind width:
Check overall fabric width from external zip edge to external
zip edge and ensure it is W-66mm (W being completed blind
width).
If required, correct fabric width.

Page 13 of 14
Zipscreen Installation Manual | v4.2| August 2019
2019 ©Copyright All Rights Reserved Rollease Acmeda
2
Troubleshooting continued…
NO. PROBLEM CAUSE SOLUTION
1 Prominent smile across fabric Not enough tension in side guides Cut new fabric skin and weld zip onto fabric ensuring
temperature is not too hot. Refer to Assembly manual for
welding tips.
Fabric is not installed straight Ensure fabric is assembled straight onto tube and weight
bar.
2 Ripples along sides of fabric Blind rolled up for extended This occurrence is inherent to roller systems and is more
period of time prevalent in some fabrics. Leave blind down for 1-4 hours –
most ripples should disappear
Fabric not central to system Remove rivets around the ripple area and reposition inner
rail and secure
Too much tension in inner rails Check fabric is centred with system. If the fabric is not centred
with the system, centre the fabric. The Side Rails may
need to be removed to correct. If fabric cannot be centred,
check scallop in fabric is large enough for installation
(refer to Assembly manual for scallop sizes). If the fabric at
the scallop is flush with the edge of the tube and the fabric
cannot move sideways any further, increase size of scallop
in fabric.
Fabric is too wide for installation Check actual installation width dimension matches the
measured blind width.
If the installation width does not match the measured blind
width:
• Correct installation width to match measured blind width
or
• Correct fabric width to correct size (based on actual
installation width)
Note: Tube and weight bar may also require correcting.
If the installation width matches the measured blind width:
Check overall fabric width from external zip edge to external
zip edge and ensure it is W-66mm (W being completed blind
width).
If required, correct fabric width.
Not enough weight in weight bar. Refer to product specs. Add ballast.
Note: for spring operated blinds, the number of pre-turns
will most likely need to be increased.
Spring operated blinds It is more common for there to be some ripples in spring
operated blinds.
To reduce the number of ripples evident, pull the blind
down softly and lock into position.
Not enough pre-turns in spring Increase number of pre-turns on spring.
Installation is not square Check overall width of U-mounting rail and inner rail is
within 42-62mm.
Check inner rails are level & parallel. If either of the above
checks are not in accordance with specifications, the
installation space requires additional packing. The side rails
or entire systems may need to be removed to correct.
Fabric permanently damaged due to Replace the fabric and ensure it is handled
inadequate handling during assembly, with care.
transportation, installation or use
Fabric is not installed straight Ensure fabric is assembled straight onto tube
and weight bar
3 Small ripples close to weld Welding temperature is too high on zip Cut new fabric skin and weld zip onto fabric
ensuring temperature is not too hot.
Refer Assembly manual for welding tips.
4 Weight bar end cap hits Inner Rail Check there is always approximately 3mm
(0.12”) gap between Weight Bar End Cap and
Inner Rail.
If there is insufficient clearance, check:
• Actual installation width dimension matches
the measured blind
width
• The weight bar length is cut in accordance
with the deductions
outlined by Acmeda
If the installation width does not match the
measured blind width:
• Correct installation width to match measured
blind width
or
• Trim weight bar length to correct size (based
on actual installation
width)
Note: Tube and fabric may also require correcting
Fabric is not installed straight Ensure fabric is assembled straight onto tube
and weight bar.
5 Spring operated blind is heavy to push up Not enough pre-turns Increase number of pre-turns on spring.
6 Spring operated blind is stuck and will not Spring pre-tension Idler has not been Ensure pre-tension Idler is unlocked on both
move un-locked. ends of system.
7 Motorised blind jolts during operation Motor rotates blind continuously whilst a This occurrence is inherent to the motorised
wind gust causes additional friction in Inner system and no damage will be caused as a
Rail and stops blind momentarily. result. If undesired, avoid operating blind in
When force of wind is reduced, the additional windy conditions.
friction is removed and blind drops.
Not enough weight in weight bar Add ballast to weight bar.
8 Cannot install inner rail into Weight bar length is too long Check actual installation width dimension
blind to feed zip matches the measured blind width.
If the installation width does not match the
measured blind width:
• Correct installation width to match measured
blind width
or
• Trim weight bar length to correct size (based
on actual installation width)
Note: Tube and fabric may also require correcting
Inner rail length is too long Check actual installation drop dimension matches the
measured blind drop.
If the installation drop does not match the measured blind
drop:
• Correct installation drop to match measured blind drop
or
• Trim inner rail length to correct size (based on actual
installation
width)
Note: U-mounting rail and L-fixing channel may also
require correcting
9SB07 Weight Bar lock doesen’t Latch has not been secured in correct position Re-install latch so shaft locates into latch.
locate into latch
10 Uneven weight bar Box is not level, thus weight bar appears Ensure box is level.
uneven
Inconsistent friction along inner rails Check inner rails are level & parallel. If the inner rails
are not level and parallel remove rivets from U-mounting
channel, reposition inner rail to reduce tension and resecure
inner rail.
Motorised blind jolts during operation See Point 7
Zip overturns on itself This occurrence is inherent to Zipscreen and there isn’t
currently a solution.
Fabric is not installed straight Ensure fabric is assembled straight onto tube and weight bar.
11 Impact Detection function of The Automate FT motor Impact Detection Put the blind up or down, increasing the distance from the
Automate FT motor is not active. function isn’t active in the first 20cm from limits and verify if the motor retracts the blind when an
the upper limit and in the last 20cm from obstacle is detected.
the lower limit.
Impact Detection function has been deactivated Press P2, Down & Down on the remote and check the
during motor installation. functionality of Impact Detection again.
Note: For all Automate FT15 Motor information visit the RollEase Acmeda Website:
http://www.rolleaseacmeda.com/au/products/product-detail/external-blind-motorisation-automate-ft15-motor

Page 14 of 14
Zipscreen Installation Manual | v4.2| August 2019
2019 ©Copyright All Rights Reserved Rollease Acmeda
5 Spring operated blind is heavy to push up Not enough pre-turns Increase number of pre-turns on spring.
6 Spring operated blind is stuck and will not Spring pre-tension Idler has not been Ensure pre-tension Idler is unlocked on both
move un-locked. ends of system.
7 Motorised blind jolts during operation Motor rotates blind continuously whilst a This occurrence is inherent to the motorised
wind gust causes additional friction in Inner system and no damage will be caused as a
Rail and stops blind momentarily. result. If undesired, avoid operating blind in
When force of wind is reduced, the additional windy conditions.
friction is removed and blind drops.
Not enough weight in weight bar Add ballast to weight bar.
8 Cannot install inner rail into Weight bar length is too long Check actual installation width dimension
blind to feed zip matches the measured blind width.
If the installation width does not match the
measured blind width:
• Correct installation width to match measured
blind width
or
• Trim weight bar length to correct size (based
on actual installation width)
Note: Tube and fabric may also require correcting
Inner rail length is too long Check actual installation drop dimension matches the
measured blind drop.
If the installation drop does not match the measured blind
drop:
• Correct installation drop to match measured blind drop
or
• Trim inner rail length to correct size (based on actual
installation
width)
Note: U-mounting rail and L-fixing channel may also
require correcting
9SB07 Weight Bar lock doesen’t Latch has not been secured in correct position Re-install latch so shaft locates into latch.
locate into latch
10 Uneven weight bar Box is not level, thus weight bar appears Ensure box is level.
uneven
Inconsistent friction along inner rails Check inner rails are level & parallel. If the inner rails
are not level and parallel remove rivets from U-mounting
channel, reposition inner rail to reduce tension and resecure
inner rail.
Motorised blind jolts during operation See Point 7
Zip overturns on itself This occurrence is inherent to Zipscreen and there isn’t
currently a solution.
Fabric is not installed straight Ensure fabric is assembled straight onto tube and weight bar.
11 Impact Detection function of The Automate FT motor Impact Detection Put the blind up or down, increasing the distance from the
Automate FT motor is not active. function isn’t active in the first 20cm from limits and verify if the motor retracts the blind when an
the upper limit and in the last 20cm from obstacle is detected.
the lower limit.
Impact Detection function has been deactivated Press P2, Down & Down on the remote and check the
during motor installation. functionality of Impact Detection again.
Note: For all Automate FT15 Motor information visit the RollEase Acmeda Website:
http://www.rolleaseacmeda.com/au/products/product-detail/external-blind-motorisation-automate-ft15-motor
Other manuals for ZIPSCREEN
4
Table of contents