Roller Grill PSR 400 E User manual

304045-6-7 en ma 2012-01 1/8
USER INSTRUCTIONS
FRY-TOPS ELECTRIC
(*304.045 - *304.046 - *304.047)
You should read these user instructions carefully before using the appliance

304045-6-7 en ma 2012-01 2/8
ELECTRIC GRIDDLE PLATES
PSR 400 E / PSR 600 E / PSR 900 E
Congratulations for the acquisition of this upmarket appliance made in France. You
chose an appliance which alloys the best technical qualities with a big user-friendliness.
We wish you the biggest contentment
1. SECURITY INSTRUCTIONS
Please respect these instructions scrupulously to avoid any risk of fire, electric shock,
scald or other wounds and damage. During the use of this appliance, fundamental cir-
cumspection of security must always be noticed, such as:
- Take into account the instructions to be systematically kept with the appliance.
- Install the appliance always in instructions respect. A 10 cm distance minimum with
the partition or the wall is necessary.
- Protect the appliance from direct light of the sun, frost and humidity.
- Never leave the appliance within the reach of children or disabled persons without
surveillance.
- Never move the appliance when it is working or when the surfaces of cooking are
still hot.
- Check that the appliance is definitely off before connecting it up or disconnecting it.
- Do not touch the hot surfaces of the appliance. The temperature of the hot surfaces
can be very important when the appliance is working. Always use handles and control
knobs.
- Do not use the appliance for other functions than determined use.
- Do not leave the cord of electrical feeding in the contact of hot surfaces.
- The appliance should not be used close to combustible materials.
- During use, look after not to obstruct hearings of aeration of the appliance
- To avoid any electric shock, never plunge the appliance, the cord or plug in water or
quite other liquid.
- If the cord is harmed, it must be replaced by the producer, his after sale service or
persons of similar skills to avoid any risk.
- Entrust compensations only to a skilled person.
- Use only spare parts of origin.
- At the end of cooking, before cleaning the appliance, do not forget to disconnect it.

304045-6-7 en ma 2012-01 3/8
2. CONTENTS OF CARDBOARD PACKAGING
Device: a griddle plate
Accessories: - A drip tray
- The present note
See exploded views for PSR 400 E / PSR 600 E / PSR 900 E at the end of the docu-
ment
3. CONFORMITY OF USE
Use the device only to cook meat, bacon, fish, hamburgers, sausages, onions, shell-
fishes, vegetables..., and also for fried eggs and omelettes…
4. WAY OF FUNCTIONING
This griddle plate is fitted with steel plate (10 mm deep). The plate’s smooth surface
provides direct heat transfer to the food being cooked, without heat loss at the centre
as in the periphery thanks to incoloy heating elements (1 for PSR 400 E, 2 for PSR
600 E and 3 for PSR 900 E ) that cover the entire cooking surface.
To turn on and preheat the plates, just turn the thermostat control knob (n°3 on pic-
ture) on the wished position. The green pilot light ignites (n°1 on picture), the device
is on and the orange pilot light ignites (n°2 on picture), plate is heating.
When orange pilot light switches off, the device is ready for the cooking.
During cooking, the temperature can be regulated thanks to thermostat control knob
(n°3 on picture) to avoid phenomenon of overheating. Orange pilot light indicates
heating periods.
Meat is cooked at a temperature around 250° - 300°C.
Your machine is fitted with a removable juice collector tray (n°5 on picture)forthe
evacuation of cooking juices and fat.It must be regularly emptied. It is recommended
to pour some water into the drip tray at the beginning of cooking to facilitate the
cleaning and avoid the solidification and the accumulation of fat in the drip tray
Never use the machine without the collector tray (n°5 on picture).

304045-6-7 en ma 2012-01 4/8
On/off pilot light Outlet for juices and fats
Thermostatic pilot light Juice collector tray
Thermostat
5. FUNCTIONING / MANIPULATION
a) Installation / assembly:
- Unpack carefully the device of its packaging.
- Place the griddle plate on a plane and heatproof surface.
- Never place the device near a wall or near a partition makes of combustible materials
even if it is very well isolated.
- A distance of minimum 10 cm with the partition or the wall is necessary.
- Remove the red sticker from the plate and the protective film around the machine
without forgetting the one on the drip tray (n°5 on picture). Use a solvent like acetone or
other solvents to remove these labels.
b) First starting:
During the first use, warm your machine up outside during about 30 min to evacuate
residual smokes of manufacturing oil from the metallic parts. This may emit a slight
smell for a few moments.
1
2
3
5
1 2
4
4
53

304045-6-7 en ma 2012-01 5/8
First cleaning
Clean the device before the first use. (See 6 Cleaning)
Connection of the device
- Check that the tension and the frequency of the electricity network suit to the values
indicated on the descriptive plate.
- Make sure that every control knob is positioned on 0.
- Check that neither the cord nor the plug are damaged
- Unwind completely the electric power cable and connect it in a plug connected with
the earth.
- The device is connected.
NB: in case of connection of the device in a plug without earth protection or directly
on the electricity network, confide its connection to a qualified person .
c) Use of device :
Elements of command and display
Never use the machine without its drip tray (n°5 on picture).
Putting on
Turn on the thermostat control knob (n°3 on picture) on the wished position: the
green pilot light (n°1 on picture) and the orange pilot light (n°2 on picture) ignite.
The machine is warming up. Once orange pilot light (n°2 on picture) is off, the
machine reached the wished temperature.
Grease the plates before each cooking.
Temperature setting
Set the temperature by positioning the thermostat (n°3 on picture) to the desired
temperature. The orange pilot light (n°2 on picture) switches on if a higher level
of temperature is required and switches off when the same is reached.
It is not necessary to leave the device switched on at full power. It is necessary
to adapt the temperature to products to be cooked to limit the energy con-
sumption.
If your food sticks on the plate, reduce the temperature of the thermostat
Command/Display Function
Thermostat (n°3 on picture) On/off + Temperature setting
Green pilot light
(n°1 on picture) Machine on (pilot light on)
Machine off (pilot light off)
Orange pilot light
(n°2 on picture) Machine is heating (pilot light on)
Temperature reached (pilot light off)

304045-6-7 en ma 2012-01 6/8
Stopping the appliance
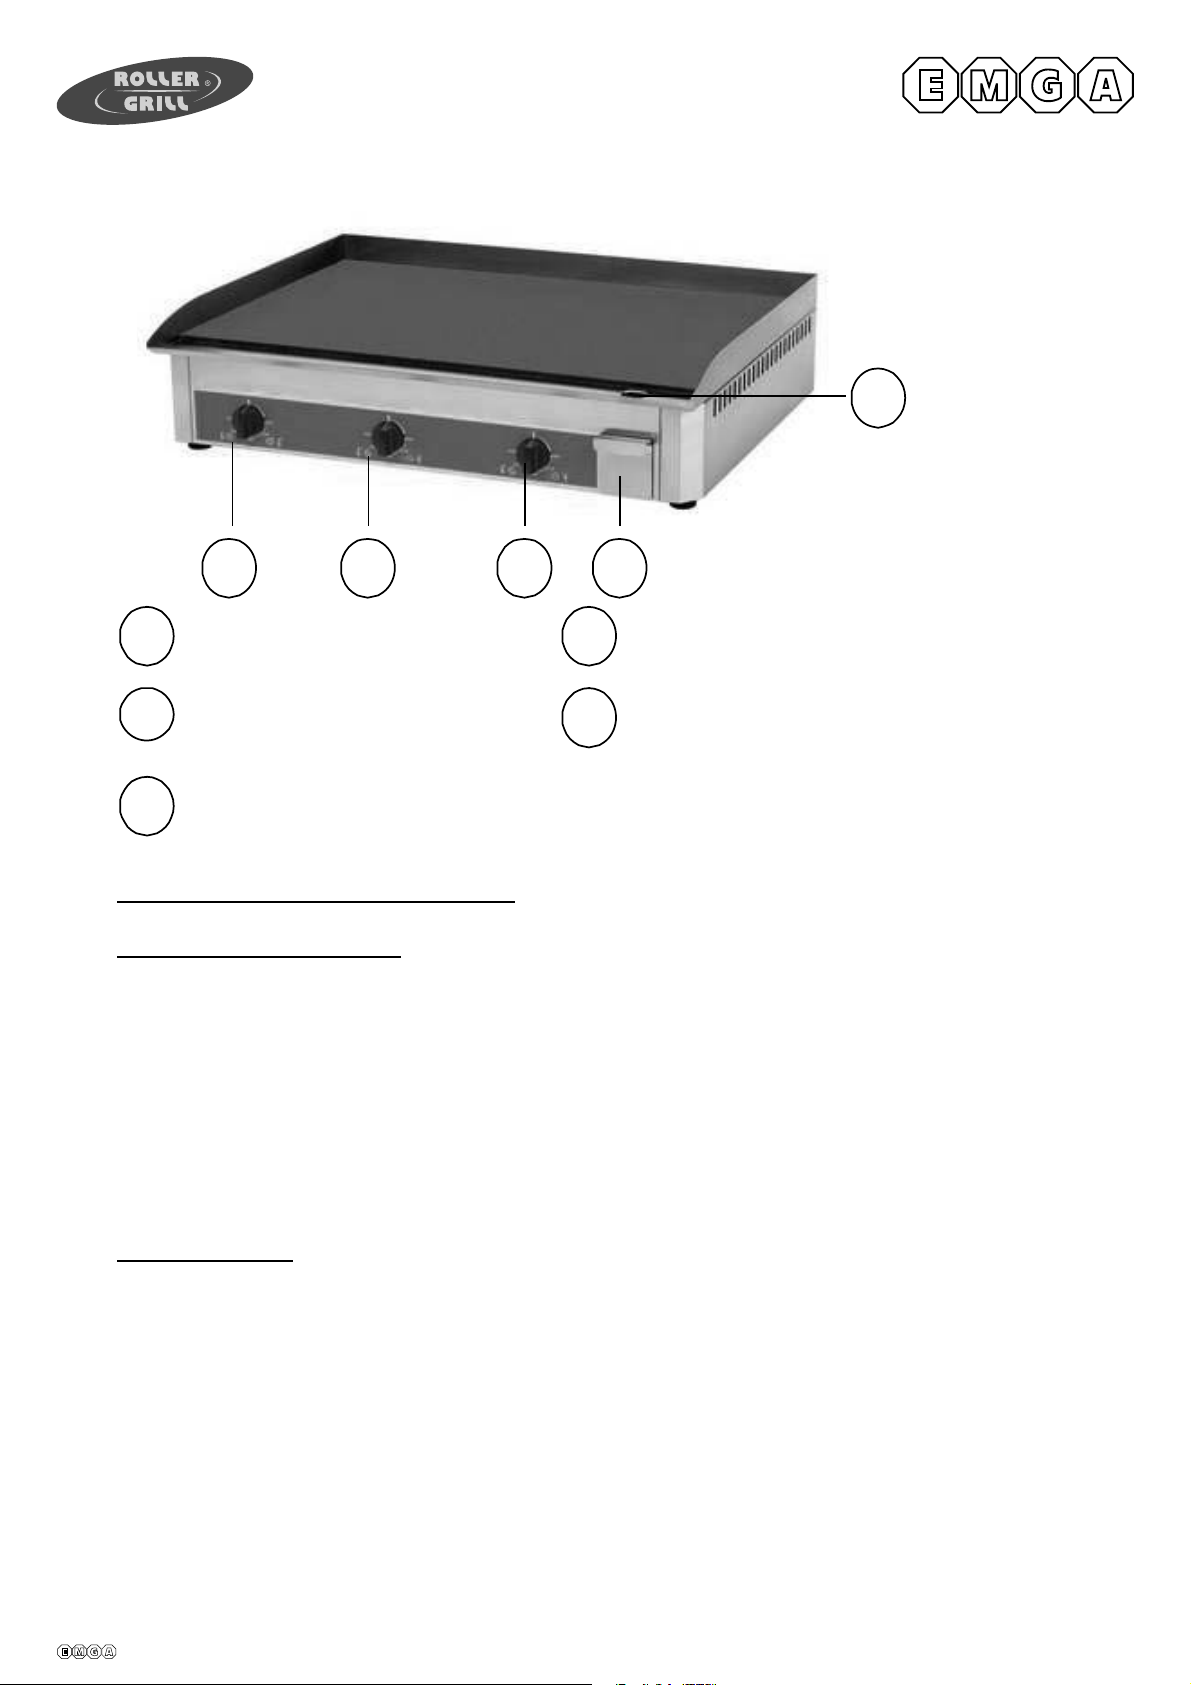
Set each control knob (n°3 on picture) on 0: the green pilot light (n°1 on picture)
switches off. The appliance is no longer functioning.
Disconnect the power cable.
Clean the appliance. (see 6. Cleaning)
d) Breakdown / repair:
In case of breakdown or of damaged part, please call your after-sales service and
confide any technical operation to qualified person.
When you contact the after-sales service of your distributor or your store, give him the
complete reference of your device (commercial name, type and serial number). This
information appears on the visible descriptive plate behind the device.
6 CLEANING AND MAINTENANCE
Disconnect the device.
The plate is still hot:
- Drain most of the fats and cooking juice with the wooden spatula towards the
outlet (n°4 on picture) in front of the plate.
- Let the plate cool down and clean it with warm soapy water and a slightly abra-
sive pad. Collect the cooking residues in the drip tray (n°5 on picture).
- Then use some white vinegar to neutralize the cooking smells.
- Finally, wipe the plate before putting it away or using it again.
Do not put ice cubes or other on the plate that is still hot (deglazing), which may
lead to a violent thermal shock, permanent damage and coloration of the plate.
The plate is cold:
- Clean the plate with a wet sponge and some dishwashing liquid.
- Wipe the plate with a soft and clean cloth.
- Remove and empty the tray (n°5 on picture) filled with fats and cooking juice.
- Clean the tray (n°5 on picture) with a wet sponge and some dishwashing liquid
(can also be washed in a machine) and wipe.
- After the tray (n°5 on picture) dries, put it back in the appliance.
- Clean the outer case of the appliance without using any abrasive product.
- Never clean the appliance under a water jet, the infiltrations may cause irrepara-
ble damage to the appliance.
- Never immerse the appliance, cord or plug in water or any other liquid to avoid
any electric shock.

304045-6-7 en ma 2012-01 7/8
Attention to the capacity of the drip tray (No.5 in the photo): consider emptying
it regularly, any overflowing inside the appliance may cause irreparable dam-
age.
During a prolonged non-use, we recommend you strongly to keep the device shielded
from the humidity .
7. TECHNICAL SPECIFICATIONS
Wires colours correspondence Phase 1 Brown
Phase 2 Black
Phase 3 Grey
Neutral Blue
Earth Yellow-Green
8. NORMS AND LEGALS DISPOSALS
The device is conform to :
IEC 60335-1
IEC 60335-2-38
EN 55014
EN 61000
9. ELIMINATION OF THE ELECTRIC AND ELECTRONIC WASTE
The device respects the directives:
2002 / 95 / CE ( DEEE) N°34270064800021
2002 / 96 / CE ( ROHS)
Never put the device among household waste.
The device must be put down in a centre of recycling for the electric equipments.
Models PSR 400 E PSR 600 E
Outside dimensions 400x475x230 mm 600x475x230 mm
Cooking surface 400x400 mm 600x400 mm
Weight 19 Kg 29 Kg
Power 3000 W 2 x 3000 W
No element 12
Current 13 A 13 A / Phase
Voltage 220-240 V N~ 380-415 V 3 N ~
PSR 900E
900x475x230 mm
900x400 mm
39 Kg
3 x 3000 W
3
13 A / Phase
380-415 V 3 N ~

304045-6-7 en ma 2012-01 8/8
The materials of the device are indeed reusable. By eliminating correctly the electric
and electronic wastes, the recycling and quite other shape of re-use of worn equip-
ments, you participate in a significant way in the environmental protection.
For any information about the collection of electric and electronic waste, please con-
tact your distributor.
10. GUARANTEE
Conditions of guarantee
The guarantee applicable to any device is the commercial guarantee of the distribu-
tor or the retailer. Please contact the store where you bought your device to know the
precise conditions.
The guarantee grants no right for damages.
The dispositions which follow are not exclusive of the profit of the legal guarantee
planned by articles 1641 and following ones of the Civil code relative to the defects
and the latent defects.
Exclusion clauses of the guarantee
Bad installation and bad maintenance, in particular if they do not respect cur-
rent regulations or instructions appearing in this user guide. Any violent ther-
mal shock leading to irreparable damage of the plate is not covered by the war-
ranty. (Deglazing = sudden cooling with ice cubes and cold water when the
plate is still hot after cooking).
Cannot benefit from the guarantee the repairs required as a result of false opera-
tions, of inappropriate use, of carelessness or of excess loads of the device, as well
as those resulting from variations of the power supply, over tension or from defective
installations.
The damage due to shocks, bad weather is not flatware by the guarantee. The mate-
rial travels at the risks of the user; in case of delivery by carrier, the consignee has to
have reservations towards the carrier before any delivery of the device.
The guarantee comes to an end in case of intervention, of repair, of modification by
no qualified persons, or of use in inappropriate purposes.
This manual suits for next models
2
Table of contents
Other Roller Grill Griddle manuals
Popular Griddle manuals by other brands

Nostalgia
Nostalgia MyMini MGD50R Instructions and recipes

Vulcan-Hart
Vulcan-Hart Vulcan 924RE Installation & operation manual

Bartscher
Bartscher FTE91MA0 Installation, operating and maintenance instructions

ROCKET COOKING
ROCKET COOKING RCMG-24 Installation & operation manual

Hamilton Beach
Hamilton Beach StepSavor manual

Star
Star BG3 Installation and operation instructions