Roper 20" User manual

,,,
,-.
RoPER
IMPOR’IIANT:
Installer: Leave IrWaUation Insb-uction.5 with the appliance
Homeowner Keep Installation Instiuctions for future reference. . ’
W$ 5*tail+G &tructions for local in+ector’s uSe., .’ i: ) s, ‘-L-
:”
i ._ / ‘_.‘. .,‘,&,i% ““- /; . .’ :
.’
; I. ,.s ‘_ ( ; .\’ :,
-”
,: ..,“.%.Z.-;
__ ,.. “,“</’“. _ -6 ,h: F;:?A\” ~~ ?., : / <. ._c ’ -_,_ .A

Before you start.. .
Check location where range will ALL OPENINGS IN THE WALL
be installed The location should OR FLOOR WHERE THE RANGE
Proper installation is your responsibility be away from strong draft areas.
Make sure you have everyihing necessoly such OS windows, doors. and TE;JC;; INSTALLED MUST BE
, -,
J venrs o( ram rne
for carrecr Insrallatlon. It ISme reSWn~lDll!N s?rcna neonnc
ofthe installer to compl,
clearance specified on the serial/rating
nhta The rtxinlirotina elate con be,,
ranae should be located for
con7enlent use In the kitchen.
Recessed inst allaticns must
Note: Clearances specified
are for combusiible walls and
Cablnef ODenIna dlmsnslons
liquids in the vicinity df this
or any other appliance.
I
w,,.a,b orcupboa,~ Mot are, shown m&t be used.
r=d - Ib - Given dlmensicns provide
lopmudta4’mh
0” clearance.
.
surfaceburners cuuse5 ‘1
risk Of being burned.
To reduce risk, Itiallation
are alreaay provraea. /
reduce hazard by lns~alling a
range hood. l-lo& should extend 5
minimum beyond front of cabinets.
Tools needed for inskliioMon.
Gas Supply
Requirements
Observe all governing codes
and ordinances.
A
This ixstallatbn must confcfm
m W’WI kc01 CC&S and ordlnonces
In the absence of lccal codes, Installatbn
must oonfwm with American Natbnal
Standard, Natbnal Fuel Gas code ANSl
2223.1 -lotest edttbn.
FOR YOUR SAFETY 1
if you smell gas:
1. Open windows.
2. Don’t touch electrical switches
3. Extinguish any open flame.
4. Immediately call your gas
supplier.
1FOR YOUR SAFETY t
Do not store or use gasoline
or other flammable vapors and
Gfouncled electrical
outtet:
is required See
Electrical Requirements.
B
I Input ratings shown on the
serial/rating plate are for
eleVOtim5 uo to 2.000 leet. For
elevations dbove 2.ooO feet. ratings
should be reduced at a rate of 4% lor
each KKKI feet above sea level
PANEL A
C
This range is equipped for use
n
wifh NATURAL gas. It is design-
certified bv A.G.A. for NATURAL and L.f?
gases wittiappmpriaie conversion, The
serial/rating plate located under the
cti~op
has information on the type of
gas that can be used. If this information
does fd agree wifh the type of gas
available. check with the local gas
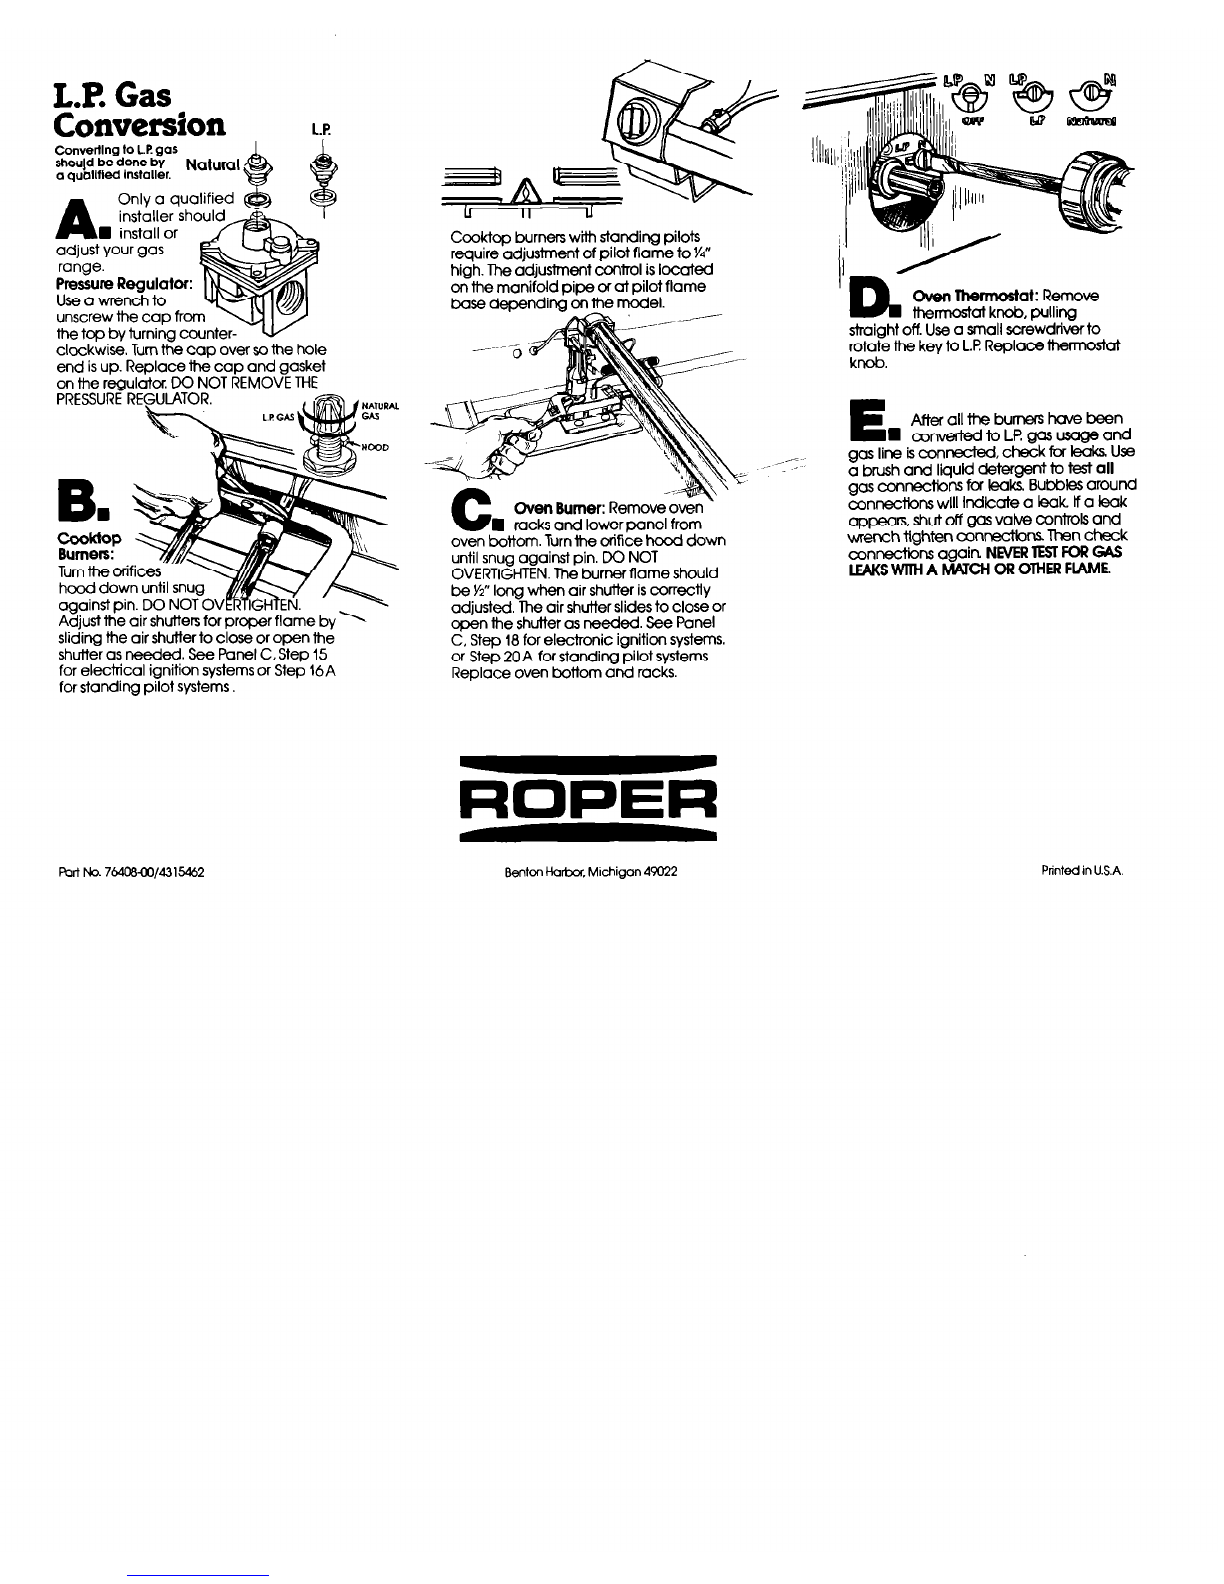
supplier. See backcover for L.P gas
conversion instructions.
D
Provide a gas supply line of
n
%” rigid pipe to the range
location. Pipe
joint
compounds resistant
to the action of L.P. gas must be used.
With L.P gas, piping or tubing size can
be K” minimum. L.P gas suppliers usually
determine the size and malerials used
on their system
E
If local codes permit. A.G.A.
I cetiifred flexible metal tubina
(new) is recommended for connecting
this
range
to the gas supply line. Do not
kink of damage the flexible tubing when
moving the range. A Y9’ male pipe
thread is needed for connection to
The supply line shall be
6dPPed with an aPDrOVed
shutoff
valve
This valve should be
loabd in the same rcom as the ronae
and
should be in a location that allows
ease of opening and closing. Do not
block access to shutoff valve.
G
If rigld
m suo~lv line. o combindon of
pipe fittings h&t be used to obtain an
in-line connection to the range. All sfralns
must be removed from the supply and
fuel lines so range will be level and in
line.
(r
lmportanl: Observe all governing
codes and ordlnanceo.
Mobile Home instaiiation
The installation of this range must
conform to the Manufactured Home
Construction and Safety Standards,
Title 24 CFR. Part 3280 (formerly the
Federal Standard for Mobile Home
Construction and Safety, Title 24. HUD
(part
280).
When this range is installed In a mcbile
home, it must be secured to the flow
during transit. The procedure used in
steo 8.Panel I3 Isonemsthcdof
se&ring range to the mobile home.
Other p&edures are avallable and
adequate If they ccnfotm to the
standards listed above,
Copies of the standard listed above
may be obtaIned from:
‘Amedcan Gas ksoclatlon
15% Wilson Boulevard
Mlngton.Vlrglnla 22209
“National Flm ProtectIon Assoclallon
Battety March Park
Qulncy, Massachusetts 02169
H
n
The inlet pressure to the
regulator should be as follows
for both operation and checking
regulator setting:
NATURAL GAS:
Mlnlmum pressure 6 Inches
Maxlmum pressure 14 Inches
1.PGAS;
Mlnlmum pressure 11Inches
Maxlmum pressure 14 Inches
I
The range and its lndlvlduol shut-off
l
valve must be discmnected from
the gas supply piping system during any
presurre testing of that system at test
pressures in excess of k psig (3.5 kPa).
The range must be isolated from the
gas supply plp~ng system by closing 11s
indrvidual manual shut-oft valve during
any pressure testing of the gas supply
pIpIng system ai test pressures equal to
or less than % psig [3.5 kPa].

Electrical
Requtrements
(If model Isso equipped.)
Warnlng: Improper connection of the
equipment grounding conductor can
result In a risk of eleclrlcal shock.
A 120 Volt, 60 Hz. AC only, 15 Ampere
fused electrical supply is required
[time-delay fuse or circuit breaker is
recommended) It is recommended that
a separate circurt serving only this
appliance be provided DO NOT
USEAN
DClENSlON CORD.
A wiring diagram is included in literature
pUCkage. The wiring diagram is also
located on the back of the range.
Recommended
Groundtng Method
DO NOT,UNDERANY CIRCUMSTANCES,
REMOVE THEPOWERSUPPLYCORD
GROUNDING PRONG.
For your personal safety. this appliance
must be grounded. This appliance is
equipped with a power supply cord
having Cl 3-prOnQ QrOUndinQ plUQ. TO
minimize possible shock hazard. the
cord must be plugged into a mating 3
prong grounding type wall receptacle,
grounded in accordance with the
National Electrical Code, ANSI/NFPA
70-1987”ond local codes and
ordinances. See Figure 1. If a mating wall
receptacle is not available, it is the
personal responsibility and
obligationof the customer
to have o properly J-P-
Qrwnded z-prong
wall receptacle
insfolk by 0
qualified
electrician
Figure 1
Temporary -
Grounding Method
DO NOT, UNDERANY CIRCUMSTANCES,
REMOVE THEPOWERSUPPLYCORD
GROUNDING PRONG.
l+ FvwetWPPI”cc4
Electrical ground Is required on this
appliance
If changing and properly grounding
the wall receptacle is imwssible and
where local &des permit [consult your
electrical inspector], a temporary
adaDtor mav be ~luooed into the
existing 2-p&g wallZceptacle to mate
with the J-prong power supply cord
If this is
done. you must
connect a
separate copper Qrcunding wire (No. 18
minimum] to a grounded cold water
pipe by means of a clamp and then to
the external Qrounding connector screw
&J naf ground lo a gas supply pipe or
hot water pipe. Do
not connect to
electrical supplyruntil appliance Is
permanently grounded
See Figure 2.
‘Grounded cold water pipe must
have metal continuity to electrical
ground and not be interrupted
by plastic, rubber or other electrrc
insulating connectors such OS
hoses. flttlngs. washers or gaskets
(including water meter or pump).
Any electrical insulating connector
should be Jumped OS shown With
length of NO. 4 wiresecurely clamp
to bare metal at both ends.
PANEL B
Now Start...
With range in kitchen.
Remove racks and other ports
Place one foot on the Shlpping
n
base. Tilt range forward slightly
to free rear legs. Gently lower range to
floor. Tilt range backwards until front legs
are free.
3
n
Remove shipping materials.
tape and protective film from
range. Do not remove cardboard
shipping base at this time.
4
Adjust the leveling legs to a
n
point where the range base
does not touch the floor.
Insert backguard supports
nto holder on the sides of
nQe.Press backguard
til locked into place.
fi cooktop and insert
ckgUOrd electriCal
onnector plug into
receptacle in right
rear of burner box
area Check that
wirrng is not kinked
or pinched between
lden and backguard.
6
Plug the electrical cord into the
n
grounded Ouilet.
7
Move the range into final
n
operating position. Remove
cardboard Shipping piece from under
range.
Range must be secured
when mobile home is moved.
I II II
8
If this range is installed
n
in a mobile home, it must be
adequately secured when mobile
home is moved
Remove the broiler drawer by lifting
Slightly and pulling out of range.
Remove the lower oven tee panel.
Remove leveling legs.
Secure the range using %” bolts,
washers and nUts through tte leveling
leg holes. Replace oven to-e panel and
broiler drawer. Skip Step 9.
Callout
numbers correspond to steps.
screw the legs up or d&n to adjust.
Note: Oven must be level for satisfactory
baking conditions.
Pressure regulator
supply pipe to the pressure reguiator in
order: manual shut-off valve, H” nlpple,
K” adapter, flexible connector. Yz”
adapter. and Yz” nlpple.
Flexlble,connector
” adapter K” adaDbf
WARNING: THEREGULATOR IS DIE CAST.
IF IHE CONNECTION IS MADE TOO
TIGHT, II WILL CRACK RESULTING IN A
GAS LEAK AND POSSIBLEFIREOR
EXPLOSION.
11
Use pipe joint compound
n
resistant to the action of L.l? gas
to Seal all gas conrectlons. If flexible
connectors are used, be certain
connectors ore not kinked

12
8 Open the shut-off valve in
the gas supply line Wait a
few minutes for gas to move through
the gas line
13
W Use a brush and llquld
detercent to test
all
aas
connectkons for l&s Bubbles &und
conrectbns will Indicate a leak ff a leak
appe5-s. shut off gas vah/e controls and
wrench tighten connectbns Then check
connections agaln. NMR TEST FOR GA.5
LEAKS
WTiHA MATCH OR OTHERFLAME.
Clean all detergent solutbn from range.
Initial llghtlng and gas tlame
adjustments depend on type of system
-electronic ignitionorstanding pilot,
Raise cooktop and check which system
is avallable. Continue installation.
following steps under the heading for this
range’s system.
Ekhonlc Ignition System
Electronic ignition systems operate within
wide voltage limits but proper grounding
and polarity is necessary. In addition to
checking that the outlet provides 120 volt
power and is correctly grounded. the
Cooktop and oven burners use
electronic igniters rn place of standing
pilots, When the ccoktop control is
fumed to the “LITE” position, the system
creates a spark to light the burner. This
sparking continues until the control IS
turned to the desired settina. When the
oven control is turned on th; sparking
WIII continue until oven pilot ignites. then
the sparking stops automatically
‘ANEL C
I Check the
operation of the
cooktop burners.
Push in and turn each
control knob to “LITE”
position The flame should light within
4 seconds.
00 not leave the knob In the ‘UTE
aosltlon after burner Ilahk.
15
After burner lights, turn
n
control knob to “HI” position.
Check each cook-tw burner for prcper
flame. The small Inner cone should have
a very distinct blue flame YA”to Yz” long.
The outer cone is not as distinct as the
shutter to the widest opening that will not
cause the flame to lift or blow off the
burner. Repeat as necessary with each
burner.
17
n
Check the
operation of the oven
burner Push in and turn
the oven control knob to
300°F. The oven burner
should light in 50 to 60 seconds. This
delay is normal. The oven safety valve
requires a certain time before it will
open and allow gas to flow.
Check the oven burner for
n
proper flame. This flame
should be YI’ long, with inner cone of
bluish-green, an outer mantle of dark
blue and should be clean and soft in
character No yellow tips. blowing or
oven flame needs 0 be
adjusted. loosen screw and
adjust the air shutter until the proper
flame appears. Tighten screw
Standing Pilot Systems
‘Q
A
i4’. knobs are in the “OFF”
Be sure all control
--
position. Raise the
-
Use a match to light
both pilots. Adjust pilot
adjustment screw so
pilot flame tip ISYd” to 3/s” high and
centered in the hole in the pilot housrna.
If the flame is too high, carbon [soot) will
accumulate under the cooktop.
A
15.
Check the operation of the
ccoktop burners. Push in and
turn each control knob to “LITE” position.
The flame should liaht wlthln 4 seconds.
Do not leave the l&ob In the ‘NE”
posltlon atier burner Ilghts.
After burner Ilghts. turn
control knob to “HI” position.
Check each&&top burner f&proper
flame. The small inner cone should have
a very dlstlnct blue flame YZ to M” long.
The outer cone is not as distinct
as the inner cone.
I
17
A
H If burners need adjusting for
proper flame, adjust the air
shutter to the widest opening that will not
cause the flame to lift or blow off of the
burner. Repeat as necessary with each
Remove the lower oven rack and oven
bottom. Hold a liohted match to the
opening In the toij of the pilot at the rear
of the oven burner No pilot adjustments
are reauired.
ation of the
sh In and turn
the oven control knob to 300°F. The oven
burner shwld light in 50 to 60 seconds.
This delay is normal. The oven safety
valve requires a certain time before it
will open and allow gas to flow.
20
A
Check the oven burner for
n
proper flame. This flame
should be ti” bng, with inner cone of
bluish-green, and cuter mantle of dark
blue and should be clean ana soft in
character. No yellow tips. blowing or
lining of flame should occur.
If oven flame needs to be
adiusted. loosen screw and
adjust the air shutter until the proper
flame appears. Tighten screw Replace
oven bottom and oven rack
To get the most efficient
use from your new Roper range,
read your Roper Use and
Care Guide. Keep Installation
Instructions and
Guide
close to the range
far
easy reference.

C

LX Gas
Conversion
L.P.
install
or
adjust your gas
range.
Pressue Regulator:
Use a wrench to
unscrew the cap
the top by turning counter-
clockwise. Turn the cap over so the hole
end is up. Replace the cap and gasket
on the regulator. DO NOT REMOVE THE
sliding the air shutter to close or open the
shutter as needed. See Fanel C. Step 15
for electrical ignition systems or Step 16A
for standing pilot systems.
Cc&top burners with standing pilots
require adjustment of pilot flame to W
high. The adjustment control is located
on the manifold
pipe
or at pilot flame
base depending on the model.
-
Oven Burner: Remove oven
racks and lower wnel from
Oven Themmtat: Remove
hsmostot knob, pulling
straight off. Use a small screwdriver to
rotate the key to L.PReplace thermostat
knob.
E
After all the burners have been
W c0nertedtoLP.gasusageand
gas line isconnected, check fcx leaks Use
a brush and liquid detergent to test all
gas connections for leaks Bubbles around
connectIons will lndlcate a leak lf a leak
appears, shut off gas vatve controls and
wrench tighten annectlons Then check
connections again NEVERlESl FOR GAS
lEAKSWlTHAMKCHOROTHERFiAME.
oven bottom. Turn the orif& hood down
until snug against pin. DO NOT
OVERTIGHTEN. The burner flame should
be Yz”long when air shutter is correctly
adjusted. The air shutter slides to close or
open the shutter as needed. See Panel
C, Step 18for electronic ignition systems.
or Step 20A for standing pilot systems
Replace oven bottom and racks.
ROPER
Benton Hartxw. Mchigan 49022 Printed in U.S.A.
Fwl No. 7blclsm/43 15462
This manual suits for next models
1
Table of contents
Other Roper Range manuals

Roper
Roper FGP305KW User manual

Roper
Roper FGP305KW User guide

Roper
Roper 9761805 User manual

Roper
Roper FGP325Y User manual

Roper
Roper FES340Y User manual

Roper
Roper SEC350X User manual

Roper
Roper FGP314TQ0 User manual

Roper
Roper FGP325G User manual

Roper
Roper FGP335Y User manual

Roper
Roper FEP310KW4 User manual

Roper
Roper REP34800 User manual

Roper
Roper FGS326RD User instructions

Roper
Roper REE32302 User manual

Roper
Roper FGS397X User manual

Roper
Roper FEP350Y User manual

Roper
Roper FGP335B User manual

Roper
Roper FES310Y User manual

Roper
Roper FGS326RD User manual

Roper
Roper FEP310KW0 User manual

Roper
Roper FES385Y User manual