7
Stereo/Bridged Mono
Mode Selection
It is useful to think of the RMB-1066 as three
stereo amplifiers in a single chassis. Each of
the three pair of amplifier channels can be
operated in Stereo or Bridged Mono mode.
• Stereo mode: Conventional 2-channel stereo
operation for a pair of amplifier channels.
Minimum speaker load: 4 ohms.
• Bridged Mono mode: Bridged Mono mode
more than doubles the power into a single
speaker. Minimum speaker load: 8 ohms.
The two modes are selected by three rear panel
switches, one for each pair of channels. Ste-
reo or Bridged Mono configuration is inde-
pendent for each pair of channels. You can
configure some pairs of channels in Stereo
mode and others in Bridged Mono mode.
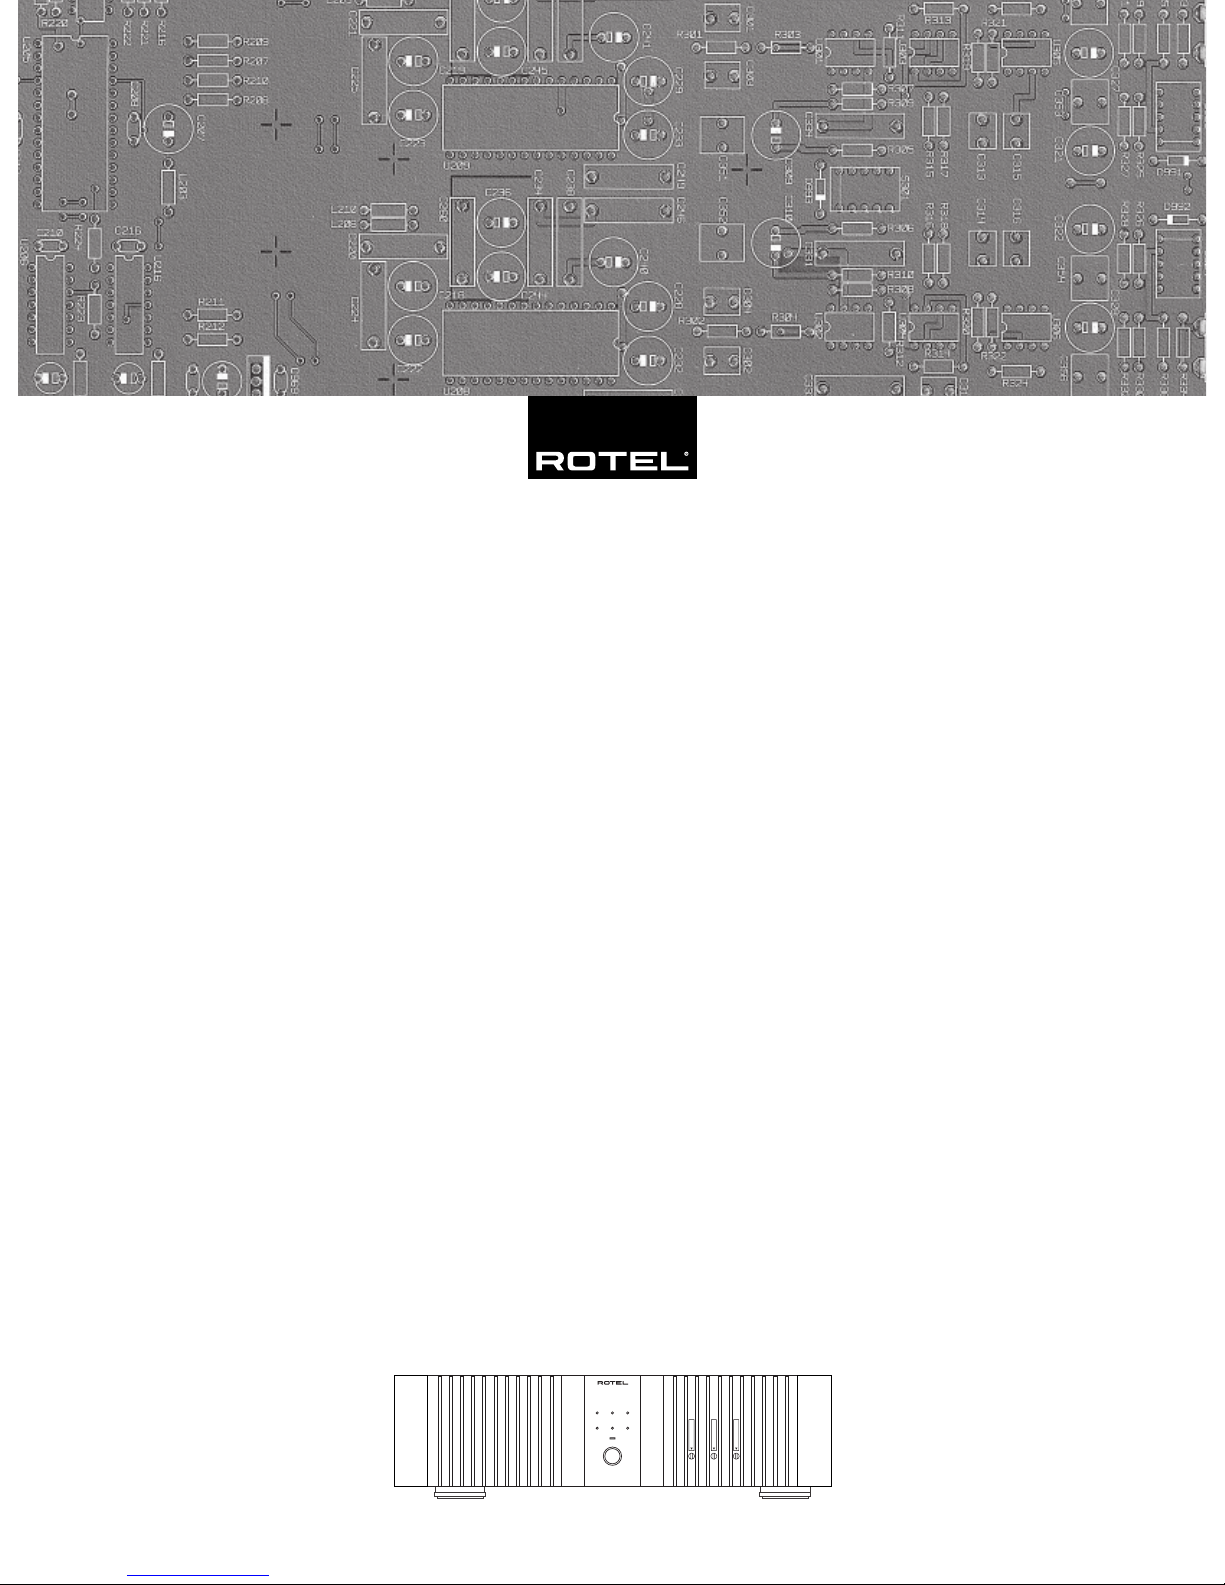
Input Select Switches
Bridged Mono LEDs
A rear panel switch adjacent to the inputs
selects Stereo mode or Bridged Mono mode
for each of the three pair of amplifier chan-
nels.
For Stereo mode: Slide the switch asso-
ciated with the desired pair of amplifier chan-
nels to the right, use both LEFT and RIGHT input
connectors, and connect one speaker to each
pair of speaker connectors.
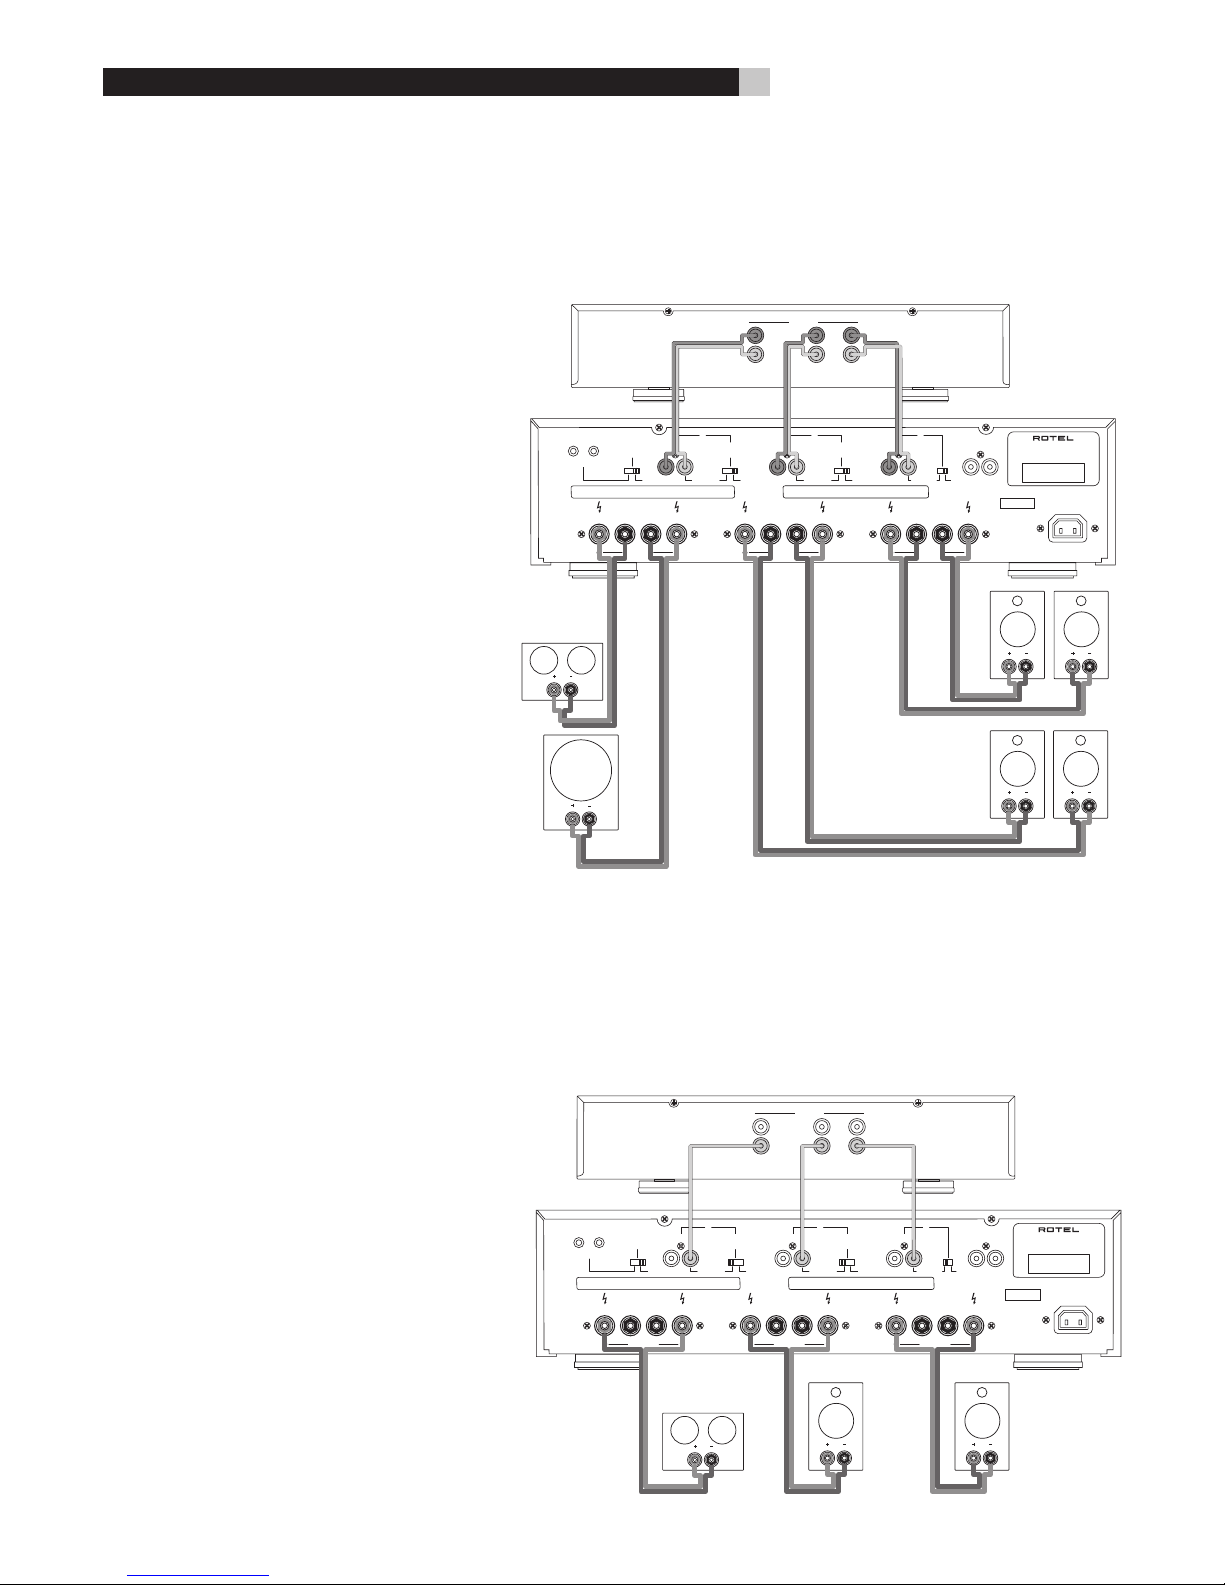
NOTE:
For groups “B” and/or “C”, you
can also place the INPUT SELECT switch in
the center LINK position for Stereo mode.
This routes the input signals from the “A”
group to the inputs for that pair of ampli-
fier channels.
For Bridged Mono mode: Slide the switch
to the left, use only the LEFT INPUT connec-
tion, and connect only one speaker to the two
outer speaker connectors. The BRIDGED
MONO LED will light to indicate Bridged Mono
mode.
Signal Connections
The RMB-1066 provides standard conven-
tional input connections — unbalanced RCA
type connections as found on nearly all au-
dio equipment.
There is also a pair of SIGNAL OUTPUT LINK
connections for passing the input signal con-
nected to the “A” pair of channels on to an-
other audio component. Additionally, the input
signal to the “A” pair of channels can be
automatically linked to the inputs for the “B”
and/or “C” channels, so that a separate in-
put signal cable is not required for those chan-
nels, for example in large systems where the
RMB-1066 is being used to drive multiple pairs
of speakers in stereo mode.
RCA Inputs
See Figures 2 and 3
There are two RCA inputs for each of the three
pair of amplifier channels. These RCA inputs
accept audio signals from preamplifiers or
surround sound processors. Use high qual-
ity audio interconnect cables for best perfor-
mance.
NOTE: You can link the inputs for group
“A” to groups “B” and/or “C” by placing
the INPUT SELECT switch in the center LINK
position. No input connection is required
for that group. Placing the switch in this
position leaves that pair of channels in Ste-
reo mode.
For Bridged Mono operation, use only
the LEFT INPUT for that pair of amplifier chan-
nels. Connect one output channel of your
preamp to the LEFT INPUT on the RMB-1066.
Make sure that the INPUT SELECT SWITCH
selector switch is in the BRIDGED position.
Input Level Controls
Three controls on the front panel, one for each
pair of amplifier channels, provide input level
adjustments. These allow you to adjust the gain
of the amplifiers to match other components
in an elaborate system.
Use a small flat blade screwdriver to turn the
control clockwise to increase gain. Turn the
control counterclockwise to reduce gain.
Signal Output Link
This pair of RCA connections can be used to
pass unprocessed input signals to another
audio component, for example to “daisy-
chain” an additional amplifier to drive a sec-
ond set of speakers.
The input signals connected to the “A” inputs
are always available at SIGNAL OUTPUT LINK
connections. These input signals can also be
linked to the “B” and/or “C” inputs by play-
ing the INPUT SELECT switch associated with
that pair of inputs in the LINK position.
Speakers
The RMB-1066 has three groups of speaker
connectors, one for each pair of amplifier
channels. These can be used to connect two
loudspeakers in Stereo mode, or to connect
one loudspeaker in Bridged Mono mode.
Speaker Selection
The nominal impedance of the loudspeaker(s)
connected to the RMB-1066 in the various
operating modes should be:
• Stereo mode: minimum 4 ohms
• Bridged Mono mode: minimum 8 ohms
When driving multiple pairs of speakers
connected in parallel to a single amplifier
channel, the effective impedance the am-
plifier sees is cut in half. For example, when
driving two 8 ohm speakers, the amplifier
sees a 4 ohm load. When driving multiple
speakers in parallel, select speakers with
a nominal impedance of 8 ohms or higher.
Speaker Wire Selection
Use insulated two-conductor stranded wire to
connect the RMB-1066 to the speakers. The
size and quality of the wire can have an au-
dible effect on the performance of the system.
Standard speaker wire will work, but can re-
sult in lower output or diminished bass re-
sponse, particularly over longer distances. In
general, heavier wire will improve the sound.
For best performance, you may want to con-
sider special high-quality speaker cables. Your
authorized Rotel dealer can help in the se-
lection of appropriate cables for your system.
English