Window glazing
Wooden beading
Window frame
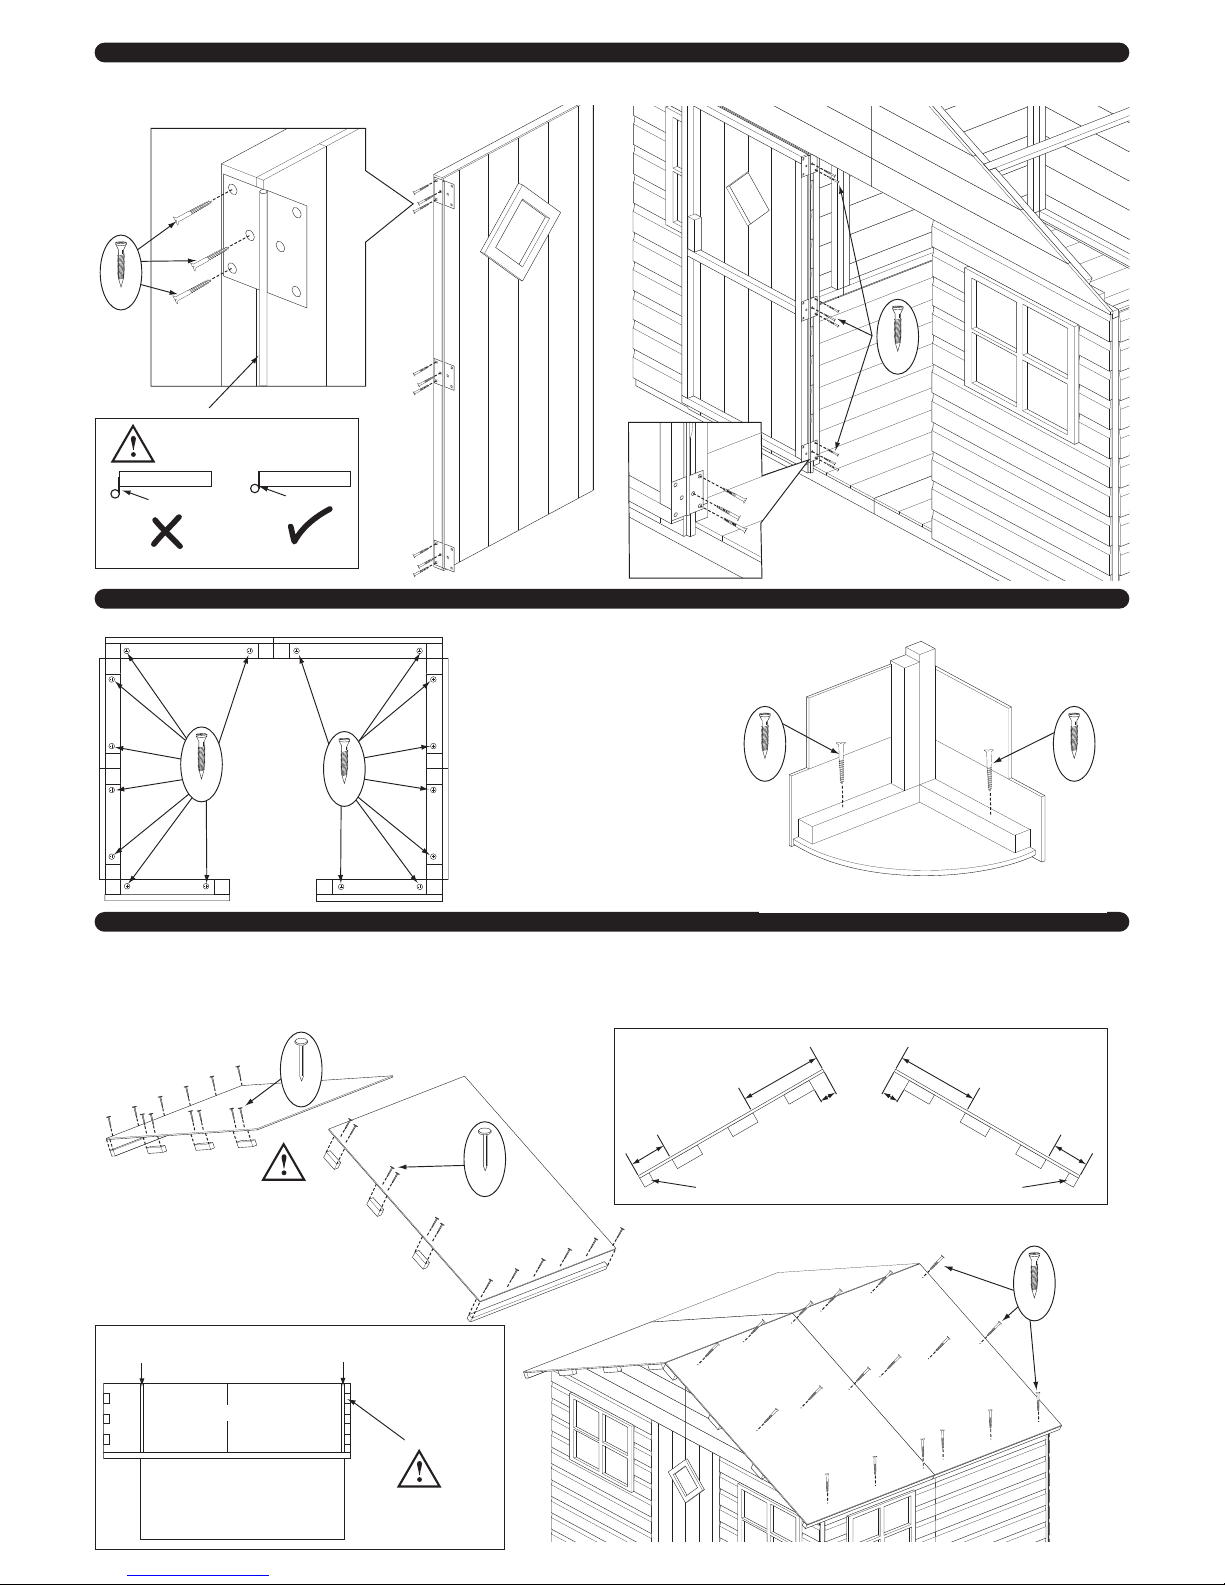
10. Window glazing
We recommended that a waterproof sealant is applied around the edge of the glazing before fitting. Place window pane on the inside of the window frame, Using 3 x 20mm
nails per beading strip. nail the top and bottom strip first and then the sides. Repeat for all four windows.
2012 © Rowlinson Garden Products Ltd
We constantly improve the quality of our products,
occasionally the components may differ from the
components shown and are only correct at time of
printing. We reserve the right to change the
specification of our products without prior notice.
If in doubt of any aspect regarding the assembly, use or safety of your playhouse please contact us :
Help Line (Normal Office Hours) 01829 261121
ROWLINSON GARDEN PRODUCTS LIMITED
Green Lane
Wardle Nr.Nantwich
Cheshire
CW5 6BN
10mm 10mm
View of door frame from inside playhouse
50mm
19mm
Important safety and maintenance information - Retain for future reference
•This product is not suitable for all children under 36 months, due to it having small parts and sharp points.
•For Family domestic use only.
•For outdoor use.
•Ensure any loose knots are removed from any panels, to reduce risk of choking. Fill holes with a suitable wood filler obtained from most DIY stores.
•It is recommended that the playhouse is positioned on a level surface at least 2m from any structure or obstruction such as a fence, garage, house, overhanging
branches, laundry lines, electrical wires.
•It is recommended that the playhouse is not installed on concrete, asphalt or any other hard surface.
•The company takes every care to ensure all goods are clean and free from splinters and rough edges prior to leaving the factory.
•Visually inspect the playhouse and to reduce the risk of splinter sand down any sharp edges or rough surfaces.
•Checks and maintenance of the main parts (fixings, etc) should be made at the beginning of each season and at regular intervals throughout. If checks are not carried
out the product could become unsafe.
•Ensure all fastenings are securely located.
•Oil all metallic moving parts.
•Ensure that the pointed ends of all nails, screws and other fastenings are not accessible on any surface of the constructed playhouse, and that all heads and surfaces
of these fastenings are either flush with the surface or countersunk.
•Always ensure a safe, suitable treatment is used to ensure the safety of children and animals.
•Assembly and installation instructions must be kept for further reference.
Shiplap buildings come ready stained but this is only a preparatory treatment.To VALIDATE the guarantee, the building must be properly treated with a recognised
external wood preserver WITHIN 3 MONTHS of assembly and RE-TREATED ANNUALLY thereafter.The building must also be erected on 50mm x 50mm
treated wooden or similar bearers (These are not supplied with the kit.) Ground contact must be avoided.
Timber Information.
As timber is a natural material, there are certain weather conditions that may affect the materials properties. In times of excessive dry spells the material may lose some
of its internal moisture causing a certain degree of shrinkage on a panel and in periods of excessive rain there will be a certain amount of swelling throughout the wooden
panels.This process can not be avoided. If you have problems with certain boards shrinking in dry spells try to decrease the amount of direct sunlight on the building or
the amount of air passing over the building. During hot spells spray water directly onto the panels with the aid of a garden hose.
This product meets the requirements of BS EN 71 Parts 1 & 2:2011 and 3:1995
11. Door catch
On the inside of the playhouse, fit the catch mounting block using 2 x 50mm screws to the frame of the apex panel at the top left corner of the door frame. The roller
catch is fitted to the mounting block and the catch plate is fitted to the door. Position them so that when the door is shut the two parts clip together. Once in position fix
the the two parts of the catch in place with 4 x 10mm screws. To the front of the door position the door handle half way up the right-hand side. Secure in place using
4 x 19mm black round head screws.