ROWonAIR MOJO 18 User manual
Instruction manual
MOJO 18' | DUDE 18' | AIRKAYAK 16'
Edition: 12/2019

Safety guidelines
Rowing can be dangerous and physically demanding. Rowing can lead
to dangerous situations developing that result in serious injury. The user
of this product should have a basic understanding of the risks involved
when rowing and be aware of consequences. Please observe the
following safety standards when using this product:
Get instruction on how to row.
Get training in First Aid and take a First Aid kit with you.
Always wear a life jacket or similar buoyancy aid.
Never row alone.
Wear clothing appropriate for the weather conditions. Cold water and/or cold
weather can cause hypothermia.
Check your equipment before each use for signs of wear or failure.
Do not consume alcohol or take drugs before using this product.
Do not go rowing if there is flooding.
Watch out for the depth of the water, tide changes, dangerous currents and
sudden weather changes.
Explore waters you are not familiar with, with caution; carry the product if
necessary.
Do not exceed your rowing ability. Do not overestimate your capabilities.
Consult your doctor before you start with rowing training.
Follow the manufacturer's recommendations when using this product.
If extra accessories are added to the boat/board, only use materials approved
by the manufacturer; embarking or disembarking should remain unobstructed.
Read the instruction manual before using this product.
Edition: 12/2019

Table of Contents
1MOJO 18'............................................................................. 1
Overview.............................................................................. 1
Assembly ............................................................................. 2
Folding away........................................................................ 3
Additional information........................................................... 5
1.4.1 Positioning the Rowing Skid on the board............................ 5
1.4.2 Tying up & towing the board................................................. 6
2DUDE 18'............................................................................. 7
Overview.............................................................................. 7
Assembly ............................................................................. 8
Folding away........................................................................ 9
Additional information......................................................... 11
2.4.1 Positioning the Rowing Skid on the board.......................... 11
2.4.2 Tying up & towing the board............................................... 12
3AIRKAYAK 16' ................................................................... 13
Overview............................................................................ 13
Assembly ........................................................................... 15
Folding away...................................................................... 17
Additional information......................................................... 19
3.4.1 Securing the kayak seat & the foot rests............................ 19
3.4.2 Cleaning the boat............................................................... 20

1
1 MOJO 18'
Overview
1……MOJO 18'
2……Transport strap
3……Repair kit
4……5.4" fin
5……Air pump with hose
6……Backpack
1
2
3
4
5
6
2
Assembly
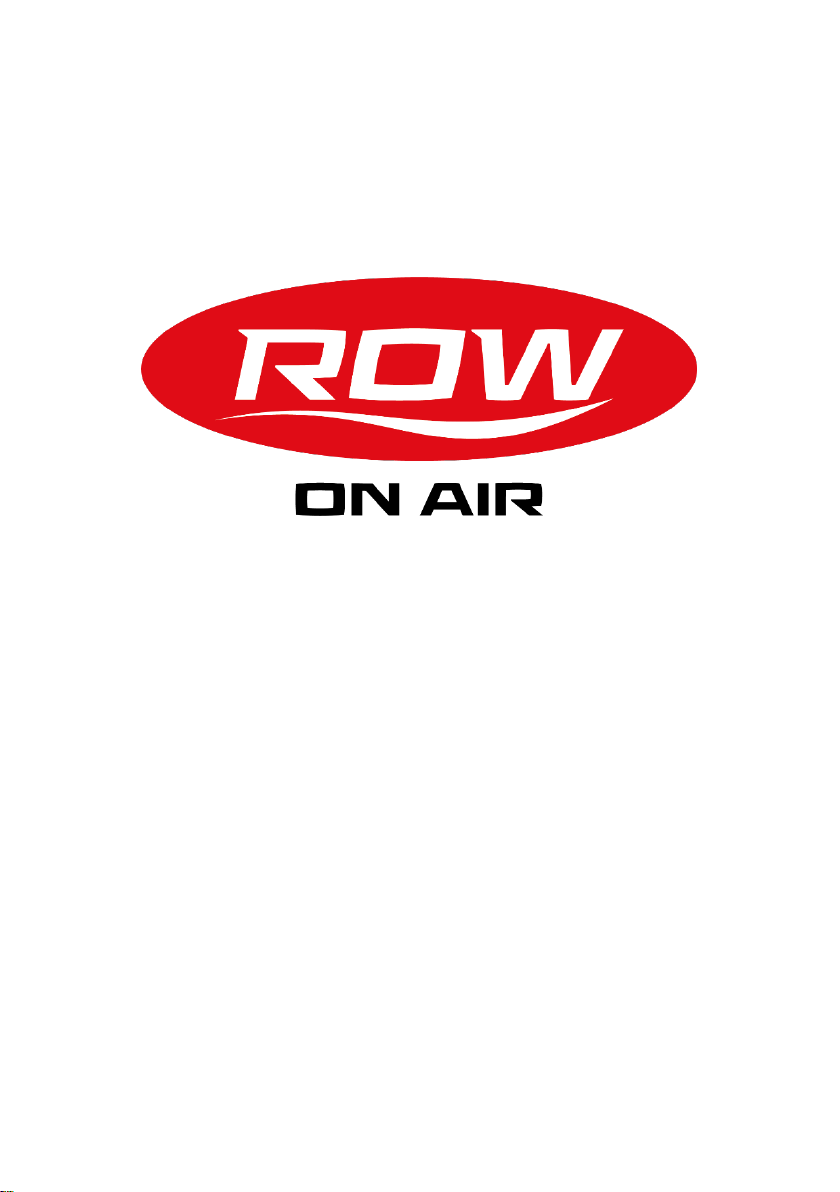
Step 1:
Make sure the valve pin is in the correct position before inflating. Push
the valve pin down and rotate anti-clockwise to ensure that the valve is
in the correct position to inflate.
Now connect the hose of the pump to the valve and pump up the board
to a pressure of 1.4 bar.
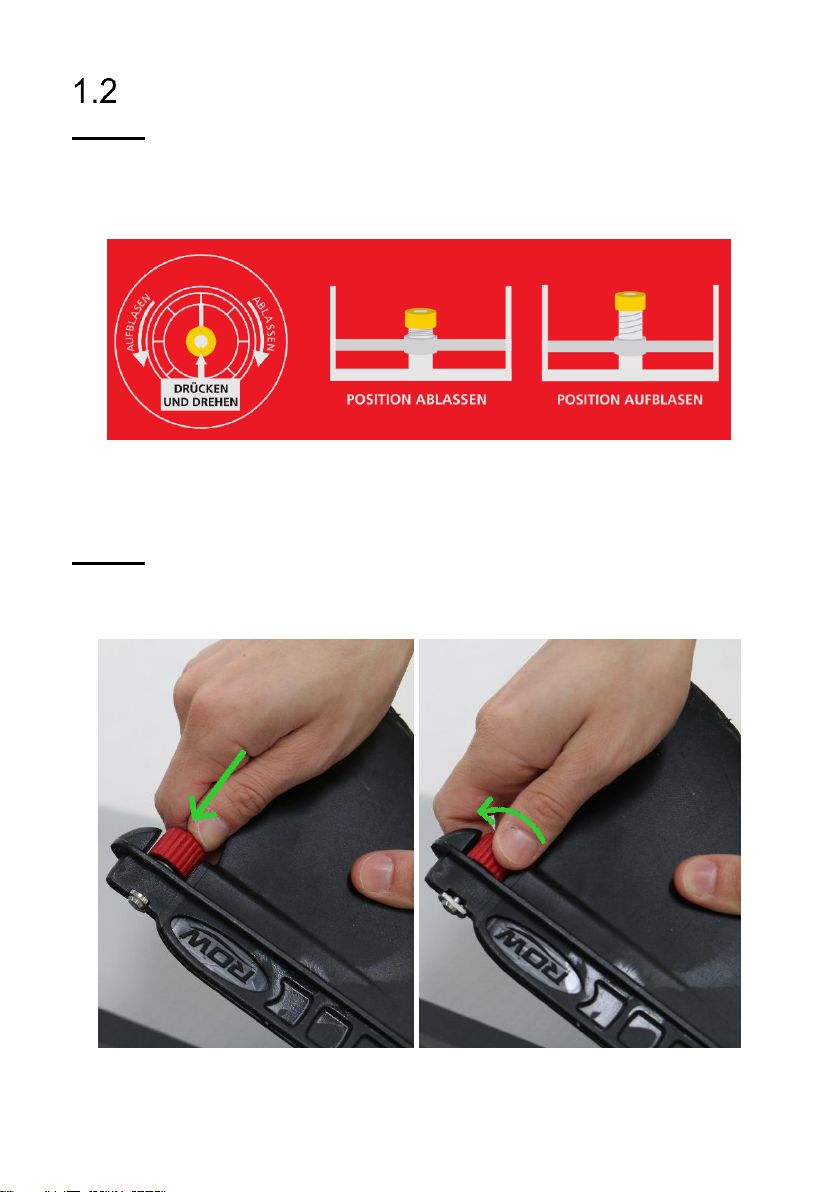
Step 4:
Press down the Easy-Mount fastener and rotate the knob to insert the
fin.
3
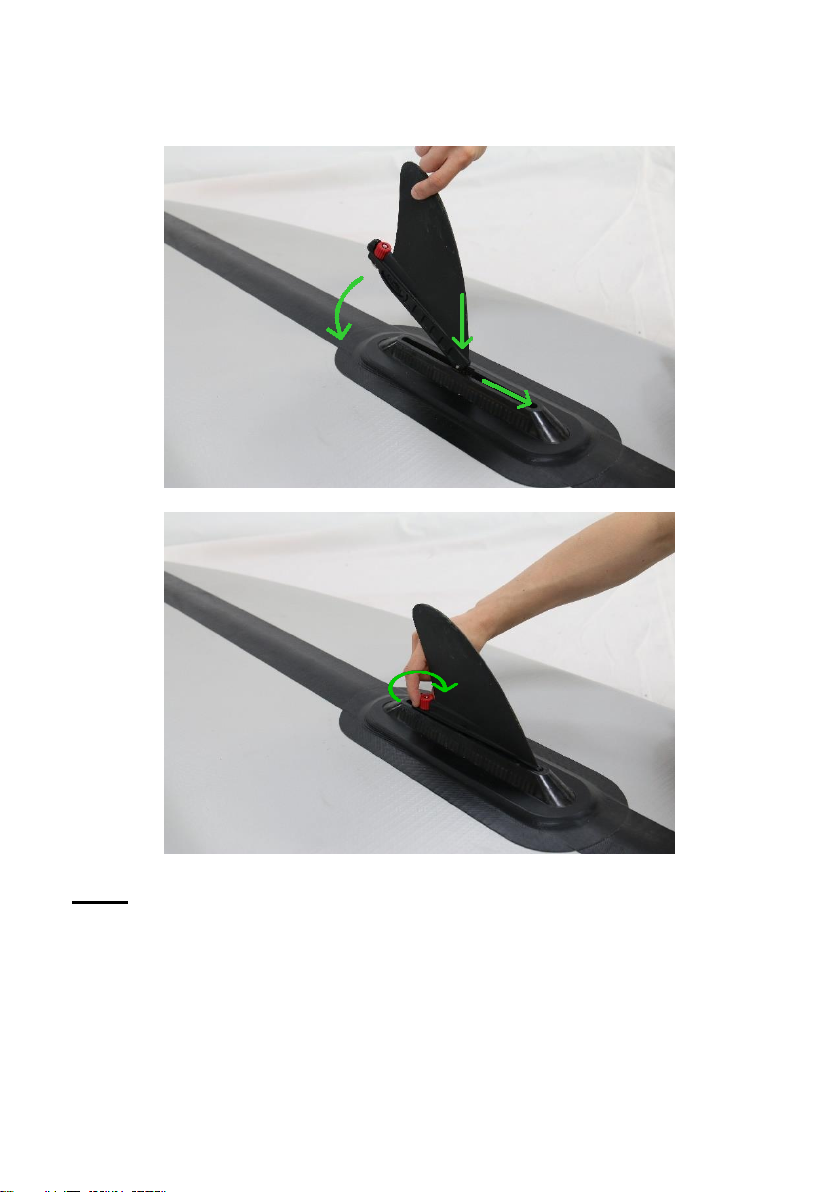
Slide the guide pin of the fin into the fin box rail and rotate the knob to
secure the fin in place. Make sure the fin is securely fixed in the fin box.
Note:
Do not drag the board over the ground. Place it in the water to avoid
damage. When the fin is inserted, make sure that it is not stressed by
the weight of the board or other objects.

4
Folding away
Step 1:
Fold over the stern of the board once so that the fold line is at the side
fold mark (black arrow). Then continue rolling up the board towards the
bow.
When the board is rolled up, place the transport strap around the rolled
up board and tighten the strap. The boat can now be easily stowed in
the backpack with the other accessories.
Note:
Make sure that the board is completely dry before folding it away. When
you are deflating the board, use the pump to extract the air from it.

5
Additional information
1.4.1 Positioning the Rowing Skid on the board
The MOJO 18' rowing board can be used alone, or in pairs (with two
rowing systems).
To row on your own, place the rowing system on the large non-slip mat
on the board. The position of the system can be adjusted by adjusting
the position of the front or rear three D-rings.
To row in pairs, position one rowing system at the front and one at the
back. Make sure that the rowing system support feet are on the large
and small non-slip mats

6
1.4.2 Tying up & towing the board
To enable the boat to be tied up or towed, there is a larger D-ring on
the bow of the rudder board.

7
2 DUDE 18'
Overview
1……DUDE 18'
2……Transport strap
3……Repair kit
4……5.4" fin
5……Air pump with hose
6……Backpack
1
2
3
4
5
6
This manual suits for next models
3
Table of contents
Popular Boat manuals by other brands


Boston Whaler
Boston Whaler CONQUEST 345 owner's manual

Jeanneau
Jeanneau SUN ODYSSEY 41 DS owner's manual

Meridian
Meridian 490 Pilothouse owner's manual

Advanced Elements
Advanced Elements AdvancedFrame Expedition AE1009 owner's manual

Robo Marine Indonesia
Robo Marine Indonesia GEOMAR user manual

Swallow Boats
Swallow Boats BayRaider owner's manual


