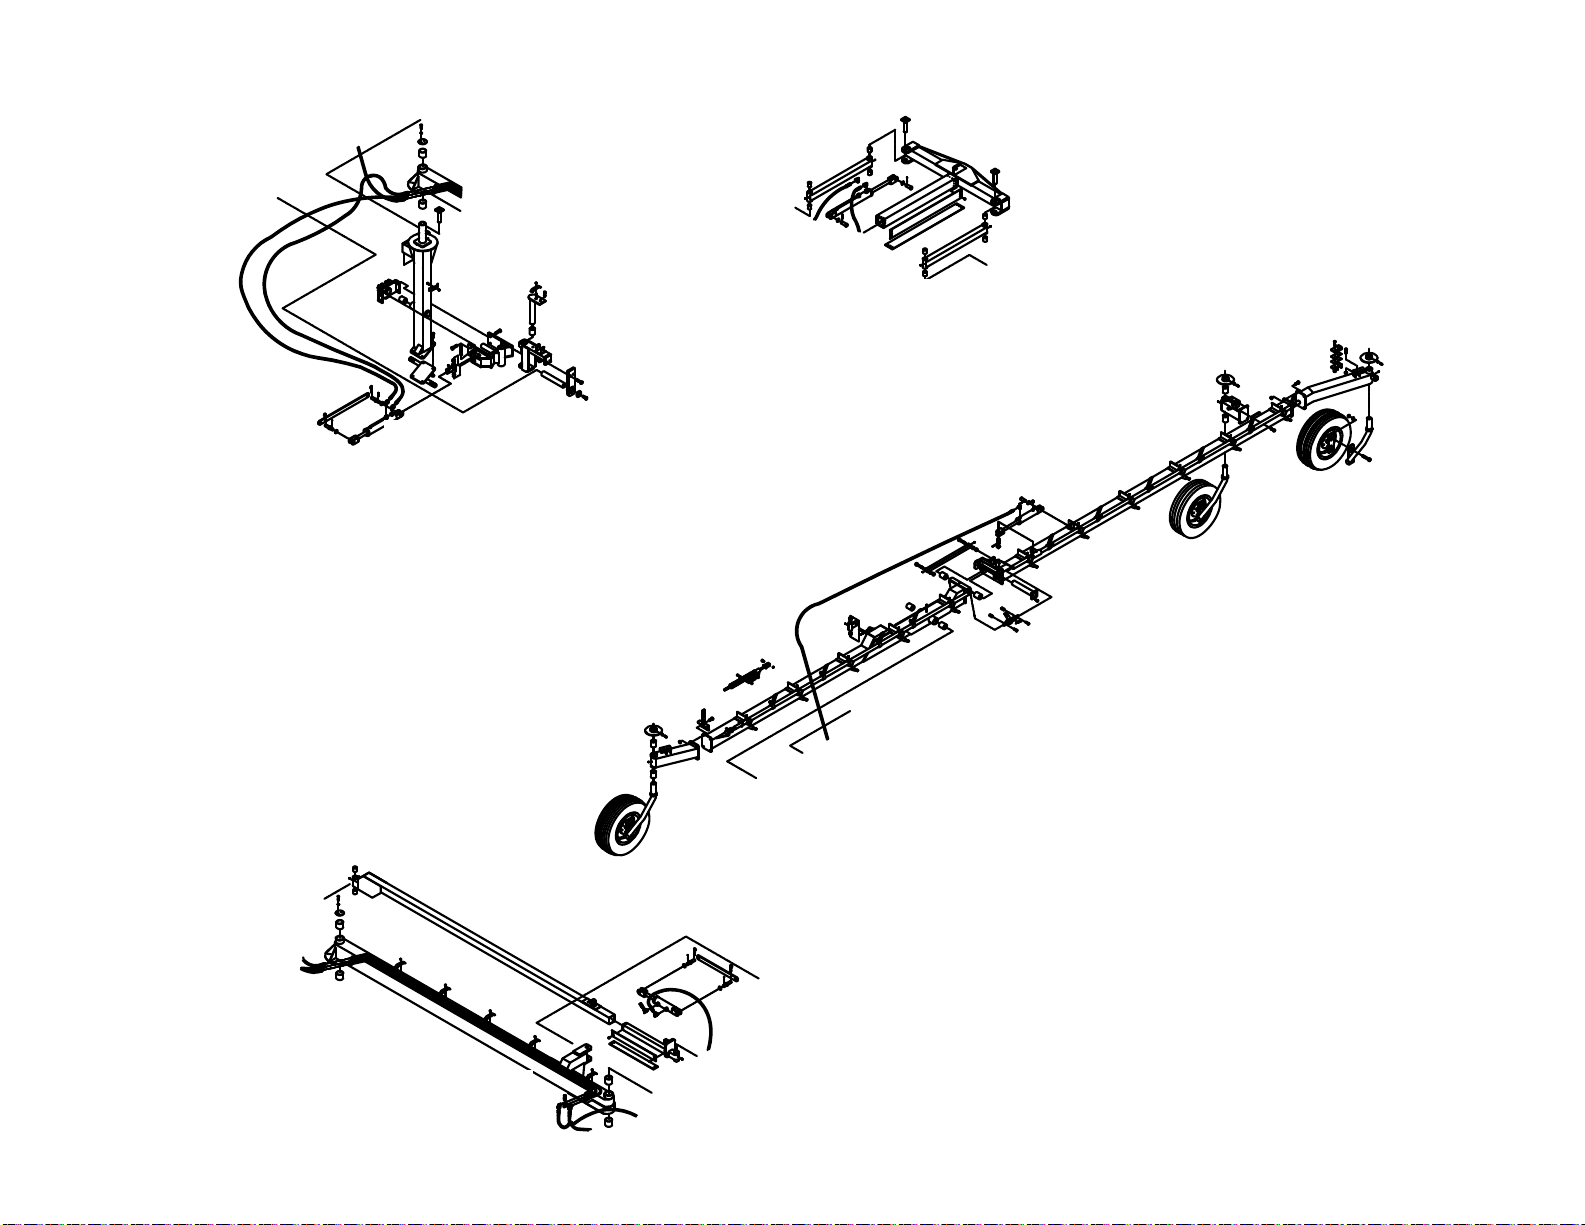
Rowse Ultimate V-Rake User manual

ROWSE HYDRAULIC RAKES COMPANY, INC.
84504 State Hwy 11 304 Simpson Road
Burwell, Nebraska 68823 O’Neill, Nebraska 68763
Phone: 308-348-2276 Phone: 402-336-3255
Fax: 308-348-2059 Fax: 402-336-3272
Toll-Free: 800-652-1912 Toll-Free: 877-336-3255
E-mail: [email protected]
Website: www.rowserakes.com
The
V-Rake
OPERATOR’S MANUAL
AND
PARTS LIST
Including Assembly and Operating Instructions and Parts List

ULTIMATE V-RAKE: COMPLETE
ULTIMATE V-RAKE: RIGHT WING
Page 41 -- Parts
ULTIMATE V-RAKE:
RIGHT MIDDLE LEG
Page 51 -- Parts
ULTIMATE V-RAKE:
MAIN
Page 59 -- Parts
ULTIMATE V-RAKE:
RIGHT UPPER ARM
Page 55 -- Parts

ULTIMATE V-RAKE: LEFT WING
Page 41 -- Parts
ULTIMATE V-RAKE:
LEFT UPPER ARM
Page 57 -- Parts
ULTIMATE V-RAKE:
LEFT MIDDLE LEG
Page 53 -- Parts
ULTIMATE V-RAKE:
ADJUSTABLE MAIN
Page 63 -- Parts

SERIAL NO. ________________________ PURCHASE DATE: _____________________
ROWSE HYDRAULIC RAKES CO., INC
84504 State Hwy 11, Burwell, Nebraska 68823 304 Simpson Road, O’Neill, Nebraska 68763
Phone: 308-348-2276 Fax: 308-348-2059 Phone: 402-336-3255 Fax: 402-336-3272
Toll-Free: 800-652-1912 Toll-Free: 877-336-3255
E-mail: rowserakes@rowserakes.com
Website: www.rowserakes.com
CONTENTS SUMMARY
SECTION
AIntroduction A
B Assembly Instructions B
C Operating Instructions C
D Safety D
E Service E
F Troubleshooting F
G Parts List G

TABLE OF CONTENTS
SECTION A: INTRODUCTION
To The Owner 1
General Outline of This Manual 1
Safety & Special Information 2
Limited Warranty 2
Warranty Details 3
Bolt Torque Information 4
Tire Ination Pressures 4
SECTION B: ASSEMBLY INSTRUCTIONS
Ultimate V-Rake Models Discussed 5
Serial Number 5
Assembly, Terminology, Terms & Phrases 6
SECTION C: OPERATING INSTRUCTIONS
Introduction 7
Operating Safety 7
Important 7
Function and Use of the Sight Gauges 8
Function and Use of the Hydraulic Valves 8
and Function Panel
Prior to Positioning Rake 9
Positioning the Ultimate Rake
- Without the Use of the Toe-In Function 10
- Using the Toe-In Function 12
- Back to Transport Position 13
- Back to Transport Position Using
the Toe-In Function 14
Function and Use of the Stabilizer Bar 15
Hydraulic Requirements 16
Removing the Air from the Hydraulic Lines 16
Adjusting Wheel Weight & Height 17
SECTION D: SAFETY
Safety Decals 18
Decal Maintenance 18
SECTION E: SERVICE
Safety Reminders 19
Lubrication 20-29
SECTION F: TROUBLESHOOTING
Introduction 30
Service Safety 30
Service Checklist 30
Troubleshooting Guide 31
Symptom 31
Not Raking Clean 31
Excessive Breakage of Teeth 31
Rake Wings Not Holding Position (Width) 31
Raking Wheels Will Not Go Down 32
Castor Wheels Shimmy (Wobble) 32
Raking Wheels Won’t Go Down on
New Rake 32
Hay Bunching, Plugging or Carrying
Over Rear Raking Wheels 32
Hydraulic Functions Don’t Work 32
SECTION G: PARTS LIST
Hydraulic Components RMT
- for Rake Without Kicker Wheels 34
- for Rake With Kicker Wheels 35-36
Remote Valve 37-40
Right Wing 41
Lift Rod Stabilizer Roller &
Compression Spring Assembly With Limiter 42
Hub Wheel & Tire Assembly 43
Flex Hinge & Wing, Right & Left 44-46
Optional Kicker Wheels 47-49
Upright Post & Positioning Wheel, Right 51-52
Upright Post & Positioning Wheel, Left 52-54
Arm, Positioning, Right 55-56
Arm, Positioning, Left 57-58
Center Frame (Platform) 59-60
Tongue Assembly 61-62
Tee Assembly 63-64
Transport Bar Assembly 65-66
Raking Wheel Assembly and
Raking Arm Assembly 67-68
Taillight Assembly 69-70

1
SECTION A:
INTRODUCTION
To The Owner General Outline Of This Manual
Congratulations on your selection of the Rowse
Ultimate V-Rake to aid you in your haying operation. This
operator’s manual will assist you in realizing the benets
you can gain from using the Rowse Ultimate V-Rake.
The Rowse Ultimate V-Rake has been designed,
manufactured, and tested to make you another satised
Rowse customer.
You will nd it very benecial to read this entire
manual to have a thorough understanding of the
Ultimate V-Rake before taking it to the eld. Also, keep
this manual handy for future reference. Become familiar
with the adjustments required to obtain maximum,
trouble-free, eciency and performance.
Proper operation and care of the Ultimate V-Rake
contribute immensely to its successful performance. A
properly lubricated, adjusted and cared for implement
saves downtime, labor costs, fuel, and repairs.
Haying conditions will vary from year to year. Items
aecting conditions include amount of moisture, kind of
crop, etc. Therefore, the normal settings outlined in this
manual are really suggested starter settings. Adjustment
may need to be made to t a particular raking situation.
Operation information contained in this manual will
aid in making the necessary adjustments. Consult your
Rowse Dealer concerning unusual eld conditions or
special applications.
Your Rowse Dealer will be glad to answer any
questions you may have on the operation and care of
this product. Also, for parts and service, see your Rowse
Dealer. Always use genuine Rowse parts to ensure
proper t and optimum performance.
Information in this manual is arranged under eight
main section headings.
Following the introduction, the steps for assembly
of the basic unit and optional equipment are discussed.
Then, important points in operating the Ultimate V-Rake
and optional equipment are covered.
Safety, service, and the troubleshooting guide give
additional operating information.
A parts list is also included in this manual. An index
in the back of the manual aids in nding information on
a specic item.
A
CAUTION
Read the Operator’s Manual.
Learn to operate this machine SAFELY.
Be alert. Observe ALL Safety Practices.
Machines can be hazardous in the hands of
an UNFAMILIAR, UNTRAINED or
COMPLACENT operator.
Don’t risk INJURY or DEATH.
!

2A
New Rowse
Agricultural and Industrial Machines
Rowse Hydraulic Rakes Co., Inc., (hereinafter“Rowse”).
Warrants each new agricultural and industrial machine
or equipment, (hereinafter “Product”) to be free from
defects in materials and workmanship under normal use
for which it was intended for a period of one year from
the date of purchase. The obligation of Rowse under this
warranty is limited to repairing or at its option, replacing
F.O.B. factory any part or parts which is reported in
writing to Rowse within 30 days from the date of
failure thereof and specifying the nature of the defect
or failure and which Rowse inspections shall disclose
to have been defective. It is the responsibility of buyer
to transport at his own expense the product to the
dealers service shop or Rowse factory. When requested
by Rowse, part or parts shall be returned for inspection,
transportation prepaid, to Rowse or a place designated
by Rowse. In no event shall Rowse be obligated for inci-
dental or consequential damages caused by such failure
or defect, including, but not limited to, the loss of crops,
inconvenience, rental of replacement equipment, loss of
prots, or other commercial loss.
There is no warranty with respect to used products
or new products that have been improperly assembled
by one other than an authorized dealer, modied or
altered, repaired, neglected, or used for purposes other
than those for which it was intended.
EXCEPT AS SPECIFICALLY WARRANTED HEREIN,
ROWSE DISCLAIMS ANY OTHER WARRANTY OF
MERCHANTABILITY, IMPLIED OR EXPRESSED, AND
FITNESS FOR PURPOSE. THERE ARE NO WARRANTIES
WHICH EXTEND BEYOND THAT FACE HEREOF.
Limited Warranty
Safety and Special Information
Safety Information
1. Throughout this manual and on machine decals im-
portant safety information appears with:
a) The Safety-Alert Symbol:
b) And one of the three signal words:
CAUTION, WARNING, or DANGER
2. Use of these three signal words is limited to safety
messages only.
3. The denition of each of these signal words follows:
CAUTION
Indicates a potentially hazardous situation which, if
not avoided, may result in minor or moderate injury.
It may also be used to alert against unsafe practices.
WARNING
Indicates a potentially hazardous situation
which, if not avoided, could result in death
or serious injury, and includes hazards that
are exposed when guards are removed. It
may also be used to alert against unsafe
practices.
DANGER
Indicates an imminently hazardous
situation which, it not avoided, will
result in death or serious injury. This
signal word is to be limited to the most
extremesituations,typicallyformachine
components which, for functional
purposes, cannot be guarded.
!
!
!
! !
4. For additional safety information, refer to Section D:
Safety.
Special Information
Messages that pertain to operational instructions,
maintenance messages, lubrication instructions, etc.,
use signal words such as: Note, Notice, Important, or
Attention. The signal word is set o in bold and all caps as
shown in the example below:
NOTE: Indicates a special point of information.

3
Warranty Detail
A
Introduction
The following information explains for you the details
of ROWSE’s farm equipment warranty. These details
include an explanation of the criteria for determining
warrant, those items which are included for warranty,
those which are not covered, and information about
how to obtain warranty service.
Warranty Determination
Only defective parts are covered under this warranty.
Any part found to be defective in accordance with the
provisions of this warranty will be repaired or replaced
by an authorized ROWSE dealer.
Items Covered by Warranty
ROWSE’s warranty includes the replacement or
repair of any part or parts of machines or attach-
ments on ROWSE new equipment purchased from an
authorized ROWSE dealer (except tires and tubes) which
are defective in material, workmanship, or both.
Obtaining Warranty Service
To obtain warranty service, contact the authorized
ROWSE dealer from whom the machine was purchased.
In the event this is not practical to do, any authorized
ROWSE dealer may perform warranty work. However, a
servicing dealer who did not sell the unit has the right
to charge the customer the dierence between their
normal shop rate and the rate Rowse allows for warranty
work.
Items Not Covered
1. Tires and tubes shall be warranted by the selling
dealer or by local representatives of the manufacturer
of said product.
2. Dealer Travel Time—The customer shall be
responsible for payment of dealer travel time to the
machine or to deliver the machine to the dealer’s
service shop for repair. ROWSE warranty does not
cover travel time.
3. Used Equipment—ROWSE warrant shall apply
only to original owner of new equipment sold by
an authorized ROWSE dealer. ROWSE shall have no
liability for used equipment.
4. No warranty shall be made on any equipment or
parts that have been modied, or altered in any way
without prior approval and knowledge of ROWSE,
nor is there warranty if service, other than normal
replacement of service items, is performed by
someone other than an authorized ROWSE dealer.
5. Normal Wear or Maintenance Parts—ROWSE shall not
be responsible for normal replacement parts such as
cutting knives, chains, belts, lters, oil, rake teeth, nor
for parts which are worn out unless they are deemed
to be defective in material or workmanship.
6. No warranty shall apply to damage resulting from
accident, misapplication, abuse, or damage caused
by environment; (such as exposure to corrosive
material).
Leased or Rented Units
If a unit is leased or rented, the warranty period
starts on the date the unit is rst leased and/or rented. If
the unit is sold to a second user at a later date, it is then
considered a used machine.
Improvements
ROWSE continually strives to improve its
products and, therefore, reserves the right to make
improvements or changes without incurring any
obligations to make such changes or additions on
equipment previously sold.
NOTICE
Charges for pick up and/or
delivery and service calls
are not covered by warranty.

4
1/4” 6 10 14
5/16” 12 19 27
3/8” 23 35 50
7/16” 35 55 80
1/2” 55 85 120
9/16” 75 130 175
5/8” 105 170 240
3/4” 185 300 425
7/8” 175 445 685
1” 270 675 1,030
1 1/8” 375 910 1,460
1 1/4” 530 1,250 2,060
A
Bolt Torque Information
1. Tighten bolts to torques shown in the chart unless
otherwise specied.
2. Bolts having locknuts with cadmium or wax nish
should be tightened to approximatley 50% of
amounts shown on charts.
3. Locknuts should be Grade C.
4. Over tightening bolts can cause as much damage
as under tightening. Tightening a bolt beyond the
recommended range can reduce its shock load
capacity.
5. Check and retighten all bolts, nuts, and set screws:
a) After initial 10 hours of use,
b) And again after every 50 hours of use.
TIRE INFLATION PRESSURES
1. Proper tire ination is important for safe and ecient
operation of the Ultimate Rake.
2. The recommended tire ination pressures are listed
in A-6.
Figure A6: Recommended Tire Pressures
Castor Wheels Front and Rear
9.5L x 15......................32 PSI
Center Positioning Wheels
11L x 15.......................45 PSI
Optional Front Wing Castors
ST225/75 R15 ............25 PSI
Figure A-7: Bolt Grade Designation
SAE-2 SAE-5 SAE-8
Figure A-8: Bolt Torque Information
A = Bolt Diameter
Bolt
Diameter
BOLT TORQUE in Ft-Lbs
SAE 2 SAE 5 SAE 8
Figure A-9: Recommended Torque for
Hub Bolts and Nuts.
NOTE: Do NOT overtorque.
Retorque after one hour.
Thread Recommended
Size Torque (Ft-Lbs)
1/2-20 UNF 80 - 90
9/16-18 UNF 110 - 120
5/8-18 UNF 125 - 135
3/4-16 UNF 275 - 285

5
B
V-Rake Models Discussed
All information in this manual pertains to the
Wheel V-Rakes Figure B-1 lists the Models covered in
this manual.
Figure B-1: Model Numbers and
Descriptions
Model Model
Number Description
ULT 17 17 Wheel Rake
ULT 19 19 Wheel Rake
ULT 25 25 Wheel Rake
ULT 27 27 Wheel Rake
Model Number and Serial Number
of Your Rowse Ultimate V-Rake
For future reference, record below the model
number and serial number of your Rowse V-Rake.
This information is stamped into the frame on the
top of the left front wing of your V-Rake. See Figure B-2.
Model Number: _________________________
Serial Number: __________________________
Serial Number and Model Number
(stamped into the frame)
FRONT

6B
SECTION B:
ASSEMBLY TERMINOLOGY, TERMS AND PHRASES
All Rowse Ultimate V-Rakes with which this
section deals with are completely set up and eld
ready. However, occasionally throughout this manual
references are made to specic areas of the V-Rake.
The following are explanations
of these terms and phrases:
A. “Right” or “Left” — As viewed from behind the
machine, looking in line of it’s forward travel.
B. “Front” or “Rear” of the rake — The “Front” is the part
closest to the tractor.
C. “Inside”, “Outside” or “Outward” — The “Inside” is the
side closest to the center of the rake. “Outside” is the
side furthest from the center, “Outward” is moving
from a point from center.
D. “Straight” or “Straighten” — Position parallel to the
line of travel (Usually referring to transport position).
E. “Toe-in” or “Toe-out” — “Toe-in” is turning the center
positioning wheels inwardly. “Toe-out” is turning the
center positioning wheels outwardly to a straight
position.
NOTE: Wings and Kicker Wheels are in
a “straight” position.
Shown below is the overall view of the complete v-rake with the terminology used to describe major areas.
FRONT
Hinge Wing
Left Front Wheel
Opt.
Front Wing Castor
Platform
Tee
Stabilizer Bars
Arm
Leg
Inside Center
Positioning Wheel
Outside Center
Positioning Wheel
Front Wing
Right Rear Wing
Lift Tube
Raking Wheel
Kicker Wheels
Tongue

7
C
SECTION C:
OPERATING INSTRUCTIONS
Introduction
1. This section deals with the operating instructions of
the Ultimate V-Rake. For assembly instructions, refer
to Section B.
2. Occasionally, reference is made to certain areas of
the Ultimate V-Rake. Here are explanations of these
phrases.
a) “Right” and “Left” — as viewed from behind the
machine.
b) “Front” or “Rear” of the Rake — the “front” is the
part closest to the tractor.
c) “Inside” or “Outside” — The “inside” is the side
closest to the center of the machine; “outside” is
the side away from the center of the machine.
3. Check and retighten all bolts, nuts, and set screws:
a) After initial 10 hours of use,
b) And again after every 50 hours of use.
c) Refer to the Bolt Torque Chart in Section A.
Operating Safety
Observe these instructions for your safety and for
the safe operation of the equipment.
DANGER
Do not ride or work on
equipment when it it is moving,
or is in a raised position.
! !
WARNING
Be aware of and stay clear of
pinch points that exist
around the equipment.
!
CAUTION
1. When hitching the Ultimate V-Rake to the tractor,
do not allow anyone to get between the tractor
and the Rake.
2. Operate at a safe speed.
a) Reduce speed when transporting
over rough ground.
3. Be sure to always use the SMV (Slow Moving
Vehicle) reector when using public roads.
!
IMPORTANT:
1. Review the Operator’s Manual and
all safety items before working with,
maintaining, or operating the V-Rake.
2. Machine must be in motion when
positioning wings in raking or
transport position.
3. Machine must be in motion when
adjusting width of machine.

8C
As with any piece of equipment, certain procedures
and guidelines must be followed to assure safety, ease
of operation, and operation without damage to the unit
while in use or when changing positions, or functions of
the rake.
Rowse has installed Sight Gauges or indicators to
assist the operator in positioning the rake in a variety of
positions. These gauges are located on the right hand
upright leg from which the right hand wing pivots and
the right hand positioning wheel is attached. These
gauges are white decals with black numbers and
lines with yellow pointers. The top gauge gives the
approximate position or width of the arms. The bottom
gauge gives the approximate position or angle of the
wings to which the raking wheels are attached and gives
the operator a guideline in setting of desired windrow
width.
EXAMPLES: When in Transport Position both the
pointers should indicate an approximate“0”-”0”reading.
(If pivotal wheels are “toed in”, reading will change).
When positioning arms are totally extended, top gauge
will show an approximate “10” reading. The lower gauge
will still remain at “0” until wings are turned into raking
position (angled). When wings are angled to give an
approximate 5 foot windrow, with positioning arms fully
extended, both gauges will indicate an approximate“10”
reading.
A reading of “5” on both gauges will give operator
an approximate 50% of total positioning arm extension
or 50% of maximum raking width, and an approximate
5 foot wide windrow. Positioning arms can be set at any
width between transport position to a fully extended
position.
IMPORTANT:
It is essential to set the positioning arms to their
desired position before changing the position of the
wings from transport position or a “0” setting of the
gauge. Likewise, it is also essential to position the
wings to the“0”on the sight gauge before moving the
positioning arms inwardly. FAILURE TO DO SO WILL
RESULT IN THE REAR WHEELS COMING TOGETHER
AND DAMAGING THE REAR RAKING WHEELS AND
OTHER COMPONENTS OF THE RAKE.
Remember, the gauges are not absolutes but a
guideline to assist the operator in placing the rake in its
desired position.
Rowse has equipped your V-Rake with an electric
over hydraulic control valve which enables you to
perform the 3 functions required to position your rake
hydraulically with only one tractor valve required. A
selector panel which mounts in the tractor cab allows
you to select which function you desire to perform.
1. The Red Toggle switch (#1) controls the Position
Arms movement.
2. The White Toggle switch (#2) controls the wings
(angle).
3. The Blue Toggle switch (#3) controls the “toe in”
function, which toes in the front of the positioning
wheels for easier movement of the positioning arms
inwardly or outwardly without adding excessive
pressure to the arm uprights or having to slide the
positioning wheels sideways.
4. The YellowToggle switch, marked“OPT”, is for units
which have the optional kicker wheels. This function
will turn the Kicker Wheels from raking position
(angled) to transport position (straight) hydraulically
for transport and should be done before rake is put in
transport position.
Function and Use of Sight Gauges Function and Use of the Hydraulic
Valves and Function Panel

9
C
1. Before attempting to position the Ultimate into eld position, operator MUST detach Stabilizer Bars from
the front of the rake wings. These bars secure the wings to the center frame during transportation of rake.
Failure to detach the Stabilizer Bars will result in from moderate to very serious and costly damage.
2. Before positioning rake, set the tractor hydraulics at slowest speed (turtle) on the tractor ow control.
Tractor should also be run at a low engine speed when positioning unit.
3. Loosen the brake assembly on top of each castor wheel.
4. Remove the “yellow stabilizer bars”from the function cylinders before attempting to position rake.
All Standard Ultimate V-Rakes are equipped with a toe-in function to assist in positioning the larger, heavier rakes,
especially when the area to position the rake is small. In larger areas the rake can be positioned without the use of the
“toe-in” function, however special attention is required.
If you choose to position rake without use of the toe-in function, follow the following procedure: Follow the 4
“Very Important” steps listed above under “Prior to Positioning V- Rake”. Under Item 4, only the two lower “yellow
stabilizer bars” near the center of the wings need to be removed.
PRIOR TO POSITIONING V-RAKE
VERY IMPORTANT

10 C
POSITIONING THE ULTIMATE V-RAKE
WITHOUT USE OF THE TOE-IN FUNCTION
Now that you’re familiar with the function and use of the sight gauges, hydraulic valve and control box, as well as,
the “Very Important, Prior to Positioning” procedures, you are now ready to start operation. A laminated procedure
card is enclosed with the owners manual and remote control box. The card is to guide and remind operator of basic
positioning procedures. Attach the card to the control box.
POSITIONING THE ULTIMATE V-RAKE INTO FIELD POSITION
1. Select the red toggle switch (#1). This controls the arm movement. Switch to“on” position (red light will come on).
Start tractor in forward motion and start activating the tractor valve designated to operating the hydraulic valve.
Tractor valve should be operated in an intermittent (start and stop) mode. This will allow the center wheels to
position outwardly with the least resistance and without damage to the unit. Using the top“sight gauge”as a guide
“0” being closed and “10” being fully extended, extend arms to desired width. Keep in mind “5” is approximately
1/2 of full width and “10” fully extended. When desired width is reached simply shut function #1 (red toggle) o.
2. Select the white toggle switch (#2) which controls the wing angle as well as the windrow width. Activate tractor
valve slowly and intermittently. Keep in mind an 8” cylinder is moving the ends of the wings from 10 feet to over
20 feet in an 8 inch stroke, so movement is very fast. If operator does not operate valve cautiously, the rear raking
wheels will crash. Extra caution must be taken if arms are not fully extended as opposing rear raking wheels will
collide. Shut function (#2) o. A more accurate width of the windrow can be set by using the wing function to get
close, but wider than, desired setting then switching to the arm function and moving the arms slowly inwardly
bring tile rear wheels closer together to desired width. When the ideal width of windrow for your operation is
reached it is recommended to place a piece of colored tape on the sight gauge decal where the “Pointer” (yellow
bar) indicates on both top and bottom decals. This will give a consistent windrow width from eld to eld.
3. If the Ultimate Rake is equipped with Kicker Wheels (three raking wheels in the center) the operator simply selects
the yellow (option) function. Activate and the wheels will turn into raking position.
4. Activate the tractor valve designated to raise the raking wheels, when wheels raise slightly, remove the 1/4” hair
pin clips located at the front end of the lifting tube. A hole to hold the hair pin clip is located in the angle iron lift
tube guide when not in use.

11
C

12 C
POSITIONING THE ULTIMATE RAKE
USING THE “TOE IN” FUNCTION
If you do not have sucient area to position rake without putting extreme pressure on the rake legs, the following
is the procedure to position the rake using the “toe in” function.
IMPORTANT: Detach the front stabilizer bars from the front wings. Set Tractor hydraulics at slowest speed
(turtle) on the ow control. Tractor should also be run at a low engine speed when positioning unit. Failure to
do so will most likely result in damage to the unit.
1. Function A - Actuate the #3 function ‘’toe’’, Blue Toggle of control panel. Red light should light up. Activate
valve on tractor, designated to control the rake functions. Positioning wheels should turn inward in front, this
will assist in ease of operation of Function B.
2. Function B - Turn toe function o and actuate Function # 1, “Arm” Toggle switch to on position with tractor
moving slowly in reverse, backing rake up, activate the hydraulic valve on tractor. The 48” Cylinder mounted
on top of center platform will push the “Tee” forward, pulling the positioning arms outwardly and forwardly.
Stop at desired width setting.
CAUTION
If arms are extended fully to gauge setting of “10”, OPERATOR MUST STOP MOVEMENT OF TRACTOR AND
RAKE IMMEDIATELY AT, or slightly before the positioning arms reach the maximum extended width, top gauge
(Yellow Pointer) on ‘’9’’ with toe in. Failure to do so will put excessive pressure on outer arm legs, to which the
positioning wheels are attached, possibly causing damage to the frame structure.
Or the preferred method is to do as follows:
a) With wheels toed in and with“Toe Function” o, actuate Function #1 “Arm”Toggle switch.
b) Place tractor hydraulic valve, delegated to the rake hydraulic valve, in oat position.
c) Slowly move the tractor and rake backwards, the tires toed in will allow the arms to extend outwards freely
without hydraulic pressure.
This preferred method is based upon two conditions.
1) The tractor has a oat detent in the designated hydraulic valve.
2) There is sucient space to allow the rake to unfold to desired width without obstruction.
Upon reaching desired width setting, switch the #1 (Arms) switch o. Activate Function #3 (toe) Blue switch, and
straighten wheels fully, make sure cylinders are fully extended.
3. Function C - Activate Function #2 (White Toggle switch) to ON position with tractor slowly moving, forward
or reverse, activate the hydraulic valve to turn “wings” on an angle. If operator desires to turn 2 windrows in
one pass without combining them, turn wings only slightly just enough to ip one windrow on either side
over. Great for moving and turning wet or uncured windrows.
Care should be shown if positioning arms are not fully extended that when turning (angling wings) opposing
rear wheels do not hit.
A second Hydraulic Valve on the tractor is used for lifting and lowering the raking wheels. For best results, this
bank of valves should be placed in the“oat” position when raking wheels are down. This allows wheels to follow the
contour of the ground, up and down without constantly releasing pressure to keep wheels down.

13
POSITIONING THE ULTIMATE V-RAKE
BACK TO TRANSPORT POSITION
To position the rake back to transport position, simply reverse the procedure
IMPORTANT: “Kicker Wheels” and ‘Wings”must be straight before bringing “Arms” in for transport.
1. Activate the tractor valve to raise the raking wheels. When just moving to another eld behind the tractor you
do not need to replace the 1/4”hair pin clips as the tractor hydraulics will hold the wheels up.
2. If the Ultimate Rake is equipped with Kicker Wheels (three raking wheels in the center), select the yellow toggle
switch (red light will come on). Activate the tractor valve and the three wheels will turn into transport position
(straight with the tongue.) If you hold the valve in this position after the wheels are straight for transport, the
rear gauge wheel of the kicker wheels will raise o the ground. NOTE: This feature is not for transport or to
carry in the eld but to raise the wheels if backing up, if excessive crop has bunched up in back or to raise and
clear pivot tracks, etc. Shut o the “yellow” (option) function.
3. Select the “white” switch which controls the wing movement. With tractor moving slowly, operate valve
straightening the wings fully for transport. The bottom gauge on the wing should read “0”. Shut o white
switch. Both wing cylinders should be totally closed.
4. Select “red” toggle switch which controls the arms. While moving ahead, start activating the tractor valve
in an intermittent (start and stop) mode. This will allow the center positioning wheels to move inward into
transport mode with the least resistance and without damage to the rake. The top gauge located on the right
positioning leg should reed “0”. (Top cylinder, 4 x 24”) should be totally enclosed.
5. Hook transport stabilizer bars from front wings to center bracket if traveling a considerable distance or behind
a pickup.
C

14
POSITIONING THE ULTIMATE V-RAKE
BACK TO TRANSPORT POSITION
USING THE “TOE-IN” FUNCTION
IMPORTANT: “Kicker Wheels” and “Wings”must be straight before bringing “Arms” in for transport.
1. Activate the tractor valve to raise the raking wheels. When just moving to another eld behind the tractor you do
not need to replace the 1/4”hair pin clips as the tractor hydraulics will hold the wheels up.
2. If the Ultimate Rake is equipped with Kicker Wheels (three raking wheels in the center), select the ‘’yellow’’ toggle
switch (red light will come on). Activate the tractor valve and the three wheels will turn into transport position
(straight with the tongue.) If you hold the valve in this position after the wheels are straight for transport, the rear
gauge wheel of the kicker wheels will raise o the ground. NOTE: This feature is not for transport or to carry in
the eld but to raise the wheels if backing up, if excessive crop has bunched up in back or to raise and clear pivot
tracks, etc. Shut o the “yellow” (option) function.
3. Select the “white” switch which controls the wing movement. With tractor moving slowly, operate valve
straightening the wings fully for transport. The bottom gauge on the wing should read“0”. Shut o “white”switch.
Both wing cylinders should be totally enclosed.
4. Actuate the #3 function ‘’Toe”, Blue Toggle of control panel. Red light should light up. Activate valve on tractor,
designated to control the rake functions. Positioning wheels should turn inward in front, this will assist in ease of
operation of Function 5.
5. Turn “Toe” function o and actuate Function #1 “Arm” toggle switch to on position. With tractor moving slowly
ahead, activate the tractor hydraulic valve in an intermittent (start and stop) mode. This will push the positioning
arms inward and rearward into transport position (4” x 24” cylinder on top of center platform should be totally
enclosed.). Both gauges on right leg should read“0”.
6. Shut “Arm”toggle switch o and activate Function #3 “Toe”function on again. Activate tractor valve to turn center
positioning wheels back to a straight position for transport. Shut “Toe” toggle switch o.
7. Attach transport stabilizer bars from front wings to center bracket if traveling a considerable distance or behind a
pickup.
C

15
C
When your“Ultimate” V-Rake was delivered, set up, it
was in the transport position. Stabilizer bars are mounted
at the forward end to stabilize the front of the wings to
which the raking wheels are attached. This also stabilizes
the “toe in” on positioning wheels for transporting unit
at highway speeds.
IMPORTANT:
It is important that when rake is to be pulled down
highways for great distances at highway speeds that
the 48”cylinder which positions the positioning arms
is totally enclosed (Top Gauge is on ‘’0” and stabilizer
arms hooked to wings before transporting. It is also
a good idea that before pulling long distances, check
“toe in” by measuring front to front, rear to rear of
inner opposing positioning wheels (center tandem).
When going into the eld position operator must
detach stabilizer bars from front of rake wings and
secure to the sides of the “A” Frame, which holds
the stabilizer bars. FAILURE TO DO SO CAN CAUSE
SEVERE DAMAGE TO THE STRUCTURE OF THE RAKE.
“A” Frame can then be lifted and secured with a
spring pin clevis assembly to bottom of center plat-
form. Four yellow stabilizer bars must be removed
from the cylinders before attempting to position
the rake into eld position. These bars do not need
to be replaced when just moving from eld to eld
but can serve as a template to assure rake is ready
for transport when unit is to be towed on pavement
roads a considerable distance.
Function and Use of Stabilizer Bar
This manual suits for next models
4
Table of contents
Popular Farm Equipment manuals by other brands

Ferrari
Ferrari MULTIPLA DISC VERSION Operating and service manual

Fransgard
Fransgard SR-3200T manual

horsch
horsch Cruiser 10 XL operating instructions

MacDon
MacDon FlexDraper FD2 Series manual

Hampel's
Hampel's Calf-Tel CT-10015AF Assembly Instruction for Installation

GREAT PLAINS
GREAT PLAINS PL5700 Operator's manual

Vicon
Vicon BW 2400 M Operation and maintenance manual

Precision
Precision RABBIT PLAYHOUSE HUTCH 45000D manual

Powerfix Profi
Powerfix Profi PMT 1.1 A1 translation of original operation manual

KUHN
KUHN VBP 2160 Operator's manual

sitrex
sitrex SR 420/11 H Use and Maintenance Spare Parts List

Yetter
Yetter TITAN Series Operator's manual