manuals.online logo
Brands
  1. Home
  2. •
  3. Brands
  4. •
  5. Roxicosly
  6. •
  7. Lantern
  8. •
  9. Roxicosly CL1000 User manual

Roxicosly CL1000 User manual

Popular Lantern manuals by other brands

DS Produkte TRF18P0752-1 instructions

DS Produkte

DS Produkte TRF18P0752-1 instructions

Stahl ECOLUX 6610 Series operating instructions

Stahl

Stahl ECOLUX 6610 Series operating instructions

SNOWJOE SUNJOE 24V-LGT500-CT Operator's manual

SNOWJOE

SNOWJOE SUNJOE 24V-LGT500-CT Operator's manual

PRG VARI LITE VL5 Service manual

PRG

PRG VARI LITE VL5 Service manual

Raytec VARIO2 series installation guide

Raytec

Raytec VARIO2 series installation guide

ENSA LEDBT18WS2 installation instructions

ENSA

ENSA LEDBT18WS2 installation instructions

LUG OFFICE LB LED N/T Installation instruction

LUG

LUG OFFICE LB LED N/T Installation instruction

Draper RLEDL19/B instructions

Draper

Draper RLEDL19/B instructions

Green Lighting TRI-SENSOR GL4612LU Assembly & fitting instructions

Green Lighting

Green Lighting TRI-SENSOR GL4612LU Assembly & fitting instructions

Panasonic EY3741B57 operating instructions

Panasonic

Panasonic EY3741B57 operating instructions

Clas Ohlson LCC8T instruction manual

Clas Ohlson

Clas Ohlson LCC8T instruction manual

Coolon WDN-140 manual

Coolon

Coolon WDN-140 manual

shada 1000436 instruction manual

shada

shada 1000436 instruction manual

BEGA 84 036 Instructions for use

BEGA

BEGA 84 036 Instructions for use

BEGA 33 596 Instructions for use

BEGA

BEGA 33 596 Instructions for use

Dale Tiffany GT701162 Assembly instructions

Dale Tiffany

Dale Tiffany GT701162 Assembly instructions

Wagan Brite Nite Pop-Up USB Lantern user manual

Wagan

Wagan Brite Nite Pop-Up USB Lantern user manual

Eaton Crouse-Hinds Pauluhn DLLA M2 Series Installation & maintenance information

Eaton

Eaton Crouse-Hinds Pauluhn DLLA M2 Series Installation & maintenance information

manuals.online logo
manuals.online logoBrands
  • About & Mission
  • Contact us
  • Privacy Policy
  • Terms and Conditions

Copyright 2025 Manuals.Online. All Rights Reserved.

CL1000 Solar Hand Crank Camping Lantern
OUTDOOR ACTIVITIES NO POWER OUTAGES CONCERNS
- 01 -
Chapter 1 LOCATION OF CONTROLS
1
2
3
4
5
6
7
8
1. Flashlight ON/OFF Button 2. Handle
3. Solar Panel 4. USB Output Charging Port
5. Main Light 6. Micro USB Input Charging Port
7. Crank Handle 8. Flashlight
- 02 -
Chapter 2 MAIN LIGHT CONTROL
TURN ON LIGHT
TURN OFF LIGHT
PULL UP
PUSH DOWN
When the 18650 rechargeable battery is fully charged, the main light can
be continuously illuminated for no less than 35 hours.
Made in Ch ina
Http://www.wismco.com
Contact our experts
[email protected]
Version 1.0
Roxicosly
- 03 -
Chapter 3 FLASHLIGHT CONTROL
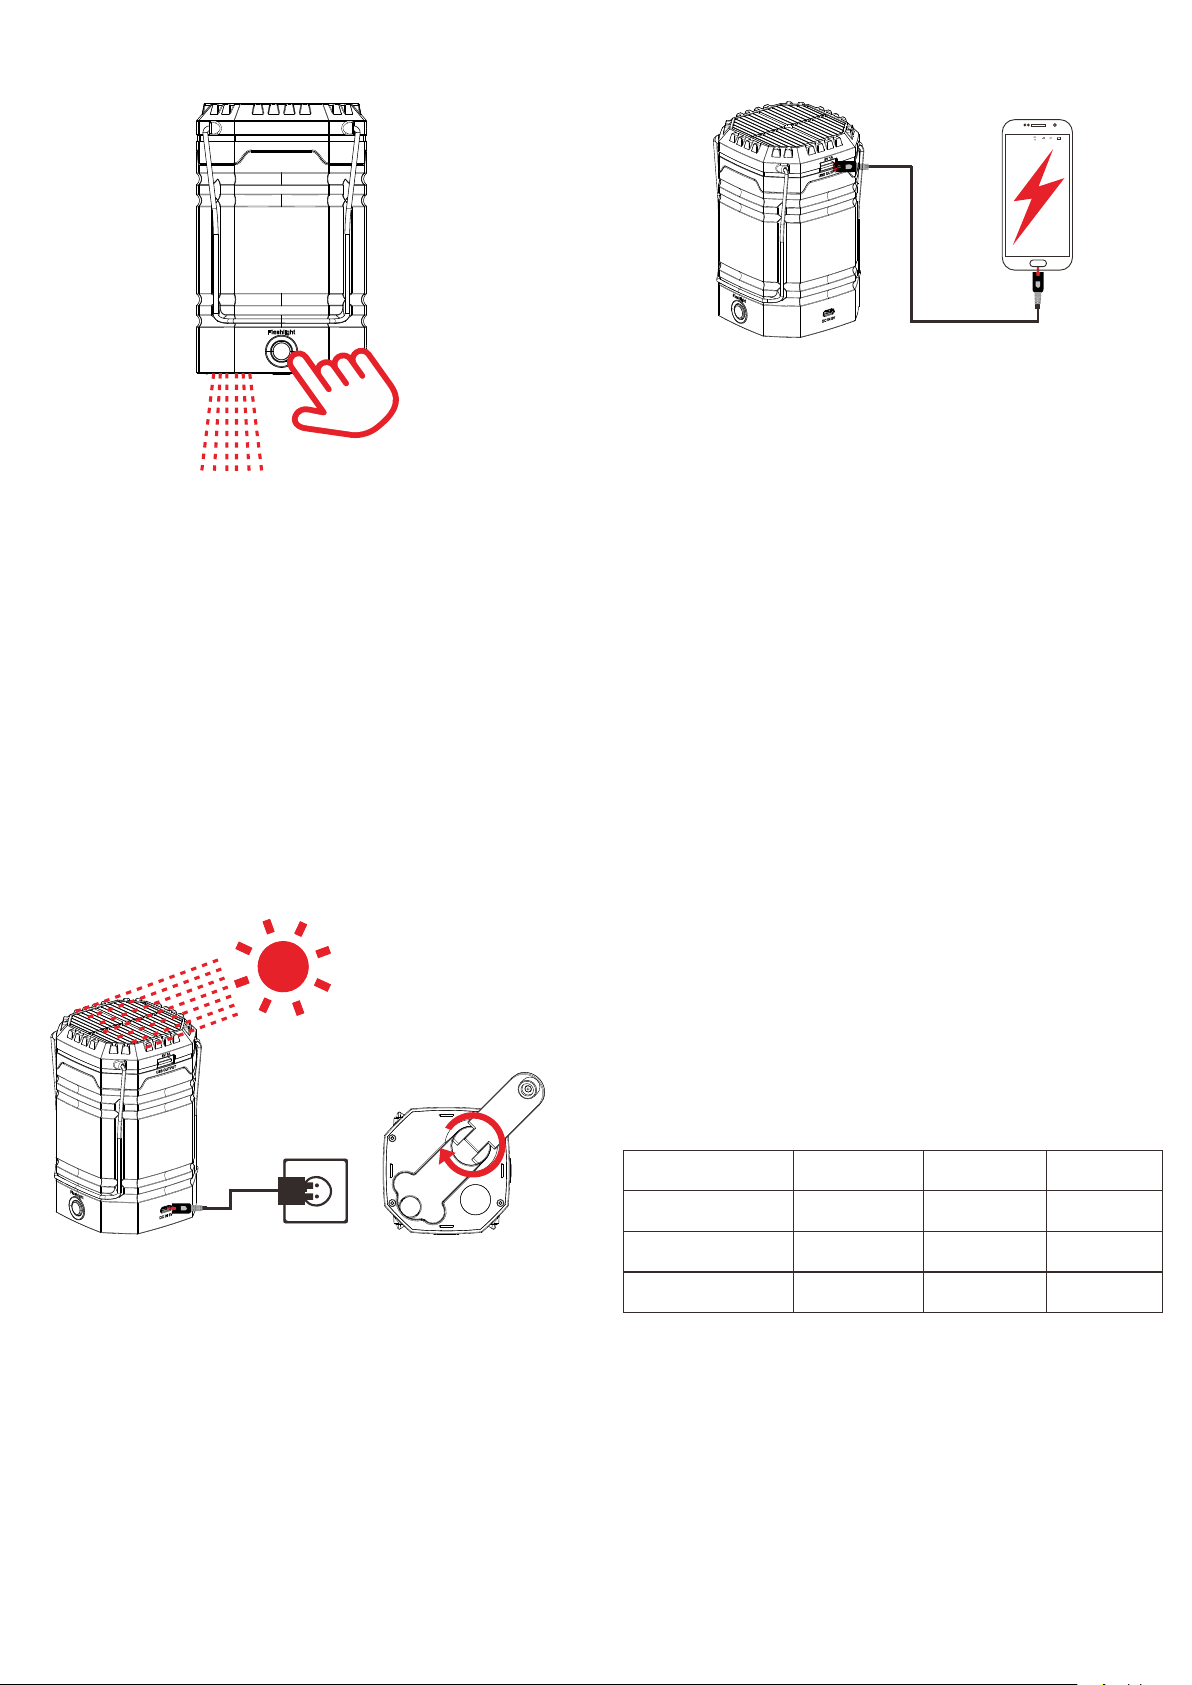
1. Click Flashlight ON/OFF Button to turn on flashlight.
2. Click Flashlight ON/OFF Button again to turn off flashlight.
When the 18650 rechargeable battery is fully charged, the flashlight can
be continuously illuminated for no less than 30 hours.
- 04 -
Chapter 4 USB OUTPUT CHARGING
22:23
2
89%
E
E
1
Connect your phone charging cable with the USB output port on the top of
the Camping Light.
If the Camping Light has no power, you can rotate the crank handle for 8-
15 minutes (time depends on your speed of rotation). then your phone will
get enough power to start up.
The maximum charge current is 1 Ampere.
- 05 -
Chapter 5 POWER SUPPLY MODE
1. Hand Crank Power
(1) Unfold the crank handle from the backside and rotate it in
either direction.
(2) Rotate the crank handle for 3-5 minutes. It will generate
ample power and activate the build-in rechargeable
battery for initial use.
Note: Rotate the crank handle at the speed of 2 laps per second.
It will generate 300-350mA electricity.
2. Solar Power
(1) Expose the solar panel to sunlight, Don’t charge indoors.
(2) It will generate 40-60mA electricity to charging build-in
18650 rechargeable battery.
- 06 -
Main Light Wattage: 2.4W
Main Light Brightness: 200LM
Main Light Color Temperature: 6500-7000K
Flashlight Wattage: 3W
Flashlight Light Brightness: 350LM
Water Resistance: IPX4
Note: Solar panel will generate 45-60mA electricity when exposed to
sunlight. It is difficult to fully charge battery with solar panel, which is
mostly used for maintaining the rechargeable battery.
3. Micro USB Adapter Charging input
(1) Plug the adapter (optional) into the standard outlet, and
then connect to the “Micro USB interface” jack on the
broadside.
(2) It will also charge the built-in rechargeable battery in the
meantime.
(3) It is highly recommended to use 5V/2A adapter.
Note 5V2A adapter is not included.
Charging Duration
Charging Type 5V2A Adapter
2 Hours
> 35 Hours
> 30 Hours
Hand Crank
10 Min
20 - 30 Min
20 - 25 Min
Solar
30 Min
20 - 30 Min
20 - 25 Min
Main Light
Working time
Flashlight
Working time