Royal garden TM21RD32FPT1 User manual

Assembly Instructions
32" Faux Stone Fire Pit
Questions, problems, or missing parts?
Before returning to the store, call Customer Service.
1-866-988-3300
8 a.m. - 5 p.m., PST Monday - Friday
Product No. TM21RD32FPT1
Retain this manual for future use.

TM21RD32FPT1
Contents
Safety Instructions
Parts List
Assembly
Operation
Cleaning & Maintenance
Troubleshooting
Warranty
3
6
7
12
13
14
15
This appliance complies with “ANSI Z21.97-2017/CSA 2.41-2017,
Outdoor Decorative Gas Appliances.”
IMPORTANT: RETAIN FOR FUTURE REFERENCE, AND READ CAREFULLY.

WHAT TO DO IF YOU
SMELL GAS
• Do NOT try lighting any appliance.
• Do NOT touch any electrical switch.
• Do NOT use any phone in your building.
• Immediately call your gas supplier from
a neighbor’s phone.
• Follow the gas supplier’s instructions.
• If you cannot reach your gas supplier,
Installation and service must be
service agency or gas supplier.
INSTALLER: Leave this manual with
the appliance.
CONSUMER: Retain this manual for
future reference.
If you are assembling this unit for
someone else, give this manual to him or
her to read and save for future reference.
WARNING
For your safety: For outdoor use only (outside,
non-enclosed area). Do not use for cooking.
WARNING
If the information in this manual is not followed
property damage, personal injury or loss of life.
WARNING
Improper installation, adjustment, alteration,
service or maintenance can cause injury or
property damage.
Read the owners manual thoroughly before
installing or servicing this equipment. If the
information in this manual is not followed
exactly, a fire or explosion may result causing
property damage, personal injury, or loss of life.
WARNING
For your safety:
1. Do NOT store or use gasoline or other
this or any other appliance.
2. An LP-cylinder not connected for use shall
not be stored in the vicinity of this or any
other appliance.
DANGER
If you smell gas:
1. Shut off gas to appliance.
3. If odor continues, keep away from the
appliance and immediately call your gas
Failure to follow these instructions could
cause property damage, personal injury,
or death.
DANGER - CARBON
MONOXIDE HAZARD
• This appliance can produce carbon monoxide
which has no odor. Using it in an enclosed space
can kill you.
• For outdoor use only.
• Never use in the unventilated or enclosed areas.
DANGER
Do NOT leave this appliance unattended
while it is in operation.
Safety Instructions
TM21RD32FPT1

WARNING
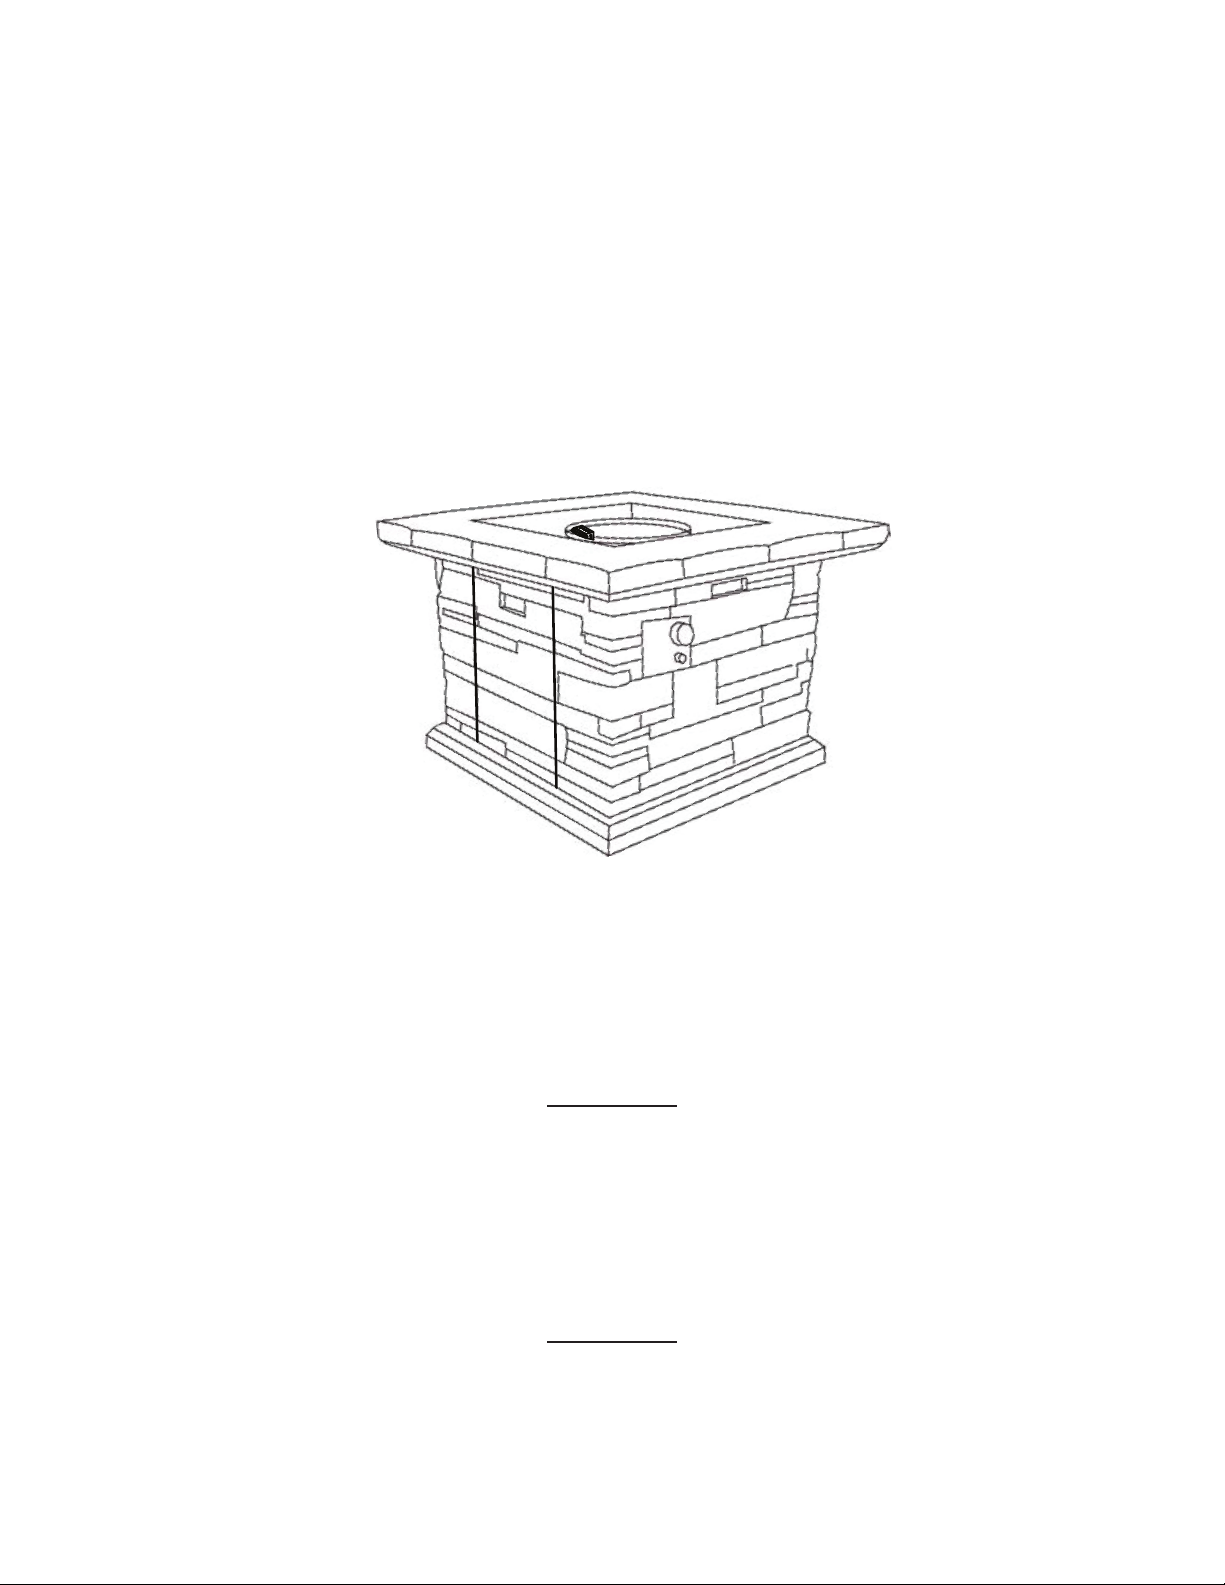
• Remove the PVC Cover from the firebowl
before opening the appliance.
• Do not pour water into the firebowl.
• Do not use this firebowl if any part has been
under water.
• Do not use this firebowl on vehicles or boats.
• Always operate the appliance on flat ground
outdoors.
• Clean the battery contacts and the device prior
to battery installation.
• Never lean over the open firebowl or place
hands or fingers on the upper portion of an
operational unit.
WARNING
• Do not operate unit until all parts are fully
assembled.
• Do not attempt to move it while in use.
• This unit is not intended for cooking.
• Young children should be carefully
supervised when they are in the area of the
appliance.
• Do not hang clothing or any other
flammable materials from the fire pit, or
place on or near the fire pit.
• Do not set the protective cover over the
unit until it is turned off and completely
cooled down.
• Combustible material should not be within
72 inches of the top of the unit, or within 48
inches around the entire unit.
• If the flame goes out while burning, turn
the gas valve off. Wait 5 minutes before
repeating the initial lighting procedure.
Once you have a flame started, hold down
the control knob for 1 minute.
WARNING
• Inspect all elements of this heating unit
before each use. If there is damage, the
burner must be replaced.
• Keep the hose out from any pathways to
eliminate any accidental damage. (if
external tank)
• Installation and repair should be done by a
qualified service person.The appliance
should be inspected before use and at least
annually by a qualified service person. More
frequent cleaning may be required as
necessary.
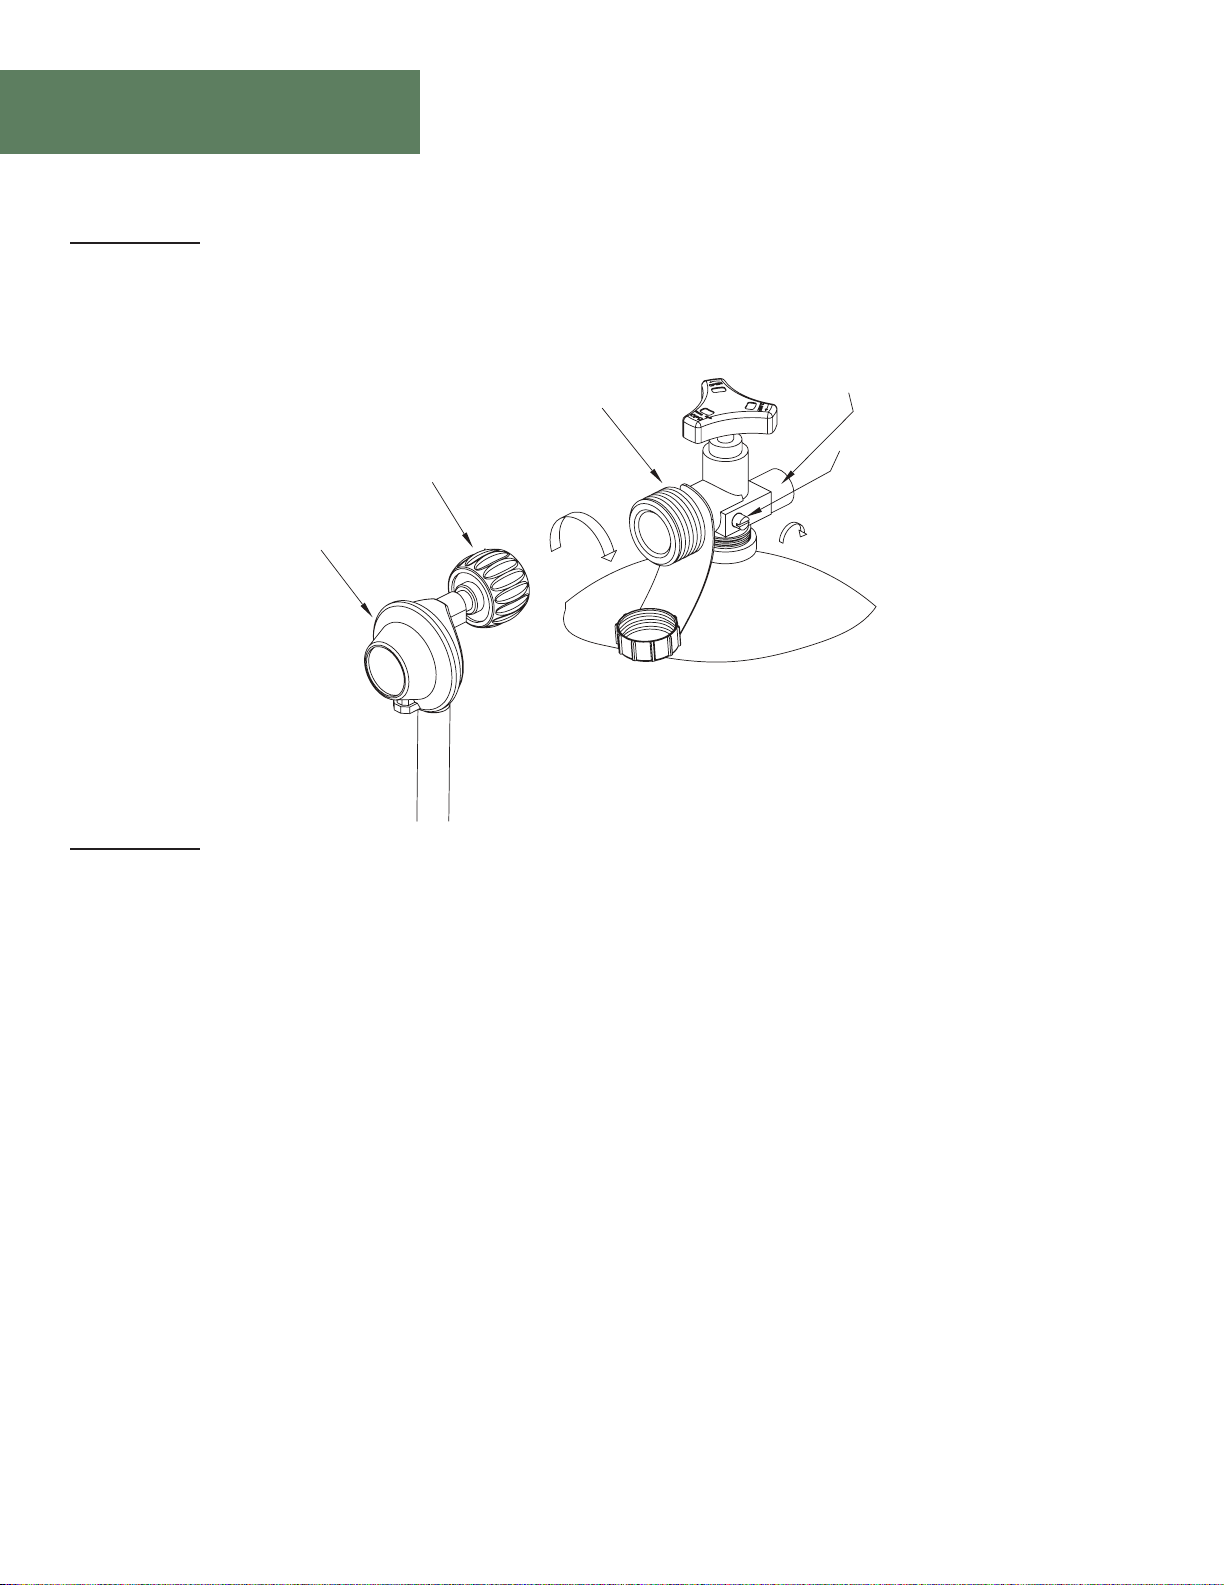
• You must follow all steps to properly
assemble this heating item. Makesure the
gas valve is turned “OFF” before
assembling. Do NOT attempt to assemble
without proper tools.
WARNING
• Lava rocks could hit somebody's face or eyes
during initial start of this unit, so please keep
away from the firebowl for the first 20 minutes
after it has been ignited.
• Pay attention when operating the firebowl. It is
hot in use and should never be left unattended.
• Users should be alerted to the hazards of high
surface temperatures and keep a safe distance
to avoid burning or clothing ignition.
• Please take out the battery when not using the
firebowl for an extended length of time.
• Do not enlarge valve orifices or burner ports
when cleaning the valve or burner.
• Do not light or use gas unit if lava rocks are
wet.
• Ensure lava rocks are completely dry before
igniting as intense heat could cause the rocks to
crack.
Safety Instructions
TM21RD32FPT1

Safety Instructions
WARNING
Failure to follow the dangers, warning and cautions in this manual may result in serious bodily
IMPORTANT NOTICE
table. Improper installation, adjustment, alteration, service or maintenance can cause injury or
property damage.
The installation of this unit must adhere to local codes or either the National Fuel Gas Code, ANSI
Z223. 1/NFPA54, or CAN/CGA-B149.1, Natural Gas and Propane Installation Code.
Minimum Clearance from Unit to Combustible Materials:
under any overhead enclosure.
IF YOU SMELL GAS
• Do not try lighting any appliance.
• Do not touch any electrical switch; do not use any phone in your building.
• Immediately call your gas supplier from a neighbor’s phone.
• Follow the gas supplier’s instructions.
• Keep these instructions for future reference. If you are assembling this unit for someone else,
give this manual to him or her to read and keep for future reference.
used inside a building, garage, or any other enclosed area.
accumulate and cause asphyxiation.
• This unit is to be used with propane gas only! (sold separately)
• Do not attach a remote gas supply to this unit.
WARNING FIRE TABLE IS FOR OUTDOOR USE ONLY
TM21RD32FPT1

Parts List
A
PVC Cover - 1
G
Base Plate - 1
C
Door - 1
I
Ignition Pin - 1
E
Ignition Screen - 1
B
Lava Rocks - 2 boxes
H
Ground Wire - 1
D
Body - 1
F
Thermocouple - 1
N
Injector - 1
K
Pulse Ignition - 1
O
Corrugated Pipe - 1
J
Nameplate Board - 1
L
Knob - 1
M
Burner - 1
P
Gas Valve - 1
Q
Regulator - 1
TM21RD32FPT1

Assembly
STEP 1
Open the carton and turn it upside down, making sure the four pieces of the carton open up.
Lift off the carton carefully and be wary of the accessories inside falling away. Take all the
packing materials away except for the paper honeycomb board rounding the top of the
firebowl.
STEP 2
Turn the firebowl heads up on a flat ground. Remove all the paper honeycomb board rounding
the top of the firebowl.
TM21RD32FPT1

Assembly
STEP 3
TM21RD32FPT1
Check each part before using the product. Make sure the gas supply system is turned off
before assembling.
STEP 4
Open the storage door on the firebowl for the gas tank. Take away the box containing lava
rock.
LAVA ROCKS

Assembly
STEP 5
Put the gas tank in the metal stand. Make sure the gas tank sits on the metal stand completely.
Turn the wing screw on the outer part of metal stand clockwise to secure the gas tank tight.
STEP 6
Evenly distribute the lava rocks in the firebowl.
Do not cover the ignition screen. Always keep the Ignition Screen visible.
The burner of the firebowl must be covered by lava rocks completely.
CORRECT INCORRECT
TM21RD32FPT1

Assembly
STEP 7
TM21RD32FPT1
Connect the Pressure-Regulating Valve to the gas tank.
STEP 8
Turn the cylinder valve clockwise to close the gas supply on the gas tank.
Cylinder Valve
Pressure
Relief Valve
Bleed-off
Valve
Regulator
Black Coupling Nut
Turn Clockwise to Connect
Turn Clockwise
to Reseal

Assembly
STEP 9
Screw Regulator Coupling clockwise by hand only. Make sure it is fastened.
TM21RD32FPT1

Operation
LIGHTING INSTRUCTIONS
1. Turn the cylinder valve on the gas tank counter-clockwise to open the gas supply.
2. Close the storing door on the firebowl for the gas tank.
3. Press and hold the Electric Ignitor. Meanwhile, push and turn the Control Knob
counter-clockwise to the "LOW" position. Keep pushing the Control Knob to light the burner .
4. After ignition, release the Electric Ignitor. Continue to push and hold the Control Knob for 45
seconds.
5. If ignition does NOT immediately take place in seconds, push and turn the Control Knob
clockwise to "OFF". Wait 5 minutes, then repeat the lighting procedure as above.
FOR YOUR SAFETY, READ BEFORE LIGHTING
• Before performing a leak test, make sure that no sparks can occur and you are in a spacious
outdoor area.
• Connect the propane gas tank to the regulator and turn the valve on the unit to the “off”
position.
• Brush a soap and water mixture on all connections.
• Make sure the igniter battery has been installed properly. The igniter will not operate otherwise.
• Before operating, smell around the appliance and next to the ground for gas odors. If you smell
gas or a leak is discovered turn the gas valve off, disconnect propane gas tank and do not use the
appliance until the leak is repaired.
• After turning the gas supply, if bubbles occur on any connection there maybe a leak.
• Do not use the appliance if any part has been submerged under water. Immediately call a
qualified service technician to inspect the unit and to replace the part.
• Do not use the heating unit without inspecting the gas hose (if applicable).
• If there are signs of wear or abrasion, please immediately replace the hose.
• Pumice stones/lava rocks/Lava Glass could pop up and strike somebody’s face during the
process of lighting this unit; stand away from the unit for the first 20 minutes after igniting.
TO EXTINGUISH
• Push the Control Knob and turn clockwise to the "OFF" position.
• Turn the cylinder valve on the gas tank clockwise to close the gas supply if not in use for a long
time. (See figure below)
TM21RD32FPT1

Cleaning & Maintenance
To enjoy years of outstanding performance from your heater, make sure you perform the
following maintenance activities on a regular basis:
• Before performing any maintenance always disconnect propane gastank.
• Use warm soapy water for cleaning. Never use flammable or corrosive cleaning agents.
• Keep the heating item free and clear from combustible materials.
• Visually inspect burner for obstructions and keep tank enclosure free and clear from debris.
• Use a soft brush to get rid of the mild stains, loose dirt and soil after the burner and pumice
stones/lava rocks/Lava Glass completely cooled down. Wipe down with a soft cloth.
• Harsh weather conditions may cause stubborn stains, discoloration and possibly rust pitting.
• Permanent damage may occur if powder or solvent comes in contact with painted or plastic
components on this heating unit.
• Keep the heating unit stored away from direct sunlight.
• If storing this unit inside, disconnect the propane gas tank from the gas valve.
• Not using manufacturer approved or supplied parts/accessories may result in a defective
condition and void the warranty of this heating unit.
• Always place lid (if applicable) or protective cover on heating item when not in use. Turn
control knob OFF.
NOTE: In a salt-air environment (such as near to ocean), corrosion occurs more quickly than
normal. Frequently check for corroded areas and repair them promptly.
TM21RD32FPT1

Troubleshooting
Burner will
not light
using igniter
Burner will
not light
with match
LP gas tank valve is closed
LP gas tank is low or empty
LP gas leak
Battery needs to be changed
Electrode and burners are wet
Electrode cracked or broken —
sparks at crack
Wire loose or disconnected
Wire is shorting (sparking)
between igniter and electrode
Bad igniter
LP gas tank is low or empty
LP gas leak
Coupling nut and regulator not
fully connected
Disengagement of burner to valve
Spider webs or insect nest in
burner/venturi tube
Burner ports clogged or blocked
Make sure regulator is securely attached to the
LP gas tank per “Installing LP Gas Tank,” then
turn LP gas tank valve to “OPEN”
1. Turn LP gas tank valve to “CLOSED”
2. Wait 5 minutes for gas to clear
3. Follow “Checking for Leaks” section
Replace the “AA” battery (follow assembly step
for inserting battery)
Wipe dry with cloth
Replacement part(s) may be needed —
contact Customer Care at 1-877-483-6759
Replacement part(s) may be needed —
contact Customer Care at 1-877-483-6759
Replacement part(s) may be needed —
contact Customer Care at 1-877-483-6759
Replacement part(s) may be needed —
contact Customer Care at 1-877-483-6759
Check if LP gas tank is empty
tank
b. If LP gas tank is not empty, refer to “Sudden
below)
1. Turn LP gas tank valve to “CLOSED”
2. Wait 5 minutes for gas to clear
3. Follow “Checking for Leaks” section
Turn the coupling nut about one-half to
three-quarters additional turn until solid stop.
Tighten by hand only — do NOT use tools
1. Clear burner/venturi tube
2. Check for bent or kinked hose
Re-engage burner and valve
Clean burner/venturi tube
Clean burner ports
TM21RD32FPT1

Warranty
Outdoor Furniture
IMPORTANT
If you have any problems with this product (missing or damaged parts, assembly issues, etc.),
PLEASE DO NOT RETURN TO THE RETAILER/STORE
from where you purchased the product.
Please call our Toll-Free Customer Service Hotline at:
1-866-988-3300
To expedite any future warranty claims, please retain the instruction sheet, warranty card and
receipt for future use.
Care and Maintenance
Store furniture in an upright position. Be careful to never allow water to build up in frames as this
will cause corrosion and freeze damage in cold climates. Wash all frames with a solution of mild
soap and water. Rinse with clean water and dry with a soft absorbent cloth towel. Frames can be
treated with a liquid wax for maximum protection against UV rays and/or salty, damp air. If your
set includes cushions, slings, and/or an umbrella they may be cleaned by hand with a solution of
soap and water with a clean water rinse. (Never machine wash cushions, slings or umbrella covers
as this will result in shrinkage or damage). After cleaning cushions tip on end and allow to drip
dry. (Never use a commercial or home dryer to tumble dry fabric goods). Do not use bleach or
solvents to clean any product! This will void the warranty.
TM21RD32FPT1

Warranty
Outdoor Furniture
1-YEAR LIMITED WARRANTY PROGRAM
For a period of one (1) year after date of purchase, the Manufacturer will either repair or replace defective
components in accordance with this Limited Warranty. This warranty is between the Manufacturer and the
original purchaser and is valid only when accompanied by the original purchaser’s sales receipt showing
original date of purchase and location of purchase. Replacements under this warranty revert back to the
date of original purchase for future warranty.
warranty applies in normal residential use only and is not intended for commercial use. The Manufacturer
can make substitutions as required of materials, components, and sub-components of comparable value
and utility. This warranty is limited to product repair or replacement (to be determined solely by the
Manufacturer). Warranty return is limited to only the single affected component.
This limited warranty covers only manufacturing defects and does not cover normal wear and tear, damage
due to acts of nature (such as, but not limited to freezing or high winds), abuse or misuse, including
chemical damage from suntan oil or other chemicals, exposure to extreme heat or cold, abrasion or
excessive weight. This product is intended to be used in standard installations only. This warranty is void
if the product is not used for its intended purpose. The Manufacturer disclaims liability for any aspect of
installation and any inconvenience caused by a defective part of a component.
Certain items are not covered by this warranty. These include, but are not limited to the following:
1. Components subjected to abuse, including abuse intended to simulate failure.
2. Damages caused by retailer, shipper or installation crew (such as scratches, dents, tears, chips, etc.).
3. Any part which merely exhibits normal wear yet functions essentially as new, including chips, scratches or
stretching of materials and stitching.
4. Tears, punctures, scratches or any damage caused by improper installation or use.
5. Damage to frames/welds resulting from improper assembly or exposure to water and/or sub-freezing
temperatures is not covered. General frame rusting is not covered.
6. Fading and/or discoloration of fabrics/cushions/straps/wicker resulting from exposure to the elements,
7. Umbrella bases are not covered under any circumstances.
To make a claim, call the toll-free number below. Please have available a copy of the original sales receipt
along with a brief description of the problem. Please also provide your email address and daytime telephone
or cell phone number. All items may be charged actual freight costs plus $15 for handling. Repairs or
replacement will be made at the Manufacturer’s option. Sales and use taxes, plus shipping and handling
charges are the responsibility of the consumer.
THIS IS THE ENTIRE EXCLUSIVE EXPRESS LIMITED LIABILITY. THE MANUFACTURER NEITHER MAKES
THOSE OF RETAILING DEALERS. THIS EXCLUSIVE REMEDY IS LIMITED TO RECEIPT OF A CREDIT IN
CONNECTION WITH THE REPAIR OR REPLACEMENT OF ANY PRODUCT OR COMPONENT DEEMED
TO BE DEFECTIVE UNDER THE TERMS AND CONDITIONS AS STATED IN THIS WARRANTY. NEITHER
ARISING OUT OF ANY BREACH OF THIS WARRANTY OR NEGLIGENCE EVEN IF IT HAS BEEN ADVISED
ARE NO OTHER EXPRESS OR IMPLIED WARRANTIES OTHER THAN THE WARRANTY DESCRIBED
OR FITNESS FOR A PARTICULAR PURPOSE ARE EXPRESSLY DISCLAIMED.
TM21RD32FPT1
Table of contents
Other Royal garden Outdoor Fireplace manuals