Royal Sovereign RBM-1200 User manual

Royal Sovereign International, Inc.
RBM-1200
BINDING MACHINE
Manual
Owner's Manual
Please read and retain these instructions.
To register your product, please go to www.royalsovereign.com
USA. Click the Customer Support Tab, then the Registration Tab.
www.royalsovereign.com
Página en Español 9
Page en Français 17

BINDING MACHINE
MANUAL

RBM-1200
3
SAFETY INSTRUCTIONS
The safety recommendations outlined in this section should be read and understood before operating this machine.
Keep this information for future reference.
Caution
1. Keep the machine away from heat and water sources.
2. Do not attempt to open or otherwise repair your machine.
3. When operating, place the machine on a flat, level surface.
4. Test punch scrap sheets before punching final documents.
5. Remove staples, paper clips, and other metals from your sheets before punching.
6. Do not use the punching handle as a carrying handle.
7. Never exceed the machine’s quoted performance.

4
Box Contents 5
Parts 5
Features 6
Operation 7~8
Troubleshooting 9
Specifications 10
Warranty 11
Contact Information 12
Página en Español 13
Page en Français 25
CONTENTS

RBM-1200
5
BOX CONTENTS
Binding machine and Handle
PARTS
Comb pins
Handle knob
Handle
Comb pullers
Hole punch selector
Adjustable edge guide
Margin depth ruler
Margin depth konb
Paper waste tray
Base
Paper entry

6
FEATURES
Combined Punch and Bind System
Easy to use handle can be pulled forward to punch up to 12 sheets at a time, or pushed backward to bind up to 150 sheets
at a time.
Adjustable Paper Edge Guide
Precise paper edge guide is adjustable for sheets of paper and binding covers.
Adjustable Margin Depth
Depth of the paper margin can easily be adjusted by turning the knob to the left or right.
Waste Tray
No-mess built in waste tray allows easy removal for paper clippings.
Punch Selector
Knobs can be pushed in to punch holes for paper larger than letter size, or pulled out to prevent punching holes.

RBM-1200
7
OPERATION
Set-up
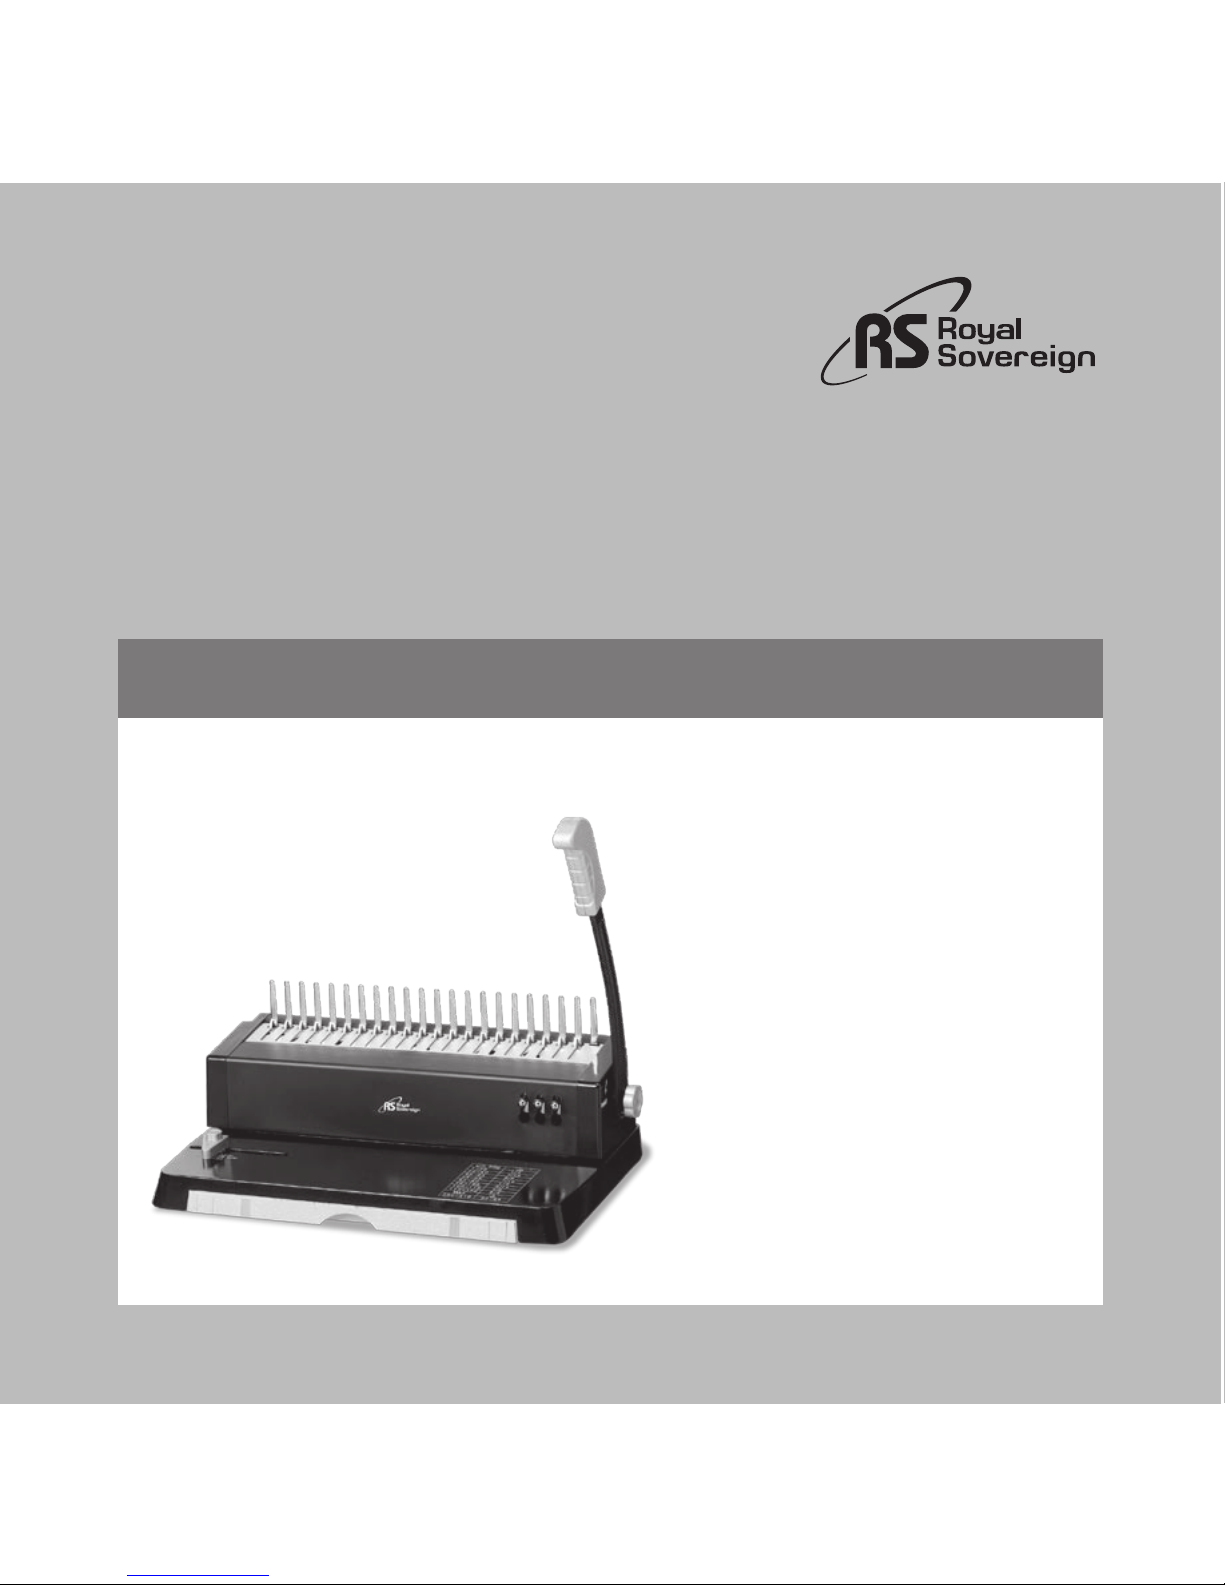
1. Before you begin binding you need to attach the handle to the machine. Unscrew the gray handle knob on the right side of the
machine by turning the knob to the left. Place the handle onto the metal square and insert the knob into the handle. Turn the knob
to the right to tighten and hold handle in place.
2. Make sure the machine is on a flat, sturdy surface.
3. Check to make sure the paper waste tray is empty and correctly fitted.
4. Move the adjustable paper edge guide to the size of paper you wish to punch.
5. Turn the margin depth knob to set the size of the margin on the paper. The size of the margin can be seen on the margin depth
ruler. It goes from 1/10”-1/4” / 2mm-6mm.
6. If using a sheet of paper larger than letter size (8 ½” x 11”), pull out the hole punch selectors to create the correct number of
holes.
7. Select the right-sized comb and covers for your documents. For the appropriate comb sizes, refer to the chart of the binding
machine.
NOTE: Test pieces of scrap paper to make sure everything is aligned properly before punching your finished document.
Punching and Binding
1. Slide the front and back covers into the paper entry lengthwise. Pull the handle down to punch.
2. Punch the remaining sheets in small batches that do not overload the machine. This machine can punch 12 sheets of
20lb./80gsm paper at one time.
3. Place the binding comb in between the comb pins with the open side facing up. Slowly push back the handle to have
the comb pullers open up the combs wide enough to insert the punched sheets. This machine binds up to 150 sheets
using a ¾” comb.
4. Insert the punched sheets onto the open binding comb. For the best results, insert the front cover face down first,
then insert the rest of the sheets and back cover.
5. When all of the sheets are loaded onto the comb, pull the handle back to its original position. Remove the bound
document by lifting it up.

8
Editing a Bound Document
Sheets may be added or removed at any time by placing the bound document into to comb pins and using the handle to
open the binding comb as described above.
Emptying the Waste Tray
The waste tray located on the front of the binding machine can be easily pulled out for emptying. Always check that the
tray is correctly fitted before punching.

RBM-1200
9
Symptom Solution
Punched holes are not centered. Adjust the edge guide and use scrap paper to test if the holes are centered.
Machine will not punch. Check that the paper waste tray is empty and correctly fitted. Check for
blockage in the paper entry
Punched holes are not parallel to the edge. Take a stiff object and slide it sideways through the paper entry to release any
paper clippings into the paper waste tray.
Holes are partially punched. Ensure that the punching capacity is not exceeded. Adjust edge guide and use
scrap paper to test if holes are properly punched.
Hole edges are damaged. Reduce the number of sheets being punched.
Waste tray is leaking. Check that the paper waste tray is empty and correctly fitted.
TROUBLESHOOTING
If you are still having complications, please contact Royal Sovereign’s Service Center at 1-800-397-1025.

10
SPECIFICATIONS
Model RBM-1200
Operation type Manual
Punching capacity 12 sheets (20lb/80g paper)
Binding capacity 150 sheets
Paper dimensions US Letter (8/12" x 11" / 216 x 279mm)
Comb capacity 1/4"-1" / 6mm-25mm
Weight 10.4lbs / 4.7kg
Dimensions 14.5"x 9.1" x 5.4" / 368 x 230 x 138mm

RBM-1200
11
LIMITED ONE YEAR WARRANTY
This warranty applies to repair or replacement of product found to be defective in material or workmanship for one year
from the date of the original purchase. This warranty is extended only to the original purchaser.
This warranty does not apply to damage resulting from abuse, misuse, or improper maintenance of damage that is
attributable to acts of nature. Royal Sovereign International, Inc. (and its affiliated companies) is not liable for incidental or
consequential damages of any nature. This limitation would not apply if you live in those areas that do not permit the
exclusion or limitation of incidental or consequential damages.
Defective products for warranty repair or replacement cannot be returned without a Return Authorization number. Please
go to www.royalsovereign.com USA-Customer Support Tab to make a request for an Office Product Return Authorization
Defective products must be returned to Royal Sovereign International Consumer Return Department, freight prepaid, with
proof of purchase and Return Shipping and Handling payment (check or money order). Upon repair or replacement the
product will be returned to the customer.
Return defective product to the following address with a detailed description of the problem. If possible, pack in original
carton. Please prepay shipping charges.
For out of warranty service or frequently asked questions please go to www.royalsovereign.com USA- Customer Support Tab.
For sales of product, parts or accessories please visit us at www.royalfulfillmentcorp.com.

12
For service or sales please contact your local Royal Sovereign Office:
ROYAL SOVEREIGN INTERNATIONAL, INC.
2 Volvo Drive Rockleigh, NJ 07647 USA
TEL : +1) 905-461-1095 FAX : +1) 905-461-1096
RS CANADA INC.
1025 Westport crescent, Mississauga, Ontario, Canada L5T1E8
TEL : +1) 800-397-1025 FAX : +1) 201-750-1022
www.royalsovereign.com

Royal Sovereign International, Inc.
RBM-1200
MÁQUINA DE ENCUADERNACIÓN
Manual
Manual del Propietario
Por favor lea y conserve estas instrucciones.
Para registrar este producto, por favor visite el sitio
www.royalsovereign.com USA- En el área de “Customer Support”
(Servicio al Cliente) y después en el área de “Registration” (Registro).
www.royalsovereign.com
Español

MÁQUINA DE ENCUADERNACIÓN
MANUAL

RBM-1200
15
INSTRUCCIONES DE SEGURIDAD
Se deben leer, comprender y seguir las recomendaciones de seguridad descritas en esta sección antes de utilizar
esta máquina. Conserve esta información para referencia futura.
Precaución
1. Conserve la maquina alejada de fuentes de calor y agua.
2. No intente abrir o de alguna forma reparar su máquina.
3. Coloque la máquina en una superficie plana y nivelada cuando esté funcionando.
4. Realice pruebas con hojas usadas antes de perforar los documentos finales.
5. Retire grapas, clips para papeles y otros materiales de las hojas antes de perforarlas.
6. No utilice la manivela de perforación como asa para transportar la máquina.
7. Nunca exceda la capacidad establecida de la máquina.

16
Contenido de la Caja 17
Partes 17
Características 18
Operación 19~20
Resolución de problemas 21
Especificaciones 22
Garantía 23
Información de Contactos 24
Page en Français 25
CONTENIDO

RBM-1200
17
CONTENIDO DE LA CAJA
Máquina de encuadernación y Manivela
PARTES
Pasadores de canutillos
Perilla de la manivela
Manivela
Dispositivos de empuje de canutillos
Selector de perforación
de orificios
Guía de borde ajustable
Regla de profundidad de márgenes
Perilla de profundidad de márgenes
Bandeja recolectora de papel
Base
Entrada de papel

18
CARACTERÍSTICAS
Sistema Combinado de Perforación y Encuadernación
La manivela fácil de usar se puede impulsar hacia delante para perforar hasta 12 hojas a la vez o empujar hacia atrás para
encuadernar hasta 150 hojas a la vez.
Guía de Borde de Papel Ajustable
La guía de borde de papel de precisión es ajustable para procesar las hojas y las cubiertas de encuadernación.
Profundidad de Márgenes Ajustable
La profundidad de márgenes del papel se puede ajustar fácilmente girando la perilla hacia la izquierda o la derecha.
Bandeja Recolectora
La bandeja recolectora permite una fácil remoción de los fragmentos de papel.
Selector de Perforación
Las perillas se pueden presionar para perforar orificios en papeles más grandes que el tamaño carta, o se pueden tirar
hacia fuera para impedir que perforen orificios.

RBM-1200
19
OPERACIÓN
Ajustes
1. Antes de comenzar a encuadernar, debe conectar la manivela a la máquina. Desatornille la perilla de la manivela gris del lado
derecho de la máquina girando la perilla hacia la izquierda. Coloque la manivela en el cuadrado de metal e inserte la perilla en la
manivela. Gire la perilla hacia la derecha para apretar y mantener la manivela en su lugar.
2. Asegúrese de que la máquina esté en una superficie plana y resistente.
3. Verifique que la bandeja recolectora de papel esté vacía y bien ajustada.
4. Mueva la guía del borde de papel para ajustarla al tamaño del papel que desee perforar.
5. Gire la perilla de profundidad de márgenes para fijar el tamaño del margen en el papel. El tamaño del margen se puede ver en la
regla de profundidad de márgenes. Va desde 1/10”a 1/4” (2mm a 6mm).
6. Si se usa una hoja de papel más grande que el tamaño carta (8 ½” x 11” – 21.6cm x 29cm), saque los selectores de perforación
de orificios para crear la cantidad correcta de orificios.
7. Seleccione los canutillos y las cubiertas del tamaño apropiado para sus documentos. Para el tamaño adecuado de los canutillos,
consulte la tabla de la máquina de encuadernación.
NOTA: Realice pruebas en papeles usados para asegurarse de que todo esté alineado de manera adecuada antes de
perforar su documento terminado.
Perforación y Encuadernación
1. Deslice las cubiertas delanteras y traseras a lo largo de la entrada de papel. Mueva la manivela hacia abajo para
perforar.
2. Perfore las hojas faltantes en lotes pequeños que no sobrecarguen la máquina. Esta máquina puede perforar hasta
12 hojas de papel de 20 lb/80 gsm a la vez.
3. Coloque el canutillo de encuadernación entre los pasadores del canutillo con el lado abierto mirando hacia arriba.
Empuje lentamente hacia atrás la manivela para que los dispositivos de empuje de canutillos abran los canutillos lo
suficiente como para insertar las hojas perforadas. Esta máquina encuaderna hasta 150 hojas usando un canutillo
de ¾” (19mm).
4. Inserte las hojas perforadas en el canutillo de encuadernación abierto. Para obtener mejores resultados, inserte
primero la cubierta delantera con la cara frontal hacia abajo, después inserte el resto de las hojas y la cubierta

20
trasera.
5. Cuando se carguen todas las hojas en los canutillos, empuje hacia atrás la manivela hasta su posición original. Retire
el documento encuadernado levantándolo hacia arriba.
Edición de un Documento Encuadernado
Se pueden agregar o sacar hojas en cualquier momento colocando el documento encuadernado en los pasadores de los
canutillos y usando la manivela para abrir el canutillo de encuadernación de la forma como se describe anteriormente.
Vaciado de la Bandeja Recolectora
La bandeja recolectora que se encuentra en la parte frontal de la máquina de encuadernación se puede sacar
fácilmente para vaciarla. Verifique siempre que la bandeja se encuentre bien ajustada antes de realizar la perforación.
Table of contents
Languages:
Other Royal Sovereign Binding Machine manuals