Rozi GLA-718 User manual

AIR FRYER
Instruction Manual
Model: GLA-718
Questions or Concerns?
Mon-Fri 9:00AM-5:00PM PT
Rozi_cs@gshopper.com
Easy & convenient life
Please carefully read this instruction manual before using this appliance.
Keep this manual for future reference.

Air Fryer Cooking Times
Beef
Beef Eye Round Roast
Burger
Filet Mignon
Flank Steak
London Broll
Meatballs (1 inch)
Rib Eye,bone in (1 inch)
Sirloin Steaks (1 inch)
Weight
4 lb
4 oz
8 oz
1.5 lb
2 lb
8 oz
12 oz
Temperature °F
390
370
400
400
400
380
400
400
Min
45 to 55
16 to 20
18
12
20 to 28
7
10 to 15
9 to 14
Chicken
Breasts, bone in
Breasts, boneless
Drumsticks
Game Hen (halved)
Legs, bone in
Tenders
Thighs, bone in
Thighs, boneless
Whole Chicken
Wings
Weight
1.25 lb
4 oz
2.5 lb
2 lb
1.75 lb
2 lb
1.5 lb
6.5 lb
2 lb
Temperature °F
370
380
370
390
380
360
380
380
360
400
Min
25
12
20
20
30
8 to 10
22
18 to 20
75
12
Vegetables
Asparagus (sliced 1 inch)
Beets (whole)
Broccoli (florets)
Brussels Sprouts (halved)
Carrots (sliced 0.5 inch)
Cauliflower (florets)
Corn on the Cob
Eggplant (1.5 inch cubes)
Fennel (quartered)
Mushrooms (sliced 0.25 inch)
Onions (peral)
Parsnips (0.5 inch chunks)
Potato Wedges
Potatoes (1 inch chunks)
Potatoes (baked whole)
Potatoes (small baby,1.5lb)
Squash (0.5 inch chunks)
Sweet Potato (baked)
Tomatoes (cherry)
Zucchini (0.5 inch sticks)
Temperature °F
400
400
380
380
380
400
390
400
370
400
400
380
360
400
400
400
400
380
400
400
Min
5
40
6
15
15
12
6
15
15
5
10
15
18 to 24
15
40
15
12
30 to 35
4
12
BEEF
Chicken
Vegetables
Pork&Lamb
Bacon (regular)
Bacon (thick cul)
Pork Chops,bone in (1 inch)
Pork Loin (1 inch)
Pork Sausage
Pork Tenderloin
Lamb Loin Chops
Rack of Lamb
Weight
6.5 oz
2 lb
1 lb
1.5 to 2 lb
Temperature °F
400
400
400
400
380
370
400
400
Min
5 to 7
6 to 10
12
55
15
15
8 to 12
22
Seafood
Calamari
Fish and Chips
Fish Cake
Fish Fillet (1 inch)
Salmon Steaks (4 steaks)
Salmon, fillet
Scallops
Shrimp
Swordfish Steak
Tuna Steak
Weight
8 oz
8 oz
8 oz
6 oz
1 to 2 lb
Weight
12 oz
10 oz
10 oz
0.5 lb
1 lb
11 oz
12 oz
10 oz
1 to 2 lb
14 to 28 oz
14 to 28 oz
Temperature °F
400
360
360
400
300
380
400
400
400
400
Min
4
15
15
10
14 to 18
12
5 to 7
5
10
7 to 10
Frozen Foods
Breaded Shrimp
Chicken Burger
Chicken Nuggets
Chicken Strips
Corn Dogs
Fish Cakes (1-4 patties)
Fish Fillets (0.5 inche)
Fish Sticks
Hash Browns
Meat Pie (1-2 pies)
Meatballs (25 per batch)
Meatloaf
Mozzarella Sticks
Onion Rings
Pizza (1 pizza)
Pot Stickers
Shrimp
Spring Rolls
Thick French Fries
Thin French Fries
Temperature °F
400
360
370
400
400
360
400
400
360
360
380
350
400
400
390
400
390
400
380
390
Min
9
11
10
12
7
11
14
10
15 to 18
25
6 to 8
35 to 40
8
8
5 to 10
8
8
15 to 20
15 to 20
10 to 14
Pork&Lamb
Seafood
Frozen Foods
Please NOTE:
To assure even cooking, turn or shake foods in the basket through the cooking time.
The preheating time is not included in the cooking time.
Cooking time may vary based on the thickness of food,quantity and other factors.

Kitchen Conversion Chart
Liquid Volumes
Weight Common ingredients
1/8 c
1/4 c
1/3 c
1/2 c
2/3 c
3/4 c
1c
2c
4c
1 oz
2oz
2 2/3 oz
4oz
5 1/3 oz
6oz
8oz
16 oz
32 oz
2Tbsp
4 Tbsp
5Tbsp
8Tbsp
11 Tbsp
12 Tbsp
16 Tbsp
32 Tbsp
64 Tbsp
6Tsp
12 Tsp
16 Tsp
24 Tsp
32 Tsp
36 Tsp
48 Tsp
96 Tsp
192 Tsp
30 ml
60 ml
80 ml
118 ml
158 ml
177 ml
237 ml
473 ml
946 ml
Cups
30 g
60 g
85 g
115 g
140 g
170 g
200 g
230 g
250 g
285 g
450 g
Metric
1 oz
2 oz
3 oz
4 oz (1/4lb)
5 oz
6 oz
7 oz
8 oz (1/2 lb)
9 oz
10 oz
16 oz (1lb)
Imperial
140 g
250 g
185 g
250 g
115 g
115 g
1 cup flour
1 cup sugar
1 cup brown sugar
1 cup butter
1 stick butter
1 cup grated cheese
Metric
5 oz
9 oz
6 1/2 oz
9 oz
4 oz
4 oz
Imperial
Fluids Oz Tablespoons Teaspoons Milliliters

PRODUCT STRUCTURE DIAGRAM
123
4
5
6
7
8
9
10
1. Frying basket
2. Protective cover
3. Push-release button
4. Handle
5. Frying pot
6. Upper housing
7. Air inlet
8. Control panel
9. Air outlet
10. Power cable
4

DISPLAY
CAUTIONS
French Fries
Ribs
Shrimp
Cake
Increase Value
Decrease Value
Temperature
Chicken Leg
Steak
Fish
Keep Warm
Increase Value
Decrease Value
Time
ModePower
5
- Please carefully read this instruction manual before using this appliance. Keep
this manual for future reference;
- Never fill the pot with oil, or it may cause a fire hazard;
- The appliance contains electronic elements and heating elements. Do not
submerge it in water or wash it with water;
- Do not cover the air inlet or outlet during operation. Do not touch the inside of
the appliance to avoid burns and scalding;
- Hot air will flow out of the air outlet when appliance is in use. Please keep a safe
distance. Do not touch the hot surfaces and do not get close to the air outlet.
Please be careful of hot air when pulling out the pot.

SECURITY WARNING
- The surfaces get hot during operation. Do not
touch the hot surfaces. Use either a handle or knob.
- Do not immerse the appliance, housing, cord, or plug in
water or any other liquid to prevent electrical shocks and to
ensure its working.
- Keep the appliance away from children to avoid scalding,
electrical shock and/or other injuries; close supervision is
necessary when the appliance is used by or near children.
- To avoid electric shock, fire and other accidents, do not
damage, twist or strongly tug on the power cord, use it to
carry heavy loads, tamper with it, let the cord dangle over
the edge of a table or counter, or touch hot surfaces.
- Please do not plug in and pull out the plug with wet
hands, otherwise it may cause electric shock.
- Plug it in tightly, otherwise, it may cause electric shock,
short circuiting, smoking, sparking, and other similar
hazards.
- Use it on a heat resistant and even surface. Keep the
appliance at least 12inch away from the wall, furniture or
other flammable objects.
- Only press the release button with the baskets resting flat
on a counter (or any level, heat-resistant surface).
- The handle is attached to the inner basket, not the outer
basket. When you press the release button, the outer basket
will drop.
Keep the appliance away from children to avoid scalding, electrical shock and/or other injuries;
close supervision is necessary when the appliance is used by or near children.
6

BEFORE THE FIRST USE
USE
Remove all packaging material.
Remove stickers or labels from the appliance.
Thoroughly clean the basket and the pan with hot water, some washing-up liquid
and a non-abrasive sponge.
Wipe the inside and outside of the appliance with a moist cloth.
Place the appliance on a stable, horizontal and level surface. Do not place the
appliance on a non-heat-resistant surface. The appliance must have good air circula-
tion and be kept away from hot surfaces, and any combustible materials.
Place the basket in the pan properly. You may hear the signal “tang”. Slide the pan
back into the appliance.
This is an appliance that works on hot air. Do not fill the pan with oil or frying fat.
Do not put anything on top of the appliance, which will disrupt the airflow and
affect its frying.
1. Put the main plug in a grounded/wall socket.
2. Preheating: Press the Power button, set the time to 5 minutes, then press the
power button to start preheating.
3. Carefully pull the frying pot out of the appliance when time reaches 0. Place the
ingredients inside the frying basket (Attention: Do not exceed the maximum line.).
Then steadily connect the frying basket to the frying pot and slide the pan back into
the appliance.
a) Never use the pan without the basket in it.
b) Do not touch the pan with hands during and after use in case of hot air. Only
allowed to hold pan by the handle.
4. Cooking:
a) Press the Mode button, choose the right mode you need. Or set the suitable
temperature and the time by press the decrease/increase value buttons.
b) After setting, press the Power button to start cooking;
c) To stop cooking process, press the Power button, then the fan will continue to
spin for 20 seconds.
7

CARE AND MAINTENANCE
5. When the time is up, the appliance will beep to signal the cooking cycle is
complete. The fan will continue to spin for 20 seconds.
6. Pull the pot out of the appliance and place it on a heat-resistant surface.
7. Check if the ingredients are ready. If the ingredients are not ready yet, slide the
pan back into the appliance and set it to cook for a few additional minutes.
8. If the ingredients are ready, carefully pull out the pan, place it on a heat-resistant
surface, press the basket release button, and lift the basket out of the pan to remove
the ingredients.
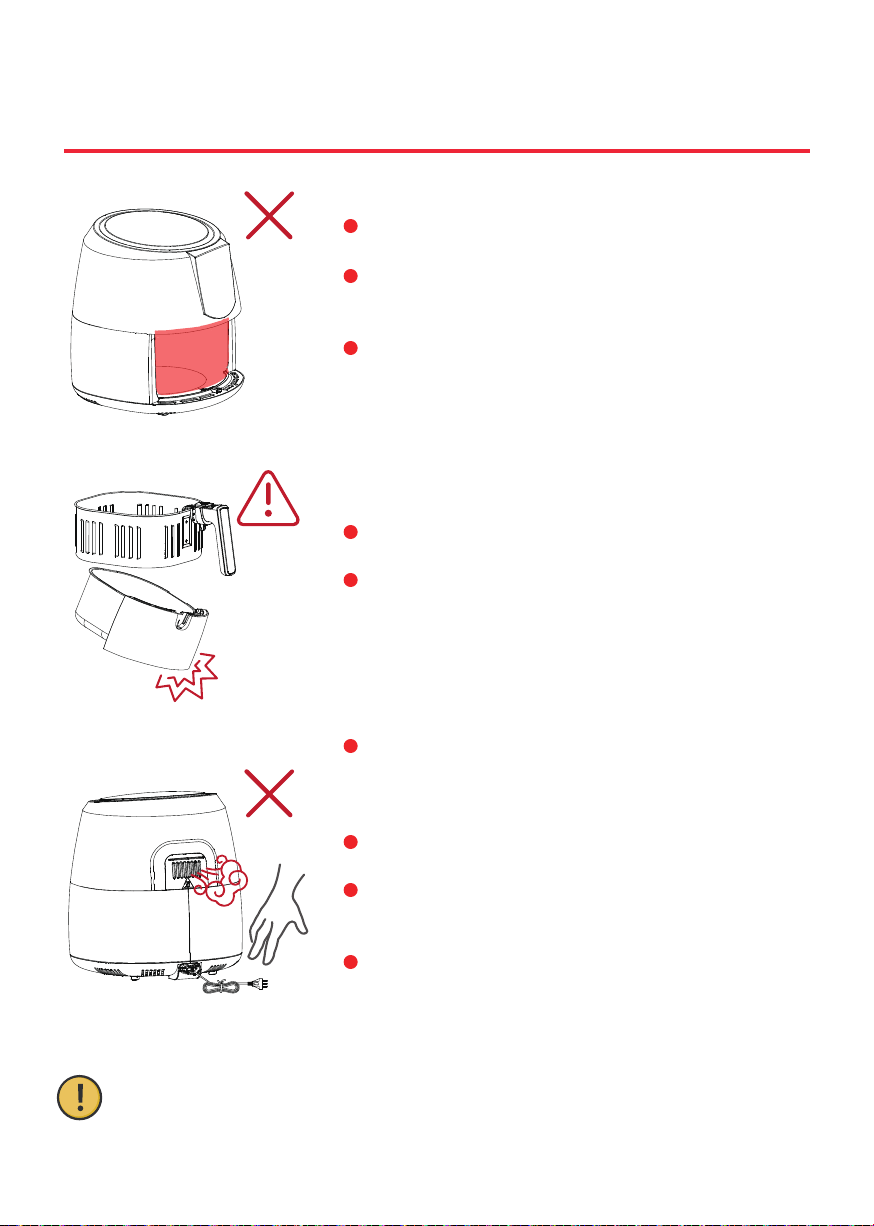
a) Do not turn the basket upside down while the pan still attached to it as any excess
oil that has collected on the bottom of the pan will leak onto the ingredients.
9. Empty the basket into a bowl or onto a plate. The appliance is ready for another
cooking.
1. Before cleaning, turn the timer to 0, unplug the appliance, and wait for the
appliance to cool down. Don’t touch the surface before cooling.
2. Never immerse the device in water or any other liquid. The device is not
dishwasher proof.
3. Clean the surface of the fryer pot and basket with hot water, some washing-up
liquid, and a non-abrasive sponge. If dirt is stuck to the basket or the bottom of the
pan, fill the pan with hot water and some washing-up liquid. Put the basket in the pan
and let the pan and basket soak for about 10 minutes.
4. Use a damp cloth to wipe the surface of the fryer. Never use harsh and abrasive
cleaners, scouring pads or steel wool, as this will damage the device.
5. If you do not use the appliance for a long time, please clean it, and store it in a cool
and dry place.
Add some oil to the ingredients for a crispy result.
Shaking ingredients halfway during the preparation time optimizes
the result and can help prevent uneven fried ingredients. To shake the
ingredients, pull the pan out of the appliance by the handle and shake
it. Then slide the pan back inside. Do not press the basket release button
during shaking.
8

TECHNICAL SPECIFICATIONS
Rated voltage
Rated frequency
Rated power
Frying basket capacity
Net weight
Adjustable temperature
Timer
Product size
120 V
60 Hz
1800 W
5.5QT
12.1LB
180-400 °F
0-60 min
12.7“( L ) x 10“(W) x 10.8“(H)
9

TROUBLESHOOTING
Problem Possible Cause Solution
Does not work
Power cord has not been
inserted into the power
socket.
Did not set the cooking mode.
Didn’t click the ON/OFF
button after selecting the
cooking mode.
Too much food in the basket.
Temperature is too low.
Cooking time is too short.
Certain foods need to be
shaken during cooking.
Some foods have to be fried
with oil.
The pot can be too heavy if it
has too much food inside it.
The basket is not correctly
placed in the pot.
Handle bar is stuck.
Frying oily food.
Fryer contains oil from last
use.
Securely insert the power cord
into a grounded power socket.
Click the mode selection button
to select an appropriate cooking
mode, then click the ON/OFF
button.
Click the ON/OFF button.
Fry food in batches.
Set at an appropriate
temperature, re-fry the food.
Set an appropriate cooking time,
re-fry the food.
During the cooking, pull the pot
out and shake it to separate the
overlapping food, then push the
pot back to re-fry.
Drip a thin layer of oil on the
surface of the food first, then
start to fry it.
The food in the basket cannot
exceed the max line.
Press the basket smoothly into
the pot.
Place the handle bar in a
horizontal position.
Normal phenomenon.
Please clean the pot and basket
after use.
Food is
uncooked
when the time
runs out
Did not evenly
fry the food
Fried food is
not crisp
Cannot
smoothly push
the pot back
into appliance
Smoking
10

CORRECT DISPOSAL OF THIS PRODUCT
This marking indicates that this appliance should not be
disposed of with other household waste. To prevent possible
harm to the environment or human health from uncontrolled
waste disposal, recycle it responsibly to promote the
sustainable reuse of material resources.
11
Table of contents
Popular Fryer manuals by other brands

ARDES
ARDES AR1D30 Instructions for use

Frymaster
Frymaster 45 Service and parts manual

Tower Hobbies
Tower Hobbies Presto PT17049WHT Safety and instruction manual

Eurofred
Eurofred Minima Series Installation, use and maintenance instructions

emerio
emerio DF-128115.1 instruction manual

Moulinex
Moulinex mega 2kg quick guide