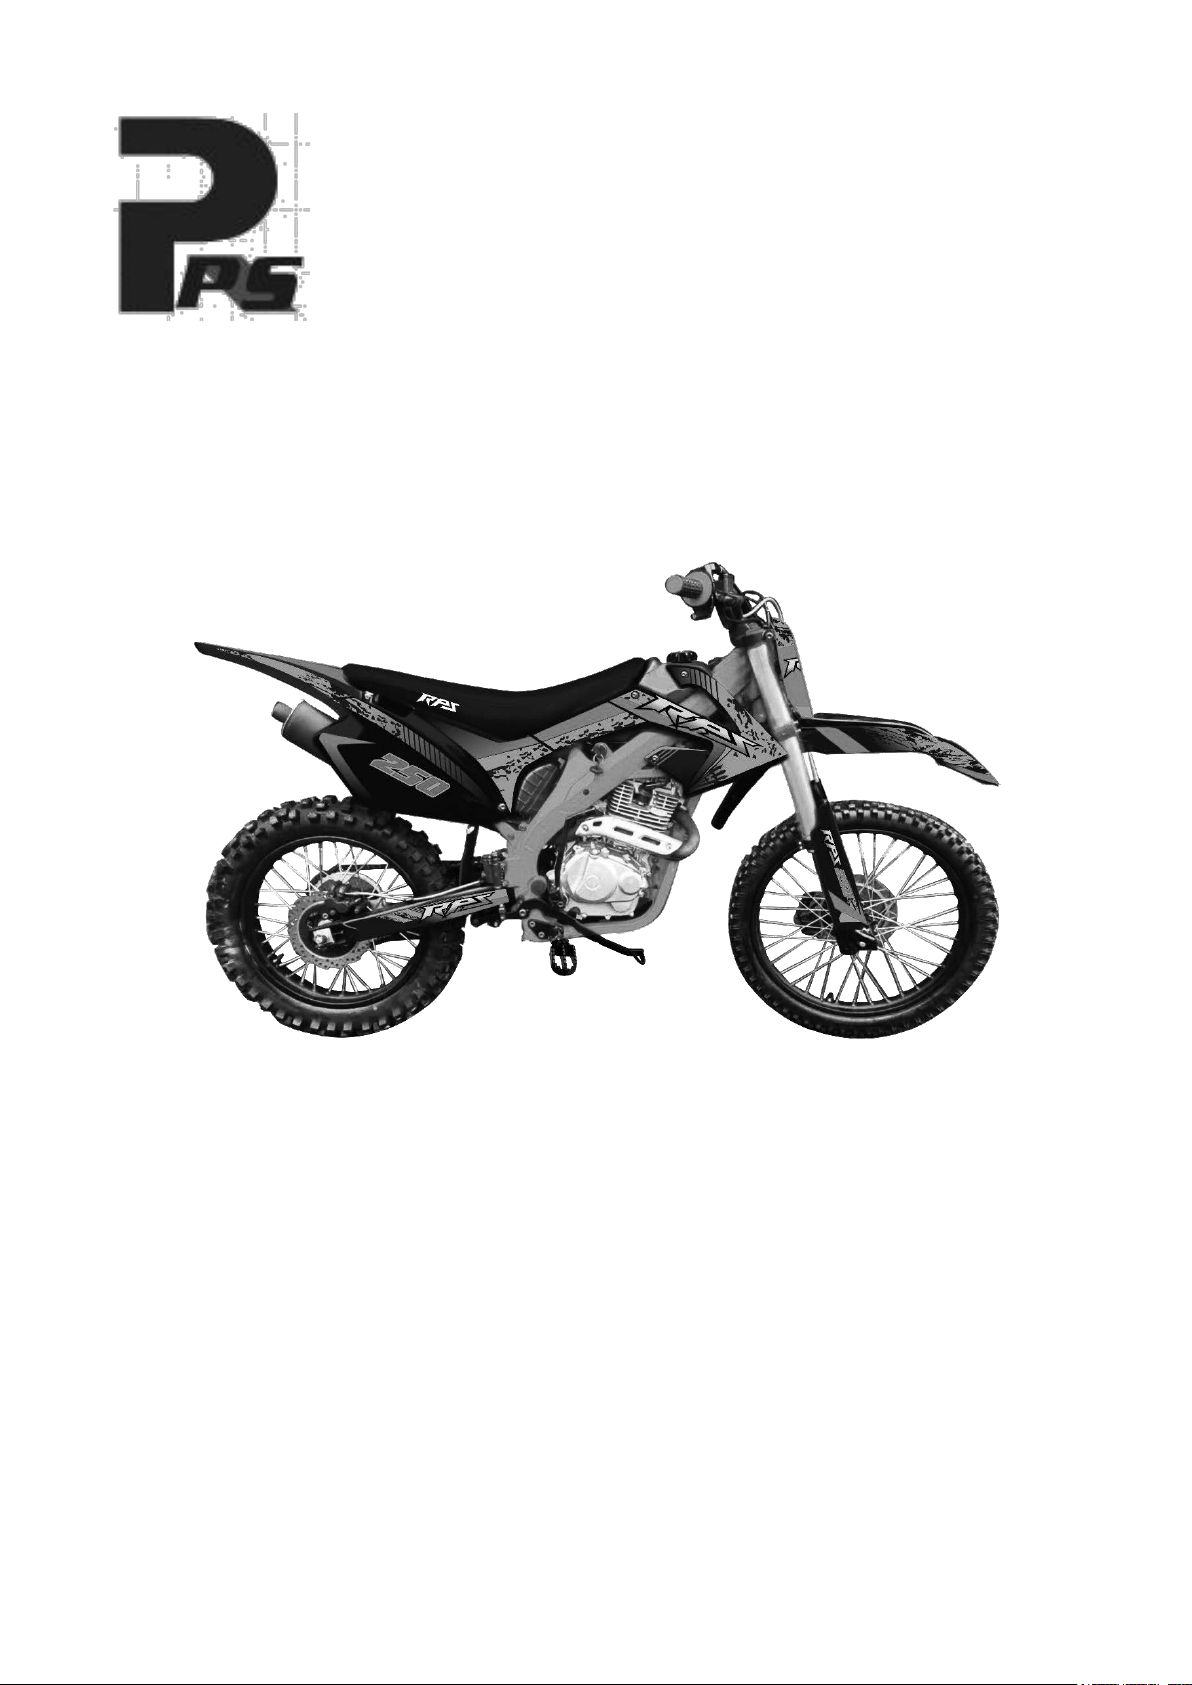
RPS Hawk Dirt Bike User manual

OWNER’S MANUAL
Hawk Dirt Bike
Minimum age requirement: 16
Always wear a helmet; It could save your Life!
This manual should be considered as a permanent part of the vehicle and should remain with the
vehicle when resold or otherwise transferred to a new user or operator. The manual contains
important safety information and instructions which should be read carefully before operating the
vehicle.

Index
Introduction ...........................................................................................................................1
Safety....................................................................................................................................1
Safety Information..................................................................................................................2
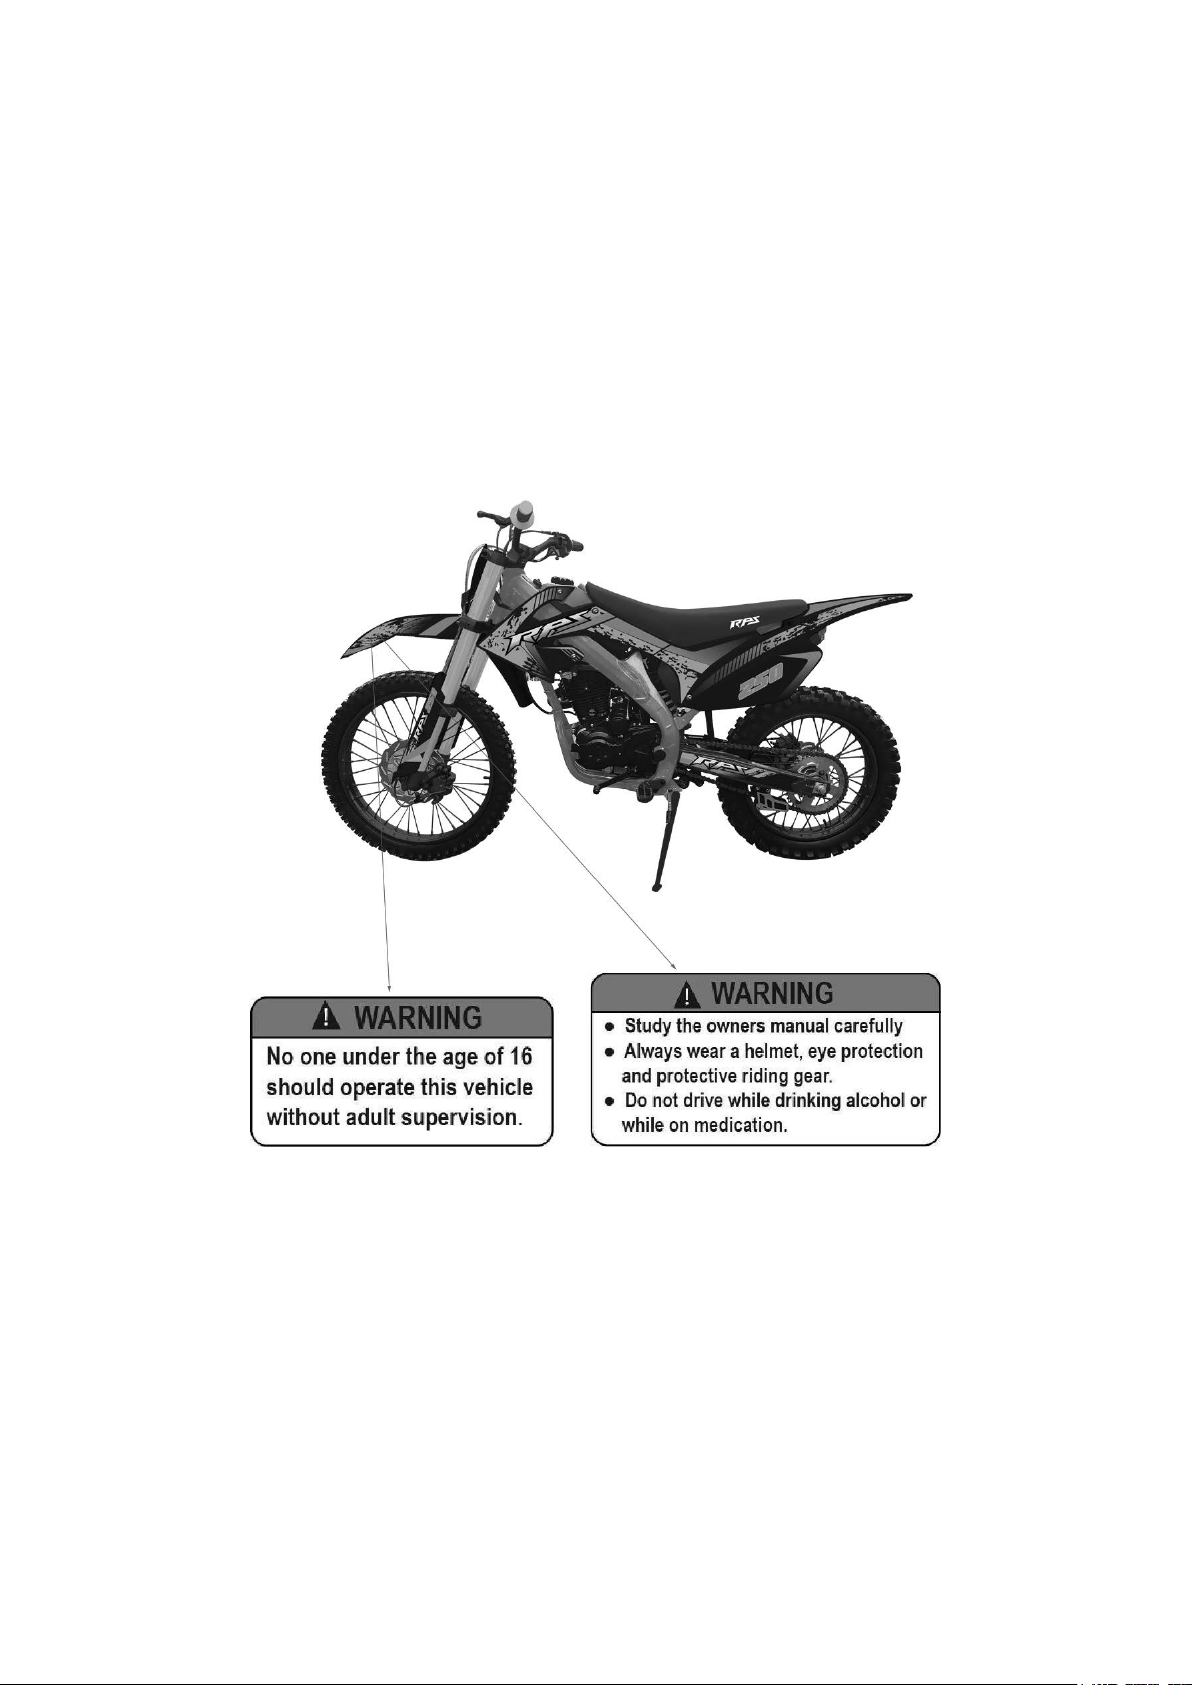
Safety Labels..........................................................................................................................3
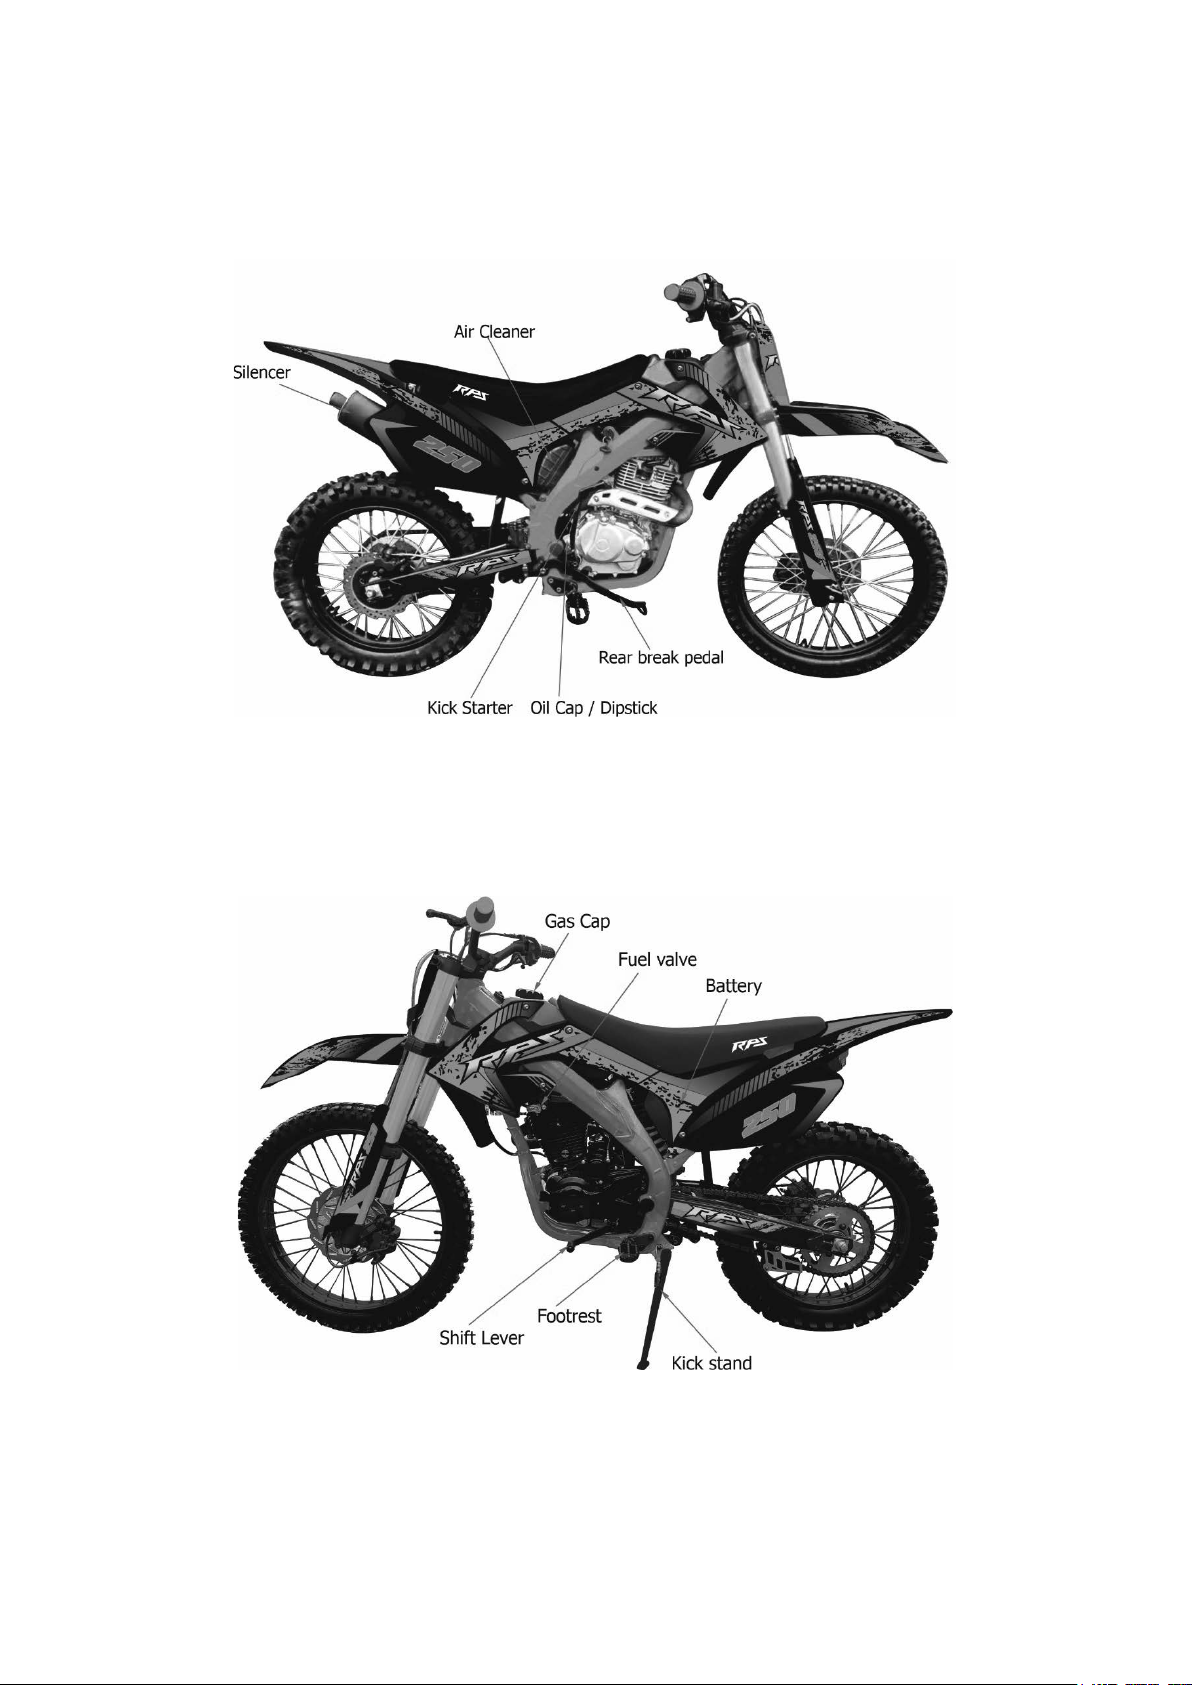
Components Locations ............................................................................................................4
Controls.................................................................................................................................5
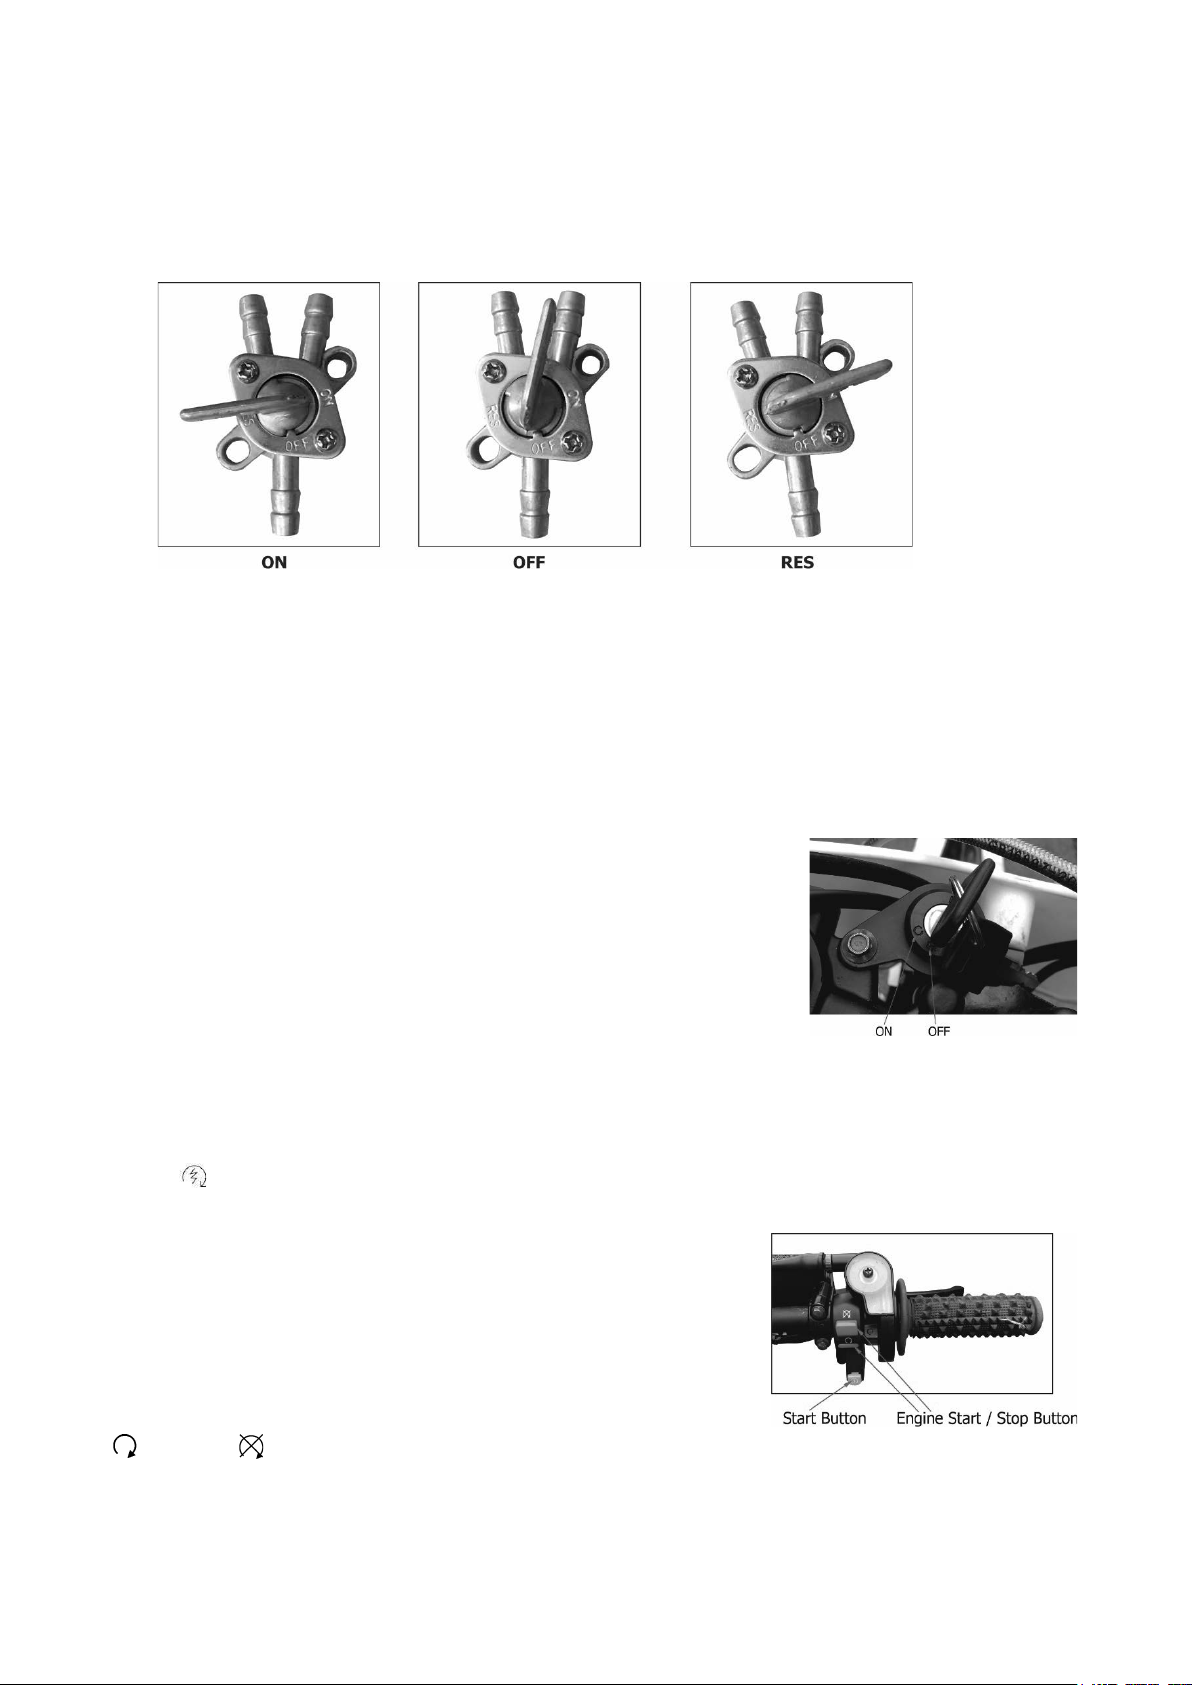
FUEL VALVE ...........................................................................................................................5
IGNITION SWITCH .................................................................................................................5
START BUTTON AND ENGINE STOP SWITCH............................................................................5
Before Riding .........................................................................................................................6
Protective Clothing..................................................................................................................6
Pre-Ride Inspection ................................................................................................................ 6
Loading guidelines and load limits............................................................................................7
Starting and Stopping the Engine.............................................................................................8
Starting procedures ................................................................................................................8
Flooded Engine.......................................................................................................................8
Starting and Stopping the Engine, Shifting Gears.......................................................................9
Shifting Gears ........................................................................................................................9
Braking................................................................................................................................ 10
Parking ................................................................................................................................ 10
Maintenance Safety .............................................................................................................. 11
Maintenance Schedule .......................................................................................................... 12
Maintenance Schedule A ....................................................................................................... 13
Maintenance Schedule B ....................................................................................................... 14
Maintenance Records ............................................................................................................ 15
Tool kit and Owner’s manual storage...................................................................................... 16
Side Cover Removal.............................................................................................................. 17
Fuel..................................................................................................................................... 18
Engine Oil ............................................................................................................................ 19
Air Cleaner........................................................................................................................... 21
Crankcase Breather and Throttle............................................................................................ 22
Clutch System ...................................................................................................................... 23
Engine Idle Speed ................................................................................................................ 24
Spark Plug ........................................................................................................................... 24
Brakes ................................................................................................................................. 25
Rear Brake Pedal Free Play.................................................................................................... 26
Tires.................................................................................................................................... 26
Air Pressure ......................................................................................................................... 26
Drive Chain .......................................................................................................................... 28
Adjustment .......................................................................................................................... 29
Battery ................................................................................................................................ 30
Vehicle Identification............................................................................................................. 32
Specifications ....................................................................................................................... 33
Wire Diagram....................................................................................................................... 34
Ricky Power Sports, LLC. – EMISSION CONTROL SYSTEM WARRANTY...................................... 35

1
INTRODUCTION
Congratulations on your purchase of the Ricky Power Sports LLC’ 250cc Dirt Bike. Take time to
understand how your bike works before riding. Scheduled service is a must and it is important to
follow the break-in guidelines and pre-ride instructions.
Make certain that you read the warranty coverage information provided and understand your
responsibilities.
If you have any questions, comment or concerns contact Ricky Power Sports, LLC at 1-844-250-
2199. All information, illustrations, photographs and specifications contained in this manual are
based on the latest product information available at the time of publication. Due to improvements
or other changes, there will be some discrepancies in this manual. We reserve the right to make
product changes at any time, without notice and without incurring any obligation to make the
same or similar changes to the vehicle previously built or sold.
SAFETY
The most important thing to remember is your safety and the safety of others. We have included
procedures and labels to help you make safe informed decisions. This information is provided to
make you aware of potential hazards that could hurt you and/or others. It is impossible to warn
you of ALL potential hazards so you must use your own best judgment. The following are different
kinds of safety information you will find in this manual: Safety Labels - On your bike
Safety Messages - Warning, Caution and Danger
The meaning of Warning, Caution and Danger Safety Messages:
Death or serious injury CAN occur if proper instructions are not followed.
Death or serious injury WILL occur if proper instructions are not followed.
You CAN be hurt if proper instructions are not followed.

2
SAFETY INFORMATION
This user’s manual contains important safety and maintenance information. Read it carefully
before riding. Failure to follow the warnings contained in this manual could result in INJURY or
DEATH.
ALWAYS WEAR A HELMET
The operator and passenger (if any) of this vehicle should always wear a helmet approved by
agencies such as the Department of Transportation (DOT), Safety Helmet Council of America
(SHCA), or Snell Memorial Foundation (SNELL). Most accident fatalities are due to head injuries.
The operator should also wear face shields or goggles, boots or closed-toe shoes, gloves and other
appropriate protective clothing. TAKE TIME TO LEARN AND PRACTICE
Take time to get to know this vehicle. The operator’s ability to operate this bike safely is largely
dependent upon the operator’s ability to exercise proper judgment. The operator must be of
sufficient age, understanding, mental capacity, and physical capability to safely operate this
vehicle. This vehicle should only be operated after sufficient practice in a decongested area. Safe
operation includes responsibility for the safety of a passenger (if any). We recommend that any
inexperienced driver should take a certified course approved by the Bike Safety Foundation (MSF).
RIDE DEFENSIVELY
A common accident happens when a car suddenly moves into your lane. Most bike collisions
happen when a car turns left in front of a bike. Pay extra attention to other vehicles around you,
never expect that they can see you.
MAKE YOURSELF VISIBLE
Make yourself more visible by wearing bright reflective clothing. Use your horn when it helps
others see you and before turning use your turn signal. RIDE WITHIN YOUR LIMITS
You should not ride beyond your abilities and never faster than the posted speed limit. NEVER
OPERATE THIS VEHICLE WHILE UNDER THE INFLUENCE OF ALCOHOL, DRUGS OR MEDICATION
OF ANY KIND. SUCH OPERATION COULD BE DANGEROUS TO YOURSELF AND/OR OTHERS.
KEEP YOUR VEHICLE IN A SAFE CONDITION
Proper maintenance will ensure a safe ride. Perform all recommended maintenance and inspect
your vehicle before each ride. Never modify your vehicle in any way to make it unsafe.

3
SAFETY LABELS
The safety labels on your bike provide you with important information do not remove them.
If a label becomes too difficult to read or comes off contact Ricky Power Sports, LLC for
replacements.

4
COMPONENTS LOCATIONS

5
CONTROLS
FUEL VALVE
Fuel valve - Used to control the flow of gasoline from the fuel tank to the carburetor.
ON - gasoline can flow to the carburetor.
OFF - gasoline cannot flow to the carburetor.
RES - gasoline can flow to the carburetor when you have run out of gas in the gas tank.
Make sure to refuel as soon as possible.
IGNITION SWITCH
Ignition switch-used for starting and stopping the engine. The key is
used to lock the steering, preventing theft.
ON-ALL electrical components are ON.
Off-ALL electrical components are OFF.
START BUTTON AND ENGINE STOP SWITCH
Start - Pushing the start button will start the engine. When button is pressed in the start
motor will crank the engine, See starting procedures.
Engine stop switch- In case of an emergency and a quick stop is
necessary turn switch to the “OFF” position. This switch must be
in the “RUN” position in order to start the vehicle, and should
remain in this position even while the engine is off. If you leave
ignition switch on and engine stop switch off, the lights will stay
on, causing the battery to lose life.
RUN OFF

6
BEFORE RIDING
Before your first ride on your new bike we strongly recommend you:
Read the owner’s manual.
Understand all safety labels.
Know how to operate all controls. Before you ride each time, make sure:
You are in good physical and mental health.
You are wearing protective gear (helmet, clothing, eye protection etc.) If you have a
passenger, be sure also having protective wears for passenger.
You do not have ANY alcohol or drugs in your system.
PROTECTIVE CLOTHING
For your protection we urge you to ALWAYS wear protective clothing. The proper clothes can
protect you from injury. Wear an approved bike helmet, goggles, a good pair of gloves, strong
boots that cover the ankle, long pants, and a long sleeve shirt every time you ride.
Helmets and Eye protection
A DOT approved bike helmet is the most important part of your protective gear. A DOT approved
bike helmet can help prevent a serious head injury. Choose a helmet that fits snug. Bike dealers
can help in selecting a good quality helmet which fits properly.
Not wearing a helmet greatly increases your chances of serious head injuries or death in the
event of an accident.
If you are riding with a passenger be sure they are also wearing a helmet and eye protection.
PRE-RIDE INSPECTION
Before each ride check the condition of your bike to make sure that it does not have mechanical
problems. Your bike should always be in good riding condition to ensure the safety of you, your
passenger (if any) and others around you.
Improper maintenance of this bike or failure to correct any problems can result in serious
injury or death. ALWAYS perform aa pre-ride inspection before every ride.
Be sure to check the following items before each ride:
BRAKES - Press on the brake pedal and hold in brake lever to ensure that the brakes are
operating correctly.
THROTTLE - Rotate the throttle handle to ensure it moves smoothly.

7
LEAKS and LOOSE ENDS - Check all hoses for leaks and cables that may be loose.
CHAIN - Check the condition. Adjust the slack (if any) and lubricate (if needed).
TIRES - Use an air pressure gauge to check the pressure. If needed add air. Look for excessive
wear or damage.
If you are riding with a passenger or carrying cargo check:
LOAD LIMIT - Do not exceed the load limit.
REAR SUSPENSION - Adjust the suspension according to the weight of the load you are
carrying.
Make certain that you keep with the Periodic maintenance (see periodic maintenance section).
LOADING GUIDELINES AND LOAD LIMITS
Your bike has been designed to carry you and one passenger. When a passenger is riding with you
there will be a difference in the acceleration and braking. Load Limits
Maximum weight capacity (including rider, passenger, accessories and cargo): 331 lbs (150kg)
Loading guidelines
Improper loading or overloading can be hazardous and may cause an accident resulting in
serious injury or death. Follow all load limits.
Improper loading of your bike may affect your stability. With the bike properly loaded always ride
at a reduced speed.
If you have questions about carrying cargo contact Ricky Power Sports LLC. for advice.
Check the following when carrying a passenger or cargo:
Both tires are properly inflated.
Rear suspension may need adjusting.
Secure all cargo.
Balance cargo weight
Do not attach large or heavy items to the front of your bike.

8
STARTING AND STOPPING THE ENGINE
Always follow proper starting procedures.
Never start the engine in a closed place as the exhausted gas
form the vehicle contains toxic carbon monoxide.
STARTING PROCEDURES
Insert key into ignition, turn to “ON” position.
Make sure the transmission is in the “NEUTRAL” position.
Turn the engine stop switch to “RUN”.
Turn fuel valve to “ON”.
If you are restarting a warm engine, follow procedure for High Air Temperature.
Normal Air Temperature : 10º -35ºC (50º -95ºF)
Starting and Stopping the Engine
High Air Temperature: 35ºC (95ºF) or above
DO NOT OPEN CHOKE
1. Slightly open throttle
2. Start engine
Low Air Temperature : 10ºC (50ºF) or below
1. Follow Normal Air Temperature procedures 1-2.
2. After RPM’s pick up, open the choke to keep fast idle.
3. Keep warming the engine until it responds to the throttle when choke is closed.
NOTICE:
Extensive use of the choke can cause damage to the piston and cylinder wall.
Fast idling for more than 5 minutes at Normal Air Temperature can cause exhaust pipe
discoloration.
FLOODED ENGINE
The engine may be flooded with extra gasoline, if it does not start after several attempts. Try the
following to clear a flooded engine:
1. Turn the engine stop switch to the “OFF” position.
2. Close the choke lever.
3. Open the throttle completely.
4. Push and hold in the start button for 5 seconds.
5. Wait 10 seconds and turn the engine stop switch to the “RUN” position.
Next, follow the High Air Temperature starting procedures.

9
STARTING AND STOPPING THE ENGINE, SHIFTING GEARS
How to stop the engine
Normal Engine Stop
Shift into neutral and turn the ignition switch “OFF”.
DO NOT leave the ignition switch “ON” while the engine stop switch if “OFF”, this will allow the
lights to stay “ON” causing the battery to loose life.
Emergency Engine Stop
If an emergency stop is necessary, use the engine stop switch. Simply press the emergency stop
switch to “OFF”.
Shifting Gears
Your bike is equipped with a cable-operated clutch.
It has five forward gears, one down and four up.
Tips for learning how to shift for the inexperienced rider:
Shift while moving a straight line.
Let loose on the throttle and pull in clutch lever completely before shifting (improper shifting
may cause damage to the engine).
Recognize the engaging point when you release the clutch lever.
SHIFTING GEARS
Tips for learning how to shift for the inexperienced rider (continued):
Reduce the throttle or shift to a higher gear before engine RPM’s
get too high.
Shift to a lower gear before the engine RPM’s get too low.
When the engine RPM’s are too high do not downshift to slow your
bike, this could cause damage.
Do not coast or tow your bike for a long period of time while the
engine is off.
If your speed drops below 9mph (15km/h) pull in clutch lever and
shift down to 1st gear or stalling can occur.
Recommended shift point
To get the best fuel economy possible ride in the highest gear that allows the engine to run and
accelerate the smoothest.
Shifting up from:
1st to 2nd - 12mph (20km/h)
2nd to 3rd - 19mph (30km/h)
3rd to 4th - 25mph (40km/h)

10
4th to 5th - 31mph (50km/h)
Shifting down from:
5th to 4th - 22mph (35km/h)
4th to 3rd - 16mph (25km/h)
BRAKING
Your bike is equipped with a hand operated front hydraulic disc brake and a foot operated rear
hydraulic disc brake. Your front brake provides 70% of your braking power. By using both front
and rear brakes you will achieve faster, more stable and effective braking.
To slow down or stop your bike apply front and rear brakes while down shifting. Slowly increase
brake as you feel your speed reduce. In order to prevent stalling, pull in clutch lever before
stopping completely.
If you apply you brakes too abruptly you may lock the wheels, slide and loose control of your bike.
If this should happen, release the brakes and steer straight until you have completely regained
control.
Before making a turn, reduce your speed. Try not to brake or close the throttle too quickly while
turning or you may loose control of your bike.
When traveling down a steep grade, reduce your speed by down shifting rather than braking.
Applying your brakes for a long period of time can reduce their effectiveness.
You should never ride with your foot resting on the brake pedal or you hand on the brake lever.
This mat causes your brakes to overheat and indicate false braking to other motorist’s.
PARKING
Try, when possible, to park on level ground. If you have no paved surface to park on, make sure
the ground is firm. If it is necessary for you to park on a hill, position your rear wheel against the
curb at an angle and leave the transmission in gear.
While parked, use the side stand for support.
- Use your foot to guide the side stand down.
- Put something solid under the side stand if you must park on a soft surface.
Theft-Prevention tips
You should park your bike in a garage if possible, otherwise make certain to park in a well lit
area.
Never leave the ignition key with the bike.
You should invest in a good quality anti-theft device that will secure your bike to a stationary
object.

11
Keep the owner’s manual, registration and insurance with the bike to help authorities find you
if it has been stolen and recovered.
Servicing your bike
This section is provided to help you keep your bike in good running condition.
The following table provides you with the three types of inspections recommended for your bike.
Type of inspection/ service When to perform? Who performs?
Pre-ride inspection Before every ride You
Maintenance schedule Interval on schedule Service Center
It is essential to your safety that you keep your bike well maintained. A properly maintained bike
will help protect your investment, avoid break-downs and assure having maximum performance.
The maintenance of your bike is YOUR responsibility.
Follow all maintenance and inspection recommendations.
Improper maintenance can cause an accident resulting in injury or death.
In the event of an accident have a service center inspect ALL parts even if they appear to be
undamaged.
MAINTENANCE SAFETY
This section will instruct you on how to perform some important routine maintenance. You can
perform many of these tasks with the tools provided with the bike. The more difficult tasks, such
as wheel removal, should be performed by a professional technician. If you do not feel capable of
performing any one task do not hesitate to contact your local service center for help.
Failing to follow these maintenance instructions can result in serious injury or death.
Important Safety Precautions
Always turn the engine off before performing any maintenance or repairs.
Let the engine cool before touching any related parts.
Do not touch any moving parts while engine is running.
Make sure you have the tools and skills required before performing any maintenance repairs.
Use the side stand or maintenance stand to prevent the bike from falling over.
Keep cigarettes, sparks, and flames away from all fuel-related parts. Use a non-flammable
solvent when cleaning parts.
Keep in mind that your local service center is equipped with the proper tools and knowledge to
help service your bike. If necessary please contact them to ensure greater quality and reliability.
Maintenance Safety

12
Including the regular maintenance and pre-ride inspection, perform the periodic checks once a
month and once a week if you ride frequently.
Check the mileage and perform any scheduled maintenance necessary.
Tires - ●Check the air pressure and add air if needed.
●Check for any excessive wear on the tread.
●Check for any damage that may have occurred.
●Check the rims and spokes for any possible damage.
Fluids - ●Check the level of engine oil.
●Check the level of the brake fluid.
●Add the correct fluids if necessary.
Lights - ●Check the headlight, brake light, tail light and turn signals. Make certain they all work
properly.
Free play - ●Check the clutch lever, rear brake pedal and throttle grip.
Drive Chain - ●Check the condition, adjust the slack and lubricate if necessary.
Fuses - ●Always have spare fuses.
Nut and bolts - ●Check all nuts and bolts, tighten if needed.
MAINTENANCE SCHEDULE
This portion of the manual will tell you how often to perform maintenance. The maintenance
schedule is based on average riding conditions. If you ride more frequently than usual and in dusty
or wet weather be sure to maintain your bike more often. We recommend that you have your local
service center perform extensive maintenance and repairs unless you have advanced mechanical
skills.
Every maintenance item requires some mechanical knowledge. some parts require more technical
information and tools than others.
* Unless you have proper tools and service information, have your local service center perform
these tasks.
** For safety reason, ONLY your local service center should perform these tasks.
NOTES:
1. Repeat the frequency interval at higher RPM.
2. Service more frequently if you are ridding in dusty or wet areas.
3. Service more frequently if you are ridding at full throttle or in rain.
4. Replace every 2 years or at indicated odometer reading, which ever comes first.

13
MAINTENANCE SCHEDULE A
I - Inspect, clean, adjust, lubricate or replace if necessary
C - Clean
A - Adjust
L - Lubricate
R – Replace

14
MAINTENANCE SCHEDULE B
I - Inspect, clean, adjust, lubricate or replace if necessary
C - Clean
A - Adjust
L - Lubricate
R – Replace

15
MAINTENANCE RECORDS
To ensure proper maintenance keep record. If the Dirt Bike is sold be sure to include the
maintenance records. All scheduled maintenance is considered normal operator cost if a service
center performs these tasks you will be charged. Please use the tables below to keep track of all
maintenance performed.
Miles(Km) Odometer Date Performed by: Notes
600(1,000)
4,000(6,400)
8,000(12,000)
12.000(19,200)
16,000(25,600)
20,000(32,000)
24,000(38,400)
36,000(57,600)
40,000(64,000)
44,000(70,400)
48,000(76,800)
52,000(83,200)
56,000(89,600)
60,000(96,000)

16
TOOL KIT AND OWNER’S MANUAL STORAGE
Your tool kit is located in the tool kit bag. These tools may come in handy during minor roadside
repairs and adjustments.
Tools in tool kit:
M8-M10 Fixed wrench
M12-M14 Fixed wrench
Multipurpose screwdriver
Spark plug wrench
Fishtail pliers
M4 Allen wrench
M5 Allen wrench
Special tool for idle speed adjustment
The tool kit is provided in steel frame of carton case package. Please contact your local dealer to
get it if possible.
Store the owner’s manual, along with the tool kit and any other important documents.

17
SIDE COVER REMOVAL
Left Side Cover
In order to clean and maintain the battery and fuses you
must remove the right side cover.
Removal
1. Remove bolt.
2. Remove cover.
Installation
1. Align prongs
2. Reverse removal steps.
Right Side Cover
In order to clean and maintain the air cleaner you must
remove the left side cover.
Removal
1. Remove bolt.
2. Remove cover.
Installation
1. Align prongs.
2. Reverse removal steps.

18
FUEL
Fuel Recommendation
Type - Unleaded
Octane number - 87 or above
Unleaded fuel procedures fewer engine deposits and will extend the life of the exhaust system
components. We suggest you use regular unleaded fuel. Be sure to only use an octane number of
87 or higher. Using a lower octane gasoline can cause severe damage to the engine. Never use
stale or contaminated gasoline or an oil/gasoline mixture. Fuel Capacity
Fuel tank capacity, including reserve – 6.2L
After using the reserve tank you should refill the gas tank immediately. Then turn the fuel valve to
the “ON” position so you do not run out fuel in the reserve tank.
Fuel and Engine Oil
Refueling
Rotate the fuel fill cap by counterclockwise.
Open cap.
Add fuel to the bottom of the filler neck. Do not overfill.
After refueling, rotate the fuel fill cap by clockwise until it locked.
Gasoline is extremely flammable and explosive. You can be burned or seriously injured.
By using, checking, adding and changing the recommended engine oil you can prolong the life of
your engine. Changing your engine oil helps get rid of dirt or debris that can damage the engine.
Always be sure to keep the right amount of oil in the engine or serious damage can occur.
If you are driving in dusty areas you should change the oil more frequently.
Table of contents