RS RS100 Quick start guide

Sail it. Live it. Love it.
RIGGING GUIDE

CONTENTS
1. INTRODUCTION
2. COMMISSIONING
2.1 Preparation
2.2 Rigging the Mast
2.3 Stepping the Mast
2.4 Rigging the Boom
2.5 Hoisting the Mainsail
2.6 Rigging the Gennaker
2.7 Attaching sail numbers
2.8 Completion
3. SAILING HINTS
3.1 Tacking
3.2 Gybing (mainsail only)
3.3 Sailing With the Assymetric Spinnaker
4. TUNING GUIDE
5. MAINTENANCE
5.1 Boat care
5.2 Foil care
5.3 Spar care, and access to bowsprit.
5.4 Sail care
6. WARRANTY
7. APPENDIX
7.1 Useful Websites and Recommended Reading
7.2 Three Essential Knots
All terms highlighted in blue throughout the Manual can be found in the Glossary of Terms
Warnings, Top Tips, and Important Information are displayed in a yellow box.

1. INTRODUCTION
Congratulations on the purchase of your new RS100, and thank you for choosing an
RS product. We are confident that you will have many hours of great sailing and
racing in this truly excellent design. The RS100 is an exciting boat to sail and offers
fantastic performance. This manual has been compiled to help you to gain the
maximum enjoyment from your RS100, in a safe manner. It contains details of the
craft, the equipment supplied or fitted, its systems, and information on its safe
operation and maintenance. Please read this manual carefully and be sure that you
understand its contents before using your RS100.
This manual will not instruct you in boating safety or seamanship. If this is your first
boat, or if you are changing to a type of craft that you are not familiar with, for your
own safety and comfort, please ensure that you have adequate experience before
assuming command of the craft. If you are unsure, your RS Dealer, or your National
sailing federation – for example, the Royal Yachting Association – will be able to
advise you of a local sailing school, or a competent instructor.
For further information, spares, and accessories, please contact:
RS Sailing
Premier Way, Abbey Park
Romsey
Hants
SO51 9DQ
For details of your local RS Dealer, please visit www.RSsailing.com
Please keep this manual in a secure place and hand it over to the new owner if you
sell the boat.

2.COMMISSIONING
2.1 Preparation
Your RS100 comes complete with all the components necessary to take the boat
sailing. In order to commission it, you will need the following tools:
•Pliers, or a shackle key
•Pozi-drive screwdriver
•PVC Electrician’s Tape
Should your RS100 require roping out, you will also need a 3mm splicing fid,
and the supplementary instructions. If it has already been roped out and
prepared, it is still wise to check knots and lashings, and tighten shackles yourself
prior to commissioning. This is especially important when the boat is new, as
travelling can loosen seemingly tight fittings and knots. It is also important to check
such items regularly prior to sailing.
You will also need to tie some particular knots, such as a bowline or a figure-of-eight
during regular rigging. If you are unfamiliar with the knot, please see Appendix 9.3
Three Essential Knots.
DO NOT use a knife or other sharp object to cut through packaging containing parts –
you may damage the contents!

2.2 Rigging the Mast
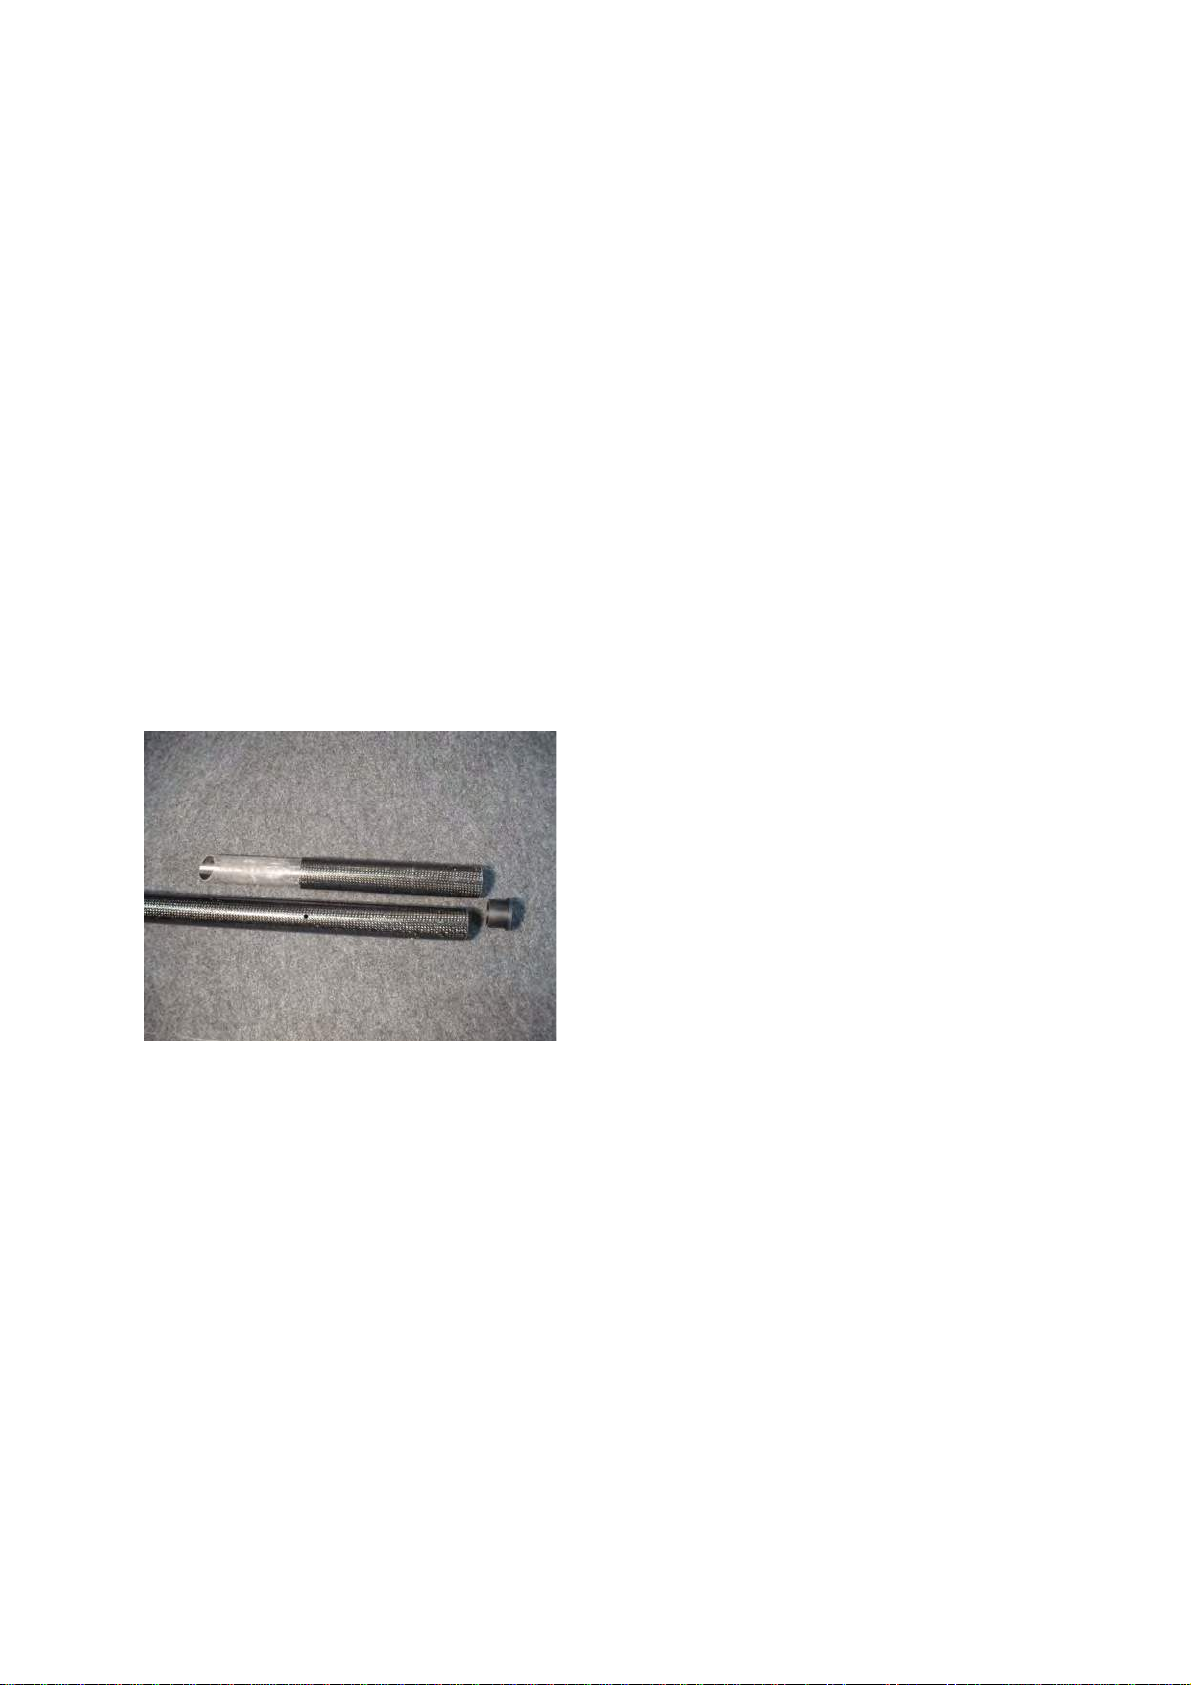
Your RS 100 mast consists of 3 component sections: The short base section is used
only in conjunction with the 10.2m sail, and if you are using this sail, then insert this
short base section into the lower main mast. The mast base plug is already supplied
attached to this base section. However, if you are using the 8.4m sail you will need
to extract the mast base plug and plug it into the base of the lower main mast.
Whichever sail you use it is wise to tape the base plug onto the mast – so that it
remains in place when the mast is taken out of the boat.
8.4m sailors should stow the short base section safely – whilst you do not
need to use it, you will need it for resale of the boat or of course if you wish to
use the 10.2m sail
Now slide the 2 main mast sections
together, taking care to push them fully
together, which should ensure the mast
track sections are properly aligned. The
photo on the left shows short mast base
section used with the 10.2m sail with the
heel plug. Remember to tape the heel plug
in place.

Rigging the main halyard:
The main halyard should be threaded around the top sheave, inside the mast briefly
and out through the slot on the front of the mast, above the cleat – both sited close to
the top of the mast.
Tie an overhand knot in the end of the halyard that will tie to the sail (aft of the mast),
and tape it to the mast about 20cm above the relevant gooseneck hole (10.2m –
lower hole / 8.4m - upper hole). This will enable you to locate the Inglefield clip
correctly as follows: slide the spare clip onto the fwd section of the halyard, and slide
it all the way up to the top of the mast, and then tie an overhand knot to locate it
there.
Thus as you hoist the sail and the knot (currently taped to the mast 20cm above the
gooseneck), ends up at the top of the mast with the sail, your Inglefield clip will end
up lower down, just above the gooseneck, ready to be clipped to its partner attached
to shockcord and emerging from the port side of the mast gate organiser. That is
how your main halyard will be retained when you are sailing.

Rigging the shrouds, spreaders and spinnaker hoist block:
The shrouds should be shackled to the lower mast eye (10.2m), or the middle mast
eye (8.4m) and the spinnaker hoist block shackled to the middle mast eye (10.2m)
or the upper mast eye (8.4m), as in the photo below. The top ends of the shrouds to
be shackled to the mast are marked with black tape around the terminals. Ensure
these are correct otherwise it will be impossible to rig correctly.
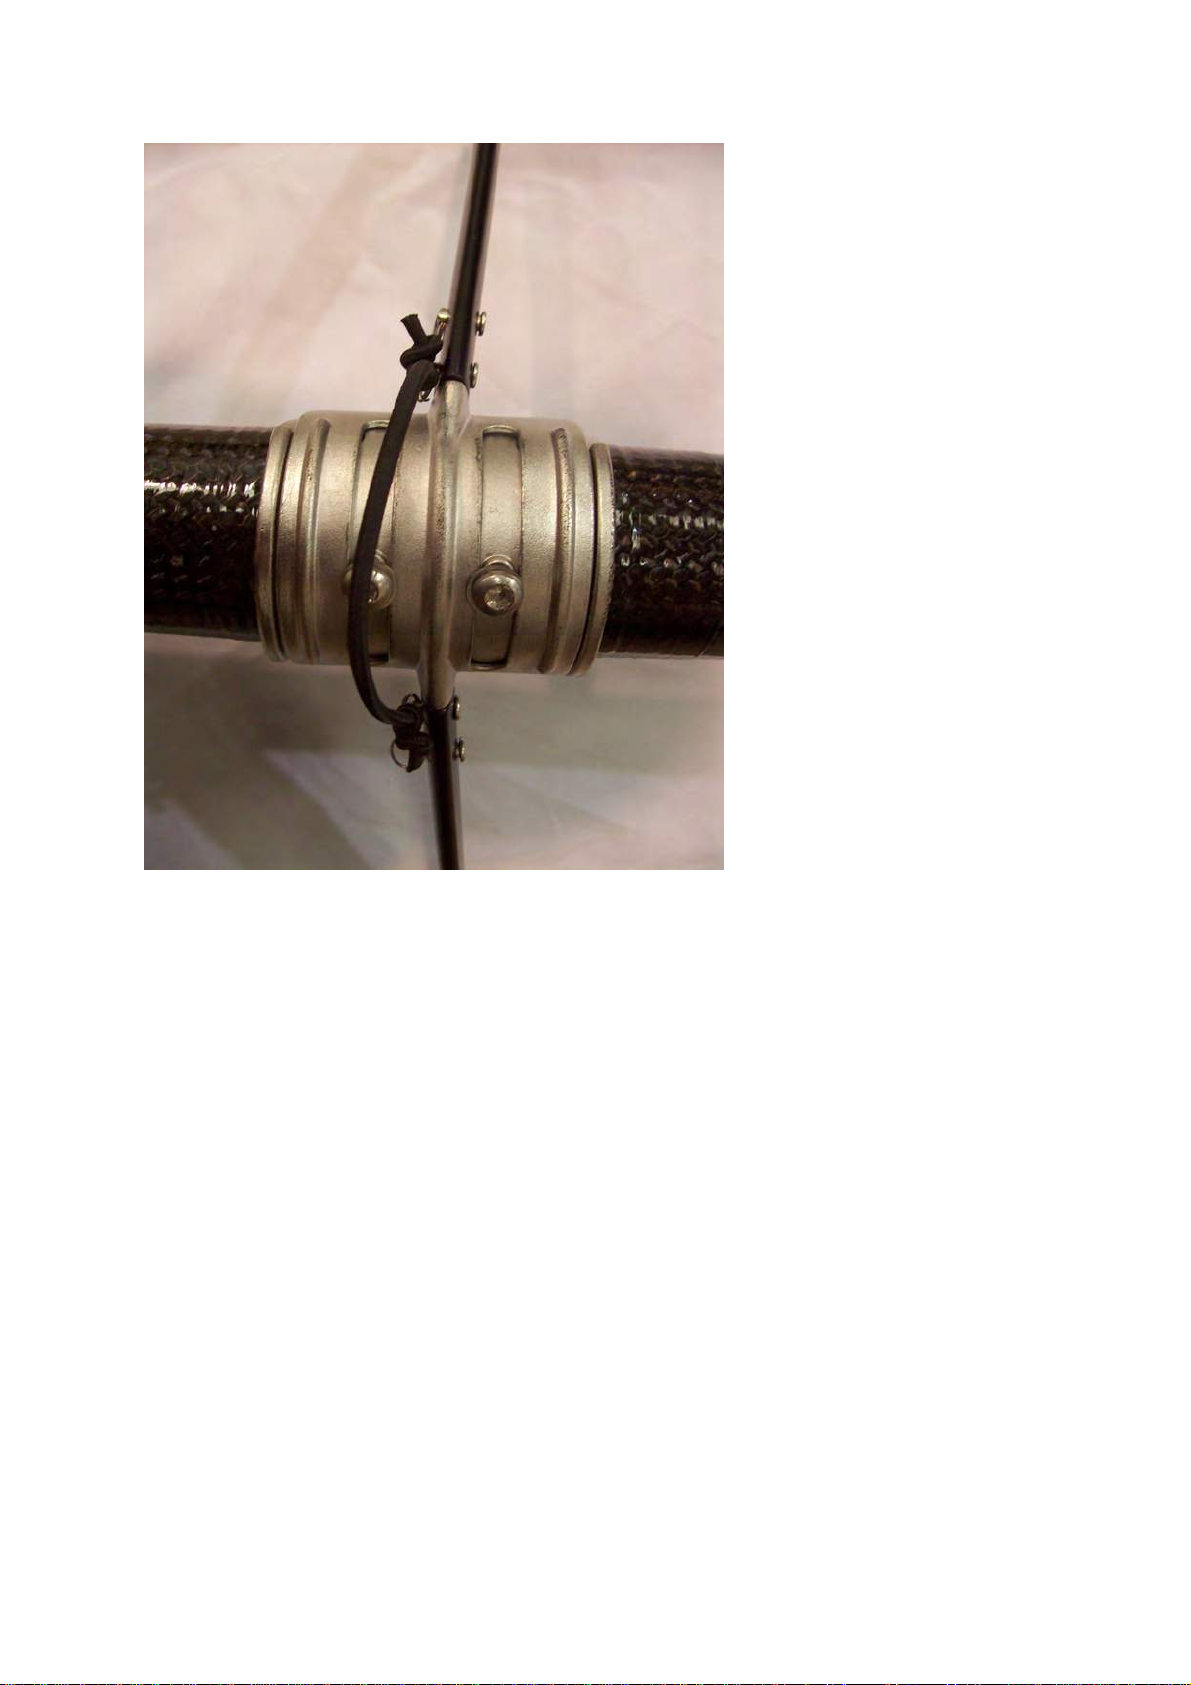
Now slide the spreaders onto the spigots on the rotating bracket, blunt edge facing
forwards, and insert the 4 locating pins, and split rings to secure. A key tip here is
to tie a short piece of 2mm shockcord – about 200mm long - to the inner split
rings here, forming a captive loop through which the kite halliard is lead going
down the mast on the hoist – this stops it ever blowing out and getting caught
around a spreader end. See photo below. Now tape up these pins and rings to
protect the spinnaker in use.

Using the pozidrive screwdriver loosen the screws in the end of the spreaders to
enable the shrouds to be attached. Double check the shrouds are the right way up
by pulling a shroud tight down to the spreaders (whilst the spreaders are rotated
centrally on the mast) and checking the spreaders can be clamped between the pair
of ferrules. Now insert the shrouds into the aft setting on the spreader ends, siting
between the relevant ferrule pair (upper pair 10.2m, and lower pair 8.4m). Check
with the photo below: Now tighten the screws again and finally check the shrouds
are not twisted from shackle to spreaders. They should not be too slack.

Take the gennaker halyard from where it exits on top of the mast gate organiser and
thread it through the hoist block that is above the point where the shrouds attach to
the mast. Run the gennaker halyard back down to the base of the mast, passing
through the little shockcord retaining loop at the spreaders. (if fitted).
The mast is now ready to be stepped.

2.3 Stepping the Mast
Before you step the mast, check that the main halyard and gennaker halyard ends
are near the base of the mast. Also, check that the bottom of the mast well is free
from any debris and sand that will cause premature wear of the mast well. Likewise
ensure the mast base plug is free from sand and grit, and taped in place.
The RS100 mast only requires one person to step it. However, if you are stepping it
for the first time, or if it is windy, it would be wise to have another person with you in
case of any difficulty.
1. Stand the mast upright beside the boat. Remember to keep the base plug
clean
2. Lift the mast up and pass the base of the mast through the hole in the mast
gate organiser.
3. Pass the mast down, until it reaches the bottom of the mast well. Take care to
avoid all lines and shockcord as it passes the gennaker sock, and ensure the
recess in the base plug sits securely over the steel peg at the bottom of the
mast well. The mast will now stand up on its own.
4. Wind the mast gate to the furthest aft position. This will ease the pinning of
the shrouds – usually around hole 2 or 3 – but as far down as you can easily
get without help. Now as you wind the mast gate back to a central position,
you will find the shrouds are gently tensioned.
HINT
A central position for the mast gate is a good starting point, but further aft (more
mast rake) helps in the breeze and further forward (less mast rake or more upright)
helps in the light winds. It is worth remembering that more mast rake will mean
less room under the boom when tacking and gybing!
Useful tip:
Your mast will come with a band of very light stainless steel or some high-
resistance ware tape at deck level – this is advisable to stop ware on the mast at
the deck collar. The tape is easily replaceable and also helps to reduce any “slop”
in the mast gate. Useful to make sure you have a couple of lengths in the toolbox!!

2.4 Rigging the Boom
To thread the mainsheet:
1. Lead the mainsheet through the centre jammer cleat and ratchet block
(making sure that the rope is threaded through the ratchet block the correct
way, so that it ‘grips’ the rope when the sheet pulls out and runs freely when
you pull the sheet in).
2. Lead the mainsheet through the block in the middle of the boom.
3. Thread the mainsheet through the 2 loops riveted to the underside of the
boom and through the block at the aft end of the boom, and down to the
mainsheet bridle that spans the back of the boat.
4. Ensure the bridle block is aligned as it would whilst sailing, and pass the
mainsheet from fwd to aft through the block.
5. Finally, pass the end of the mainsheet through the hole in the underside of the
boom and secure inside with a stopper knot.
The boom can now be bolted to the mast. Offer the boom jaws up to the mast, and
as you do so lift the kicker and Cunningham control lines over the boom as in the
photo below. Now locate the boom jaws either side of the mast – aligned with the
gooseneck holes, and push the boom bolt through the boom jaw and mast and out

the other side, through the other side of the boom jaw. Now firmly screw the head of
the boom bolt home to secure the boom. The Gnav arms and roller should be
sitting astride the mast marginally above the boom, with the control lines over
the boom – see photo below:

2.5 Hoisting the Mainsail and rigging the control
lines.
To hoist the mainsail:
1. Unroll the mainsail and attach the clew to the boom using the Velcro clew
strop provided on the sail. This should be tensioned such that the foot of the
sail will rest a few mm clear of the boom when in use. NB: the 10.2 sail clew
strap is positioned aft of the mainsheet block, and the 8.4m sail clew is
positioned forward of the mainsheet block.
2. Feed the outhaul through the clew of the mainsail and thread it back through
the hole in the end of the boom. The 8.4m sail will need the entire length of
the outhaul line, leaving a small tail at the cleat, whereas the 10.2m sail
will have a long tail at the cleat which should either be suitably
shortened or plaited to ensure it is neat and tidy in use. As a guide about
150-200mm tail is useful when the outhaul is fully eased. This relates to about
120mm between the boom and the foot of the sail. This is a maximum,
whereas the minimum (when it is windy) would be the foot of the sail pulled
tight along the boom.
3. The tack of the mainsail should now be shackled to the forward end of the
boom – ensure the sail is passed in between the gnav arms, and shackled to
the aft lacing eye and ensure the control lines (kicker/gnav control and
Cunningham) are free forward of the sail.
TOP TIP
Only hoist the mainsail when you are ready to go afloat, as this will prolong the life of your
sail and prevent any possible damage occurring while you are away from your boat.

4. Tie the main halyard to the head of the mainsail, using the “knot on a knot”
method. See the photo at the back of this manual – “knots”.
5. Hoist the mainsail, ensuring the boat is head to wind, by pulling on the end of
the main halyard that runs down the front face of the mast. Gently guide the
luff of the sail into the sail feeder, as you do so, as the elasticated boltrope
can jump the sail feeder easier than a standard solid boltrope.
6. Hoist the main nearly to the top, say 500mm short, then fix the control lines as
in 7 and 8, prior to the final hoist to the top. When the mainsail is hoisted to
the top of the mast, cleat the main halyard in the cleat located on the front
face of the mast.
7. Now you should shackle the kicker control block to the forward eye on top of
the boom, and then pass the 2 gnav roller lines attached to the blocks, over the
roller – from aft to forward – in the grooves in the roller, and down to loop over
the gooseneck pin ends to secure. Ensure that with the mainsail fully hoisted
the blocks on the end of the gnav roller lines are pulled right up to the roller
– see the photo below: You might need to adjust the lines in the process:
This will ensure you have maximum “travel” in your kicker/gnav system.

8. Now feed the Cunningham line up through the sail and back down to tie onto
the shackle on the aft eye on top of the boom. Again ensure the
Cunningham block is up by the sail eye, to ensure you have maximum
travel.
9. Now finally you should stow the main halyard - clip the Inglefield Clip on the
tail of the main halyard to the Inglefield Clip attached to the piece of shockcord
on the deck near the base of the mast. This will tension the tail of the main
halyard
10.Finally coil up the tail of the main halyard and stow it in the small pocket sewn
onto the tack area of the mainsail. Ensure it is led inside the spinnaker
halyard.
Top tip:
It is useful to have the kicker and Cunningham rigged such that the last 250mm
of mainsail hoist is effectively bending the mast even with the kicker and
Cunningham eased to the maximum. This gives you all the travel you will ever
need.

2.6 Rigging the Gennaker
To rig the gennaker:
1. Take the tack line that emerges from the end of the bowsprit, and tie it to the
tack of the gennaker. If this is tied to the gennaker halyard that emerges
from the chute, ensure you do not lose the halyard back up the chute –
perhaps tie it to the trolley handle
2. Tie the end of the gennaker halyard that runs from the top of the mast to the
head of the sail.
3. Take the tail end of the gennaker halyard that runs from the gennaker chute
(which you might have tied to the trolley handle) and pass it:
oThrough the ring on the lower patch in the middle of the gennaker
oThen tie the halyard off to the loop of webbing on the top patch of the
gennaker. There is a little stopper ball supplied that should be on
the halyard between the patches. This will ensure the knot never
gets stuck in the lower ring, thus stopping the kite from properly
hoisting.
4. Find the middle of the gennaker sheet by folding it in half.
5. Pass the middle of the gennaker sheet through the metal eye in the clew of
the gennaker.
6. Pass the rest of the gennaker sheet through the loop and pull tight.

7. Pass the sheets through the shockcord retainers emerging from the foredeck
either side of and adjacent to the mast.
8. Thread the gennaker sheet through the ratchet blocks on the side decks and
tie the two ends together. Ensuring that you pass the sheets aft of the
mainsheet base.
9. Using the gennaker downhaul, and pulling from aft of the halyard block, pull
the gennaker down into the chute.
TOP TIP
Although it may be tempting to leave the gennaker in the chute, it is better if it is left to
dry and folded properly if stored for long periods of time.

2.7 Attaching Sail numbers
The sail numbers come with your boat in the “owners pack”, and will be found
with an instruction sheet. The National letters supplied should be put on to the
sail in the panel below the numbers, by following the same instructions, ie
measure in 100mm from the edge and 70mm down from the batten pocket, and
mark up the sail, then fix the letters as you did the numbers.
!

2.8 Completion and launching
Rudder:
Firstly pass the tiller and extension under the mainsheet bridle – you will need to
check that the tiller extension is free to rotate forward of the bridle. Now simply slot
the rudder gudgeon and pintle onto the transom pintle and gudgeon and ensure that
the rudder-retaining clip has located properly; it will ‘click’ in place. Check that the
rudder is fitted correctly by simply lifting the rudder to see if it lifts off. Hold the rudder
in the up position and tighten the rudder bolt to hold the rudder in position. The
rudder may be stiff at first; this will ease up with use while still maintaining a positive,
non-sloppy feel.
Launching:
Now you are ready to launch your RS100: As you float the boat off the trolley, you
will need to smartly grab the gunwale or shroud, to ensure the boat remains upright,
and does not float away. It is helpful at this stage to have someone to help take the
trolley.
When you have launched the boat, loosen the rudder bolt and pull the rudder down a
fraction using the rudder downhaul line. Push the bow off the wind and hop in – often
easiest over the transom as the side deck is wide. Sail off into deeper water. You will
not be able to sail the boat hard as this will damage the rudder. When you are in
deep enough water, pull hard on the rudder downhaul line and cleat it. Tighten the
rudder bolt to take any play out.

Centreboard
It is helpful to lower a small amount of board prior to getting in – if sufficient depth of
water. To do this you pull on the board downhaul which emerges either side from the
mainsheet turret
When you have sailed into deeper water, lower the board fully – as far as the down
as the system allows. To raise the board pull on the uphaul which emerges from the
“multilead”, positioned under the toestrap cleat.
!
!
Table of contents
Other RS Boat manuals
Popular Boat manuals by other brands

Pelican
Pelican KJ12 manual

Key West Boats
Key West Boats 230 Bay Reef Quick guide and schematics

Scout Boats
Scout Boats 245 XSF owner's manual

Advanced Elements
Advanced Elements AE2040 owner's manual

Outcast Sporting Gear
Outcast Sporting Gear PAC 1300 owner's manual

Trophy
Trophy 1703 Owner's manual supplement