RTX OUTBACK 3 Paso User manual

1
ENGLISH INSTRUCTIONS – PAGE 2
FRANÇAIS INSTRUCTIONS – PAGE 12
FTXOB3PassoManual.indd 1FTXOB3PassoManual.indd 1 19/07/2021 12:1019/07/2021 12:10

2
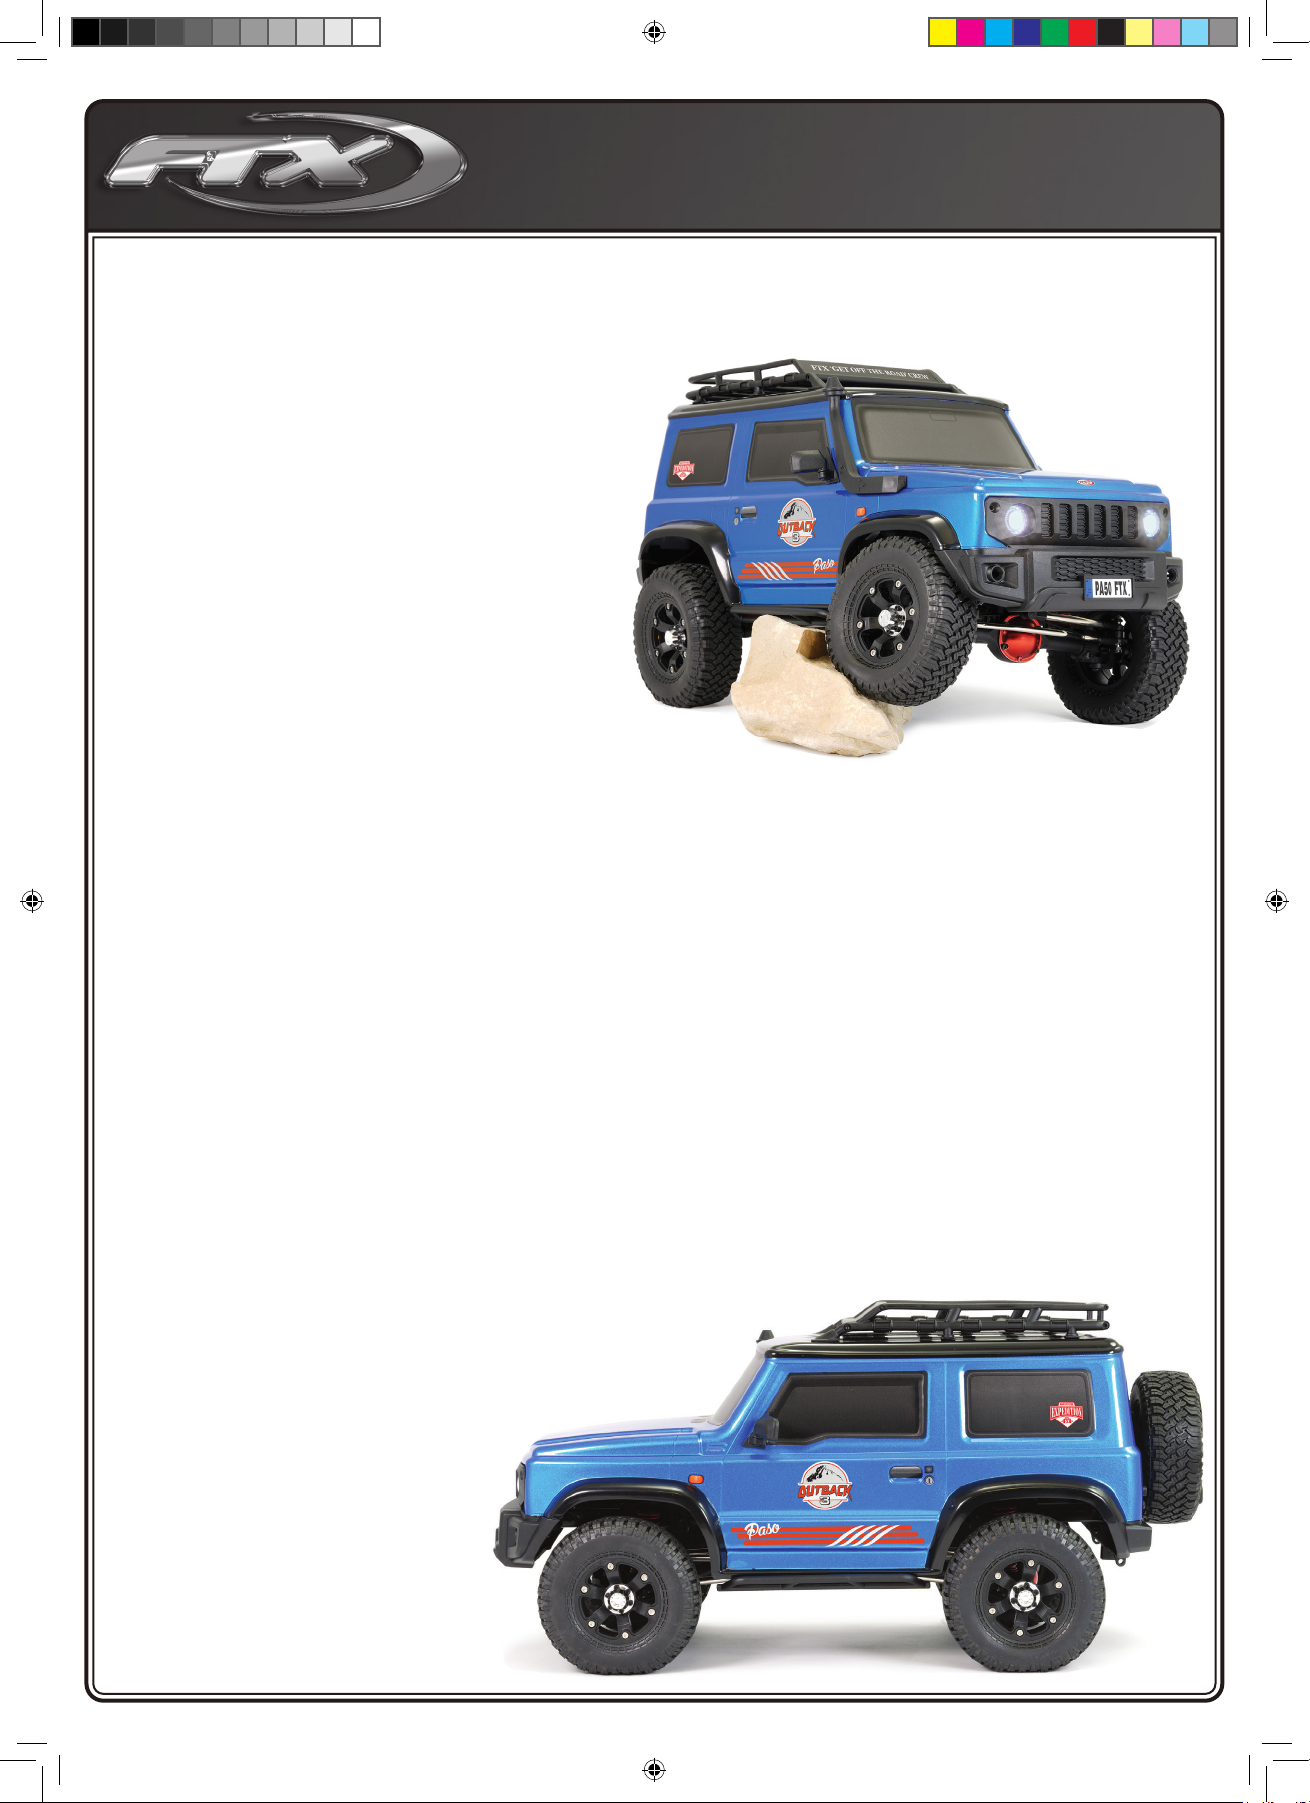
FTX Outback 3 Paso 1/10th Scale 4WD Electric
Powered Ready-To-Run Off Road Trail Vehicle
Congratulations on your purchase of the
FTX Outback 3 Paso 1/10th Trail Vehicle
This 1/10th scale model has been factory assembled and all electrics installed and
set up to make it the easiest possible introduction to the sport of driving RC cars.
WARNING: Read the ENTIRE instruction manual to become familiar with the
features of the product before operating.
Failure to operate the product correctly can result in damage to the product,
personal property and cause serious injury.
This is NOT a toy and must be operated with caution and common sense.
Failure to operate this product in a safe and responsible manner could result in
damage,
injury or damage to other property.
This product is not intended for use by children without direct adult supervision.
It is essential to read and follow all the instructions and warnings in the manual,
prior to assembly, set-up or use, in order to operate correctly and avoid damage or serious
injury.
Safety Precautions and Warnings
• You are responsible for operating this model such that it does not endanger
yourself and others, or result in damage to the product or the property of others.
• This model is controlled by a radio which is possibly subject to interference which can cause momentary loss of control so it is advisable to
always keep a safe distance to avoid collisions or injury.
• Age Recommendation: 14 years or over. This is not a toy. This product is not intended for use by children without direct adult supervision.
Carefully follow these directions and warnings, plus those of any additional equipment
associated with the use of this model, chargers, ESC and motors, radio etc.
• Never operate your model with low transmitter batteries.
• Always operate your model in an open area away from cars, trafc or people.
• Never operate the model in the street or in populated areas.
• Always keep the vehicle in direct line of sight, you cannot control what you cannot see!
• Keep all chemicals, small parts and anything electrical out of the reach of children.
• Although splash-proof the car and electronics are not designed to be subjected to extended moisture exposure or submersion.
To do so will result in permanent damage.
• Avoid injury from high speed rotating parts, gears and axles etc.
• Novices should seek advice from more experienced people to operate the model correctly and meet its performance potential.
• Exercise caution when using tools and sharp instruments.
• Do not put ngers or any objects inside rotating and moving parts.
• Take care when carrying out repairs or maintenance as some parts may be sharp.
• Do NOT touch equipment such as the motor, electronic speed control and battery, immediately after
using your model because they can generate high temperatures.
• Always turn on your transmitter before you turn on the receiver in the car. Always turn off
the receiver before turning your transmitter off.
• Keep the wheels of the model off the ground, and keep your hands away from the
wheels when checking the operation of the radio equipment.
• Prolong motor life by preventing overheat conditions.
Undue motor wear can result from frequent turns, rapid
change of direction forwards/backwards, continuous stop/
starts, pushing/pulling objects, driving in deep sand and
tall grass, or driving continuously up hill.
Contents:
FTX Outback 3 Paso Trail Vehicle
Transmitter: 2.4ghz Steerwheel
Charger: USB 500mA Charger
Battery: 1500mAh 7.2V NiMh
FTXOB3PassoManual.indd 2FTXOB3PassoManual.indd 2 19/07/2021 12:1019/07/2021 12:10

3
REQUIRED EQUIPMENT FOR OPERATION
4 pcs AA Alkaline Batteries
FTXOB3PassoManual.indd 3FTXOB3PassoManual.indd 3 19/07/2021 12:1019/07/2021 12:10

4
FTXOB3PassoManual.indd 4FTXOB3PassoManual.indd 4 19/07/2021 12:1019/07/2021 12:10

5
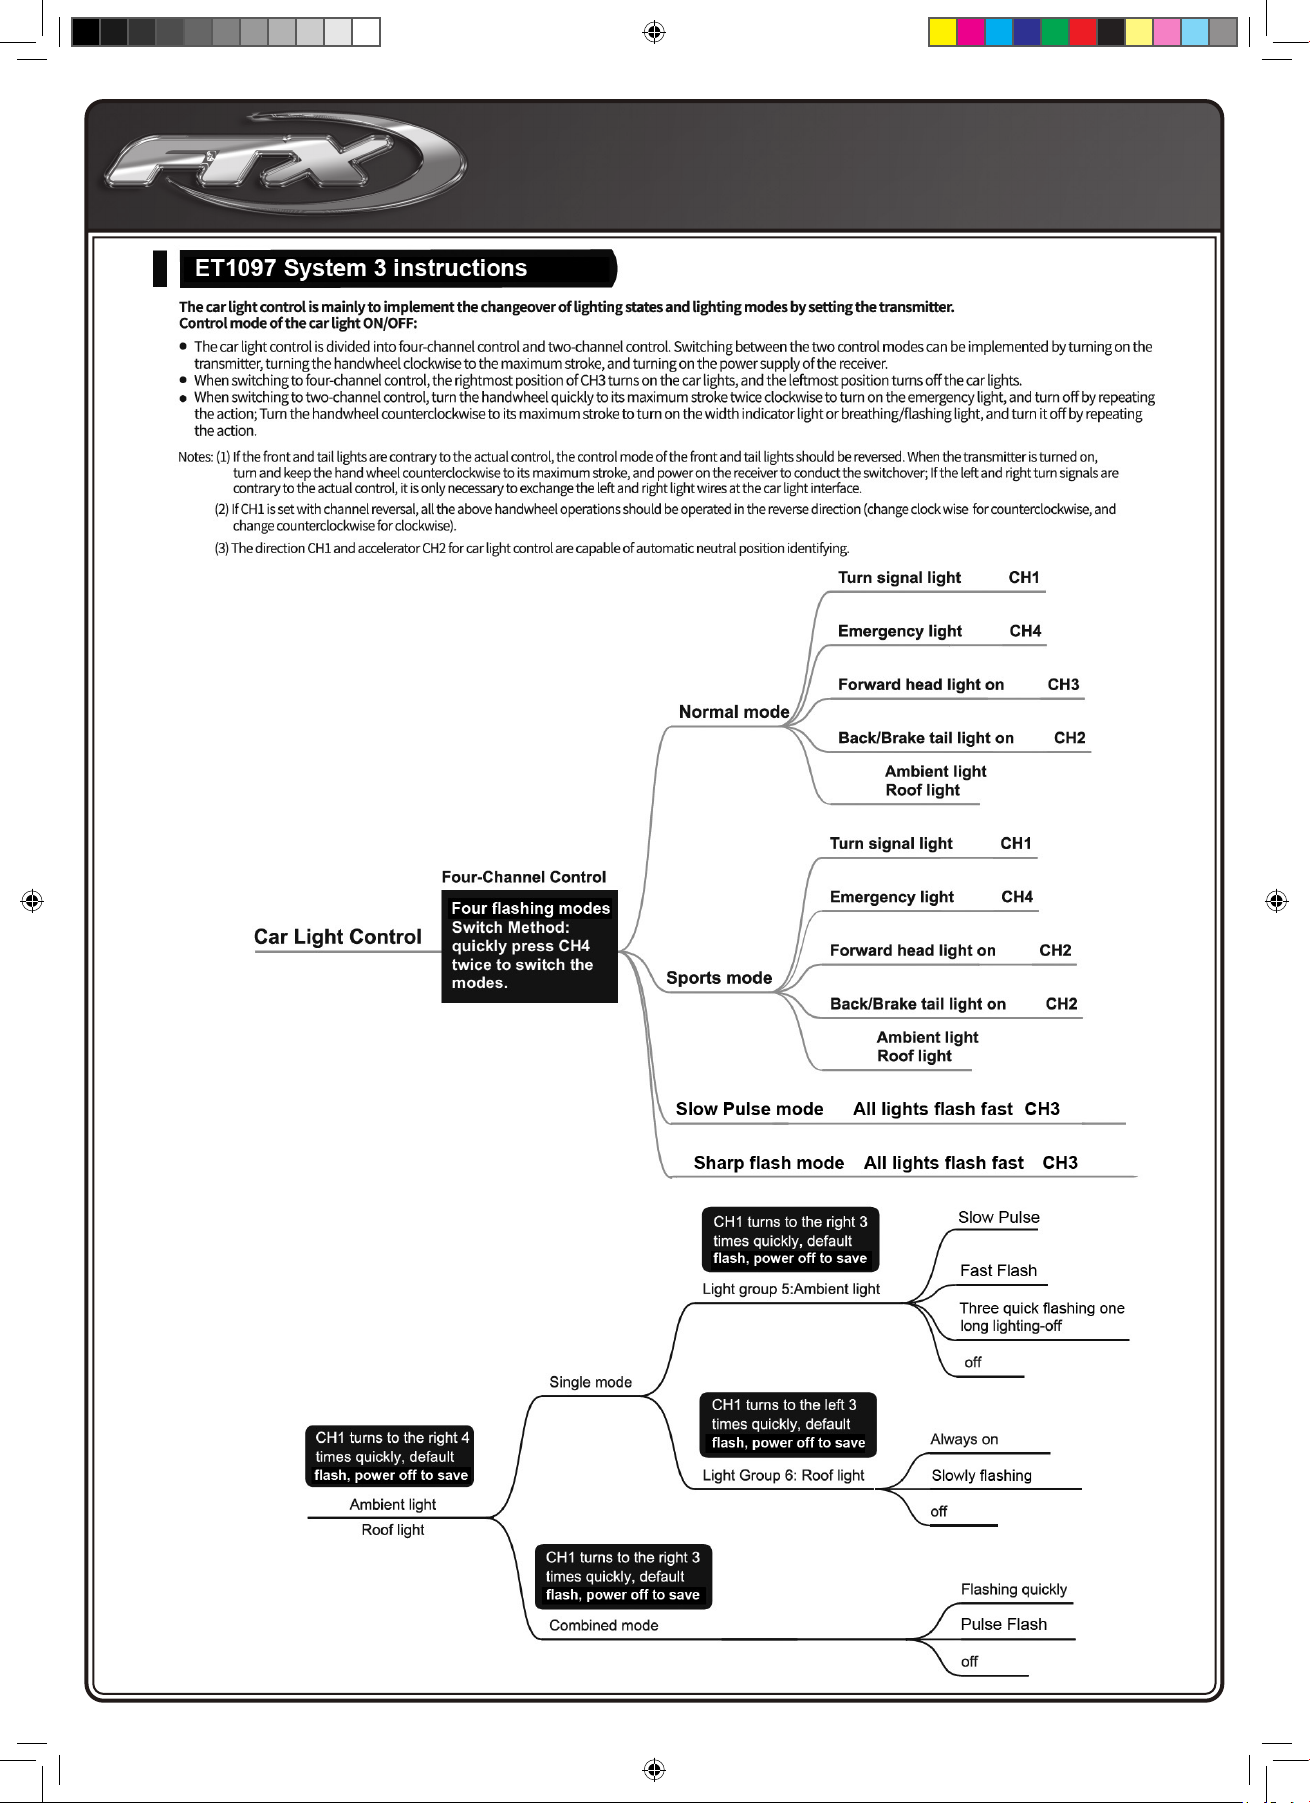
ESC FUNCTION INSTRUCTIONS
BINDING
FTXOB3PassoManual.indd 5FTXOB3PassoManual.indd 5 19/07/2021 12:1019/07/2021 12:10

6
LIGHTING CONTROL SYSTEM
FTXOB3PassoManual.indd 6FTXOB3PassoManual.indd 6 19/07/2021 12:1019/07/2021 12:10

7
FTXOB3PassoManual.indd 7FTXOB3PassoManual.indd 7 19/07/2021 12:1019/07/2021 12:10

8
RUNNING YOUR CAR
1. TURNING ON THE RECEIVER OF YOUR CAR 2. TURN ON THE RADIO CONTROLLER
3. CHECK STEERING PERFORMANCE
The ESC Receiver
switch is located
under the
bodyshell of the
model. Switch on
the ESC/Receiver
Switch as shown
in the
picture.
Switch on the
power switch
on the radio
controller.
Your radio is
bound with
your car
automatically.
CENTRE TURN RIGHT TURN LEFT
1. To keep the car running straight,
keep the streering wheel centered.
2. Turn the steering wheel to the right
to allow the car to right.
3. Turn the steering wheel to the left
to allow the car to turn to the left.
4. CHECK TRIGGER RESPONSE
PLEASE NOTE: THE MODEL SWITCHES BETWEEN
FORWARD AND REVERSE INSTANTLY FOR SLOW SPEED
MANEOUVABILITY. EXCESSIVE USE OF THIS FEATURE
CAN CAUSE TRANSMISSION AND ESC DAMAGE.
A. B.
A. Pull the trigger back to accelerate, release it to decelerate.
B. To stop running your car, release the trigger to neutral.
C. Pushing the trigger forward activates reverse.
PULL TRIGGER BACK
CENTRE
PUSH
TRIGGER
FORWARD
C.
STOP!
FTXOB3PassoManual.indd 8FTXOB3PassoManual.indd 8 19/07/2021 12:1019/07/2021 12:10

9
RUNNING YOUR CAR
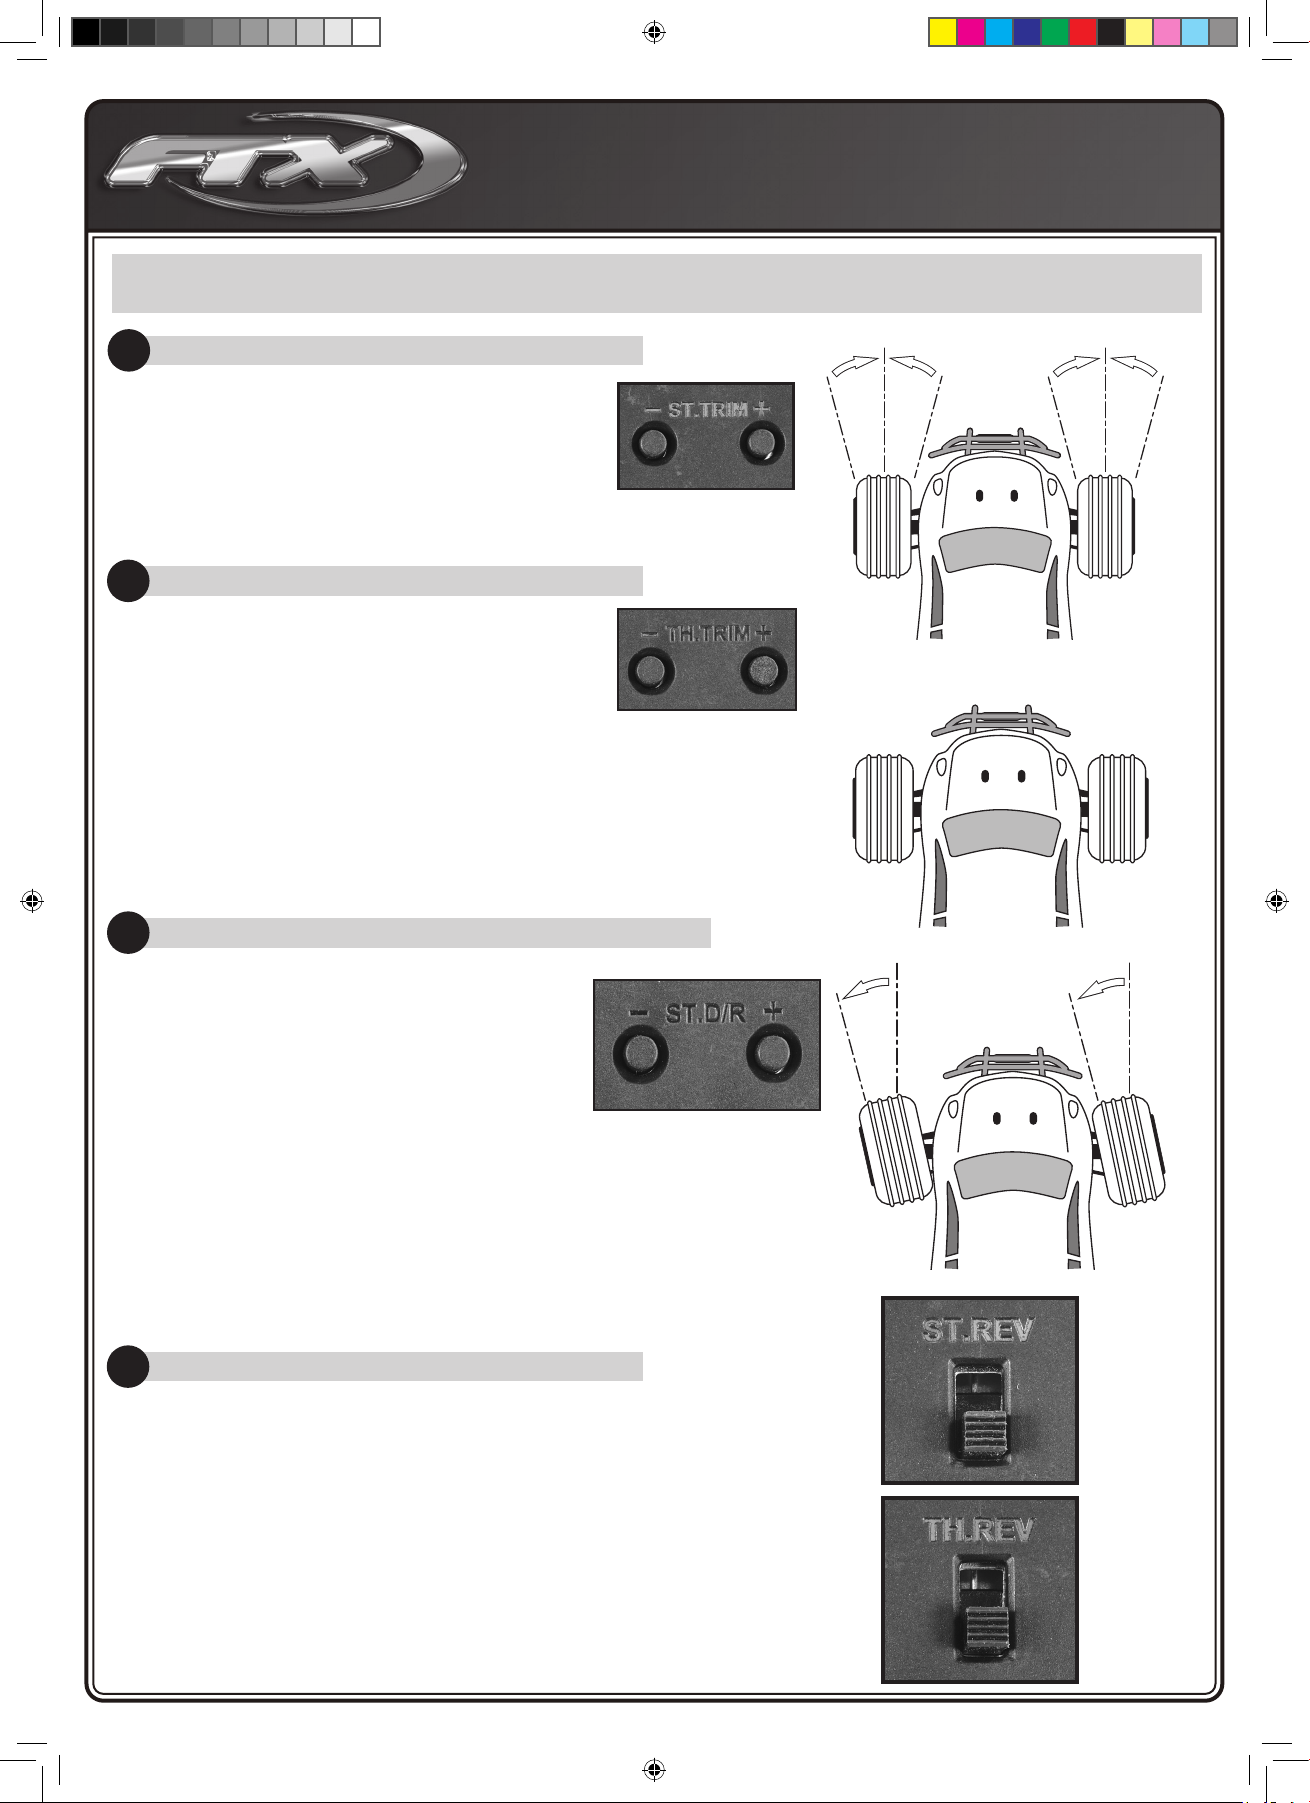
5. TUNING THE STEERING TRIM
STEERING TRIM BUTTONS
Gently pull the trigger to allow your car to run slowly.
Meantime, tune the steering trim to allow the front
wheels to be aligned by pressing the left or right
buttons. STEERING
6. TUNING THE THROTTLE TRIM
7. TO TUNE THE STEERING DUAL RATE CONTROL DIAL
THROTTLE TRIM BUTTONS
Throttle Trim is used to set the idle speed of the car,
by pressing the left or right buttons.
LED INDICATOR:
• When using the trim keys the G.LED will ash slowly
for short presses and quickly on long presses.
• When the adjustment value is at the midpoint,
the G.LED will ash twice slowly.
• When the adjustment value is at the end of either + or - ,
the trim adjustment is at its maximum and as such G.LED will not ash.
THROTTLE TRIM
STEERING D/R
8. STEERING/THROTTLE REVERSE
This function is used to adjust each channels direction of movement in relation to
it’s input .
The ST.REV/TH.REV switches are the reverse buttons for CH1 and CH2. If the
switch is up it indicates reverse, down indicates normal..
LED INDICATOR:
• When using the trim keys the G.LED will ash slowly on short presses and
quickly on long presses.
• When the adjustment reaches the end point the G.LED will no longer ash.
STEERING D/R KNOB:
The buttons marked “ST/DR” is for servo travel
adjustment. You should adjust this to give maximum
steering without straining the servo.
Adjustment range: 0-120%(the default is 100%),
the step is 5%.
ST.D / R + : increase servo travel.
ST.D / R – : decrease servo travel.
FTXOB3PassoManual.indd 9FTXOB3PassoManual.indd 9 19/07/2021 12:1019/07/2021 12:10

10
(Note: Your model is already bound from the factory)
CHARGING
discharged 1500mAh battery.
• When charging the Red LED will be solid.
• When the battery is fully charged the Green LED will be solid.
2.5-3
FTXOB3PassoManual.indd 10FTXOB3PassoManual.indd 10 19/07/2021 12:1019/07/2021 12:10

11
Getting Started
Switch on transmitter. Hold vehicle clear of the ground, connect battery pack and
switch on receiver. Bind the Transmitter and receiver if required.
Test the transmitter to check control of the vehicle with wheels off the ground.
Start driving slowly and if the vehicle does not go straight, adjust steering trim dial
on Transmitter. For the very rst run use the throttle gently, to gradually bed in the
motor brushes and help the driver become accustomed to the vehicles behaviour
and controls.
PLEASE NOTE:
Although the electronics are waterproof the rest of car can be subjected to damage
if running in excessively wet or submerged conditions.
After Run.
Switch off the receiver power, switch off the transmitter and lower the aerial.
Disconnect the battery and remove it from the vehicle, allow it to cool before
recharging. If you have a second charged battery all ready to use, still allow the
vehicle to cool slightly before continuing.
Regular maintenance.
Frequently check the whole vehicle for loose or missing xings. Use thread lock on
any replacement screws into metal threads.
Frequently check rotating parts are free from grass, string etc. that might bind
their motion and over stress the motor or speed controller. Remove the wheels
occasionally and check behind the mounting hex for obstructions or anything that
might have been wrapped around the axle and caused extra drag.
Shock absorbers will wear prematurely if used in dirty dusty conditions. Replace oil
and seals as required to keep a smooth dampening action.
Warranty
Due to the nature of this product and potential use FTX warrants it to be free
of material and workmanship defects when new. FTX will at its sole discretion
repair or replace defective components free of charge within 30 days from date of
purchase. This warranty does not cover wear and tear, crash or impact damage,
modications, component water damage failure to perform maintenance or damage
from improper use. Proof of purchase date will be required to action any warranty
claims. In no case shall FTX’s liability exceed the original cost of the purchased kit.
SHORT RUNTIME:
Battery damaged/not
charged
Motor dirty or brushes worn
Drivetrain binding
SLUGGISH ACTION:
Motor dirty or brushes worn
Bind in drive train
Battery running low on
power
MOTOR/ESC OVERHEAT:
Over-geared
Binding transmission.
Seized axle bearing.
Motor binding
MOTOR SPINS BUT VEHICLE
REFUSES TO MOVE:
Gears damaged.
Gears loose on shaft.
Drive shaft broken or
missing.
POOR RANGE OR FAILS TO
OPERATE:
Transmitter batteries low
Vehicle Battery Low.
Transmitter switched off
Transmitter/receiver aerial
not extended.
ESC switched off or battery
not connected.
Loose connectors/wires.
Instructions for disposal.
Environmental Protection Notes & WEEE
The crossed-out wheeled bin symbol shown here, which may be found on the
product itself, in the operating instructions or on the packaging, is in accordance
with the Waste Electrical and Electronic Equipment (WEEE) Directive. Individual
markings indicate which materials can be recycled and re-used. You can make an
important contribution to the protection of our common environment by re-using
the product, recycling the basic materials or recycling redundant equipment in
other ways.
When this product comes to the end of its useful life, you must not dispose of it
in the ordinary domestic waste. Many electrical items that we throw away can
be repaired or recycled. Recycling items helps to save natural resources and
also reduces the environmental and health impacts that are linked with sending
electrical goods to landll. The correct method of disposal is to take it to your local
collection point for recycling electrical and electronic equipment. You can go to
recycle-more.co.uk for details of locations.
Alternatively FTX can offer our customers free take-back of their WEEE on a like-
for-like basis when they buy a new Electrical or Electronic product from us.
For example, if a customer bought a new radio system from us or a dealer, we
would accept their old radio and prevent it going into a landll site by disposing
of it safely. Customers must return their old WEEE item to us within 28 days of
purchasing their new item.
Remove batteries from your device and dispose of them at your local collection
point for batteries. If you don’t know the location of your nearest disposal centre,
please enquire at your local council ofce.
Trouble shooting guide.
CML Distribution, Saxon House, Saxon Business Park, Hanbury Road,
Bromsgrove, B60 4AD. WEE/GB4215VX
FTXOB3PassoManual.indd 11FTXOB3PassoManual.indd 11 19/07/2021 12:1019/07/2021 12:10

12
Le Outback 3 Paso 4x4, une voiture de trail à
l’échelle 1/10 prête à rouler
Merci d’avoir choisi le FTX Outback 3 Paso 4x4 électrique.
Ce modèle est monté d’usine, l’électronique est pré
installée et réglée pour permettre un démarrage et du
plaisir le plus rapidement possible.
Attention: lisez l’intégralité du manuel pour exploiter au mieux la
voiture et éviter des dommages mécaniques ou corporels.
Ce modèle n’est pas un jouet, il doit être manipulé avec précaution.
Utilisé dans de mauvaises conditions, ce modèle peut causer des
dommages.
Ce modèle n’est pas fait pour être utilisé par un enfant sans la
surveillance directe d’un adulte.
Il est essentiel de lire et de suivre les instructions et les
recommandations de ce manuel pour entretenir et faire évoluer
votre modèle dans de bonnes conditions.
Mesures de sécurité:
• Vous êtes responsable lors de l’évolution de ce modèle, veillez
à ne pas vous mettre en danger, à mettre en danger le modèle ou
la propriété d’autrui.
• Ce modèle radiocommandé peut être perturbé par d’autres sources d’onde radio, ce
qui peut entrainer la perte momentanée du contrôle de la voiture.
• Age recommandé : 14 ans, ceci n’est pas un jouet, ce produit n’est pas fait pour être utilisé par un enfant sans surveillance.
Suivez consciencieusement les instructions suivantes :
• Ne jamais évoluer avec des batteries d’émission faibles
• Toujours évoluer dans une zone dégagée, loin de la circulation et de la foule
• Ne jamais évoluer dans une rue ou un endroit fréquenté
• Toujours garder le modèle dans son champ de vision
• Gardez hors de portée des enfants tous les composants de petite taille, électriques ou chimiques
• Tenez le modèle hors de portée de l’eau (la rouille peut causer des dommages irréversibles au modèle)
• Faites attention aux pièces en rotations, axes, pignons etc.
• Les débutants doivent prendre conseil auprès de personnes plus expérimentées
• Faites attention lors de l’utilisation des outils
• Attention à ne pas mettre les doigts ou d’autres parties du corps en contact avec les pièces en rotation
• Faites attention lors du transport, de la maintenance ou de la réparation, certaines pièces peuvent être coupantes.
• NE JAMAIS toucher les composants tels que le moteur, le variateur ou les batteries après utilisation, ces pièces peuvent être chaudes
• Lorsque vous changez de fréquence d’émission assurez-vous que les quartz de fréquence sont bien positionnés (RX pour récepteur et TX pour l’émetteur)
• Toujours éteindre en premier la voiture avant l’émetteur
• Vériez le bon fonctionnement de la voiture les roues dans le vide (en prenant les
précautions nécessaires)
• Prolongez la durée de vie du moteur en le préservant de la surchauffe (la durée
de vie du moteur dépend
aussi de la fréquence de roulage, des changements rapide de direction
avant/arrière,
des conditions de roulage difciles poussière/boue des utilisations abusives
tirer/pousser des objets)
Contents:
1 FTX Outback 3 4x4 électrique
1 Emetteur à volant fréquence 2.4GHz
1 Chargeur: USB sortie 500mA
1 Batterie: 7.2V 1500mAh NiMH
FRANÇAIS
FTXOB3PassoManual.indd 12FTXOB3PassoManual.indd 12 19/07/2021 12:1019/07/2021 12:10

13
EQUIPMENTS REQUIS POUR LA MAINTENANCE:
FRANÇAIS
FTXOB3PassoManual.indd 13FTXOB3PassoManual.indd 13 19/07/2021 12:1019/07/2021 12:10

14
FRANÇAIS
FTXOB3PassoManual.indd 14FTXOB3PassoManual.indd 14 19/07/2021 12:1019/07/2021 12:10

15
FRANÇAIS
INSTRUCTION SUR LE FONCTIONNEMENT DE L’ESC
LIAISON (BIND)
FTXOB3PassoManual.indd 15FTXOB3PassoManual.indd 15 19/07/2021 12:1019/07/2021 12:10

16
FRANÇAIS
SCHÉMA DU BRANCHEMENT DES LEDS
FTXOB3PassoManual.indd 16FTXOB3PassoManual.indd 16 19/07/2021 12:1019/07/2021 12:10

17
FRANÇAIS
FTXOB3PassoManual.indd 17FTXOB3PassoManual.indd 17 19/07/2021 12:1019/07/2021 12:10

18
GESTION DE VOTRE VOITURE
1. METTRE SUR ON INTERRUPTEUR 2. METTRE LA RADIO SUR ON
3. ASSURE UNE BONNEPERFORMANCE DE PILOTAGE
L’ensemble
variateur/
recepteur se
situe sur ON
comme montré
sur la photo.
Mettre le bouton
d’allumage de
la radio sur ON.
Votre voiture est
automatiquement
appairer avec
votre radio.
CENTRE TOURNE À GAUCHE
2. Tourner à droite pour permettre à
votre d’aller à gauche.
3. Tourner à gauche pour permettre à
votre voiture d’aller à droite.
4. VÉRIFIER LA REEPONSE DE LA GACHETTE
S’IL VOUS PLAÎT NOTEZ :
LE MODÈLE PASSE ENTRE LA MARCHE AVANT ET ARRIÈRE
INSTANTANÉMENT POUR UNE MANŒUVRABILITÉ À
FAIBLE VITESSE. UNE UTILISATION EXCESSIVE DE
CETTE FONCTIONNALITÉ PEUT ET VA ENDOMMAGER LA
TRANSMISSION ET L’ESC.
STOP!
A. B. C.
A. Tirer la gâchette en arrière pour accélérer? La lâcher pour décélérer et la
pousser pour freiner.
B. Pour arrêter la voiture, lâchette jusqu’au neutre.
C. Pousser la gâchette vers l’avant active la marche arrière.
TIRER
CENTRE
POUSSER
EN
AVANT
TOURNE À DROITE
1. Pour que la voiture aille droite ne pas
tourner le volant (le laisser au centre).
FRANÇAIS
FTXOB3PassoManual.indd 18FTXOB3PassoManual.indd 18 19/07/2021 12:1019/07/2021 12:10

19
GESTION DE VOTRE VOITURE
5. RÉGLAGE DU TRIM DE DIRECTION
Accélérez tout doucement an de faire lentement
avancer la voiture. Appuyez-en même sur les
boutons droit et gauche pour régler l’orientation des
roues an que la voiture avance tout droit.
STEERING
6. RÉGLAGE DU TRIM D’ACCÉLÉRATION
7. RÉGLAGE DES BUTÉES DE DIRECTION
Le bouton de trim d’accélérateur est utilisé pour régler le
régime de ralenti de la voiture.
INDICATEUR LED:
• Lorsque vous utilisez les boutons de réglage du trim,
la LED clignote lentement pour un appui court et
rapidement pour un appui long.
• Quand la valeur du trim est au milieu, la LED clignote 2
fois lentement
• Quand la valeur du trim est au maximum vers la droite ou vers la gauche,
la LED ne clignote pas
THROTTLE TRIM
STEERING D/R
8. INVERSE DU SENS DE ROTATION DE LA DIRECTION ET DE L’ACCÉLÉRATEUR
Inversion de la direction:
Pour changer le sens de rotation de la direction, montez le bouton « ST R/N » pendant quelques
secondes jusqu’à entendre un « BIP » sonore, relâchez ensuite le bouton.
Inversion de l’accélérateur:
Cette fonction permet de changer le sens de rotation de l’accélération.
Si le bouton est en bas celle-ci est le sens normal tandis que si il est en haut, elle sera inversée.
INDICATEUR LED :
• Lorsque vous utilisez les boutons de réglage du trim, la LED clignote lentement
pour un appui court et rapidement pour un appui long.
• Quand la valeur du trim est au maximum la LED ne clignote pas.
Le bouton noté « ST/DR » est utilisé pour régler les ns
de course du servo de direction
Ajustable de 0 à 120% (100% par défaut), une pression
du bouton change la valeur de 5%
ST.D / R + : Augmente la course de direction
ST.D / R - : Réduit la course de direction
FRANÇAIS
FTXOB3PassoManual.indd 19FTXOB3PassoManual.indd 19 19/07/2021 12:1019/07/2021 12:10

20
FRANÇAIS
(Remarque: votre modèle est déjà lié de l’usine)
CHARGE
8. CHARGEMENT ET MONTAGE DE LA BATTERIE
•Stockez toujours votre voiture avec la batterie
débranchée et enlevée
•Chargez toujours votre batterie en dehors de la
voiture.
Le chargeur USB inclus met environ 2.5h à 3h
pour charger la batterie lorsqu’elle est déchargée.
•Pendant la charge la LED rouge reste allumée
•Lorsque la batterie est chargée, le LED verte
restent allumées.
• Labatteriepeutlégèrementchauerpendant
la charge, mais elle ne doit pas être chaude.
•Si la batterie est chaude, arrêtez immédiatement
la charge. Débranchez alors la batterie du chargeur
dès que la LED du chargeur devient verte.
9. NOTES SUR L’UTILISATION DE LA BATTERIE
•Laissez toujours la batterie refroidir après son utilisation avant de la recharger.
•Inspectez toujours la batterie avant de la charger
• Toutldénudé,connecteurcoupéoufuitemontreunemauvaiseutilisationdelabatterie
•N’essayez jamais de charger une batterie endommagée ou morte
•Ne démontez pas la batterie et/ou ne coupez pas les câbles
•Si la connectique de la batterie devient tellement chaude qu’elle fond, cela indique qu’il y a un problème
important avec votre voiture, la transmission, les câbles de la batterie ou le contrôleur de vitesse. Trouvez
alors l’origine du problème et corrigez-le avant de monter une autre batterie
•Ne chargez jamais la batterie sans la surveiller en cas ce surcharge, vous devez pouvoir monitorer la
charge à tout moment
• Chargezlabatterieéloignéedetoutmatériauxinammablessurunesurfacenoninammabledanslecas
où la batterie deviendrait trop chaude.
FTXOB3PassoManual.indd 20FTXOB3PassoManual.indd 20 19/07/2021 12:1019/07/2021 12:10
This manual suits for next models
3
Table of contents
Other RTX Motorized Toy Car manuals