Runlucky RL-R50/MYA-1 User manual

RUNLUCKY SHOWER SOFTENER
SHOWER SOFTENER
Model:RL-R50/MYA-1
User Manual
The appearance is just for reference. It is subject to the real product.
Version 1
Please read this manual in details before using the product and keep it
properly in order to consult in the future.
0WRX.466.623
Application: The product is mainly used for making soft water for shower, can also
be used in applications, such as floor heating, beauty salon, hairdressing salon,
washing machines etc..
The treated water of the product can not be drunk.
Warm Note
1. With upgrading of the product, there may be some of words or figure in the manual is
different with the real product, please be subject to the real product.
2. All the contents are carefully checked. If there is any printing errors or mistakes in the
manual, we reserve the rights of interpretation.

RUNLUCKY SHOWER SOFTENER
Catalogue
Notice........................................................................................................................ 1
1. Product Overview.................................................................................................. 2
1.1. Characteristics................................................................................................ 2
1.2. Technical Parameters ..................................................................................... 2
1.3. Water Technological Process ......................................................................... 2
1.4. Appearance Dimensions................................................................................. 2
1.5. Structure Chart ............................................................................................... 2
2. Installation............................................................................................................. 3
2.1. Installation Type Instruction ............................................................................ 3
2.2. Product Installation ......................................................................................... 3
2.3. Pipeline Installation Instruction........................................................................ 4
2.3.1 Installed after Water Heater....................................................................... 4
2.3.2. Installed before Water Heater................................................................... 5
2.3.3. Drain Pipeline Installation ......................................................................... 8
2.3.4. Power Cable Installation........................................................................... 8
3.Trial Running.......................................................................................................... 8
4.Regeneration Operation ......................................................................................... 9
4.1. Water Treatment Capacity .............................................................................. 9
4.2. Regeneration Salt Consumption ..................................................................... 9
4.3. Regeneration Process Operation.................................................................... 9
5. Resin Replacement ............................................................................................. 10
6.Parameter Setting ................................................................................................ 12
6.1. Product Control Panel Instruction.................................................................. 12
6.2. Display Board Connector Instruction............................................................. 12
6.3. Product Installation Type Setting .................................................................. 12
6.4. Regeneration Days Reminding Setting ......................................................... 13
6.5. Meaning of Running Code ............................................................................ 13
7. Trouble Shooting................................................................................................. 13
8. Warranty Card..................................................................................................... 14

RUNLUCKY SHOWER SOFTENER
1
Notice
1. If it is necessary to buy spare parts for installation, please select the parts with good quality.
2. The thread of the product is standard. When the ender user buys the matched accessories, please
select it with good quality to prevent the accessories can’t be matched, thread cross, etc..
3. User manual is a guiding document for the correct use of the product, please do the usual operation,
check and maintenance strictly in accordance with the manual.
4. It is recommended to select professional personnel appointed by authorized dealer to install the
product. When installation, ender user should inform the detail information of installation wall, such
as the material of wall, distribution of water pipeline and wire, etc.. If the product is installed by ender
user himself, if there is any problem happened during the installation, we will not take any
responsibility.
5. The product is suit for municipal tap water, water pressure is 0.1~0.6 MPa, water temperature is
5℃-70℃. It is forbidden to use it out of the range.
6. The product is only suitable for indoor installation and use. It should be put in a cool and dry place,
avoid direct sunlight. The pipeline connected to the product should be kept away from light source,
heat source, corrosive environment and crash with sharp objects.
7. There is a sewer within 1 meter around the product which is used for drainage.
8. In any case, do not spray water to the product.
9. When the product is in failure, please cut off the water and contact the local dealer in time.
10. In order to prevent the regeneration can’t achieve the desired effect, please use the grain salt
provided by our company as possible.
11. When the transformer or cable damaged, the replaced one must be from our company.
12. Due to the product need electricity in use, please put the transformer in a place where no water can
spray.
13. If the consequences happened due to not operating according to the above notes, our company will
not take any responsibility.

RUNLUCKY SHOWER SOFTENER
2
1. Product Overview
1.1. Characteristics
●Wall-mounted, no brine tank, small volume.
●Dynamic regeneration mode, bigger water treatment capacity, save salt and water.
●Extensive applicability: could be installed before or after the water heater. Installed before water heater
could prevent it damaged because of scaling.
●Automatically controlling the regeneration time, one button to realize regeneration. No need people
stand by, LED display each status.
●Remind the use days and show the next regeneration time.
●It has an automatic backwash function to reduce the phenomenon of resin harden and strainer
blockage, and improve the service lifetime of resin.
●Internal structure adopts quick connection, more easier to maintain and replace the resin.
●There is a check valve on outlet to prevent the water in water heater backflow.
●Data saved after power off.
1.2. Technical Parameters
Item
Requirement
Working Pressure
0.1~0.6MPa
Inlet Water Temperature
5℃~70℃
Environment Temperature
5℃~50℃
Electrical Facility
AC100~240V/50~60Hz
Water Treatment Capacity
750L
Inlet/Outlet
G1/2
Salt Consumption of Regeneration
400g
Applicable Water
Municipal Tap Water
Outlet water quality: Meet the requirement of Sanitary Safety and Function Evaluation
Regulation of Water Treatment Device for Drink Water-General Water Treatment Device (2001).
All the parameters of the product is tested under the standard test condition (Tested water hardness is
CaCO3, 200 mg/ L) . The parameters will be different if the actual usage condition changed.
1.3. Water Technological Process
Municipal tap water Na cation resin Soft water
1.4. Appearance Dimensions
1.5. Structure Chart

RUNLUCKY SHOWER SOFTENER
3
2. Installation
2.1. Installation Type Instruction
There are two types of installation.
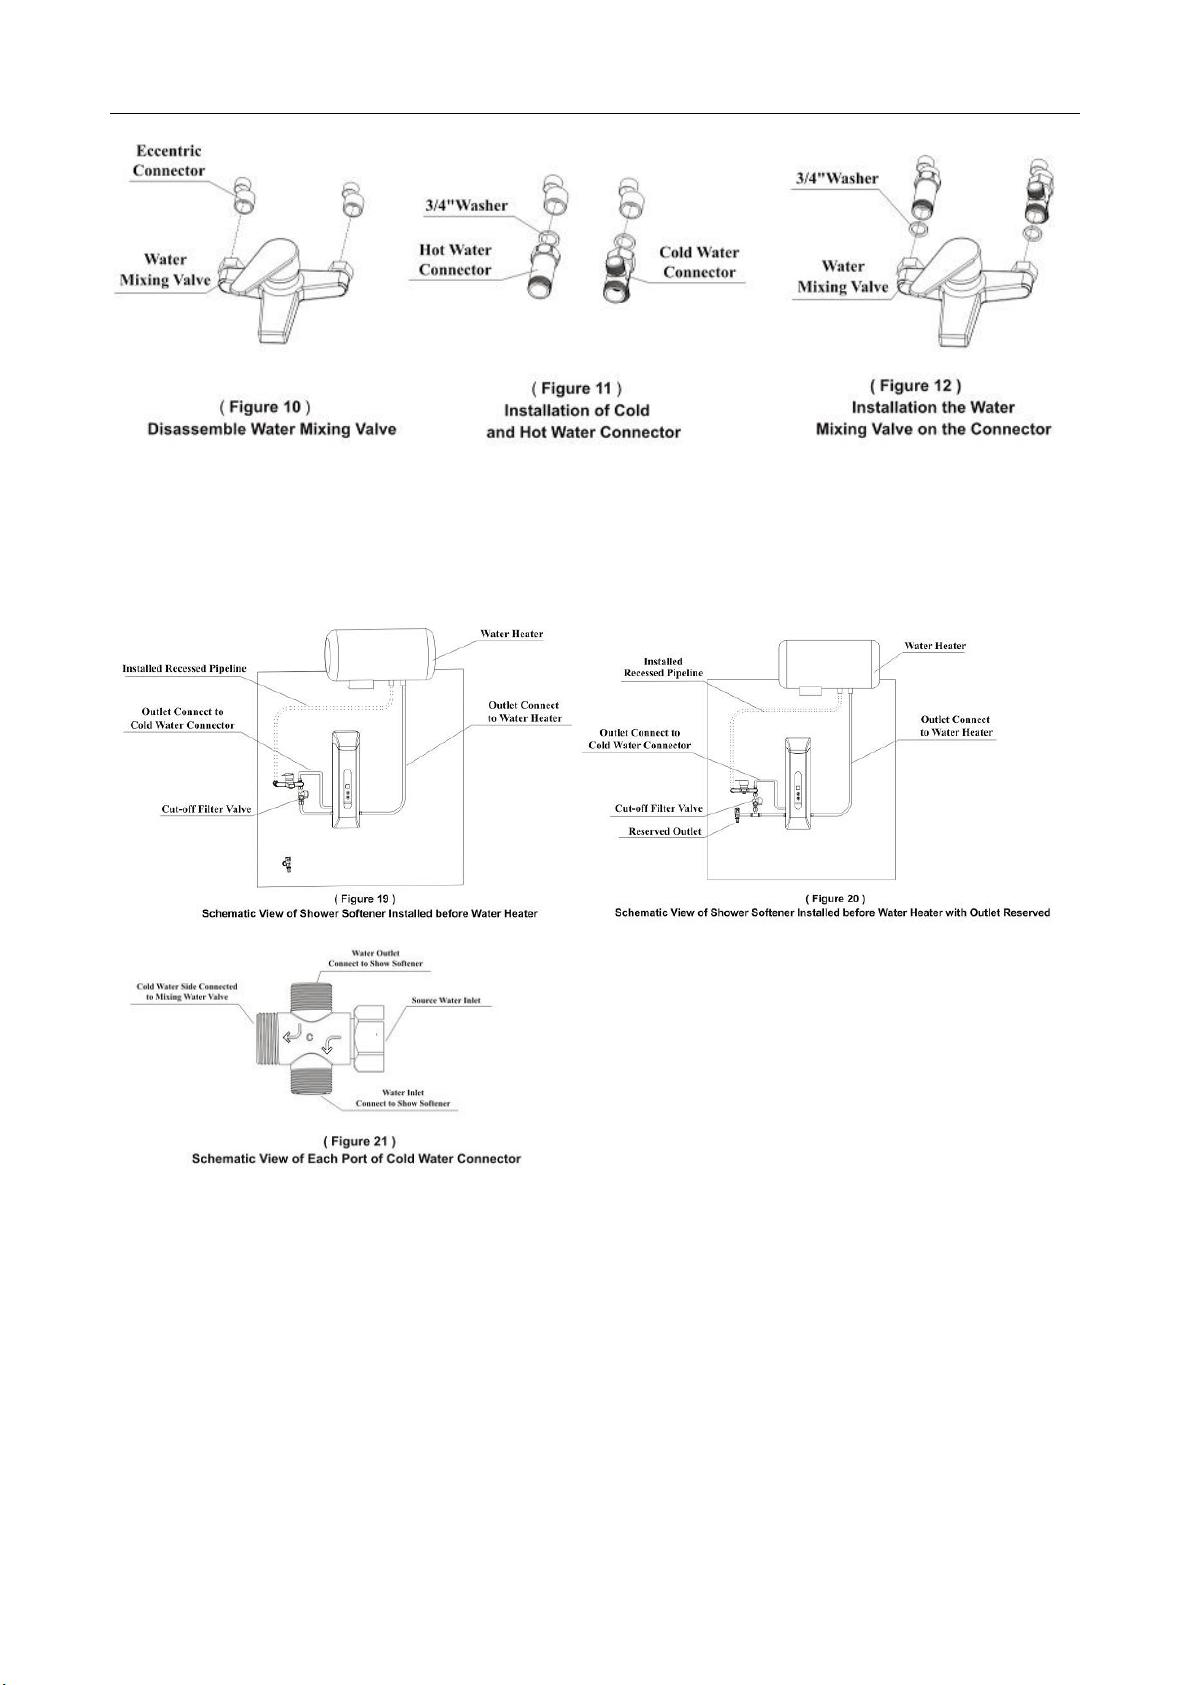
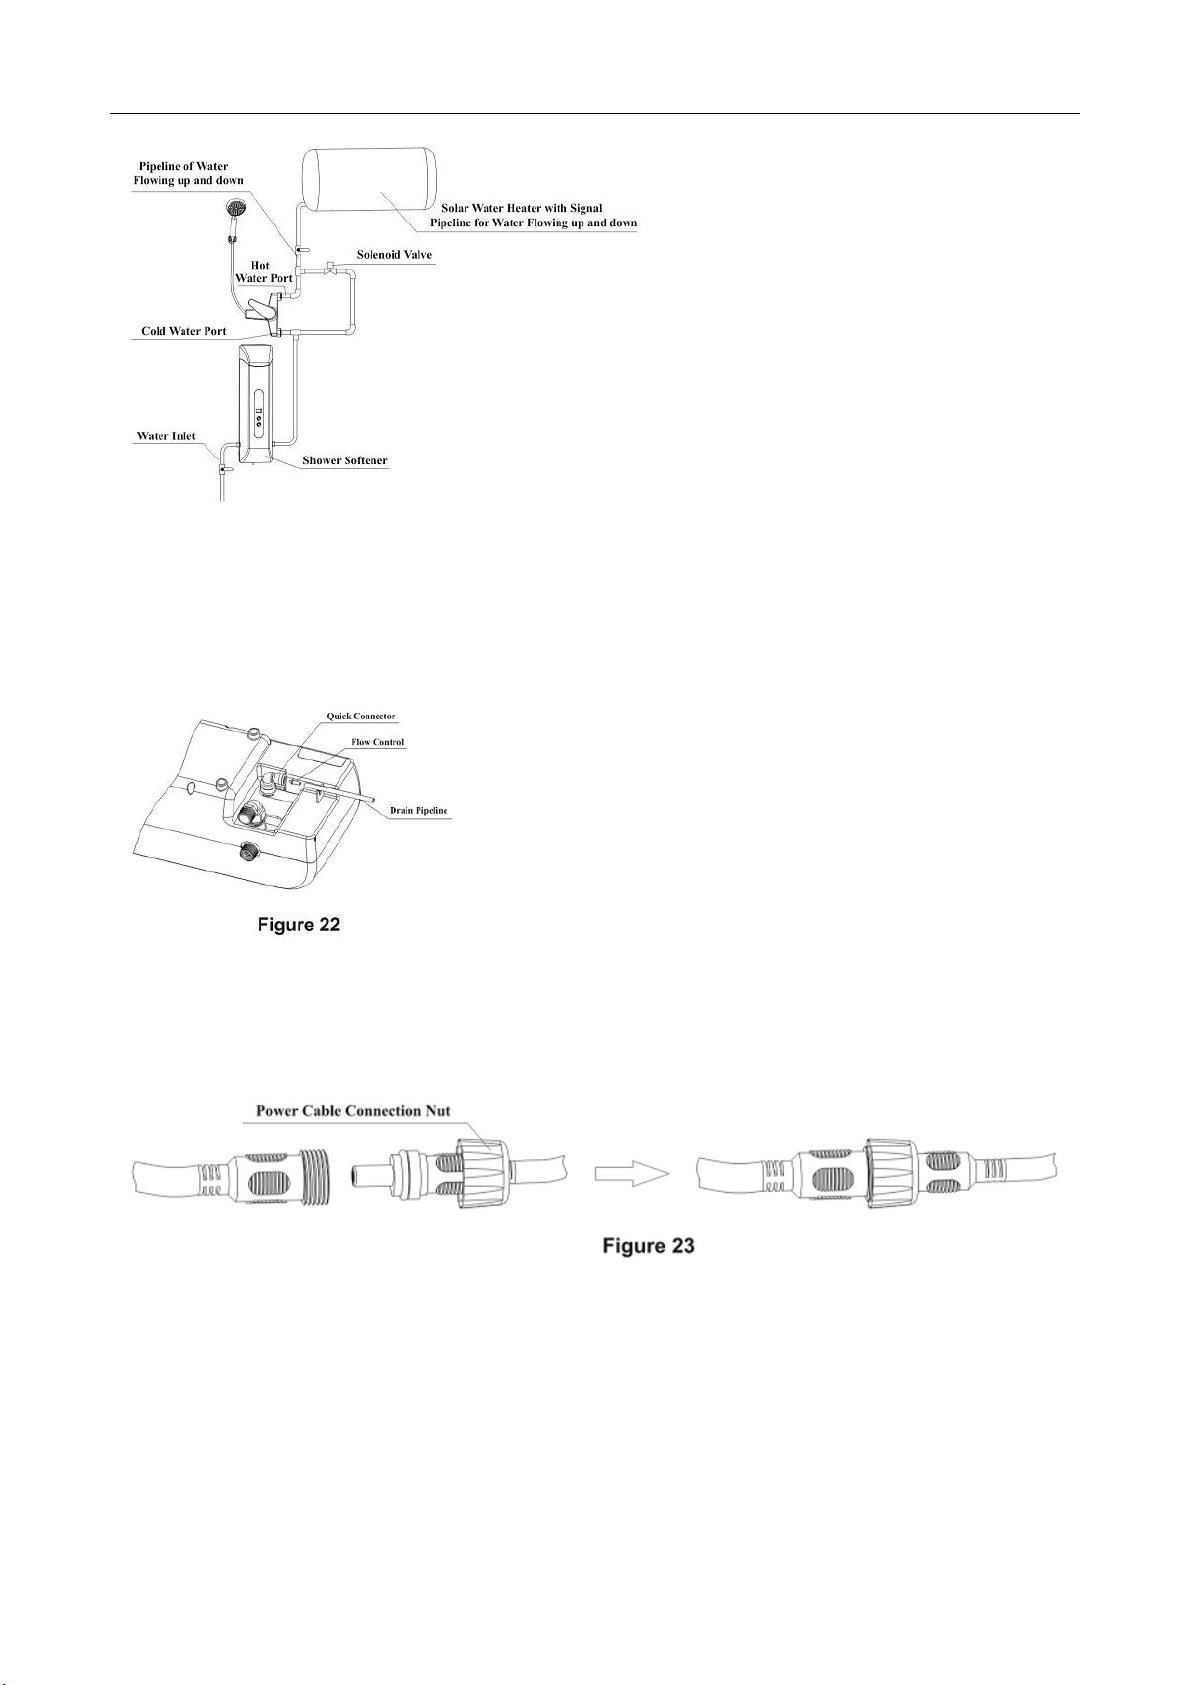
A. Installed before water heater
Advantage: Installed before water heater, the water flowing into water heater is soft which prevent the
scaling and energy saving, as well as ensure the soft water for shower. It is suited for the user whose
house is not decorated, could distribute the piping.
B. Installed after water heater
Advantage: Installed after water heater, easy pipeline installation, soft water for shower. It is suited for
the user whose house has already decorated.
The above two types of installation is optional in accordance with need.
2.2. Product Installation
The product adopts wall-mounted. It is recommended to select professional personnel to install the
product. If you install by yourself, please follow the following steps.
2.2.1. Prepare the installation tools
These tools may need:Adjustable spanner, pipe wrench, screwdriver, percussion drilling.
2.2.2. Installation Location
(The product installation location and pipeline connection relate to installation type, please refer the
pipeline installation instruction in details.).
When the resin goes invalid during the usage of the product, it needs to add salt. Depending on the
operator’s height, hang the product in a proper height. There is a sewer within 1 meter around the
product.
2.2.3.Product wall-mounted operation steps:
2.2.3.1.Open package, please check if the softener is complete and accessories are complete.
2.2.3.2.Tak e out the expansion screws and stainless steel clevis, remark the hole of clevis on the wall
and drill the hole with percussion drilling. The expansion screw is ST3.9 x30. It is suggested to select the
percussion drill head with 6 mm diameter. Product installation height should be considered of adding salt
manually.
2.2.3.3.Normally, stainless steel clevis only need 4 expansion screws. But if the wall is soft, such as
wooden wall, lime wall, it needs more screws. As shown in Figure 1.
2.2.3.4.Put the expansion screw tube into the in the drilled hole, then use a screwdriver to fix the clevis
on the wall, as shown in Figure 2. The cone side should face outwards.
2.2.3.5.Fixed the plate of shower softener on the slot of clevis. After the installation, it is shown as in

RUNLUCKY SHOWER SOFTENER
4
2.3. Pipeline Installation Instruction
2.3.1 Installed after Water Heater
Remind: No water flows out when the shower softener in regeneration status (about 1 hour). If there is
no spare faucet in the bathroom, it is suggested to have a spare outlet reserved when installation.
Installation steps:
2.3.1.1.The water mixing valve is closed. Dissemble the nut between sprinkler and water mixing valve
with adjustable spanner as shown in Figure 4.
2.3.1.2.Tighten the nut of sprinkler on the outlet of shower softener, as shown in Figure 5.
2.3.1.3.Connect the outlet of water mixing valve with the inlet of shower softener by braided tube or
corrugated tube. As the shower softener installation location relates to the inlet pipeline connection, take
some samples of common installation types for reference.
a.It is the schematic view of spare faucet available in installation place. The shower softener could be
installed either at the right or left side of shower softener, as shown in Figure 6 and 7.

RUNLUCKY SHOWER SOFTENER
5
b.If there is no spare faucet available in installation place and the ender user needs to use water in
regeneration, it is suggest to have a spare outlet reserved on the outlet pipeline of water mixing valve.
The shower softener could be installed either at the right or left side of shower softener, as shown in
Figure 8 and 9.
2.3.2. Installed before Water Heater
A.Installation for electrical water heater, solar water heater with double pipelines for water flowing up
and down as well as some similar products.
Note: As installed before water heater is more complicated, please purchase the other accessories
from dealer separately.
Needed Accessories When Installed before Water Heater
No.
Name
Figure
Remark
1
Hot Water Connector
On the connector engraved with " H "
2
Cold Water Connector
On the connector engraved with "C"

RUNLUCKY SHOWER SOFTENER
6
3
Cut-off
Filter Valve
Optional
4
1/2〃Elbow Connector
The following installation steps for installing before water heater
2.3.2.1.Install the cold and hot connector
a.Shut off the source inlet water, remove the water mixing valve with a spanner, keep the original center
distance of eccentric connector the same, as shown in Figure 10.
b.Take out the hot water connector, cold water connector and 3/4〃washers. As shown in Figure 11 to
assemble the cold water connector and hot water connector on the eccentric connectors on the wall.
Make sure the washers no damaged.
c.Use spanner, connect the cold water side of water mixing valve with the cold water connector, connect
the hot water side of water mixing valve with the hot water connector. Make sure the washers no
damaged, as shown in Figure 12.
d.Figure 13 is the schematic view of after water mixing valve installed. According to the view and mark
on connector, adjust the outlet of cold water connector adown, as shown in Figure 13.
e.In order to prevent the big grain substance entering into softener which will affect the effectiveness, it is
suggested to install a shut-off filter valve. Take out shut-off filter valve and washer, tighten it between cold
water and raw water. Place the washer as shown in Figure 14. After installation as shown in Figure 15.
2.3.2.2.Pipeline Installation Instruction
a.Install the 1/2〃animated elbow connector on rear outlet behind the shower softener. Disassemble the
sealing plug on rear outlet behind the shower softener as shown in Figure 16, take out the 1/2〃
animated elbow connector from the accessories bag, tighten it on rear outlet as shown in Figure 17.
Place the washer, schematic view of after installation as shown in Figure 18.
b.Choose the appropriate location to hang the shower softener on the wall.(Please refer the previous
product installation instructions)

RUNLUCKY SHOWER SOFTENER
7
c.Use braided tube or corrugated pipeline to connect source inlet and inlet of shower softener. One outlet
connects to inlet of water heater, the other outlet connects to cold water side of water mixing valve. As
the product doesn’t have water flow out in regeneration process, a spare outlet is reserved when
distribute the pipelines if needs to use water. These are common installation schematic view for
reference, as shown in Figure 19, 20. The cold water connector installation is shown in Figure 21.
B.Installation schematic view of solar water heater with signal pipeline for water flowing up and down

RUNLUCKY SHOWER SOFTENER
8
2.3.3. Drain Pipeline Installation
The product has been installed drain pipeline in the factory. If the drain pipeline is needed longer, as
sewer is far away or other reason, please use 1/4 "quick connector to connect the drain pipeline. Be sure
the flow control in drain pipeline placed as shown in Figure 22. Please contact your distributor if you lose
it.
2.3.4. Power Cable Installation
The product needs the power supply far away from the water mist, when the machine is installed. The
plug of power cable uses the seal design. When installation, please tighten the connection nut,
installation as Figure 23.
3.Trial Running
1.Power on, slowly open the source water, let the machine run in service position for about five minutes
to check if there is any leakage on connection. If leak, please tighten the leaking area.
2.For the machine firstly use, there may be a little yellow water from the outlet ,this is a normal
phenomenon. Because the resin is new, just rinse it.
Note: Remove the plug on drain pipeline when uses the product to prevent no water drain out in

RUNLUCKY SHOWER SOFTENER
9
washing.
4.Regeneration Operation
4.1. Water Treatment Capacity
Water treatment capacity relates to water hardness. For a family with 3 persons, if everyone uses 40L
water for shower, calculate the regeneration time.
Water Hardness
Water Capacity
Regeneration Time
200mg/L
750L
About 6 days
400 mg/L
320L
About 3 days
When the local water hardness is less than 450mg/L, the ender user could calculate the regeneration
time according to the practical water condition.
The product in service shows the used days such as 01(it has been used for one day after
regeneration), 02( it has been used for two days after regeneration)…, which is convenient to check the
used days.
The ender user could set the regeneration time warn to know when it will regenerate better. The detail
refers to the parameter setting.
4.2. Regeneration Salt Consumption
Regeneration salt is made according to the characteristics of shower softener. One time of
regeneration consumes 400g of salt (1 bag).
Note: Use other brand of salt may cause bad effect of regeneration.
4.3. Regeneration Process Operation
When the water treatment capacity reaches a certain value, the resin invalid, it needs to regenerate
with salt.
Operation methods:
4.3.1.The shower softener needs water supplied for regeneration. For the shower softener installed after
water heater, the ender user needs to open the water mixing valve to let cold water enter to shower
softener to regenerate, or else the regeneration is invalid.
4.3.2.During regeneration, press and hold the button for 3 seconds, and hear a sound “Di”, enter
into regeneration status. The display board shows when motor is rotating. When it reaches at
backwash status, it shows , water flows out from drain. After 20 seconds at status, it will switch
to status automatically. figure flashes and sounds buzzer.
4.3.3.Open upper cover of shell as shown in Figure 24, unscrew the salt cover as shown in Figure 25,
add 400 grams of special regeneration salt through salt adding port as shown in Figure 26. Stir the grain
salt to be flat and distributed equally. Tighten the salt cover, put the upper cover. It is better to control the
salt adding operation within in 3 minutes.
4.3.4.The shower softener will regenerate automatically, no need people to check. The regeneration
process is about 1 hour. After regeneration, if it is the mode of installed before water heater, the shower
softener will enter into water using statues , if it is the mode of installed after water heater, the
shower softener will enter into waiting status . If it needs to use water, ender user presses and holds

RUNLUCKY SHOWER SOFTENER
10
regeneration button to switch it to water using status.
Note: During the switching of regeneration process, there will be some water flowing out from outlet.
Make sure the outlet of sprinkler not face to the shower softener.
5. Resin Replacement
It needs to replace the resin after the shower softener being used for 2 to 4 years. It is
recommended to do it by professional personal. If you replace the resin by yourself, please
follow these steps:
a.Unscrew 4 bolts on back cover and 2 bolts on clevis by a cross screwdriver.
b. Take out the front cover of shower softener. Be sure not scratch the surface.
c. Unscrew 4 bolts which are used to fix resin tank to back cover by a cross screwdriver.
d. Take out the resin tank and valve. Taking them with care to prevent causing damage of circuit board.
e. Unscrew the resin tank cover with a special tool.
f. Take out the strainer carefully and prevent the riser pipe falling out.
g. Press the riser pipe to prevent it falling out. Pour out of resin, and put 2.5 liters of new resin in to resin
tank.
h.After resin replaced, assemble the shower softener according to the above instruction.
Install the shower softener according to above steps, please note:
1.Thread on resin tank and O-ring should be cleaned.

RUNLUCKY SHOWER SOFTENER
11
2. If the riser pipe falls out, it needs to be cleaned and inserted into resin tank.
3.Be sure the drain line flow control is undamaged when installing the drain pipeline.

RUNLUCKY SHOWER SOFTENER
12
6.Parameter Setting
6.1. Product Control Panel Instruction
7.2. Display Board Connector Instruction
6.3. Product Installation Type Setting
There are two types of instalation, which are installed before and after water heater. It has difference
processes accordingly. Resin invalid warning has time clock type and meter type. (Currently, it only has
time clock type. The meter type will be developed later.)
The meanings of each code are as following:
Code
Meaning
Setting
Installed after water heater,
time clock type
Power on, press and hold both and
buttons for three seconds to enter into
Installed before water
heater, time clock type

RUNLUCKY SHOWER SOFTENER
13
Installed after water heater,
meter type
installation type selection, press to select
the type, then press to save the setting
and quit.
Installed before water
heater, meter type
Enquiry mode:Power on, interface will display installation type.
6.4. Regeneration Days Reminding Settings
The shower softener can be set up alarm of regeneration days according to the practical circumstance.
The screen flashes to remind the ender user to add salt. Under the time clock mode, press and hold
button to enter into the interface of setting regeneration days reminding. Press to set the days, then
press to save the setting and quit. For example, if it is set 07, 7 days after regeneration, the screen
flashes to remind the ender user to add salt. The default setting is 00 which means no reminding.
6.5. Meaning of Running Code
Code
Meaning
Explaination
Code
Meaning
Explaination
Service/ Service
Days
Fast Rinse
Water flows out
from drain
Backwash
Water flows
out from drain
Salt Disslution
Salt Disslution
Fast Rinse
Water flows out
from drain
Fast Rinse
Water flows
out from drain
Closing and
Waiting
Salt Disslution
7. Trouble Shooting
Problem
Cause
Correction
Leakage
No o-ring installed or assembly
not tight.
Install o-ring and tighten the
connection.
Water flow rate
decreased
Strainer blocked.
Clean strainer and install front filter
screen.
Outlet water
unqualified
1.Resin invalid.
2.Resin lifetime expired.
3.Regeneration effect not good.
1.Regenerate resin.
2.Replace resin.
3.Check if the drain pipeline blocked or
use the special regeneration salt.
Regeneration
effect not good
1.Do not use the special
regeneration salt.
2.The drain is blocked.
3.Source water is not opened
during regeneration.
1.Use the special regeneration salt.
2.Clean the drain line flow control.
3.Open the source water and
regenerate again.
E1 flash
1.Motor failure.
1.Replace motor.

RUNLUCKY SHOWER SOFTENER
14
2.Control board failure.
3.Locating board failure.
4.Moving disk stuck.
2.Replace Control board.
3.Replace locating board.
4.Clean the substance between
moving disk and fixed disk.
E2 flash
1.Wiring of locating board is bad.
2.Control board failure.
1.Replace the locating board wiring.
2.Replace control board.
E3 flash
Control board failure.
Replace control board.
8. Warranty Card
Dear client:
This warranty card is the guarantee proof of RUNLUCKY Shower Softener. It is kept by
client self. You could get the after-sales services from the supplier which is appointed by
RUNLUCKY manufacturer. Please keep it properly. It couldn’t be retrieved if lost. It couldn’t
be repaired free of charge under the below conditions:
1.Guarantee period expired.(One year);
2.Damage resulting from using, maintenance, and keeping that are not in accordance with
the instruction;
3.Damage resulting from repairing not by the appointed maintenance personnel;
4.Content in guarantee proof is unconfirmed with the label on the real good or be altered;
5.Damage resulting from force majeure.
Product Name
RUNLUCKY SHOWER SOFTENER
Model
Code of
Valve Body
Purchase
Company Name
Tel/Cel.
Problem
Solution
Date of Repairing
Date of
Accomplishment
Maintenance
Man Signature
WENZHOU RUNXIN MANUFACTURING MACHINE CO., LTD.
ADD:Jinger Road, Shatou Group, Linjiang, Lucheng District, Wenzhou, Zhejiang, China
TEL:0577-88635628 88630038 FAX:0577-88633258
http://www.run-xin.com Email:sales@run-xin.com
Table of contents
Popular Water Dispenser manuals by other brands

Franklin
Franklin PSX1 Series Installation instructions and owner's manual

Elkay
Elkay OBFATL8 1E Series Installation, care & use manual

Murdock
Murdock A171.8 Series installation instructions

H2O International
H2O International H2O 1000 Operation manual

Curtis
Curtis Thermopro Airpot TLXA22 instructions

BRIO
BRIO CLCTPOU720UVF3 Setup manual

Greenway Home Products
Greenway Home Products Polar PWD5975BLS specification

Acorn
Acorn A172108F-UBL Installation, operation and maintanance manual

Aqua Computer
Aqua Computer aquaero 3.07 owner's manual

Water Control Corporation
Water Control Corporation BrassMaster Installation & operation manual

Zip
Zip HydroChill HCF090 Installation instructions & user manual

Antunes
Antunes WSS-0948-R owner's manual