Russell Taylors V10i User manual

WET & DRY VACUUM CLEANER
USER MANUAL
V10i

Contents
1.Safety Instructions ..................................................................................................................................1
1.1 Warning ...............................................................................................................................................1
1.2 Safety Instruction ................................................................................................................................2
2.Product Introduction ..............................................................................................................................3
2.1 Product Component ............................................................................................................................3
2.2 Charging Base ....................................................................................................................................4
2.3 Accessories .........................................................................................................................................4
2.4 Status Display ....................................................................................................................................5
2.5 Display Light Details .........................................................................................................................5
2.6 Voice Indicator ...................................................................................................................................6
3.Product Assembly ...................................................................................................................................7
3.1 Install the handle .................................................................................................................................7
3.2 Remove the handle .............................................................................................................................7
4.Product Operation ..................................................................................................................................8
4.1 Fill Water to Clean Water Tank ..........................................................................................................8
4.2 Wash the floor .....................................................................................................................................9
4.3 Charging ..............................................................................................................................................10
5.Product Routine Cleaning ......................................................................................................................11
5.1 Dirty Water Tank Cleaning ..................................................................................................................11
5.2 Cotton filter of dirty water tank clean .................................................................................................12
5.3 Roller Brush Clean ..............................................................................................................................13
6.Product Specification ..............................................................................................................................14
7.Common Fault ........................................................................................................................................15

7KLVKDQGKHOGÀRRUZDVKHULVDKRXVHKROGSURGXFW1RWUHFRPPHQGWREHXVHGLQLQGXVWULDODQGFRPPHUFLDO
or other heavy dirty conditions.
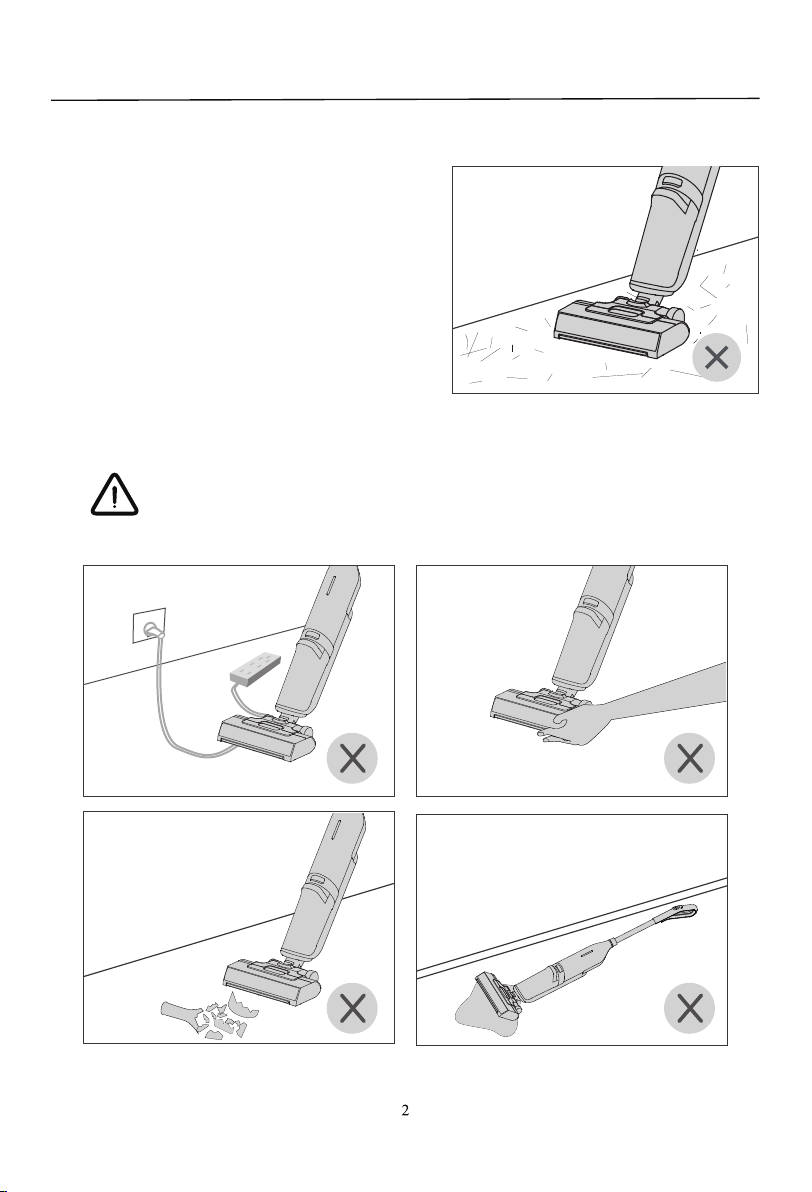
3OHDVHGRQRWXVHPDFKLQHWRFOHDQVKDUSREMHFWVWRSUHYHQWUROOHUEUXVKGDPDJH
Please do not use the device to clean cement, gypsum powder,wall powder and other small particles that are
HDV\WRIUHH]LQJRUODUJHREMHFWVVXFKDVWR\SDSHUEDOOVRWKHUZLVHWKHÀRRUZDVKHUZLOOEHEORFNHGDQGWKH
PRWRUZLOOEHEXUQHG
3OHDVHGRQRWXVHWKHPDFKLQHWRFOHDQLQÀDPPDEOHDQGH[SORVLYHREMHFWVDQGGRQRWWRSXWVXFKOLTXLGLQWR
water tank.
'XULQJWKHFOHDQLQJSURFHVVLIWKHUROOHUEUXVKLVWZLVWHGZLWKZLUHREMHFWVSOHDVHVKXWGRZQWKHPDFKLQH
immediately to clean up the wires to avoid damage to the machine.
Please do not put the machine sideways or upside down.Please clean the dirty water tank in time after using.
:KHQXVLQJWKHPDFKLQHIRUWKH¿UVWWLPHRUDIWHUORQJWHUPVWRUDJHSOHDVHIXOO\FKDUJHWKHPDFKLQH¿UVW
If the machine is not used for a long time, please ensure that it is charged at least every three months.
Wipe with a dry cloth when cleaning the machine.Do not use gasoline or corrosive cleaners that are easy to
crack and discolor the shell.
Do not let children play with the machine as a toy.
:KHQWKHGHYLFHLVIXOO\FKDUJHGDQGFDQQRWZRUNLWPXVWEHLQVSHFWHGDQGUHSDLUHGDWWKHGHVLJQDWHG
PDLQWHQDQFHSRLQW'RQRWGLVDVVHPEOHE\\RXUVHOI
,IWKHSRZHUFRUGLVGDPDJHGWRDYRLGWKHGDQJHULWPXVWEHUHSODFHGE\WKHPDQXIDFWXUHUVORFDOPDLQWH
nance department or similar department for professional replacement.
7KLVDSSOLDQFHFDQEHXVHGE\FKLOGUHQDJHGIURP\HDUVDQGDERYHDQGSHUVRQVZLWKUHGXFHGSK\VLFDO
VHQVRU\RUPHQWDOFDSDELOLWLHVRUODFNRIH[SHULHQFHDQGNQRZOHGJHLIWKH\KDYHEHHQJLYHQVXSHUYLVLRQRU
instruction concerning use of the appliance in a safe way and understand the hazards involved. Children
VKDOOQRWSOD\ZLWKWKHDSSOLDQFH&OHDQLQJDQGXVHUPDLQWHQDQFHVKDOOQRWEHPDGHE\FKLOGUHQZLWKRXW
supervision.
7KHDSSOLDQFHLVRQO\WREHXVHGZLWKWKHSRZHUVXSSO\XQLWSURYLGHGZLWKWKHDSSOLDQFH
7KHDGDSWHUPXVWEHUHPRYHGIURPWKHVRFNHWRXWOHWEHIRUHFOHDQLQJRUPDLQWDLQLQJWKHDSSOLDQFH
7KLVDSSOLDQFHFRQWDLQVEDWWHULHVWKDWDUHRQO\UHSODFHDEOHE\VNLOOHGSHUVRQV
:$51,1*)RUWKHSXUSRVHVRIUHFKDUJLQJWKHEDWWHU\RQO\XVHWKHGHWDFKDEOHVXSSO\XQLWPRGHO[[[
provided with this appliance.
1RQUHFKDUJHDEOHEDWWHULHVDUHQRWWREHUHFKDUJHG
'LIIHUHQWW\SHVRIEDWWHULHVRUQHZDQGXVHGEDWWHULHVDUHQRWWREHPL[HG
%DWWHULHVDUHWREHLQVHUWHGZLWKWKHFRUUHFWSRODULW\
([KDXVWHGEDWWHULHVDUHWREHUHPRYHGIURPWKHDSSOLDQFHDQGVDIHO\GLVSRVHG
,IWKHDSSOLDQFHLVWREHVWRUHGXQXVHGIRUDORQJSHULRGWKHEDWWHULHVDUHUHPRYHG
7KHVXSSO\WHUPLQDOVDUHQRWWREHVKRUWFLUFXLWHG
1.Safety Instructions

1.Safety Instructions
1.2 Use Restrictions
7KLVSURGXFWLVRQO\VXLWDEOHWRZDWHUSURRI
KDUGÀRRUVXFKDVFHUDPLFVPDUEOH
ZRRGHWFGRQRWXVHWKLVGHYLFHWRFOHDQ
carpet or other non waterproof ground.
1RWH7KLVGHYLFHLVQRWVXLWDEOHIRUFDUSHW
cleaning.
Be careful not to press on the power cord when using the device to prevent
HOHFWULFVKRFN(QVXUHWKDWDQ\SDUWRIWKHKXPDQERG\RUODUJHREMHFWVVXFKDV
FORWKHVDUHDZD\IURPWKHUROOHUEUXVK

2.Product Introduction
2.1 Product Components
212))%XWWRQ
Water Spray Button
Handle Removal Button
Clean Water Release
Button
Clean Water Tank
Voice
%DWWHU\,QVLGH
Charging Pins
Handle
Indicator
Sewage Tank
Front Cover
Release Button
Front Cover
Roller Brush
Sewage Tank Release
Button
Mode Button
$XWR0D[
6HOIFOHDQLQJ%XWWRQ
3

2.Product Introduction
2.1 Charging Base
Charging Pins
Power Port
Sponge Filter
Adapter Instruction Manual
2.2 Accessories
4

2.Product Introduction
2.4 Status Display
6WHDG\RQEDWWHU\LVIXOO\FKDUJHG
6WD\RQ%DWWHU\
)ODVKHVLQ&KDUJLQJ
6WD\RQORZEDWWHU\
)ODVKHV$EQRUPDODODUP
Green
Orange
Red
2.5 Display Light Details
5
Machine Status
Low battery
Battery fully
charged
Short circuit
protection
Battery over
temperature
In charging
Dirty tank
full
6RXQG'L'L'L7KHUHGOLJKWVWD\VRQ
for 5 seconds and then turns off.
Display light status
Red light
*UHHQOLJKWLVRQIRUPLQXWHV
and then turns off.
6RXQG'L'L'L7KHUHGOLJKWIODVKHV
for 5 seconds and then turns off.
Orange light flashes slowly
EUHDWKLQJOLJKWHIIHFW
6RXQG3OVHPSW\WKHGLUW\ZDWHUWDQN
The red light flashes for 5 seconds
and then turns off.
6RXQG'L'L'L7KHUHGOLJKWIODVKHV
for 15 seconds and then turns off.
Abnormal water
pump
Machine Status
Battery>40%
10%<Battery<40%
Abnormal roller
brush
Fan abnormal
Abnormal
charging
Battery<10%
6RXQG'L'L'L7KHUHGOLJKWIODVKHV
for 10 seconds and then turns off.
Display light status
*UHHQOLJKW
Orange light
6RXQG3OVFKHFNWKHPDLQEUXVK7KH
red light flashes for 5 seconds and then
turns off.
6RXQG'L'L'L7KHUHGOLJKWVWD\VRQ
for 10 seconds and then turns off.
Red light, meanwhile,sound
DOHUW/RZEDWWHU\
Battery>40%

Voice activation condition Voice Content (English)
Start cleaning
3RZHURIISOHDVHSXWEDFNWKHPDFKLQHWRWKHFKDUJLQJ
EDVH
Press the Start switch
Dirty tank full
Clean water tank is Empty.
Put it on the charging stand.
3UHVVWKHVHOIFOHDQLQJEXWWRQ
6HOIFOHDQLQJLVILQLVKHG
/RZEDWWHU\
$EQRUPDOUROOHUEUXVK
Powerful mode
Auto mode
Please empty the dirty water tank.
Clean water shortage
Start charging
6WDUWVHOIFOHDQLQJ
6HOIFOHDQLQJILQLVKHG
/RZEDWWHU\SOHDVHFKDUJH
3OHDVHFKHFNWKHPDLQEUXVK
3UHVVWKHPRGHEXWWRQ
2.Product Introduction
2.6 Voice Indicator
6

3.Product Assembly
3.1 Installing the handle
3.2 Removing the handle
)LJXUH )LJXUH
Schematic diagram of
dismantling the handle
8VHDQRQVKDUSDX[LOLDU\WRROVXFKDVDEDPERRVWLFNWRSRNHLQWRWKHVPDOOKROHVKRZQ
in the figure to hold the handle removal key, and at the same time pull out the handle
vertically upward.
Insert the handle into the corresponding top position of the fuselage in the direction shown
LQ)LJXUH7KHUHDUHEXFNOHVIRUSRVLWLRQLQJ$IWHULQVHUWLQJLI\RXKHDUWKHVRXQGRI
.DWKHLQVWDOODWLRQLVFRPSOHWHDVVKRZHGRQ)LJXUH
7

4.Product Operation
4.1 Fill water to clean water tank
3UHVVWKHWDQNEXWWRQWR
remove the solution tank.
2SHQWKHVRIWFRYHU
Lift up and turn clockwise.
,QMHFWFOHDQZDWHUQRW
H[FHHGLQJWKH0$;OLQH
,QVWDOOWKHVRIWFRYHU
Turn counterclockwise first,
then press down
8
Put the clean water tank
EDFNLQWRWKHIXVHODJHDQG
the installation is
successful when you hear
DVRXQGRIND

4.Product Operation
4.2 Wash the floor
9
3OHDVHWLOWWKHPDFKLQHILUVWEHIRUH
turning it on.
Press start switch, turn on the washer , start
AUTO mode.
3UHVVWKHRQRIIEXWWRQDJDLQLWVWRSV
working.
When the machine is running, press the
0RGHEXWWRQWRVZLWFKEHWZHHQWKH
$XWR6WURQJPRGH
3UHVVDQGKROGWKHZDWHUVSUD\EXWWRQVWDUW
ZDWHUVSUD\LQJ5HOHDVHWKHEXWWRQVWRS
spraying.
After using the
PDFKLQHLWFDQEH
placed upright
2USXWLWEDFNLQWKH
FKDUJLQJEDVH

4.Product Operation
4.3 Charging
4.4 Self-cleaning
10
Connect the power adapter to the
FKDUJLQJEDVHDVVKRZQDQGLQVHUWLW
LQWRWKHSRZHUERDUG
:KHQWKHLQGLFDWRUEOLQNVRUDQJHFRORUWKHZDVKHULVLQFKDUJLQJIXOOFKDUJHGWKHLQGLFDWRU
EHFRPHVFRQVWDQWJUHHQLQGLFDWRURIIDIWHUPLQXWHVDQGZDVKHUHQWHUVVOHHS
Self-clean can only be
selected when the battery is
charged and the battery
power is greater than 10%.
Put the wahser into the charging
EDVHDVEHORZSLFWXUH
Insert direction
6HOIFOHDQEXWWRQ
Gentle reminder:
$IWHUWKHPDFKLQHLVFOHDQHGSXWLWEDFN
RQWKHFKDUJLQJEDVHSOHDVHHPSW\WKH
sewage tank first, and make sure that the
clean water tank has enough water, press
WKHVHOIFOHDQLQJEXWWRQWKHPDFKLQHZLOO
HQWHUWKHVHOIFOHDQLQJPRGHDQGLWZLOO
finish cleaning and drying in 1 minute,
and then stop automatically.

5. Prodcut Routine Cleaning
5.1 Dirty Water Tank Clean
11
Pour out solid waste. Install the water tank cover, put the sewage
WDQNEDFNLQWRWKHIXVHODJHDQGWKHLQVWDOODWLRQ
LVVXFFHVVIXOZKHQ\RXKHDUDVRXQGRIND
3UHVVWKHZDWHUWDQNEXWWRQWRUHPRYHWKH
water tank.
Remove the tank cover.
Pour out sewage. Take out the filter holder.

5. Prodcut Routine Cleaning
5.2 Cotton filter of dirty water tank clean
12
Take out cotton filter support from water
tank cover.
Open the stand cover.
Take out the filter sponge, the filter sponge
DQGWKHKROGHUFDQEHZDVKHGWRJHWKHUZLWK
water.
After washing the filter sponge, you can dry
LWDQGSXWLWEDFNLQWRWKHEUDFNHWDVVHPEO\
FORVHWKHEUDFNHW

5. Prodcut Routine Cleaning
5.3 Roller brush clean
13
3XOOWKHIURQWFRYHUEXWWRQDQGUHPRYHWKH
front cover.
3XOOXSRQWKHUROOHUEUXVKKDQGOHWRUHPRYH
WKHUROOHUEUXVK
Washing the rollers manually. 5ROOHUVLGHFRYHUFDQEHSXOOHGRXWPDQXDOO\
to remove tangled hair.
Shake off surface moisture. 7KHFOHDQHGUROOHUVFDQEHSODFHGRQWKH
UROOHUEUDFNHWVRQERWKVLGHVRIWKHFKDUJLQJ
stand for drying.

15
7KHPDFKLQHGRHVQW
work.
7KHEDWWHU\SRZHULVLQVXIILFLHQWSOHDVHXVHLWDIWHU
charging.
7KHDLUGXFWLVEORFNHGDQGWKHUROOHUEUXVKLVEORFNHG
3OHDVHFOHDQXSWKHIRUHLJQREMHFWVLQWLPH
5HERRWWRXVH
3. The sewage tank is full, please clean the sewage tank.
$EQRUPDOQRLVH 7KHDLUGXFWLVEORFNHGE\IRUHLJQREMHFWVDQGWKHUROOHU
EUXVKLVLQWHUIHUHGE\IRUHLJQREMHFWV3OHDVHUHVWDUWWKH
PDFKLQHDIWHUFOHDQLQJWKHIRUHLJQREMHFWVIURPWLPHWR
time.
7KHVHZDJHWDQNDVVHPEO\LVQRWLQVWDOOHGSURSHUO\
SOHDVHFKHFNWKHVHZDJHWDQNDVVHPEO\ILOHDQGUHLQVWDOO
The light does not
light up when charging.
1. Check whether the power adapter is plugged in properly.
7KHEDWWHU\LVIXOO\FKDUJHGDQGWKHEDWWHU\HQWHUVWKH
sleep state.
Suction drop 7KHDLUGXFWLVEORFNHGE\IRUHLJQREMHFWVDQGWKHUROOHU
EUXVKLVLQWHUIHUHGE\IRUHLJQREMHFWV3OHDVHUHVWDUWWKH
PDFKLQHDIWHUFOHDQLQJWKHIRUHLJQREMHFWVIURPWLPHWR
time.
7KHVHZDJHWDQNDVVHPEO\LVQRWLQVWDOOHGSURSHUO\
SOHDVHFKHFNWKHVHZDJHWDQNDVVHPEO\ILOHDQGUHLQVWDOO
3. The filter sponge of the sewage tank is dirty, please clean
it.
7KHEDWWHU\YROWDJHLVWRRORZFKDUJHLWLQWLPH
Main Failure Failure cause and solutions
When the machine does not work properly, please refer to the following
to handle the abnormal situation.
6.Common Fault
Table of contents
Other Russell Taylors Vacuum Cleaner manuals