Russo 1 C/W User manual

,
'
...
,
et44fJ ..
UeA& .ee_
,
.'
fDJe
1111111
A
IPllel1l· • •
. . SllPey/B
(MODELS # 1C/W and #2 C/W)
'
"
"440
·;t
i
'\
{
_A•• IrA........ •••• ':'
.AI!I••
&••
@.A
.....J!!I-o
I
, i
I
!

TABLE OF CONTENTS
Introduction 3
Important Facts on Coal and Wood 4
Unpackaging and Assembly 5
Clearance for Installation 5
Installation Guidelines 6
Burning Wood 8
Burning Coal 9
Starting a Coal Fire 9
Maintaining a Coal Fire . . . . . . . . . . . . . . . . . . . . . . . . . . . . . . . . . . . . . . . . .. 10
Removal and Disposal of Ashes 11
Maintenance 11
The use of coal and wood as alternate sources of
energy for home heating has become more and
more popular during the 1970's and into the
1980's. A quality stove like the Coal-Wood Com-
bination would have been technologically
i
pos-
sible only a few years ago. Your Russo is an "air
tight stove" that offers efficient burning of ei er
coal or wood a large Corning-Hearthwind
=-
viewing glass, tough steel construction and
smooth, graceful appearance.
The Russo Coal-Wood Combination is not a con-
verted wood stove. It is a newly designed stove
specifically engineered to provide the versatility of
burning either coal or wood. With the optional
Russo cast iron coal basket for the
1coal/wood,
and the grate for the #2 coal/wood, it provides the
direct draft, shaker system and ash drawer required
for coal burning and for airtight overnight wood
burning. Both stoves feature gasketed doors,
welded seams and controlled air intake.
INTRODUCTION
Congratulations You have made a wise choice in
stoves. With proper installation and care, your
Russo Coal-Wood Combination stove will give you
long and faithful service. Many people are not
acquainted with the use of coal or wood stoves, so
great care has been taken to provide detailed in-
formation about proper installation and operation
procedures in this manual.
We welcome your comments and response to your
stove. Yours is the finest coal-wood combination
on the market and we are always eager to hear
from satisfied Russo Stove owners.

IMPORT NT F CTS ON
CO L ND WOOD
In your Russo, primary air for your coal fire enters
through the draft control on the ashpan door. This
air is drawn up through the shaker grate and the
coal bed. All oxygen from this air is used by the fire.
Additional (secondary) air enters above the fire
bed from a space around the glass frame and
through two channels in the front corners of the
firebox. This secondary air provides oxygen for
combustion of unburned volatile gases. This com-
bustion can be seen in the blue flames above the
fire bed of your coal fire.
Your Russo combination stove is designed to give
you a choice of the solid fuel that you burn - either
coal or wood. You should realize that these two
fuels burn differently and that your stove will per-
form effectively only if you follow the instructions in
this manual.
COAL FACTS
Your Russo will burn either anthracite (hard coal)
or bituminous (soft coal). Anthracite is recom-
mended for home heaters because it burns freely
and uniformly, with very little odor or smoke. Nut
size coal is recommended for your stove, but pea
anthracite, which is smaller in size, and stove
anthracite, which is larger, can be burned with no
problems.
A coal fire produces no creosote like wood. An
unburned product of a coal fire is soot, which, like
creosote, will build up in aflue and chimney, and for
safety must be removed at least twice during a
heating season.
WOOD FACTS
Bituminous coal is more commonly available from
Ohio into the Western parts of the United States.
There are various types and grades of bituminous
coal. Generally soft coal burns with more smoke,
soot, and odor than hard coal.
When dry, most woods, regardless of the type,
have essentially the same energy content: 8600
btu/lb. A pound of dry oak contains the same
energy as one pound of pine. But oak has a much
higher density, so that a cubic foot of oak is heavier
and contains significantly more energy than a
cubic foot of pine. Hardwoods have a higher
energy content per volume and should be used for
long sustained heating.
Cannel coal should never e urned in your stove.
Cannel coal contains volatile material that is re-
leased as the coal is heated. In a closed heater
burning cannel coal can become explosive. Wood that is green has a much higher moisture
content than wood that is dry. Wood that has been
cut for six months to two years is said to be dry .
Burning exclusively green wood is not recom-
mended because much of the heat of the fire is
used to evaporate the moisture in the wood. Green
wood creates much more creosote than dry wood.
CO L COMBUSTION
Solid fuels burn when a kindling temperature is
attained that allows the fuel to change from a solid
to a combustible gas form. For wood this process
begins to happen at about 550°F, for coal at 660°F.
More heat is needed to sustain a coal fire, but little
heat is used to evaporate moisture like in a wood
fire.
WOOD COMBUSTION
The gases in a wood fire can be seen burning in
long yellow flames. When wood is burned slowly, it
produces tar and other organic vapors, which

4
- expelled moisture to form creosote.
e creoso e vapors condense in the relatively
cool
chimney flue lining. When ignited, this creo-
so e makes an extremely hot fire.
The accumulation of creosote is greater with green
wood, pine, and slower burning, cooler fires. Your
chimney connector and chimney should be in-
spected at least twice monthly during the heating
season to determine if a creosote buildup has
occurred. Ifcreosote has accumulated, itshould be
removed to help reduce the risk of a chimney fire.
UNP CK GING ND SSEMBLY
Remove all external poly wrappings. The loading
door should be removed from its protective foam,
mounted on hinges and checked for proper open-
ing and closing operation. The two pickets should
be installed into the inside frame of the loading
door. The pickets protect the glass from falling
logs.
Both the Russo # 1 C/W and #2 C/W have fire-
bricks lining the combustion chamber of the stove.
The bricks, and in the
1 C/W, the pans holding
the bricks, should be checked for proper position-
ing. The ash pan should be checked for proper
position and, if purchased, the optional 265 cfm
blower mounted according to instructions included
with the blower. The Handy Tool should be re-
moved from inside the stove. The baffle, which is
packed inside the #2 C/W, should be positioned in
the stove. (see diagram)
Before installation, your stove and stove pipe
should be burned outdoors to cure the paint and
steel. If this is not possible, and the stove must be
cured indoors, proper ventilation should be pro-
vided to minimize possible smoke and odor.
CLE R NCES FOR INST LL TION
The clearances required for the installation of your
stove are shown in graphic form below. These
18 1
DISTANCE BETWEEN
NON-CONBUSTIBLE WALL
NOU NTE D ON NON - CON
BUSTIBLE SPACERS WITH
A
1
AIR SPACE ALL AROUND
NON- CO/ilBUSTIBLE
WALL
.1
FREESTANDING INSTALLATION
WITH PROPER CLEARANCES
18
1\
. 36 D1STA NC E
BETWEEN COM-
BUSTIBLE WALL
NON- COMBUSTIBLE
FLOOR PROTECTION

clearances are - 36 from combustibles on each
side and to the rear of the stove. The stovepipe
must be a minimum of 18 from combustibles.
Combustible materials such as furniture, clothing,
and draperies must be kept a minimum of 36 from
the stove.
The stove can be placed directly on a fireplace
earth, cement floor, or an approved
-cornbustible surface. A clearance of 18 is
required on the load door side, and 12 on other
sides of the stove. The area directly under the
.chimney pipe and 2 to either side of that pipe must
also be protected. The material used for floor
protection must provide insulation at least equal to
3/8
asbestos rnillboard.
For further information on using your heater safely,
write for a copy of the publication Using Coal and
Wood Stoves Safely from the National Fire Pro-
tection Association, Batterymarch Park, Quincy,
MA02269
NOTE: This stove is not approved or recom-
mended for use in mobile homes.
5
INST LL TION GUIDELINES
WARNING The installation of this stove must
comply with state and local requirements and be
inspected by the state or local building inspector, if
required.
CHIMNEY
The chimney system your stove is connected to
plays some key roles in the performance of your
stove .
1.The top of the chimney should be at least three
(3) feet higher than the roof at the point of exit. With
pitched roofs, the top of the chimney must be at
least two (2) feet higher than any point on the roof
within ten (10) feet of the chimney. Check with your
local building Inspector for local building code
compliances.
2. Only one stove should be connected to a flue.
This will help assure proper drafts and the airtight-
ness of the flue system.
INSTALLATIONS WITH BAROMETRIC
DAMPER REQUIRED FOR COAL BURNING

:-.:::: :
===:e!)' •.,.........,••.••ovlde the proper draft
operate. For your Russo to
?nJIDEm,
a draft of between .04 w.e.
- needed.
iameter of the chimney must not be
Your Russo Coal/Wood Stove can safely and
effectively be connected to either pre-fabricated/
factory-built or a Class A masonry chimney. Only
(UL) Underwriters Laboratories listed and ap-
proved factory-built chimneys should be used.
Installations of these chimneys should be made
exactly to the manufacturer's specifications.
NOTE: A stove pipe should never be used for a
chimney.
Masonry chimneys must be lined for safety. A
masonry chimney should be inspected and
cleaned before installation and burning of your
stove.
Many performance problems that occur with
/
stoves are a result of poor draft or faulty chimney
I
systems. Please assure your chimney system is
PROPER CLEARANCES AND
INSTALLATION FOR
A
FREESTANDING INSTALLATION
ELBOW OR CAPPED \.
CLEAN-OUT TEE
.x
"- NON-COMBUSTIBLE
FLOOR PROTECT ION
both safe and sound before proceeding with your
installation.
TOOLS ND CCESSORIES
NEEDED
After obtaining all necessary permits for installa-
tion, you will need to assemble the following tools
and accessories for proper installation:
• Barometric damper
• Stovepipe
(6/1
minimum 22 gauge)
• Sheet metal screws
• Furnace Cement
• Tape measure
• Hammer
• Screwdriver
• Electric drill
• Crimpers
• Tin-snips
• Draft gauge
I
I
______ ...L
r-
METAL THI MBLE OR
®
APPROVED DEVICE
GOING' THROUGH COMBUSTIBLE
WALL INTO A MASONRY OR
APPROVED CHIMNEY
18
11 11
COMBUSTIBLE WALL
-NON-COMBUSTIBLE WALL
MOUNTED ON NON- COMBUSTIBLE
SPACERS WITH A
r
AIR SPACE
ALL AROUND

7
ONNE TING THE STOVE least 22 gauge. Install smoke pipe segments with
the crimped end down. Any horizontal pipe should
have the seam up to prevent creosote from drip-
ping out of the seam.
A barometric damper is required for the installation
of your Russo Coal/Wood Combination stove. The
warranty on your stove is voided if a barometric
damper is not used. The barometric damper must
be set when the fire is adequate to heat the chim-
ey. The draft on your barometric damper should
be set between .04 w.c. to .06 w.c. The barometric
s ould be located between the first and second
e gths of pipe coming from your stove.
WARNING Use of.aluminum type B gas vent for
solid fuels is unsafe and prohibited by the National
Fire Protection Association code.
OTE No other damper should be used between
the barometric and the flue.
Not more than one elbow should be used in the
stovepipe. Any horizontal pipe should have an up-
ward pitch toward the chimney of at least
%"
for
each foot of horizontal run. There must be at least
an 18" clearance between any horizontal pipe and
combustible ceiling.
2" AIR SPACE
FIREPLACE INSTALLATION WITH
PROPER INSTALLATION
AND CLEARANCE
Your barometric can be set by your Russo dealer
or a furnace service person. The chimney connection pipe should extend at
least 2" into the chimney, but not sofarthat it blocks
air flow. Where a pipe passes through a wall or
ceiling, this penetration should always be made
with insulated pipe and the proper accessories.
Your stove can be connected to the chimney flue
using high quality, non-corrosive, 6-inch pipe of at
r
I1
1
I
I
I
I"
I-.
METAL HEAT SHIELD
26 GA OR HEAVIER
r
- -J-_-+----
PIPE EXTENSION BEYOND BLOCK-OFF PLATE
I
1/1\
I
\4--+=- -
NON-COMBUSTIBLE OAMPER BLOCK-Off
/\
I
I""
-J'-
I
LTJ
I
CLEAN-OUT TEE
OR ELBOW
I
WOOD ANTEL
--18"
MASONRY
HEARTH
r
NON- COMBUS TIBlE
FLOOR PROTECTION
_ _ _ L-.L-l
-L--L---,
CARPET

8
L
pipe should be avoided as they can
emus creosote or ash build-up. Each
sto ipe joint should be secured with three (3)
s ee e al screws to avoid possible separation
du
g
use.
For fireplace installations, first remove the fireplace
damper. It is usually held in place by its own weight,
and is controlled by the damper actuating
mechanism. Center the stove in the fireplace
opening and install 6 stovepipe just beyond the
damper. Make templates to close the remaining
opening of the flue. They should fit snugly around
the stove pipe and should extend about W' beyond
the edge of the damper opening. Convert the tem-
plate to 24 gauge or heavier sheet metal. Discard
the template; install the sheet metal, securing it to
existing masonry or damper opening. Inspect for a
snug fit, using stove cement to fill all cracks, seams
or holes.
WARNING Only a blower labeled Russo Ap-
proved may be used with your # 1 C/W or #2
C/W. Use of other non-approved blowers will void
the safety label required in most states and may
void the stove warranty.
FOR WOOD BURNING - #1 C/W
HOW TO USE YOUR STOVE
WARNING Never use gasoline, gasoline type
lantern fuel, kerosene, charcoal lighter fluid, or
similar liquids to start or freshen-up a fire in this
heater. Keep all such liquids well away from the
heater while it is in use.
BURNING WOOD
Wood is burned on the center steel plate supplied
with the #1 C/W. Wood should be burned on top of
the three firebricks packed with the #2 C/W. These
bricks should be placed on the grate with air
spaces allowed between each brick.
Only paper and kindling should be used to start a
fire. The air inlet located on the ash drawer door
and the damper should be fully opened. During
normal use this draft control and the flue damper
should be toward the closed position. The loading
door and ash drawer door should always be shut
when the stove is in operation. Resinous woods
and manufactured logs should not be used in your
stove as they create undesirable by-products
which could damage the stove or chimney system.
FOR WOOD BURNING - #2 C/W

A Handy Tool is supplied with the stove. It is a
valuable part of the stove and serves several func-
tions. It can be used to open and close the draft
regulator and flue damper, to clear the ashes from
the corners of the
1C/W coal basket, and to pull
the ash pan from the stove.
The flue damper should always be open before the
loading door is opened. When refueling, unlatch
and open the loading door slowly.
NOTE: 1. When in use, do not touch the stove.
Severe burns may result. Never burn your stove so
that any part of the stove or pipe become red hot.
2. Do not fire your stove too hot on the first few fires.
A series of small wood fires should be built to allow
the cast iron parts of your stove to temper before
using your stove for coal fires or extended burns.
BURNING CO L
To burn coal in a Russo 1 C/W an optional coal
basket is required. In the Russo 2 C/W coal is
burned directly on the cast iron grates; the bricks
used for wood burning must not be on top of the
integral grate system. Your stove should be
FOR COAL BURNING -
1C/W
9
thoroughly cooled before converting it from one
fuel burning mode to another.
To burn coal in the Russo 1 C/W the following
instructions apply:
Remove the center bottom plate and clean out all
ashes. Install the coal basket in the opening pro-
vided, with the open side of the basket facing the
rear of the stove. (see diagram) The fire bricks
which line the rear of the stove act as the fourth side
of the basket. With the basket in place, the shaker
rod can be connected to the tab of the slotted
shaker disc, and by moving the rod in and out, the
disc will be rotated and the ashes will fall into the
ash drawer. Before starting a fire in the basket,
check the shaker mechanism for free operation
and the basket for proper positioning. Install the
extenders onto the sides of the coal basket; they
are keyed to fit in only one position.
ST RTING CO L FIRE
Fully open the draft regulator on the ash drawer
door with the tool provided. Set flue damper in the
fully open position. Place a few pieces of crumpled
FOR COAL BURNING - 2 C/W

WE'r:"':"S::E"::e'"
'C
a
0
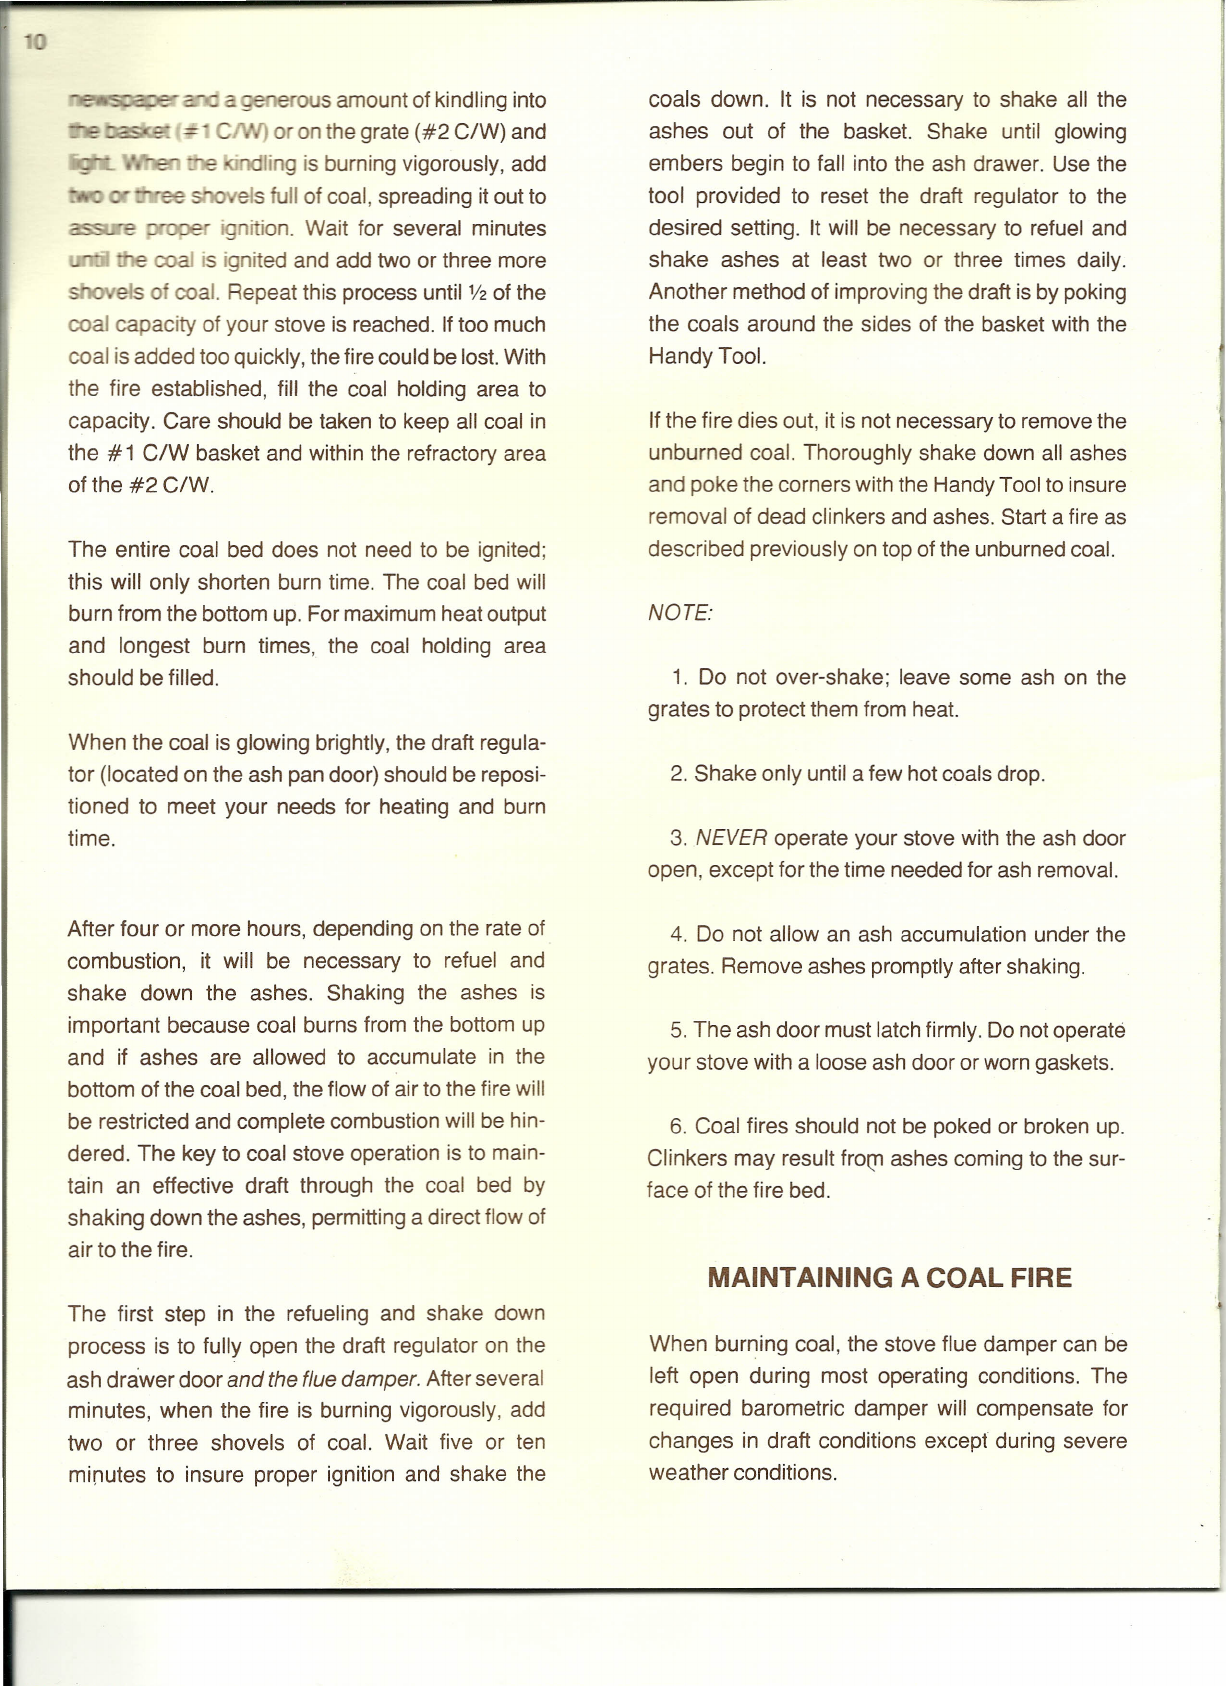
s amount of kindling into
or on the grate (#2 C/W) and
0 -
ling is burning vigorously, add
els full of coal, spreading it out to
nition. Wait for several minutes
is ignited and add two or three more
soovets
0
coal. Repeat this process until
V
of the
coal capacity of your stove is reached. If too much
coal is added too quickly, the fire could be lost. With
the fire established, fill the coal holding area to
capacity. Care should be taken to keep all coal in
the
#
1 C/W basket and within the refractory area
of the #2 C/W.
coals down. It is not necessary to shake all the
ashes out of the basket. Shake until glowing
embers begin to fall into the ash drawer. Use the
tool provided to reset the draft regulator to the
desired setting. It will be necessary to refuel and
shake ashes at least two or three times daily.
Another method of improving the draft is by poking
the coals around the sides of the basket with the
Handy Tool.
If the fire dies out, it is not necessary to remove the
unburned coal. Thoroughly shake down all ashes
and poke the corners with the Handy Tool to insure
removal of dead clinkers and ashes. Start a fire as
described previously on top of the unburned coal.
The entire coal bed does not need to be ignited;
this will only shorten burn time. The coal bed will
burn from the bottom up. For maximum heat output
and longest burn times, the coal holding area
should be filled.
NOTE:
1. Do not over-shake; leave some ash on the
grates to protect them from heat.
When the coal is glowing brightly, the draft regula-
tor (located on the ash pan door) should be reposi-
tioned to meet your needs for heating and burn
time.
2. Shake only until a few hot coals drop.
3 NEVER operate your stove with the ash door
open, except for the time needed for ash removal.
After four or more hours, depending on the rate of
combustion, it will be necessary to refuel and
shake down the ashes. Shaking the ashes is
important because coal burns from the bottom up
and if ashes are allowed to accumulate in the
bottom of the coal bed, the flow of air to the fire will
be restricted and complete combustion will be hin-
dered. The key to coal stove operation is to main-
tain an effective draft through the coal bed by
shaking down the ashes, permitting a direct flow of
air to the fire.
4. Do not allow an ash accumulation under the
grates. Remove ashes promptly after shaking.
5. The ash door must latch firmly. Do not operate
your stove with a loose ash door or worn gaskets.
6. Coal fires should not be poked or broken up.
Clinkers may result from ashes coming to the sur-
face of the fire bed.
M INT INING CO L FIRE
The first step in the refueling and shake down
process is to fully open the draft regulator on the
ash drawer door and the flue damper After several
minutes, when the fire is burning vigorously, add
two or three shovels of coal. Wait five or ten
minutes to insure proper ignition and shake the
When burning coal, the stove flue damper can be
left open during most operating conditions. The
required barometric damper will compensate for
changes in draft conditions except during severe
weather conditions.

It will be necessary to periodically empty the fire
bed area of any non-combustible a e ial. This
should be done with the fire out and the s
0
ecool.
Care should be taken to fully open the ash drawer
door before attempting to remove the ash drawer. If
the ash drawer door gasket is damaged, reduced
control and shorter burn times could result When
removing the ash drawer, turn off the blower, if
operating or it could blow hot ashes-onto you.
The Russo Coal-Wood Combination S oves are
designed to burn anthracite nut coal - but -II
operate effectively with stove or pea anthracite.
The
1 C/W has a coal capacity of 20-25 pounds,
and will heat up to 9000 cubic feet of living space
when burning coal. The #2 C/W has a coal capa-
city of 40-45 pounds, and will heat up to 15,000
cubic feet of living space when burning coal.
Ashes should be place in a metal container with a
tight-fitting lid. The closed container of ashes
should be placed on a non-combustible floor or on
the ground, well away from all combustible
materials, pending final disposal. If the ashes are
disposed of by burial in soil or otherwise locally
dispersed, they should be retained in a closed
container until all cinders have thoroughly cooled.
NOTE: For proper burning there must be a con-
tinuous supply of fresh air. Ventilation is needed
not just for proper combustion, but for the occu-
pants of a home. In most homes there is an air
leakage sufficient to support stove combustion. In
well-insulated tight homes, proper draft for stove
burning cannot be achieved without ventilation. Itis
advisable under all conditions to leave a window
slightly open to allow a constant source of air when
your stove is burning.
REMOV L ND DISPOS L OF
SHES
The Russo Coal-Wood Combination Stove is
equipped with a removable ash drawer which
simplifies the ash removal process. If you are
burning wood, the ashes can .be removed by
pushing them over the center bottom plate or the
bricks and allowing them to drop through the holes
and into the ash drawer. Ifcoal is being burned, the
ashes will drop through the shaker.
It will be necessary to remove the ashes daily dur-
ing the heating season. Use the tool provided to
slide the ash drawer toward the front. Be sure to
use protective gloves when removing the drawer.
The ash drawer door must not be left open while
the ashes are being dumped. ASH REMOVAL
AND
DISPOSAL
11

12
ENANCE Dust will accumulate on the inlet screen and impel-
ler wheel of the blower. These parts should be
thoroughly cleaned to insure adequate flow of air
and minimize strain on the motor.
o Id be checked for creosote
be cleaned with a chimney brush
can
be done professionally or by the home-
o er. e chimney should be cleaned at least
o ce a year. Chimney cleaning following coal
usage should be done with plastic or brass brushes
to avoid possible soot explosions.
If your blower motor is equipped with oil holes, it
should be lubricated every six months only with
SAE 20 NON DETERGENT OIL. When reinstalling
blower, it is essential that all wires be kept as far
away from the stove as possible.
At least once every year, preferably at the end of
the heating season, the inside of the stove should
be thoroughly cleaned. A wire brush should be
used to remove soot and creosote. This will mini-
mize rust, maximize the heat output and extend the
life of the stove. You may choose to re-paint part or
all of the stove. Use only high quality high tempera-
ture paint. Check all gaskets for proper adhesion
and wear. Gasket replacement kits are available
from your Russo dealer.
The glass should be cleaned periodically with a
fireplace and glass cleaner. Exceptionally heavy
tar deposits can be removed with oven cleaner. Do
not use steel wool, abrasives, or scrapers as the
glass may become scratched. Allow the stove to
cool before attempting to clean the glass. All resi-
due of cleaning agents must be removed before
refiring your stove.
If your stove is equipped with a blower, it should be
removed and cleaned at least every six months.
The viewing window is Corninq-Hearthwindowe
glass and should be replaced only with Corning-
Hearthwindow glass, available through your
THERMOSTAT
SPEEDNUT 4)
MOTOR

absorb s
ck by a blu
e s ove must not be
aced. Under normal operati
lass will not break. The glass is no
e stove should not be operated wi
ro en glass.
e e glass from your load door when
a g the glass the washers found between
e lass frame and the stove must be replaced in
oosit ion. The nut holding the glass should be
_ e ed with hand pressure to prevent breakage.

1
CCESSORIES
OE. Our own design, this longer-handled heavy duty wrought iron tool is really two tools in one. Its unique
desiqn - perfectly suited for use in wood stoves.
HEAT SHIELD. Specially designed to protect wooden mantels. Kit comes complete with clips, hardware, and
instructions.
STOVE PAINT. High quality, high temperature paint available in black and colors: metallic maroon, midnight green,
metallic green, metallic blue, metallic brown.
GASKET REPAIR KITS. Includes gasket material, adhesive, instruction sheet. Specify model stove.
265 CFM BLOWER. Greatly improves air circulation, this thermostatically controlled unit mounts on lower rear
section of stove.
REPLACEMENT GLASS. Do not use ordinary or tempered glass in a Russo Coal-Wood Combination. Use only
Corrunq-Hearthwindowe glass, available through your Russo dealer.
COAL BASKET. Must be used to burn coal in the Russo
1Coal-Wood Combination.
LEG EXTENDERS. For use in hearth installations where the stove extends beyond the hearth.
RUSSO COAL STOREID.Stores up to a weeks supply of coal (approx. 175 Ibs.). Hinged top, gravity fed for easy
filling and shoveling. For use beside your stove.
COAL SHOVEL. A heavy steel shovel to make stove loading an easy, clean operation.
YOUR RUSSO DE LER
Your Authorized Russo Dealer will be more than willing to assist you with any questions
or problems you might have with your stove.
If you have any unanswered questions or unresolved problems, please write or
call us at the Russo Manufacturing Corporation.
We welcome your comments, questions, and suggestions.
This manual suits for next models
1
Table of contents
Popular Wood Stove manuals by other brands

Regency
Regency Classic F1100 Specification sheet

wiking
wiking Luma 1 Installation and user manual

Dovre
Dovre 700 Installation & operating instructions

Faber
Faber e-MatriX heat 800/500 RD installation manual

Dovre
Dovre BOLD 300 Installation instructions and operating manual

TermaTech
TermaTech TT70 User and mounting manual

LA NORDICA
LA NORDICA TermoRossella Plus DSA Instructions for installation, use and maintenance

Nibe
Nibe Contura 620T manual

Specflue
Specflue Gainsborough Series manual

Jøtul
Jøtul F 602 ECO Installation and operating instructions

HASE
HASE TORONTO Instructions for use

Dovre
Dovre 325CB Installation instructions and operating manual