Ryobi CDC1802 User manual

CORDLESS DRILL DRIVER USER’S MANUAL 1
PERCEUSE-VISSEUSE SANS FIL MANUEL D’UTILISATION 5
AKKU-BOHRSCHRAUBER BEDIENUNGSANLEITUNG 10
TALADRO-ATORNILLADOR SIN CABLE MANUAL DE UTILIZACIÓN 15
TRAPANO AVVITATORE A BATTERIA MANUALE D’USO 20
ACCU-BOORSCHROEFMACHINE GEBRUIKSINSTRUCTIES 25
BERBEQUIM-APARAFUSADORA SEM FIO MANUAL DE UTILIZAÇÃO 30
BATTERIDREVEN BORE-SKRUEMASKINE BRUGERVEJLEDNING 35
SLADDLÖS BORRMASKIN/SKRUVDRAGARE INSTRUKTIONSBOK 40
JOHDOTON PORAKONE-RUUVITALTTA KÄYTTÄJÄN KÄSIKIRJA 45
OPPLADBAR BOR-/SKRUMASKIN BRUKSANVISNING 49
ÄääìåìãüíéêçÄü ÑêÖãú-òìêìèéÇÖêí êìäéÇéÑëíÇé èé ùäëèãìÄíÄñàà 53
BEZPRZEWODOWA WIERTARKO-WKRTARKA INSTRUKCJA OBSUGI 58
AKU VRTACÍ ŠROUBOVÁK NÁVOD K OBSLUZE 63
FÚRÓ / CSAVAROZÓ GÉP, VEZETÉK NÉLKÜLI HASZNÁLATI ÚTMUTATÓ 68
MAIN DE GURIT I ÎNURUBAT CU ACUMULATORI MANUAL DE UTILIZARE 73
AKUMULATORA URBIS-SKRVGRIEZIS LIETOTJA ROKASGRMATA 78
BELAIDŽIO SUKTUVO -GRŽTO NAUDOJIMO VADOVAS 82
AKUTRELL KASUTUSJUHEND KASUTAJAJUHEND 86
BEŽINA BUŠILICA-ODVIJA KORISNI»KI PRIRU»NIK 90
AKU-VRTALNIK-VIJANIK UPORABNIŠKI PRIRONIK 94
BEZDRÔTOVÁ VTAKA NÁVOD NA POUŽITIE 99
104
KABLOSUZ MATKAP-TORNAVDA KULLANiM KILAVUZU 110
CDC1802
GB
FR
DE
ES
IT
NL
PT
DK
SE
FI
NO
RU
PL
CZ
HU
RO
LV
LT
EE
HR
SI
SK
GR
TR
GB ORIGINAL INSTRUCTIONS FR TRADUCTION DES INSTRUCTIONS ORIGINALES DE ÜBERSETZUNG DER ORIGINALANLEITUNG ES TRADUCCIÓN DE
LAS INSTRUCCIONES ORIGINALES IT TRADUZIONE DELLE ISTRUZIONI ORIGINALI NL VERTALING VAN DE ORIGINELE INSTRUCTIES PT TRADUÇÃO DAS
INSTRUÇÕES ORIGINAIS DK OVERSÆTTELSE AF DE ORIGINALE INSTRUKTIONER SE ÖVERSÄTTNING AV DE URSPRUNGLIGA INSTRUKTIONERNA FI
ALKUPERÄISTEN OHJEIDEN SUOMENNOS NO OVERSETTELSE AV DE ORIGINALE INSTRUKSJONENE RU
PL TUMACZENIE INSTRUKCJI ORYGINALNEJ CZ PEKLAD ORIGINÁLNÍCH POKYN HU AZ EREDETI ÚTMUTATÓ FORDÍTÁSA RO TRADUCEREA
INSTRUCIUNILOR ORIGINALE LV TULKOTS NO ORIINLS INSTRUKCIJAS LT ORIGINALI INSTRUKCIJ VERTIMAS EE ORIGINAALJUHENDI TÕLGE
HR PRIJEVOD ORIGINALNIH UPUTA SI PREVOD ORIGINALNIH NAVODIL SK PREKLAD POKYNOV VORIGINÁLI GR
TR ORIJINAL TALIMATLARIN TERCÜMESI

16
17
6
2
1
Fig. 1 Fig. 2
Fig. 3 Fig. 4
Fig. 5 Fig. 6
Fig. 7 Fig. 8
1
2
3
4
5
6
7
11
12 13
14 3
10 515
89
20 11 13
21
12
10
18
19
1

Important!
It is essential that you read the instructions in this manual before mounting and operating
this machine.
Attention !
Il est indispensable que vous lisiez les instructions contenues dans ce manuel avant
le montage et la mise en service de l’appareil.
Achtung!
Bitte lesen Sie unbedingt vor Montage und Inbetriebnahme die Hinweise dieser Bedienungsanleitung.
¡Atención!
Es imprescindible que lea las instrucciones de este manual antes del montaje y de la
puesta en servicio.
Attenzione!
Prima di procedere al montaggio e alla messa in funzione, è indispensabile leggere
attentamente le istruzioni del presente manuale.
Let op!
Het is absoluut noodzakelijk vóór montage en inbedrijfstelling de aanwijzingen in deze
handleiding te lezen.
Atenção!
É indispensável ler as instruções deste manual antes de montar e pôr em serviço.
OBS!
Denne brugsanvisning skal læses igennem inden montering og ibrugtagning.
Observera!
Det är nödvändigt att läsa instruktionerna i denna bruksanvisning före montering och
driftsättning.
Huomio!
On ehdottoman välttämätöntä lukea tässä käyttöohjeessa annetut ohjeet ennen
asennusta ja käyttöönottoa.
Advarsel!
Vennligst les instruksjonene i denne bruksanvisningen før du monterer og tar i bruk
maskinen.
ÇÌËχÌËe! èee‰ Ò·ÓÍÓÈ Ë Á‡ÔÛÒÍÓÏ ËÌÒÚÛÏeÌÚ‡ ÌeÓ·ıÓ‰ËÏÓ ÔÓ˜eÒÚ¸ ËÌÒÚÛ͈ËË ËÁ ̇ÒÚÓfl˘e„Ó
ÛÍÓ‚Ó‰ÒÚ‚‡.
Uwaga!
Przed montowaniem i uruchomieniem, koniecznie musicie si Pastwo zapozna
z zaleceniami zawartymi w niniejszym sposobie uycia.
Dležité upozornní!
Ped montáží náadí a uvedením do provozu je nutné si peíst následující pokyny.
Figyelem!
Feltétlenül fontos, hogy a jelen használati útmutatóban foglalt elírásokat az
összeszerelés és az üzembe helyezés ellt elolvassa!
Atenie!
Este indispensabil sã citii instruciunile coninute în acest mod de utilizare înainte de montaj
i de punerea în funciune.
Uzmanību! Ir ļoti būtiski, lai jūs izlasītu norādījumus, kas sniegti šajā rokasgrāmatā, pirms ķeraties
pie ierīces montēšanas un iedarbināšanas!
Dėmesio! Prieš surinkdami ir paleisdami aparatą į darbą, reikia, kad jūs perskaitytumėte šiame
vadove esančias instrukcijas.
Tähtis! Lugege enne seadme kokkupanekut ja kasutamist kindlasti läbi selles juhendis
sisalduvad eeskirjad ja juhised!
Upozorenje! Vaæno je da upute u ovom KorisniËkom priruËniku proËitate prije postavljanja i uporabe ovog alata.
Pomembno!
Zelo pomembno je, da pred namestitvijo in prvo uporabo te naprave preberete
navodila v tem prironiku.
Upzornenie! Je dôležité, aby ste si pred montážou a spustením zariadenia prečítali pokyny, ktoré sa
nachádzajú v tomto návode.
!
Dikkat!
Cihazn montajndan ve çaltrlmasndan önce bu klavuzda bulunan talimatlar okumanz zorunludur.
Subject to technical modifications / Sous réserve de modifications techniques /Technische Änderungen vorbehalten /
Sujeto a modificaciones técnicas / Con riserva di eventuali modifiche tecniche /Technische wijzigingen voorbehouden /
Com reserva de modificações técnicas / Med forbehold for tekniske ændringer / Med förbehåll för tekniska ändringar /
Tekniset muutokset varataan / Med forbehold om tekniske endringer / åÓ„ÛÚ ·˚Ú¸ ‚ÌeÒeÌ˚ ÚeıÌ˘eÒÍËe ËÁÏeÌeÌËfl /
Z zastrzeeniem modyfikacji technicznych / Zmny technických údaj vyhrazeny / A mszaki módosítás jogát fenntartjuk /
Sub rezerva modificrilor tehnice / Paturam tiesības mainīt tehniskos raksturlielumus / Pasiliekant teisę daryti techninius pakeitimus /
Tehnilised muudatused võimalikud /Podloæno tehniËkim promjenama /Tehnine spremembe dopušene/
Technické zmeny vyhradené / / Teknik deiiklik hakk sakldr

1
English
GB
FR DE ES IT NL PT DK SE FI NO RU PL CZ HU RO LV LT EE HR SI SK GR TR
SPECIFIC SAFETY RULES
QWear ear protectors with impact drills. Exposure
to noise can cause hearing loss.
QUse auxiliary handles supplied with the tool. Loss
of control can cause personal injury.
QHold tool by insulated gripping surfaces when
performing an operation where the cutting tool
may contact hidden wiring. Contact with a “live”
wire will also make exposed metal parts of the tool
“live” and shock the operator.
QKnow your power tool. Read operator’s manual
carefully. Learn its applications and limitations,
as well as the specific potential hazards related
to this tool. Following this rule will reduce the risk of
electric shock, fire, or serious injury.
QAlways wear safety glasses with side shields.
Everyday glasses have only impact resistant lenses.
They are NOT safety glasses. Following this rule will
reduce the risk of eye injury.
QProtect your lungs. Wear a face or dust mask
if the operation is dusty. Following this rule will
reduce the risk of serious personal injury.
QProtect your hearing. Wear hearing protection
during extended periods of operation. Following
this rule will reduce the risk of serious personal
injury.
QBattery tools do not have to be plugged into
an electrical outlet; therefore, they are always
in operating condition. Be aware of possible
hazards when not using your battery tool or
when changing accessories. Following this rule
will reduce the risk of electric shock, fire, or serious
personal injury.
QDo not place battery tools or their batteries near
fire or heat. Following this rule will reduce the risk of
explosion and possibly injury.
QNever use a battery that has been dropped or
received a sharp blow. A damaged battery is
subject to explosion. Properly dispose of a dropped
or damaged battery immediately.
QBatteries can explode in the presence of a
source of ignition, such as a pilot light. To reduce
the risk of serious personal injury, never use any
cordless product in the presence of open flame. An
exploded battery can propel debris and chemicals.If
exposed,flush with water immediately.
QDo not charge battery tool in a damp or wet
location.Following this rule will reduce the risk of
electric shock.
QFor best results, your battery tool should be
charged in a location where the temperature is
more than 10°C but less than 38°C. Do not store
outside or in vehicles.
QUnder extreme usage or temperature conditions,
battery leakage may occur. If liquid comes in
contact with your skin, wash immediately with
soap and water, then neutralize with lemon juice
or vinegar. If liquid gets into your eyes, flush
them with clean water for at least 10 minutes,
then seek immediate medical attention. Following
this rule will reduce the risk of serious personal
injury.
QSave these instructions. Refer to them frequently
and use them to instruct others who may use this
tool. If you loan someone this tool, loan them these
instructions also to prevent misuse of the product
and possible injury.
DESCRIPTION
1. Torque Adjustment Ring
2. Keyless Chuck
3. Switch Trigger
4. Mag TrayTM
5. Rotation Selector
6. Two- Speed Gear Switch (Hi – Lo)
7. Level
8. Battery Pack(not included)
9. Latches
10. Chuck Body
11. Unlock(Release)
12. Lock(Tighten)
13. Chuck Collar
14. Forward
15. Reverse
16. High Speed
17. Low Speed
18. To Decrease Torque
19. To Increase Torquee
20. Bit
21. Chuck Jaws
FEATURES
Voltage 18 V
Chuck (mm) 0-10 mm
Switch Variable speed
No load speed (drill mode): 0-350/0-1300 min-1
Max. Torque (Nm) 42.6
Weight -console (KG) 1.27

2
English
GB
FR DE ES IT NL PT DK SE FI NO RU PL CZ HU RO LV LT EE HR SI SK GR TR
FEATURES
MODEL BATTERY PACK
(not included) CHARGER
(not included)
CDC1802
BPP-1815
BPP-1815M
BPP-1817
BPP-1817M
BPL-1820
BPL-1815
BCL-1800
BCL1418
BCS618
BPP-1815
BPP-1815M
BPP-1817
BPP-1817M
BC-1815S
BC-1800
OPERATION
WARNING:
Do not allow familiarity with products to make
you careless. Remember that a careless fraction
of a second is sufficient to inflict serious injury.
WARNING:
Always wear safety goggles or safety glasses
with side shields when operating products.
Failure to do so could result in objects being
thrown into your eyes, resulting in possible
serious injury.
WARNING:
Do not use any attachments or accessories
not recommended by the manufacturer of this
product. The use of attachments or accessories
not recommended can result in serious personal
injury.
TO INSTALL BATTERY PACK(not included)
See Figure 2.
QPlace the rotation selector in center position.
QAlign raised rib on battery pack with groove in drill’s
battery port.
QMake sure the latches on each side of the battery
packsnap in place and that battery pack is secure
before beginning operation.
TO REMOVE BATTERY PACK(not included)
QPlace the rotation selector in center position.
QLocate latches on side of battery pack and depress
both sides to release battery pack from the drill.
Remove battery pack from the drill.
BATTERY PROTECTION FEATURES
Ryobi 18 V lithium-ion batteries are designed with
features that protect the lithium-ion cells and maximize
battery life. Under some operating conditions, these
built-in features may cause the battery and the tool it is
powering to act differently from nickel-cadmium batteries.
During some applications, the battery electronics may
signal the battery to shut down, and cause the tool to
stop running. To reset the battery and tool, release the
trigger and resume normal operation.
NOTE: To prevent further shut down of the battery, avoid
forcing the tool.
If releasing the trigger does not reset the battery and
tool, the battery pack is depleted. If depleted, the battery
pack will begin charging when placed on the lithium-ion
charger.
WARNING:
Battery products are always in operating
condition. Therefore, the switch should always
be locked when not in use or when carried at
your side.
SWITCH TRIGGER (See Figure 3.)
To turn the drill ON, depress the switch trigger. To turn it
OFF, release the switch trigger.
VARIABLE SPEED
The switch trigger delivers higher speed and torque
with increased trigger pressure and lower speed with
decreased trigger pressure.
NOTE: You might hear a whistling or ringing noise from
the switch during use. Do not be concerned; this is a
normal part of the switch function.
ROTATION SELECTOR (FORWARD/REVERSE/
CENTER LOCK)
See Figure 3.
The direction of bit rotation is reversible and is controlled
by a selector located above the switch trigger. With
the drill held in normal operating position, the rotation
selector should be positioned to the left of the switch
trigger for drilling. The drilling direction is reversed when
the selector is to the right of the switch trigger.
Setting the rotation selector in the OFF (center lock)
position helps reduce the possibility of accidental starting
when not in use.
CAUTION:
To prevent gear damage, always allow the chuck
to come to a complete stop before changing the
direction of rotation.

3
English
GB
FR DE ES IT NL PT DK SE FI NO RU PL CZ HU RO LV LT EE HR SI SK GR TR
OPERATION
To stop the drill, release the switch trigger and allow the
chuck to come to a complete stop.
NOTE: The drill will not run unless the rotation selector is
pushed fully to the left or right.
Avoid running the drill at low speeds for extended periods
of time. Running at low speeds under constant usage
may cause the drill to become overheated. If this occurs,
cool the drill by running it without a load and at full speed.
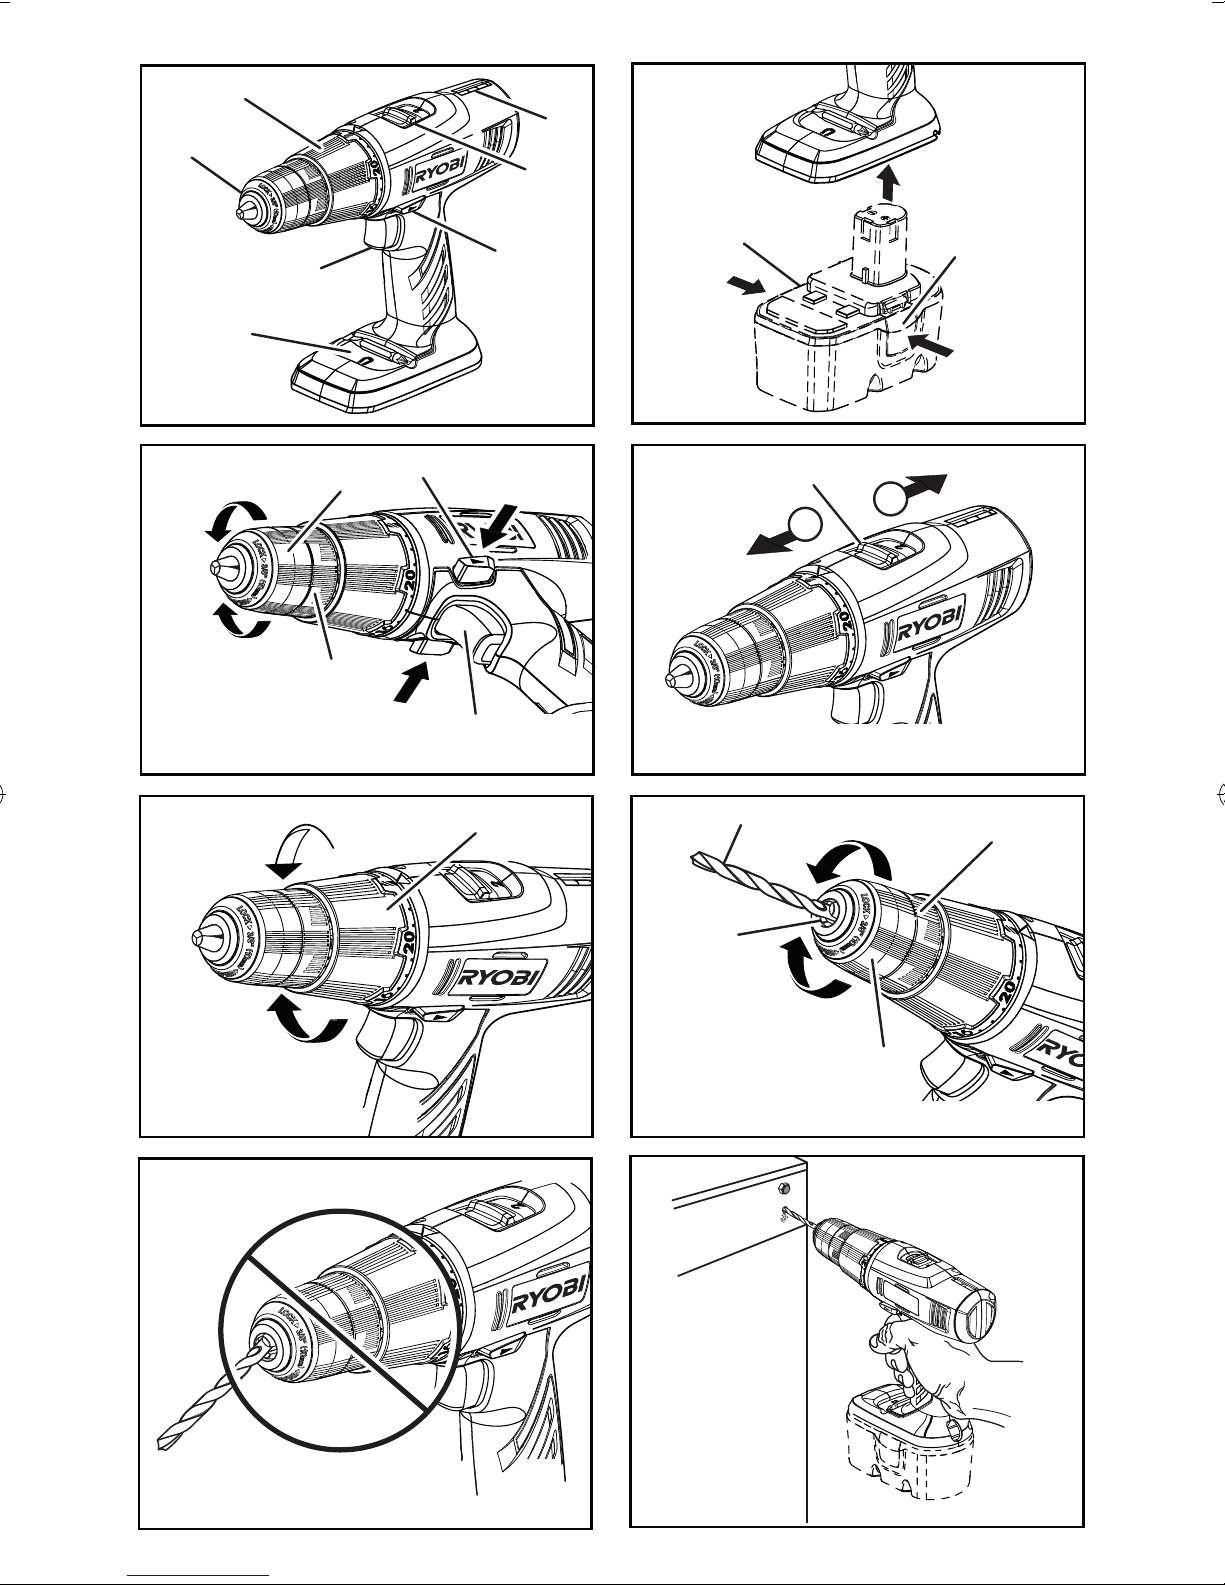
KEYLESS CHUCK (See Figure 3.)
The drill has a keyless chuck to tighten or release drill
bits in the chuck jaws. Grasp and hold the collar of the
chuck with one hand. Rotate the chuck body with your
other hand. The arrows on the chuck indicate which
direction to rotate the chuck body in order to LOCK
(tighten) or UNLOCK (release) the drill bit.
WARNING:
Do not hold the chuck body with one hand and
use the power of the drill to tighten the chuck
jaws on the drill bit. The chuck body could slip in
your hand, or your hand could slip and come in
contact with the rotating drill bit. This could cause
an accident resulting in serious personal injury.
TWO-SPEED GEAR SWITCH (See Figure 4.)
The drill has a two-speed gear switch designed for drilling
or driving at LO (1) or HI (2) speeds. A slide switch is
located on top of the drill to select either LO (1) or HI (2)
speed. When using drill in the LO (1) speed range, speed
will decrease and unit will have more power and torque.
When using drill in the HI (2) speed range, speed will
increase and unit will have less power and torque. Use
LO (1) speed for high power and torque applications and
HI (2) speed for fast drilling or driving applications.
ADJUSTABLE TORQUE CLUTCH
This product is equipped with an adjustable torque
clutch for driving different types of screws into different
materials. The proper setting depends on the type of
material and the size of screw you are using.
ADJUSTING TORQUE (See Figure 5.)
There are twenty-four torque indicator settings located on
the front of the drill.
QRotate adjustment ring to the desired setting.
• 1 -4 For driving small screws
• 5 -8 For driving screws into soft material
• 9 -12 For driving screws into soft and hard materials
• 13 -16 For driving screws in hard wood
• 17 -20 For driving large screws
• 21 -For heavy drilling
INSTALLING BITS (See Figure 6-7.)
QLock the switch trigger by placing the rotation selector
in the center position.
QOpen or close the chuck jaws to a point where the
opening is slightly larger than the bit size you intend to
use. Also, raise the front of the drill slightly to keep the
bit from falling out of the chuck jaws.
QInsert the drill bit.
QTighten the chuck jaws on the drill bit. To tighten,
grasp and hold the collar of the chuck with one hand,
while rotating the chuck body with your other hand.
NOTE: Rotate the chuck body in the direction of the
arrow marked LOCK to tighten the chuck jaws.
WARNING:
Make sure to insert the drill bit straight into the
chuck jaws. Do not insert the drill bit into the
chuck jaws at an angle then tighten, as shown
in figure 7. This could cause the drill bit to be
thrown from the drill, resulting in possible serious
personal injury or damage to the chuck.
NOTE: Do not use a wrench to tighten or loosen the
chuck jaws.
REMOVING BITS (See Figure 6.)
QPlace the rotation selector in center position. This will
lock the switch trigger in the off position.
QLoosen the chuck jaws from the drill bit.
QTo loosen the chuck jaws from the drill bit, grasp
and hold the collar of the chuck with one hand, while
rotating chuck body with your other hand.
NOTE: Rotate chuck body in the direction of the arrow
marked UNLOCK to loosen chuck jaws.
QRemove drill bit from chuck jaws.
DRILLING (See Figure 8.)
A level is located on top of the motor housing to help
keep the drill bit level during use.
QCheck the rotation selector for the correct setting
(forward or reverse).
QSecure the material to be drilled in a vise or with
clamps to keep it from turning as the drill bit rotates.
QHold the drill firmly and place the bit at the point to be
drilled.
QDepress the switch trigger to start the drill.
QMove the drill bit into the workpiece, applying only
enough pressure to keep the bit cutting. Do not force
the drill or apply side pressure to elongate a hole. Let
the tool do the work.

4
English
GB
FR DE ES IT NL PT DK SE FI NO RU PL CZ HU RO LV LT EE HR SI SK GR TR
OPERATION
WARNING:
Be prepared for binding at bit breakthrough.
When these situations occur, the drill has a
tendency to grab and kick in the opposite
direction and could cause loss of control when
breaking through material. If not prepared, this
loss of control can result in possible serious
injury.
QWhen drilling hard, smooth surfaces, use a center
punch to mark the desired hole location. This will
prevent the drill bit from slipping off-center as the hole
is started.
QWhen drilling metals, use a light oil on the drill bit to
keep it from overheating. The oil will prolong the life of
the bit and increase the drilling action.
QIf the bit jams in the workpiece or if the drill stalls,
stop the tool immediately. Remove the bit from the
workpiece and determine the reason for jamming.
NOTE: This drill has an electric brake. When the switch
trigger is released, the chuck stops turning. When the
brake is functioning properly, sparks will be visible
through the vent slots on the housing. This is normal and
is the action of the brake.
WOOD DRILLING
For maximum performance, use high speed steel bits for
wood drilling.
QBegin drilling at a very low speed to prevent the bit
from slipping off the starting point. Increase the speed
as the drill bit bites into the material.
QWhen drilling through holes, place a block of wood
behind the workpiece to prevent ragged or splintered
edges on the back side of the hole.
METAL DRILLING
For maximum performance, use high speed steel bits for
metal or steel drilling.
QBegin drilling at a very low speed to prevent the bit
from slipping off the starting point.
QMaintain a speed and pressure which allows cutting
without overheating the bit. Applying too much
pressure will:
• Overheat the drill;
• Wear the bearings;
• Bend or burn bits;
• Produce off-center or irregular-shaped holes.
QWhen drilling large holes in metal, start with a small
bit, then finish with a larger bit. Also, lubricate the bit
with oil to improve drilling action and increase bit life.
MAINTENANCE
WARNING
When servicing, use only identical Ryobi
replacement parts. Use of any other parts may
create a hazard or cause product damage.
Avoid using solvents when cleaning plastic parts. Most
plastics are susceptible to damage from various types of
commercial solvents and may be damaged by their use.
Use clean cloths to remove dirt, dust, oil, grease, etc.
WARNING
Do not at any time let brake fluids, gasoline,
petroleum-based products, penetrating oils,
etc. come in contact with plastic parts. They
contain chemicals that can damage, weaken or
destroy plastic.
ENVIRONMENTAL PROTECTION
Recycle raw materials instead of disposing as
waste. The machine, accessories and packaging
should be sorted for environmental-friendly
recycling.
SYMBOL
Safety Alert
V Volts
min-1 Revolutions or reciprocations per minute
Direct current
CE Conformity
Please read the instructions carefully before
starting the machine.
Recycle unwanted
Waste electrical products should not be
disposed of with household waste. Please
recycle where facilities exist. Check with your
Local Authority or retailer for recycling advice.
Other manuals for CDC1802
2
Table of contents
Other Ryobi Cordless Driver Drill manuals