SAB ALICE User manual

TEL. 0331 515230
FAX. 0331 516881
Sito web: www.svitalia.eu
Email: info@svitalia.eu
VIA MAZZINI 57
20028 SAN VITTORE OLONA (MI)
ITALY
A L I C E
M a n u a l e u t e n t e - O p e r a t o r M a n u a l 2 0 1 3
C o n r i s e r v a d i m o d i f i c h e –S u b j e c t t o
c h a n g e w i t h o u t n o t i c e
Manuale Utente (pagg.2/16)
User’s Manual (pages 17/31)
M a c c h i n a d a c a f f è e s p r e s s o - E s p r e s s o c o f f e e m a c h i n e

Pagina 2
Pagina 31

Pagina 30
Somm a rio
Informazioni Generali 4
Introduzione 5
Importanti precauzioni per la sicurezza 6
Descrizione componenti 8
Installazione 10
Accensione 11
Funzionamento 13
Pulizia e Cura 15
Certificazione CE 16
Pagina 3

Pagina 4
I n f orm a zi on i G e ne r al i
Produttore: S.V.ITALIA S.R.L.
VIA MAZZINI 57
20028 SAN VITTORE OLONA (MI)
Tel. 0331 515230
Fax. 0331 516881
Denominazione Prodotto: Macchina da caffè espresso
ALICE
Versione: 1 gruppo a dosaggio semiautomatico
Dati Tecnici
Gruppi erogazione 1
Lancia vapore 1
Funzionamento a dosaggio manuale
Regolazione livello acqua in caldaia automatica
Voltaggio fare riferimento alla targa dati sulla
macchina
Frequenza fare riferimento alla targa dati sulla
macchina
Wattaggio 1100 W
Misure 43Px23,5Lx39,5H cm
Peso 19 Kg
Pagina 29
E C DE C LA R A T IO N O F CO N F O RM I T Y
S.V. ITALIA S.r.l. in accordance with the following Directive(s) :
2004/108/EC the Electromagnetic Compatibility Directive
2006/95/EC the Low Voltage Directive
declares that the machine ALICE is in conformity with the applicable
requirements of the following documents:
EN 55014-1:2006+A1:2009
EN 60335-2-15:2002+A1:2005+A2:2008
EN 55014-2:1997+A1:201+A2:2008
EN 60335-1:2002+A11:2004+A1:2004+A12:2006+A2:2006+A13:2008
+A14:2010
EN 61000-3-2:2006+A1:2009+A2:2009
EN 61000-3-3:2008
EN 62233:2008
Declares that the equipment named above has been designed to
comply with the relevant sections of the above specifications. The unit
complies with all applicable Essential Requirements of the Directives.

Pagina 28
Pro p e r c a r e a n d m a i n t e n a n c e
The following operations at user’s care are necessary, in order to get
the best efficiency from your espresso machine ALICE and have its look
unchanged:
Cleaning operations to be effected daily on standby machine
Remove the filter holders, empty and clean them and the filters with
hot water.
Let some water come out from the brewing head without filter
holder: Caution: hot water, causes burns!
Brush the internal part of the coffee brewing group to remove possi-
ble coffee remains.
Open shortly the steam valve: Caution: hot steam, causes burns!
Cleaning operations to be effected daily on switched off machine
Clean with a humid cloths the upper cup tray
Clean the steam wand and the water wand with a humid non abra-
sive cloth
Clean and empty the lower drip tray and the grid.
Empty and clean carefully the tank.
Clean the bodywork with non abrasive cloth.
Pagina 5
Intro d u z i o n e
Questo manuale fornisce importanti informazioni sulla corretta installa-
zione, uso e manutenzione della macchina da caffè ALICE.
Vi preghiamo di leggere attentamente questo manuale prima di iniziare
ad usare la macchina.
In particolare sottolineiamo l’importanza di leggere e capire le precau-
zioni di sicurezza descritte, prima di utilizzare il prodotto.
Per ulteriori informazioni o delucidazioni siete pregati di contattare il di-
stributore del prodotto.
Il presente manuale va conservato in luogo sicuro ed accessibile per
future possibili consultazioni in fase di utilizzo del prodotto.
Il presente manuale è parte essenziale della macchina da caffè.
Il presente manuale riflette le attuali procedure di produzione ed è sog-
getto a cambiamenti in caso di modifiche.
Il produttore è libero di modificare questo manuale senza aggiornare le
versioni precedenti, salvo casi specifici.
Il produttore non assume alcuna responsabilità’ per danni a persone o
cose causati da installazione, utilizzo o manutenzione non corretta.
Le istruzioni contenute in questo manuale non sostituiscono in nessun
caso le istruzioni di sicurezza e i dati tecnici sulla macchina riguardanti
installazione e funzionamento.
Questa macchina da caffè deve essere utilizzata secondo le istruzioni
indicate nel manuale da persona adulta e responsabile.

Pagina 6
Importanti pre c a u z i o n i p e r la sicure zza
La macchina da caffè ALICE produce caffè e vapore per bevande cal-
de. Ogni altro uso è incorretto e quindi pericoloso.
Questo apparecchio non è utilizzabile da minori o persone non in grado
di intendere e volere senza la supervisione di un adulto.
La macchina non deve essere utilizzata a temperature inferiori a 6°C e
superiori a 36°C. Non usare all’aperto. La zona di utilizzo della macchi-
na deve essere pulita e a norme di sicurezza.
La macchina deve essere collegata con un sistema di messa a terra
adeguato ed efficiente.
Non utilizzare aerosol vicino alla macchina.
Non posizionare oggetti pesanti sulla macchina.
Non posizionare la macchina vicino a bruciatori a gas o elettrici.
Non versare liquidi nella macchina.
Non toccare le superfici calde come lancia vapore e gruppo: pericolo di
ustione.
Non mettere le mani sotto la lancia vapore e gruppo mentre stanno ero-
gando liquidi o vapore: pericolo di ustione.
Non immergere la macchina o parte di essa in acqua o altri liquidi: ri-
schio di scossa elettrica.
Non toccare mai la macchina con mani bagnate o piedi nudi : rischio di
scossa elettrica.
Prima di qualsiasi intervento, spegnere la macchina e farla raffreddare .
Pagina 27
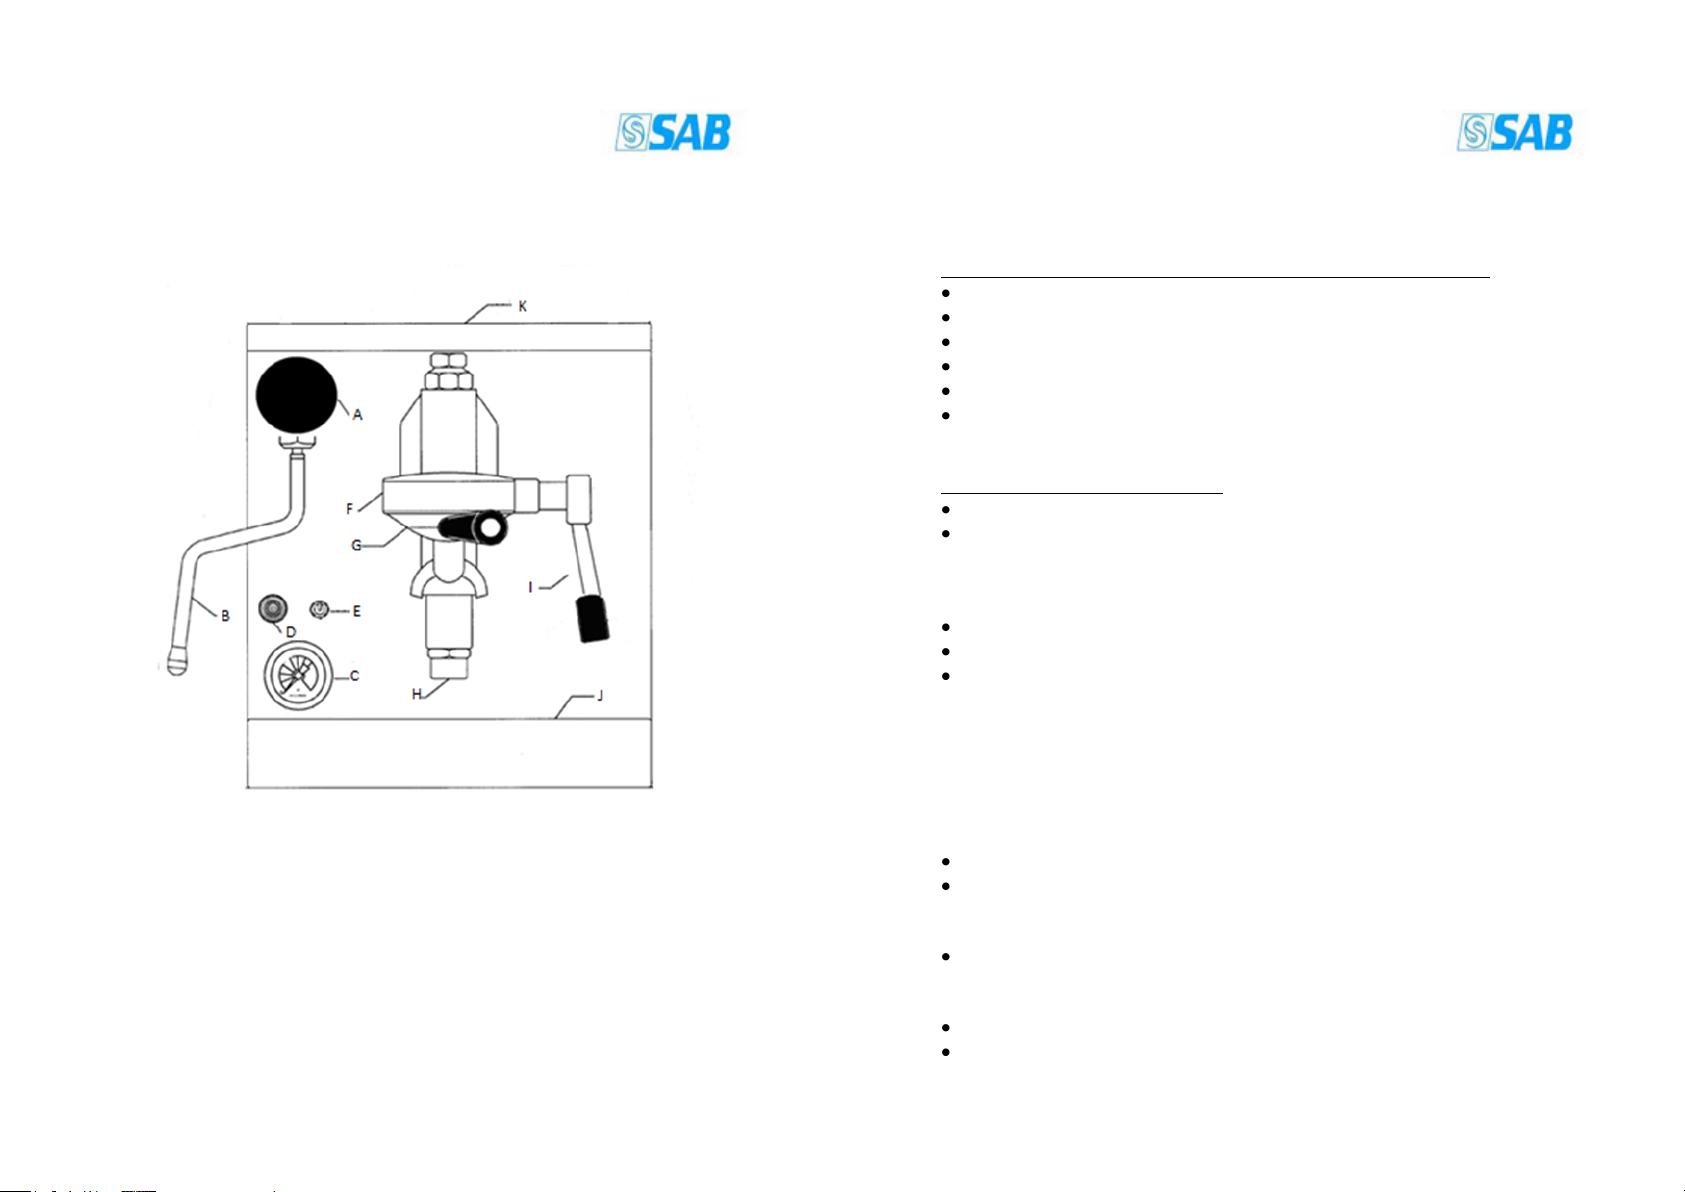
When the desired quantity of coffee has been dispensed, position
the lever (Dr. 1 - I) completely down to stop the coffee dispensing
process.
The remain hot water is uploaded from the brewing lower piston
(Dr. 1 - H) into drip tray (Dr. 1 - J). Caution: hot water!
Remover filter holder (Dr. 1 - G) from the machine and empty
used coffee grounds.
Note: for safety reasons and to avoid personal injury it’s extremely im-
portant that the lever (Dr. 1 - I) is positioned completely down and not
just to the position where the coffee stops to flow out and the pump’s
noise can’t be heard any more.
Frothing milk or heating up liquids
Fill a suitable pitcher 3/4 with the liquid to be heated up or frothed.
Position the steam nozzle of the steam wand (Dr. 1 - B) just be-
low the surface of the liquid inside the liquid in the recipient. To
avoid personal injury always ensure that the end nozzle of the
steam pipe is below the surface of the liquid to be steamed. Pay
attention to hot spays! They may cause injuries
Turn to left the steam valve (Dr. 1 - A) to open the steam.
As soon as you reach the wished foam consistency or tempera-
ture of the liquid, turn to right the steam valve (Dr. 1 - A) to close
the steam
CAUTION: the wand becomes extremely hot during steaming and can
cause burns. Do not touch!!
N.B. To avoid milk rests to dry on the wand, we strongly recommend to
clean the wand with a humid non abrasive cloth after every use. Pay
attention during this operation: the wand becomes extremely hot during
steaming and can causes burns.

Pagina 26
Now open the steam handle (Dr. 1 - A) for 5 seconds to let out
some steam. This operation is very important as it removes possi-
ble vacuum inside the boiler which will reflect in suction of milk
inside the boiler itself once starting to steam milk. Close the
steam handle (Dr.1-A) again.
Wait until the boiler pressure gauge (Dr.1 - C)
reaches again 1 Bar.
Pull the lever (Dr.1 –I) completely up.
Allow a cup of water to come out of the coffee
brewing group (Dr. 1–F). Caution: hot water!
Pull the lever (Dr. 1 - I) completely down (water
will stop flowing)
The machine is now ready for operation.
Opera t i o n
Brewing coffee
Insert the lower filter in the filter
holder with 1 spout to prepare 1 cup
of espresso. Fill with 1 measuring
spoon (ca. 6/7 g) of grinded coffee
and tamp it gently.
Insert the higher filter in the filter
holder with 2 spouts to prepare 2
cups of espresso.
Fill with 2 measuring spoons (ca. 12-
14 g) of grinded coffee and tamp it
gently.
Tighten the filter holder (Dr.1 –G) firmly into the brewing head
(Dr.1 –F).
Put one/two cup/s under the filter holder spout/s.
Pull the lever (Dr. 1 - I) completely upwards.
Hot coffee flows into the cups from the filter handle’s
coffee spouts.
Pagina 7
Non utilizzare con cavi elettrici danneggiati. Contattate subito il servizio
di assistenza.
Non utilizzare la macchina senza acqua nel serbatoio: controllare il livel-
lo prima dell’utilizzo.
La macchina funziona con acqua fresca, potabile addolcita. Nel caso di
alto contenuto di minerali nell’acqua potabile di rete, utilizzare un addol-
citore. Eventuali residui di minerali possono restringere il flusso
dell’acqua all’interno del circuito idraulico e causare danni alla macchina
con conseguenti rischi per l’utilizzatore.
Prima di togliere la alimentazione elettrica, spegnere la macchina.
Tutti gli interventi di manutenzione devono essere effettuati da persona-
le autorizzato dal produttore.
Utilizzare solo ricambi originali.
Ogni qual volta l’operatore si allontana dalla macchina, spegnere la
macchina.

Pagina 8
Disegno 1
Pagina 25
Start up
Before starting using the machine, please check the following:
Lever (Dr.1- I) is completely down.
Steam handle (Dr.1 - A) is closed.
Hot water handle (Dr.1 - J) is closed.
On/off switch (Dr.1 –D) is on position “0” (=machine switched off)
Machine is unplugged.
Drip tray (Dr. 1-L) and its grid are properly positioned into the ma-
chine.
Now please proceed as follows:
Remove the cover from the machine’s cups tray on top (Dr.1– K)
Remove the water reservoir and clean it carefully with food quality
cleaning products. It’s very important that the water reservoir is
always clean! Please repeat this operation every day and when-
ever necessary.
Fill the water tank with fresh drinking water to just over ¾ full.
Place the tank inside the machine taking care not to spill water.
Put on the cover on top of the water reservoir.
Note: It may be possible that during removal and replacing of the tank
some air remains in the collector put on the end of the tank. In this case
the control lamp flashes although the tank is filled in. Please remove
and replace partially the tank in order to get the air out from the collec-
tor.
Plug in the machine.
Turn the on/off switch (Dr.1 –D) to the on position “1” (= machine
switched on) and open the steam handle (Dr. 1-A) by turning left
side. Boiler water fill starts (you will hear the pump’s noise).
When the boiler is properly filled with water, the pump will stop
(=no more noise). Now close the steam handle (Dr. 1- A) by turn-
ing right side.
The heating up of the boiler water starts.
Wait till the boiler pressure gauge (Dr.1 –C) reads approximately
1 bar.

Pagina 24
Inst a l l a t ion
The espresso machine ALICE is to be installed to comply with the
applicable local safety regulations by authorized technical service.
The manufacturer has tried to foresee all possible safety devices to en-
sure the safety of the users.
It’s absolutely necessary to evaluate all remaining risks and to care
about the following:
Installation and maintenance must be carried out by technicians and
service providers authorised by the manufacturer.
Any defect or discrepancy has to be notified immediately to the
authorised persons for installation and maintenance
This machine is safe only when it has been correctly connected to
an efficient grounding /earthing system, implemented in accordance with
the current safety regulations.
Check the integrity of all components and do not install defective or
damaged parts. Ask for replacement.
Check that capacity of the electrical system is sufficient for the
maximum rated power shown on the data rating plate of the machine.
The machine has to operate with clean soft drinking water. Building
up of scale will seriously damage this equipment and can also cause
injuries. If necessary, install an inlet filter.
Handle the machine with care.
Do not leave such packing items as plastic bags, styrofoam, nails,
etc. around because children or other people could get hurt or dam-
aged.
Pagina 9
De s c r i zi o n e c o m p o n enti –R if. dise g n o 1 pagi na 7
A. Manopola lancia vapore: girare a sinistra per aprire a destra per
chiudere. Non toccare il retro della manopola: pericolo di ustione!
B. Lancia vapore. Non toccare le parti metalliche non isolate: pericolo
di ustione!
C. Manometro caldaia: indica la pressione in caldaia.
D. Interruttore accensione/spegnimento: pos. 0 = spento ; pos. 1 = ac-
ceso
E. Spia controllo macchina.
Spia verde: controllo tensione elettrica, se lampeggia indica mancanza
di acqua nella tanica
F. Gruppo di erogazione: Elevato rischio di ustione! Diventa caldo a
macchina accesa.
G. Portafiltro: le parti metalliche diventano molto calde a macchina ac-
cesa
H. Pistone infusore del gruppo: scarica l’acqua bollente nella bacinella
ad erogazione finita. Elevato rischio di ustione con acqua bollente e par-
ti metalliche!
I. Leva erogazione: Non toccare le parti metalliche non isolate: perico-
lo di ustione!
J. Bacinella di scarico e griglia: Attenzione : svuotare periodicamente
K. Bacinella scaldatazze: non versare liquidi! Pericolo di scossa elettri-
ca dovuta al contatto dei liquidi con l’interno della macchina.

Pagina 10
I ns t al la z i on e
La macchina da caffè ALICE deve essere installata conformemente
alle locali norme di sicurezza da servizio tecnico autorizzato.
Il produttore ha cercato di fornire il prodotto con tutte le possibili appa-
recchiature per garantire la sicurezza dell’utente.
È necessario valutare i rischi rimanenti tenendo presente quanto segue:
L’installazione e la manutenzione devono essere effettuati solo da
servizi tecnici autorizzati dal produttore
Qualsiasi difetto o malfunzionamento deve essere immediatamente
segnalato al servizio tecnico di assistenza
Questa macchina è sicura solo se è correttamente allacciata ad una
rete elettrica dotata di messa a terra e conforme alla normativa locale
Controllate l’integrità dei componenti e non installate parti danneg-
giate o difettose. Richiedete la sostituzione
Controllate la potenza dell’impianto elettrico che deve corrispondere
alla massima potenza indicata sulla targa dati della macchina
La macchina deve essere alimentata con acqua fresca potabile.
Utilizzare un addolcitore se la durezza dell’acqua fosse superiore a 7 °
F. La formazione di calcare danneggia seriamente la macchina e po-
trebbe causare danni a cose e persone
Trattare la macchina con cura
Non lasciare sacchetti di plastica od altro materiale da imballaggio
pericoloso in giro per evitare danni a bambini o altre persone
Pagina 23
De s c r i p t i o n o f c o m p o nents –d r a w i n g n o. 1
A. Steam valve handle: Turn left to open steam; turn right to shut. Do
not touch the back of the handle: can become hot ant cause burns.
Caution!
B. Steam wand. Can become hot and cause burns. Caution!
C. Boiler pressure gauge.
D. Machine’s on/off switch. Position “0” = off; position “1” = on.
E. Control lamp.
Green control lamp “Voltage”, if flashing check the tank water level
F. Brewing head. Can become hot and cause burns. Caution!
G. Filter holder. Its metal parts can become hot and cause burns. Cau-
tion!
H. Brewing head’s (or group’s) progressive infusion piston. Unloads
hot water into drip tray once brewing process is terminated. Caution: its
metal parts can become very hot and cause serious burns. Attention to
hot water flow coming out beneath after brewing process is terminated!
I. Lever for brewing process control. Caution: its metal parts can be-
come very hot and cause burns!
J. Drip tray and grid: empty often
K. Cups tray. Do never pour any liquid on this tray! It will filter inside the
equipment and can cause electrical shocks and serious injuries. Dan-
ger!

. Pagina 22
Drawing 1
Pagina 11
Acc e n s i o n e
Prima di iniziare a utilizzare la macchina effettuare i seguenti controlli:
La leva erogazione (dis. 1 - I) è completamente abbassata
Il rubinetto vapore (dis. 1 - A) è chiuso
L’interruttore di accensione (dis. 1 - D)è sulla posizione 0 (spento)
La spina elettrica della macchina non è inserita
Ora procedere come segue:
Togliere il coperchio del serbatoio dalla bacinella scaldatazze
(dis. 1 –K)
Estrarre il serbatoio e lavarlo accuratamente. La pulizia del ser-
batoio è molto importante. Questa operazione va ripetuta tutti i
giorni.
Riempire il serbatoio con acqua fresca potabile (se necessario)
addolcita, per ¾ della capienza
Inserire il serbatoio nella sua sede evitando la fuoriuscita di ac-
qua.
Rimettere il coperchio del serbatoio dalla bacinella scaldatazze
(dis. 1 –K).
Nota: E’ possibile che nella fase di estrazione/inserimento del serbatoio
si formi una bolla d’aria nel collettore posto alla base del serbatoio. In
questo caso la spia di accensione lampeggia nonostante la presenza di
acqua nel serbatoio. E’ necessario sollevare leggermente il serbatoio e
riposizionarlo in modo da permettere la fuoriuscita della eventuale bolla
d’aria nel collettore.
Inserire la spina della corrente
Posizionare l’interuttore di accensione (dis. 1 - D) sulla posi-
zione 1 (=acceso) ed aprire il rubinetto vapore girando verso
sinistra la relativa manopola (dis. 1 - A). Inizia il caricamento
acqua in caldaia (si sente il rumore della pompa).
Quando la caldaia e’ correttamente caricata, il rumore della
pompa finisce. Chiudere il rubinetto vapore girando verso
destra la relativa manopola (dis. 1 - A) .
Inizia il riscaldamento dell’acqua in caldaia.

Pagina 12
Attendere fino a che sia raggiunta la pressione di esercizio
(ca. 1 bar) , controllando il manometro (dis. 1 –C).
Aprire nuovamente il rubinetto vapore girando verso sinistra
la relativa manopola (dis. 1 –A) per 5 secondi e fare uscire
del vapore: Attenzione: rischio di ustione con vapore caldo!
Questa operazione è molto importante per rimuovere possibili
vuoti in caldaia che potrebbero causare risucchio di latte in
caldaia quando viene montato. Chiudere il rubinetto vapore
girando verso destra la relativa manopola (dis. 1 –A).
Attendere fino a che sia raggiunta nuovamente la pressione
di esercizio (ca. 1 bar) , controllando il manometro (dis. 1 –
C).
Spingere completamente verso
l’alto la leva di erogazione
(dis. 1 - I)
Fare uscire un po’ di acqua dal
gruppo: Attenzione: rischio di
ustione con acqua calda!
Premere completamente verso il basso la leva di erogazione
(dis. 1–I). Il flusso dell’acqua si interrompe.
La macchina è pronta per
operare.
Pagina 21
Before carrying out any maintenance operations turn the machine to
“OFF” and allow cooling.
Do not operate with a damaged cord, plugs. Do always contact the
authorised technical service.
Do not operate without water in the tank; check always the water level
before operating.
The machine must be operated with soft, clean drinking water. If the
local water supply has a high mineral content use a water softener. A
build up of mineral deposit may restrict the flow of water within the hy-
draulic systems causing damage to the machine and risking personal
injury.
Before disconnecting the plug from the wall outlet, turn the machine to
“OFF”.
To ensure efficient and correct operation it is essential to follow the
manufacturer’s instructions concerning the periodic maintenance carried
out by authorized service technician.
All maintenance must be carried out exclusively by authorized service
technicians.
All spare parts must be original parts or parts authorized by the manu-
facturer.
The machine must be switched off whenever it is left unattended

Pagina 20
I m po r ta n t s af e t y pr e ca u ti o n s
The espresso machine ALICE is designed for the sole purpose of pro-
ducing coffee and steam for hot drinks. All other uses are incorrect and
–therefore –dangerous.
This machine is not be used by children or person with reduced physical
or mental capabilities, unless they have been given supervision or in-
struction.
The machine should not be operated with temperatures lower than 6 °C
and hotter than 36 °C. Do not use outdoors. The machine’s surrounding
area has to be safe and hygienic and respecting the local safety regula-
tions.
The machine has to be installed with an efficient grounding/earthing sys-
tem.
Do not use aerosol sprays near the machine.
Do not place heavy objects or climb on top of the coffee machine.
Do not place on or near a hot gas or electric burner.
Do not allow liquids to get inside the coffee machine.
Never touch coffee groups, boilers, metal pipes, spouts, steam valve
and wand. They are hot and could cause burns.
Never hold your hands under the brewing group, the filter holder, the
steam wand when hot drinks and hot steam are dispensed. Danger!
Causes burns
To protect against electric shock do not immerse any part of the ma-
chine, as well as cord and plugs in water or other liquid.
To reduce the risk of electrical shock, do not touch the machine with wet
hands or wet or bare feet.
Pagina 13
Fu n zi o n a m e nto
Preparazione del caffè
Inserire il filtro più basso nel por
tafiltro con un beccuccio per pre
parare una tazza di caffè. Riempi
re con 1 misurino (ca. 6/7 gr) di
caffè macinato e premere legger
mente.
Inserire il filtro più alto nel portafil
tro con due beccucci per prepara
re due tazze di caffè. Riempire
con 2 misurini (ca. 12-14 gr) di
caffè macinato e premere legger
mente.
Agganciare il portafiltro (dis.1 –G) nel gruppo di erogazione
(dis. 1 –F) e ruotarlo verso sinistra fino a fine corsa.
Posizionare sotto il/i beccuccio/i la/le tazza/e.
Spingere verso l’alto la leva di erogazione (dis. 1 - I).
Il caffè viene erogato nella/e tazza/e.
Al raggiungimento della quantità desiderata, spingere verso il
basso la leva di erogazione (dis. 1 - I) per fermare il flusso
Dal pistone infusore (dis. 1 - H) viene scaricata nella bacinella
(dis. 1 - J) acqua bollente residua. Attenzione pericolo di u-
stione!
Togliere il porta filtro (dis. 1 - G) dal gruppo di erogazione
(dis. 1 - F) e svuotarlo.
N.B. Per motivi di sicurezza ed evitare danni è fondamentale che la leva
di erogazione sia sempre nella posizione completamente inferiore quan-
do non viene erogato il caffè.

Pagina 14
Schiumatura del latte o riscaldamento di liquidi
Il vapore caldo viene erogato dalla lancia vapore per la schiumatura del
latte o il riscaldamento di liquidi.
Riempire un bricco per ¾ con il latte o il liquido da riscal-
dare
Posizionare la parte finale della lancia vapore (dis. 1 –B)
nel bricco sotto la superficie del liquido. Attenzione: se la
parte finale della lancia vapore non e’ ricoperta dal liqui-
do, si generano spruzzi bollenti che possono causare
ustioni!
Ruotare verso sinistra la manopola lancia vapore (dis. 1 –
A) completamente.
Appena raggiunta la consistenza della schiuma o la tem-
peratura desiderata, chiudere il rubinetto del vapore gi-
rando la manopola lancia vapore (dis. 1 –A) completa-
mente verso destra.
N.B. Per evitare la cristallizzazione del latte sulla lancia è consigliabile
pulire con panno umido non abrasivo la lancia stessa dopo ogni utilizzo.
Porre la massima attenzione durante questa operazione: la lancia può
essere molto calda: pericolo di ustione!
Pagina 19
Intro d u c t i o n
Read and understand all instructions. These instructions provide impor-
tant information on the correct installation, safe and correct use and
maintenance of your espresso machine model ALICE.
Thoroughly read this manual before you start to use this product. In par-
ticular, be sure to read and fully understand the Safety Precautions de-
scribed in this manual before you use this product.
For further information or additional handbooks, please contact your
distributor or the manufacturer.
Also, store this manual in a safe place so that it can be easily referred to
during use of this product.
This handbook is an essential part of the machine.
This handbook reflects the current manufacturing requirements and is
subject to change according to future modifications.
The manufacturer is free to modify this manual without updating previ-
ous editions except in exceptional cases.
The manufacturer accepts no responsibility for damage to persons or
objects caused by incorrect installation and unreasonable use and
maintenance
The instructions in this handbook are in no way a substitute for the
safety instructions and technical data on the machine or the packaging
concerning installation and function.
This machine is to be operated according to the instructions supplied in
the handbook by a responsible adult person.

Pagina 18
Genera l data
Manufacturer: S.V. ITALIA S.r.l.
Via Mazzini 57
I-20028 San Vittore Olona (MI)
Tel. +39 0331 515 230
Fax +39 0331 516 881
V.A.T. No. IT12610070158
Model ALICE
Version 1 group semiautomatic
Technical data
Brewing group 1
Steam wand 1
Operation semiautomatic
Boiler water refill automatic
Voltage Please refer to the
technical data plate on
the machine
Wattage Please refer to the
technical data plate on
the machine
Dimensions 43Dx23,5Wx39,5H cms
Weight 19 kgs
Pagina 15
Puli zi a e cu r a
Per ottenere la massima efficienza dalla macchina da caffè ALICE e
mantenere inalterato nel tempo il suo aspetto, sono necessarie le se-
guenti semplici operazioni di pulizia serale a cura dell’utilizzatore:
Operazioni a macchina accesa:
Togliere il portafiltro, svuotarlo e lavare portafiltro e filtro con acqua
calda
Erogare un po’ di acqua dal gruppo senza il portafiltro :Attenzione:
rischio di ustione con acqua calda.
Spazzolare la parte interna del gruppo per rimuovere eventuali resi-
dui di caffè
Aprire brevemente il rubinetto vapore : Attenzione: rischio di ustione
con vapore.
Operazioni a macchina spenta e fredda:
Pulire con panno umido la bacinella scaldatazze
Pulire con panno non abrasivo la lancia vapore.
Svuotare e pulire la bacinella sottotazza e la relativa griglia.
Svuotare e lavare il serbatoio
Pulire la carrozzeria della macchina con panno non abrasivo.

Pagina 16
C ER T I FI CA Z IO N I C E
S.V.ITALIA S.R.L. in conformità alle seguenti direttive:
2004/108/EC Direttiva Compatibilità Elettromagnetica
2006/95/EC Direttiva Bassa Tensione
dichiara che la macchina modello ALICE è conforme ai requisiti dei se-
guenti documenti:
EN 55014-1:2006+A1:2009
EN 60335-2-15:2002+A1:2005+A2:2008
EN 55014-2:1997+A1:201+A2:2008
EN 60335-1:2002+A11:2004+A1:2004+A12:2006+A2:2006+A13:2008
+A14:2010
EN 61000-3-2:2006+A1:2009+A2:2009
EN 61000-3-3:2008
EN 62233:2008
Dichiara che l’apparecchiatura sopra denominata è stata progettata in
conformità con le sezioni pertinenti sopra specificate.
L’unità è conforme con tutti i requisiti essenziali delle direttive.
Pagina 17
Summ a ry
General data 18
Introduction 19
Important safety precautions 20
Description of components 22
Installation 24
Start up 25
Proper care and maintenance 28
EC declaration of conformity 29
Table of contents
Other SAB Coffee Maker manuals