SAF Holland FW16 Guide

EnglishEspañol
XL-FW10084RM-en-US Rev B · 2014-01-29 · Amendments and Errors Reserved · © SAF-HOLLAND, Inc., SAF-HOLLAND, HOLLAND, SAF,
and logos are trademarks of SAF-HOLLAND S.A., SAF-HOLLAND GmbH, and SAF-HOLLAND, Inc.
FW16 LowLube Fifth Wheels
Release Handle Replacement Procedures for the XA-161 Series Top Plates
Quintas ruedas FW16 LowLube
Procedimiento de reemplazo de la manija de liberación para las placas superiores de la serie XA-161
Replacement Instructions
FW16 Release Handle
Manual de reemplazo
Manija de liberación FW16
Introduction
These instructions provide the information necessary to properly
replace the release handle on the HOLLAND®FW16 XA-161
Series Fifth Wheel Top Plates.
Read these instructions before using or servicing this product and
keep it in a safe location for future reference. Updates to these
instructions, which are published as necessary, are available
on the internet at www.safholland.us.
When replacement parts are required, SAF-HOLLAND®highly
recommends the use of only SAF-HOLLAND®Original Parts. A
list of technical support locations that supply SAF-HOLLAND®
Original Parts and an Aftermarket Parts Catalog are available
on the internet at www.safholland.us or contact Customer
Service at 888-396-6501.
Notes, Cautions, and Warnings
Before starting any work on the unit, read and understand all
the safety procedures presented in this manual. This manual
contains the terms “NOTE”, “IMPORTANT”, “CAUTION”, and
“WARNING” followed by important product information. These
terms are defined as follows:
NOTE: Includes additional information to enable accurate
and easy performance of procedures.
IMPORTANT: Includes additional information that
if not followed could lead to hindered
product performance.
Used without the safety alert symbol,
indicates a potentially hazardous
situation which, if not avoided, could
result in property damage.
Indicates a potentially hazardous
situation which, if not avoided, could
result in minor or moderate injury.
Indicates a potentially hazardous
situation which, if not avoided, could
result in death or serious injury.
1. General Safety Instructions
Read and observe all Warning and Caution hazard alert
messages.The alerts provide information that can help prevent
serious personal injury, damage to components, or both.
Failure to follow the instructions and safety
precautions in this manual could result in
improper servicing or operation leading
to component failure which, if not avoided,
could result in death or serious injury.
All repair and maintenance should be performed by a properly
trained technician using proper/special tools, and safe procedures.
NOTE: In the United States, workshop safety requirements
are defined by federal and/or state Occupational
Safety and Health Act (OSHA). Equivalent laws may
exist in other countries. This manual is written based
on the assumption that OSHA or other applicable
employee safety regulations are followed by the
location where work is performed.
NOTE: Before replacing the HOLLAND®Fifth Wheel
release handle review the model number on the
identification tag. This rebuild procedure applies
only to model XA-161 fifth wheel top plates.
IMPORTANT: All maintenance MUST be performed while
the tractor is uncoupled from the trailer.
IMPORTANT:
These instructions apply to the proper replacement
on the XA-161 series fifth wheel top plates only.
There are other important checks, inspections,
and procedures not listed here that are
necessary, prudent, and/or required by law.
For proper installation procedures, refer to Installation Manual
XL-FW10008BM-en-US
available on the internet at www.safholland.us.
IMPORTANT: Prior to operation of the fifth wheel, verify
that the fifth wheel has been properly
installed on the vehicle.
Failure to properly repair and install the fifth
wheel could adversely affect performance
resulting in tractor trailer separation which, if
not avoided, could result in death or serious injury.

2XL-FW10084RM-en-US Rev B · 2014-01-29 · Amendments and Errors Reserved · © SAF-HOLLAND, Inc., SAF-HOLLAND, HOLLAND, SAF,
and logos are trademarks of SAF-HOLLAND S.A., SAF-HOLLAND GmbH, and SAF-HOLLAND, Inc.
Model Identification and Replacement Procedures
2. Model Identification
These instructions contain the installation procedures for
the SAF-HOLLAND®replacement kit RK-161-11493. Before
replacement, verify that the replacement kit for the fifth
wheel top plate is correct for the attempted repair.
Fifth wheel serial tags are located on the left side of the fifth
wheel top plate above the fifth wheel bracket pin, or on the
pickup ramps. The part number and serial number are listed
on the tag as indicated (Figure 1).
3. RK-161-11493 Kit Contents (Figure 2)
ITEM DESCRIPTION PART NUMBER QTY.
1 Release Handle XA-11618-RP-P 1
2 Washer, 1/2" SAE XB-PW-1732-1-116 1
3 Cotter Pin XB-16 1
4 Extension Spring, Inner XB-10489 1
5 Extension Spring, Outer XB-10490 1
1
4
5
2
3
Figure 1
U.S. AND FOREIGN PATENTS APPLY
Model No. XXXXXXXXXXXX
Serial No. XXXXXXXXXXXX
FAILURE TO PROPERLY INSTALL, MAINTAIN & OPERATE
THIS PRODUCT COULD RESULT IN TRACTOR TRAILER
SEPARATION CAUSING SERIOUS INJURY OR DEATH.
MADE IN
XXXXXX
Figure 2
Figure 3
4. Top Plate Removal
1. Clean off excessive grease, grime, and dirt from top plate.
2. Remove bracket pin retention bolt and nut from both
sides of fifth wheel top plate (Figure 3).
3. Using a pry bar, pull bracket retention pins out of fifth
wheel top plate (Figure 3).
4. Using a lifting device capable of lifting 500 lbs. (227 kg),
remove top plate from mounting base. Place fifth wheel
upside down on a flat, clean working area.
NOTE: Follow instructions published by lifting device
manufacturer for proper operation of lifting device.
TOP PLATE RETENTION
BOLT
PRY BAR
BRACKET PIN
RETENTION
NUT

3
English
XL-FW10084RM-en-US Rev B · 2014-01-29 · Amendments and Errors Reserved · © SAF-HOLLAND, Inc., SAF-HOLLAND, HOLLAND, SAF,
and logos are trademarks of SAF-HOLLAND S.A., SAF-HOLLAND GmbH, and SAF-HOLLAND, Inc.
Replacement Procedures
Figure 6
Figure 5
Figure 4
5. Replacement Procedures
1. Carefully detach springs from loop on release handle.
Remove existing release handle from the top plate by
cutting through the handle near the release cam so the
“S-bend” in the handle can be removed (Figure 4).
Discard all release handle parts.
2. Insert the new release handle through the cast slot on
the top plate. Position the end of the release handle into
the hole in the release cam (Figure 5).
3. Install the washer and cotter pin (Figure 5) to connect
the new release handle to the release cam.
4. Spread the cotter pin legs so that the ends wrap around
the release handle.
5. Insert the inner extension spring into the outer extension
spring. Attach the new extension springs so that both
spring openings face away from fifth wheel top plate
(Figure 6).
6. Flip fifth wheel over.
CUT RELEASE HANDLE HERE
RELEASE CAM
RELEASE CAM
WASHER
COTTER PIN
RELEASE HANDLE
INNER SPRING
OUTER SPRING

4XL-FW10084RM-en-US Rev B · 2014-01-29 · Amendments and Errors Reserved · © SAF-HOLLAND, Inc., SAF-HOLLAND, HOLLAND, SAF,
and logos are trademarks of SAF-HOLLAND S.A., SAF-HOLLAND GmbH, and SAF-HOLLAND, Inc.
Operation Check
HOLLAND®LOCK TESTER
Figure 7
6. Operation Check
1. Verify the proper operation of the fifth wheel by locking
and unlocking the fifth wheel using a SAF-HOLLAND®
Kingpin Lock Tester TF-TLN-5001 (Figure 7).
2. Set the lock tester tool on the fifth wheel, engage the “J”
hook, and rotate the handle clockwise to lock (Figure 7).
3. Pull the release handle forward, out and forward to hook
on casting to unlock (Figure 8).
4. Rotate the lock tester handle counter clockwise to unlock
(Figure 7).
5. After each attempt, verify that the fifth wheel is properly
locked (Figure 8 and 9).
6. After unlocking, verify that the handle ‘kicks off’ the unlock
notch and moves into the ready to couple position.
IMPORTANT: Before using the fifth wheel, visually
inspect all components of fifth wheel
for proper operation while coupling and
uncoupling fifth wheel with lock tester.
IMPORTANT: DO NOT use any fifth wheel which does
not operate properly.
Failure to repair an improperly operating
fifth wheel could result in tractor trailer
separation which, if not avoided, could
result in death or serious injury.
After a minimum of two (2) successful operational checks, the
fifth wheel is ready for installation and return to operation.
LOCK ENGAGED
AROUND KINGPIN
HOOK ENGAGED
BEHIND LOCK
“J” HOOK
LOCK
UNLOCK
Figure 8
Figure 9
UNLOCK NOTCH
CLOSED POSITION
LOCK NOTCH BEHIND RIB

5
English
XL-FW10084RM-en-US Rev B · 2014-01-29 · Amendments and Errors Reserved · © SAF-HOLLAND, Inc., SAF-HOLLAND, HOLLAND, SAF,
and logos are trademarks of SAF-HOLLAND S.A., SAF-HOLLAND GmbH, and SAF-HOLLAND, Inc.
Top Plate Installation
Figure 10
Figure 11
BRACKET PIN
RETENTION NUT
RETENTION BOLT
TOP PLATE
POCKET
INSERT
POCKET
AREA DOUBLE
FACE TAPE
7. Top Plate Installation
1. If pocket inserts are dislodged from fifth wheel casting,
clean pocket area of casting and apply a strip of double
face tape in bottom of pockets. Install pocket inserts by
pressing them down into the pocket areas (Figure 10).
2. Using a lifting device capable of lifting 500 lbs. (227 kg),
install fifth wheel top plate onto its mounting base.
NOTE: Follow instructions published by lifting device
manufacturer for proper operation of lifting device.
3. Install bracket pins through fifth wheel casting and
mounting base and secure by installing the bracket pins
retention bolts and nuts (Figure 11). Torque retention
CPMUTOPUUPFYDFFEGUMCT/tN


Español
XL-FW10084RM-es-US Rev B · 2014-01-29 · Correcciones y errores reservados · © SAF-HOLLAND, Inc., SAF-HOLLAND, HOLLAND, SAF,
y logos son marcas registradas de SAF-HOLLAND S.A., SAF-HOLLAND GmbH, and SAF-HOLLAND, Inc.
Quintas ruedas FW16 LowLube
Procedimiento de reemplazo de la manija de liberación para las placas superiores de la serie XA-161
Manual de reemplazo
Manija de liberación FW16
Introducción
Estas instrucciones dan la información necesaria para
reemplazar adecuadamente la manija de liberación en las
placas superiores de quinta rueda series FW16 XA-161
de HOLLAND®.
Lea estas instrucciones antes de utilizar o dar mantenimiento
a este producto y guárdelas en un lugar seguro para consulta
posterior. Las actualizaciones de este manual, que se publican
cuando sea necesario, están disponibles en la red en www.
safholland.us.
Cuando se requieran refacciones, SAF-HOLLAND®recomienda
encarecidamente usar sólo partes originales SAF-HOLLAND®.
Una lista de locales de apoyo técnico que proveen refacciones
originales SAF-HOLLAND®y un catálogo del mercado de
repuestos, están disponibles en la red en www.safholland.us
o llame al Servicio al Cliente al 888-396-6501.
Notas, precauciones y advertencias
Antes de comenzar a trabajar en la unidad, lea y entienda
todos los procedimientos de seguridad presentados en
este manual. Este manual contiene los términos “NOTA”,
“IMPORTANTE”, “PRECAUCIÓN” y “ADVERTENCIA” seguidos
de información importante sobre el producto. Estos términos
se definen como sigue:
NOTA: Incluye información adicional para permitir la
realización de procedimientos exactos y fáciles.
IMPORTANTE: Incluye información adicional que, de no
atenderse podría ocasionar una disminución
en el rendimiento del producto.
Sin el símbolo de alerta de seguridad
indica una situación con riesgo potencial
que, si no se evita, puede provocar daños
materiales.
Indica una situación con riesgo potencial
que, si no se evita, puede provocar
lesiones menores o moderadas.
Indica una situación con riesgo potencial
que, si no se evita, puede provocar la
muerte o lesiones graves.
PRECAUCIÓN
ADVERTENCIA
PRECAUCIÓN
1. Instrucciones generales de seguridad
Lea y preste atención a todos los mensajes de alerta, de advertencia
y de precaución de riesgos. Las alertas proporcionan información
que puede ayudar a evitar lesiones personales graves, daños a
los componentes o ambos.
Si no se siguen las instrucciones y las
precauciones de seguridad de este manual,
podría ser causa de mantenimiento
inadecuado o mal funcionamiento con daño
a los componentes que, si no se evita, podría
provocar muertes o lesiones graves.
Toda reparación y mantenimiento debe realizarlos
un
técnico debidamente capacitado con las herramientas
y los procedimientos de seguridad adecuados.
NOTA: En Estados Unidos, los requisitos de seguridad en
el taller están definidos por la Ley de seguridad
y salud laboral federal o estatal (OSHA). En otros
países pueden existir leyes equivalentes. Este manual
está escrito basándose en la suposición de que se
siguen los reglamentos de OSHA u otros reglamentos
aplicables de seguridad del empleado en el lugar
donde se realiza el trabajo.
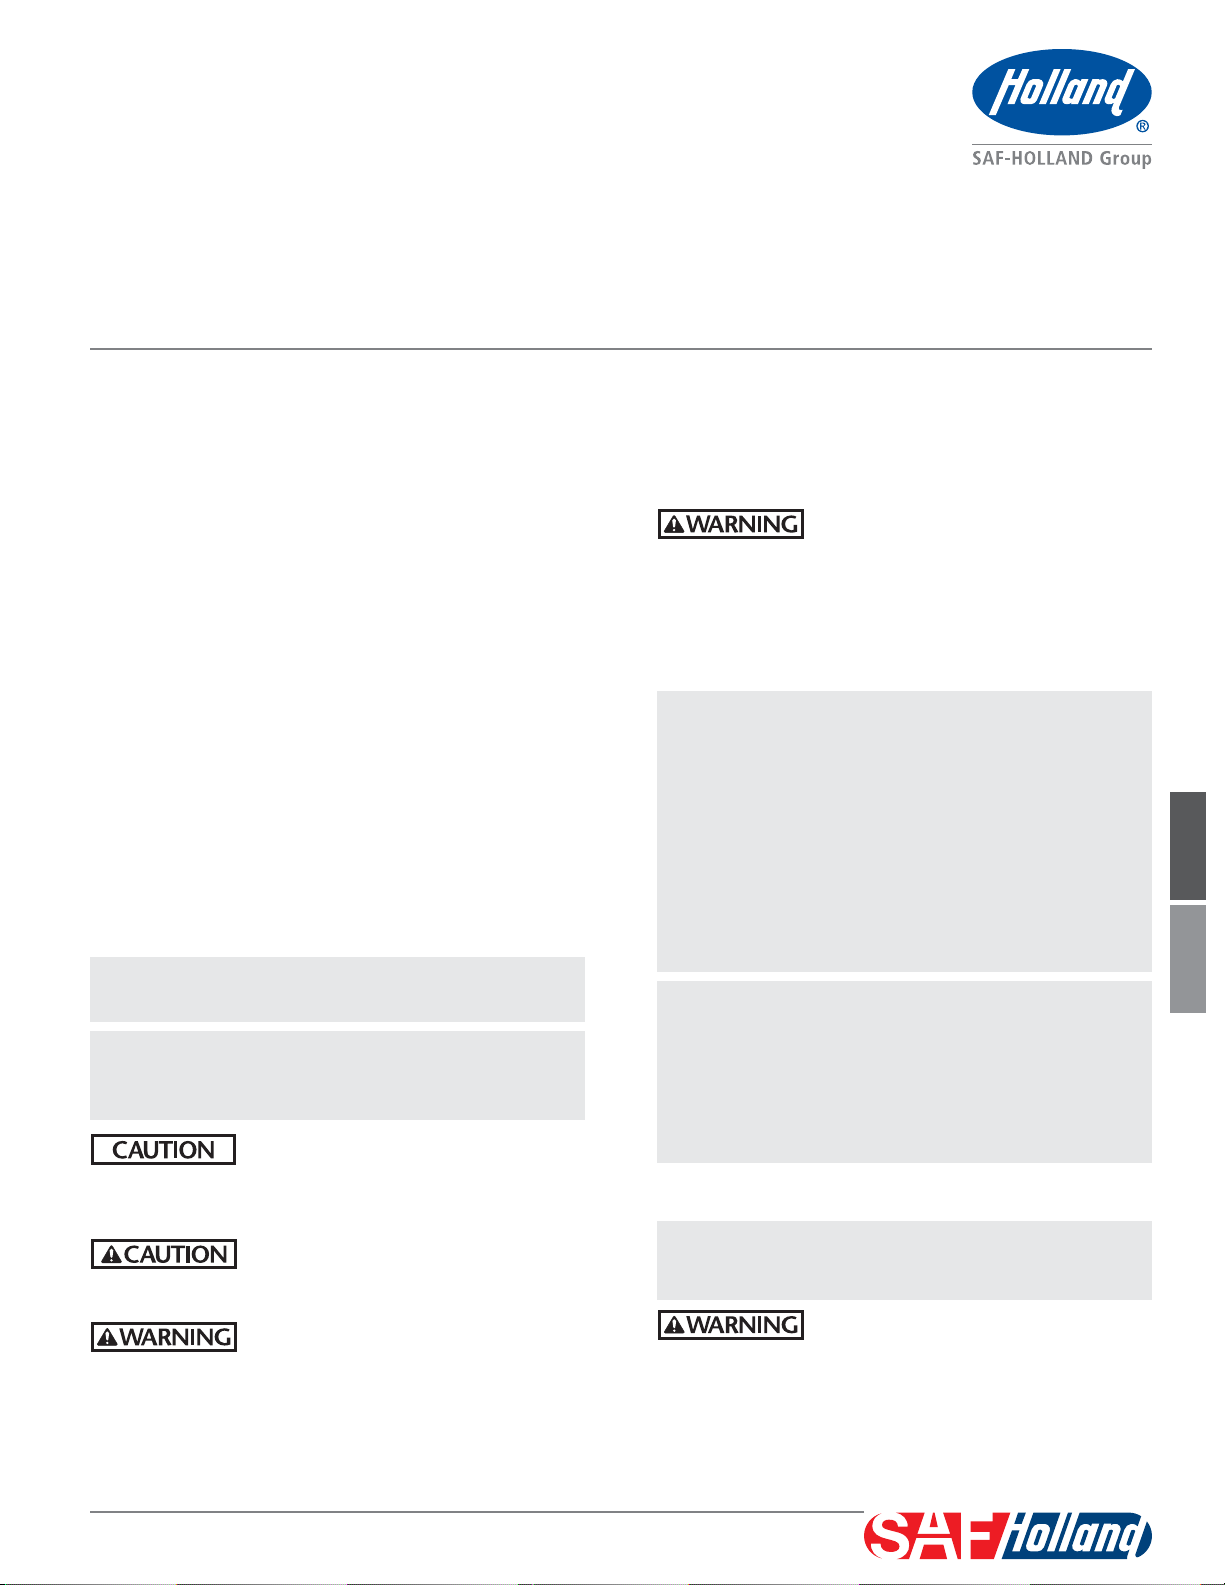
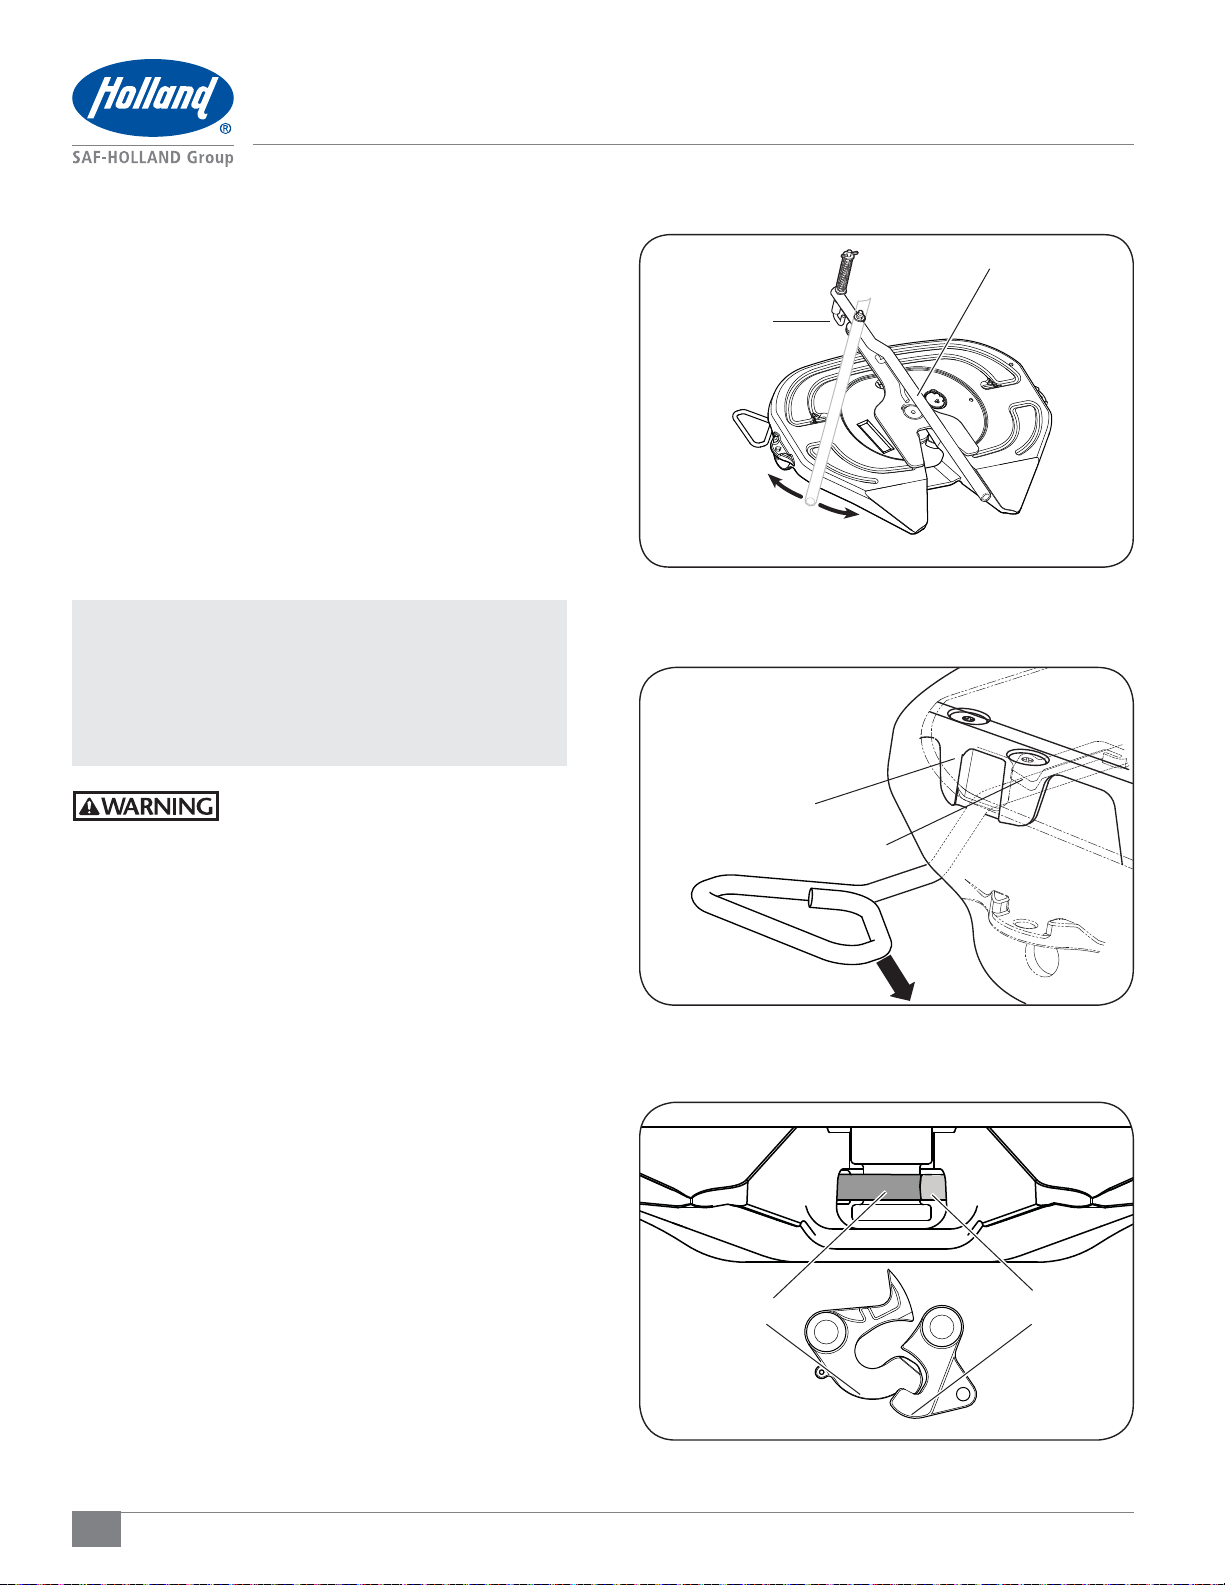
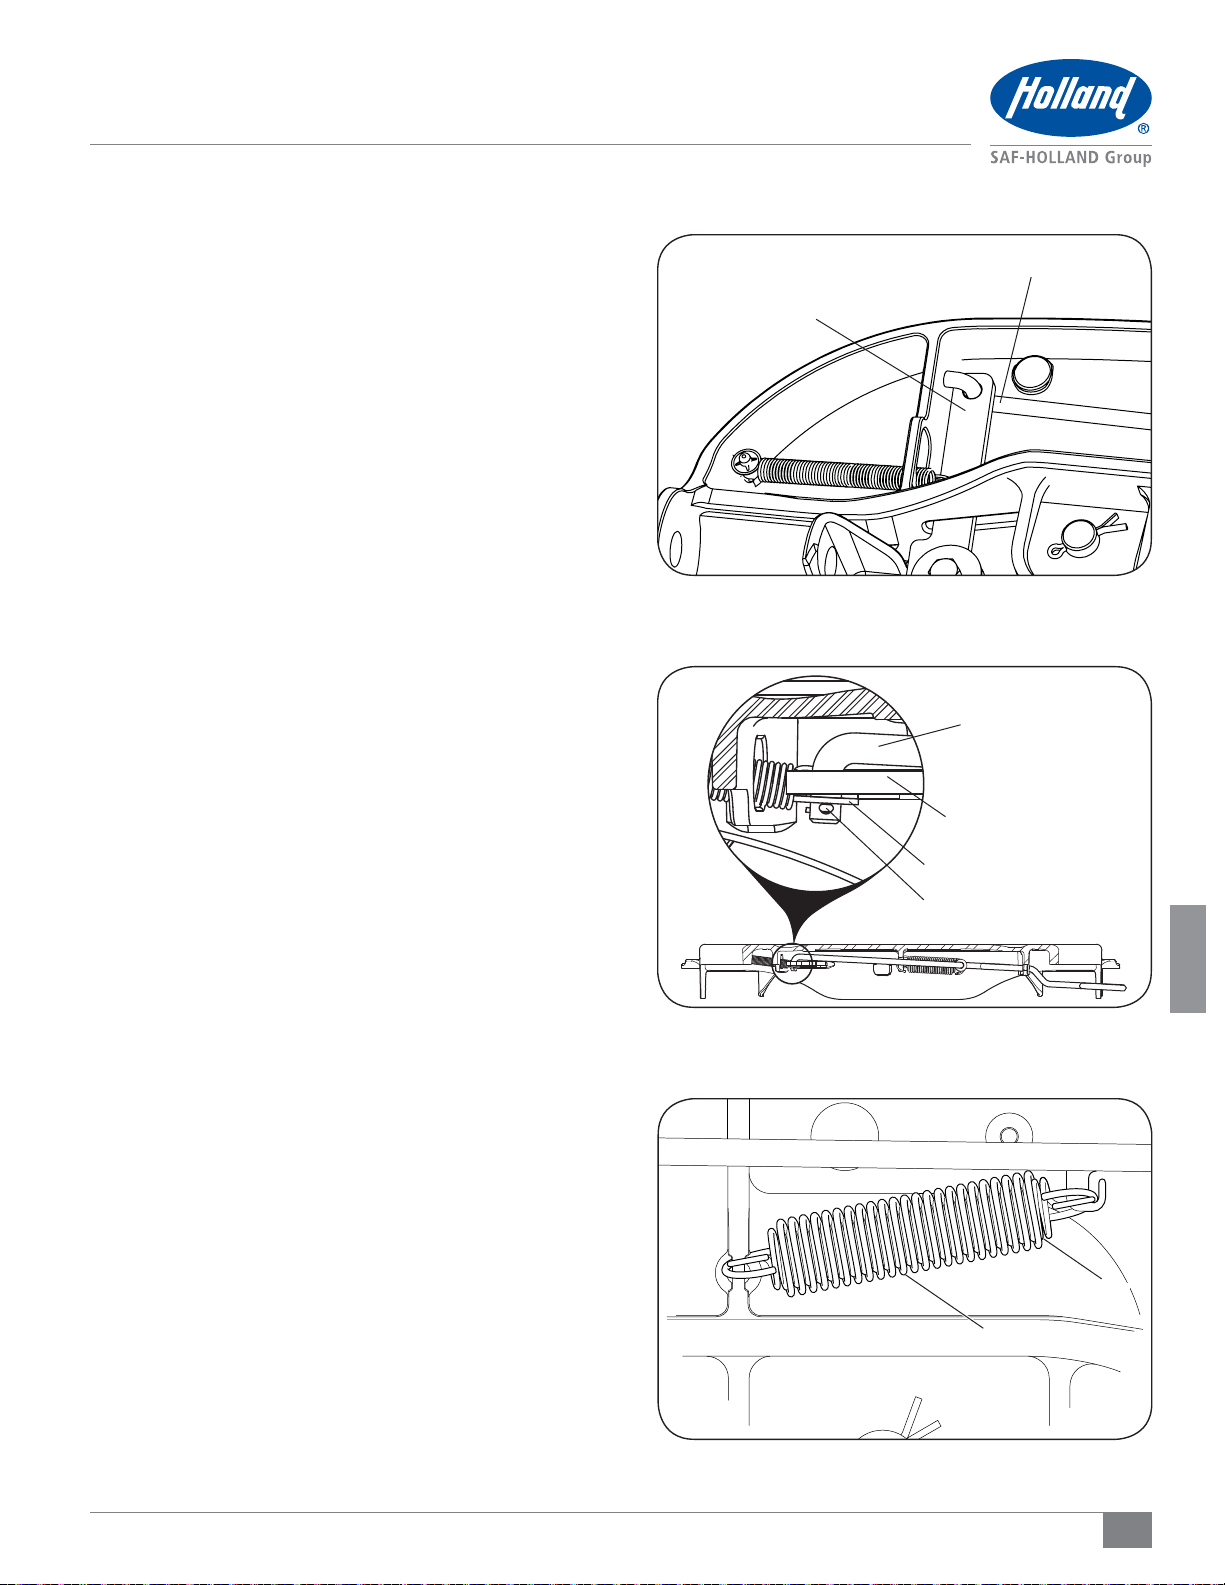
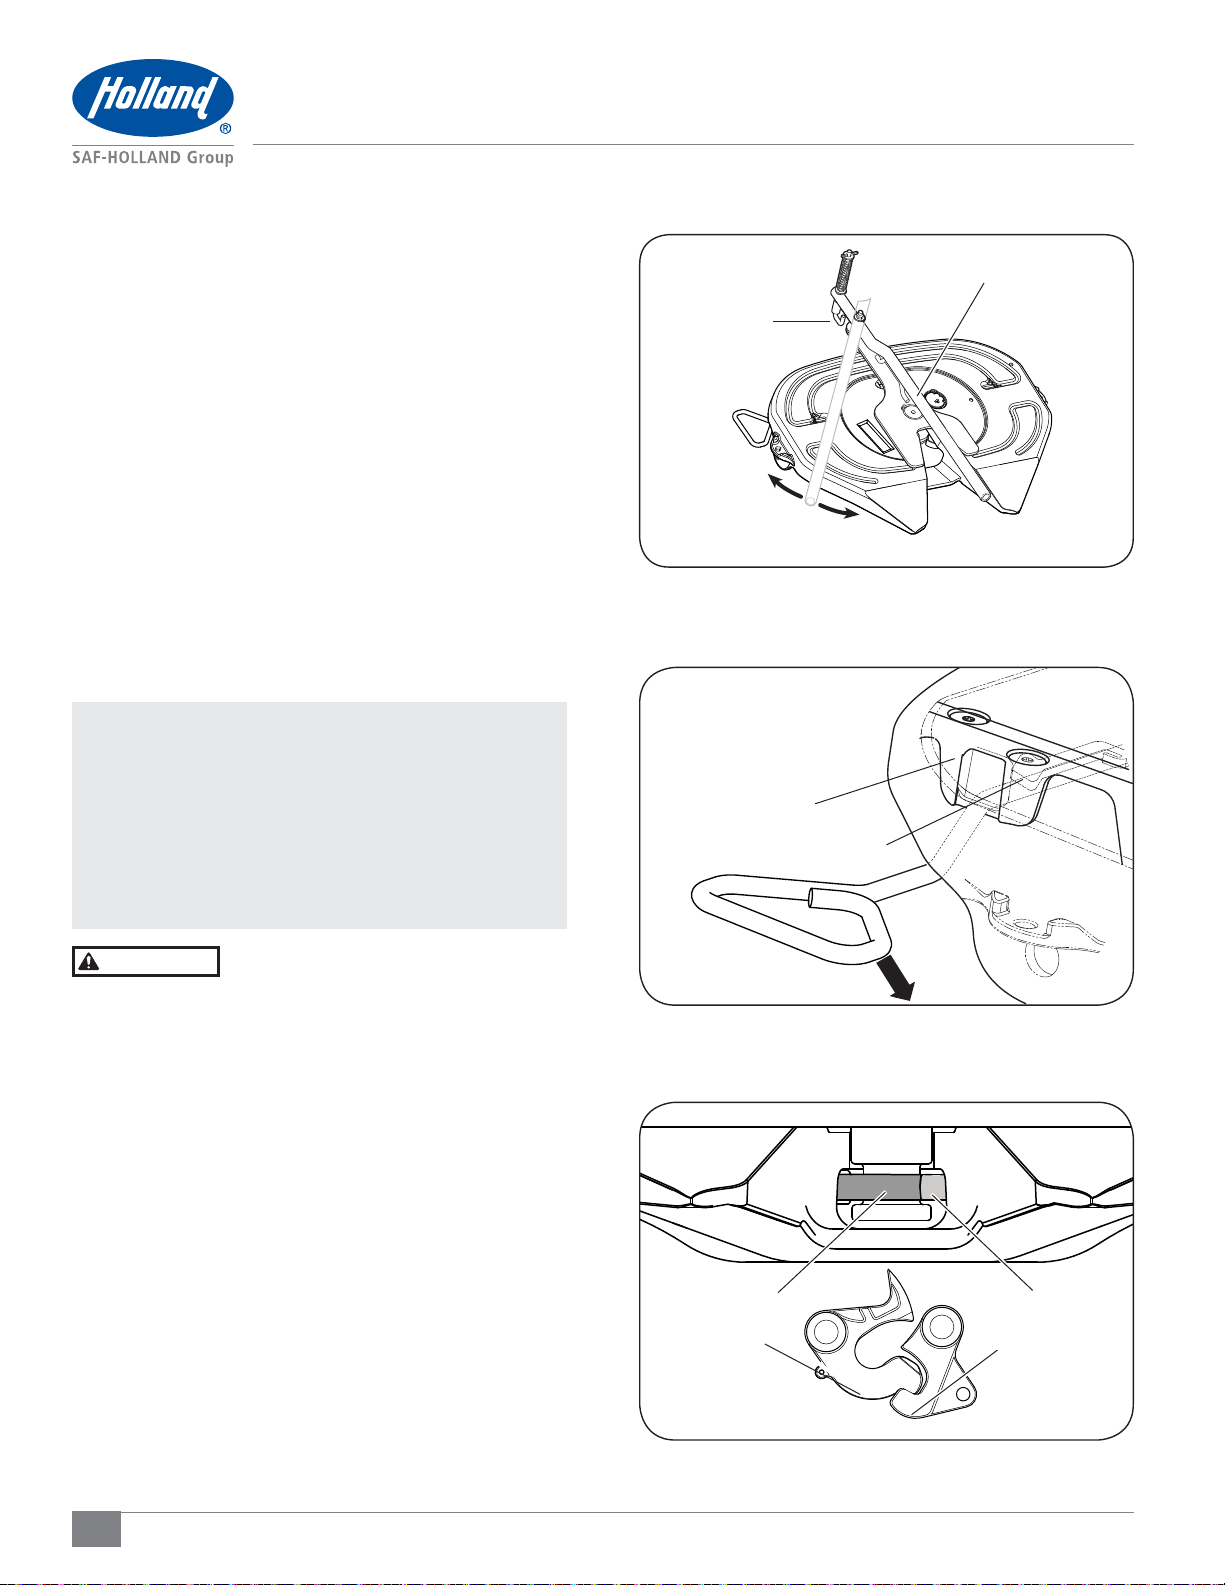
NOTA: Antes de reemplazar la manija de liberación de
quinta rueda HOLLAND®, revise el número de modelo
en la etiqueta de identificación. Este procedimiento
de reconstrucción se aplica solamente a las placas
superiores modelo XA-161 de quinta rueda.
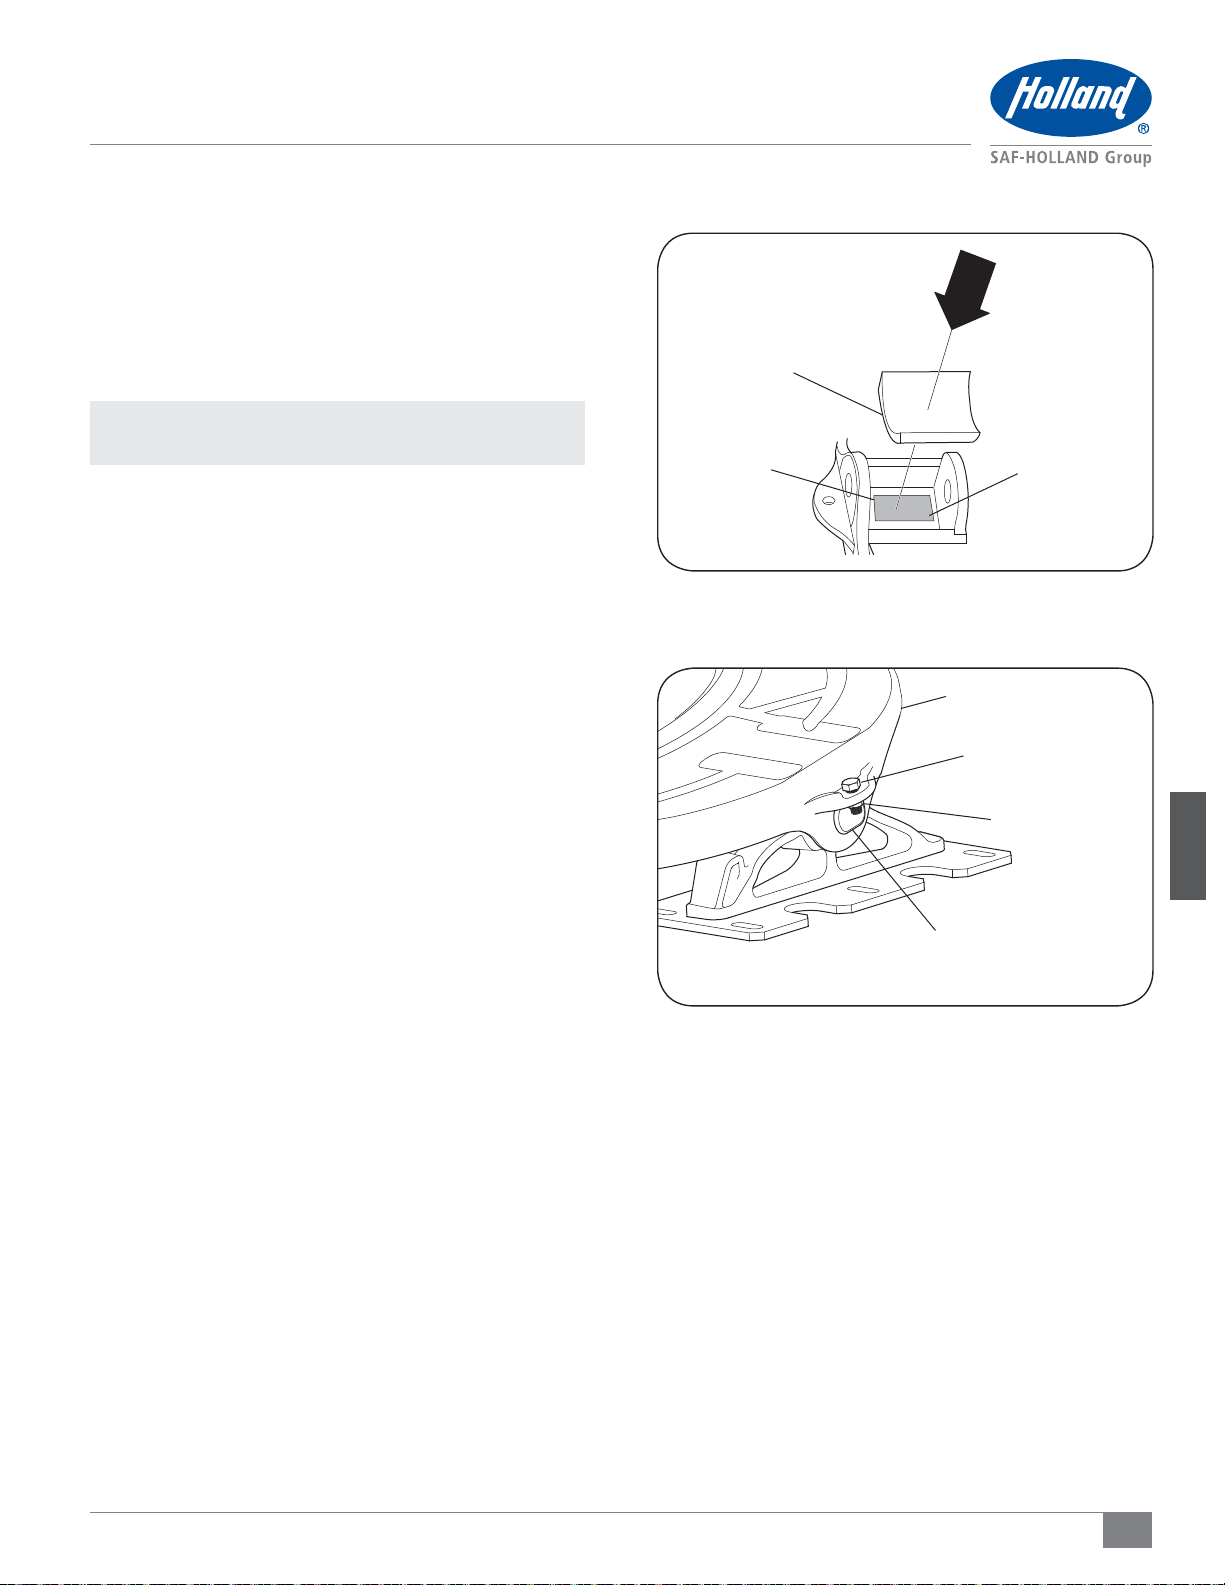
IMPORTANTE: Todo el mantenimiento debe realizarse mientras
el tractocamión no está acoplado al remolque.
IMPORTANTE: Estas instrucciones son para al reemplazo
adecuado sobre las placas superiores de quinta
rueda series XA-161 solamente. Existen otras
verificaciones, inspecciones y procedimientos que
no aparecen aquí y que son necesarios, prudentes
y/o exigidos por la ley.
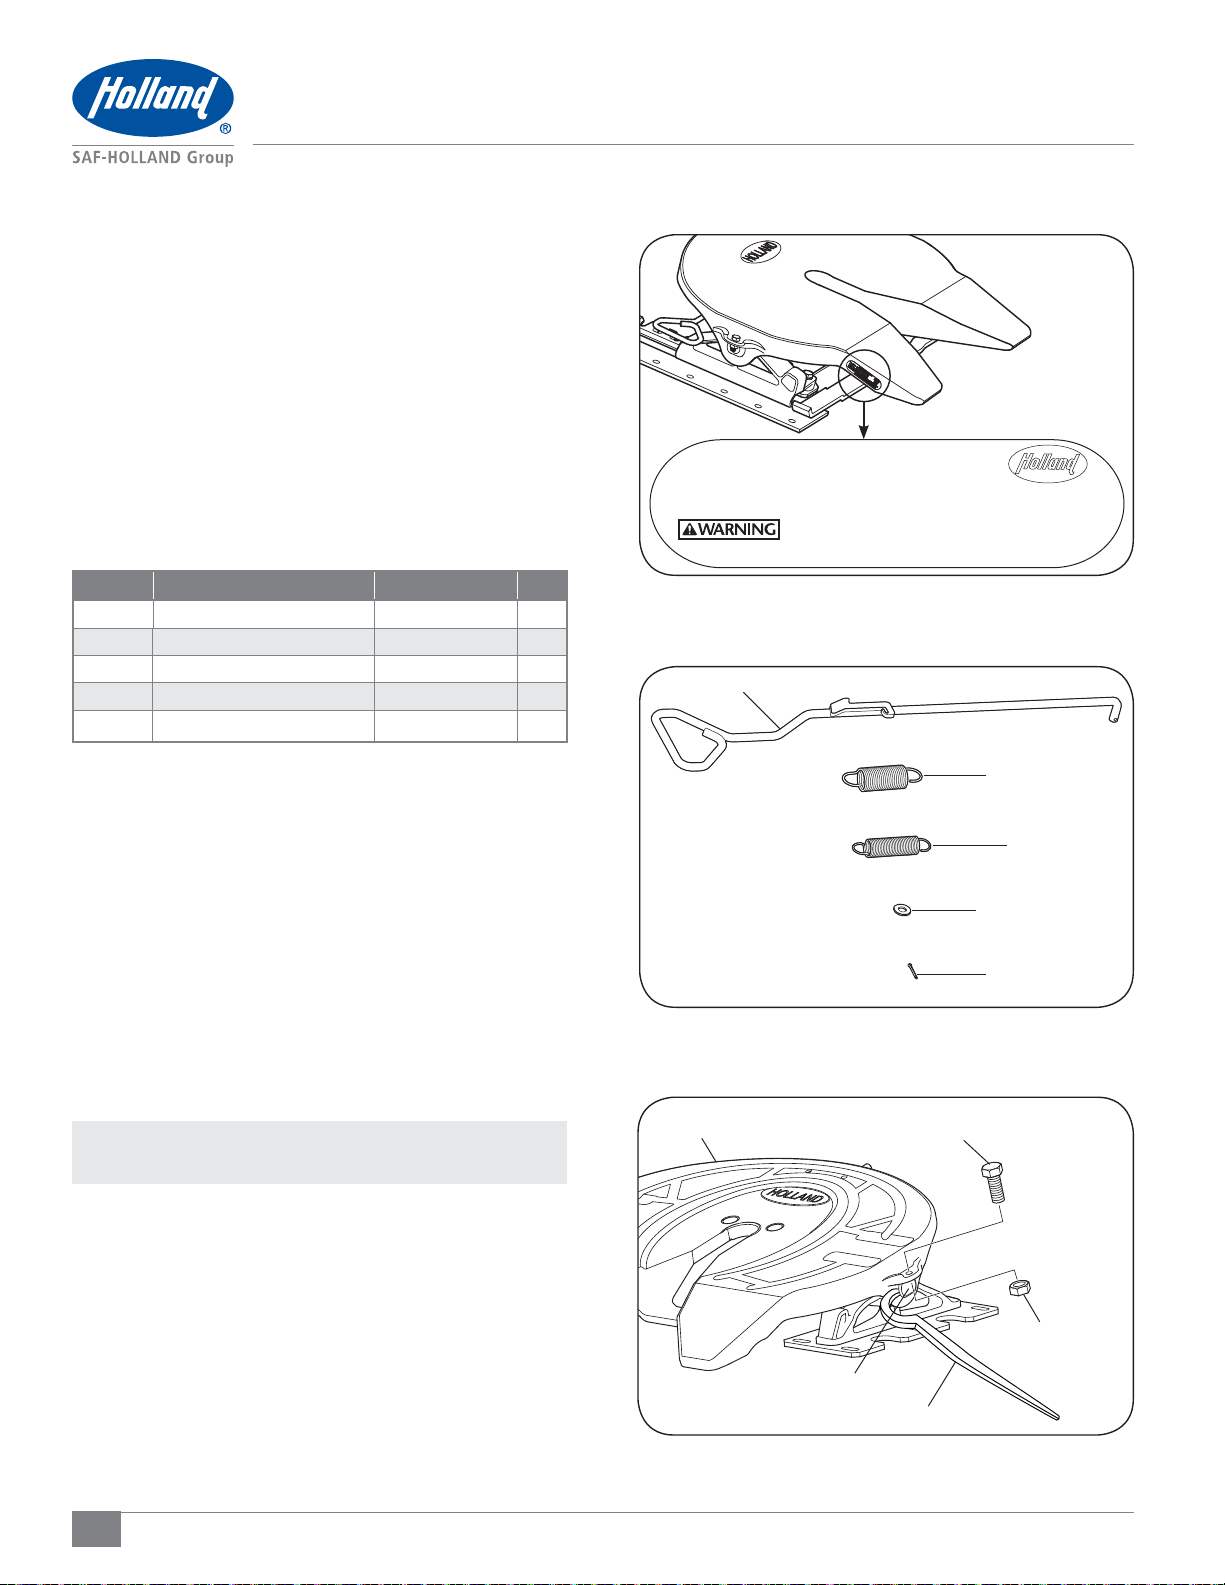
Para los procedimientos de instalación adecuados, consulte
el manual de instalación
XL-FW10008BM-en-US
disponible en
la red en www.safholland.us.
IMPORTANTE: Antes de comenzar la operación de la quinta
rueda, asegúrese que la quinta rueda haya sido
bien instalada en el vehículo.
Si no se repara e instala adecuadamente
la quinta rueda, podría perjudicar el
desempeño y ocasionar la separación del
tractocamión y el remolque que,
si no se
evita, podría causar muertes o lesiones graves.
ADVERTENCIA
ADVERTENCIA

8XL-FW10084RM-es-US Rev B · 2014-01-29 · Correcciones y errores reservados · © SAF-HOLLAND, Inc., SAF-HOLLAND, HOLLAND, SAF,
y logos son marcas registradas de SAF-HOLLAND S.A., SAF-HOLLAND GmbH, and SAF-HOLLAND, Inc.
3. Contenido del equipo RK-161-11493
(Figura 2)
ARTÍCULO DESCRIPCIÓN NÚM. DE PARTE CANT.
1 Manija de liberación XA-11618-RP-P 1
2 Arandela, 1/2 pulg. SAE XB-PW-1732-1-116 1
3 Pasador de aletas XB-16 1
4 Resorte de extensión, interno XB-10489 1
5 Resorte de extensión, externo XB-10490 1
Identificación del modelo e Procedimientos de reemplazo
2. Identificación del modelo
Este manual contiene los procedimientos de instalación para el
equipo de reemplazo SAF-HOLLAND®RK-161-11493. Antes de
reemplazar, verifique que tenga el equipo de reemplazo correcto
para la placa superior de la quinta rueda que desea reparar.
Las etiquetas de número de serie de la quinta rueda están
colocadas en la placa superior de la quinta rueda encima del
perno de soporte, o en las rampas de acoplamiento como se
muestra. El número de parte y el número de serie aparecen en
la etiqueta como se indica (Figura 1).
Figura 1
U.S. AND FOREIGN PATENTS APPLY
Model No. XXXXXXXXXXXX
Serial No. XXXXXXXXXXXX
FAILURE TO PROPERLY INSTALL, MAINTAIN & OPERATE
THIS PRODUCT COULD RESULT IN TRACTOR TRAILER
SEPARATION CAUSING SERIOUS INJURY OR DEATH.
MADE IN
XXXXXX
1
4
5
2
3
Figure 2
4. Remoción de la placa superior
1. Limpie el exceso de grasa, la suciedad y el polvo de la
placa superior.
2. Retire la tuerca y tornillo de retención del perno de
soporte de ambos lados de la placa superior de la quinta
rueda (Figura 3).
3. Con una palanca, jale los pernos de retención del soporte
de la placa superior de la quinta rueda (Figura 3).
4. Use un elevador capaz de soportar 500 lb (227 kg) para
retirar la placa superior de la base de montaje. Coloque
la quinta rueda de cabeza sobre una superficie de trabajo
plana y limpia.
NOTA: Siga las instrucciones publicadas del fabricante
sobre la operación adecuada del elevador.
Figura 3
PLACA SUPERIOR TORNILLO DE RETENCIÓN
PALANCA
PERNO DE SOPORTE
TUERCA DE
RETENCIÓN

9
Español
XL-FW10084RM-es-US Rev B · 2014-01-29 · Correcciones y errores reservados · © SAF-HOLLAND, Inc., SAF-HOLLAND, HOLLAND, SAF,
y logos son marcas registradas de SAF-HOLLAND S.A., SAF-HOLLAND GmbH, and SAF-HOLLAND, Inc.
Figura 6
Figura 5
Figura 4
5. Procedimientos de reemplazo
1. Desprenda cuidadosamente los resortes del bucle de la
manija. Retire la manija de liberación existente de la
placa superior cortándola cerca de la leva de liberación
de manguera que la curva en forma de “S” se pueda
retirar (Figura 4). Deseche todas las partes de la manija
de liberación.
2. Inserte la nueva manija de liberación a través de la
ranura moldeada en la placa superior. Ubique el extremo
de la manija de liberación en el hoyo en la leva de
liberación (Figura 5).
3. Instale la arandela y el pasador de aletas (Figura 5)
para conectar la nueva manija de liberación con la leva
de liberación.
4. Separe las aletas del pasador de manera que los
extremos envuelvan la manija de liberación.
5. Inserte el resorte de extensión interno dentro del resorte
de extensión externo. Coloque los nuevos resortes de
extensión de manera que la abertura de ambos resortes
apunte hacia afuera de la placa superior de la quinta
rueda (Figura 6).
6. Voltee la quinta rueda.
CORTE LA MANIJA DE LIBERACIÓN AQUÍ
LEVA DE
LIBERACIÓN
LEVA DE LIBERACIÓN
ARANDELA
PASADOR DE ALETAS
MANIJA DE
LIBERACIÓN
RESORTE INTERNO
RESORTE EXTERNO
Procedimientos de reemplazo

10 XL-FW10084RM-es-US Rev B · 2014-01-29 · Correcciones y errores reservados · © SAF-HOLLAND, Inc., SAF-HOLLAND, HOLLAND, SAF,
y logos son marcas registradas de SAF-HOLLAND S.A., SAF-HOLLAND GmbH, and SAF-HOLLAND, Inc.
Verificación de funcionamiento
Figura 9
ADVERTENCIA
PROBADOR DE
SEGUROS HOLLAND®
Figura 7
6. Verificación de funcionamiento
1. Verifique que la quinta rueda funcione correctamente.
Para ello, libere y asegure la quinta rueda con un
probador de seguros de perno rey SAF-HOLLAND®
TF-TLN-5001 (Figura 7).
2. Fije la herramienta del probador de seguros en la quinta
rueda, coloque el gancho en forma de “J” y gire la
palanca en sentido horario para asegurarla (Figura 7).
3. Jale la manija de liberación hacia adelante, hacia afuera
y hacia adelante para enganchar en el molde para abrir
el seguro (Figura 8).
4. Gire la manija en el probador de seguros en sentido
antihorario para abrir (Figura 7).
5. Después de cada intento, verifique que la quinta rueda
esté asegurada correctamente (Figuras 8 y 9).
6. Después de liberarla, verifique que la palanca “gire”
de la muesca de apertura y se mueva a la posición listo
para acoplar.
IMPORTANTE: Antes de usar su quinta rueda, inspeccione
visualmente todos los componentes
de la quinta rueda para verificar que
funcionen bien durante el acoplamiento
y desacoplamiento de la quinta rueda
con el probador de seguros.
IMPORTANTE: NO utilice una quinta rueda que no
funcione correctamente.
Si no repara una quinta rueda que
no funciona adecuadamente, podría
ocasionar la separación del tractocamión
y el remolque que, si no se evita, podría
causar muertes o lesiones graves.
Después de probar el funcionamiento correcto al menos dos
(2) veces, su quinta rueda está lista para instalarse y volver
a funcionar.
GANCHO
EN “J”
ASEGURA
ABRE
Figura 8
MUESCA
DE APERTURA
POSICIÓN CERRADA
MUESCA DE CIERRE DETRÁS
DEL REBORDE
SEGURO FIJADO
ALREDEDOR DEL
PERNO REY
GANCHO FIJADO
DETRÁS DEL
SEGURO

11
Español
XL-FW10084RM-es-US Rev B · 2014-01-29 · Correcciones y errores reservados · © SAF-HOLLAND, Inc., SAF-HOLLAND, HOLLAND, SAF,
y logos son marcas registradas de SAF-HOLLAND S.A., SAF-HOLLAND GmbH, and SAF-HOLLAND, Inc.
Instalación de la placa superior
Figura 10
Figura 11
PERNO DE SOPORTE
TUERCA DE
RETENCIÓN
TORNILLO DE
RETENCIÓN
PLACA SUPERIOR
INTERIOR DEL
BOLSILLO
ÁREA DEL
BOLSILLO
CINTA DE DOBLE
ADHERENCIA
7. Instalación de la placa superior
1. Si el interior de los bolsillos se desprende del molde de la
quinta rueda, limpie el área de los bolsillos y aplique una
cinta de doble adherencia en el fondo de los bolsillos.
Instale el interior de los bolsillos presionando hacia
adentro en las áreas de los bolsillos (Figura 10).
2. Use un elevador capaz de soportar 500 lb (227 kg) para
instalar la placa superior encima de la base de montaje.
NOTA: Siga las instrucciones publicadas del fabricante
sobre la operación adecuada del elevador.
3. Instale los pernos de soporte a través del molde de
la quinta rueda y la base de montaje y fíjelos con los
tornillos y tuercas de retención del perno de soporte
(Figura 11). Ajuste los tornillos de retención hasta no
más de 50-60 pie libra (68-81 N m).

SAF-HOLLAND USA · 888.396.6501 · Fax 800.356.3929
www.safholland.us
SAF-HOLLAND CANADA · 519.537.3494 · Fax 800.565.7753
WESTERN CANADA · 604.574.7491 · Fax 604.574.0244
www.safholland.ca
SAF-HOLLAND MEXICO · 52.55.5362.8743 · Fax 52.55.5362.8743
www.safholland.com.mx
XL-FW10084RM-en-US Rev B · 2014-01-29 · Amendments and Errors Reserved · © SAF-HOLLAND, Inc., SAF-HOLLAND, HOLLAND, SAF, and logos are trademarks of SAF-HOLLAND S.A., SAF-HOLLAND GmbH, and SAF-HOLLAND, Inc.
From fifth wheel rebuild kits to suspension bushing repair kits,
SAF-HOLLAND Original Parts are the same quality components used in
the original component assembly.
SAF-HOLLAND Original Parts are tested and designed to provide
maximum performance and durability. Will-fits, look-alikes or, worse
yet, counterfeit parts will only limit the performance potential and
could possibly void SAF-HOLLAND’s warranty. Always be sure to spec
SAF-HOLLAND Original Parts when servicing your
SAF-HOLLAND product.
SAF-HOLLAND USA, INC.
1950 Industrial Blvd., Muskegon, MI 49442
www.safholland.com
Table of contents
Languages:
Other SAF Automobile Accessories manuals