TH8 POE Injector Quick Installation Guide
About
This guide covers the the installation procedures for connecting a 12 V or 48 V POE (Power Over Ethernet)
injector kit to a TH8 recorder.
A POE injector kit lets the TH8 recorder connect up to 2 additional IP cameras via its expansion ports. This
increases the recorder’s maximum channel count from 8 to a potential 10.
Note that the 12 V and 48 V POE injectors kits are separate, distinct products. This guide covers the installation
procedure for both kits. Ensure that you are following the proper installation procedure for your kit.
Pre-requisites
Before proceeding with this document, you must rst have a TH8 recorder with FW 2.0 or higher installed and
functioning in a vehicle. Do not proceed with this document if you still haven’t installed the TH8 recorder. The
TH8 Installation Guide (Part #: 700-1123) can be found on the Safe Fleet Community (community.seon.com/
documents/).
Note: You will need login credentials to access the documentation. Please contact tech support if you do not
have access to the Community.
Kit Contents (1 kit required per camera added)
Specications
12 V POE Injector Adapter Harness
Materials UL Rated Materials, Meets RoHS Requirements
Voltage Rating 60VDC Maximum
RJ45 Jack Shielded CAT5 Rated, Gold Plated Contacts
RJ45 Power Pins 4, 5 (+) 7, 8 (-)
DC Wire Size 28AWG x 4
CAT5 Wire Size 24AWG x 8, Shielded
Cable Length 165mm (6.5”)
Total Length 254mm (10”)
Weight 31 g (1.1 oz )
Operating Temp -40°C to 80°C (-40°F to 176°F)
Support
• Phone: 1-844-899-7366
Warranty
For full warranty information, visit:
• www.seon.com/documents/Seon-Warranty.pdf
2002/96/EC (WEEE directive): This product cannot be disposed of as unsorted municipal waste
in the European Union. For proper recycling, return the product to your local supplier upon the
purchase of equivalent new equipment, or dispose of it at designated collection points, for more
information, see www.recyclethis.info.
2006/66/EC (battery directive): This product does not contain batteries. © Safe Fleet | Nov 2019 | All rights reserved | Part #: 700-1172 R2
12 V POE Injector Kit (Part #: TH8POEKIT12):
• POE Injector Harness (Part #: APPINJ) - Qty 1
• Y-Power Harness (Part #: 060-1163) - Qty 1
48 V POE Injector Kit (Part #: TH8POEKIT48):
• POE Inserter (Part #: 085-1106) - Qty 1
• Y-Power Harness (Part #: 060-1163) - Qty 1
• Microt Ctrl Cable (Part #: 060-0656) - Qty 1
• 1.5 ft CAT5e Cable (Part #: 085-0065) - Qty 1
• 1” Stainless Steel Philips Rounded Head Drilling
Screw (Part #: 600-1022) - Qty 1
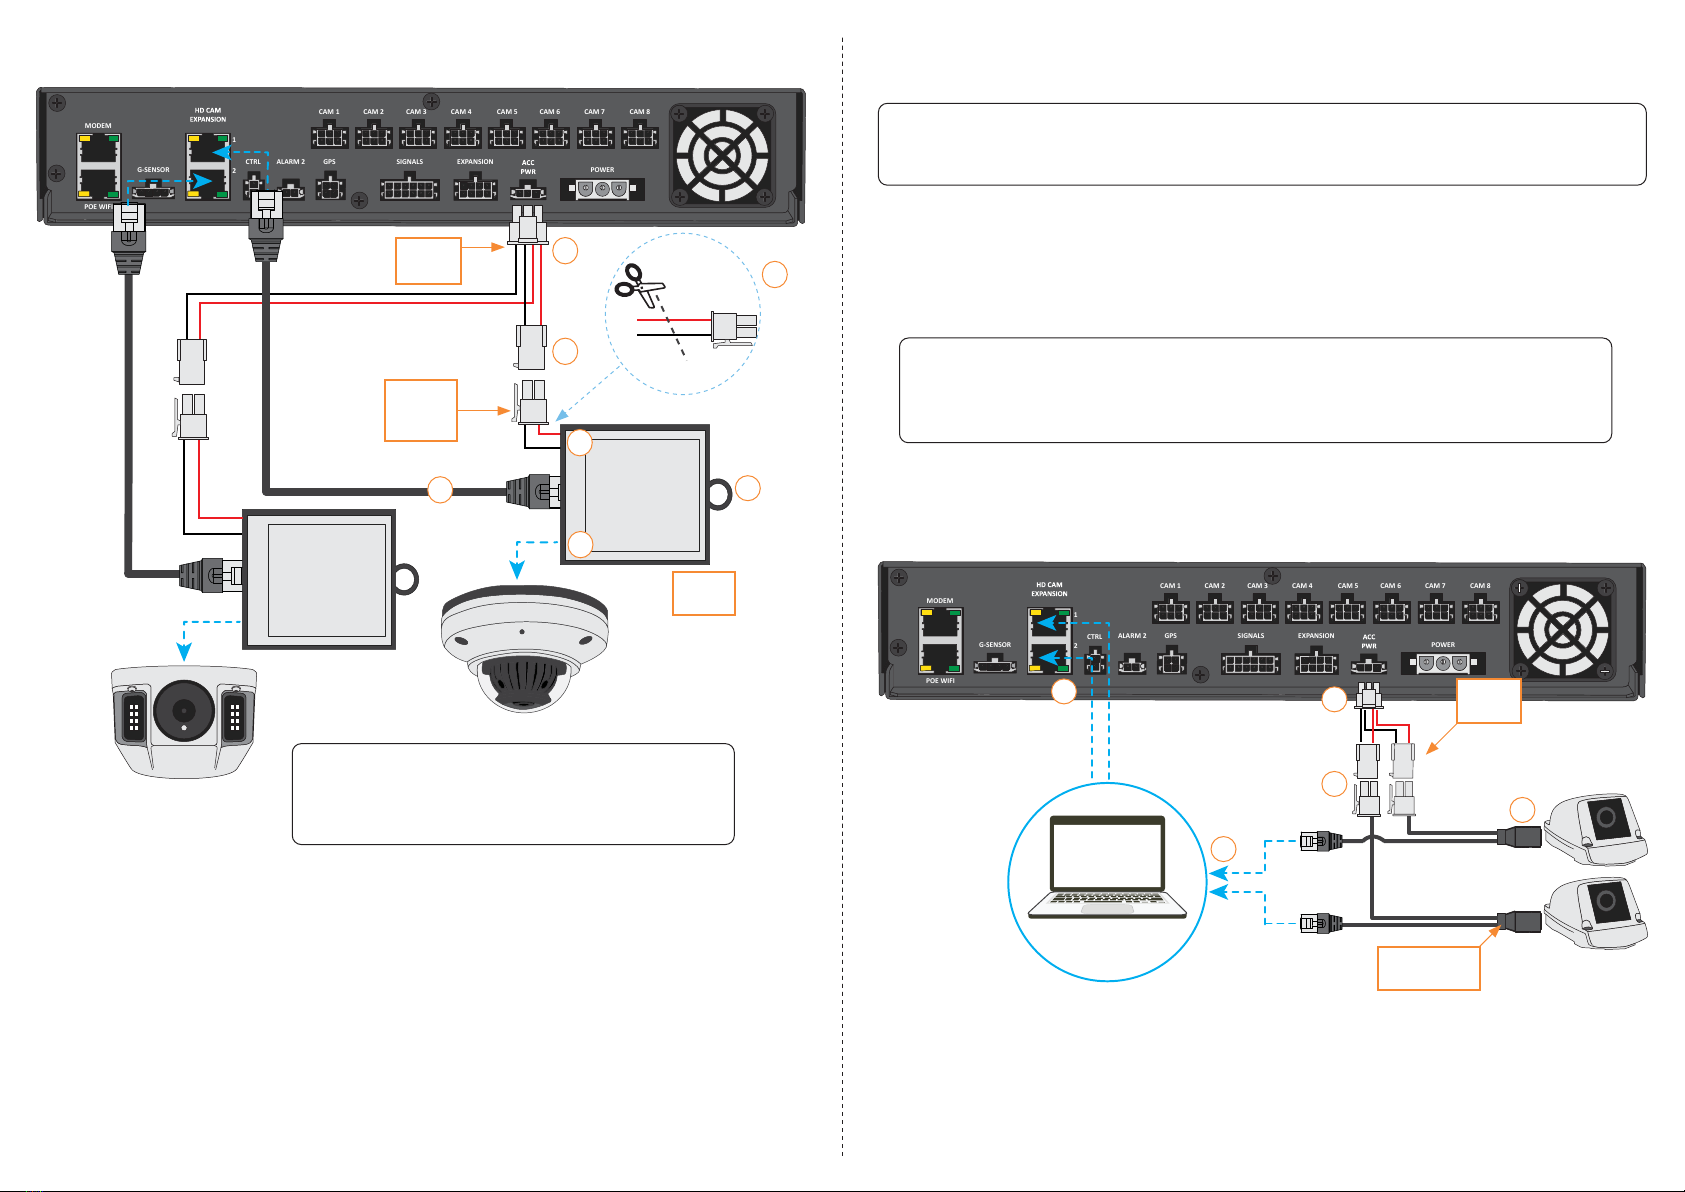
Installing the 48 V POE Kit
(Refer to diagram on next page)
1. Connect the Y-Power Harness to the TH8’s ACC PWR output
2. Connect the other end of the Y-Power Harness to one end of the Microt Control Cable (MCC)
3. Cut off the other end of the MCC and strip the red and black wires
4. Connect the MCC red wire to the POE Inserter’s VDC Input (+), and the black wire to the VDC Input (–)
5. Connect an ethernet cable from the TH8’s HD CAM EXPANSION port to the POE Inserter’s IN port
6. Connect an ethernet cable from the POE Inserter’s OUT port to the camera. For the 48 V POE kit, you can
only connect the following cameras:
• C3W9PD
• C3Q9PD
7. Secure the casing of the PoE Inserter to the vehicle using the provided screw.
48 V POE Inserter
Input 12VDC/1.5A to 16VDC/1.1A.
Output 48 VDC, up to 15.4 W max. IEEE 802.3af compliant. Short circuit protection.
Ethernet Connectivity: RJ45, auto-crossover. Wire type: 4-pair CAT5e.
Distance: up to 100 m. Speed: 10/100BaseT, half/full duplex, auto negotiation.
Indicators (LED) Red LED: Port status.
Yellow & Green LED (by RJ45 jack): IP Link status, 10/100Base-T/active.
Agency Listings UL/cUL: UL60950-1 (Information Technology Equipment).
CE European Conformity.
Dimensions (W x L x H) 2.5” x 3.8” x 1” (63.5 mm x 96.52 mm x 25.4 mm).
Weight (approx.) Product Weight: 0.2 lbs. (0.1 kg). Shipping Weight: 0.25 lbs. (0.11 kg).
Temperature Operating: 0º C to 40º C (32º F to 104º F).
Storage: -40º C to 70º C (-40º to 158º F).
Relative Humidity 85% +/-5%.
Operating Altitude: -304.8 to 3,048 m (-1000 to 10,000 ft.).