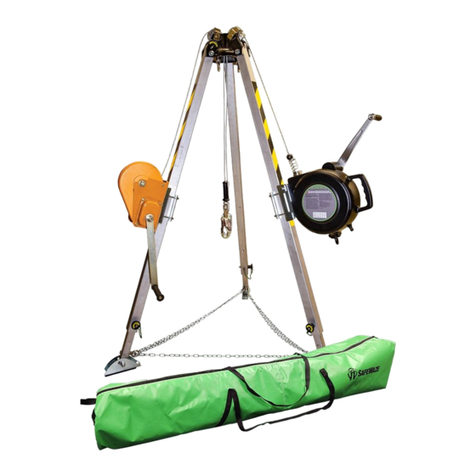
SafeWaze 022-11029 User manual

220-00091
This manual is intended to meet the manufacturer’s instructions as required by ANSI and should be used as part of an
employee training program as required by OSHA.
10’ Tech Tripod
Manual
ANSI Z359.18-2017 (Type T), Z359.4-2013, Z117.1-2022
OSHA 1910.140, 1926.502
V1.0 2023 Copyright Safewaze
022-11029 10’ Tech Tripod Basic
022-11033 10’ Tech Tripod Complete
022-11034 10’ Tech Tripod Kit: 65’ Personnel Winch, 65’ 3-Way
022-11035 10’ Tech Tripod Kit: 65’ Material Winch, 65’ 3-Way
022-11036 10’ Tech Tripod Kit: 65’ 3-Way
022-11037 10’ Tech Tripod Kit: 65’ Material Winch
Read and understand instructions before using equipment!
Do not throw away instructions!

V1.0 2023 Copyright Safewaze
TABLE OF CONTENTS
1.0 INTRODUCTION .................................................................................... 1
2.0 INTENDED USE ..................................................................................... 1
3.0 APPLICABLE SAFETY STANDARDS .................................................... 1
4.0 SPECIFICATIONS .................................................................................. 1
5.0 WORKER CLASSIFICATIONS............................................................... 3
6.0 TRAINING............................................................................................... 3
7.0 SUPERVISION ....................................................................................... 3
8.0 RESCUE PLAN ...................................................................................... 3
9.0 HARNESS CONNECTIONS/FALL CLEARANCE................................... 3
10.0 COMPATIBILITY OF COMPONENTS .................................................... 4
11.0 COMPATIBILITY OF CONNECTORS..................................................... 4
12.0 MAKING CONNECTIONS ...................................................................... 4
13.0 APPLICATIONS...................................................................................... 5
14.0 INSTALLATION AND USE ...................................................................... 5
15.0 COMPATIBLE DEVICES/CONNECTION POINTS................................ 10
16.0 AFTER A FALL....................................................................................... 12
17.0 MAINTENANCE AND SERVICE ........................................................... 12
18.0 INSPECTION......................................................................................... 12
19.0 PRODUCT LIFE .................................................................................... 13
20.0 DISPOSAL............................................................................................. 14
21.0 LABELING ............................................................................................. 14
22.0 INSPECTION LOG ................................................................................ 15
User Information
Date of First Use:
Serial Number:
Trainer:
User:
IMPORTANT: Record initial usage of product on the Table of Contents page. Competent Person inspections are required to be
documented in the Inspection Log Table.
Always verify the latest revision of the Safewaze Manual is being utilized.
Visit the Safewaze website, or contact Customer Service, for updated manuals.

V1.0 2023 Copyright Safewaze
Every user must be trained in the inspection, installation, operation, and proper use of their Fall Protection, Conned Space, and Rescue Equipment. Unapproved
or inappropriate use of this equipment could result in serious injury or death. Refer to these instructions for the proper selection, installation, maintenance, and
service of this equipment. For questions regarding use of this equipment beyond the scope of this manual, contact Safewaze.
The warnings indicated below are designed to minimize risk associated with the use of the 10’ Tech Tripod and associated equipment. Failure to heed
these warnings, and/or improper use of this equipment may result in serious injury or death.
• Inspect this equipment prior to each use and at least annually by a Competent Person other than the user.
• If inspection reveals an unsafe or defective condition, the equipment must be removed from service and repaired or replaced as specied in this
manual.
• If this equipment is exposed to fall arrest or impact forces, it must be immediately removed from service and tagged “Unusable.”
• Never allow slack to form in a lifeline constituent.
• Never tie knots for load bearing end terminations.
• Utilize extra caution to keep lifeline free from any obstructions including but not limited to surrounding objects, tools, equipment, moving machinery,
co-workers, yourself, or possible impact from overhead objects.
• Do not use this equipment in an environment where the intended rescue/descent path is obstructed by machinery, equipment, or other potential
hazards. User or rescuer must ensure that the descent path is clear and will not allow contact with an object that could cause or exacerbate injury.
• Follow all recommendations in this manual regarding installation and use of this equipment.
• Ensure all feet of tripod are securely anchored to resist side-ways, spreading, and uplift forces.
• Proper edge protection must be used if a lifeline constituent will be exposed to sharp or abrasive edges.
• If the PFAS is made up of components from dierent manufacturers, ensure that all components of the PFAS are compatible with each other and
meet all applicable standards, regulations, or requirements. A Competent or Qualied Person should always review and approve the PFAS system
prior to worker use.
• Always account for the direction and strength of forces on the tripod when installing.
• Improper exposure of forces on the tripod may allow the system to topple over.
• Ensure that proper fall protection safety measures are adhered to during rescue operations per the jobsite rescue plan.
• Never attach any user equipment to the tripod until fully assembled, anchored, and adjusted for the specic application.
• Never attempt to adjust location, height, or stance of the tripod while in use.
• Never exceed the maximum allowed number of users on the system.
• Never exceed the maximum allowed capacity of the system.
• Consult your doctor if there is reason to doubt your tness to safely absorb the shock from a fall arrest. Age and tness seriously aect a worker’s
ability to withstand falls. Pregnant women or minors must not use Safewaze equipment.
• For questions regarding service/repair of components, contact Safewaze.
• A Rescue Plan must be in place in the event of a fall. All employees should be trained and knowledgeable in the Rescue Plan and
Rescue Operations.
• Equipment must never be altered or modified. Only Safewaze, or entities authorized in writing by Safewaze, may make repairs to
Safewaze fall protection equipment.
• User(s) of Safewaze fall protection equipment must ensure that their health and physical condition allows them to withstand the potential forces
and risks associated with working at heights.
• Use of a body belt is not authorized for fall arrest applications.
• Always wear required personal protective equipment when installing, using, or inspecting this equipment.
• If conducting training operations with this equipment, ensure that a secondary fall protection system is installed and utilized in a manner that does
not expose the trainee to unintended fall hazards.
• Immediately seek medical attention in the event a worker suffers a fall arrest incident.
• Work directly under the anchor point as much as possible to minimize swing fall hazards.
• Certain subsystems may interfere with the proper operation of the equipment in this manual. Use only compatible connections. Contact
Safewaze for questions regarding compatibility of equipment or components not covered in this manual.
• Avoid objects, equipment, or surfaces that could harm the user or equipment.
• User must ensure that there is adequate fall clearance when working at height.
• If work is conducted in a high heat environment, ensure that Arc Flash or other suitable fall protection equipment is utilized.
Users should enact the precautionary measures listed below to reduce the inherent risks of working at height:
Safety Information and Precautions:
User must read, understand, and follow all safety and usage information contained within this manual prior to use of this equipment. Failure to follow
all safety and usage information can result in serious injury or death.
WARNING
CAUTION

V1.0 2023 Copyright Safewaze
1.0 INTRODUCTION
Thank you for purchasing the Safewaze 10’ Tech Tripod. This manual must be read and understood in its entirety and used as part of an employee
training program as required by OSHA or any applicable state agency. This manual and any other instructional material must be made available to the user
of the equipment. Users must be trained in operation of the 10’ Tech Tripod and all related conned space, fall arrest, or rescue equipment intended for
connection to the tripod.
The Safewaze 10’ Tech Tripod is designed to be used as an adjustable anchorage point for fall protection, fall restraint, rescue, and material hauling. The 10’ Tech
Tripod is suitable for most transition applications. These include Construction, Transportation, General Industry, Oil, Utilities, Trench, Mining, Cli, and Rescue.
The 10’ Tech Tripod can be rigged as a standard tripod or congured for advanced applications. Each leg of the 10’ Tech Tripod can be adjusted in both length and
installation angle. Leg length is adjusted telescopically, while installation angle is achieved by adjusting the installation hole pattern at the Head Unit of the tripod.
The 10’ Tech Tripod is meant for use by a single user with a maximum weight of ANSI 130-310 lbs. and OSHA up to 420 lbs. The Tech Tripod can also
accommodate 2 users at 310 lbs. each in an emergency rescue scenario. The purpose of the 10’ Tech Tripod is to safely provide access and egress in conned
spaces and may be installed in multiple congurations to provide Fall Protection, Personnel Lifting Capability, and Material Handling capability of up to 620 lbs.
4.0 SPECIFICATIONS
System Specications:
Capacity: • Maximum Weight Capacity:
• ANSI 130 to 310 lbs. (59-141 kg)*
• OSHA 420 lbs. (190 kg)*
* Including any tools, clothing, accessories, etc.
• System Capacity: Maximum of 620 lbs. (281 kg)
• Material Lifting: Maximum of 620 lbs. (281 kg)
• Captive Eye: 5,000 lbs. Minimum Breaking Strength (MBS)
• 6 Anchor Points (Head Unit): 5,000 lbs. MBS
Dimensions: • Collapsed:
• Length- 97 in. (246.4 cm)
• Width- 12 in. (30.5 cm)
• Working Heights (measurements are from working surface to captive eye):
• Stance #1A- 74.5 in. (189.2 cm) - Minimum working height
• Stance #1B- 119 in. (302.3 cm) - Maximum working height
• Stance #2A- 53.5 in. (135.9 cm) - Minimum working height
• Stance #2B- 84 in. (213.4 cm) - Maximum working height
• Over Edge- Dependent on work zone. To be determined by Competent Person.
Working Temperature: -30°F (-34°C) to 130°F (54°C)
Free Fall: Limited to 6 ft. (1.8 m)
Component Specications:
Part Number Description Materials
N/A 10’ Tech Tripod Aluminum
N/A Head Unit Aluminum
N/A Captive Eye Stainless Steel
N/A Tripod Feet Powder Coated Steel Feet, Rubber Foot Pads
3.0 APPLICABLE SAFETY STANDARDS
When used according to instructions, this equipment meets ANSI Z359.18-2017 (Type T), ANSI Z359.4-2013, ANSI Z117.1-2022 and OSHA 1910.140, 1926.502.
Applicable standards and regulations depend on the type of work being done, and may include state-specic regulations. Refer to local, state, and federal (OSHA)
requirements for additional information concerning the governing of occupational safety regarding Personal Fall Arrest Systems (PFAS) rescue operations.
2.0 INTENDED USE
The equipment covered in this manual is intended for use as part of a complete Personal Fall Protection, Rescue, and Material Handling System. Use of this
equipment for any other purpose including, but not limited to, sports or recreational activities, non-approved material handling applications, or other action not
described in these User Instructions is not approved by Safewaze. Use of this equipment in a manner outside the scope of those covered within this manual can
result in serious injury or death. The equipment covered in this manual must only be used by trained personnel in workplace applications.
Page 1

V1.0 2023 Copyright Safewaze Page 2
Part Number Description Materials
Dimension Diagrams:
N/A Fasteners Zinc Plated Steel
N/A Detent Pins Nylon, Stainless Steel
019-11005/019-11015 3-Way System/Universal Mount
(65’ or 120’)
Aluminum Housing, Plated Steel/Stainless Steel Components,
Galvanized Steel Cable, Plastic Handle
019-11007/019-11008 Personnel Winch
(65’ or 120’)
Powder Coated Steel Device, Plated Steel Components, Galvanized
Steel Cable, Rubber Handles, Plastic Cover
019-11009 Material Winch
(65’)
Powder Coated Steel Device, Plated Steel Components, Galvanized
Steel Cable, Plastic Handle
022-11031 Perimeter Warning Line Polyester Webbing, Zinc Plated Steel Adjuster, Nylon Brackets
022-11030 Tripod Step Powder Coated Steel Step, Nylon and Stainless Steel Detent Pin
020-11025 Aluminum Tripod Pulley Aluminum
FS1015 Carabiner YCM Steel
022-11032 Tripod Bag Water Repellent Tarpaulin, Polyester Fabric, Webbing, Nylon Wheels
and Adjusters
019-11010 Universal Tripod Bracket Galvanized Steel
019-11017 Tripod Replacement Chain Zinc Plated Steel
97”
(246.3cm)
74.5”
(189.2cm)
86.5” Ø
(219.9cm Ø)
119”
(302.2cm)
127.1” Ø
(323cm Ø)

V1.0 2023 Copyright Safewaze
Prior to the use of this equipment, employers must create a rescue plan and provide the means to implement the plan through training. This plan must be
communicated to/understood by all equipment users, authorized persons, and rescuers. Rescue operations may require specialized equipment beyond the scope
of this manual. Every user must be trained in the inspection, installation, operation, and proper usage of their Rescue Equipment and Rescue Plan. See ANSI
Z359.4-2013 for specic rescue information.
Users must be trained in the installation, operation, use, intended applications, and inspection of the 10’ Tech Tripod and all related conned space, fall arrest,
or rescue equipment intended for connection to the tripod. It is the responsibility of the users to understand the material in this manual, the limitations of the
equipment, and consequences of improper usage.
6.0 TRAINING
5.0 WORKER CLASSIFICATIONS
Understand the denitions of those who work in proximity of, or may be exposed to, fall hazards or rescues.
Qualied Engineer: “Qualied Engineer” means a person with a bachelor of science degree in engineering from an accredited college or university. They are able
to assume personal responsibility for the development and application of engineering science and knowledge in the design, construction, use, and maintenance of
their projects.
Qualied Person: “Qualied Person” means one who, by possession of a recognized degree, certicate, or professional standing, or who by extensive
knowledge, training, and experience, has successfully demonstrated their ability to solve or resolve problems relating to the subject matter, the work, or the project.
Competent Person: “Competent Person” means one who is capable of identifying existing and predictable hazards in the surroundings or working
conditions which are unsanitary, hazardous, or dangerous to employees, and who has authorization to take prompt corrective measures to eliminate them.
Authorized Person: “Authorized Person” means a person approved or assigned by the employer to perform a specic type of duty or duties, or to be at a specic
location or locations, at the jobsite.
It is the responsibility of a Qualied or Competent person to supervise the jobsite and ensure safety
regulations are complied with.
Page 3
Use of this equipment requires an ANSI Z359.11-2021 Full Body Harness (FBH).
9.0 HARNESS CONNECTIONS/FALL CLEARANCE
7.0 SUPERVISION
A Qualied Person must supervise the installation of the 10’ Tech Tripod. A Competent Person must supervise the use of the 10’ Tech Tripod.
NOTE: Special rescue measures may be required for a fall over an edge.
8.0 RESCUE PLAN
135” Ø
(343.1cm Ø)
53.5”
(135.9cm)
218.2” Ø
(554.3cm Ø)
84”
(213.4cm)
It is up to competent/qualified
person to determine best
configuration for edge work.
Every configuration must have
two tie back rope/straps 6x
user weight capacity.
6x user weight
capacity
Use foot spikes for
over edge
configurations
Edge
Edge

V1.0 2023 Copyright Safewaze Page 4
AArrest Distance
BSafety Factor
CSub-Total for Minimum Required Fall Clearance
Minimum Required Fall Clearance
ANSIZ359.14,ANSIA10.32
OSHA1910.66,OSHA1926.502
0
2
0
0
5
1
ANSIZ359.14,ANSIA10.32
OSHA1910.66,OSHA1926.502
0
2
0
0
5
1
A
B
FIGURE 1 - MINIMUM REQUIRED FALL CLEARANCE
Connectors are compatible with connecting elements when they have been designed to work together in such a way that their sizes and shapes do not cause their
gate mechanisms to inadvertently open regardless of how they become oriented. Connectors (hooks, carabiners, and D-rings) must be capable of supporting at
least 5,000 lbs. (22.2 kN). Do not use equipment that is not compatible. Non-compatible connectors may unintentionally disengage (Figure 2). Connectors must be
compatible with the anchorage or other system components. Connectors must be compatible in size, shape, and strength. Self-locking snap hooks and carabiners
are required by ANSI Z359 and OSHA guidelines. Contact Safewaze if you have any questions about compatibility.
NOTE: SOME SPECIALTY CONNECTORS HAVE ADDITIONAL REQUIREMENTS. CONTACT SAFEWAZE WITH QUESTIONS.
FIGURE 2 - UNINTENTIONAL DISENGAGEMENT
3 - gate opens
2 - gate presses
against
non-complaint part
4 - parts disengage
1 - Non-compliant part
Using a connector that is undersized or irregular in shape (1) to connect a snap hook or carabiner could allow the connector to force open the gate of the snap
hook or carabiner. When force is applied, the gate of the hook or carabiner presses against the non-compliant part (2) and forces open the gate (3). This allows
the snap hook or carabiner to disengage (4) from the connection point.
11.0 COMPATIBILITY OF CONNECTORS
Snap hooks and carabiners used with this equipment must be double locking and/or twist lock. Ensure all connections are compatible in size, shape, and strength.
Do not use equipment that is not compatible (Figure 3). Ensure all connectors are fully closed and locked.
Safewaze connectors (hooks, carabiners, and D-rings) are designed to be used only as specied in each product’s user instructions. See Figure 3 for examples of
inappropriate connections. Do not connect snap hooks and carabiners:
• To a D-ring to which another connector is attached.
• In a manner that would result in a load on the gate (with the exception of tie-back hooks).
• In a false engagement, where features that protrude from the snap hook or carabiner catch on the anchor, and without visual conrmation seems to be fully
engaged to the anchor point.
• To each other.
• By wrapping the lifeline around an anchor and securing to lifeline except as allowed for Tie-Back models.
• To any object which is shaped or sized in a way that the snap hook or carabiner will not close and lock, or that roll-out could occur.
• In a manner that does not allow the connector to align properly while under load.
12.0 MAKING CONNECTIONS
10.0 COMPATIBILITY OF COMPONENTS
Unless otherwise noted, Safewaze equipment is designed for, and tested with, associated Safewaze components or systems.
IMPORTANT: If substitutions or replacements are made to the system, ensure all components meet the applicable
ANSI requirements. Read and follow manufacturer’s instructions for all components and subsystems in your
personal fall arrest system. Not following this guidance may jeopardize compatibility of equipment, and possibly aect
the safety and reliability of the overall system.
Any personal fall arrest systems (PFAS) used with the 10’ Tech Tripod must be compliant with current standards, codes, and requirements for each component or
device. The PFAS much include a Full Body Harness and mitigate Average Arresting Force.
If an Self-Retracting Lanyard (SRL) is used with the 10’ Tech Tripod, a clear fall path is required to ensure the SRL will lock in the event of a fall. Working in
obstructed fall paths, cramped areas, or on moving materials like sand and grain, may not allow the user’s body to gain enough speed buildup to cause the SRL to
engage and lock in the event of a fall.

V1.0 2023 Copyright Safewaze
Page 5
Step 1: Ensure the location chosen for installation of the tripod is suciently stable, level, and in an area that allows for proper installation of the tripod.
Installation of the tripod must ensure the lifeline will be situated directly above the intended work location. A Competent Person must determine that the
installation location is capable of supporting intended loads on the tripod. User must be aware of and avoid potential hazards. Hazards can include but
are not limited to electrical, thermal, chemical, or gaseous.
Step 2: At the Head Unit of the tripod, remove the detent pins and adjust each leg to the #1 position of the tripod head (Figure 4). Reinstall detent pins.
Step 3: Remove the leg detent pins. Adjust the tripod leg length as needed (stance 1A is the shortest with no extension needed, 1B is the longest) by
depressing the button locks and sliding the inner sections of the tripod legs out until buttons lock and re-engage (Figure 5). Reinstall detent pins.
Step 4: Prior to standing the tripod into its upright position, it is recommended to install your devices (Section 15). Stand the tripod up. If a height
adjustment or installation of devices is required while in the upright position, there are optional tripod steps available to assist in accessibility.
Step 5: Connect the tripod legs together using the provided safety chain. Ensure all feet of tripod are secured with the chain to resist moving, splaying, or shifting
from the tripod set location.
NOTE: Safety Chain MUST be installed to complete installation. Remove all slack from chain. Do not use tripod without safety chain installed.
14.0 INSTALLATION AND USE (10’ TECH TRIPOD/STANCE 1A AND 1B)
FIGURE 4 - HEAD UNIT/LEG ANGLE ADJUSTMENT FOR 1A and 1B
P
U
S
H
T
O
O
P
E
N
P
U
S
H
T
O
O
P
E
N
Remove
Detent Pin
Head Unit
Hole Pattern
Rotate bracket
to align with
Hole #1
P
U
S
H
T
O
O
P
E
N
#1
Collapsed
#2
Dwg 1 Dwg 2 Dwg 3
Dwg 4
Re-install
Detent Pin
P
U
S
H
T
O
O
P
E
N
• NOTE: Large snap hooks must not be connected to objects which will result in a load on the gate if the hook twists or rotates, unless the snap hook complies
with ANSI Z359.12 and is equipped with a 3,600 lb (16 kN) gate. Check the marking on your snap hook to verify its compatibility.
FIGURE 3 - INAPPROPRIATE CONNECTIONS
Precautions should be taken in the design and installation of a PFAS in order to avoid hazards such as thermal, chemical, electrical, heat, corrosive environments,
explosive gases, toxic substances, moving machinery, abrasive edges, or overhead hazards. Avoid moving machinery, sharp and/or abrasive edges, and any other
hazard that could damage or degrade components of the PFAS.
A Competent Person must conduct an analysis of the workplace and anticipate where workers will be conducting their duties, the route they will take to reach their
work, and any existing and potential fall hazards. The Competent Person must choose the fall protection equipment to be utilized. Selections must account for all
potential hazardous workplace conditions. All fall protection equipment should be purchased in new and unused condition.
13.0 APPLICATION LIMITS
The components of a PFAS used in conjunction with the Safewaze Rescue/Descent System should meet the
requirements of the ANSI Z359 Fall Protection Code.
IMPORTANT:
Contact Safewaze if you have questions regarding compatibility of this equipment. Do not alter or misuse this
equipment. Some subsystem components could aect the performance and the operation of this equipment. Do not
connect this product to moving machinery, or hazards that include chemical, electrical, or gaseous characteristics.
Failure to comply with this warning could result in serious injury or death.
WARNING:

V1.0 2023 Copyright Safewaze Page 6
FIGURE 5 - TRIPOD LEG EXTENSION
Dwg 1
Press silver buttons, and release to
adjust legs heights.
A. denotes the shortest leg
configuration possible.
B. denotes the longest.
Button Lock Operation
Inner
Leg Section
Inner
Leg Section
“CLICK”
“CLICK”
Slide-Out
Slide-Out
Button Locks
Outer Sleeve
Dwg 2
14.1 INSTALLATION AND USE (10’ TECH TRIPOD/STANCE 2A AND 2B)
Step 1: Ensure the location chosen for installation of the tripod is suciently stable, level, and in an area that allows for proper installation of the tripod.
Installation of the tripod must ensure the lifeline will be situated directly above the intended work location. A Competent Person must determine that the
installation location is capable of supporting intended loads on the tripod. User must be aware of and avoid potential hazards. Hazards can include but
are not limited to electrical, thermal, chemical, or gaseous.
Step 2: At the Head Unit of the tripod, remove the detent pins and adjust each leg to the #2 position of the tripod head (Figure 6). Reinstall detent pins.
Step 3: Remove the leg detent pins. Adjust the tripod leg length as needed (stance 2A is the shortest with no extension needed, 2B is the longest) by depressing
the button locks and sliding the inner sections of the tripod legs out until buttons lock and re-engage (Figure 5). Reinstall detent pins.
Step 4: Prior to standing the tripod into its upright position, it is recommended to install your devices (Section 15). Stand the tripod up. If a height
adjustment or installation of devices is required while in the upright position, there are optional tripod steps available to assist in accessibility.
Step 5: Connect the tripod legs together using the provided safety chain. Ensure all feet of tripod are secured with the chain to resist moving, splaying, or shifting
from the tripod set location.
NOTE: Safety Chain MUST be installed to complete installation. Remove all slack from chain. Do not use tripod without safety chain installed.

V1.0 2023 Copyright Safewaze
Page 7
Step 1: Ensure the location chosen for installation of the tripod is suciently stable, level, and in an area that allows for proper installation of the tripod.
Installation of the tripod must ensure the lifeline will be situated directly above the intended work location. A Competent Person must determine that the
installation location is capable of supporting intended loads on the tripod. User must be aware of and avoid potential hazards. Hazards can include but
are not limited to electrical, thermal, chemical, or gaseous.
Step 2: At the Head Unit of the tripod, remove the detent pins and adjust each leg and adjust each leg to their necessary position based on operational
requirements. Reinstall detent pins.
Step 3: Remove the leg detent pins. Adjust the tripod leg length as needed (stance 2A is the shortest with no extension needed, 2B is the longest) by
depressing the button locks and sliding the inner sections of the tripod legs out until buttons lock and re-engage. Reinstall detent pins.
Step 4: Prior to standing the tripod into its upright position, it is recommended to install your devices (Section 15). If a height adjustment or installation of
devices is required while in the upright position, there are optional tripod steps available to assist in accessibility.
Step 5: Connect the tripod legs together using the provided safety chain. Ensure all feet of tripod are secured with the chain to resist moving, splaying, or
shifting from the tripod set location. It may be necessary to congure the two tripod feet towards the nearest edge in a vertical position for best grip.
NOTE: Safety Chain MUST be installed to complete installation. Remove all slack from chain. Do not use tripod without safety chain installed.
14.2 INSTALLATION AND USE (10’ TECH TRIPOD - OVER EDGE)
The 10’ Tech Tripod is designed for use over an edge. Over edge installations are inherently more complex than a standard tripod conguration. Users must
ensure that adequate anchorage is available for tie-back of the tripod. For edge applications, there must be (2) tie-back anchor locations to secure the tripod.
Each tie-back anchorage must be at least 6x the users weight capacity.
FIGURE 6 - HEAD UNIT/LEG ANGLE ADJUSTMENT FOR 2A and 2B
P
U
S
H
T
O
O
P
E
N
P
U
S
H
T
O
O
P
E
N
Remove
Detent Pin
Head Unit
Hole Pattern
Rotate bracket
to align with
Hole #2
P
U
S
H
T
O
O
P
E
N
#1
Collapsed
#2
Dwg 1 Dwg 2 Dwg 3
Dwg 4
Re-install
Detent Pin
P
U
S
H
T
O
O
P
E
N

V1.0 2023 Copyright Safewaze
LeadingEdge
6x User
Weight
Capacity. 6x User
Weight
Capacity.
30kN
15kN15kN
30kN
15kN15kN
DANGER WORK ZONE DANGER WORK ZONE DANGER WORK ZONE
ANSIZ359.14,ANSIA10.32
OSHA1910.66,OSHA1926.502
DANGER WORK ZONE DANGER WORK ZONE DANGER WORK ZONE
Page 8
FIGURE 7 - OVER EDGE USE
Step 1: Ensure the location chosen for installation of the tripod is suciently stable, level, and in an area that allows for proper installation of the tripod.
Installation of the tripod must ensure the lifeline will be situated directly above the intended work location. A Competent Person must determine that the
installation location is capable of supporting intended loads on the tripod. User must be aware of and avoid potential hazards. Hazards can include but
are not limited to electrical, thermal, chemical, or gaseous.
Step 2: At the Head Unit of the tripod, remove the detent pins and adjust each leg to their necessary position based on operational requirements. Reinstall the
detent pin.
Step 3: Pre-measure the trench and adjust tripod legs accordingly. Remove the leg detent pins. Adjust the leg length as needed by
depressing the button locks and sliding the inner sections of the tripod legs out until buttons lock and re-engage. Reinstall detent pins.
Step 4: Prior to standing the tripod into its upright position, it is recommended to install your devices (Section 15). If a height adjustment or installation of
devices is required while in the upright position, there are optional tripod steps available to assist in accessibility. Stand the tripod into an upright position
and ensure all feet are stable.
Step 5: Connect the tripod legs together using the provided safety chain. Ensure all feet of tripod are secured with the chain to resist moving,
splaying, or shifting from the tripod set location. Also check the anchorage lines to ensure they are secure.
14.3 INSTALLATION AND USE (10’ TECH TRIPOD - TRENCH)
The 10’ Tech Tripod is suitable for use in Trench operations. Although not as complex as Over Edge installation, there are potential hazards that must be taken
into consideration when installing the Tech Tripod for Trench operations. Trench applications may require workers on either side of opening to properly operate the
tripod and/or associated devices (Figure 9).
WARNING
Trench environments present additional hazards not covered in this manual. These hazards may include but
are not limited to collapse, cave-in, atmospheric contamination, standing-water, inadequate shoring, sloping
etc. Refer to standards and regulations specic to the type of work being performed. Prepare and establish a
rescue plan prior to work operations.

V1.0 2023 Copyright Safewaze
Page 9
FIGURE 8 - TRENCH USE
3-Way System, Personnel Winch, Material Winch:
Step 1: The Universal Tripod Bracket is designed to allow quick connection and disconnection of up to 3 Safewaze Devices to the 10’ Tech Tripod. One
section of the bracket (xture plate) comes pre-installed onto the tripod leg, with the second component (device bracket) pre-attached to the device.
NOTE: Although pre-installed onto a leg of the tripod, the xture plate can be adjusted in height and orientation by loosening the lock nuts on the
back of the xture plate and sliding the plate up or down the green section, or rotating to the inside or outside, of the tripod leg. With the plate in the
selected location on the tripod leg, re-tighten the lock nuts to 15 ft-lb. Do not over tighten. The bracket can also be moved from one tripod leg to
another if necessary, and may be oriented on the inside or outside of the tripod leg, based on jobsite parameters or user preference.
Step 2: Remove the detent pin from the xture plate and position the device with the lifeline oriented towards the top of the tripod and the device bracket hooks
facing down (Figure 10, Step 1).
Step 3: Place the device bracket inside the xture plate, ensuring the device bracket hooks are properly seated onto the crossbar of the xture plate. With the
device hooks securely seated on the crossbar, rotate the device upwards until holes in both sections of the bracket are realigned. Re-install the detent
pin through the aligned holes (Figure 10, Step 2). The device lifeline can now be routed through appropriate rigging at the head unit (Figure 10).
15.0 COMPATIBLE DEVICES/CONNECTION POINTS
FIGURE 9 - UNIVERSAL BRACKET/DEVICE CONNECTION
Device Installation
(Outside of Tripod Leg)
Device Installation
(Inside of Tripod Leg)
Device
Device
Bracket
Tripod
Leg
Device Bracket
Hooks
Fixture Plate
Detent Pin
Step 1
Device
Device
Bracket
Tripod
Leg
Fixture Plate
Detent
Pin
Step 2
ANSI Z359.14-2021,ANSI Z359.4-2013
OSHA1910.140, OSHA 1910.66
OSHA1926.502
470-00145
3-WAY SELF RETRACTING
LANYARD
3-WAY SELF RETRACTING
LANYARD
ANSI Z359.14-2021,ANSI Z359.4-2013
OSHA1910.140, OSHA 1910.66
OSHA1926.502
470-00145
3-WAY SELF RETRACTING
LANYARD
3-WAY SELF RETRACTING
LANYARD
30kN
15kN 15kN
P
U
S
H
T
O
O
P
E
N
Device
Work Area
Rigging
*Carabiner (FS1015) and
pulley (020-11025) can be sold
separately if expanding system
with additional devices.
P
U
S
H
T
O
O
P
E
N
P
U
S
H
T
O
O
P
E
N
30kN
15kN15kN
30kN
15kN15kN
ANSIZ359.14-2021,ANSI Z359.4-2013
OSHA1910.140,OSHA 1910.66
OSHA1926.502
470-00145
3-WAYSELF RETRACTING
LANYARD
3-WAYSELF RETRACTING
LANYARD
DANGER WORK ZONE DANGER WORK ZONE DANGER WORK ZONE
Leading Edge

V1.0 2023 Copyright Safewaze
FIGURE 10 - HEAD UNIT
5,000 lbs.(2268 kg.)
Head Unit Anchor Points
SRL, Rescue, and Descent Devices:
Step 1: The 10’ Tech Tripod is designed to allow quick connection and disconnection of Rescue and Descent Devices to the Head Unit of the Tripod.
Step 2: Devices can connect to the captive eye or any of the six anchor points on the Head Unit (Figure 11).
Step 3: Do not allow lifelines to cross. Utilize extra caution to keep the lifelines free from any obstructions including, but not limited to, surrounding objects, tools,
equipment, moving machinery, co-workers, yourself, or possible impact from overhead objects.
Page 10
P
U
S
H
T
O
O
P
E
N
DANGER WORK ZONE DANGER WORK ZONE
PartNo: 019-11008
PersonnelWinch
BatchNo:xxxxx SerialNo:xxxxx
WorkingLength:115 ft. (35.05 m)
Material:Lifeline(Galvanized Steel Wire Rope)
1/4”(Construction7x19)
Mfg.Date:
RatedLoad:310 lbs.
Complieswith
ANSIZ117.1-2016, Z359.4-2013,A10.32-2012
OSHA1926.502,1910.140, 1926.21
Readmanufacturer’sinstructionscarefully supplied with this product at
timeofshipment.Instructions must be followed for proper use,
maintenanceandinspection.Use only with OSHA/ANSI compliant
fallarrestorrestraint systems. Use of this product for lowering
orraisingaperson, requires use of a backup fall arrest system by that
person.Theremustbe direct communication with the person being
hoistedatalltimes. Avoid contact with sharp edges and abrasive surfaces.
Alwayskeepthelifeline taut and do not allow slack in the system. Make
onlycompatibleconnections.
ProperUse:Install the winch on the tripod with the winch bracket.
Unreelthelifelineto connect to the user’s harness by rotating the handle
inacounterclockwise direction. To raise the user, rotate the handle in a
clockwisedirection.Tolower the user, first rotate the handle clockwise to
releasethebrake,and then rotate in a counter clockwise direction which
willlowertheuser as needed.
WARNING
ANYALTERATION,ABUSEORMISUSE OF THIS PRODUCT
VOIDSTHEWARRANTY!
Inspection:
Usermustinspecttheproduct before each use. Every 6 months a competent
personmustcompletefinalinspection of the product and record initials in the
inpsectionlog.
YRMO
J F M A M J A S O ND
J
Forcerequiredto operate rescue device when loaded to its
fullcapacity: 18.5 lbs. / 8.3 kg.
i
ReadUser’sManualCarefully Before Use
MadeinIndia
ANSIZ359.14,ANSIA10.32
OSHA1910.66,OSHA1926.502
0
2
0
0
9
7
30kN
15kN 15kN
DANGER WORK ZONE
Personnel Winch
ANSI Z359.14-2021
Compliant SRL
ANSI Z359.11-2021
Compliant FBH
FIGURE 11 - EXAMPLE SYSTEM CONNECTIONS
WARNING The Cotter Pins on the Head Unit are permanent and not intended to be removed. Do not remove them. Only
adjust the Head Unit via the removable dent pin.

V1.0 2023 Copyright Safewaze
Page 11
Choose hole to place step at
desired user height.
FIGURE 12 - ATTACHABLE/REMOVABLE STEP
Perimeter Warning Line (022-11031):
Step 1: The Perimeter Warning Line (sold separately) can be easily installed onto the tech tripod to prevent unauthorized entry into the work area. Install the
Perimeter Warning Line Brackets onto the outside surface of each leg of the tripod.
Step 2: Thread the end of the Perimeter Warning Line through each of the 3 brackets.
Step 3: Pull the free end of the warning line through the cam buckle until line is snug and secure any excess webbing to prevent a trip hazard.
Attachable/Removable Steps (022-11030):
Step 1: The Attachable/Removable Steps (sold separately) can be easily installed onto the tech tripod. The two attachable/removable steps assist in device or
accessory connection at the head unit of the tripod.
Step 2: The steps pin into the tripod frame using detent pins.
NOTE: Although the tripod steps are mounted to the inside of the tripod, climbing operations must be approached and utilized from outside of the
tripod frame (Figure 12).

V1.0 2023 Copyright Safewaze
Should the 10’ Tech Tripod be exposed to the force of a fall, or shows damage consistent with the eects of a fall, it must be IMMEDIATELY removed from service
and tagged “Unusable.” Equipment must then be disposed of (Section 20).
16.0 AFTER A FALL
FIGURE 13 - PERIMETER WARNING LINE
Page 12
Only Safewaze, or entities authorized in writing by Safewaze, may make repairs to Safewaze fall protection equipment.
Remove the Conned Space System from use if inspection reveals an unsafe or defective condition. If unsafe or defective condition is found, dispose of the
component(s) as recommended in Section 20.
Use a dry cloth or brush and clean devices. The Tech Tripod can be cleaned with water and a mild soap solution. Allow components to air dry. DO NOT use heat.
Never store any component when wet.
Store Safewaze Conned Space system components in a cool, dry, and clean environment out of direct sunlight. Utilize the storage bag and component pockets
to neatly store the tripod and components. Avoid areas where chemical vapors may exist. Thoroughly inspect the system after any period of extended storage.
17.0 MAINTENANCE AND SERVICE
The 10’ Tech Tripod must be inspected prior to each use and at least annually by a Competent Person other than the user. Inspect the tech tripod for absence or
illegibility of markings or damaged components that may aect the correct function of the tripod. Inspect for any damage to tech tripod components such as sharp
edges, cracks, deformation, excessive corrosion, chemical exposure, missing or damaged detent pins, or unauthorized alteration or modication to the tripod.
18.0 INSPECTION
In addition to inspection prior to each use, the 10’ Tech Tripod must be inspected annually by a Competent Person other than the user. Severe or harsh
environments may require more frequent inspections.
See Figure 14 for more information regarding inspection frequency requirements.
18.1 INSPECTION FREQUENCY

V1.0 2023 Copyright Safewaze
Page 13
Equipment inspectors must be trained to look for damage to any of the components of the system. If inspection reveals an unsafe or defective condition, remove
the system from service. See Figure 14 for inspection criteria and inspection diagram.
18.2 COMPONENT INSPECTION
FIGURE 14 - INSPECTION DIAGRAM/10’ TECH TRIPOD
10’ Tech Tripod inspection:
1. Inspect Head Unit for damage such as cracks, deformation, corrosion. Ensure eye-bolt anchor point is undamaged and serviceable. Inspect that all
detent pins, bolts, etc., are present and functional.
2. Inspect exterior tripod leg sleeve for any warping, bends, cracks, corrosion, or other damage. Inspect that all detent pins, bolts, etc., are present and
functional. Ensure no damage exists that would prevent Interior Tripod Leg from moving freely during adjustment.
3. Inspect the Interior Tripod Leg for any bends, excessive corrosion, warping, cracks, or other potential damage that could possibly prevent the leg from
moving freely during adjustment.
4. Inspect that tripod feet are present and in good working condition. Feet should swivel freely and not bind or stick.
5. Inspect tripod chain for any kinks, broken links, corrosion, chemical exposure or any other damage.
6. Inspect the tripod steps for any deformation, cracks, bends, corrosion and overall condition. Inspect that all detent pins, bolts, etc., are present and
functional.
7. Inspect the Perimeter Warning Line for tears, adequate tension, and signs of any other damage.
DANGERWORK ZONE DANGERWORK ZONE DANGER WORK ZONE DANGERWORK ZONE
10’ Tech Tripod
1 Head Unit
2Exterior Tripod Leg Sleeve
3 Interior Tripod Leg
4 Tripod Feet
5 Safety Chain
6 Tripod Steps (if equipped)
7 Perimeter Warning Line (if equipped)
1
2
6
7
3
5
4
NOTE: Refer to specic manufacturer’s instructions for any devices connected to the 10’ Tech Tripod.
The working life of the 10’ Tech Tripod System is determined by work conditions, care, and inspection provided. So long as the system and all components passes
inspection, it may remain in service. If any component of the system is exposed to the forces of a fall, it must be removed from service and tagged “Unusable.”
19.0 PRODUCT LIFE
FIGURE 14 - INSPECTION FREQUENCY
Type of Use Application Examples Conditions of Use Inspection Frequency by
Competent Person
Infrequent to Light Rescue and Conned Space, Factory
Maintenance
Good Storage Conditions, Indoor
or Infrequent Outdoor Use, Room
Temperature, Clean Environments
Annually
Moderate to Heavy Transportation, Residential
Construction, Utilities, Warehouse
Fair Storage Conditions, Indoor
and Extended Outdoor Use, All
Temperatures, Clean or Dusty
Environments
Semi-Annually to Annually
Severe to Continuous Commercial Construction, Oil and
Gas, Mining
Harsh Storage Conditions, Prolonged
or Continuous Outdoor Use, All
Temperatures, Dirty Environment
Quarterly to Semi-Annually

V1.0 2023 Copyright Safewaze Page 14
FIGURE 16 - LABEL EXAMPLES
21.0 LABELING
5,000 lbs.(2268 kg.)
(x6)
Choose hole to place step at
desired user height.
Press silver
buttons, and
release to
adjust legs
heights. A.
denotes the
shortest leg
configuration
possible. B.
denotes the
longest.
74.5”
(189.2cm)
119”
(302.2cm)
86.5” Ø
(219.9cm Ø)
127.1” Ø
(323cm Ø)
XXXXXX
XX/XXXX
022-11029
022-11033
022-11034
022-11035
022-11036
022-11037
Other:
WARNING
User must read and understand
all instructions provided with
this product, at time of
shipment, prior to use. Misuse
of this product or failure to
follow instructions may result in
serious injury or death. Make
only compatible connections.
ANSI Z359.18-2017 Type T,
Z359.4-2013, Z117.1-2022
OSHA 1910.140, 1926.502
INSPECTION
INSPECTION LOG
Date Initial Date Initial
Tripod must be inspected prior
to each use. This product must
be inspected by a competent
person at least every 6 months,
or more frequently in harsh
environments. Do not use if
inspection reveals
damaged/defective
components.
97”
(246.3cm)
SPECIFICATIONS:
Meets:
User Capacity:
System Capcity:
Material Lifting:
Minimum Breaking
Strength:
Materials: Aluminum, Zinc Plated Steel
ANSI 130-310 lbs. (59-141 kg)
OSHA up to 420 lbs. (191 kg)
620 lbs. (281 kg) Max
5,000 lbs. (2268 kg)
Place warning line when desired
configuration is reached.
53.5”
(135.9cm)
135” Ø
(343.1cm Ø)
218.2” Ø
(554.3cm Ø)
It is up to competent/qualified
person to determine best
configuration for edge work.
Every configuration must
have two tie back rope/straps
6x user weight capacity.
6x user weight
capacity
84”
(213.4cm)
Use foot spikes for
over edge
configurations
*Sold Separately
(#022-11031)
Edge
Edge
Dispose of the 10’ Tech Tripod System if inspection reveals an unsafe or defective condition. Any component of the 10’ Tech Tripod that is damaged and
unserviceable should be destroyed so as not to allow accidental re-use.
20.0 DISPOSAL

V1.0 2023 Copyright Safewaze
Page 15
Product lifetime is indenite as long as it passes pre-use and Competent Person inspections. User must inspect prior to each use. A Competent Person other than
the user must complete formal inspection at least annually.
22.0 INSPECTION LOG
INSPECTION LOG
If equipment fails inspection
IMMEDIATELY REMOVE FROM SERVICE
Inspection
Date:
Inspector: Pass/Fail: Comments/
Corrective Action:
INSPECTION LOG
ANNUAL FORM
IMPORTANT:
Competent Person inspections must be recorded in the inspection table included in this manual as well as the
inspection table labels on each product individually. The Competent Person must place their initials in the block which
corresponds with the month and year that the inspection is performed. All individual labels on equipment will be
initialed in the same manner.

V1.0 2023 Copyright Safewaze

V1.0 2023 Copyright Safewaze
Safewaze
225 Wilshire Ave SW
Concord, NC 28025
PHONE: 1-800-230-0319
FAX: 1-704-262-9051
EMAIL: [email protected]
Web: safewaze.com
This manual suits for next models
5
Table of contents
Other SafeWaze Camera Accessories manuals