Sage SMART OVEN PRO User manual

the Smart Oven®Pro
Instruction Book - BOV820

2
SAGE
RECOMMENDS
SAFETY FIRST
At Sage‰by Heston
Blumenthal‰we are very
safety conscious. We design
and manufacture consumer
products with the safety of you,
our valued customer, foremost
in mind. In addition we ask
that you exercise a degree of
care when using any electrical
appliance and adhere to the
following precautions.
IMPORTANT
SAFEGUARDS
READ ALL
INSTRUCTIONS BEFORE
USE AND SAVE FOR
FUTURE REFERENCE
•Before using for the first
time please ensure that
your electricity supply
is the same as shown
on the rating label on
the underside of the
appliance. If you have any
concerns please contact
your local electricity
company.
•Your Sage‰by Heston
Blumenthal‰appliance
includes a BS 13 amp
moulded mains plug on
the supply cord.
•Should you need to
change this plug, please
complete the rewiring as
follows (after safe disposal
of the moulded plug).
•Please note that a cut off
plug inserted into a socket
is a serious danger risk.
2 Sage Recommends Safety First
8 Components
10 Quick Start Guide
12 Functions
−Operating your oven 12
−GRILL function 13
−TOAST function 14
−CRUMPET function 15
−BAKE function 16
−ROAST function 17
−PIZZA function 18
−COOKIES function 19
−REHEAT function 20
−WARM function 21
−SLOW COOK function 21
−Replacing the oven light 23
24 Care & Cleaning
26 Troubleshooting
Contents

3
•Wires are coloured as
follows:
− Blue = Neutral
− Brown = Live
− Green & Yellow = Earth
•As the colours of the wire
may not correspond with
the coloured markings
which identify the
terminals in
your plug, please refer to
the following:
− The Blue wire must
be connected to
the terminal which
is marked ‘N’.
− The Brown wire
must be connected
to the terminal
which is marked
with the letter ‘L’.
− The Green & Yellow
wire must be connected
to the terminal which is
marked with the letter E
or the earth symbol .
•Please note that if a 13
amp plug is used, a 13
amp fuse should be used.
•Remove and safely
discard any packing
materials and promotional
labels before using the
oven for the first time.
•To avoid choking hazard
for young children,
remove and safely dispose
the protective cover fitted
on the power plug.
•Do not use the appliance
near the edge of a
benchtop or table. Ensure
the surface is stable, level,
heat-resistant and clean.
•Do not use on a cloth-
covered surface, near
curtains or other
flammable materials.
•A fire may occur if the
oven is covered or touches
flammable material,
including curtains,
draperies, walls, and the
like, when in operation.
•Do not use the appliance
on (or close to) a hot
gas or electric burner, or
where it could touch a
heated oven or surface.

4
•Do not let the power cord
hang over the edge of a
table or counter, or touch
hot surfaces.
•To avoid electric shock,
do not immerse the cord,
plug or motor base in
water (or other liquids).
•When operating the oven,
keep a minimum distance
of 10cm of space on both
sides of the appliance and
15cm above.
•The temperature of
accessible surfaces
may be high when the
appliance is operating.
•Do not touch hot surfaces.
To avoid burns, use
extreme caution when
removing pans, dishes
and accessories such as
the included grilling rack
and roasting pan, that
contain hot oil or other
hot liquids.
•Do not lay cooking
utensils, roasting pans or
dishes on the glass door.
•Do not leave the door
standing open for
extended periods of time.
•Do not store any item on
top of the oven when in
operation except those
described on page 22 of
this book.
•Do not place cardboard,
plastic, paper, or other
flammable materials in
the oven.
•Do not cover crumb tray
or any part of the oven
with metal foil. This will
cause overheating of the
oven.
•Caution should be
exercised when using
pans and dishes
constructed of materials
other than metal. Ensure
pans and dishes are oven
safe before using in the
oven.

5
•Caution should be
exercised when using lids
in the oven, as pressure
build up in a covered pan
or dish may cause hot
ingredients to expel or
the dish to crack. Do not
place sealed or airtight
containers in the oven.
•Oversized foods and
metal utensils must not
be inserted in the oven as
they may create fire or risk
of electric shock.
•The use of accessories
and attachments not
recommended or supplied
with this oven may cause
injuries.
•This appliance is for
household use only.
Do not use in any type
of moving vehicles.
Do not use the appliance
outdoors, or for anything
other than its intended
use. Misuse can cause
injury.
•If the appliance is to be:
left unattended, cleaned,
moved, assembled or
stored, always switch
the unit off and unplug
the cord from the power
outlet and allow to cool
completely.
•Do not clean with metal
scouring pads. Pieces
can break off the pad and
touch electrical parts,
creating a risk of electric
shock.
•The appliance can be
used by children aged
from 8 years and above
and persons with reduced
physical, sensory or
mental capabilities, or
lack of experience and
knowledge, if they have
been given supervision
or instruction concerning
use of the appliance in a
safe way and understand
the hazards involved.
•Children shall not play
with the appliance.

6
•Cleaning and user
maintenance shall not be
made by children unless
they are older than 8 and
supervised.
•Keep the appliance and
its cord out of reach of
children less than 8 years.
•It is recommended to
regularly inspect the
appliance. Do not use
the appliance if power
cord, power plug or
appliance becomes
damaged in any way. If
damaged or maintenance
other than cleaning is
required, please contact
Sage Customer Service
on 0808 178 1650 |
0333 0142 970 or go to
sageappliances.co.uk.
•The appliance is not
intended to be operated
by means of external
timer or separate remote
control system.
SPECIFIC
INSTRUCTIONS
FOR BOV820
•We recommend the oven
is operated on a dedicated
circuit separated from
other appliances. Consult
a licensed and qualified
electrician if you are
unsure.
•To turn off the oven,
press the START/
CANCEL button on the
control panel. The oven
is off when the button
backlights turns off.
•Regularly clean the
crumb tray. To clean the
crumb tray:
−Turn OFF the oven,
−Allow the oven to cool
completely and then
remove the power cord
from the power outlet.
−Remove the crumb tray
and clean with warm
soapy water.
−Dry the tray completely
before inserting it
securely back in place.

7
WARNING
To reduce the risk
of FIRE, ELECTRIC
SHOCK, EXPOSURE
TO EXCESSIVE UV
RADIATION, OR INJURY
TO PERSONS:
•Always unplug the oven
and let all parts (including
the bulb housing, glass
cover and enclosure)
cool completely before
replacing bulb.
•Only use a 25 Watt, 220–
240V, G9 type oven bulb.
•Always use a soft cloth
when handling the bulb
and do not directly touch
the surface as oil from
your skin can damage
the bulb.
•Do not look directly at a
glowing bulb.
•Do not remain in the light
if skin feels warm.
•Keep bulb away from
materials that may burn.
FOR HOUSEHOLD USE ONLY
SAVE THESE INSTRUCTIONS
•The bulb gets hot quickly.
Only ever use the light
button to turn on the light.
•Do not operate the light
if the bulb housing,
glass cover, UV filter or
enclosure are missing or
damaged.
The symbol shown
indicates that this
appliance should not
be disposed of in normal
household waste. It should
be taken to a local authority
waste collection centre
designated for this purpose
or to a dealer providing this
service. For more
information, please contact
your local council office.
This symbol indicates,
temperature of accessible
surfaces may be high when
the appliance is operating
and for some time after use.

8
Components
A. Grilling rack
B. 28 x 33.5cm enamel roasting pan
C. 30cm non-stick pizza pan
D. Door handle
E. Oven light
F. Top rack height position:
GRILL function.
G. Middle rack height position:
TOAST, Crumpet, PIZZA and
COOKIES functions.
H. Bottom rack height position:
BAKE, ROAST, REHEAT, WARM and
SLOW COOK functions.
I. Wire rack
J. Crumb tray
K. Ventilation slots
L. Power Plug
D
A
B
C
J
K
L
D
FE
G
H
I

9
D
A
B
C
J
K
L
D
FE
G
H
I
M
N
S
T
U
O
P
Q
R
M. LCD screen
N. START/CANCEL button
O. FUNCTION dial
P. TEMPERATURE conversion button
Q. TEMPERATURE dial/toast and crumpet
darkness control
R. TIME dial/toast and crumpet
slice selection
S. OVEN LIGHT button
T. CONVECTION button
U. FROZEN FOODS button
Accessories sold separately:
Bamboo Cutting Board
Part No: BOV800CB

10
Quick Start Guide
This Quick Start Guide is designed for first time use.
For safety and more information, refer to rest of the Instruction Booklet.
PREPARING THE OVEN
In order to remove any protective substances
on the heating elements, it is necessary to run
the oven empty for 15 minutes. Ensure the
area is well ventilated as the oven may emit
vapours. These vapours are safe and are not
detrimental to the performance of the oven.
1. Remove and safely discard any packing
material, promotional labels and tape from
the oven.
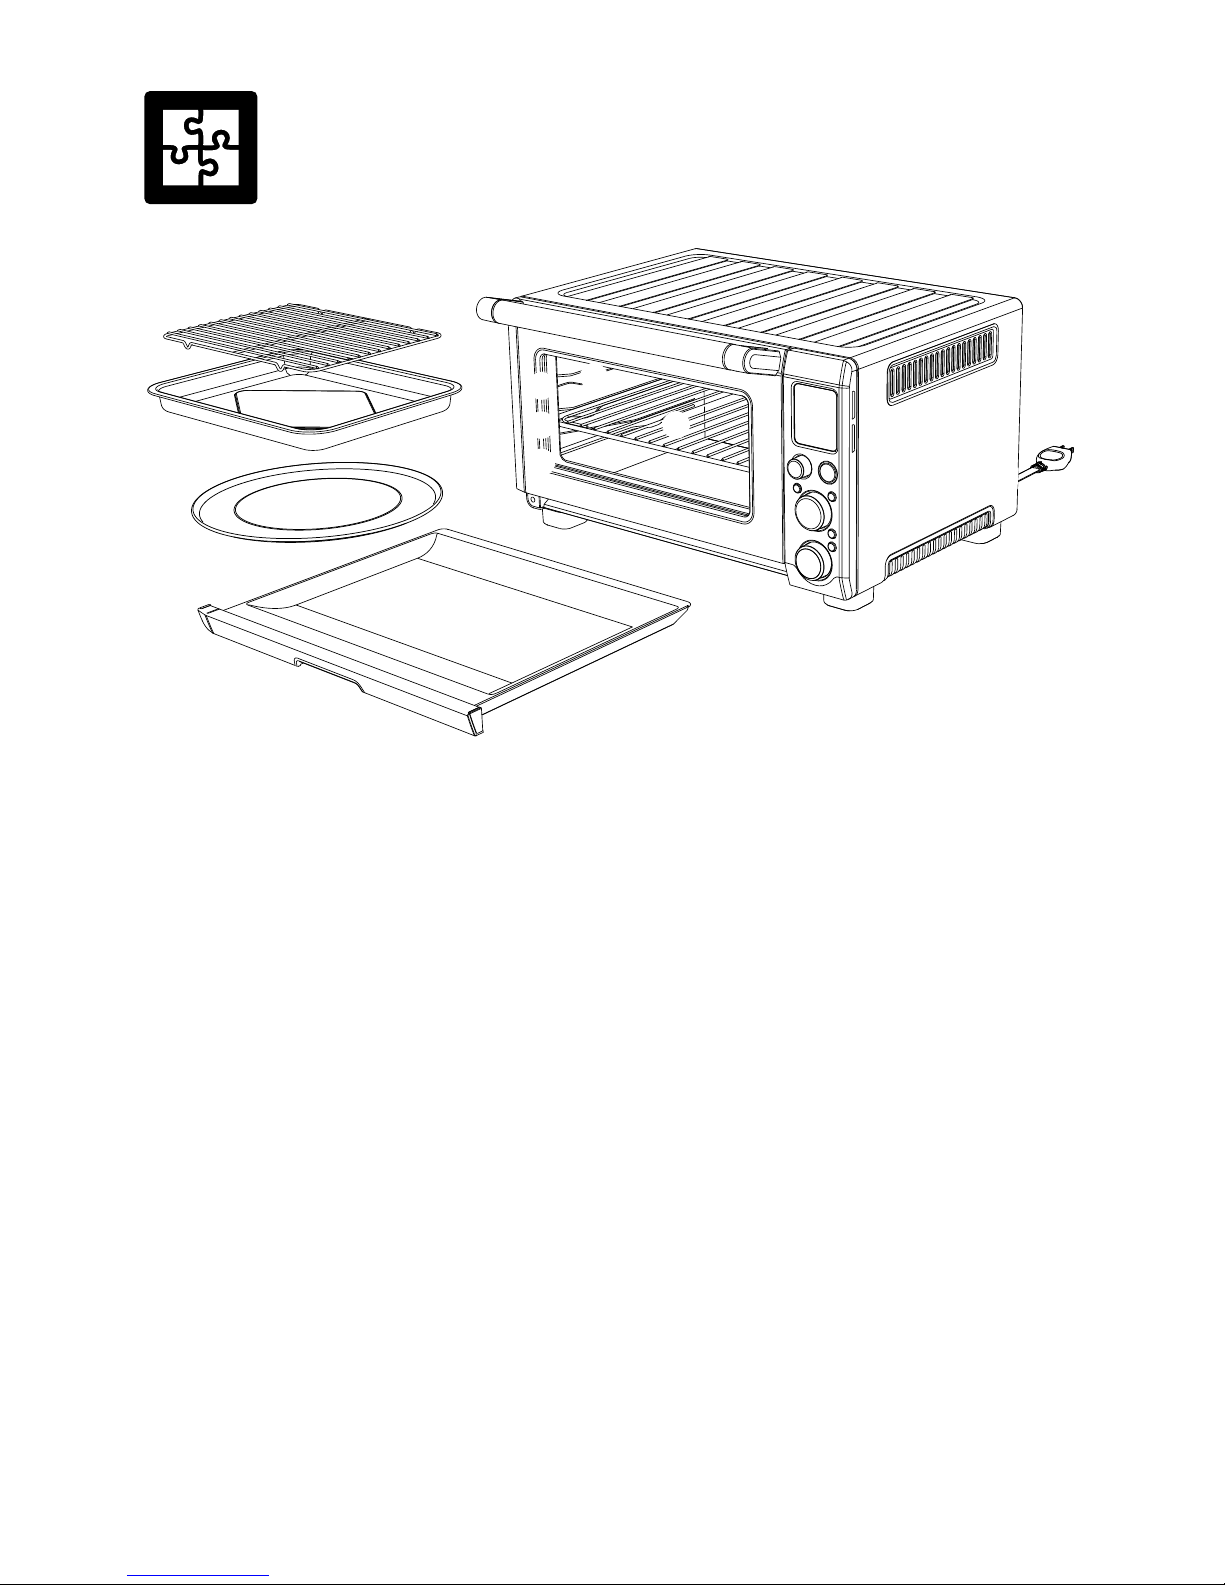
2. Remove the crumb tray, wire rack, grilling
rack, roasting pan and pizza pan from the
polyfoam packaging. Wash them with a soft
sponge in warm, soapy water then rinse and
dry thoroughly.
3. Wipe the interior of the oven with a soft,
damp sponge. Dry thoroughly.
4. Place the oven on a flat, dry surface. Ensure
there is a minimum distance of 10cm of
space on both sides of the appliance and
15cm above.
5. Insert the crumb tray into the oven.
6. Unwind the power cord completely and
insert the power plug in to a grounded
power outlet.
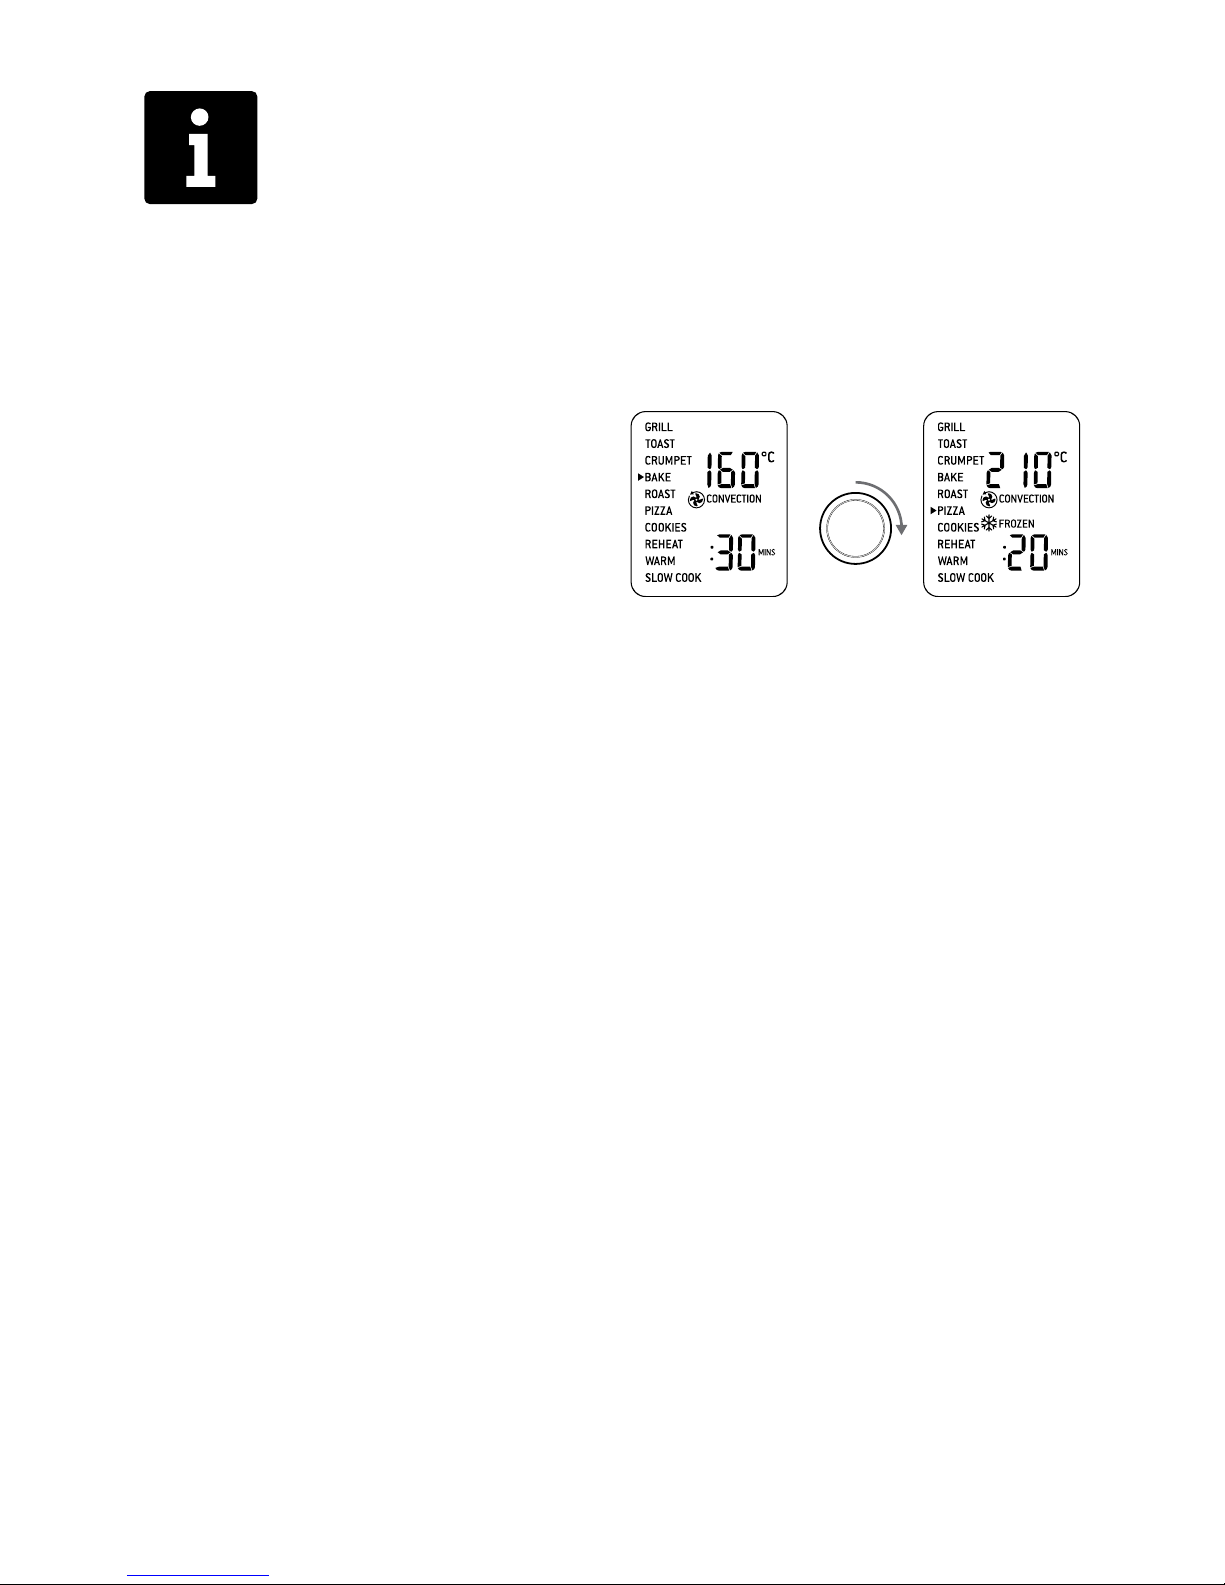
7. The oven alert will sound and the LCD
screen will illuminate. The function options
will appear with an indicator on the
BAKE setting.
8. Turn the FUNCTION dial to the right until
the indicator reaches the PIZZA function.
ROTATE
FUNCTION
DIAL
9. Press the START/CANCEL button. The
button backlight will illuminate red, the
LCD screen will illuminate orange and the
oven alert will sound.
10. The LCD screen will indicate a blinking
‘PREHEATING’. Once the oven has reached
the set temperature, the temperature alert
will sound.
11. The timer will be displayed and
automatically begin to count down.
12. At the end of the cooking cycle, the oven
alert will sound, the START/ CANCEL
button backlight will go out and the
LCD screen will illuminate blue.
13. The oven is now ready to use.

11
ELEMENT IQ‰
The Sage Smart Oven‰Pro features Element IQ‰, a cooking technology that adjusts the power of
the heating elements to cook food more evenly and quickly. Each of the oven’s functions is preset
with our recommended setting, however we suggest experimenting with these depending on the
recipe, amount of food and your personal taste.
Your customised setting will remain in the memory of the oven until changed or the oven is
unplugged from the power outlet.
OVEN FUNCTIONS OVERVIEW
FUNCTION RACK
POSITION
OPTIONAL
SETTINGS
PRESETS PREHEAT RANGE
GRILL Top TEMPERATURE
CONVERSION HI
10 MINS
No HI, MED, LO
Up to 20 MINS
TOAST Middle FROZEN FOODS Darkness 4
Slices 4
No Darkness 1–7
Slices 1–6
CRUMPET Middle FROZEN FOODS Darkness 4
Slices 4
No Darkness 1–7
Slices 1–6
BAKE Bottom CONVECTION
TEMPERATURE
CONVERSION
160°C
CONVECTION
30 MINS
Yes 50°C–230°C
Up to 10:00 HRS
ROAST Bottom CONVECTION
TEMPERATURE
CONVERSION
175°C
CONVECTION
1:00 HRS
Yes 50°C–230°C
Up to 10:00 HRS
PIZZA Middle CONVECTION
TEMPERATURE
CONVERSION
FROZEN FOODS
210°C
CONVECTION
FROZEN FOODS
20 MINS
Yes 50°C–230°C
Up to 2:00 HRS
COOKIES Middle CONVECTION
TEMPERATURE
CONVERSION
FROZEN FOODS
175°C
CONVECTION
11 MINS
Yes 50°C–230°C
Up to 1:00 HRS
REHEAT Bottom CONVECTION
TEMPERATURE
CONVERSION
165°C
CONVECTION
15 MINS
No 50°C–230°C
Up to 2:00 HRS
WARM Bottom CONVECTION
TEMPERATURE
CONVERSION
70°C
1:00 HRS
No 50°C–230°C
Up to 2:00 HRS
SLOW
COOK
Bottom CONVECTION HI
CONVECTION
4:00 HRS
Yes HI, 4:00 – 6:00 HRS
LO, 8:00 – 10:00 HRS
Automatic KEEP WARM
Up to 2:00 HRS

12
Functions
OPERATING YOUR OVEN
1. Position the wire rack so the spokes face
upward and insert it into the desired
rack position. The rack positions are
conveniently printed on the right-hand side
of the oven door window.
2. Turn the FUNCTION dial until the
indicator on the LCD screen reaches
the desired setting.
3. The top figure on the LCD screen
indicates the preset cooking temperature
for the selected setting. For the TOAST
and CRUMPET settings it indicates the
darkness level. Turn the TEMPERATURE
dial to the left to reduce the temperature or
to the right to increase the temperature.
REDUCE
TEMPERATURE
INCREASE
TEMPERATURE
ROTATE
TEMPERATURE
DIAL
4. The bottom figure on the LCD screen
indicates the preset cooking time for
the selected setting. For the TOAST and
CRUMPET settings it indicates the number
of slices. Turn the TIME dial to the left to
reduce the cooking time or to the right to
increase the cooking time.
REDUCE
TIME
INCREASE
TIME
ROTATE
TIME
DIAL
5. For settings without a preheat cycle
(TOAST, CRUMPET, GRILL, REHEAT,
WARM), place the food directly on the wire
rack or on the included pizza pan, grilling
rack and/or roasting pan. Ensure the food
is centered in the oven for the most even
cooking.
a) Close the oven door.
b) Press the START/CANCEL button.
The button backlight will illuminate red, the
oven alert will sound, and the LCD screen
will illuminate orange.
c) The timer will be displayed and begin to
count down. The cooking temperature and
time can be adjusted during the cooking
cycle.

13
6. For settings that feature a preheat cycle
(BAKE, ROAST, PIZZA, COOKIES, SLOW
COOK), press the START/CANCEL button
before placing food in the oven. The button
backlight will illuminate red, the oven alert
will sound and the LCD screen will indicate
a blinking ‘PREHEATING’ while the oven is
heating up.
a) When the oven is ready for use, the blinking
‘PREHEATING’ will go out, the oven alert
will sound and the timer will start counting
down. Place the food in the oven, either
directly on the wire rack or on the included
pizza pan, grilling rack and/or roasting pan.
Ensure the food
is centered in the oven for the most
even cooking.
b) Close the oven door.
c) The timer will continue to count down.
The cooking temperature and time can be
adjusted during the cooking cycle.
7. At the end of the cooking cycle, the oven
alert will sound, the START/ CANCEL
button backlight will go out and the LCD
screen will illuminate blue.
NOTE
The cooking cycle can be stopped at any time
by pressing the START/ CANCEL button. This
will cancel the cycle and the button backlight
will go out.
MAGNETIC AUTO-EJECT RACK
When the wire rack is inserted into the middle
rack position, it will automatically eject halfway
out of the oven when the door is opened so you
can easily remove your toasted items.
Always open the door slowly when the wire
rack is in this position to prevent the rack from
ejecting too quickly.
GRILL FUNCTION
The GRILL function is ideal for open-faced
sandwiches, small cuts of meat, poultry and
fish, sausages and vegetables. Grilling can also
be used to brown the tops of casseroles and
gratins.
1. Insert the wire rack, with the spokes facing
upward, into the top rack height position.
2. Insert the included grilling rack into the
roasting pan. Place food on the assembled
grilling rack or in an oven-proof dish, then
place on the center of the wire rack so air
flows around the sides of the food.
3. Close the oven door.
4. Turn the FUNCTION dial until the
indicator on the LCD screen reaches the
GRILL function. The top figure on the LCD
screen indicates the preset grill setting of
‘HI’, while the bottom figure indicates the
preset time of ‘:10 MINS’.
5. The grill setting and time can be adjusted
before or during the grilling cycle.
a) The grill setting is displayed as the
top figure on the LCD screen. Turn the
TEMPERATURE dial to adjust grilling to
one of three pre-set temperatures:
LO, MED or HI.
b) The grilling time is displayed as the bottom
figure on the LCD screen. Turn the TIME
dial to adjust the time up to 20 minutes.
6. Press the START/CANCEL button to
activate the GRILL function. The button
backlight will illuminate red, the oven
alert will sound and the LCD screen will
illuminate orange.

14
7. The timer will be displayed and
automatically begin to count down.
The temperature and time can be adjusted
during the grilling cycle by turning the
corresponding TEMPERATURE and TIME
dial. The cycle can be stopped at any time
by pressing the START/CANCEL button.
8. At the end of the GRILL cycle, the
oven alert will sound. The START/CANCEL
button backlight will go out and the LCD
screen will illuminate blue.
TOAST FUNCTION
The TOAST function browns and crisps the
outside of your bread while keeping the inside
soft and moist. This function is also ideal for
English muffins and frozen waffles.
1. Insert the wire rack, with the spokes
facing upward, into the middle rack height
position.
2. If toasting 1–3 slices, center the slices on the
wire rack. If toasting 4–6 slices, evenly space
them with 2–3 slices at the front of the wire
rack and 2–3 slices at the back of the rack.
3. Close the oven door.
4. Turn the FUNCTION dial until the
indicator on the LCD screen reaches the
TOAST function. The top figure on the LCD
screen indicates the preset darkness setting
‘4’, while the bottom figure indicates the
preset number of slices ‘4’.
5. The darkness setting and number of
slices can be adjusted before or during the
toasting cycle.
a) The darkness setting is indicated by the
row of circles at the top of the LCD screen.
Turn the TEMPERATURE dial to the left to
reduce the darkness setting, or to the right
to increase it. The triangle above the circles
will move according to the selected setting.
As a general guide:
DESIRED TOAST COLOUR SETTING
Light 1 or 2
Medium 3, 4 or 5
Dark 6 or 7
b) The number of slices is displayed as the
bottom figure on the LCD screen. Turn the
TIME dial to the left to reduce the number
of slices, or to the right to increase it. The
number of slices ranges from ‘1’ to ‘6’.
6. Press the START/CANCEL button to start
the TOAST function. The button backlight
will illuminate red, the oven alert will sound,
and the LCD screen will illuminate orange.
7. The timer will be displayed and
automatically begin to count down. The
time can be adjusted during the toasting
cycle by turning the TIME dial. The cycle
can be stopped at any time by pressing the
START/CANCEL button.
PRESS
8. At the end of the TOAST cycle, the oven
alert will sound. The START/CANCEL
button backlight will go out and the LCD
screen will illuminate blue.

15
CRUMPET FUNCTION
The CRUMPET function crisps the top of your
crumpet while only lightly toasting the base.
This function is also ideal for toasting bagels or
thick sliced specialty breads which require one
side to be toasted more than the other.
1. Insert the wire rack, with the spokes
facing upward, into the middle rack height
position.
2. If toasting 1–3 crumpets, center on
the wire rack. If toasting 4–6 crumpets,
evenly space them with 2–3 crumpets
at the front of the wire rack and
2–3 crumpets at the back of the rack.
NOTE
The top of the crumpet must always face
upwards towards the top heating elements.
This allows the top to get crisp while the base
is only lightly toasted.
3. Close the oven door.
4. Turn the FUNCTION dial until the
indicator on the LCD screen reaches the
CRUMPET function. The top figure on the
LCD screen indicates the preset darkness
setting ‘4’, while the bottom figure indicates
the preset number of crumpets ‘4’.
NOTE
If you like your crumpets equally crisp on both
the top and bottom, we recommend using the
TOAST function.
5. The darkness setting and number of
crumpets can be adjusted before or during
the toasting cycle.
a) The darkness setting is indicated by the row
of triangles at the top of the LCD screen.
Turn the TEMPERATURE dial to the left to
reduce the darkness setting, or to the right
to increase it. The circle below the triangles
will move according to the selected setting.
As a general guide:
DESIRED CRUMPET COLOUR SETTING
Light 1 or 2
Medium 3, 4 or 5
Dark 6 or 7
b) The number of crumpets is displayed as the
bottom figure on the LCD screen. Turn the
TIME dial to the left to reduce the number
of crumpets, or to the right to increase it.
The number of crumpets ranges from
‘1’ to ‘6’.
6. Press the START/CANCEL button to
start the CRUMPET function. The button
backlight will illuminate red, the oven
alert will sound, and the LCD screen will
illuminate orange.
7. The timer will be displayed and
automatically begin to count down.
The time can be adjusted during the
crumpet cycle by turning the TIME dial.
The cycle can be stopped at any time by
pressing the START/CANCEL button.
PRESS
8. At the end of the CRUMPET cycle, the oven
alert will sound. The START/CANCEL
button backlight will go out and the LCD
screen will illuminate blue.

16
BAKE FUNCTION
The BAKE function cooks food evenly
throughout. This function is ideal for baking
cakes, muffins, brownies and pastries. The
BAKE function is also ideal for cooking pre-
packaged frozen meals such as lasagna and
pot pies.
1. Insert the wire rack, with the spokes facing
upward, into the bottom rack height
position. Note that some baked goods, such
as brownies or pastries, may be more suited
to the middle rack height position.
2. Close the oven door.
3. Turn the FUNCTION dial until the
indicator on the LCD screen reaches the
BAKE function. The top figure on the
LCD screen indicates the preset BAKE
temperature of 160°C, while the bottom
figure indicates the preset time of
‘:30 MINS’. The preset CONVECTION
setting will also be displayed.
4. The baking temperature and time can be
adjusted before or during the baking cycle.
a) The baking temperature is displayed as
the top figure on the LCD screen. Turn
the TEMPERATURE dial to adjust the
baking temperature from 50°C/120°F to a
maximum of 230°C/450°F.
b) The baking time is displayed as the bottom
figure on the LCD screen. Turn the TIME
dial to select up to 2 hours for temperatures
above 150°C/300°F and up to 10 hours for
temperatures below 150°C/300°F.
5. Press the START/CANCEL button to
activate the BAKE function. The button
backlight will illuminate red, the oven
alert will sound and the LCD screen will
illuminate orange. The LCD screen will
indicate a blinking ‘PREHEATING’.
6. Once the oven has reached the set
temperature, the temperature alert
will sound.
7. Place food, positioned on the included
roasting pan or other oven-proof dish, on
the center of the wire rack so air will flow
around all sides of the food.
8. After the PREHEATING alert has sounded,
the timer will automatically begin to count
down. The temperature and time can be
adjusted during the baking cycle by turning
the corresponding TEMPERATURE and
TIME dial. The cycle can be stopped at any
time by pressing the START/CANCEL
button.
PRESS
PREHEATING
START/CANCEL
WHEN AT
TEMPERATURE
9. At the end of the BAKE cycle, the oven alert
will sound. The START/CANCEL button
backlight will go out and the LCD screen
will illuminate blue.

17
ROAST FUNCTION
The ROAST function is ideal for cooking a
variety of meats and poultry. Food will be
tender and juicy on the inside and roasted to
perfection on the outside.
1. Insert the wire rack, with the spokes
facing upward, into the bottom rack
height position.
2. Close the oven door.
3. Turn the FUNCTION dial until the
indicator on the LCD screen reaches
the ROAST function. The top figure
on the LCD screen indicates the preset
ROAST temperature of 175°C, while the
bottom figure indicates the preset time
of ‘1:00HRS’. The preset CONVECTION
setting will also be displayed.
4. The roasting temperature and time can be
adjusted before or during the roasting cycle.
a) The roasting temperature is displayed
as the top figure on the LCD screen. Turn
the TEMPERATURE dial to
adjust the baking temperature from
50°C/120°F to a maximum of 230°C/450°F.
b) The roasting time is displayed as the
bottom figure on the LCD screen. Turn
the TIME dial to select up to 2 hours for
temperatures above 150°C/300°F and
up to 10 hours for temperatures below
150°C/300°F.
5. Press the START/CANCEL button to
activate the ROAST function. The button
backlight will illuminate red, the oven
alert will sound and the LCD screen will
illuminate orange. The LCD screen will
indicate a blinking ‘PREHEATING’.
6. Once the oven has reached the set
temperature, the temperature alert
will sound.
7. Place food, positioned on the included
roasting pan or other oven-proof dish, on
the center of the wire rack so air will flow
around all sides of the food.
8. After the PREHEATING alert has sounded,
the timer will automatically begin to count
down. The temperature and time can be
adjusted during the roasting cycle by
turning the corresponding TEMPERATURE
and TIME dial. The cycle can be stopped
at any time by pressing the START/
CANCEL button.
PRESS
WHEN AT
TEMPERATURE
9. At the end of the ROAST cycle, the oven
alert will sound. The START/CANCEL
button backlight will go out and the LCD
screen will illuminate blue.

18
PIZZA FUNCTION
The PIZZA function melts and browns cheese
and toppings, while crisping up the pizza crust..
1. Insert the wire rack, with the spokes
facing upward, into the middle rack
height position.
2. Close the oven door.
3. Turn the FUNCTION dial until
the indicator on the LCD screen reaches
the PIZZA function. The top figure on the
LCD screen indicates the preset PIZZA
temperature of ‘210°C’, while the bottom
figure indicates the preset time of
‘:20 MINS’. The preset CONVECTION and
FROZEN settings will also be displayed.
4. The pizza temperature and time can be
adjusted before or during the cycle.
a) The pizza temperature is displayed as
the top figure on the LCD screen. Turn
the TEMPERATURE dial to adjust the
baking temperature from 50°C/120°F to a
maximum of 230°C/450°F.
b) The pizza time is displayed as the bottom
figure on the LCD screen. Turn the TIME
dial to adjust the time up to 2 hours.
5. Press the START/CANCEL button to
activate the PIZZA function. The button
backlight will illuminate red, the oven
alert will sound and the LCD screen will
illuminate orange. The LCD screen will
indicate a blinking ‘PREHEATING’.
6. Once the oven has reached the set
temperature, the temperature alert
will sound.
7. Place food, positioned on the included pizza
pan, on the center of the wire rack so air will
flow around all sides of the food.
8. After the PREHEATING alert has sounded,
the timer will automatically begin to count
down. The temperature and time can be
adjusted during the cycle by turning the
corresponding TEMPERATURE and TIME
dial. The cycle can be stopped at any time
by pressing the START/CANCEL button.
PRESS
9. At the end of the PIZZA cycle, the oven alert
will sound. The START/CANCEL button
backlight will go out and the LCD screen
will illuminate blue.

19
A note on pizza stones
When using a pizza stone, it is necessary
to first heat the stone (without a pizza) for
optimum results.
1. Insert the wire rack, with the spokes
facing upward, into the middle rack
height position.
2. Place pizza stone on the center of the wire
rack so air will flow around all sides of
the stone.
3. Close the door.
4. Turn the TIME dial to the left to reduce the
time to ‘:15 MINS’. The time is displayed
as the bottom figure on the LCD screen.
The preset CONVECTION and FROZEN
settings will also be displayed.
5. Press the START/CANCEL button to
activate the PIZZA function. The button
backlight will illuminate red, the oven
alert will sound and the LCD screen will
illuminate orange. The LCD screen will
indicate a blinking ‘PREHEATING’.
6. Once the oven has reached the set
temperature, the temperature alert
will sound.
7. After the PREHEATING alert has sounded,
the timer will automatically begin to
count down.
8. At the end of the cycle, the oven alert will
sound. The START/CANCEL button
backlight will go out and the LCD screen
will illuminate blue.
9. Open the oven door and carefully place
frozen pizza on the heated pizza stone.
When cooking fresh pizza, carefully remove
the entire wire rack with pizza stone using
insulated oven mitts. Place on the counter
and transfer the fresh pizza dough onto
the heated stone before placing back into
the oven.
10. Select desired PIZZA setting and press the
START/CANCEL button to re-start the
PIZZA cycle.
COOKIES FUNCTION
The COOKIES function is ideal for baking
homemade or commercially prepared cookies
and other baked treats.
Ready-to-bake crescent rolls, cinnamon scrolls,
biscuits and strudels are ideally baked using
this function.
1. Insert the wire rack, with the spokes
facing upward, into the middle rack height
position.
2. Close the oven door.
3. Turn the FUNCTION dial until the
indicator on the LCD screen reaches
the COOKIES function. The top figure
on the LCD screen indicates the preset
temperature of 175°C, while the bottom
figure indicates the preset time of
‘:11 MINS’. The preset CONVECTION
setting will also be displayed.
4. The baking temperature and time can be
adjusted before or during the cookie cycle.
a) The baking temperature is displayed as
the top figure on the LCD screen. Turn
the TEMPERATURE dial to adjust the
baking temperature from 50°C/120°F to a
maximum of 230°C/450°F.
b) The baking time is displayed as the bottom
figure on the LCD screen. Turn the TIME
dial to adjust the time up to 1 hour.

20
5. Press the START/CANCEL button to
activate the COOKIES function. The button
backlight will illuminate red, the oven
alert will sound and the LCD screen will
illuminate orange. The LCD screen will
indicate a blinking ‘PREHEATING’.
6. Once the oven has reached the set
temperature, the temperature alert
will sound.
7. Place food, positioned on the included
roasting pan, pizza pan or other oven-proof
dish, on the center of the wire rack so air
will flow around all sides of the food.
8. After the PREHEATING alert has sounded,
the timer will automatically begin to count
down. The temperature and time can be
adjusted during the cycle by turning the
corresponding TEMPERATURE and TIME
dial. The cycle can be stopped at any time
by pressing the START/CANCEL button.
9. At the end of the COOKIES cycle, the oven
alert will sound. The START/CANCEL
button backlight will go out and the LCD
screen will illuminate blue.
REHEAT FUNCTION
The REHEAT function is ideal for reheating
leftovers without browning.
1. Insert the wire rack, with the spokes
facing upward, into the bottom rack
height position.
2. Place food, positioned on the included
roasting pan, pizza pan or other oven-proof
dish, on the center of the wire rack so air
will flow around all sides of the food.
3. Close the oven door.
4. Turn the FUNCTION dial until
the indicator on the LCD screen reaches
the REHEAT function. The top figure
on the LCD screen indicates the preset
temperature of ‘165°C’, while the bottom
figure indicates the preset time of
‘:15 MINS’. The preset CONVECTION
setting will also be displayed.
5. The reheating temperature and time
can be adjusted before or during the
reheating cycle.
a) The temperature is displayed as the
top figure on the LCD screen. Turn
the TEMPERATURE dial to adjust the
temperature from 50°C/120°F to a
maximum of 230°C/450°F.
b) The time is displayed as the bottom figure
on the LCD screen. Turn the TIME dial to
adjust the time up to 2 hours.
6. Press the START/CANCEL button to
activate the REHEAT function. The button
backlight will illuminate red, the oven
alert will sound and the LCD screen will
illuminate orange.
7. The timer will be displayed and begin to
count down. The temperature and time can
be adjusted during the reheating cycle by
turning the corresponding TEMPERATURE
and TIME dial. The cycle can be stopped
at any time by pressing the START/
CANCEL button.
8. At the end of the REHEAT cycle, the oven
alert will sound. The START/CANCEL
button backlight will go out and the LCD
screen will illuminate blue.
Other manuals for SMART OVEN PRO
1
Table of contents
Other Sage Oven manuals

Sage
Sage the Smart Oven Pizzaiolo BPZ820 User manual

Sage
Sage Smart Oven Air Fryer SOV860 User manual

Sage
Sage Smart Oven BOV860 User manual

Sage
Sage SOV820 User manual

Sage
Sage Smart Oven Pro BOV820 User manual

Sage
Sage Smart Oven Pro BOV820 User manual

Sage
Sage The Smart Oven Pro SOV820 User manual

Sage
Sage SOV820BSS4EEU1 User manual

Sage
Sage the Smart Oven Pizzaiolo BPZ820 User manual

Sage
Sage SMART OVEN PRO User manual