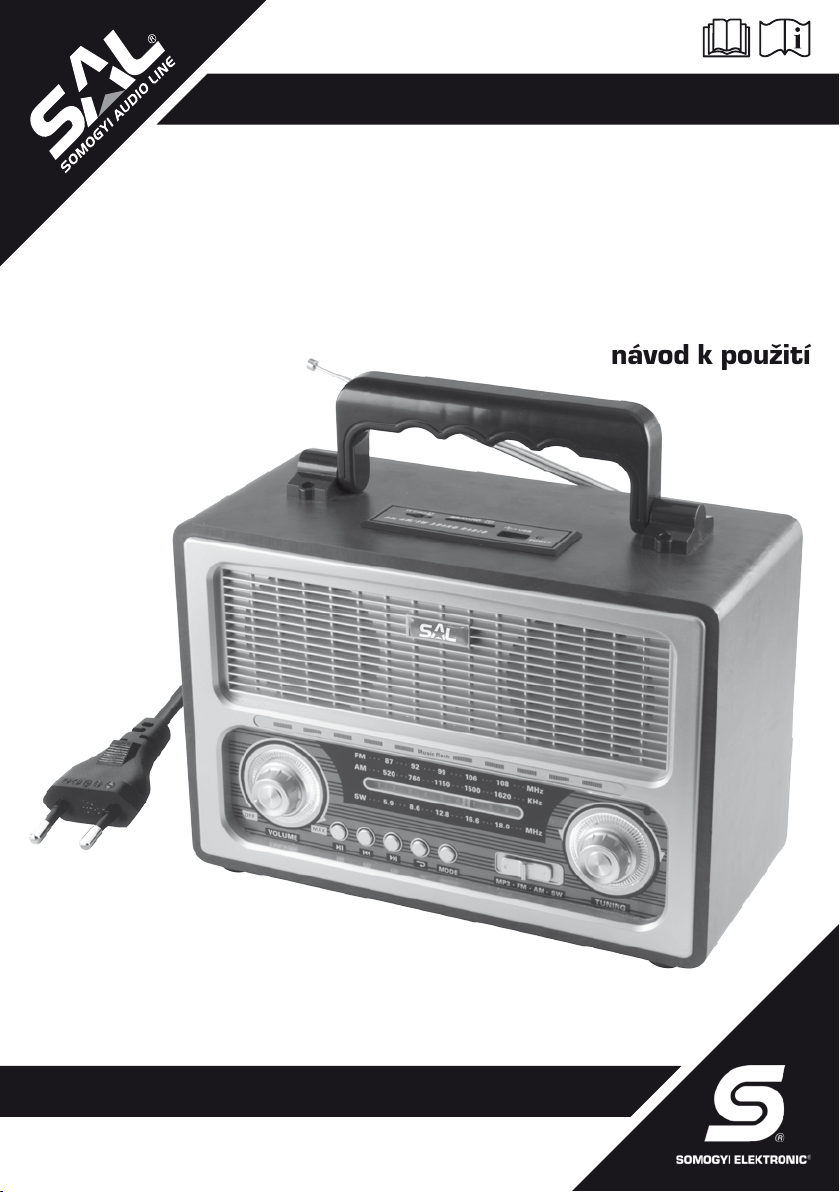
RRT 3B
retro portable radio
Before using the product for the rst time, please read the instructions for use below and retain them for later reference. The original instructions were written
in the Hungarian language.
This appliance may only be used by persons with impaired physical, sensory or mental capabilities, or lacking in experience or knowledge, as well as children from the
age of 8, if they are under supervision or have been given instruction concerning use of the appliance, and they have understood the hazards associated with use. Children
should not be allowed to play with the unit. Children may only clean or perform user maintenance on the appliance under supervision. After unpacking the device, make sure
it has not been damaged during transit. Keep children away from the packaging, if it contains a polybag or other signicant risk component!
• 4in1: BT + MP3 + AUX + radio • wireless BT connection • listening to music from mobile device or computer • playing MP3 les from USB/SD/microSD devices • wired audio
input (AUX IN) • 3-band AM-FM-SW radio• volume indicator 2 x 5 LEDs • voice announcement by changing operation modes • classic wooden sound box with carrying handle •
various power supply: built-in accumulator, 4xD/LR20 (1,5 V) battery, (not included), external 6 V
adapter or accumulator (not included), accessory power cable for charging
INSTALLATION, POWER SUPPLY
The device has four different power supply options. After charging, it can be operated with its built-in accumulator. In case the accumulator is depleted, plug the enclosed cable in the socket
located at the rear side of the device, and then to the power outlet. After maximum 8 hours, unplug it from the device and from the power network as well. Red, charging indication LED will be
lighting, till the user doesn’t interrupt the charging.
Beside, you can operate the device with 4xD (LR20/1,5V) batteries, or with 6 V
, solar panel, accumulator or adapter, - has to be purchased separately-, to be connected to the socket at
the rear side.
Operation time will be approximately 8-12 hours, which depends on the adjusted volume, the selected function, and external conditions (e.g.: temperature).
• Chargethebuilt-inaccumulatorfor4-6hoursbeforetherstusewiththeenclosednetworkcable.Chargingwillbeslower,ifyouarelisteningtomusicinthemeantime.
• Inthefuture,donotchargeitformorethan8hoursifitisdischargedcompletely!Unplugthecablefromthedeviceaswellasfromthenetworkafterthespeciedtime!Ifyoudonotremove
thechargingcablefromtheradio–onlyfromthepowernetwork-,theradiowillnotoperate.
• Placethe4pcsofDbatteriestothebatteryholdercompartmentaccordingtomarkedpolarity.Ifyouusethedevicewithbatteries,theywillbenotchargedneitherwithusingthecharging
cablenorwithusingtheexternal6Vpowersupply.Itisnotrecommendedtouseaccumulatorsinsteadofbatteries.
• Decreasingvolumeordistortedsoundindicatesthedepletionofbatteriesortheaccumulator.Chargetheaccumulator,orremovethedepletedbatteriesimmediately!
• Donotusedifferentkindsofbatteriesand/orusedandnewbatteriestogether!Thebatteriesshouldbereplacedbyadultsonly!
• Ifthereissomeliquidownout,thentakeaprotectivegloveandcleanthebatteryholderwithadrycloth!Donotopen,burnandshortcircuitthebatteries!•Itisforbiddentochargethe
batterieswhicharenotrechargeable!Riskofexplosion!Donotuseaccumulatorsinsteadofbatteries,becausetheirvoltageandefciencyissignicantlylower!
SELECTING FUNCTIONS
Switch on the device with VOLUME (7) button. Select the desired function with the (13.) slide switch. Radio: AM-FM-SW bands or MP3: MP3 / BT andAUX IN functions.
USE OF RADIO
Select the desired band with the (13.) slide switch. If FM or SW band is selected, carefully pull out the antenna, and set it to reach the best receiving conditions. Seek the desired station with
TUNING (14.) knob.
• Receptionabilityofradiodependsonthesiteofuse,andtheactualreceptionconditions.
• Handletheantennawithcare,soasnottocrushit!
• IncaseoflisteningtoAMband,therewillbeabuilt-inantennaoperated.Don’tpulloutthetelescopicantenna,butrotatethedevicetothebestreceivingposition.
• Receptionmaybedisturbedbytheelectronicappliancesnearby!
PLAYING MP3 FILES (FROM SD/MICROSD MEMORY CARD OR USB DEVICE)
Insert a data storage device to the suitable slot/port. Playing will start automatically. Available functions: playing (8.), pause / stepping tracks (9.) (10.) / repeating tracks (11.) Slide
switch should be in MP3 position and in case of necessity press MODE button (12.), to select MP3 function.
• DonotremovememorycardorUSBdeviceduringplaying,sinceitmaycausedamageofdata!
• Recommendedlesystem:FAT32.DonotuseNTFSformattedmemoryunit!
• Playingwillstartfromthersttrackafterthememoryunithadinserted.Ifyouhavelistenedtoitpreviously,thenplayingwillgoonfromthelastchosentrack,evenifthedevicehadbeen
switchedoffinthemeantimeorthestoragedevicehadbeenremoved.
• Uniquefeaturesofthestoragedevicecancauseirregularoperation,itdoesn’tindicatemalfunction!
LINE IN / AUX AUDIO INPUT
If you have such device which is equipped with 3,5 mm audio output or headphone socket, then you can listen to music through the speakers of this radio. Connect the AUX IN (15.) input with
the audio output of the other device. Set the slide switch (13.) to MP3 position, and press MODE (12.) button repeatedly, till you can hear AUDIO INPUT announcement.
• Theavailablesoundqualitydependsonthequalityofaudiosignalprovidedbytheexternaldevice.
• Volumecontrolofexternaldevicemaysignicantlyaffectthesoundquality.
USING WIRELESS BT CONNECTION
The device can be paired with other equipment which is communicating by BT protocol, within maximum 10 meters operation range. After pairing, the music which is played on mobile phone,
tablet, notebook and other similar device will be audible amplied. Select BT MODE function with MODE (12) button, when the slide switch (13.) is in MP3 position. The LED on the top of the
device will be ashing in green. If you switch on the device with VOLUME (7.) button and the slide switch is standing in MP3 position, then BT function will be activated. Search for BT devices
nearby, including this one, as shown in the instruction manual of the device to be paired. Connect the devices to each other. After successful pairing the LED will change to continuous lighting
from ashing and CONNECTED announcement will be said. After that, desired programs will be audible through the stereo speakers.
• OneradiocanbepairedwithoneBTapplianceatthesametime.
• Volumeandsoundqualityissignicantlydependsonthesettingoftheexternaldevice.Aninstalledequalizerapplicationallowsyoutosetthedesireduniquesound.
• Incaseofanyproblemofpairing,switchtheradioonoffandafteron,aswellastheBTfunctionontheexternaldeviceandtryagainpairing!
• Actualoperationrangedependsontheotherdeviceandenvironmentalconditions.