manuals.online logo
Brands
  1. Home
  2. •
  3. Brands
  4. •
  5. SAL
  6. •
  7. Remote Control
  8. •
  9. SAL PIXIE SMC3BTAS User manual

SAL PIXIE SMC3BTAS User manual

1. Product Introduction
The PIXIE Multifunction Remote Control Button is the 3rd generation
multifunction remote control button, that is portable and powered by
coin battery. Without the need of running wires, this product brings
huge flexibility for the application.
1.1 Product Features
• Coin battery powered, portable
without worrying wiring availability
• LED indicator colour selectable -
blue or amber
• PIXIE Multifunction Remote Control
button Gen 3, can pair with a master
device, a group or scenes
1.2 Product Parts
LED
indicator
Control Button
50mm
13mm
SMC3BTAS
Multifunction
Remote Control Button G3
Installation Instructions
2. Specifications and Capabilities
PIXIE Multifunction
Remote Control Mech SMC3BTAS White 50 x 50 x 13
CR2032 * 1
Product Description Model NO. Colour Dimensions L x W x H (mm)Battery
Weight (g)
16
Product Application
Operating Ambient Temperature
Operating Humidity
IP Rating
Portable
Interior residential or
commercial
0-85% RH, NC 0-85% RH, NC
IP20
0℃- 40℃0℃- 60℃
Storage Ambient Temperature
Product Installation
Storage Humidity
This product contains lithium
coin battery
Swallowing can cause severe or fatal
injuries within 2 hours. Seek immediate
medical attention if swallowed.
KEEP BATTERIES OUT OF REACH
OF CHILDREN
WARNING
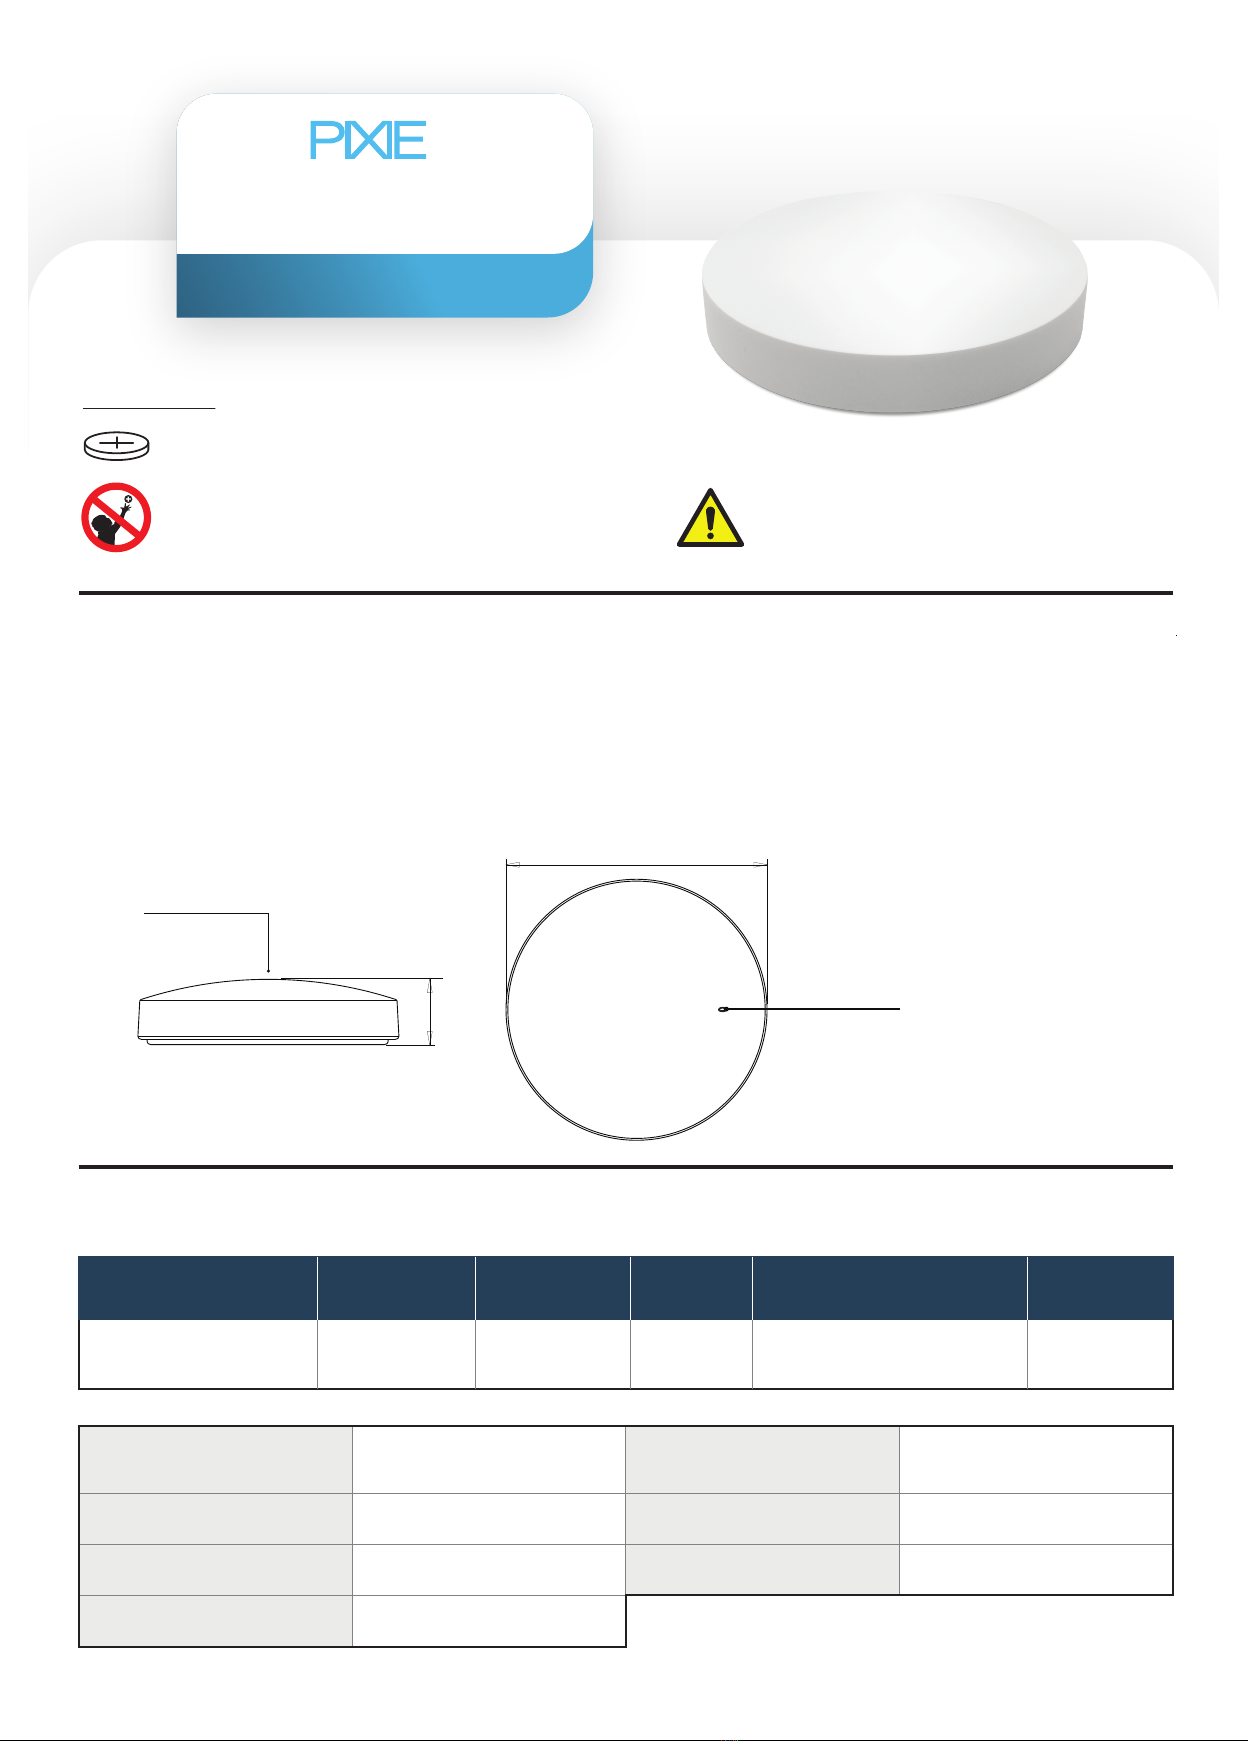
3. Installation process
3.1 - Before installation, for optimum signal communication, the maximum distance between a PIXIE device and
the controlled device is 15 metres.
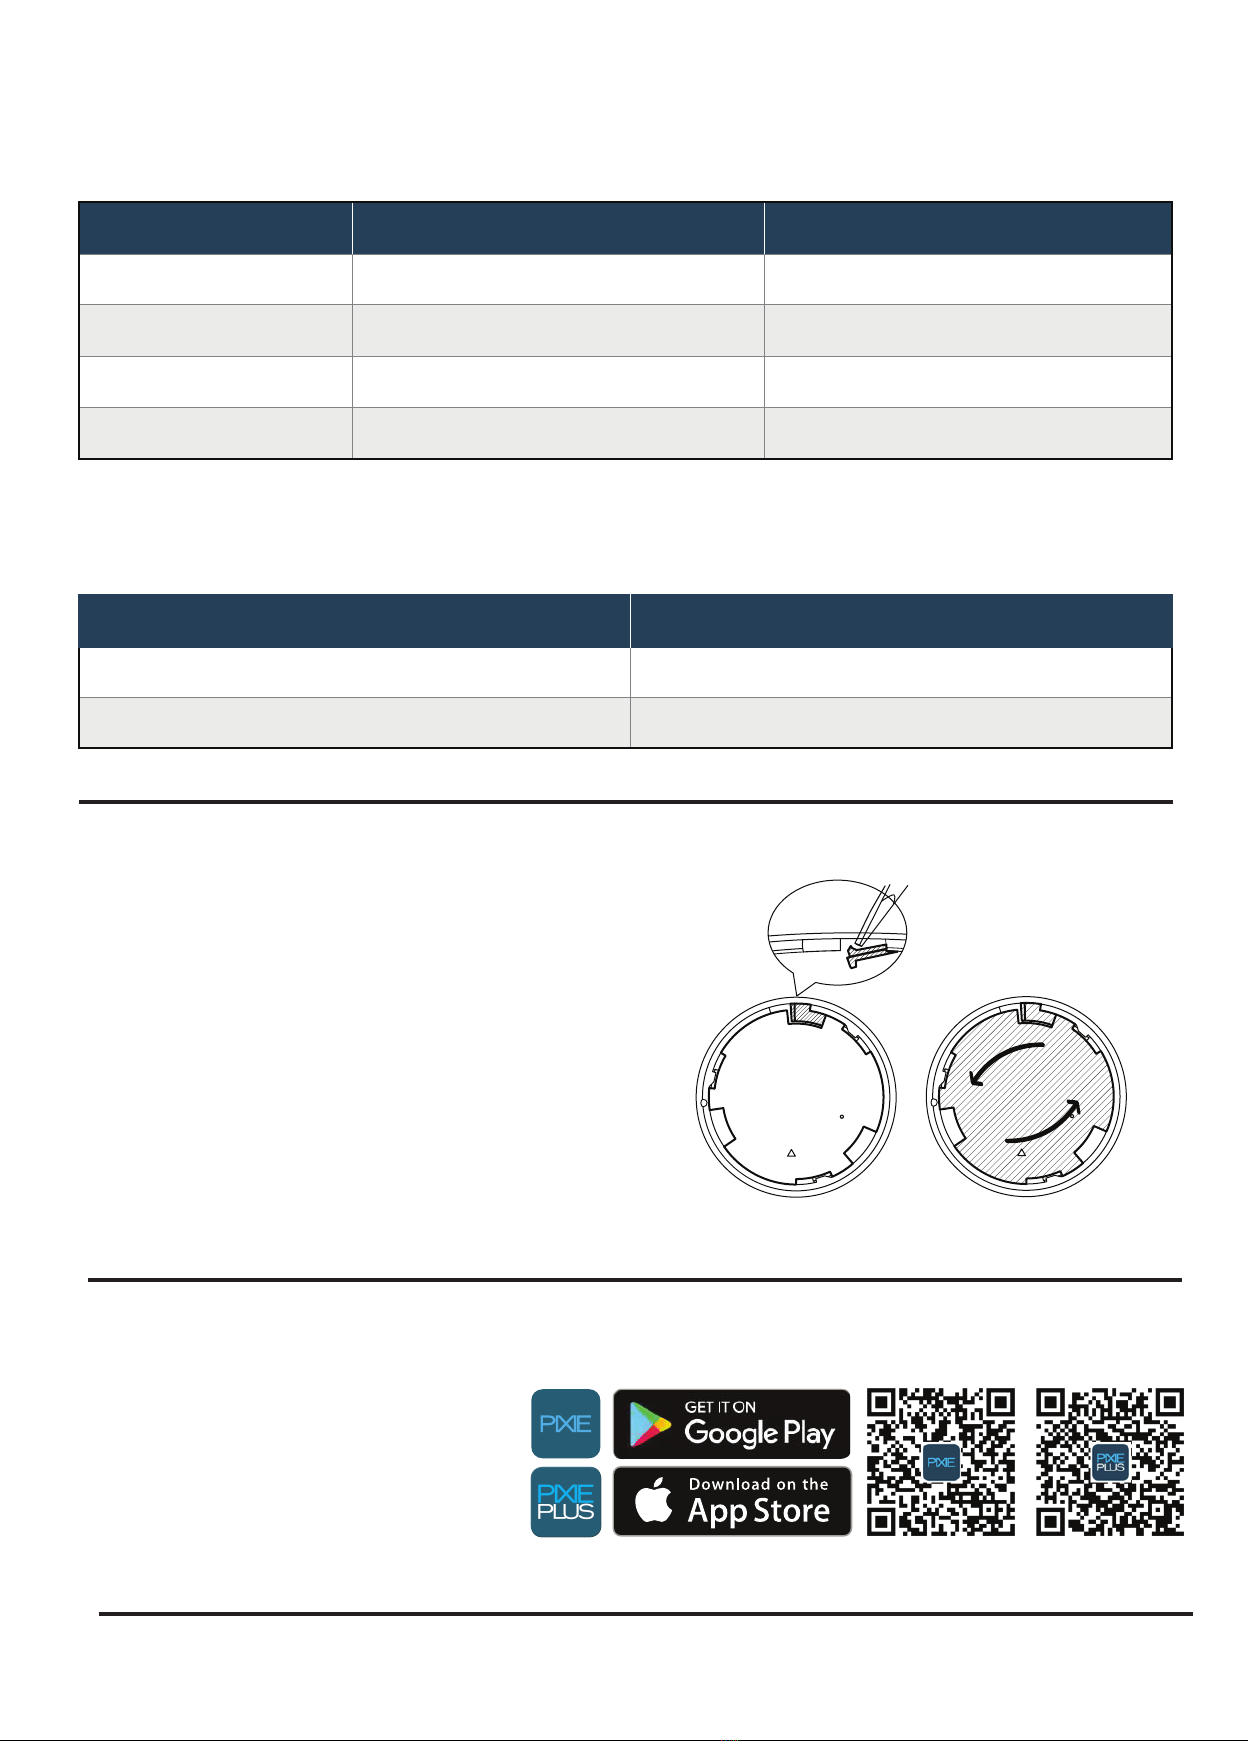
3.2 - Launch pairing mode for PIXIE Master device
3.3 - Launch paring mode of SMC3BTAS within 30 seconds.
Note: If the paired PIXIE product changes HOME setup in the PIXIE Apps or reset to factory, the pairing process will
need to be repeated.
4. Operations
4.1 Setting operations
4.2 Control operations - paired with a master device
Change the LED
indicator color
Toggle LED indicator colour selectable - blue or
amber
Reset the product to
factory default
All the previous pairing will be
cleared after a successful reset
Enter pairing mode, the mode
lasts 10 seconds
5 Clicks
9 Clicks
- Can pair with a PIXIE master device, a group or
two scenes
- After a successful pairing, pairing mode will end.
Pressing the button during pairing mode will
cancel and exit pairing mode
- LED indicator will flash twice, and stay solid blue
for 2 seconds to indicate the pairing is successful
4 Clicks
Function
_
Slowly flash ble for
3 seconds
Quickly flash in blue
for 10 seconds
LED Indicator RemarkOperation
1 Click
2 Clicks
Turn ON/OFF.
When turning the light on, it will
work on the last used brightness
setting
Turn ON/OFF.
When turning the light on, it will
work on the last used brightness
setting
Turn ON/OFF.
When turning the light on, it will
work on the last used brightness
setting
Shortcut to the maximum
brightness
Shortcut to the maximum
brightness
Shortcut to the maximum
brightness
3 Clicks
Long Press
Switch to the next color
temperature, which circulates in
Warm White->Cool White->
Daylight. For S9842 downlight
only.
Switch to the next color. Color
circulates in
White->Red->Green->Blue.
NA
When the light is on, long press
the button to dim up or down,
release the button to stop.
When the light is off, long press
the button to turn on the light at
minimum brightness and
increase brightness, release the
button to stop.
When the light is on, long press
the button to dim up or down,
release the button to stop.
When the light is off, long press
the button to turn on the light at
minimum brightness and
increase brightness, release the
button to stop.
When the light is on, long press
the button to dim up or down,
release the button to stop.
When the light is off, long press
the button to turn on the light at
minimum brightness and
increase brightness, release the
button to stop.
Operation
Paired device
PIXIE
Smart Dimmer
PIXIE
Smart RGB Strip, RGB Strip
Controller
PIXIE
Smart Single Color Strip,
Single Color Strip Controller
Operations when configured to control a device
-
4.3 Control operations - paired with a group
4.4 Control operations - paired with scenes
5. Battery replacement
When the battery is low, the operation will not work properly.
Please follow the steps below to replace the battery.
5.1 - Locate the tab as indicated in the image, use screwdriver to
slightly push the tab a bit farther away from the body.
5.2 - Meanwhile, rotate the back cover anticlockwise to remove
it.
5.3 - Remove the battery
5.4 - Insert a new CR2032 lithium 3V coin battery with positive side
facing up
5.5 - Replace the cover to align with the slot, rotate the cover
clockwise until it stops.
warning: The battery might cause injury to small children.
Keep away from small children.
Operations when configured to control a group
Operations when configured to control scenes
Shortcut to the maximum brightness Dimmable product group only
Dimmable product group only
Switch colour/colour temperature
Subject to the product group functionality
Turn ON/OFF the Group
2 Clicks
3 Clicks
Long Press
NA1 Click
Result Remark
Operation
1 Click
2 Clicks
Activate scene 1
Activate scene 2
Operation Result
Scan QR code or go to App store (IOS)
or Google Play (Android) to download
the free PIXIE app to your smart phone.
IOS: Requires IOS 6.0 or later. Compatible
with iPhone, iPad and iPad touch
Android: Requires Android 4.4 or above,
devices must support Bluetooth 4.0
Specifications above are for reference
only and may vary without prior notice.
Warranty – In accordance with SAL’s standard terms and conditions of sale, SAL warrant this product to be free
from defects in materials and or workmanship for a period as stated below for goods not subject to incorrect
installation, maintenance, operation, mishandling, environmental, unauthorised modifications or electrical
operating conditions outside the nominated product specification as detailed in these installation instructions.
The benefits to you given by this warranty are in addition to other rights and remedies you have under law. Our
goods come with guarantees that cannot be excluded under the Australian Consumer Law. You are entitled to
a replacement or refund for a major failure and compensation for any other reasonably foreseeable loss or
damage. You are also entitled to have the goods repaired or replaced if the goods fail to be of acceptable
quality and the failure does not amount to a major failure.
Warranty term – Residential usage (12) months, Commercial usage (12) months, Replaceable lamps (where
supplied) (12) months and batteries where supplied (12) months from date of purchase.
How to make a claim?
Step #1 – Within 30 days of the fault discovery, please contact the original place of the SAL product purchase
during standard (local) business hours, with the following information (a) proof of purchase (b) description and
quantity of the claimed fault (c) address of installation. (d) operating hours of the product.
Step #2 – It is then the responsibility of the original place of product purchase to report the matter to SAL
aftersales;
PIXIE is a trademark of SAL National Pty Ltd.
COPYRIGHT © 2022 This document is copyright by SAL National Pty Ltd. Except as permitted
under the relevant law, no part of this application note may be reproduced by any process
without written permission of and acknowledgment to SAL National.
DISCLAIMER: SAL National reserves the right to alter the specifications, designs or other
features of any items and to discontinue any items at any time without notice and without
liability. While every effort is made to ensure that all information in this application note is
correct, no warranty of accuracy is given and SAL National shall not be liable for any error.
TRADEMARKS: The identified trademarks and copyrights are the property of SAL National ty
Ltd unless otherwise noted.
Contact Information
SAL National Pty Ltd.
Web: www.sal.net.au
ABN: 21 633 189 474
All Enquiries:
+61 2 9723 3099
[email protected]
Step #3 - Upon review of your claim and if the product is required to be returned to SAL for technical evaluation, then at the
owners expense the product must be returned to SAL as per the above nominated locations.
Step #4 - Pending the evaluation, the claim will be validated resulting in the product being repaired or replaced with the same
or best equivalent product at the discretion of SAL, or rejected if the product fault was found to be caused by conditions
beyond the responsibility of SAL warranty obligations. Consideration of installation, product removal, return freight and or
testing fees are not the responsibility of SAL.
NSW | ACT
QLD
VICT | TAS | SA | NT
WA
SAL National Pty Ltd, 40 Biloela Street Villawood NSW 2163
SAL National Pty Ltd, 36 Whitelaw Place Richlands QLD 4077
SAL National Pty Ltd, 46-48 Keys Road Moorabbin Victoria 3189
SAL National Pty Ltd, 29 Beringarra Av Malaga WA 6090
| P # 02 9723 3099
| P # 07 3879 5999
| P # 03 9532 3168
| P # 08 9248 7458
1) The product wireframe drawings in this document
are intended for illustration purposes only and may
differ from the final physical product.
2) The installation instruction is subject to change
without prior notice.

Popular Remote Control manuals by other brands

ABB XSeriesG4 user manual

ABB

ABB XSeriesG4 user manual

Mitsubishi Heavy Industries eco touch RC-EX1 user manual

Mitsubishi Heavy Industries

Mitsubishi Heavy Industries eco touch RC-EX1 user manual

FUTABA T6K-V2 instruction manual

FUTABA

FUTABA T6K-V2 instruction manual

Daikin BRC1C71 engineering data

Daikin

Daikin BRC1C71 engineering data

BEA DK-12 Guide

BEA

BEA DK-12 Guide

Vivo E-FD55 FD55 user guide

Vivo

Vivo E-FD55 FD55 user guide

Grandview 1GD-IRAnIII operation instruction

Grandview

Grandview 1GD-IRAnIII operation instruction

Mitsubishi Electric PAR-SL100A-E Operation manual

Mitsubishi Electric

Mitsubishi Electric PAR-SL100A-E Operation manual

JR ProPo XG6 Operation manual

JR ProPo

JR ProPo XG6 Operation manual

Bosch Twist quick start guide

Bosch

Bosch Twist quick start guide

PIKO 35041 quick start guide

PIKO

PIKO 35041 quick start guide

Sharp TU-160H Re-tuning guide

Sharp

Sharp TU-160H Re-tuning guide

Philips SBC RU 230/00 Instructions for use

Philips

Philips SBC RU 230/00 Instructions for use

Cochlear CR310 user guide

Cochlear

Cochlear CR310 user guide

DSC WLS909 operating instructions

DSC

DSC WLS909 operating instructions

CAC / BDP RG57F3(B) Service manual

CAC / BDP

CAC / BDP RG57F3(B) Service manual

V2 WES-BASE user manual

V2

V2 WES-BASE user manual

ModelCraft MP-24-DT operating instructions

ModelCraft

ModelCraft MP-24-DT operating instructions

manuals.online logo
manuals.online logoBrands
  • About & Mission
  • Contact us
  • Privacy Policy
  • Terms and Conditions

Copyright 2025 Manuals.Online. All Rights Reserved.