SaMASZ SnowPick 91 User manual

SaMASZ Sp. z o.o.
Poland, 16-060 Zabłudów, ul. Trawiasta 1
Established – 1984
NIP PL-966-159-29-76
tel. (+48) (85) 664 70 31
fax (+48) (85) 664 70 41
e-mail: samasz@samasz.pl
www.samasz.pl
OPERATOR'S MANUAL
TRUCK SNOW PLOW:
SnowPick 91
SnowPick 96
SnowPick 102
SnowPick 114
IN1535USA000
2017.11.22
EDITION NO. 0
Translation of original instructions

This operator’s manual is an indispensable part of any snow plow and is intended to
familiarize future user with principles of proper operation and use of the machine as well as
risks involved. Before commissioning of the machine learn thoroughly the contents of this
operator's manual and safety instructions herein.
If snow plow is resold to other user, operator’s manual must be handed to the latter
with written confirmation of delivery of the manual.
WARNING!
It is recommended to adjust transport and working speed to conditions
on the road.
Never exceed a transport speed of 72km/h (45mph).
Make sure the working speed is no higher than 16km/h (10mph).
WARNING!
When the plow is in parking position its shield should lean the ground. When
the plow is not mounted on a vehicle it should rest on the support foot and
have the aligned shield.
WARNING!
Instructions given in this operator’s manual marked with this symbol
and warning signs provided on the machine indicate a risk.
NOTE:
Keep this manual for further reference!
We congratulate you on the purchase of your new SaMASZ snow plow and wish you much
pleasure and the very best experience resulting from its operation.
Prepared by: mgr inż. Marcin Bujnowski

Operator's Manual
Truck Snow Plow
SnowPick
- 1 -
Contents
……………………………………………………………………………………………………………………………………..
page
1.
IDENTIFYING THE MACHINE...........................................................................................................................2
2.
INTRODUCTION....................................................................................................................................................3
3.
TECHNICAL DESCRIPTION ...............................................................................................................................3
3.1. Intended use.............................................................................................................................................................3
3.2. Technical data .........................................................................................................................................................4
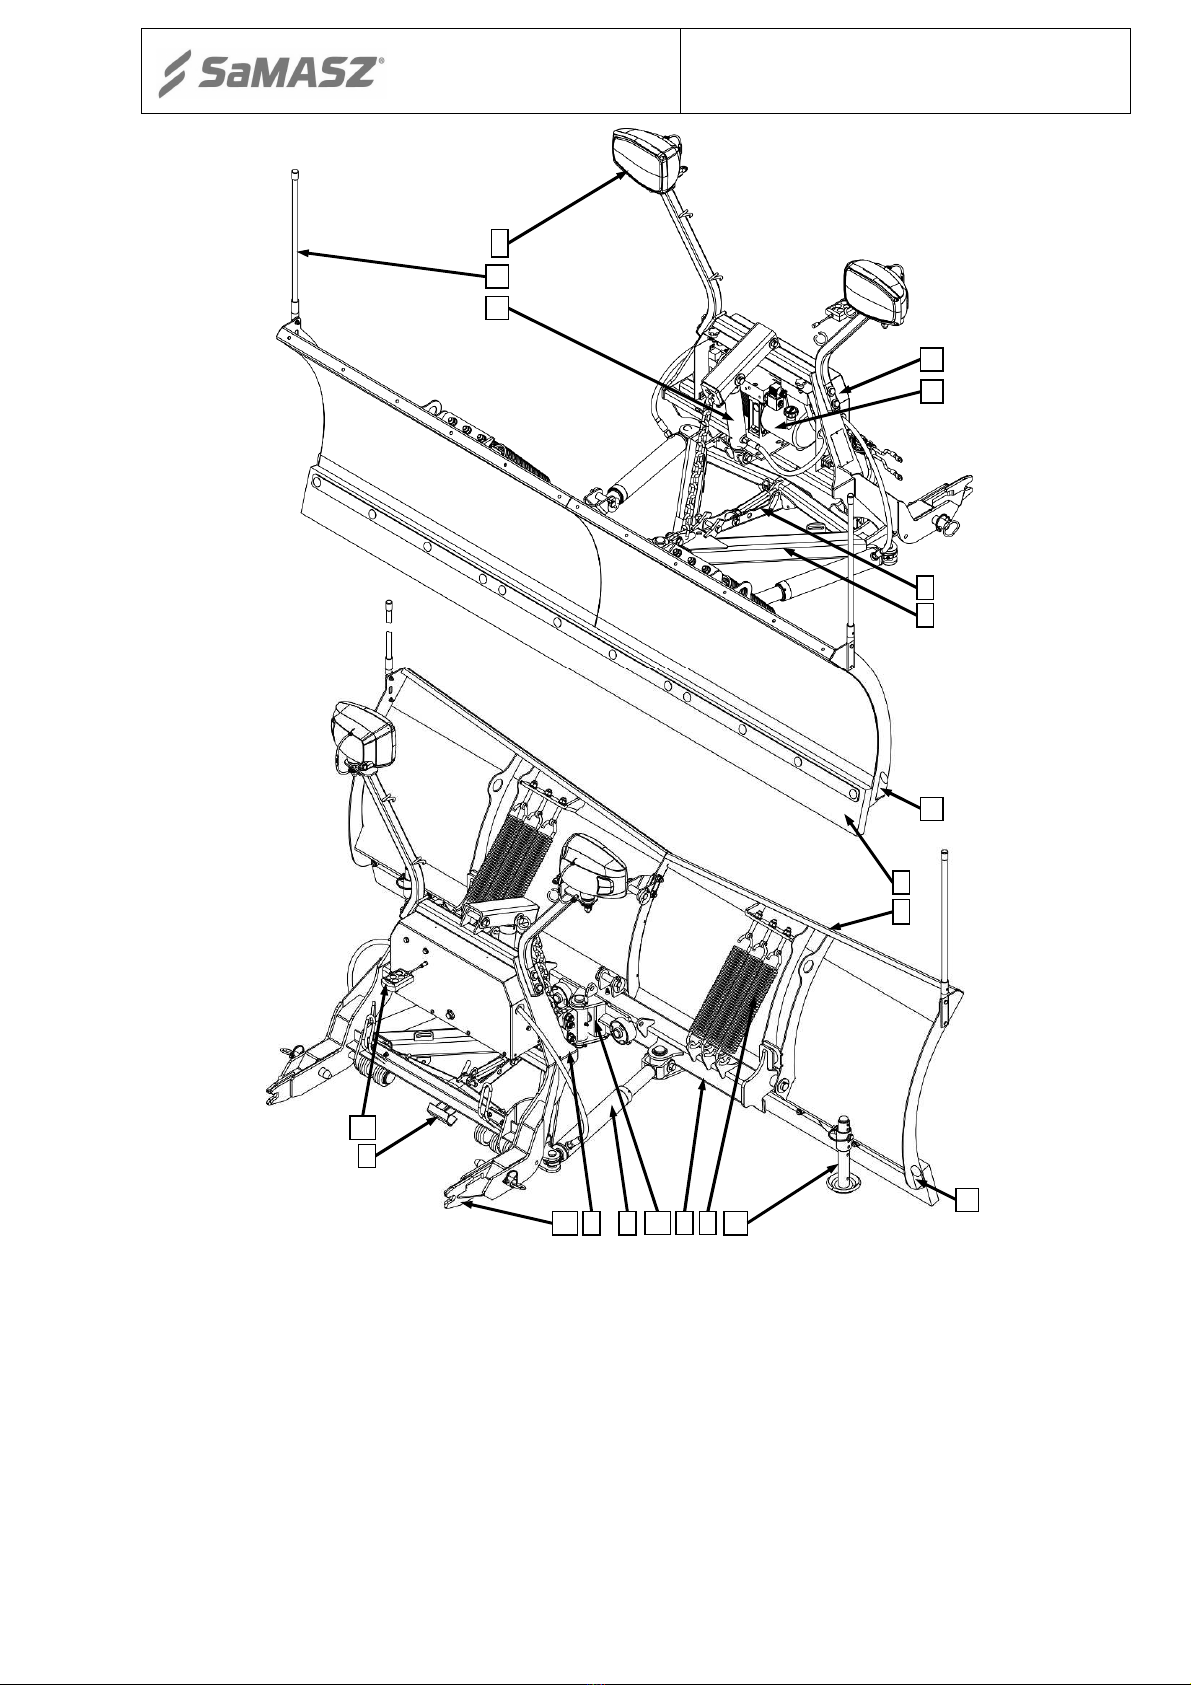
3.3. Construction ............................................................................................................................................................4
3.4. Standard equipment.................................................................................................................................................6
3.5. Optional equipment.................................................................................................................................................7
3.6. Spare parts...............................................................................................................................................................7
4.
SAFETY PRECAUTIONS ......................................................................................................................................7
4.1. General safety rules and regulations........................................................................................................................7
4.2. Qualifications of operator........................................................................................................................................8
4.3. Transport .................................................................................................................................................................8
4.4. Delivery...................................................................................................................................................................8
4.5. Residual risk..........................................................................................................................................................10
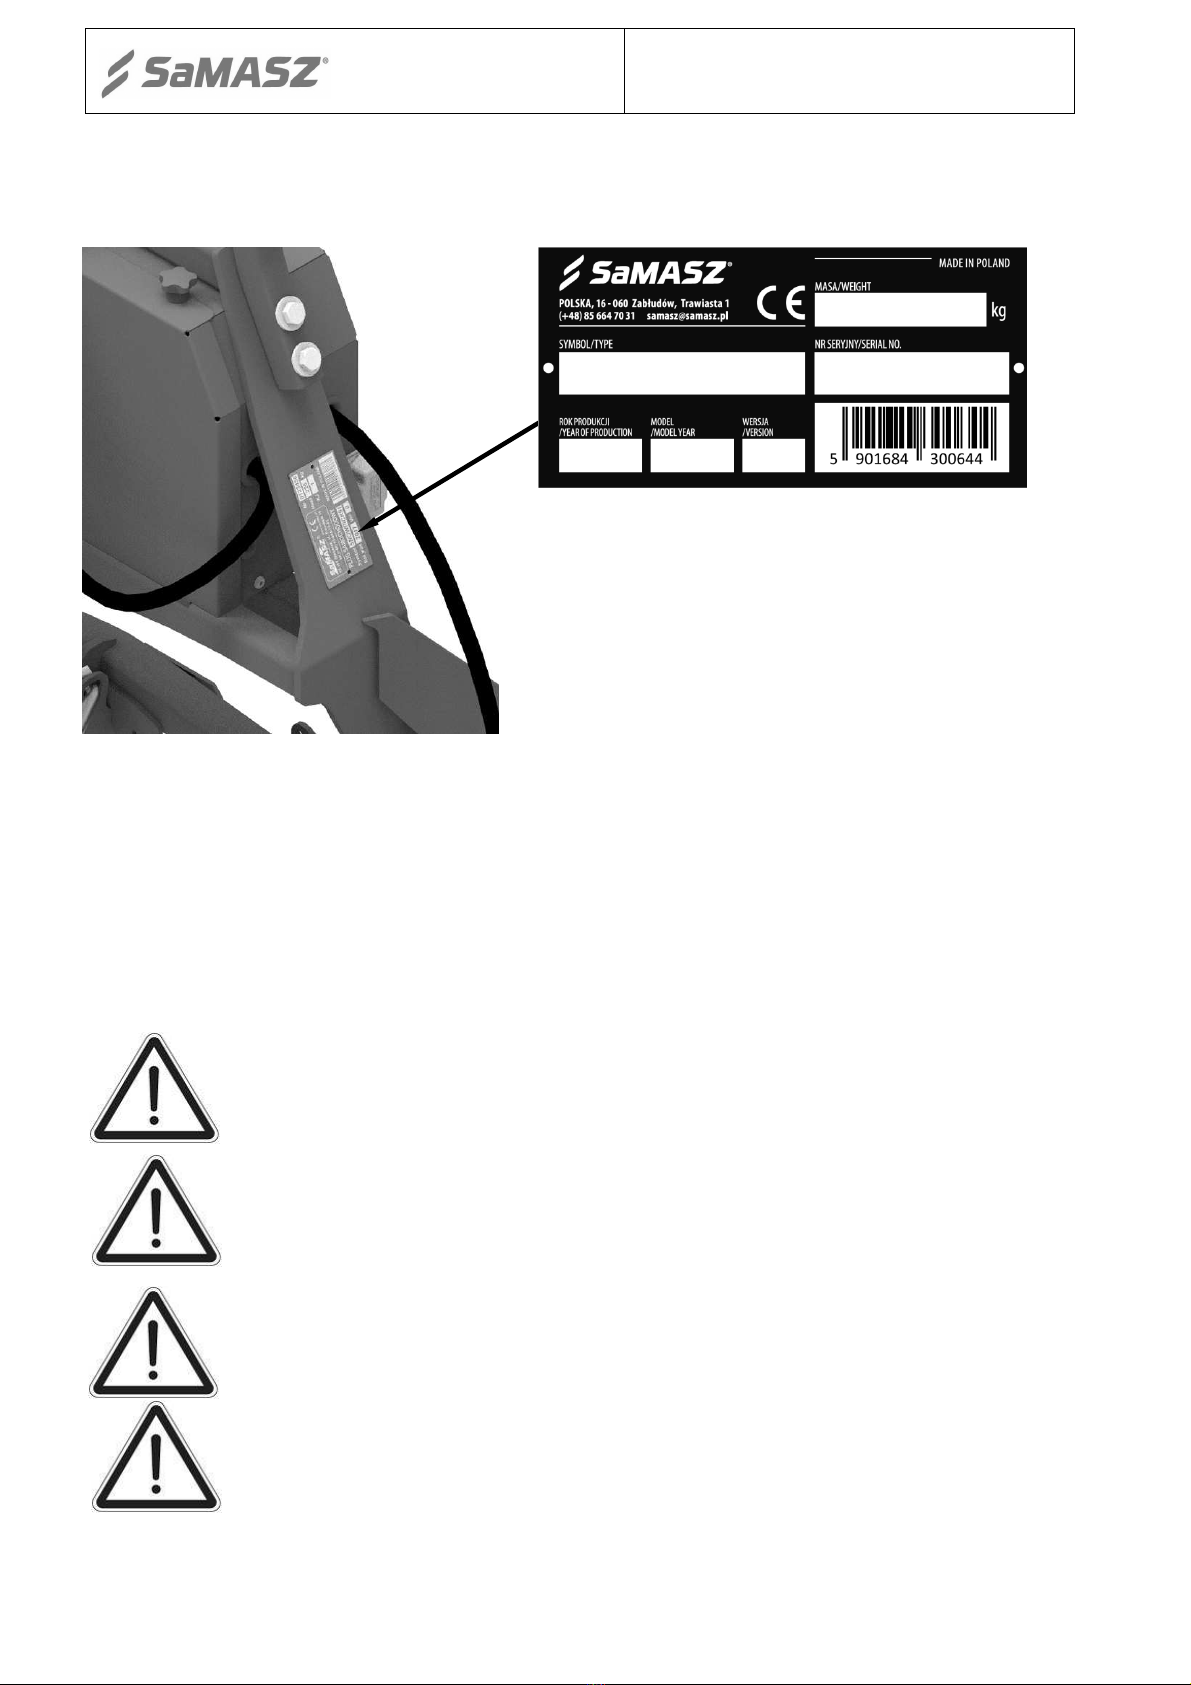
4.1
Safety labels and their meaning .......................................................................................................................11
5.
OPERATING PLOW.............................................................................................................................................13
5.1.
Mounting plow on vehicle ...............................................................................................................................13
5.1.1. Conditions for mounting SnowPick plow on vehicle.....................................................................................13
5.2.
Increasing load of vehicle's rear axle ...............................................................................................................16
5.3.
Preparing plow for operation............................................................................................................................16
5.4.
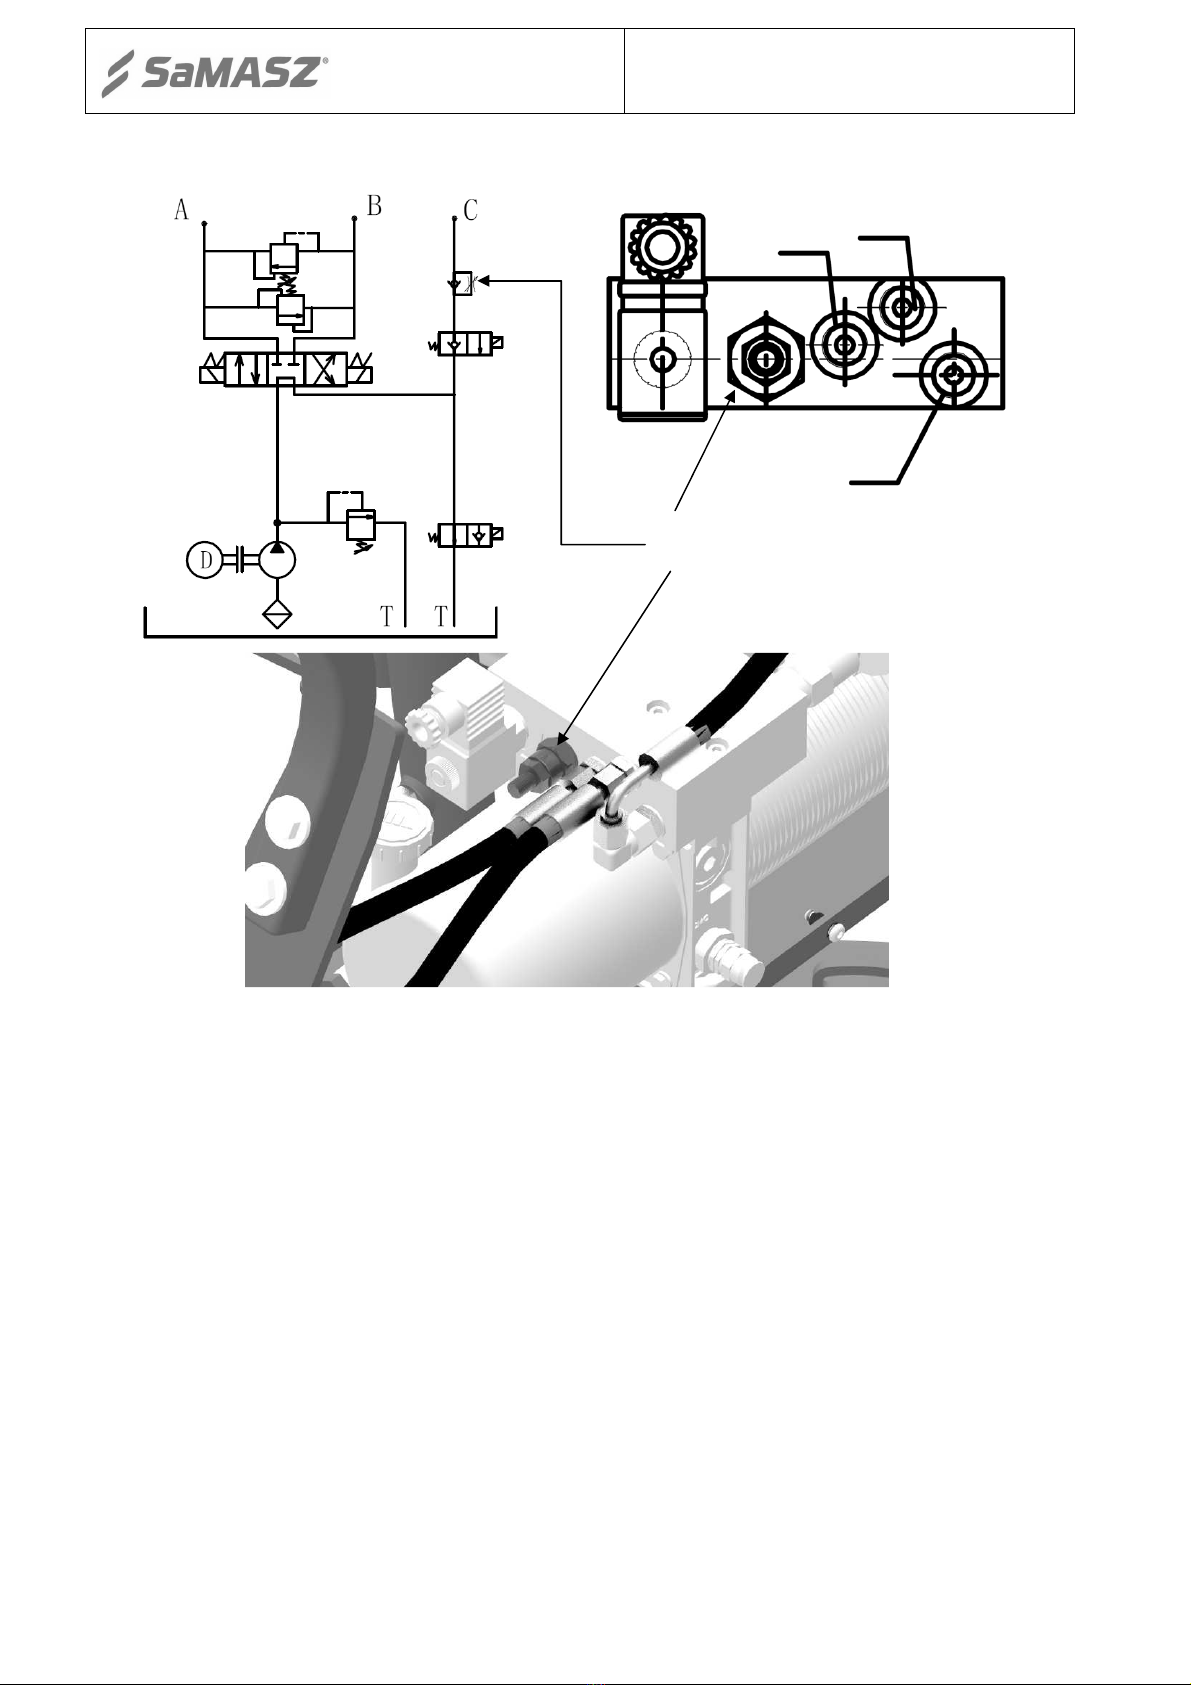
Plow control.....................................................................................................................................................17
5.4. Setting run time for hydraulics..............................................................................................................................19
6. WORKING..................................................................................................................................................................19
6.1. Transport and parking position..............................................................................................................................20
6.2. Detaching from vehicle .........................................................................................................................................21
7. OPERATING SERVICE............................................................................................................................................21
8. LUBRICATION..........................................................................................................................................................22
8.1. Risks present when lubricating..............................................................................................................................23
9. MAINTENANCE AND STORAGE..........................................................................................................................23
10. MALFUNCTIONS AND THEIR REPAIRS..........................................................................................................23
11. REPAIR AND WITHDRAWAL FROM USE .......................................................................................................24
11.1. Repair..................................................................................................................................................................24
11.2. Disassembly and withdrawal from use................................................................................................................25
11.3. Environment........................................................................................................................................................25
12. WIRING DIAGRAMS..............................................................................................................................................26
13. WARRANTY CARD................................................................................................................................................27
14. WARRANTY TERMS..............................................................................................................................................27
14.1. Warranty repairs record.......................................................................................................................................29

Operator's Manual
Truck Snow Plow
SnowPick
- 2 -
1. IDENTIFYING THE MACHINE
Each snow plow can be easily identified thanks to data plate mounted firmly on the linkage
body or shield as shown below in Fig. 1.
Fig. 1. Data plate location
Data plate includes:
- name and adress of the manufacturer, - model year,
- CE marking means, that the produce - version number,
conforms to 2006/42/EC Directive and - machine weight,
harmonized standards, - id number,
- machine symbol, - barcode.
- date of manufacture,
WARNING!
Data plate is considered a document. Do not modify its content or make it
illegible.
NOTE
Data plate includes all the necessary information required to contact your
dealer if any questions or doubts arise.
IMPORTANT
When placing an order on spare parts make sure to give name, type, serial
number and manufacturing date of the machine for which these are intended.
NOTE
Should the contents of the herein manual be unclear, ask the manufacturer or
your dealer for more detailed information on the machine.

Operator's Manual
Truck Snow Plow
SnowPick
- 3 -
2. INTRODUCTION
This operator’s manual should be considered as the machine's basic equipment. If the machine
is handed over to another user, it should be serviceable, and include this operator's manual, EC
declaration of conformity and its required basic equipment.
This operator’s manual is essential for safe and proper use of this machine and should be read
before anyone operates this machine.
The machine is manufactured according to international safety rules.
Respecting recommendations herein shall ensure use safety.
Should you have any queries relating to the operation and service of the machine please contact
the manufacturer.
This operator’s manual is an indispensable part of any machine and is intended to familiarize
future user with principles of proper operation and use of the machine as well as the risks
involved.
GENERAL PRECAUTION
When operating the machine always respect warnings and safety rules marked with this
sign.
3. TECHNICAL DESCRIPTION
3.1. Intended use
SnowPick is a light-weight plow with inclined shield and is designed for clearing snow from
roads, parking lots and squares with minor unevenness. It cooperates with Pickup trucks equipped
with a purpose-specific mounting.
It is not advisable to remove icy surface and layers of compacted snow frozen to the surface.
It is not advisable to use the SnowPick snow to level any uneven road or terrain.
WARNING!
Do not use the machine for purposes other than the above.
Improper use can be dangerous and may lead to voiding of the warranty. The
machine should be operated, maintained and repaired only by personnel who
are familiarized with its detailed specifications and safety rules and
procedures. Tampering with the machine may lead to relieving the
manufacturer of any responsibility for the resulting damages.
As standard plows have toppings which help to reduce pressure of the plow on the ground,
and thus extends service life of rubber/polyurethane clearing bars or Hardox steel clearing bars.

Operator's Manual
Truck Snow Plow
SnowPick
- 4 -
3.2. Technical data
Tab. 1.
General specification of SnowPick mowers
Plow type
Parameter SnowPick 91 SnowPick 96 SnowPick 102 SnowPick 114
Working width [cm / ft in]
Steering angle = 0° 231 / 7′6″246 / 8′1″261 / 8′6 ¾″291 / 9′6 ½″
Steering angle = 24° 212 / 6′11″225 / 7′4 ½″238 / 7′9″267 / 8′9″
Shield's height [cm / ft in] 71 / 2′3″
Dimensions
l /w /h [cm / ft in] 136/235/132 /
4′5″/7′8″/4′4″136/250/132 /
4′5″/8′2″/4′4″136/265/132 /
4′5″/8′8″/4′4″136/295/132 /
4′5″/9′8″/4′4″
Hitch type Dedicated to vehicle
Weight [kg / lbs] 225 / 496 230 / 507 235 / 518 240 / 529
Power supply 12V/ 130A
Control Control panel in vehicle
Oil type in hydraulic system Shell Tellus S2 VA 46
YA-N46 Anti-wear hydraulic oil
Working width of the plow changes according to geometry setting. Hydraulic system of the plow enables
turning of shields within angle range of ±24°.
3.3. Construction
Snow plow comprises shield (1), in which working part is replaceable blade (2), topping (10)
and markers (11). The shield (1) is mounted on beam (5). These elements are additionally coupled
by springs (4). Beam (5) through transverse ground following holder and at the same time mounting
point adjustment unit (13) is suspended on rocker (6). Linkage frame (8) has mounting points (8a)
by means of which the plow is mounted in suspension sockets on the vehicle. Electric pump (14)
fed by the vehicle's wiring system controls turning cylinders (3) and lifting cylinder (12).

Operator's Manual
Truck Snow Plow
SnowPick
- 5 -
Fig. 2. Construction of SnowPick plow
1 – Shield 9 – Lamp
2 – Blade (rubber / polyurethane / steel)
10 – Toppings
3 – Blade turning cylinders 11 – Markers
4 – Springs 12 – Lifting cylinder
5 – Beam 13 – Transverse ground following holder and
mounting point adjustment unit
6 – Rocker 14 – Electric pump
7 – Foot 15 – Electric pump guard
8 – Suspension frame 16 – Control panel
8a – Hitch fin 17 – Bumper
17
2
13
1
5
6
7
7
10
8
9
12
16
14
15
11
8a
3
4
17
17

Operator's Manual
Truck Snow Plow
SnowPick
- 6 -
Fig. 3. Hydraulic diagram
A– Left turn cylinder, B– Right turn cylinder,
C– Lifting cylinder, D– Falling speed adjustment valve (clockwise direction = slower)
3.4. Standard equipment
warranty card,
operator's manual with catalogue of spare parts and declaration of conformity,
rubber, polyurethane or Hardox steel clearing bar,
control panel,
shield hydraulic control,
protection – inclined shield / overload protection – torsion shield,
own independent hydraulics,
markers,
road lights,
electric connector (12V),
wiring system,
safety bumpers,
toppings,
mounting on vehicle's hitch,
spray paint (150 ml).
D
C
A
B

Operator's Manual
Truck Snow Plow
SnowPick
- 7 -
3.5. Optional equipment
rubber, polyurethane or Hardox steel clearing bar,
shock absorber,
snow protection screen,
parking rollers.
3.6. Spare parts
Spare parts should be ordered according to spare part catalogue by giving full name of the part as
well as its catalogue no.
IMPORTANT
Use only original SaMASZ equipment and spare parts. Spare parts of
unknown origin or new made feature lower strength and have unfavorable
influence on the machine’s performance and overall safety.
NOTE
The SaMASZ co. does not bear any responsibility for damages and defects
caused as a result of applying non-original parts and equipment.
4. SAFETY PRECAUTIONS
NOTE
Snow plow can only be operated by personnel familiarized with this
operator's manual.
Each operator of the plow should be fully aware of potential risks resulting from its operation
and principles of their prevention.
4.1. General safety rules and regulations
Before any operation read the operator's manual carefully.
Failure to have familiarized with its contents may bring risk of damaging the plow.
Use the plough only as intended.
Do not make any modifications of the design unless agreed with the manufacturer.
When driving on public roads always comply with local traffic regulations.
Working speed of the tractor-plow combination should always be adjusted to conditions such
as: degree of unevenness, presence of stones, curbs and other solid obstacles. When working
make sure the speed is no more than 16km/h (10mph).
Keep low working speed – with low gears engaged. Working at higher speeds may expose the
vehicle’s driver to injuries and the plow’s parts and the vehicle’s front linkage to damages.
Make sure that no bystanders are present within the plow's operating reach.
Before operating the machine carry out its technical inspection paying particular attention to
the condition of the basic connections on the machine’s assemblies as well as proper mounting
of the machine to the tractor.
Before working make sure the support leg is lifted.
When performing any works requiring lifting on the vehicle, it is necessary to protect the plow
from falling.
Periodically check bolts and other fasteners. Never operate with damaged or worn fasteners.
Never drive the plow if any person or object is present on the machine during transport or
work.
The plow should be mounted on the vehicle only by means of original pins and safety devices.
When idle and stored, the plow should be in parking position.

Operator's Manual
Truck Snow Plow
SnowPick
- 8 -
Replace any damaged hydraulic hoses and other hydraulic parts.
Use only original spare parts which can be ordered at our store or at your dealer.
While performing any repair, maintenance and adjustment works always wear safety gloves.
Do not leave the vehicle with mounted plow on slopes. If it is necessary, leave the plow, turn
off the engine, take the ignition key out, engage vehicle’s parking brake.
The plow should be stored in under a roof, with lifting cylinder retracted.
In case of a serious malfunction, turn off the engine, take the ignition key out, disconnect high-
current cables. Then call for technical service, and if an accident (in this case: road accident)
occurs, follow first aid rules and contact relevant authorities.
When using the plow make sure that the vehicle is equipped with a fire extinguisher suitable for
use on electrical fires.
NOTE
The person in charge of the machine's transport shall be responsible for
securing the danger area and performing the work.
4.2. Qualifications of operator
To provide safe machine operation each operator must meet the following requirements:
Should hold driving license, have ability to drive vehicles safely and know road traffic rules.
Must be in proper physical condition to be able to operate the machine.
Must not be under the influence of alcohol, drugs and medicines, which all have influence on
vehicle driving and machine operation.
Should be familiarized with this manual and follow its provisions.
Operator should be familiar with working principles of both the vehicle and the machine, and be
able to recognize and avoid hazards resulting from operation of the aggregate.
4.3. Transport
Before changing position of the machine make sure that all bystanders (children in particular)
not involved in operation of the machine are not nearby.
When transported the machine should always be set in transport position.
Always adjust your driving speed to the current road conditions and to local traffic rules in the
country where the plow is used.
Do not transport any people or objects on the machine.
It is forbidden for the operator to leave the vehicles when driving.
Never exceed a permissible transport speed of 72km/h (45mph).
Reckless driving and speeding may cause a traffic accident or collision.
4.4. Delivery
NOTE
Snow plow is delivered completely assembled and well adjusted – ready for
use.

Operator's Manual
Truck Snow Plow
SnowPick
- 9 -
WARNING!
When transported the snow plow should be secured properly so as to prevent
its shifting. When placing the snow plow on a transport vehicle, it should be
lifted up by transport holders are marked with special labels. When lifting
use lifting devices with a load capacity not less than snow plow’s overall
weight.
Both carrier and driver are responsible for machine transport. All equipment and parts must
be secured for transport. In order to move plow onto other means of transport, follow the below
rules:
For hoisting do use hoists with capacity bigger than the machine weight as indicated on its data
plate. It also applies to the necessary cables and chains,
transport belts, belt suspensions, ropes cannot be damaged. Whenever damages to these parts
are found, replace these with new ones,
Grab the machine by any lifting devices only in places indicated by hook sign (Fig. 4),
When mounting slings, chains, clamps, etc. always keep in mind the center of gravity of the
machine (Fig. 5),
For seizing the machines pick lines of adequate length, so that the angle between them was no
greater than 120°, and the angle of inclination between the cable and the vertical was no greater
than 60°,
when relocating the machine onto another vehicle, there should be no unauthorized personnel
permitted to remain within the danger area,
The machine should be protected from shifting on the vehicle's trailer.
Fig. 4. Points of lifting plow when moving

Operator's Manual
Truck Snow Plow
SnowPick
- 10 -
Fig. 5. Location of center of gravity
Tab. 2. Location of center of gravity
Dimension
[mm / ft in]
Plow type
SnowPick 91 SnowPick 96 SnowPick 102 SnowPick 114
A 500 / 1′8″495 / 1′7″490 / 1′7″475 / 1′6″
B 495 / 1′7″490 / 1′7″490 / 1′7″480 / 1′7″
C 565 / 1′10″565 / 1′10″570 / 1′10″585 / 1′11″
L 1150 / 3′9″1230 / 4′1300 / 4′3″1450 / 4′9″
WARNING!
Securing the maneuver area and providing safety for operation performed is
the responsibility of the person in charge of the plow moving.
4.5. Residual risk
Despite the fact that SaMASZ Białystok – the manufacturer of the machinery has taken great
care in the design and manufacturing of the machinery, certain risks during machinery operation
and maintenance are unavoidable.
Major source of risk results from the following actions:
1. operation of the machine by minors and individuals who have not read the operator's manual,
2. operation of the machine by persons under the influence of alcohol or other abusive substances,
3. failure to exercise caution during transport and handling of the machine during operation,
4. presence of people and animals within the machine operation range,
5. performing machine servicing works and adjustments when the supply is connected and the
vehicle's engine is on.
WARNING!
Residual risk may occur if specified instructions and forbidden actions are
not respected.
NOTE
Despite the fact, that SaMASZ Białystok company – the manufacturer of the
snow plow takes the responsibility for the plow design and manufacturing, in
order to eliminate risk, certain risk when operating the plow is unavoidable.

Operator's Manual
Truck Snow Plow
SnowPick
- 11 -
NOTE
Present residual risk results mainly from erroneous actions of the snow
plow’s operator and failure to follow the instruction manual.
NOTE
When describing residual risk, the snow plow shall be considered a machine,
which until the moment of production launching had been designed and
manufactured in accordance with the state of the art at the day of the
manufacture.
CAUTION
Danger of wounds is present when replacing parts with sharp edges. For any
repair and maintenance works always wear safety gloves.
PROHIBITED ACTIONS
Bear in mind the following prohibited actions when operating the snow plow.
Do not operate the plow under the influence of alcohol, drugs or medicines causing
deterioration of motor skills.
It is prohibited to operate the plow by unauthorized and unskilled personnel.
Do not use the plow for purposes other than mentioned in the operator's manual.
4.1 Safety labels and their meaning
IMPORTANT
Always follow the safety labels describing risks, and warning signs attached
to the machine.
IMPORTANT
All warning labels should be clean and legible.
Lost or damaged labels must be replaced.
New labels can be ordered at the Manufacturer.
IMPORTANT
When replacing any sub-assemblies, make sure they have all safety labels
provided by the manufacturer.
N-3
Read the operator’s manual before use N-4
Before any service or repair disconnect the power supply
N-11
N-40
Point of lifting when moving plow

Operator's Manual
Truck Snow Plow
SnowPick
- 12 -
N-206
Wear protective gloves
Fig. 6. Label locations
N-3
N-206
N-40
N-4
N-206
N-11
N-11
LOGO
LOGO

Operator's Manual
Truck Snow Plow
SnowPick
- 13 -
5. OPERATING PLOW
5.1. Mounting plow on vehicle
CAUTION!
Exercise particular caution when mounting plow on vehicle. During
mounting make sure there are no people between the plow and the vehicle.
5.1.1. Conditions for mounting SnowPick plow on vehicle
SnowPick plows are designed as front plows with various hitch options according to
customer's individual needs. The range includes hitches for the following vehicles: Dodge, Chevy-
GMC, Ford, GM and Toyota. Due to continuous development number of hitches for vehicles varies.
Ask manufacturer or your dealer on their availability.
Fig. 7. Mounting plow on vehicle: (A– Plow hitch fin,
B– Vehicle hitch socket, C– Lock bolt, D– Safety cotter)
Fig. 8. Setting plow on vehicle: (A– Support foot,
B– Rotation axle, C– Chain, D– Topping)
A
C
D
A
B
C
D

Operator's Manual
Truck Snow Plow
SnowPick
- 14 -
To mount the plow on the vehicle do the following:
lift the hitch on a required assembling height using support foot (if no range is available (Fig.
11) place mounting point for foot bolt in the other hole (Fig. 10), and set hitch fins (Fig. 7 – A)
so they are vertical in relation to the ground using chain (Fig. 8 – C),
Fig. 9. Shield inclination adjustment
(A – Linkage frame, B – Adjustment bolts, C –
Rotation axle)
Fig. 10. Adjusting support foot height
drive the vehicle towards the plow at a distance allowing for mounting,
after mounting the plow insert two pins Cand secure them with cotters D(Fig. 7),
fold support foot A and secure it with cotter (Fig. 8),
set rotation axle Bof the shield perpendicular to the ground (Fig. 8), then adjust by loosening bolt
connection B(Fig. 9
Fig. 9
), next tighten the bolt connection with torque 92lbf*ft (125Nm) (Important: Adjustment
should be carried out on a flat surface after lowering the shield),
connect the wiring system,
connect control panel to wire harness block,
check lighting for proper operation,
adjust height of toppings D,
lift the shield to its maximum and check the gap between bumpers (min. 6 mm – ¼") Fig. 12, if
the gap is smaller than the one given adjust the chain accordingly,
check basic functions (UP/DOWN/RIGHT/LEFT).
Fig. 11. Range of SnowPick plow hitch height adjustment
Increasing
hitch height

Operator's Manual
Truck Snow Plow
SnowPick
- 15 -
Fig. 12. Plow positions – position: up – down with expected suspension height
NOTE
The manufacturer shall not bear any responsibility for damages of the plow
resulting from it improper mounting on the vehicle. Make sure to
periodically inspect the plow for its correct mounting.
NOTE
After mounting the plow check condition of all bolt connections and safety
devices.
NOTE
Before operating check and inspect tightening bolts of high-current
connections (Fig. 13).
Fig. 13
. Inspection place of high-current cables
min.
¼" (6 mm)
1
2
3
4

Operator's Manual
Truck Snow Plow
SnowPick
- 16 -
5.2. Increasing load of vehicle's rear axle
After mounting the plow on the vehicle it is recommended to apply increased load on the
vehicle's rear axle. Amount of required additional load can be calculated from the below formula:
Fig. 14. Increasing load of vehicle's rear axle
C– distance between plow's center of gravity and hitch protection point (value for calculations – see
Tab. 2), D– distance between hitch protection and vehicle's front axle, E– distance between vehicle's axes,
F– ballast, M– plow's weight (value for calculations – see Tab. 1)
5.3. Preparing plow for operation
After the plow is properly mounted on the tractor, inspect and examine whether the plow's
clearing bars are in good condition or there are no loosen bolt connections. If needed, replace worn
elements and tighten screws. If the plow is ready for operation set it in a desired position and start
clearing snow. The Fig. 15 shows basic working positions of the plow. When operating on public
roads, make sure lighting is always on.
Fig. 15. Basic working positions of SnowPick plow, a) clearing snow to the left, b) clearing snow to the
right, c) pushing snow forward
b)
a)
c)
F
M
C
E
D

Operator's Manual
Truck Snow Plow
SnowPick
- 17 -
5.4. Plow control
Plow's independent hydraulic assembly comprises electric pump and three control cylinders.
The lifting assembly has chain allowing for lifting a wing when driving onto an obstacle.
Plow is controlled by means of control panel (Fig. 16). The plow's desired position (working
or transport) can be set using corresponding buttons.
Fig. 16. Control panel functions: 1– lifting, 2– turning shield to the left, 3– turning shield to the right, 4–
lowering (floating), 5– wing automatic lifting and lowering,
A– power LED, B– floating LED, C– wing automatic lifting and lowering LED
Tab. 3. Remote control functions
Button Action Function
1 Push Lifting wing
Push quickly twice Lifting wing to an end position (default run
time 2s)
2 Push Deflecting wing to the left
Push quickly twice Deflecting wing to the left to an end
position (default run time 3s)
3 Push Deflecting wing to the right
Push quickly twice Deflecting wing to the right to an end
position (default run time 3s)
4 Push Lowering wing
Push quickly twice Lowering wing to an end position (default
run time 10s)
4 Push twice (first push quickly, second time hold
the button) Floating 20 min (LED B - Fig. 16)
1 Push Cancelling floating option
5+1 Push
AUTO
then push Wing is lifted when reverse gear is engaged
(red LED C- Fig. 16)
5+4 Push
AUTO
then push Wing is lowered when reverse gear is
engaged (green LED C- Fig. 16)
5 Push
AUTO
Cancelling options
AUTO
1B
2
C
3
4
B
A
5

Operator's Manual
Truck Snow Plow
SnowPick
- 18 -
Instructions for controller operation:
1. The controller starts automatically after turning the ignition key.
2. To move the shield UP/LEFT/RIGHT push , , button respectively (also it can be
pushed quickly twice).
3. To LOWER the shield push and hold button
(also it can be pushed quickly twice).
4. To turn on the FLOATING function push button , and then push again and hold it. The
option will become activated for 1-29mins (default 20 min). The option can be cancelled by
pushing .
5. Snow removal AUTO. To activate this function push button
AUTO
, and then /
respectively. This enables snow removal in two work modes:
•Pulling snow to the rear. The shield will lower automatically, if the reverse gear is engaged
in the vehicle. The shield will raise automatically, if the reverse gear is disengaged.
•Pushing snow to the front. The shield will lower automatically, if the reverse gear in the
vehicle is engaged. The shield will raise automatically, if the reverse gear is engaged.
•The AUTO mode will become deactivated after button
AUTO
is pressed and released, to
indicate this LED (C) (Fig. 16) will go out.
After buttons / / are pushed quickly the hydraulic power supply motor will
operate for 1s. This is meant to reduce power consumption, so that after the button is pushed twice
the motor is not started twice. This would cause faster wear of the plow's motor pump and
consumption of vehicle's battery.
While the plow SnowPick is transported and operated make sure its support feet are lifted.
Also turn off the vehicle's assembly lighting. Check whether the clearance between bumpers is kept
(Fig. 12), otherwise loosen the chain.
This manual suits for next models
3
Table of contents
Other SaMASZ Snow Blower manuals