Sammic LL-60 User manual

INSTRUCCIONES - USERS MANUAL - GEBRAUCHSANWEISUNG -
MODE D’EMPLOI - INSTRUZIONI PER L’USO - MANUAL DE INSTRUÇÕES
Licuadora lenta
Slow Juicer
Centrifugueuse lente
Estrattore du Succo a Freddo
Liquidificador lento
LL-60

2
ES
PRECAUCIONES
Siempre que se utilicen aparatos eléctricos, se deben respetar una serie de
precauciones básicas, como las siguientes:
1. Lea detenidamente las instrucciones y componentes antes de su uso.
2. Este aparato está destinado únicamente a uso alimentario.
3. No utilice el aparato para nes distintos a los previstos o especicados.
4. Antes de enchufar el cable de corriente, asegúrese de que la indicación
de voltaje en el aparato corresponde con el voltaje de su vivienda, para
evitar daños en el aparato.
5. Para evitar descargas eléctricas, no sumerja el cable, enchufe ni la base
en agua u otros líquidos. No utilice la máquina con las manos mojadas
ni la deposite sobre supercies mojadas. No permita que el cable cuel-
gue del borde de la mesa o encimera ni que toque supercies calientes.
6. Si el cable suministrado está dañado, debe ser sustituido por el fabrican-
te, su agente de servicios o personas de similar cualicación, al objeto
de evitar riesgos.
7. Desconecte el enchufe cuando no esté en uso.
8. Para evitar descargas eléctricas, está prohibido enchufar o desenchufar
con las manos mojadas.
9. Para desconectar, extraiga el enchufe de la toma de electricidad.
10. Este aparato no está diseñado para el uso por personas (incluidos
niños) con capacidades físicas, sensoriales o mentales reducidas, ni
con falta de experiencia o conocimiento, a no ser que hayan recibido
supervisión o instrucciones referidas al uso del aparato de una persona
responsable de su seguridad.
11. Los niños deben ser supervisados para evitar que jueguen con el
aparato.
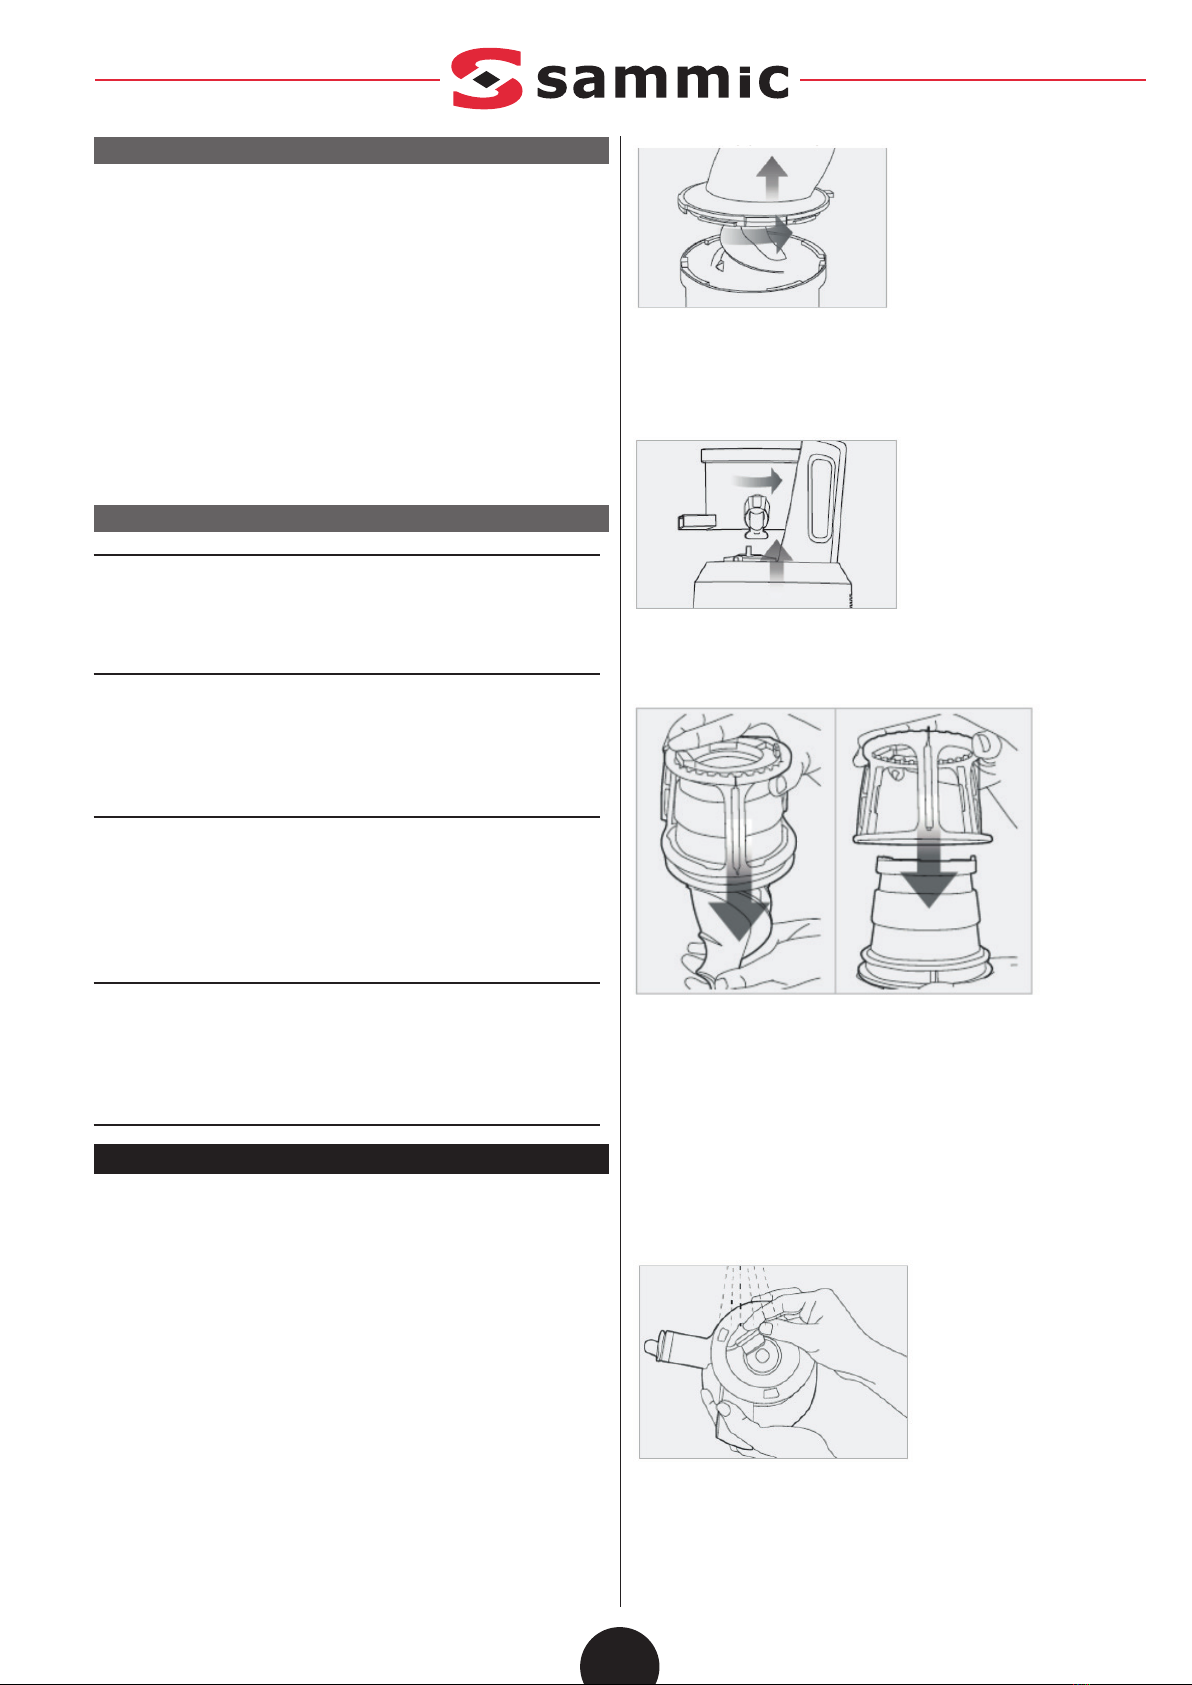
12. Revise el colador cada vez que quiera utilizar el aparato. Si detecta
cualquier grieta o daño, no utilice el aparato y contacte con el centro de
servicios más cercano.
13. Fije siempre todas las piezas antes de encender el motor y no las libere
mientras el aparato esté en funcionamiento.
14. Evite el contacto con las piezas móviles. Asegúrese de que el motor
esté completamente detenido antes de desmontar el exprimidor.
15. No coloque el aparato encima o cerca de una cocina de gas o eléctrica
ni dentro de un horno caliente.
16. No deje el aparato funcionando si se marcha.
17. No desmonte la base.
18. No introduzca objetos extraños en la máquina.
19. No la utilice durante más de 30 minutos ininterrumpidos.
20. No accione la máquina en modo de espera. El tiempo de espera no
puede exceder de 2 minutos, de lo contrario podría dañarse la cuchilla
helicoidal.
21. Durante el uso, introduzca los alimentos lentamente para evitar obstruir
el giro. En caso de obstrucción, detenga el aparato inmediatamente.
Active la función Reverse un tiempo y abra la tapa para extraer los
alimentos: el aparato volverá a funcionar normalmente.
22. Utilice la varilla especial de presión para introducir el alimento en la
tolva.
23. Antes del uso, corte los ingredientes en trozos pequeños y quite el
hueso para evitar obstrucciones.
24. No introduzca alimentos muy voluminosos o duros. Si ha intro-
ducido estos alimentos en la tolva y se han bloqueado las cuchillas
helicoidales, apriete inmediatamente el botón Reverse para evitar la
obstrucción. Si durante el uso se activa la protección de bloqueo de
la rotación, desenchufe el aparato, límpielo y, 10 segundos después,
restablezca la corriente para volver a usarlo.
25. No añada alimentos demasiado duros. Los cereales deben ser sum-
ergidos y empapados en agua antes de introducirlos en la tolva. De lo
contrario podría dañar la máquina.
26. Si durante el uso observa cualquier sonido anómalo, olor, recalenta-
miento, humo, etc., desconecte inmediatamente la corriente y diríjase
al centro de servicios para que lo reparen. De esta forma evitará des-
cargas eléctricas, fugas de energía y riesgos de incendio.
27. Para evitar incendios, descargas eléctricas o daños al cuerpo de la
máquina, etc., no lave el exterior de la máquina en recipientes llenos
de agua ni derrame agua en su interior.
28. Cuando se prepare zumo de zanahoria, preste atención al tamaño de
las zanahorias: no deben superior los 80 mm de largo, los 15 mm de
ancho, ni los 15 mm de alto. El tiempo de la alimentación a intervalos
no debe ser inferior a 5 segundos.
ESPECIFICACIONES
Voltaje CA 220-240 V, ~50/60 Hz
Consumo eléctrico 240 W
Tiempo de funcionamiento 5 min
Tiempo de funcionamiento 3 min
Peso 7,5 kg
Dimensiones 25 x 16 x 47 cm
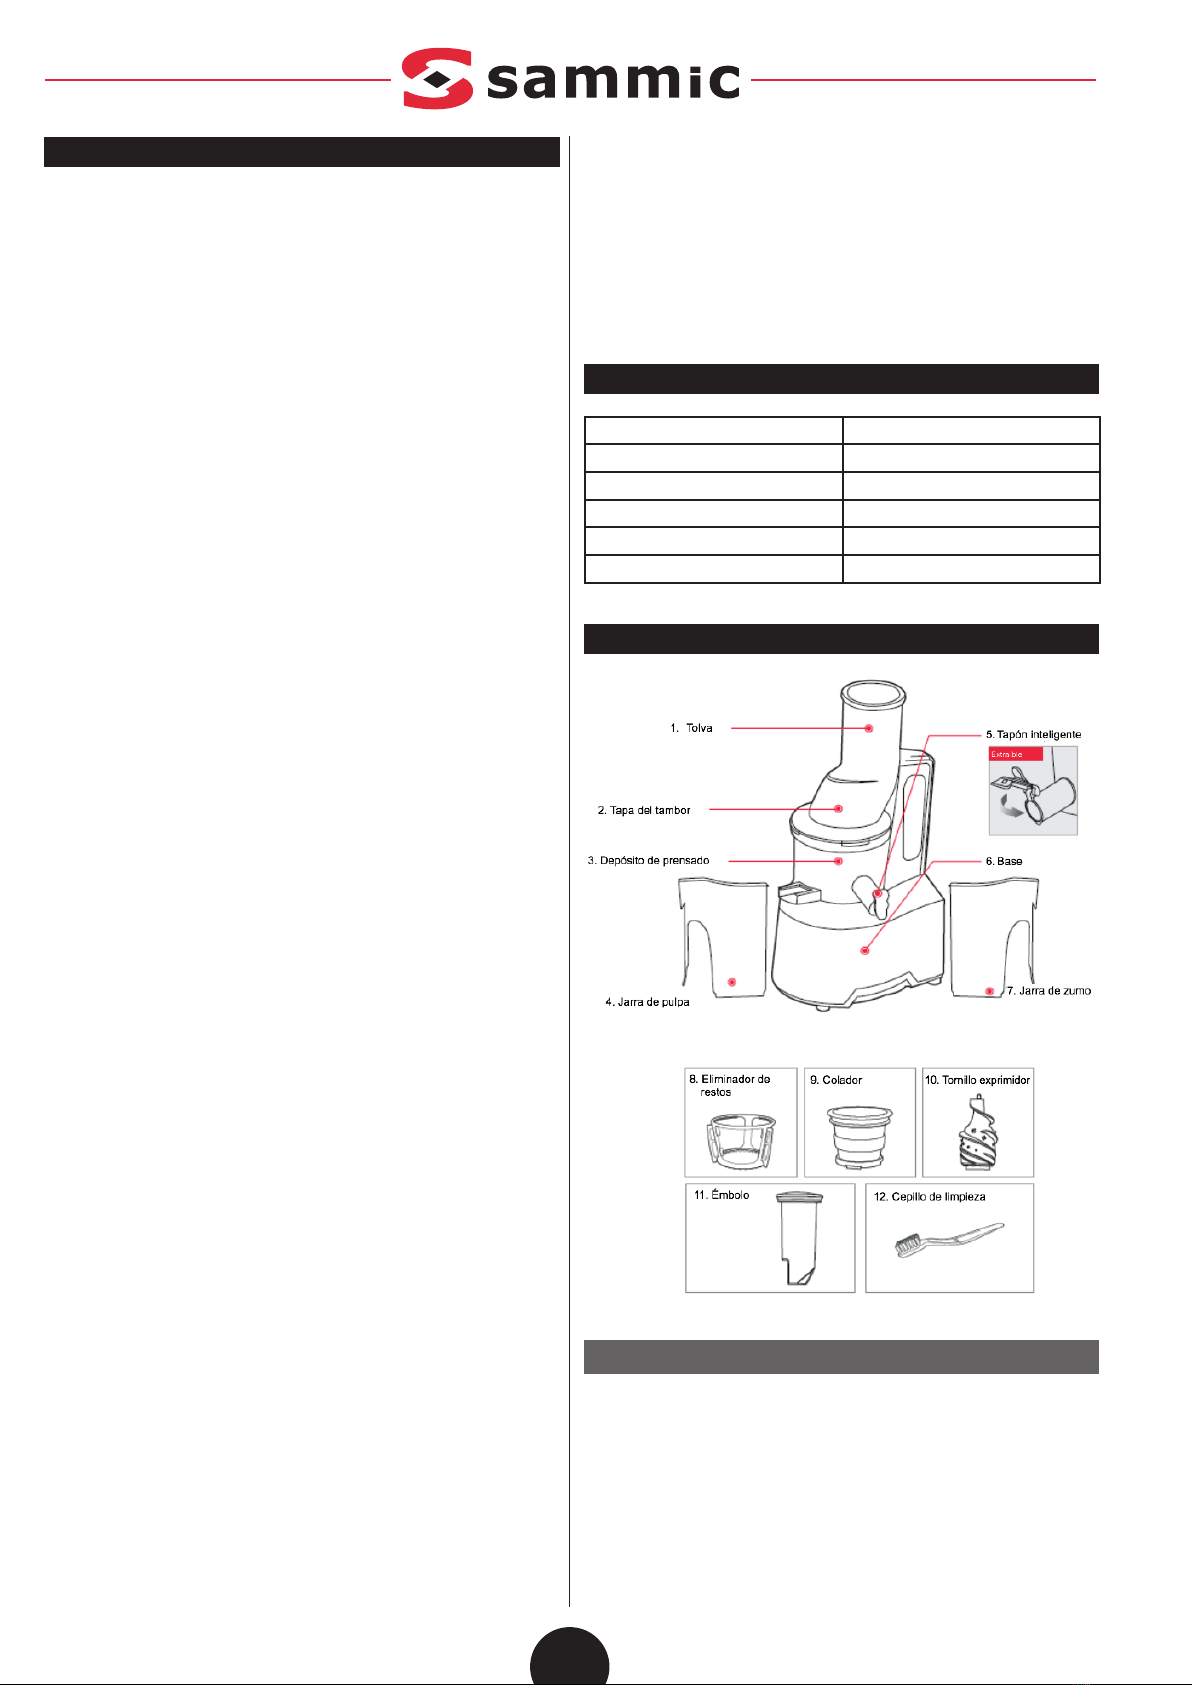
PIEZAS DEL APARATO
¿QUÉ ES UN EXPRIMIDOR LENTO?
El exprimidor lento es un extractor de zumos equipado con el Sistema de
Tecnología de Baja Velocidad (LSTS). Se llama exprimidor lento porque
gira a solo 80~90 revoluciones por minuto y no consume más que 150
vatios de energía, en lugar de las 1000~24.000 rpm y los 1500 vatios de los
clásicos exprimidores centrífugos de alta velocidad. Pero que no le engañe
el nombre: el exprimidor lento prepara zumos más rápidamente que los
convencionales y obtiene una pulpa más seca, con un rendimiento mucho
mayor. Su método de extracción se basa en masticar y prensar, empleando
el tornillo exprimidor a modo de mortero y triturador. Este tornillo aplasta y

3
ES
prensa los alimentos, liberando sus nutrientes y enzimas más profundos.
También descompone más tonutrientes, con lo que permite obtener un
zumo de color más rico, que conserva más vitaminas y minerales. Sus
lentas revoluciones no alteran la estructura celular de las frutas y verduras,
con lo que se evita su oxidación y disgregación. De esta forma, preserva las
valiosas enzimas y nutrientes en el estado más parecido a su forma natural.
CÓMO MONTARLO
PASO 1. MONTAJE DE LA PARTE SUPERIOR
• Lave las piezas antes del primer uso.
• Compruebe que la silicona de compresión y el anillo de silicona están
correctamente montados.
1. Inserte con fuerza la silicona de compresión en la ranura situada debajo
del caño de pulpa.
Nota: el exprimidor podría perder líquido si no se monta correcta-
mente.
2. Inserte el tornillo exprimidor en el colador. Gire y presione hacia abajo
hasta que encaje en su sitio.
Nota: para poder cerrar la tapa del tambor, es necesario bloquear el
tornillo exprimidor en su sitio.
3. Introduzca el colador en el eliminador de restos y después inserte este
bloque en el depósito de prensado, asegurándose de que el punto rojo del
colador quede alineado con el punto rojo del depósito.
4. Ponga la tapa del tambor en el depósito de prensado alineando el punto
rojo de la tapa con el punto rojo del depósito.
PASO 2. MONTAJE DE LA PARTE SUPERIOR Y LA BASE
CONSEJO: para facilitar el montaje, sujete la tapa del tambor agarrando
la tolva y gire en sentido de las agujas del reloj como se muestra en la
imagen.

6. Marcas Abrir/Cerrar en la parte superior.
Nota: el exprimidor no funcionará si no se monta correctamente.
7. Inserte el depósito sobre la base de modo que la echa gris quede alin-
eada con la negra de la base. Una vez montada, gire la tapa del tambor en
sentido de las agujas del reloj para cerrarlo.
8. Ponga la jarra de pulpa bajo el caño de pulpa y la jarra de zumo bajo el
caño de zumo, como se muestra en la ilustración.
FUNCIONAMIENTO
1. Cuando todas las piezas estén montadas, enchufe el cable de corriente
a una toma de corriente aprobada.
2. Ponga la jarra de pulpa bajo el caño de pulpa y la jarra de zumo bajo el
caño de zumo.
3. El exprimidor lento tiene tres ajustes:
FORWARD: enciende el motor y absorbe los alimentos hacia abajo.
OFF: detiene el exprimidor.
REVERSE: devuelve los alimentos por arriba.
4. Antes de insertar alimentos en el exprimidor, lávelos y aclárelos bien.
Después córtelos en trozos que quepan fácilmente por el tubo. Elimine
antes los huesos de fruta.
NOTA: Inserte los trozos uno a uno.
5. La mayoría de las veces, al insertar los alimentos en el exprimidor, el
tornillo los absorberá y empezará a exprimir de inmediato. Algunos ali-
mentos necesitará prensarlos con el émbolo.
NOTA: Si los ingredientes se atascan en el tornillo y la tapa del tambor
no se abre, pulse el botón OFF. A continuación mantenga pulsado el
botón REVERSE durante 2 o 3 segundos hasta que se desprendan los
ingredientes. Repita REVERSE-OFF-FORWARD tantas veces como
necesite hasta conseguir lo que busca. Si este procedimiento no funcio-
na, desmonte las piezas y límpielas antes de volver a usar el exprimidor.
NOTA: El botón REVERSE solo funciona mientras mantiene pulsado el
interruptor. Para evitar averías, deje que el exprimidor se detenga total-
mente antes de pulsar el botón REVERSE.
6. Utilice el tapón inteligente para hacer zumos mixtos, detener el chorro de
zumo o lavar entre zumos distintos.
CONSEJO: Exprimir con el tapón inteligente cerrado crea varias mezclas
de zumo si se seleccionan distintas frutas y verduras, leche, plátano,
judías, etc.
7. El exprimidor lento cuenta con un exclusivo proceso de limpieza fácil para
cambiar entre zumos y frutas de distinto sabor. Para limpiar rápidamente
los restos que dejen sabor, vierta un vaso de agua en el exprimidor con el
tapón inteligente cerrado y accione el exprimidor. De esta forma eliminará
la mayoría de los residuos y ya podrá añadir otros ingredientes.
8. Una vez extraído totalmente el zumo y la pulpa, apague el aparato.
NOTA: si no se extraen totalmente los restantes ingredientes del depósito
de prensado, puede que el tambor no se abra con facilidad. Después de
cada extracción, accione el exprimidor durante otros 30 segundos para
extraer el resto de la pulpa.
Si se atasca la tapa del tambor, pulse los botones REVERSE – OFF –
FORWARD en este orden, cambiando de atrás adelante 2 o 3 veces
para desprender los alimentos. A continuación ponga las manos sobre
la tapa del tambor y presione con fuerza hacia abajo mientras la gira en
sentido antihorario para abrirla.
4
ES

CONSEJOS SOBRE INGREDIENTES
NO añada los siguientes ingredientes en el exprimidor:
Huesos de fruta: De melocotón, nectarinas, albaricoques, ciruelas, man-
gos. Retírelos antes de introducir estas frutas.
Pieles duras o incomestibles: De piña, melón, mango, naranja, etc. Pele
la fruta antes de introducirla.
Fruta helada o hielo: Fresas, arándanos, frambuesas heladas, etc.
Descongele totalmente las frutas antes de exprimirlas. No vierta hielo.
Aceite vegetal o animal: Semillas de sésamo, mantequilla, margarina, etc.
No exprima ingredientes que contengan aceite vegetal o animal, ya que
pueden mermar el rendimiento del exprimidor e incluso dañarlo.
Otros: Coco, azúcar de caña, cereales integrales: no exprima ingredientes
que no contengan agua.
CONSEJOS DE PREPARACIÓN DE INGREDIENTES Y EXTRACCIÓN
Frutas y verduras blandas
(naranjas, tomates)
Pélelas y retire las semillas. Trocéelas.
Para exprimir ingredientes que formen
mucha espuma, deje abierto el tapón inteli-
gente. Cierre el émbolo para evitar salpica-
duras de zumo.
Frutas y verduras duras
(zanahoria, patata, remo-
lacha)
Sumérjalas en agua fría antes de expri-
mirlas y córtelas en trozos (de 2,5 cm de
grosor, 2,5 cm de ancho y 5-15 cm de
largo). Para extraer la máxima cantidad
de zumo, exprima ingredientes con alto
contenido en agua.
Ingredientes con semillas
pequeñas (frambuesas,
uvas, granada)
Antes de exprimir ingredientes congela-
dos, deje que se descongelen. Lave los
ingredientes y elimine el tallo y las pepitas.
En el caso de la granada, descarte la piel
y exprima solo la pulpa. Inserte entre 3 y
5 uvas a la vez, añada 1 cucharada de
granada y frambuesa al mismo tiempo.
Alimentos brosos o de
hoja verde resistente
Sumérjalos en agua fría durante unos 30
minutos y córtelos en pequeños trozos.
Separe los tallos. Corte el tallo exterior que
es más grueso y resistente unos 10 cm de
longitud o menos. Vaya insertando hojas y
tallos de forma alterna.
LIMPIEZA Y MANTENIMIENTO
1. Apague el aparato y desenchufe el cable de corriente de la toma de
pared.
Nota: Extraiga toda la pulpa que quede en el depósito de prensado antes de
apagar el exprimidor. Para facilitar la limpieza, accione el exprimidor otros
30 segundos después de extraer el zumo.
- Si se atasca la tapa del tambor, pulse los botones REVERSE – OFF –
FORWARD en este orden 2 o 3 veces para desprenderla. A continuación
ponga las manos sobre la tapa del tambor y presione con fuerza hacia
abajo mientras la gira en sentido antihorario para abrirla.
2. Una vez montada, gire la tapa del tambor en sentido de las agujas del
reloj para cerrarla.
NOTA: cuando necesite mover el aparato, no lo levante por la tolva.
Levántelo siempre tomándolo por la base o el mango.
3. Inserte el depósito sobre la base de modo que la echa gris quede alin-
eada con la echa negra de la base.
4. Desmonte el tornillo exprimidor, el colador y el eliminador de restos del
depósito de prensado. Limpie con el cepillo incluido.
NOTA: Limpie el exprimidor de inmediato antes de cada uso. Si se secan
los residuos del exprimidor, es posible que el montaje y la limpieza le result-
en más difíciles. La acumulación de restos puede hacer que el aparato
funcione de manera deciente.
- Para un desmontaje más sencillo, deposite la parte superior en el fregade-
ro y vierta agua por arriba.
- Seque bien la parte inferior del tornillo exprimidor, en la parte de la base
en que se conecta al eje cilíndrico de metal.
5. Coloque el depósito de prensado bajo el agua del grifo y extraiga la
silicona de compresión para limpiar el caño de pulpa.
CONSEJO: Sumerja el depósito de prensado en una solución de agua
caliente con bicarbonato y un poco de lejía para limpiar el exceso de restos
acumulados.
5
ES

USO DEL ACCESORIO PARA HELADOS
NOTA: Antes del uso, compruebe que la tapa de silicona esté bien colo-
cada.
1. Para montar la parte superior, coloque el tornillo exprimidor y el acceso-
rio para helados en el depósito de prensado y cierre la tapa.
- Inserte el accesorio para helados en el depósito de prensado alineando
los puntos rojos del accesorio para helados y del depósito de prensado.
- Inserte el tornillo exprimidor en el accesorio para helados con un movi-
miento giratorio.
- Coloque la tapa en el depósito de prensado alineando los puntos rojos de
la tapa y del depósito de prensado. A continuación, gire la tapa en sentido
horario hasta cerrarla.
Deje siempre el tapón inteligente abierto cuando utilice el accesorio
para helados.
2. Acople la parte superior montada en la base.
PRECAUCIÓN:
El accesorio para helados se utiliza con ingredientes congelados. Deje que
los alimentos congelados se descongelen entre 5 y 20 minutos antes del
uso, dependiendo del tipo de ingrediente. Procese despacio una cantidad
más pequeña por lote.
NOTA: No vierta hielo ni alimentos que contengan aceite vegetal o animal.
Podría averiar el aparato.
Quite los huesos de la fruta y pélela antes de introducirla.
USO DEL ACCESORIO PARA BATIDOS
NOTA: Antes del uso, compruebe que la tapa de silicona esté bien colo-
cada.
1. Para montar la parte superior, inserte el tornillo exprimidor y el accesorio
para batidos en el depósito de prensado y cierre la tapa.
- Inserte el eliminador de restos y el accesorio para batidos en el depósito
de prensado alineando los puntos rojos del accesorio y del depósito de
prensado.
- Inserte el tornillo exprimidor en el accesorio para helados con un movi-
miento giratorio.
- Coloque la tapa en el depósito de prensado alineando los puntos rojos de
la tapa y del depósito de prensado. A continuación, gire la tapa en sentido
horario hasta cerrarla.
Deje siempre el tapón inteligente cerrado cuando utilice el accesorio
para batidos.
2. Acople la parte superior montada en la base.
PRECAUCIÓN:
Para exprimir alimentos congelados, deje que se descongelen entre 5 y 20
minutos antes, dependiendo del tipo de alimento. Procese despacio una
cantidad más pequeña por lote. Vierta leche u otro líquido adicionalmente.
NOTA: No vierta hielo ni alimentos que contengan aceite vegetal o animal.
Podría averiar el aparato. Quite los huesos de la fruta y pélela antes de
introducirla.
6
ES

CÓMO LIMPIAR LAS PIEZAS DE SILICONA
Las piezas de silicona pueden extraerse para su limpieza. Una vez limpias,
vuelva a ponerlas en su sitio, como se muestra en la imagen de abajo.
RESOLUCIÓN DE PROBLEMAS
Problema Solución
El exprimidor no
tiene corriente
• Revise si el cable de corriente está bien ench-
ufado
• Revise si la tapa de tambor y el depósito de
prensado están en su sitio
• Revise si la parte superior y la base están cor-
rectamente montadas.
El exprimidor no funcionará si las piezas no
se montan correctamente. El exprimidor no
funcionará si las piezas no se montan cor-
rectamente.
Poca cantidad de
zumo
• La cantidad de zumo depende del contenido de
agua de los ingredientes.
• Si los ingredientes no son frescos, su cantidad
de agua será menor.
• Revise si la silicona de compresión está bien
insertada.
• Si el propio ingrediente tiene un bajo contenido
de agua, un truco es empaparlo en agua antes
de exprimirlo.
• Si exprime ingredientes con pepitas diminutas,
es posible que la cantidad de zumo sea menor
tras varias raciones. Desmonte y limpie la parte
superior entre usos.
• Los restos de semillas en el fondo del cola-
dor pueden afectar el rendimiento del exprim-
idor y la cantidad de zumo en general.
Hay mucha pulpa en
el zumo
• Cuando se exprime continuamente, dependien-
do de los ingredientes, el zumo puede contener
pulpa na abundante.
• Para reducir la cantidad de pulpa, limpie la parte
superior frecuentemente y extraiga la pulpa.
• Utilice la rejilla del colador y ltre el zumo con
ella para recoger la pulpa no deseada.
• Si el colador y el tornillo están dañados, se
recomienda sustituir estas piezas.
• La vida útil de cada pieza puede variar
dependiendo de la duración y forma de uso y
de los ingredientes exprimidos.
• Si se introducen muchos ingredientes al mismo
tiempo, es posible que el exprimidor se detenga
continuamente. El resultado será presencia de
pulpa en el zumo. Introduzca los ingredientes
despacio y en pocas cantidades a la vez.
La tapa del tambor
no cierra
• Para poder cerrar la tapa de tambor adecuada-
mente, asegúrese de que ha empujado el tornillo
exprimidor hasta el colador.
•Si el tornillo exprimidor no está ajustado
correctamente en su posición, es posible que
la tapa del tambor no cierre.
Sonido extraño del
exprimidor
• Revise si las piezas están bien montadas.
Pruebe a volver a montar las piezas y escuche si
el sonido extraño se repite.
• No ponga en marcha el exprimidor a no ser que
haya ingredientes y/o líquido en él.
• Utilizar el exprimidor sin ingredientes puede
provocar daños al tornillo e incrementar el
nivel de ruido.
• Si se produce algún ruido después de introducir
los ingredientes en el exprimidor, compruebe el
tamaño de los trozos. No introduzca alimentos de
más de 2,5 cm de grosor.
• Dependiendo del tipo de ingredientes, las
dimensiones pueden ser menores.
• El ruido puede producirse si el exprimidor es
accionado en supercies irregulares o inclina-
das. Durante el uso, sitúe el exprimidor sobre
una supercie horizontal plana.
La pulpa extraída es
muy húmeda
•Al principio de la extracción, puede que la pulpa
contenga más agua.
• El estado de los ingredientes puede afectar a
la pulpa extraída. Especialmente si no son fres-
cos, es posible que se extraiga zumo junto con
la pulpa.
El depósito de pren-
sado se mueve
durante el uso
•El tornillo exprimidor y el colador están cong-
urados para triturar y exprimir los ingredientes.
Es normal que el tornillo exprimidor y el colador
vibren.
• La vibración de la parte superior puede ser
mayor si el ingrediente contiene bras resistentes.
7
ES

El exprimidor se
detiene de repente
• Revise el cable de corriente y asegúrese de que
está enchufado correctamente.
• Revise que todas las piezas están correcta-
mente montadas.
• Si se introducen muchos ingredientes al mismo
tiempo es posible que el exprimidor se detenga.
• Si el exprimidor se detiene porque hay demasi-
ados ingredientes en él, apriete los botones
REVERSE – OFF – FORWARD en este orden,
cambiando adelante y atrás 2 – 3 veces.
• La opción Reverse devuelve los ingredientes
hacia arriba y la opción Forward los absorbe.
• Si el exprimidor se detiene por la protección de
sobrecarga, deje que se enfríe durante entre 30
minutos y 2 horas antes de exprimir de nuevo.
• Si la fruta tiene hueso, retírelo antes de exprimir.
Los huesos pueden dañar el exprimidor.
Capas de sepa-
ración en el zumo
• Dependiendo de la densidad de los ingredien-
tes, el zumo extraído puede mostrar capas de
zumos diferentes. Es diferente de la separación
debida a la oxidación causada por exprimir con
un exprimidor de alta velocidad.
La tapa de tambor
está atascada
• Después de exprimir accione el exprimidor otros
30 segundos para extraer la pulpa restante.
• Si hay mucha pulpa en la parte superior, es
posible que la tapa del tambor no se abra. En
este caso presione los botones REVERSE – OFF
– FORWARD en este orden, cambiando adelante
y atrás 2 – 3 veces.
•Vierta agua a través de la tolva para lavar
el interior y después intente abrir la tapa del
tambor.
•
El zumo gotea por
el cuerpo de la base
•Si la silicona de compresión en el fondo del
depósito de prensado no está bien encajada,
el zumo puede derramarse hacia la base del
exprimidor. Antes de montar las piezas, revise
y asegúrese de que la silicona de compresión
encaje correctamente.
Decoloración de las
partes plásticas
• Si, después de exprimir, el exprimidor no se
limpia inmediatamente, la pulpa restante puede
secarse y deteriorar el color.
• Los ingredientes ricos en carotenoides (zanaho-
rias, espinacas) pueden teñir las partes plásticas.
• Frote con aceite vegetal las zonas decoloradas
y utilice un detergente suave para la limpieza.
• Utilice aceite vegetal para la limpieza de las
partes decoloradas. No utilice aceite vegetal
en el tornillo exprimidor ni en el colador. Si
el aceite vegetal o aceites de grasa de animal
entran en contacto con el tornillo exprimidor
o el colador, el rendimiento del exprimidor
podría reducirse y las piezas, dañarse.
.
NOTA: No deseche el aparato junto con la basura doméstica normal al nal
de su vida útil. Llévelo a un punto limpio para su reciclaje. Así ayudará a
proteger el medio ambiente.
8
ES

SAFETY PRECAUTIONS
When using the electrical appliances, basic safety precautions should
always be followed including the following:
1. Please carefully read the instructions and components before operating.
2. This appliance is intended for food use only.
3. Do not use the appliance other than intended or specied purposes.
4. Make sure the voltage mark on the appliance corresponds to the voltage
in your home before plugging in the power cord in order to avoid damage
to the appliance.
5. To protect against electrical shock, do not place cord, plug, or base unit in
water or other liquids. Don’t operate machine with wet hand or place on a
wet working place. Do not let the cord hang over the edge of the table or
counter or touch hot surfaces.
6. If the supply cord is damaged, it must be replaced by the manufacturer,
its service agent or similarly qualied persons in order to avoid a hazard.
7. Unplug from outlet when not in use.
8. It is prohibited to plug or unplug with wet hand to avoid electric shock.
9. To disconnect, remove plug from the electric outlet.
10. This appliance is not intended for use by persons (including children) with
reduced physical, sensory or mental capabilities, or lack of experience
and knowledge, unless they have been given supervision or instruction
concerning use of the appliance by a person responsible for their safety.
11. Children should be supervised to ensure that they do not play with the
appliance.
12. Check the strainer every time you want to use the appliance. If you
detect any cracks or damage, do not use the appliance and contact the
nearest service centre.
13. Always securely clamp in place all parts before the motor is turned on.
Do not unfasten while appliance is in operation.
14. Avoid contacting moving parts. Make sure the motor stops completely
before disassembling.
15. Do not place the appliance on or near a hot gas or electric burner or in
a heated oven.
16. Do not let the appliance go on working when you move away.
17.Do not disassemble the base.
18.Do not put any foreign materials into the machine.
19.Do not use for more than 30 minutes continuously.
20.It is prohibited to let the machine operate in idle state. Idling time can’t
exceed 2 minutes or it will damage the spiral blade.
21. During operation, please feed the food material slowly to avoid clogging
rotation. If clogging happens, please stop working immediately. Reverse
it for a while then open the lid to take out the food and then it can work
again.
22.Please use the special pressing stick to feed food into the feeder opening.
23.Before use, please cut ingredients into small pieces and take out core or
it will cause clogging.
24.It is prohibited to insert too big or too hard food materials. If those foods
have been put into the feed tube and thus blocking the spiral blades,
immediately press the reverse button to anti-block. If blocking rotation
protection happens during operation, please unplug the power and clear
up and 10 seconds later, you connect the power to use it again.
25.Do not use too hard food materials. Cereals should be carefully immersed
and soaked in water before it can be fed into the feeder opening. This can
avoid damage to the machine.
26. When using, if there are any abnormal sound, smell, overheating, smoke,
etc., immediately turn off the power and apply to the service center for
maintenance and repair. This can avoid electric shock, electricity leakage
and re hazard.
27. It is prohibited to scrub and wash the machine body on water-lled plat-
form or pour water to wash the inside of the machine to avoid re, electric
shock or damage to machine body, etc.
28. When making the carrot juice, please pay attention to the size of carrots,
the size should be no more than 80mm in length, no more than 15mm in
width, no more than 15mm in height. Interval feeding time should be no
less than 5 seconds.
SPECIFICATION
Voltage AC 220-240V, ~50/60Hz
Power consumption 240 W
Rated working time 5 min
Rated interval time 3 min
Weight 7,5 kg
Dimensions 25 x 16 x 47 cm
PARTS OF APPLIANCE
WHAT IS A SLOW JUICER?
The slow juicer is a juice extractor that uses Low Speed Technology System
(LSTS).It is called a slow juicer. Because it operates at only 80~90RPM and
uses a mere 150watt of energy, instead of 1,000~24,000RPM and up to
1,500watt of energy like a typical centrifugal ”High Speed” juicer. But don’t
let the name fool you. The slow juicer actually juices faster than a typical
juicer and expels much drier pulp with a much higher yield. The method of
extraction is masticating and pressing, using the screw-like juicing screw like
a mortar and pestle. The action crushes and presses the food, releasing
its deep-seated nutrients and enzymes. It also breaks up more of phyto-
nutrients, resulting in a richer colored juice that retains more vitamins and
minerals. The slow RPM ensures that it does not disturb the cellular structure
of fruits and vegetables, eliminating oxidation and separation. Thus, it preser-
ves the precious enzymes and nutrients that are closed to its natural form.
9
EN

HOW TO ASSEMBLE
STEP 1. TOP SET ASSEMBLY
• Wash the parts before rst use.
• Ensure that the compression silicone and silicone ring are assembled
properly.
1. Firmly insert the compression silicone into the slot below the pulp spout.
Note: the Juicer may leak if not assembled properly.
2. Place the juicing screw into the strainer. Turn and press down on it until
it clicks in place.
Note: the juicing screw needs to be locked in place in order to close
the drum lid.
3. Assemble the strainer into the rotation wiper then place this assembly into
the juicing blow ensuring the red dot on the strainer is aligned with the red
dot on the juicing bowl.
4. Place the drum lid on to the juicing bowl aligning the red dot on the drum
lid with the red dot on the juicing bowl.
STEP 2. TOP SET AND BASE ASSEMBLY
TIP: for easy assembly hold the drum lid by grabbing the feeding tube and
turn clockwise as shown in the illustration.
6. Open/ Close mark on the top-set.
10
EN

Note: the Juicer will not operate if not assembled properly.
7. Place the bowl on the base so that its grey arrow lines up with the black
arrow on the base. Once assembled, turn the drum lid clockwise to close.
8. Place the pulp cup under the pulp spout and place the juice cup under the
juice spout as shown in the illustration.
OPERATION
1. Once all parts are securely in place, connect the power cord to an appro-
ved power source.
2. Place the pulp container under the pulp spout and a juice cup under the
spout for juice.
3. The Slow Juicer has three settings:
FORWARD –Starts the motor and pulls down the food.
OFF –Stops the operation.
REVERSE – Pushes the food back up.
4. Before placing food in the juicer, please make sure all foods are thoroughly
washed and cleaned, cut all foods to an appropriate size to easily t into
the food chute. Please remove any hard seeds before juicing.
NOTE: Insert prepared ingredients one piece at a time.
5. For the most part, when placing food into the Slow Juicer, the juicing
screw will pull in the food and start juicing immediately. You will need the
included pusher with some foods.
NOTE: If the ingredients become jammed in the screw and drum lid does
not open, press OFF button. Then press and hold the REVERSE button
for 2-3 until the ingredients become dislodged. Repeat REVERSE-OFF-
FORWARD as often as needed to receive the desired result. If this does
not help, disassemble and clean the parts before using the juicer again.
NOTE: The REVERSE button only works while holding down the switch.
Let the juicer stop completely before using the REVERSE button to pre-
vent malfunction.
6. Use the smart cap to make mixed juices, stop juice from dripping or rinse
between different juices.
TIP: Juicing with the smart cap closed creates various mixed juice crea-
tions when different fruits and vegetables, milk, banana, beans, etc are
selected.
7. The Slow Juicer has a unique simple cleaning process when switching
between different avors of juices and fruits. Quickly rinse away leftover
avors by running a glass of water in the juicer with the smart cap closed.
This will rinse out most of the residue and you are ready to keep juicing.
8. After juice and pulp are completely extracted, switch the unit OFF.
NOTE: if the remaining ingredients in the juicing bowl have not been extrac-
ted completely, the drum may not open easily. After each extraction run
the juicer for additional 30 seconds to let the juicer extract the remaining
pulp.
When the drum lid is stuck, press REVERSE – OFF – FORWARD buttons
in this order; switching back and forth 2 – 3 times to dislodge the ingre-
dients. Then place hands on top of the drum lid and rmly press down
while simultaneously turning the drum lid counter clockwise to open.
11
EN

TIPS ON INGREDIENTS
DO NOT put the following ingredients into the juicer:
Hard seeds: Peach, nectarines, apricot, plum, mango – remove hard seeds
before juicing.
Hard or inedible skins: Pineapple, melon, mango, orange, etc. – peel the
skins from the ingredients before juicing.
Frozen fruits or ice: Frozen strawberry, blueberry, raspberry, etc. – comple-
tely thaw frozen fruits before juicing. Do not use ice.
Vegetable/ animal oil: Sesame seed, butter, margarine, etc – do not extract
ingredients containing vegetable or animal oil – this can reduce performance
and even damage the juicer.
Others :Coconut, sugarcane, whole grains, etc. – do not extract ingredients
with no water content.
INGREDIENTS PREPARATION AND EXTRACTION TIPS
Soft fruits and vegetables
(oranges, tomatoes)
Peel the skin, take out the seeds. Cut
into pieces.
Leave the smart cap open when juicing
ingredients that create excessive foam
during the extraction. Use the pusher to
prevent juice splash.
Hard fruits and vegetables
(carrots, potato, beets)
Soak in cold water prior to juicing, cut to
appropriate sizes (2.5cm thick, 2.5cm
wide and 5-15cm long). To maximize
the juice yield, juice with ingredients
with high water content.
Ingredients with small seeds
(raspberry, grape, pomegrana-
te)
Thaw frozen ingredients before juicing.
Rinse ingredients, remove the seeds
and discard the stem. For pomegrana-
te, discard the skin and juice only the
inner part. Insert 3-5 grapes at a time,
add about 1 tablespoon of pomegrana-
te and raspberry at a time.
Fibrous and/ or tough leafy
ingredients
Soak in cold water for about 30 minutes
and cut into small lengths. Separate
each stem. Cut the outer stem that are
thick and tough to 10cm long or less.
Alternate between inserting leafy parts
and stems while juicing.
CLEANING AND MAINTAINANCE
1. Switch OFF and unplug the power cord from the wall outlet.
Note: Extract all the remaining pulp in the juicing bowl before stopping the
juicer. For easier clean up, operate the juicer for additional 30 seconds after
the juice is extracted.
- When the drum lid is stuck, press the REVERSE – OFF – FORWARD
button in this order 2 – 3 times to dislodge. Then place hands on top of the
drum lid and rmly press down simultaneously turning the drum lid counter-
clockwise to open.
2. Turn the drum lid clockwise to open.
NOTE: when grabbing the appliance, do not lift by grabbing the feeding tube.
Always lift the appliance by grabbing the base or handle.
3. Place the bowl on the base so its grey arrow lines up with the black arrow
on the base.
4. Remove the juicing screw, strainer and rotation wiper unit from the juicing
bowl. Clean with provided brush.
NOTE: Immediately clean the juicer after each use. If remaining residue in
the juicer dries up, it can make disassembling and cleaning difcult. The
excess build up can cause poor performance in future uses.
- For easier disassembly please the top-set in the sink and run the water
through from the top of the top-set.
- Thoroughly dry the bottom of the juicing screw where it connects to the
metal cylinder shaft on the base.
5. Place the juicing bowl under running water and unplug the compression
silicone to clean the pulp spout.
TIP: Soak the juicing bowl in a solution of warm water with baking soda or
little bit of bleach to clean the excess build up.
12
EN

USE OF ICE-CREAM STRAINER
NOTE: Before use make sure that silicone cover is correctly in place.
1. To assemble the top set, place the juicing screw and the blank strainer in
the juicing bowl and close the lid.
- Insert the blank strainer into the juicing bowl while aligning the red dots of
the blank strainer and the juicing bowl.
- Insert the juicing screw into the blank strainer with a twisting motion.
- Place the lid onto the juicing bowl by aligning the red dots of the lid and the
juicing bowl. Then, rotate the lid clockwise until the lid is secured.
When using the blank strainer, always leave the smart cap open.
2. Place the assembled top set onto the base.
CAUTION:
The ice cream strainer is used only with frozen ingredients. Depending on
the different ingredients, allow the frozen items to thaw for 5-20 minutes
before use. Slowly process a smaller amount per batch.
NOTE: Do not use ice or process ingredients containing vegetable or animal
oil. It may cause a malfunction.
Remove hard seeds from the ingredients and peel the skins from the ingre-
dients before juicing.
USE OF MILK SHAKE STRAINER
NOTE: Before use make sure that silicone cover is correctly in place.
1. To assemble the top set, place the juicing screw and the milk shake stra-
iner in the juicing bowl and close the lid.
- Insert the rotating wiper and milk shake strainer into the juicing bowl while
aligning the red dots of the milk shake strainer and the juicing bowl.
- Insert the juicing screw into the blank strainer with a twisting motion.
- Place the lid onto the juicing bowl by aligning the red dots of the lid and the
juicing bowl. Then, rotate the lid clockwise until the lid is secured.
When using the milk shake strainer, always leave the smart cap clo-
sed.
2. Place the assembled top set onto the base.
CAUTION:
When juicing frozen ingredients, depending on the different ingredients,
allow the frozen items to thaw for 5-20 minutes before use. Slowly process a
smaller amount per batch. Pour milk or other liquid additionally.
NOTE: Do not use ice or process ingredients containing vegetable or animal
oil. It may cause a malfunction. Remove hard seeds and peel the skins from
the ingredients before juicing.
13
EN

HOW TO CLEAN SILICONE WIPERS
The silicone wipers are removable for cleaning. After cleaning, place the
silicone wipers back onto the frame as shown in the picture below.
TROUBLESHOOTING
Problem Solution
No power to the juicer • Check if the power cord is properly plugged in.
• Check if the drum lid and the juicing bowl are
in place.
• Check if the top-set and the base are properly
assembled.
• Juicer will not operate if the parts are not
assembled properly.
Low juice yield • The juice yield depends on the water content
of the ingredients.
• If the ingredients are not fresh, they contain
reduced amount of uids.
• Check if the compression silicone is rmly
inserted.
• If the ingredient itself has low water content, it
may help to soak it in water before juicing.
• If juicing ingredients with small seeds, after
a few servings it may reduce the juice yield.
Disassemble and wash the top-set in between
juicing.
• If there is seed residue on the bottom of the
strainer it can affect juicer performance and
the overall juice yield.
There is too much pulp
in the juice
• When continuously juicing, depending on the
ingredient the juice may contain a lot of ne pulp.
• To reduce the ne pulp, clean the top-set fre-
quently and extract the pulp.
• Use the mesh strainer and put the juice throu-
gh it to collect the unwanted pulp.
• If the strainer and the screw are damaged, it is
recommended to replace the parts.
• The lifetime of each part may vary depen-
ding on length and method of use and ingre-
dients extracted.
• If too many ingredients are inserted at the
same time, it may cause juicer to stop frequent-
ly. This can lead to pulpy juice. Insert ingredients
slowly and few at a time.
The drum lid will not
close
• Make sure the juicing screw is pushed all the
way in to the strainer in order for the drum lid to
close properly.
• If the juicing screw is not properly in posi-
tion, the drum lid may not close.
Odd noise from the
juicer
• Check if the parts are assembled correctly.
• Try reassembling the parts and listen for the
odd noise.
• Do not start the juicer unless there are ingre-
dients and/ or liquid in it.
• Operating the juicer without ingredients can
cause damage to the screw and increase the
noise level.
• The friction noise from the juicing screw and
the strainer will disappear when ingredients are
inserted into the juicer.
• If noise occurs when the ingredients are inser-
ted into the juicer, check the size of ingredients.
Do not insert anything over 2.5cm of thickness.
• Depending on the type of ingredients, the
dimensions can be smaller.
• The noise can occur if the juicer is opera-
ted on an uneven or slanted surface. Place
the juicer of a horizontally at surface while
operating.
The extracted pulp is
very moist
• During the very beginning of extraction the pulp
can be more moist.
• Depending on the ingredient’s condition, the
extracted pulp can be affected; especially when
the ingredient is not fresh, the juice can be
extracted with the pulp.
During operation the
juicing bowl shakes
• The juicing screw and the strainer are set up to
crush and squeeze the ingredients. It is normal
for the juicing screw and the strainer to vibrate.
• If the ingredient contains strong ber, the vibra-
tion from the top-set may be stronger.
During juicing the jui-
cer stopped
• Check the power cord and make sure it is
plugged in correctly.
• Check that all the parts are correctly assem-
bled.
• If too many ingredients are inserted at once,
this can cause the juicer to stop.
• When the juicer stops because there are too
many ingredients in it, press the REVERSE
– OFF – FORWARD buttons in this order, swit-
ching back and forth 2 – 3 times.
• The reverse setting will push the ingre-
dients up and the forward setting will pull the
ingredients down.
If the juicer stops due to the overload protection,
let the juicer cool down for 30 minutes to 2 hours
before juicing again.
If there are hard seeds within the ingredients,
remove them before juicing. Hard seeds can
damage the juicer.
Layers of separation in
the juice
• Depending on the density of the ingredients,
the extracted juice may show layers of different
juices. It is different from separation due to
oxidation caused by juicing with a high-speed
juicer.
14
EN

The drum lid is stuck • After juicing let the juicer operate for another
30 seconds to extract the remaining pulp.
• If there is too much pulp in the top-set, this can
cause the drum lid not to open. In this situation
press the REVERSE – OFF – FORWARD
buttons in this order, switching back and forth
2 – 3 times.
• Pour water down the feeding tube to rinse
out the inside and then try opening the drum
lid.
Juice dripping down
the body of the base
• If the compression silicone on the bottom of
the juicing bowl is not plugged in correctly, the
juice may seep out on to the juicer base. Before
assembling the parts, check and make sure the
compression silicone is plugged in correctly.
Discoloration of the
plastic parts
• After juicing if the juicer is not cleaned right
away, the remaining pulp inside can dry up and
affect the color of the juicer.
• Ingredients that are rich in carotenoids (carrots,
spinach) may dye plastic parts.
• Rub vegetable oil in to the dyed areas and use
mild detergent to clean.
• Vegetable oil should be used during clean-
up for parts are discolored. Do not use
vegetable oil on the juicing screw or the
strainer. If vegetable oil or oil from animal fat
gets on the juicing screw or the strainer, this
can affect juicer’s performance and damage
the parts.
NOTE: Do not throw away the appliance with the normal household waste
at the end of its life. Hand it in at an ofce collection point for recycling. By
doing this, you help to preserve the environment.
15
EN

SICHERHEITSMASSNAHMEN
Beim Gebrauch der elektrischen Komponenten des Geräts müssen
grundsätzliche Sicherheitsmaßnahmen stets befolgt werden. Dazu zählen:
1. Lesen Sie die Anweisungen und Komponenten sorgfältig durch, bevor Sie
das Gerät betätigen.
2. Dieses Gerät ist nur zur Verwendung mit Lebensmitteln bestimmt.
3. Verwenden Sie das Gerät nur für die vorgesehenen oder spezizierten
Zwecke.
4. Stellen Sie sicher, dass die Spannungskennzeichnung auf dem Gerät der
Spannung bei Ihnen zu Hause entspricht, bevor Sie das Kabel einstecken.
Dies, um Schäden am Gerät zu vermeiden.
5. Um sich vor Kurzschlüssen zu schützen, geben Sie das Kabel, den
Stecker oder das Basisgerät nicht in Wasser oder andere Flüssigkeiten.
Verwenden Sie die Maschine nicht auf einer nassen Arbeitsäche
oder wenn Sie nasse Hände haben. Lassen Sie das Kabel nicht vom
Tisch oder der Theke hinunterhängen. Das Kabel darf nicht mit heißen
Oberächen in Kontakt kommen.
6. Wenn das Kabel beschädigt ist, muss es durch den Hersteller, dessen
Händler oder ähnlich qualiziertes Personal ersetzt werden, um Gefahren
zu vermeiden.
7. Ziehen Sie den Stecker, wenn Sie das Gerät nicht verwenden.
8. Es ist nicht erlaubt, den Stecker mit nassen Händen zu ziehen, um einen
Kurzschluss zu vermeiden.
9. Um das Gerät auszuschalten, ziehen Sie den Stecker aus der Steckdose.
10. Dieses Gerät ist nicht vorgesehen für die Verwendung durch Personen
(Kinder eingeschlossen) mit reduzierten physischen, sensorischen oder
mentalen Fähigkeiten oder Personen, die nicht über ausreichend
Erfahrung und Wissen verfügen, sofern diese nicht beaufsichtigt werden
oder Anweisungen bezüglich der Verwendung des Gerätes durch eine
für ihre Sicherheit verantwortliche Person erhalten haben.
11. Kinder müssen beaufsichtigt werden, um sicherzustellen, dass sie nicht
mit dem Gerät spielen.
12. Überprüfen Sie das Sieb vor jedem Gebrauch. Sollten Sie Risse oder
Defekte feststellen, lassen Sie das Gerät vorläug unbenutzt und kontak-
tieren Sie das nächste Kundenzentrum.
13. Befestigen Sie stets alle Komponenten am richtigen Ort, bevor Sie den
Motor einschalten. Nehmen Sie keine Komponenten ab, wenn das Gerät
in Betrieb ist.
14. Vermeiden Sie den Kontakt mit sich bewegenden Teilen. Stellen Sie
sicher, dass der Motor angehalten hat, bevor Sie das Gerät auseinan-
derbauen.
15. Platzieren Sie das Gerät nicht auf oder in der Nähe von einem heißen
Gas- oder Elektroherd oder einem geheizten Ofen.
16. Bleiben Sie beim Gerät, solange es in Betrieb ist.
17. Die Basis darf nicht demontiert werden.
18. Führen Sie keine Fremdmaterialien in die Maschine ein.
19. Verwenden Sie das Gerät jeweils nicht länger als 30 Minuten an einem
Stück.
20. Das Gerät darf nicht im Leerlauf betrieben werden. Wird das Gerät
länger als 2 Minuten im Leerlauf betrieben, wird das Spiralmesser bes-
chädigt.
21. Geben Sie die zu pressenden Lebensmittel während des Betriebes
langsam in das Gerät, um Verstopfungen zu vermeiden. Sollte eine
Verstopfung eintreten, muss das Gerät umgehend angehalten werden.
Drehen Sie das Gerät für eine Weile um. Öffnen Sie dann den Deckel,
um die Lebensmittel herauszunehmen. Nun können Sie das Gerät wie-
der in Betrieb nehmen.
22. Verwenden Sie den besonderen Stößel, um Lebensmittel in das Gerät
einzugeben.
23. Schneiden Sie zu pressende Lebensmittel in kleine Stücke und entfer-
nen Sie Kerne, andernfalls können Verstopfungen entstehen.
24. Große Stücke oder harte Lebensmittel dürfen nicht in das Gerät einge-
geben werden. Sollten trotzdem solche Lebensmittel eingegeben und
dadurch das Spiralmesser blockiert werden, drücken Sie umgehend die
Rückwärtstaste, um das Gerät zu entsperren. Sollte das Gerät während
des Betriebes blockiert werden, ziehen Sie den Stecker, entfernen
Sie sämtliche Lebensmittel im Gerät und nehmen Sie das Gerät 10
Sekunden später wieder in Betrieb.
25. Verwenden Sie für dieses Gerät keine harten Lebensmittel. Cerealien
müssen in Wasser aufgeweicht werden, bevor sie mit diesem Gerät
verarbeitet werden können. Dadurch schützen Sie Ihr Gerät vor
Beschädigungen.
26. Sollten Sie während des Gebrauchs seltsame Geräusche, Gerüche,
Überhitzung, Rauch oder Ähnliches feststellen, schalten Sie das Gerät
umgehend aus und wenden Sie sich an ein Kundenzentrum, um das
Gerät warten und reparieren zu lassen. Dadurch schützen Sie sich vor
Kurzschlüssen, Entweichen von Strom und Feuergefahren.
27. Das Maschinengehäuse darf nicht auf einer mit Wasser befüllten
Plattform geschrubbt und gereinigt werden oder Wasser ins Innere der
Maschine gefüllt werden. Dadurch können Feuergefahren, Kurzschlüsse
oder Schäden am Maschinengehäuse vermieden werden.
28. Beim Herstellen von Karottensaft ist es wichtig, darauf zu achten, dass
die Karotten eine Länge von 80 mm, eine Breite von 15 mm und eine
Höhe von 15 mm nicht überschreiten. Das Einführungsintervall sollte
mindestens 5 Sekunden betragen.
EIGENSCHAFTEN
Spannung Wechselstrom 220-240 V, ~50/60 Hz
Stromverbrauch 240 W
Nennbetriebszeit 5 min
Nennintervallzeit 3 min
Gewicht 7,5 kg
Abmessungen 25 x 16 x 47 cm
TEILE DES GERÄTES
16
DE

WAS IST EIN SLOW JUICER?
Ein Slow Juicer ist ein Entsafter, der das
Niedergeschwindigkeitstechnologiesystem (LSTS) verwendet. Es nennt sich
Slow Juicer, weil das Gerät mit nur 80~90 Umdrehungen pro Minute arbeitet
und bloß 150 Watt nutzt. Im Vergleich dazu arbeitet ein typischer zentrifuga-
ler „Hochgeschwindigkeits“-Entsafter mit 1.000~24.000 Umdrehungen pro
Minute und bei 1.500 Watt. Lassen Sie sich durch den Namen jedoch nicht
täuschen. Der Slow Juicer entsaftet schneller als ein typischer Entsafter und
stößt wesentlich trockeneren Trester mit wesentlich mehr Saftausbeute aus.
Die Extraktionsmethode besteht aus Zermalmen und Pressen, wofür die
schraubenähnliche Entsaftungsschnecke als Mörser und Stößel verwendet
wird. Lebensmittel werden zerkleinert und gepresst, wobei die tieiegenden
Nährstoffe und Enzyme freigesetzt werden. Dabei werden außerdem mehr
sekundäre Panzenstoffe aufgespalten, was für einen noch farbigeren Saft
sorgt, der mehr Vitamine und Mineralien bietet. Die langsame Drehzahl sorgt
dafür, dass die Zellstruktur von Obst und Gemüse nicht gestört wird. So wird
Oxidation und Spaltung vermieden. Die wertvollen Enzyme und Nährstoffe,
welche ihrer natürlichen Form sehr nahe sind, werden erhalten.
AUFBAU
SCHRITT 1. AUFBAU VON OBEREN TEILEN
• Waschen Sie die Teile vor dem ersten Gebrauch.
• Stellen Sie sicher, dass das Kompressionssilikon und der Silikonring korre-
kt angebracht sind.
1. Drücken Sie das Kompressionssilikon in den Leerraum unter dem
Abussrohr für den Trester.
Hinweis: Der Entsafter kann auslaufen, wenn er nicht korrekt zusam-
mengebaut ist.
2. Platzieren Sie die Entsaftungsschnecke im Sieb. Drehen Sie die
Schnecke, bis ein „Klicken“ ertönt.
Hinweis: Die Entsaftungsschnecke muss eingerastet sein, um den
Trommeldeckel zu schließen.
3. Geben Sie das Sieb in den Rotationsabstreifer und geben Sie dann diese
beiden Teile in den Entsaftungsbehälter. Achten Sie dabei darauf, dass der
rote Punkt auf dem Sieb mit dem roten Punkt auf dem Entsaftungsbehälter
übereinstimmt.
4. Platzieren Sie den Trommeldeckel auf dem Entsaftungsbehälter und ach-
ten Sie dabei darauf, dass der rote Punkt auf dem Trommeldeckel mit dem
roten Punkt auf dem Entsaftungsbehälter übereinstimmt.
17
DE

SCHRITT 2. AUFBAU OBERER TEIL UND BASIS
Tipp: Halten Sie für einen einfachen Aufbau den Trommeldeckel, indem
Sie den Einfüllhals ergreifen und wie auf der Abbildung aufgeführt im
Uhrzeigersinn drehen.
6. Öffnen/ Schließen Sie den Deckel gemäß Kennzeichnung.
Hinweis: Der Entsafter funktioniert nicht, wenn er nicht korrekt zusam-
mengebaut ist.
7. Der Behälter wird auf die Basis gesetzt, sodass der graue Pfeil mit
dem schwarzen Pfeil auf der Basis übereinstimmt. Drehen Sie dann den
Trommeldeckel im Uhrzeigersinn, um das Gerät zu schließen.
8. Platzieren Sie den Tresterbehälter wie abgebildet unter das Abussrohr
für den Trester und den Saftbehälter unter das Abussrohr für den Saft.
BETRIEB
1. Wenn alle Teile sicher platziert sind, stecken Sie das Kabel in eine geeig-
nete Steckdose.
2. Platzieren Sie den Tresterbehälter unter das Abussrohr für den Trester
und den Saftbehälter unter das Abussrohr für den Saft.
3. Der Slow Juicer verfügt über drei Modi:
FORWARD –Startet den Motor und presst den Saft aus den Lebensmitteln.
OFF –Hält den Betrieb an.
REVERSE –Drückt Lebensmittel zurück nach oben.
4. Bevor Sie Lebensmittel in den Entsafter geben, stellen Sie sicher, dass
sämtliche Lebensmittel gewaschen und geputzt sind sowie in geeignete
Stücke geschnitten sind, dass sie durch den Einfüllhals passen. Entfernen
Sie sämtliche Kerne, bevor Sie Lebensmittel auspressen.
HINWEIS: Geben Sie vorbereitete Lebensmittel Stück für Stück in den
Entsafter.
5. In der Regel reicht es aus, Lebensmittel einfach in den Slow Juicer zu
geben. Die Entsaftungsschnecke zieht die Lebensmittel dann durch und
der Entsaftungsprozess beginnt umgehend. Bei einigen Lebensmitteln
werden Sie den im Lieferumfang enthaltenen Stößel verwenden müssen.
HINWEIS: Sollten sich Lebensmittel in der Schnecke ansammeln und der
Trommeldeckel lässt sich nicht öffnen, drücken Sie die AUS-Taste. Halten
Sie dann die RÜCKWÄRTS-Taste für 2-3 Sekunden gedrückt, bis die
hängengebliebenen Lebensmittel entfernt werden können. Wiederholen
Sie diesen Prozess über die RÜCKWÄRTS-AUS-VORWÄRTS-Tasten
sooft wie nötig, um das gewünschte Resultat zu erhalten. Sollte diese
Vorgehensweise nicht helfen, nehmen Sie das Gerät auseinander und
reinigen Sie die Einzelteile, bevor Sie den Entsafter erneut verwenden.
HINWEIS: Die RÜCKWÄRTS-Taste funktioniert nur, wenn diese gedrückt
gehalten wird. Lassen Sie den Entsafter komplett anhalten, bevor Sie die
RÜCKWÄRTS-Taste verwenden. Dies, um Fehlfunktionen zu vermeiden.
18
DE

6. Verwenden Sie die Saftklappe, um gemischte Säfte herzustellen.
Verhindern Sie ein Herunterlaufen und Heruntertropfen von Saft, während
Sie verschiedene Säfte zubereiten.
TIPP: Das Entsaften bei geschlossener Saftklappe ist ideal, wenn Sie
gemischte Säfte aus verschiedenem Obst und Gemüse, Milch, Bananen,
Bohnen, usw. herstellen möchten.
7. Der Slow Juicer verfügt über einen einzigartigen und einfachen
Reinigungsprozess, wenn Sie zwischen verschiedenen Säften und
Zutaten wechseln. Spülen Sie Überreste von Zutaten einfach mit einem
Glas Wasser weg, welches Sie bei geschlossener Saftklappe einießen
lassen. Dadurch werden die meisten Überreste weggespült und Sie kön-
nen weiter entsaften.
8. Wenn aller Saft und Trester vollständig ausgegeben sind, schalten Sie
die Einheit AUS.
HINWEIS: Sollten Überreste im Entsaftungsbehälter nicht vollständig aus-
gegeben werden, lässt sich die Trommel möglicherweise nicht richtig öff-
nen. Nachdem Überreste ausgegeben wurden, lassen Sie den Entsafter
30 Sekunden lang laufen, um übrigen Trester zu entfernen.
Sollte der Trommeldeckel klemmen, drücken Sie folgende Tasten:
RÜCKWÄRTS-AUS-VORWÄRTS, am besten 2-3 Mal, um Zutaten
zu entfernen. Legen Sie dann beide Hände auf den Trommeldeckel
und drücken Sie fest nach unten, während Sie den Trommeldeckel im
Uhrzeigersinn drehen, um ihn zu öffnen.
TIPPS FÜR ZUTATEN
NICHT GEEIGNET sind folgende Zutaten:
Harte Kerne: Entfernen Sie harte Kerne von Obst wie Prsich, Nektarine,
Aprikose, Paume oder Mango.
Harte oder ungenießbare Schalen: Schälen Sie Zutaten wie Ananas,
Melone, Mango, Orange, bevor Sie diese entsaften.
Gefrorenes Obst oder Eis: Tauen Sie gefrorenes Obst wie Erdbeeren,
Blaubeeren, Himbeeren, usw. vollständig auf, bevor Sie diese entsaften.
Verwenden Sie kein Eis.
Panzliches/ Tierisches Öl: Entsaften Sie keine Zutaten, die panzliches
oder tierisches Öl enthalten wie Sesamsamen, Butter, Margarine, usw. Die
Verwendung solcher Zutaten könnte die Leistungsfähigkeit einschränken
oder das Gerät sogar beschädigen.
Anderes: Geben Sie keine Zutaten ohne Wassergehalt wie Kokosnuss,
Zuckerrohr, Vollkorn, usw. in den Entsafter.
VORBEREITUNG DER ZUTATEN UND TIPPS ZUM ENTSAFTEN
Weiches Obst und Gemüse
(Orangen, Tomaten)
Entfernen Sie die Haut und Kerne.
Schneiden Sie die Zutaten in Stücke.
Lassen Sie die Saftklappe offen, wenn
Sie Zutaten entsaften, bei denen ein
übermäßiger Schaum während des
Entsaftens entsteht. Verwenden Sie den
Stößel, um Saftspritzer zu vermeiden.
Hartes Obst und Gemüse
(Karotten, Kartoffeln, Rote
Beete)
Legen Sie diese Zutaten zuerst in kaltem
Wasser ein und schneiden Sie sie dann
in geeignete Stücke (2,5 cm dick, 2,5
cm breit und 5-15 cm lang). Um mehr
Saft zu erhalten, entsaften Sie diese
Zutaten mit Zutaten mit einem höheren
Wassergehalt.
Zutaten mit kleinen Kernen
(Himbeeren, Trauben,
Granatapfel)
Tauen Sie gefrorene Zutaten auf, bevor
Sie entsaften. Spülen Sie die Zutaten ab,
entfernen Sie Kerne und Stiele. Entfernen
Sie beim Granatapfel die Schale und
entsaften Sie nur die Granatapfelkerne.
Geben Sie 3-5 Trauben gleichzeitig in
den Entsafter, fügen Sie einen Esslöffel
Granatapfelkerne und Himbeeren hinzu.
Faserige und/ oder zähe blät-
trige Zutaten
Legen Sie diese Zutaten etwa 30 Minuten
in kaltem Wasser ein und schneiden Sie
sie dann in schmale Streifen. Trennen
Sie die einzelnen Stränge voneinander.
Schneiden Sie die äußeren Stränge,
welche dick und zäh sind, in 10 cm lange
oder kürzere Stücke. Geben Sie nun
zum Entsaften jeweils einen blättrigen
Teil und einen Strang in das Gerät.
REINIGUNG UND WARTUNG
1. Schalten Sie das Gerät AUS und ziehen Sie den Stecker aus der
Steckdose.
Hinweis: Pressen Sie sämtlichen übrigen Trester im Entsaftungsbehälter
aus, bevor Sie den Entsafter anhalten. Für eine einfachere Reinigung lassen
Sie den Entsafter nach dem Entsaften 30 Sekunden weiterlaufen.
- Sollte der Trommeldeckel klemmen, drücken Sie folgende Tasten:
RÜCKWÄRTS-AUS-VORWÄRTS, am besten 2-3 Mal, um Zutaten zu ent-
fernen. Legen Sie dann beide Hände auf den Trommeldeckel und drücken
Sie fest nach unten, während Sie den Trommeldeckel im Uhrzeigersinn
drehen, um ihn zu öffnen
2. Drehen Sie den Trommeldeckel im Uhrzeigersinn, um das Gerät zu
öffnen.
NOTE: Heben Sie das Gerät nicht am Einfüllhals hoch. Halten Sie das Gerät
zum Hochheben an der Basis oder am Griff.
3. Der Behälter wird auf die Basis gesetzt, sodass der graue Pfeil mit dem
schwarzen Pfeil auf der Basis übereinstimmt.
4. Entfernen Sie die Entsaftungsschnecke, das Sieb und den
Rotationsabstreifer vom Entsaftungsbehälter. Reinigen Sie das Gerät mit
der mitgelieferten Bürste.
19
DE

HINWEIS: Reinigen Sie den Entsafter umgehend nach jedem Gebrauch.
Wenn zurückbleibender Abfall im Entsafter trocknet, kann dies das Abbauen
und die Reinigung des Entsafters erschweren. Dies kann sich außerdem in
schlechtem Betrieb bei zukünftigem Gebrauch äußern.
- Für ein einfacheres Auseinandernehmen der oberen Teile, legen Sie diese
als Einheit in das Spülbecken und lassen Sie das Wasser darüber laufen.
- Trocknen Sie den unteren Teil der Entsaftungsschnecke vollständig. Dies
ist der Teil, an dem die Entsaftungsschnecke mit dem Metallzylinderschaft
der Basis verbunden wird.
5. Stellen Sie den Entsaftungsbehälter unter laufendes Wasser und entne-
hmen Sie das Kompressionssilikon, um das Abussrohr für den Trester zu
reinigen.
TIPP: Geben Sie den Entsaftungsbehälter in eine Mischung aus warmem
Wasser und Backpulver oder ein wenig Bleichmittel, um Rückstände zu
entfernen.
VERWENDUNG DES EISCREME-SIEBS
HINWEIS: Stellen Sie als Erstes sicher, dass der Silikondeckel korrekt
angebracht ist.
1. Um den oberen Teil des Gerätes zusammenzubauen, setzen Sie die
Entsaftungsschnecke und das Sorbet-Sieb in den Entsaftungsbehälter und
schließen Sie den Deckel.
- Legen Sie das Sorbet-Sieb in den Entsaftungsbehälter und achten Sie
darauf, dass die roten Punkte der beiden Teile miteinander übereinstimmen.
- Geben Sie die Entsaftungsschnecke mit einer Drehbewegung in das
Sorbet-Sieb.
- Geben Sie den Deckel auf den Entsaftungsbehälter und achten Sie darauf,
dass die roten Punkte des Deckels und des Entsaftungsbehälters mitei-
nander übereinstimmen. Drehen Sie den Deckel nun im Uhrzeigersinn, bis
dieser arretiert.
Wenn Sie das Sorbet-Sieb verwenden, lassen Sie die Saftklappe stets
offen.
2. Setzen Sie die zusammengesetzte obere Einheit auf die Basis.
ACHTUNG:
Das Eiscreme-Sieb darf nur für gefrorene Zutaten verwendet werden. Je
nach Zutaten lassen Sie die gefrorene Produkte 5-20 Minuten antauen,
bevor Sie diese verwenden. Verarbeiten Sie pro Eingabe langsam eine
kleinere Menge.
HINWEIS: Verwenden Sie kein Eis oder Produkte, die panzliches oder
tierisches Öl enthalten. Dies kann zu Fehlfunktionen führen.
Entfernen Sie harte Kerne und schälen Sie die Zutaten, bevor Sie mit dem
Entsaften beginnen.
VERWENDUNG DES SMOOTHIE-SIEBES
HINWEIS: Stellen Sie als Erstes sicher, dass der Silikondeckel korrekt
angebracht ist.
1. Um den oberen Teil des Gerätes zusammenzubauen, setzen Sie die
Entsaftungsschnecke und das Smoothie-Sieb in den Entsaftungsbehälter
und schließen Sie den Deckel.
- Legen Sie den Rotationsabstreifer und das Smoothie-Sieb in den
Entsaftungsbehälter und achten Sie darauf, dass die roten Punkte der bei-
20
DE
Table of contents
Languages:
Other Sammic Juicer manuals