Sampo SR1046PRO User manual

SR 1046 PRO
Harvester
instruction manual
Sampo Rosenlew Ltd
P.O.Box 50
FI–28101 PORI, FINLAND
2/2012
0812371
Englanti

- 3 -

- 3 -
SR 1046PRO
instruction manual
H
a r v e s t e r
2/2012
Introduction
The purpose of this book is to familiarize the operator with the forest harvester. It is of utmost
importance that the operator becomes familiar with the structures, adjustments and main-
tenance of his harvester. Compliance with the advice and instructions given in this manual
guarantees the best results at the lowest costs.
This manual provides descriptions of as well as operating and maintenance instructions for the
forest harvester. The other manuals you will find useful when using and servicing your forest
harvester include the instructions and spare parts catalogue for the harvester head, the instruc-
tions for the harvesting computer, the instructions for the crane, the instructions for the base
machine control system as well as the engine manual and the spare parts catalogue.
Have these manuals always in the cab, in the special pocket reserved for them, for conve-
nient reference. If, for some reason, they are not supplied together with the harvester, send
immediately for new manuals.
Item ”Technical Specifications” has a description of all the features of the forest harvester in
accordance with the delivery contract. It does, however, not include retro-fitted accessories.
The Manufacturer reserves the right to modify the structure, adjustments or accessories of
the harvester as well as the service and maintenance instructions without further notice.
Sampo Rosenlew Ltd

- 4 -
- 5 -
SR 1046PRO
instruction manual
Ha r v e s t e r
2/2012
Table of contents
Introduction 3
Safety precautions 5
Marking of danger points 10
Type marking 12
Technical specifications 13
Certificate on conformity to the EU directives 14
Guarantee 15
Structure and functions of the forest harvester 16
Cut - away picture of the forest harvester 17
Operator control instruments 18
Signs and symbols 24
Operation and Adjustments 25
Hydraulics 37
Electricity 39
IQAN control system 40
Service and maintenance 50
Lubrication 62
Summary of periodical procedures 64
Storage when not in use 65
Recommended tools and accessories 66
Battery 67
Hydraulic diagram 69
Electric diagram 71

- 5 -
SR 1046PRO
60 m
instruction manual
H
a r v e s t e r
2/2012
Safety precautions
Read carefully these instructions on safety and use before starting to operate the harvester.
The time spent becoming familiar with the instructions now will save you money or may even
spare you from injury.
Before accepting the delivery of the harvester, make sure it conforms to the delivery
contract. Do not fit the harvester with any accessories not approved of by the Manufacturer.
The Manufacturer of the forest harvester is not responsible for any damage or injury caused
by such accessories either to people or property. If any information provided in this manual
contradicts the laws and regulation of the country in which the harvester is used, local regu-
lations are to be followed.
1. Transportation on a vehicle or
by rail
Make sure you know the measurements
and weights of the harvester and the
transporter. Comply with any regulations
concerning transportation.
Use increased tyre pressure, minimum of 3
bar, to improve stability.
Fix the harvester securely to the transporter.
For road transport lower the crane fully and
fix it to the transporter.
2. Driving in traffic
On public roads a transporter shall be used
to move the harvester.
Remember that the harvester has articu-
lated steering.
Test brake functions before driving on the road.
Wear the safety belt.
Never drive downhill with the gear in neutral.
Only shift gear on level ground.
Never carry passengers on the harvester.
Never use the harvester for transporting goods.
If the harvester fault diagnostics detects a malfunctioning brake or drive pedal, the driver
can still drive the harvester in for a service, but at a low speed and with slow crane
movements.
3. Forest harvesting
Get familiar with the structure of the forest harvester by studying the manual before start-
ing harvesting.
Make sure the protective guards are properly attached and in good condition.
Sound the signal to warn people around the harvester before starting the engine.
Never use the forest harvester for anything except harvesting trees.
Manual feeding of trees into the harvester head is forbidden.
Before starting, particularly reversing, make sure that everybody nearby is aware of your
intentions.
Fasten the seat belt. This is important, particularly when driving across steep terrain.
Danger zone for Crane
and harvester head
Harvester tying
Slow Vehicle sign

- 6 -
- 7 -
SR 1046PRO
instruction manual
Ha r v e s t e r
2/2012
Test the brakes as soon as you start, and stop immediately if the brakes or steering operate
defectively.
Never adjust the seat or joysticks while driving.
Never leave the cab while the harvester is moving.
Never leave the engine running unattended.
Beware of the crane and the moving parts in the harvester head.
Never saw with the saw guide bar pointing towards the cab. If the saw chain comes loose it is
dangerous and may penetrate the window.
In cold weather heat the oil by circulating it through the harvester head, too, at low revolu-
tions and low pressure before starting work.
Drive carefully on hillsides; the harvester may overturn, particularly with the crane on the
downhill side.
The forest harvester cab is a safety cab.
The harvester has two exits. The left-side door is the normal exit. The right-hand side window
may be used as an emergency exit when the lock has been opened.
Always before getting in the cab, open or ensure from the outside that the lock on the right-
side door is unlocked.
When the harvester is in use, the exits must be closed. For safety reasons their construc-
tion must not be changed. When driving on frozen rivers or lakes, make sure the ice is strong
enough. When driving on ice, keeping doors open helps exiting cabin. In this case beware of
thight curves that may cause rear tyre to hit the door
Note the recommended safety distances when harvesting under power lines.
Stop the engine before cleaning or servicing the harvester.
Stop the harvester and the engine immediately if there is an alarm or any abnormal sounds
or smells. Find out the reason for them, and solve the problem before carrying on with
harvesting.
If there are leaking hydraulic connections, tighten the connections and wipe the oil off the
frame and underpan.
Support or lock the crane and the harvester head before going beneath them.
Never clean the harvester without proper equipment.
When leaving the harvester, lower the crane, stop the engine, remove the ignition key, lock
the door and turn the master switch to its zero position.

- 7 -
SR 1046PRO
2m
5 m
4 m 4 m
400/230 V
1 - 45 kV
110 - 400 kV
400 kV 220 kV 110 kV
2m
instruction manual
H
a r v e s t e r
2/2012
Safety diStanceS when harveSting
under open-wire power lineS
The minimum space between the harvester and
power lines with voltage must be in accordance
with the enclosed illustration, in which the danger
zone is darkened.
Low-voltage power lines (230/400V) can be
distinguished from high-voltage lines (over 1 kV)
by the smaller insulators and the fact that there
are usually 4 low-voltage lines. In case the height
or voltage of the power line is difficult to estimate,
the Electric Company shall be consulted
In case the height or voltage of the power line
is difficult to estimate, the Electric Company shall
be consulted.
In case of accident
If there is an accident despite all precautions, keep
calm and consider carefully what to do. First try to
reverse the harvester away from the power line.
If there are other people near, ask them to check
that the harvester is not stuck in the line. If the
harvester is just leaning against the lines, try to
drive it away from them. Follow the advice from
the people nearby. Due to their own safety, they
shall stay a minimum of 20 metres away from the
harvester touching the power line.
If the harvester cannot be driven off, and you have
to leave the machine, jump down with your feet
together in order not to touch the harvester and
the ground simultaneously. Do not make yourself a
conductor through which electricity can pass; the
real danger lies in touching the harvester and the
ground simultaneously.
Get away from the harvester jumping either with
your feet together, or with only one foot on the
ground at a time. Otherwise the electric field on
the ground may create a fatal electric current
between your legs. You will be safe at a distance
of 20 metres from the harvester. Beware of broken
power lines lying on the ground.
A harvester touching a power line may catch fire.
Leave the harvester immediately if smoke starts
coming from the tyres.
Make sure the harvester will be guarded at a safe
2m
2m
5 m
4 m 4 m
400/230
1 - 45 kV
110 - 400 kV
400 kV 220 kV 110 kV
Ca. 5 m
Ca. 6 -8m
Ca. 4 m
(Onside5m)
(Onside3m)
(Onside2m)

- 8 -
- 9 -
SR 1046PRO
instruction manual
Ha r v e s t e r
2/2012
distance. Do not try to get on the harvester
even if the power in the power lines may seem
to have gone off.
Remember that open-wire lines never have a
”blown fuse”, but they are always dangerous
unless made dead by an electrician. Even if the
power went off, it might come back on in a while
due to technical reasons. This may be repeated
several times.
Contact the Electric Company and inform them
about the exact site of the accident. By doing
this, any risk can be eliminated and the fault
repaired.
Ask the Electric Company for advice and follow
it. Inform them about any contact with power
lines even if there was no actual damage.
Source: Koneviesti Magazine 15/87
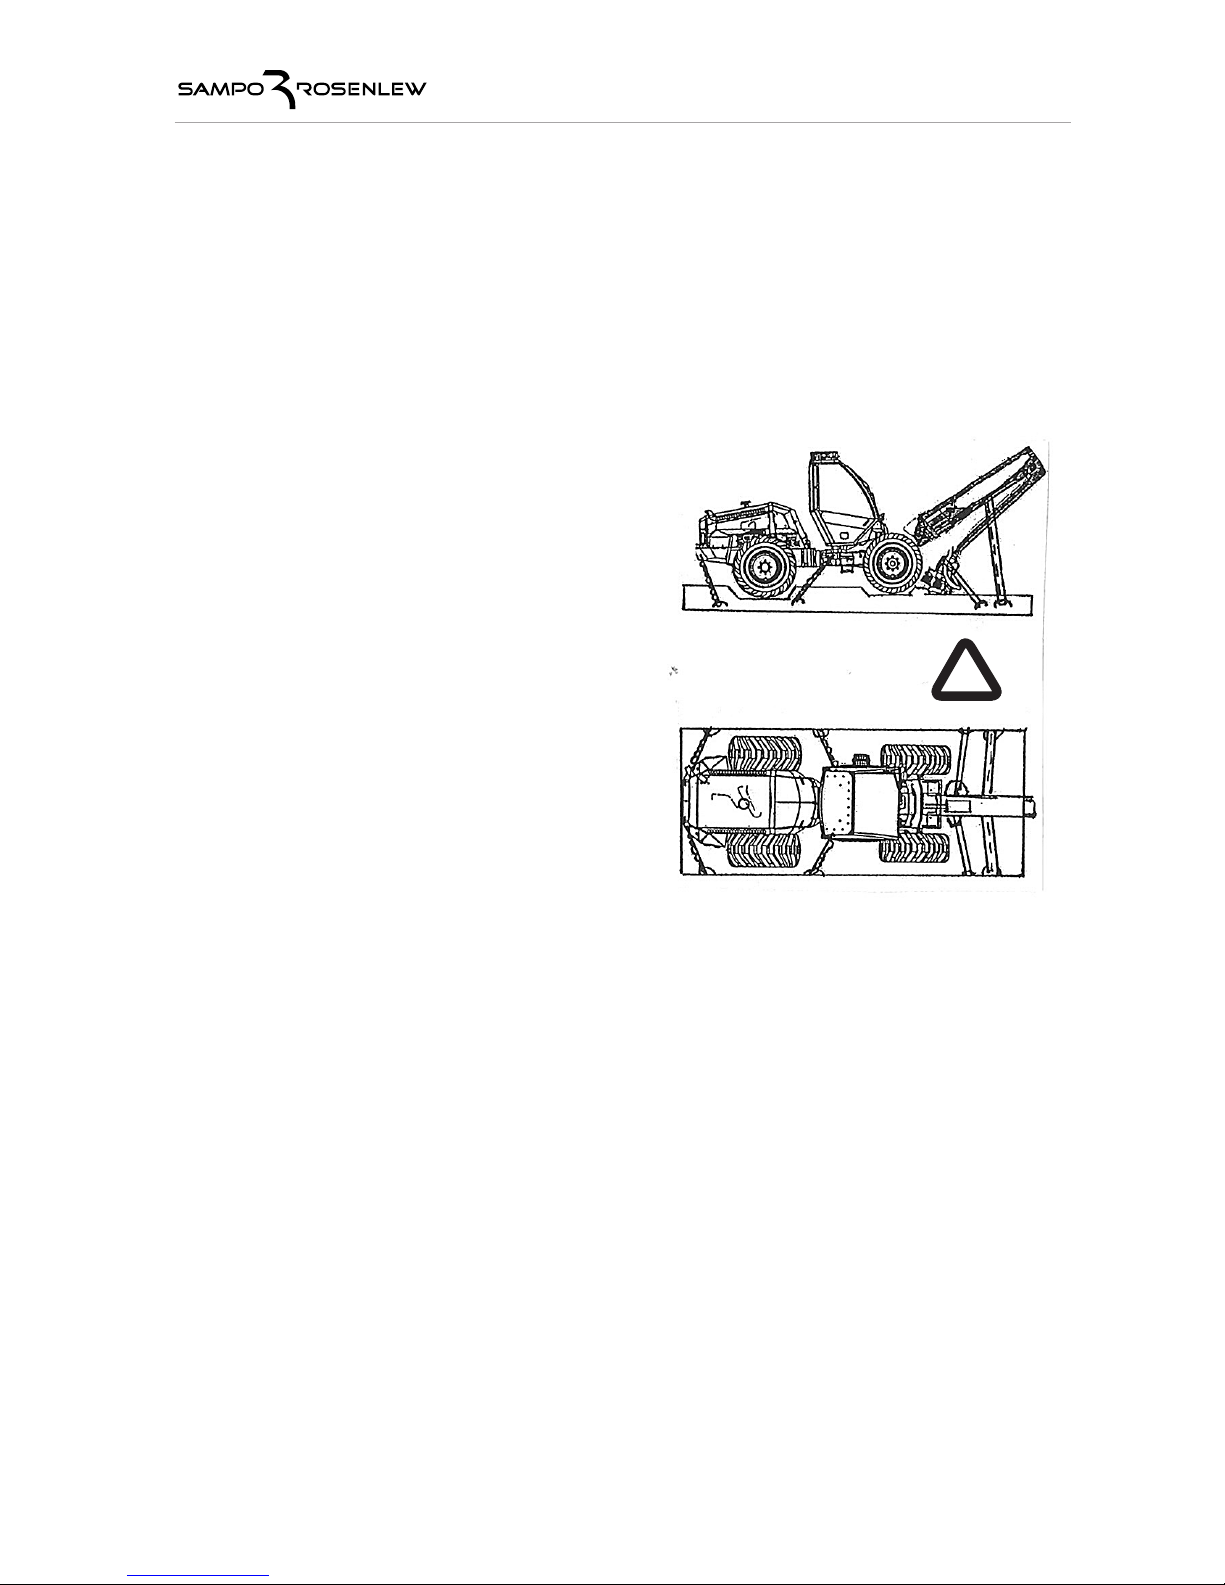
4. Repair and service
Always keep the harvester in good condition. Check the condition of fast moving parts daily.
Pay special attention to the transmission mechanism and the rotating parts in the harvester
head. Replace defective parts before they become dangerous.
Clean, repair and service the harvester with the transmission and engine off, the ignition key
off the ignition switch and main switch off.
The harvester head has many danger points. Read the harvester head manual to familiar-
ize yourself with them. On some models turning of the measuring wheel by hand makes the
knives, tracks and rolls close. This is extremely dangerous if the engine is running or there
is pressure in the hydraulic accumulator of the harvester head. Do not go near the harvester
head, particularly the knives, tracks and rolls, with the engine running.
Before welding, disconnect the battery cables, input cable of the diesel engine control unit (the
left hand side cable under the cover of the control unit attached to the engine), all the cables
to the PC processor, the cables of the measuring device head module (MCC) and the cab MCI
module, connector of the large wiring harness between the frames, the two large connec-
tors positioned on the rear frame that connect the frames and the central unit cables of the
optional fire extinguishing system.
Always have the earth cable of the welding set near where welding is done.
Do not use inappropriate tools to connect and disconnect the battery.
Do not make an open fire or smoke near the battery.
Handle the battery acids with care.
Do not add air in the tyres without a pressure gauge due to risk of explosion.
Do not add coolant with the engine running.
Do not remove the radiator cap from an overheated engine.
Beware of hot surfaces of the engine and exhaust pipe.
Do not refuel with the engine running.
Do not smoke while fuelling.
Do not adjust the hydraulic working pressure without a pressure gauge due to possible injury
and damage to the components.
When servicing the hydraulics, be aware of the high pressure in the system. Make sure there
is no pressure in the system, not in the head pressure accumulator, either, before disconnect-
ing the connectors.
Never use over-sized fuses; they involve risk of accident.
Never start the harvester with anything but the ignition key.
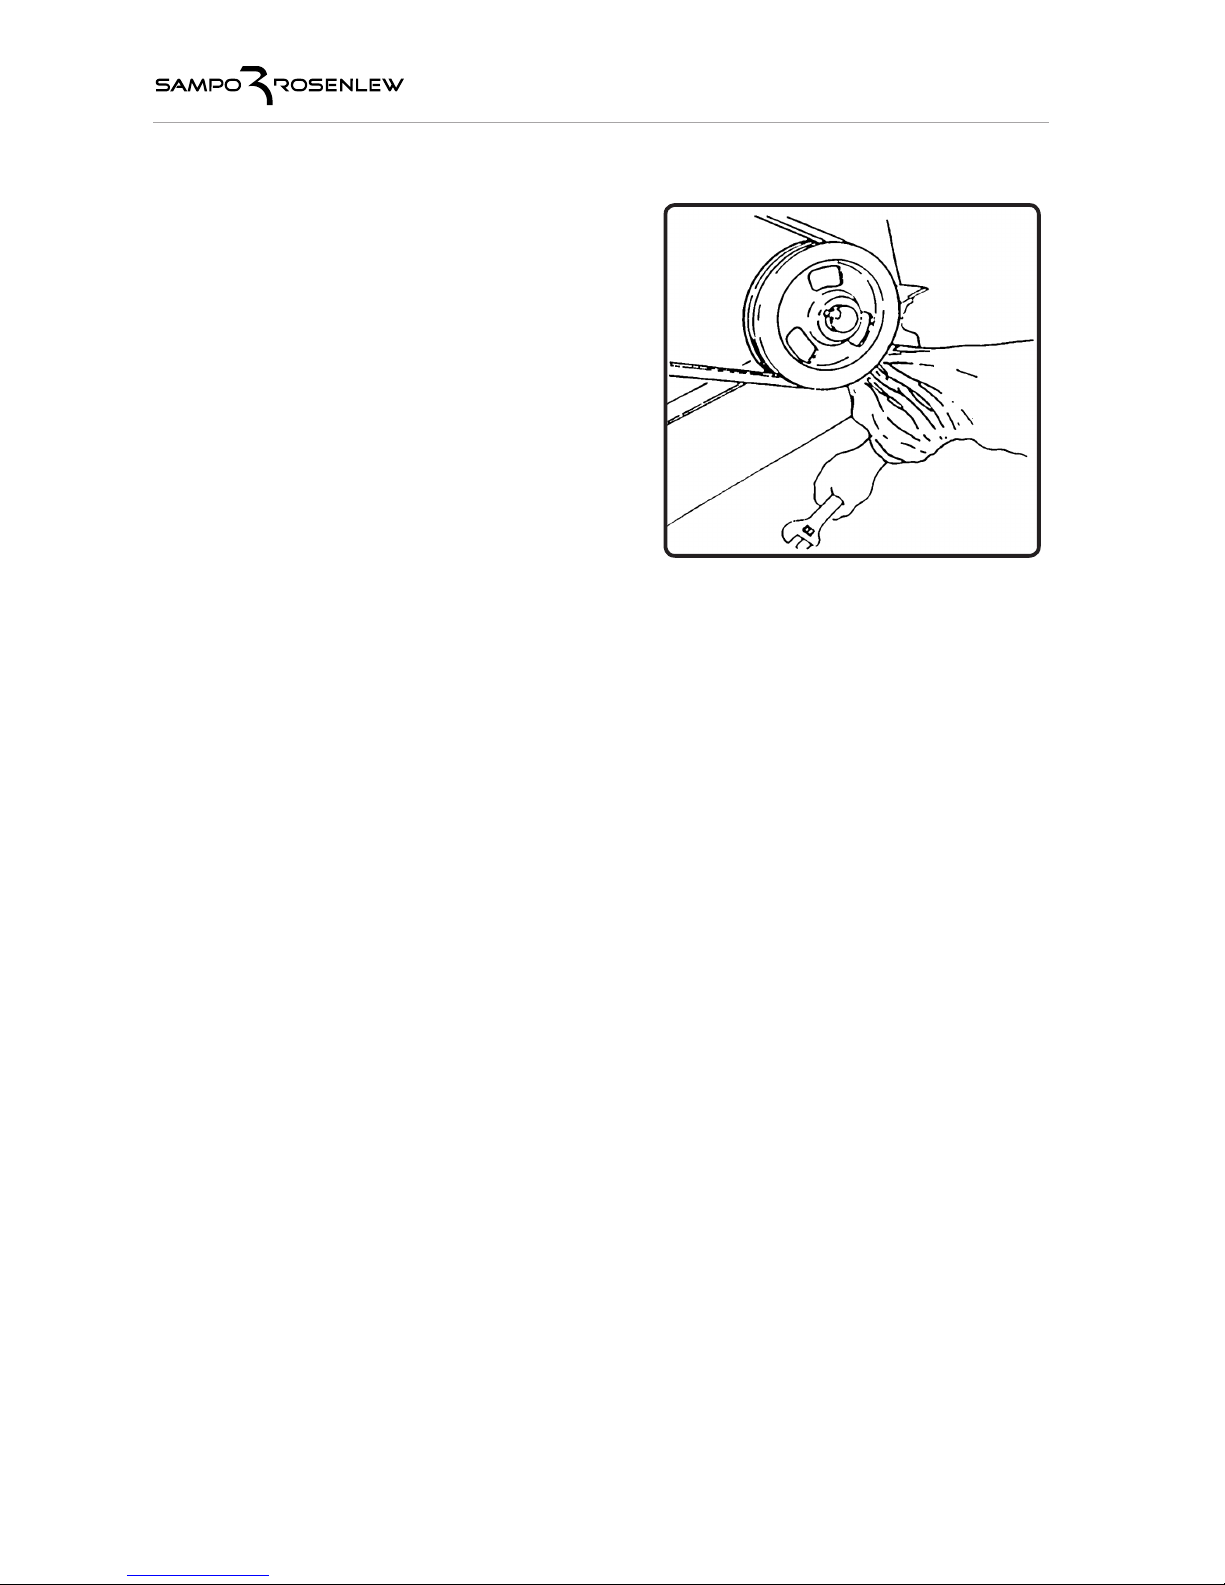
When refitting a wheel, tighten the fixing screws to the correct torque. Switching on the diesel
engine is allowed only when the hub is connected to the motor Do not make any such struc-

- 9 -
SR 1046PRO
instruction manual
H
a r v e s t e r
2/2012
This symbol in The manual refers to a special risk involved in taking a certain measure,
due to which extra caution shall be practised.
6. Fire safety
Two factors are needed to start a fire: flammable material and ignition. Oxygen is always
available. In the forest highly flammable dust accumulates in and on the harvester. Clean the
harvester periodically. Oil and fuel leaks also increase the risk of fire. Repair any detected
defects immediately. The engine and the exhaust pipes, the electric system in case of a short
circuit and overheated brakes pose a real risk of fire.
The harvester comes with two 6-kilo hand extinguishers. They are stored above the rear
wheel inside the side guard that opens rearwards. The extinguishers shall be inspected every
6 months by an authorized service outlet.
The harvester may be equipped with a semi-automatic fire extinguishing system. Make sure
to comply with the manufacturer’s instructions when using the system.
Before driving the harvester on a public road, make sure that harvester is correctly equipped
and applies to the local regulations and laws given for such a vehicle.
Machine operator have to be trained to drive and use harvester safely.
5. Local laws and regulations

- 10 -
- 11 -
SR 1046PRO
instruction manual
Ha r v e s t e r
2/2012
Subject to danger due to
insufficient information
A raised part may fall down
Gap in belt drive
Getting entangled in
moving parts
Falling of the machine or of
objects handled with it
Electric shock
Danger symbols
Read the manual before starting
the harvester
Support raised parts before
going under them
Stop the engine and remove the
ignition key before removing
any guards
Keep at a safe distance from
jointed components
Keep at a safe distance from
the harvester, the crane, the
head and the wood handled
Keep at a safe distance from
power lines. See the safety
distances above
SymbolTo avoid dangerDanger
Marking of danger points
Although an effort has been made to build the forest harvester as safe to use as possible,
there are certain risks involved in its use. These are to be kept in mind when operating the
harvester.
The danger points have been marked on the harvester using danger symbols. On the follow-
ing page you will find the key to these symbols. The danger symbols are based on the inter-
national ISO 11 684 standard.

- 11 -
SR 1046PRO
instruction manual
H
a r v e s t e r
2/2012
Fire
Fire
Service measures
Safety belt not worn
Normal exit not available
Pressurized oil spray
Refrigerant
In case of fire:
- turn off the engine
- turn off the main power
- extinguish the fire
- get help if necessary
Extinguish the fire with the fire
extinguisher stored under the guard
marked with this sticker.
Before starting of service:
- turn off the engine
- turn off the main power
- when servicing the harvester
head, remove pressure from the
pressure accumulator as instructed
Always wear a properly adjusted
safety belt while working and driv-
ing on the road
Open the handle on the right-hand
door and exit through the open door
Before starting work make sure that
emergency exit is unlocked also from
the outside.
Before disconnecting hydraulic
connections, let the presure off the
pressurized oil tank by opening the
breather filter with a gloved hand
while keeping your face far from
the breather.
Leaking refrigerant may cause
frostbite
SymbolTo avoid dangerDanger

- 12 -
- 13 -
SR 1046PRO
instruction manual
Ha r v e s t e r
2/2012
Type marking
When ordering spare parts or service, always quote the type marking and number shown on
the machine plate. When ordering engine parts, also quote the engine number.
Write down the serial numbers of the forest harvester and engine on this page (and in the
spare parts list).
Fill in the serial numbers of the crane and the harvester head
Engine number
Note! Left side of the forest harvester = The side of the cab with the stairs
Right side of the forest harvester = The side with the side instrument panel

- 13 -
SR 1046PRO
instruction manual
H
a r v e s t e r
2/2012
Technical specifications
The base forest harvester with articulated steering includes: the cab, gear box, valves, and crane on the front frame,
the engine, pumps and tanks on the rear frame.
SR 1046 PRO
Weight Weight approx. 8000-9500 kg
Maximum permissible weight (ROPS) 10000 kg
Main Dimensions
Length without crane 4.9 m
Width 2.1 – 32,3 m
Height in transport position 3.03 - 3.10m
Ground clearance 0.6 m
Engine Agcosisudiesel 44 CTA
- power 84 kW/2,200 rpm
- fuel tank 135 l
Transmission
Traction hydraulics pump 123 l / min & 420 bar
Front axle drive motor in dividing gear box 45 cc
Rear wheels with hub motors 3150 cc
Two speed ranges forward and backward 1st gear 0-4 km/h / 0-3 km/h
3rd gear 0-19 km/h
Electrically controlled flow divider valve
At the front hydraulically controlled mechanical differential lock
Tyres
Front 500/60-26.5, 540/65R28, 600/55-26.5
Rear 500/60-26.5, 540/65R28
Hydraulic system
Pump in working hydraulics 220 l/min & 210 bar
Load sensing, programmable electric joystick control (IQAN-Design)
Oil tank 110 l
Electric system
Voltage 24 V
Battery 2 x 115 Ah
Charging generator 100 A
Working lights 19
Crane Kesla H671
Operating range 7,13m
Lifting capacity (gross) 55 kNm
Crane weight 1200 kg
Harvesterhead e.g. Keto 51, 51 Victor, 51 Supreme, 55 Supreme, Kesla RH18, Nisula 400H
3-hose hydraulic system
Max. delimbing diameter 420 mm
Weight 420 – 500 kg
Brakes
At the front hydraulically & mechanically controlled drum brakes
At the rear negative multi-disc brakes
Cab Quiet safety cab (FOPS, ROPS, OPS)
Noise level 71 dB (A)
Windows Lexan Margard polycarbonate
Harvesting computer Motomit IT / PC

- 14 -
- 15 -
SR 1046PRO
instruction manual
Ha r v e s t e r
2/2012
Certificate on conformity to the EU directives

- 15 -
SR 1046PRO
instruction manual
H
a r v e s t e r
2/2012
Guarantee
Sampo Rosenlew Ltd, later called the Manufacturer, grants a guarantee regarding defects in
the material and workmanship.
1.
The guarantee period starts as soon as the harvester has been delivered to the customer.
2. The guarantee does not cover:
• freight and postage costs
• transport damage
• damage due to carelessness, misuse or injury
• damage due to impurities in the hydraulic oil or the use of wrong type of oil
• damage due to non-compliance with the operating instructions
• damage due to neglected periodical maintenance procedures
• damage caused by spare parts not approved of by the Manufacturer
• damage due to the natural wear of parts; parts and materials likely to show natural wear,
such as :
- rubber hoses
- light bulbs, sensors
- chain and guide bar
- tyres
- belts and chains
- windscreen wipers
- fuel, oil, coolant and brake fluids
- filter cartridges
- packing and gaskets
- electric cables
- injection nozzles
- windows and guards made of polycarbonate
• damage due to measures taken by the purchaser affecting the quality and structure of
the harvester. Increasing of the hydraulic working pressure and pressure limits may cause
damage;
• indirect damage, such as
- loss of output or down time
- compensation claims submitted by a third party
- overtime and holiday compensations
• damage to property caused by the equipment
• if there is a change in the ownership of the harvester
3. When working in cold conditions, the guarantee is valid only when the outdoor temperature
does not drop below -25oC.
4. Any compensation claims under guarantee shall be submitted to the Manufacturer in a
complete form within two weeks of the damage.
5. The guarantee compensation is limited, and the Manufacturer shall only replace the defec-
tive component unless otherwise agreed with the customer.
6. The components replaced under guarantee are the property of the Manufacturer, and they
shall be returned to the Manufacturer upon request. Otherwise they shall be scrapped.
7. The guarantee on components delivered or repaired during the guarantee period will run
out at the same time as the guarantee on the harvester.

- 16 -
- 17 -
SR 1046PRO
instruction manual
Ha r v e s t e r
2/2012
Structure and functions of the forest harvester
Structure
The Sampo 1046PRO forest harvester has been designed to meet the demands set on the
first thinning of forest. It is light and easy to handle, small but with a wide operating range.
It does not damage standing trees and due to its light weight, it does not cause damage to
the roots. With the PRO model, additional attention is paid to the requirements set by conti-
nuous professional use.
The forest harvester has articulated steering. The crane, gears and cab are located on the
front frame. The engine, hydraulic pumps and oil and fuel tanks are located on the rear frame.
The harvester is steered and tilted by means of a joint. The weight of the crane, which is the
outermost part of the harvester, is low down. Therefore the whole operating range of the
harvester can be utilised and it is easy to get close to the trees. A crane that is near and at
a low height does not block the view, and its route is visible even when harvesting from the
side. The inner rims of both the front and rear tyres go along the same tracks, which means
that the harvester is easy to handle even in dense forest as you only need to keep your eye
on the front. The harvester is extremely nimble as the turning angle of the frame joint is 50°
and the turning radius only 4.0 m. Depending on the tyres, the width varies between 2.5 – 3.0
m. Although the harvester has been designed to be used in first thinning, it also performs
efficiently when clearing larger trees off the driving tracks.
Harvester head
The harvester head cuts and fells the tree. After that the tree is delimbed and cut into a pre-
set length. When harvesting, make sure the engine revolutions are high enough to produce
sufficient working pump output to enable the required work movements. Too high working
revolutions are heavy on petrol. The Sampo harvester is supplied with alternative harvester
heads. The 3-hose system in hydraulics and the CAN route with its easily detachable connec-
tors used in controlling of the head make it easy to change heads. As a harvesting compu-
ter is Motomit IT, and when necessary, an on-board computer with a GPS and a data transfer
function can be selected.
For further harvesting instructions, check the user manuals for the harvesting computer and
the harvester head.

- 17 -
SR 1046PRO
11
12 13
14
1
2
3
4
5
6
7
8, 9,
10
15
instruction manual
H
a r v e s t e r
2/2012
1. Final drive
2. Gearbox
3. Hydraulic motor
4. Traction hydraulics pump
5. Working hydraulics pump
6. Hub motor
7. Fuel tank
8. Radiator
9. Oil cooler
10. Intercooler
11. Hydraulic valve
12. Oil tank
13. Air filter
14. Engine
15. AC condenser
Cut - away picture of the forest harvester

- 18 -
- 19 -
SR 1046PRO
1
2
instruction manual
Ha r v e s t e r
2/2012
Equipment on the
instrument panel (fig. 1)
A Harvesting computer display
B IQAN system display
C Engine heater display
D AC regulator
E Ignition, starter (and electric stop)
F Emergency stop
G Heater thermostat
H Fan speed regulator
I Phone outlet
J Measuring device touchpad
K Charge indicator light
Switches on the
instrument panel (fig. 2)
A Throttle
B Frame lock
C Brakes
D PC
E Sound signal
F Windscreen wiper
G Windscreen washer
H Harvesting computer
I Seat heating
J Working lights + delayed light
K Working lights
L Working lights
M Emergency flasher
N 4WD
O Rear lock
P Differential lock front
Q Emergencylight (red)
R Working lights, engine
S Master switch
T Turning signal
U Headlights, dipped
V Headlights, full
Operator control instruments

- 19 -
SR 1046PRO
D A C B E
3F
instruction manual
H
a r v e s t e r
2/2012
Equipment on the ceiling (fig. 3)
A) Alarm light (yellow)
B) Fire extinguishing system light (red)
C) Indoor light
D) Speaker
E) Radio
F) PC

- 20 -
- 21 -
SR 1046PRO
4
5
instruction manual
Ha r v e s t e r
2/2012
Vertical levers (fig. 4)
Crane control lever, left
V1 Outer boom inwards
V2 Outer boom outwards
V3 Crane turn left
V4 Crane turn right
Crane control lever, right
O1 Crane lift up
O2 Crane lowering down
O3 Frame steering left /
rotator turn
O4 Frame steering right /
rotator turn
Mini levers (fig.5)
Crane control lever, left
V1 Outer boom inwards
V2 Outer boom outwards
V3 Crane turn left
V4 Crane turn right
V5 Sidetilt left
V6 Sidetilt right
Crane control lever, right
O1 Crane lift up
O2 Crane lowering down
O3 Frame steering left / rotator turn
O4 Frame steering right / rotator turn
O5 Head open / up
O6 Head closed / down
Table of contents