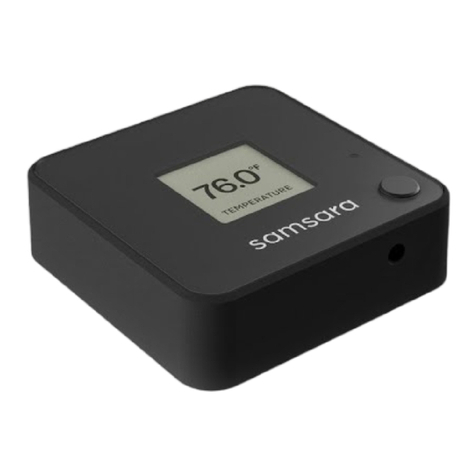
Samsara EM31 User manual

samsara.com/support © 2023 Samsara Inc. R03
Environmental Monitor
EM31 / ACC-EM-P1
INSTALL GUIDE - ENVIRONMENTAL MONITOR ............................................. 2-4
GUIDE D’INSTALLATION - CONTRÔLEUR ENVIRONNEMENTAL .................... 5-7
INSTALLATIONSANLEITUNG - UMWELTMONITOR ....................................... 8-10
GUÍA DE INSTALACIÓN - SENSOR AMBIENTAL .......................................... 11-13
INSTALLATIEGIDS - OMGEVINGSMONITOR ............................................... 14-16
samsara.com/eet-app

2samsara.com/support © 2023 Samsara Inc.
Enclosure Screws
(4x, Phillips #0)
Adhesive +
Protective Liner
(2x)
Display
DISPLAY ICONSDISPLAY ICONS
Rubber Dust Plug
Screw Mounting Holes (2x)
Metal Tab
(Ambient Temperature
“INT” Sensor)
Signal Strength (Connection to Gateway) INT: Ambient temperature displayed
EXT: Probe temperature displayed
/
/Battery Life (1x AA Energizer L91 Battery) Temperature unit (by locale)
ENVIRONMENTAL MONITOR DIAGRAM
WHAT YOU’LL NEED
HELPFUL LINKS
• Sensor Battery Replacement – Samsara Support
• Change Your Organization’s Locale – Samsara Support
1x Environmental Monitor 2x Drilling Screws
1x Accessory Probe
(Optional, sold separately)

3samsara.com/support © 2023 Samsara Inc.
Phillips 0
1
Make sure your Samsara Gateway is installed.
Make sure both the Gateway and Environmental
Monitor are activated. This can be completed on
the Samsara Dashboard or on the Samsara Fleet
App.
2a
Choose a mounting location for the device within
100 feet of the Gateway.
The Ambient Temperature (“INT”) sensing tab is on
the side of the device. Place the device in a location
with open airow, away from doors to avoid large
temperature uctuations. Ensure the rubber plug on
the bottom of the device remains inserted when not
using an accessory temperature probe.
2b 3
ACC-EM-P1
ACC-EM-P1
4” (10cm)
100’ (30.5m)
5
Probe Installation Only (if applicable):
Remove the rubber plug at the bottom of the device. Insert the connector with grips facing forwards. Fasten
the connector with the screws. An “EXT” external temperature reading will appear on the screen. Note that both
ambient temperature and probe temperature are being recorded and surfaced in the Samsara cloud.
For the Probe Temperature (“EXT”), ensure four inches
below the device is free of obstructions to allow for
cable connection.
Note: Probe is sold separately.
Mount the device using the attached adhesive
strips onto a clean, at surface. For added security,
use the two ½” self-drilling screws included in the
packaging.

4samsara.com/support © 2023 Samsara Inc.
IMPORTANT SAFETY AND USE INFORMATION
Note: this equipment is designed for installation within 2 meters of the area to be monitored.
This installation guide contains typical information specic to products manufactured at the time of its publication. The
contents of this guide do not constitute a warranty and are for reference only.
Do not attempt to repair this product, use any third party replacement parts with this product, or otherwise modify this
product except in accordance with product manuals or as otherwise instructed by Samsara. Failure to do so may cause
property damage, lead to physical injury, or void your product warranty.
For detailed product specications and important safety information, please refer to the product’s datasheet, available at
https://www.samsara.com/products/models/.

5samsara.com/support © 2023 Samsara Inc.
Vis du boîtier
(4x, Phillips #0)
Bandes adhésives
+ Doublure de
protection (2x)
Écran
ICÔNES D’ÉCRANICÔNES D’ÉCRAN
Bouchon en caoutchouc
Trous de montage des
vis (2x)
Capteur de la
Température Ambiante
(“INT”)
Force du signal (connexion à la passerelle) INT : Température ambiante afchée
EXT : Température de la sonde afchée
/
/Vie de la pile (1x AA pile au lithium L91 Energizer) Unité de température (par région)
SCHÉMA DU CONTRÔLEUR ENVIRONNEMENTAL
CE DONT VOUS AUREZ BESOIN
LIENS UTILES
• Remplacement des piles du capteur – Assistance Samsara
• Mettez à jour les paramètres régionaux de votre organisation – Assistance Samsara
1x Contrôleur Environnemental 2x Vis Autoforeuses
1x Sonde Accessoire
(Faculative, vendue séparément)

6samsara.com/support © 2023 Samsara Inc.
Phillips 0
1
Assurez-vous que votre passerelle Samsara est
installée.
Assurez-vous que la passerelle et le moniteur
environnemental sont activés. Ceci peut être
complété sur le tableau de bord Samsara ou sur
l’application Samsara Fleet.
2a
Identiez un emplacement de montage à moins de
30,5 m de votre boîtier télématique.
Le capteur de la température ambiante (“INT”) se
trouve sur le côté du dispositif. Placez l’appareil
dans un endroit avec un ux d’air ouvert et loin
des portes pour éviter de grandes uctuations
de température. Assurez-vous que le bouchon en
caoutchouc au bas de l’appareil reste inséré lorsque
la sonde de température n’est pas utilisée.
2b 3
ACC-EM-P1
ACC-EM-P1
10cm
30,5m
5
Installation de la sonde (le cas échéant) :
Retirez le bouchon en caoutchouc au bas de l’appareil. Insérez le connecteur avec les poignées tournées vers
l’avant. Fixez le connecteur avec les vis. Une lecture de température externe “EXT” apparaîtra sur l’écran. Notez que
la température ambiante et la température de la sonde sont enregistrées dans le cloud Samsara.
Pour la température sonde (“EXT”), veillez à laisser 10
cm sous le dispositif sans obstruction pour permettre
le raccordement des câbles.
Note : La sonde est vendue séparément.
Fixez le dispositif à l’aide des bandes adhésives
jointes sur une surface propre et plate. Pour plus
de sécurité, utilisez les deux vis autoforeuses de ½
po (1,27 cm) fournies dans l’emballage.

7samsara.com/support © 2023 Samsara Inc.
INFORMATIONS IMPORTANTES SUR LA SÉCURITÉ ET L’UTILISATION
Remarque : cet équipement est conçu pour être installé dans un rayon de 2 mètres de la zone à contrôler.
Ce guide d’installation contient des informations types spéciques aux produits au moment de sa publication. Le contenu de
ce guide ne constitue aucune garantie et est indiqué à titre de référence uniquement.
Ne pas essayer de réparer ce produit, d’utiliser des pièces de rechange tierces avec ce produit ou d’autrement modier ce
produit, sauf conformément aux manuels du produit ou à des instructions contraires de Samsara. Le non-respect de cette
instruction peut entraîner des dommages matériels, une blessure physique ou annuler la garantie de votre produit.
Pour avoir les spécications détaillées du produit et les informations de sécurité importantes, veuillez consulter la che
technique du produit, disponible sur https://www.samsara.com/products/models/.

8samsara.com/support © 2023 Samsara Inc.
Gehäuseschrauben
(4x, Phillips #0)
Klebestreifen +
Schutzfolie (2x)
Bildschirm
BILDSCHIRMSYMBOLEBILDSCHIRMSYMBOLE
Gummistopfen
Schraubenbefestigungslöcher
(2x)
Sensorplatte für die
Umgebungstemperatur
(„INT”)
Signalstärke (Verbindung zum Gateway) INT: Umgebungstemperatur angezeigt
EXT: Sondentemperatur angezeigt
/
/Batterielebensdauer (1x AA L91 Energizer Lithiumbatterie) Temperatureinheit (nach Region)
DIAGRAMM DER UNWELTMONITOR
WAS SIE BRAUCHEN
HILFREICHE LINKS
• Austausch von Sensorbatterien – Samsara-Unterstützung
• Aktualisieren Sie das Gebietsschema Ihrer Organisation – Samsara-Unterstützung
1x Umweltmonitor 2x Selbstschneidenden Schrauben
1x Zubehörsonde
(Optional, separat erhältlich)

9samsara.com/support © 2023 Samsara Inc.
Phillips 0
1
Stellen Sie sicher, dass Ihr Samsara-Gateway
installiert ist.
Stellen Sie sicher, dass sowohl das Gateway als
auch der Umweltmonitor aktiviert sind. Dies kann
im Samsara Dashboard oder mit der Samsara Fleet
App erfolgen.
2a
Identizieren Sie einen Montageort innerhalb von
30,5 m von Ihrem Gateway.
Die Sensorplatte für die Umgebungstemperatur
(„INT”) bendet sich seitlich am Gerät.
Stellen Sie das Gerät an einem Ort mit freier
Luftzirkulation und entfernt von Türen auf, um
große Temperaturschwankungen zu vermeiden.
Stellen Sie sicher, dass der Gummistopfen an der
Unterseite des Geräts eingesteckt bleibt, wenn der
Temperaturfühler nicht verwendet wird.
2b 3
ACC-EM-P1
ACC-EM-P1
10cm
30,5m
5
Sondeninstallation (falls zutreffend):
Entfernen Sie den Gummistopfen an der Unterseite des Geräts. Stecken Sie den Stecker mit den Griffen nach
vorne ein. Befestigen Sie den Stecker mit den Schrauben. Auf dem Bildschirm erscheint der Messwert „EXT“ für
die Außentemperatur. Beachten Sie, dass sowohl die Umgebungstemperatur als auch die Sondentemperatur im
Samsara-Dashboard angezeigt werden.
Für die Sondentemperatur („EXT”), stellen Sie
sicher, dass 10 cm unterhalb des Geräts frei von
Hindernissen sind, um den Kabelanschluss zu
ermöglichen.
Anmerkung: Die Sonde ist separat erhältlich.
Montieren Sie das Gerät mit den beigefügten
Klebestreifen auf einer sauberen, ebenen
Oberäche. Verschrauben Sie das Gerät für
zusätzliche Sicherheit mit den beiliegenden beiden
selbstschneidenden Schrauben (½”, 1,27 cm).

10samsara.com/support © 2023 Samsara Inc.
WICHTIGE SICHERHEITS- UND VERWENDUNGSINFORMATIONEN
Hinweis: Dieses Gerät ist für die Installation innerhalb von 2 Metern um den zu überwachenden Bereich vorgesehen.
Diese Installationsanleitung enthält typische Informationen für Produkte, die zum Zeitpunkt ihrer Veröffentlichung hergestellt
werden. Der Inhalt dieses Leitfadens stellt keine Garantie dar und dient lediglich als Referenz.
Versuchen Sie nicht, dieses Produkt zu reparieren, Ersatzteile von Drittanbietern mit diesem Produkt zu verwenden oder es
zu modizieren, es sei denn, dies geschieht in Übereinstimmung mit den Produkthandbüchern oder gemäß anderweitigen
Anweisungen von Samsara. Andernfalls kann es zu Sachschäden, Körperverletzungen oder zum Erlöschen der Garantie
kommen.
Ausführliche Produktspezikationen und wichtige Sicherheitshinweise nden Sie im Datenblatt des Produkts, das unter
https://www.samsara.com/products/models/ verfügbar ist.

11samsara.com/support © 2023 Samsara Inc.
Tornillos de la caja
(4x, Phillips #0)
Tiras adhesivas
+ Forro protector
(2x)
Pantalla
ICONOS DE PANTALLAICONOS DE PANTALLA
Tapón de goma
Agujeros para tornillos de mon-
taje (2x)
La pestaña de detección
de aire ambiental (“INT”)
Intensidad de la señal (conexión a la puerta de enlace) INT: Temperatura ambiente mostrada
EXT: Temperatura de la sonda mostrada
/
/Duración de la batería (1x AA batería de litio Energizer L91) Unidad de temperatura (por localidad)
DIAGRAMA DEL SENSOR AMBIENTAL
LO QUE NECESITA
ENLACES ÚTILES
• Reemplazo de la batería del sensor – Soporte de Samsara
• Actualice la conguración regional de su organización – Soporte de Samsara
1x Sensor Ambiental 2x Tornillos autoperforantes
1x Sonda accesoria
(Opcional, se vende por separado)

12samsara.com/support © 2023 Samsara Inc.
Phillips 0
1
Asegúrese de que su puerta de enlace Samsara
esté instalada.
Asegúrese de que su puerta de enlace y su sensor
ambiental estén activados. Puede completar esto
en el Samsara dashboard o con la applicación
Samsara Fleet.
2a
Identique una ubicación de montaje dentro de
30,5m (100 ft) de su terminal telemático.
La pestaña de detección de la temperatura
ambiente (“INT”) está en el costado del dispositivo.
Coloque el dispositivo en un lugar con ujo de aire
abierto y lejos de las puertas para evitar grandes
uctuaciones de temperatura. Asegúrese de que el
tapón de goma en la parte inferior del dispositivo
permanezca insertado cuando la sonda de
temperatura no esté en uso.
2b 3
ACC-EM-P1
ACC-EM-P1
10cm
30,5m (100’)
5
Instalación de la Sonda (si corresponde):
Retire el tapón de goma en la parte inferior del dispositivo. Inserte el conector con el relieve hacia el frente. Fije el
conector con los tornillos. Aparecerá una lectura de temperatura externa “EXT” en la pantalla. Tenga en cuenta que
tanto la temperatura ambiente como la temperatura de la sonda se mostrarán en el Samsara dashboard.
Para la temperatura de la sonda (“EXT”), asegúrese de
que no haya obstrucciones en los 10 cm (4 in) debajo
del dispositivo para permitir la conexión del cable.
Nota: La sonda se vende por separado.
Monte el dispositivo usando las tiras adhesivas
adjuntas sobre una supercie limpia y plana.
Para mayor seguridad, use los dos tornillos
autoperforantes de ½” (1,27 cm) incluidos.

13samsara.com/support © 2023 Samsara Inc.
INFORMACIÓN IMPORTANTE SOBRE SEGURIDAD Y USO
Nota: Este equipo está diseñado para instalarse a menos de 2 metros del área a monitorear.
Esta guía de instalación contiene información típica especíca de los productos fabricados en el momento de su
publicación. El contenido de esta guía no constituye una garantía y es solo para consulta.
No intente reparar este producto, utilizar piezas de repuesto de terceros con este producto ni modicar este producto de otro
modo, excepto de conformidad con los manuales del producto o según las instrucciones de Samsara. El no hacerlo puede
causar daños a la propiedad, provocar lesiones físicas o anular la garantía del producto.
Para obtener especicaciones detalladas sobre el producto e información de seguridad importante, consulte la hoja de datos
del producto, disponible en: https://www.samsara.com/products/models/.

14samsara.com/support © 2023 Samsara Inc.
Behuizing schroeven
(4x, Phillips #0)
Plakstrips +
Beschermfolie
(2x)
Scherm
SCHERMPICTOGRAMMENSCHERMPICTOGRAMMEN
Rubberen stofplug
Bevestigingsschroefgaten (2x)
Metalen lipje
(Omgevingstemperatuursensor “INT”)
Signaalsterkte (verbinding met gateway) INT: Omgevingstemperatuur weergegeven
EXT: Sondetemperatuur weergegeven
/
/Batterijduur (1x AA lithium batterij Energizer L91) Temperatuureenheid (per landinstelling)
DIAGRAM VAN DE OMGEVINGSMONITOR
WAT U NODIG HEEFT
HANDIGE LINKS
• Sensor Battery Replacement – Samsara Support
• Change Your Organization’s Locale – Samsara Support
1x Omgevingsmonitor 2x Zelftappende schroeven
1x Accessoire sonde
(Optioneel, apart verkocht)

15samsara.com/support © 2023 Samsara Inc.
Phillips 0
1
Zorg ervoor dat uw Samsara-gateway is
geïnstalleerd.
Zorg ervoor dat uw gateway en omgevingsmonitor
zijn geactiveerd. Dit kan worden gedaan in het
Samsara-dashboard of met de Samsara Fleet-app.
2a
Kies een montagelocatie voor het apparaat binnen
30,5 m van de gateway.
Het lipje voor de detectie van de
omgevingstemperatuur (“INT”) bevindt zich aan de
zijkant van het apparaat. Plaats het apparaat op een
locatie met een open luchtstroom, uit de buurt van
deuren om grote temperatuurschommelingen te
voorkomen. Zorg ervoor dat de rubberen plug aan
de onderkant van het apparaat blijft zitten wanneer
u de temperatuursonde niet gebruikt.
2b 3
ACC-EM-P1
ACC-EM-P1
10cm
30,5m
5
Sonde-installatie (indien van toepassing):
Verwijder de rubberen plug aan de onderkant van het apparaat. Plaats de connector met de handgrepen naar
voren gericht. Bevestig de connector met de schroeven. Er verschijnt een “EXT” externe temperatuurmeting op
het scherm. Merk op dat zowel de omgevingstemperatuur als de sondetemperatuur worden geregistreerd en
opgedoken in de Samsara-dashboard.
Voor de sondetemperatuur (“EXT”), zorg ervoor dat
10 cm onder het apparaat vrij is van obstakels om
kabelverbinding mogelijk te maken. Zie stap 4 voor
installatie-instructies voor de sonde.
Opmerking: Sonde wordt apart verkocht.
Monteer het apparaat met behulp van de
bijgevoegde plakstrips op een schone, vlakke
ondergrond. Gebruik voor extra veiligheid de twee
½” (1,27 cm) zelftappende schroeven.

16samsara.com/support © 2023 Samsara Inc.
BELANGRIJKE VEILIGHEIDS- EN GEBRUIKSINFORMATIE
Opmerking: deze apparatuur is ontworpen voor installatie binnen 2 meter van het te bewaken gebied.
Deze installatiehandleiding bevat typische informatie die speciek is voor producten die op het moment van publicatie zijn
gefabriceerd. De inhoud van deze handleiding vormt geen garantie en dient alleen ter referentie.
Probeer dit product niet te repareren, gebruik voor dit product geen vervangende onderdelen van derden, breng ook geen
andere wijzigingen aan dit product aan, behalve in overeenstemming met de producthandleidingen of andere instructies
van Samsara. Het niet naleven ervan kan dit leiden tot materiële schade, lichamelijk letsel of het vervallen van uw
productgarantie.
Raadpleeg voor gedetailleerde productspecicaties en belangrijke veiligheidsinformatie het productgegevensblad,
beschikbaar op https://www.samsara.com/products/models/.
This manual suits for next models
1
Table of contents
Languages:
Other Samsara Measuring Instrument manuals
Popular Measuring Instrument manuals by other brands

Bacharach
Bacharach 0012-9015 Operation and maintenance manual

SATO
SATO SK-670PH instruction manual

FujiFilm
FujiFilm FUJI DRI-CHEM IMMUNO AU CARTRIDGE vf-SAA Instructions for use

ABB
ABB DHH805-A Operating instruction

Racelogic
Racelogic RLPBT-V1 quick start guide

Labom
Labom BX1007 Series operating instructions

Natech
Natech Nealact quick start guide

Tektronix
Tektronix 1200C01 instructions

Extreme Networks
Extreme Networks A3 MK II instruction manual

Renishaw
Renishaw PH10 user guide

Elenco Electronics
Elenco Electronics M-2666K Assembly and instruction manual

Johnson Controls
Johnson Controls RLBC Series user manual