manuals.online logo
Brands
  1. Home
  2. •
  3. Brands
  4. •
  5. Samsung
  6. •
  7. Security Camera
  8. •
  9. Samsung SCV-2080 User manual

Samsung SCV-2080 User manual

431
SCV-2080 Series
Quick Install Guide
This installation should be made by a qualified service person and should conform to all
local codes.
The lightning flash with arrowhead symbol, within an equilateral triangle is intended
to alert the user to the presence of uninsulated "dangerous voltage" within the
product's enclosure that may be of sufficient magnitude to constitute a risk of
electric shock to persons.
The exclamation point within an equilateral triangle is intended to alert the user to
the presence of important operating and maintenance (servicing) instructions in the
literature accompanying the appliance.
INFORMATION -This equipment has been tested and found to comply with limits for a
Class A digital device, pursuant to part 15 of the FCC Rules.
These limits are designed to provide reasonable protection against harmful interference
when the equipment is operated in a commercial environment. This equipment generates,
uses, and can radiate radio frequency energy and, if not installed and used in
accordance with the instruction manual, may cause harmful interference to radio
communications. Operation of this equipment in a residential area is likely to cause
harmful interference in which case the user will required to correct the interference at
his own expense.
WARNING - Changes or modifications not expressly approved by the manufacturer
could void the user’s authority to operate the equipment.
WARNING - To prevent electric shock and risk of fire hazards:
ýDo NOT use other than specified power source.
ýDo NOT expose this appliance to rain or moisture.
1. INSTALLATION
• The installation should be done by qualified service personnel or sysytem installers.
• If the ceiling material is not strong enough to hold the installation screws, the camera may
fall off. Reinforce the ceiling as needed.
• If you don't install the main body on he mounting bracket, the camera may not be
waterproof according to install location.
Notes
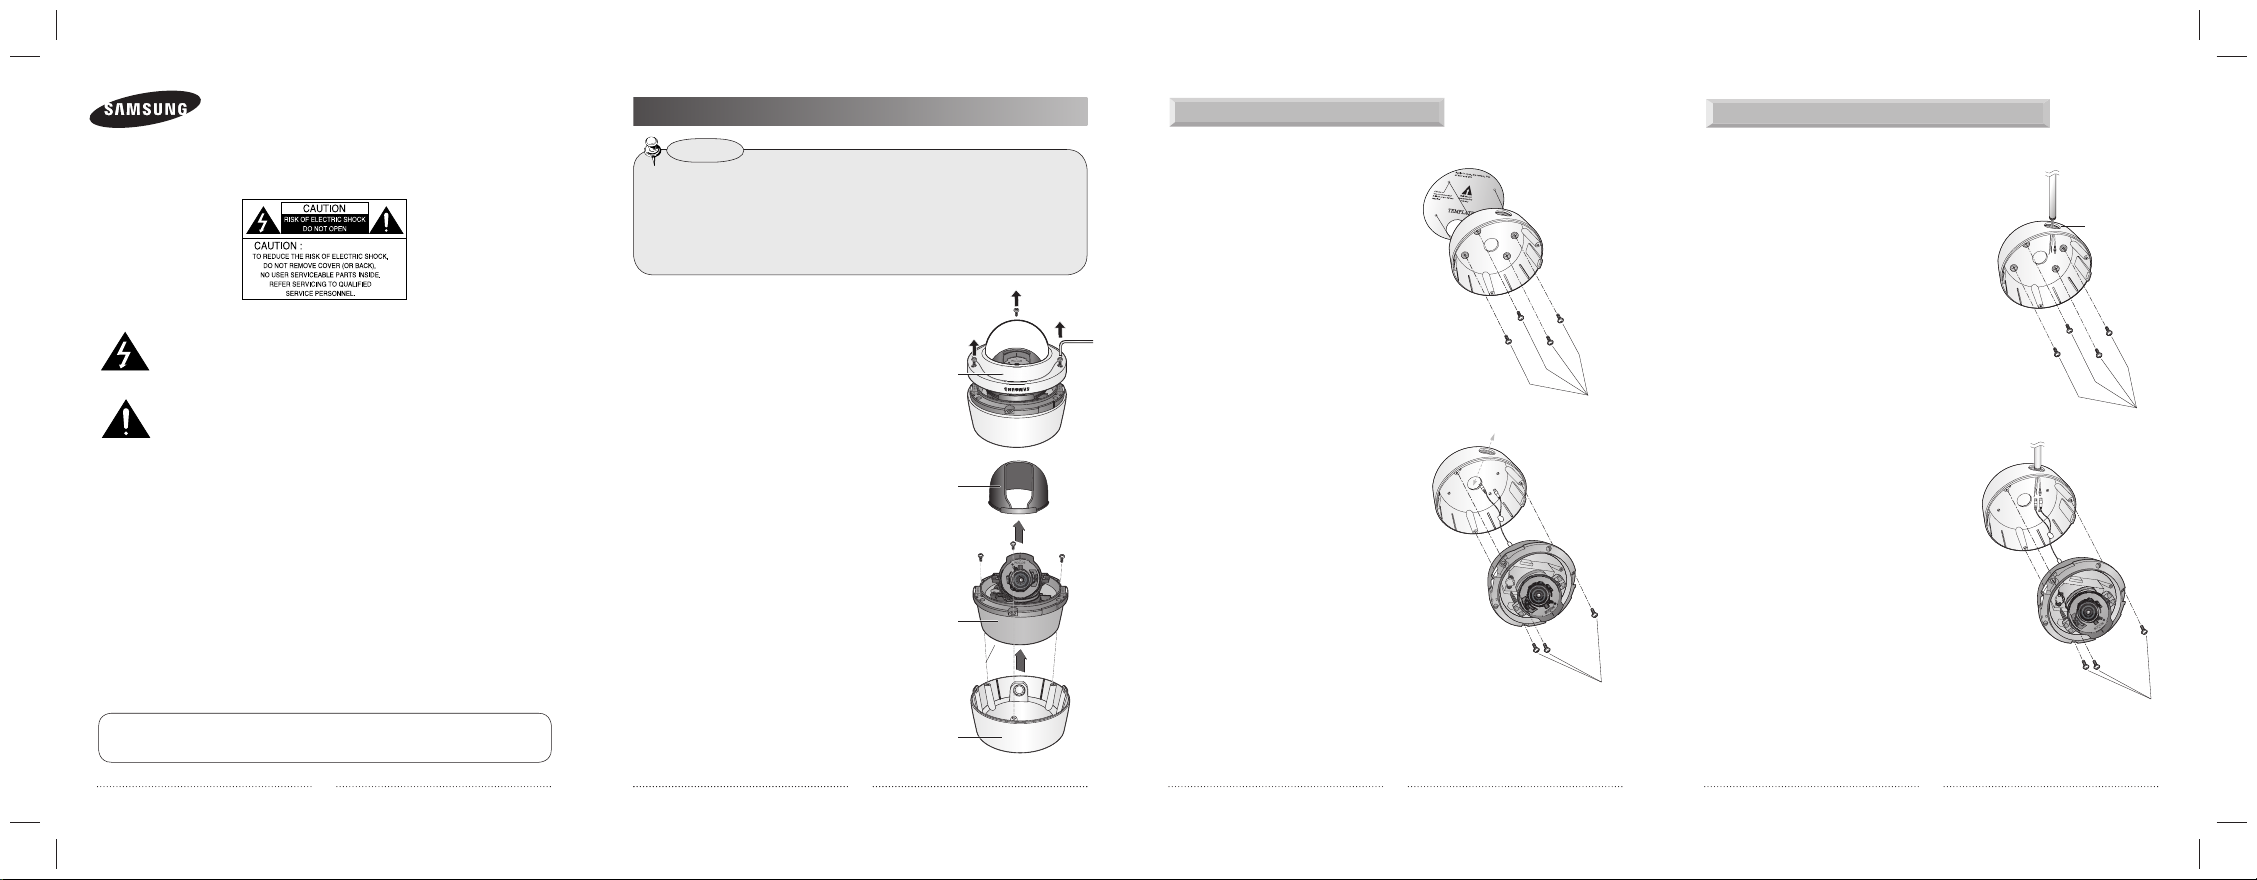
Installing the camera on a ceiling or wall Installing the camera on a ceiling or wall with pipeline
1)
Using the L-wrench provided, loosen
3 screws by turning them counterclockwise
and separate the dome cover.
2) Lift up the inner cover while gently
pressing both ends to separate it from the
unit.
3)
Loosen 3 screws by turning them
counterclockwise, press both left and right
lock releases inwards (in arrow direction) to
unlock the stopper, and then separate the
camera from the case.
Case
Main Body (Camera)
Inner cover
Dome Cover
2
1) Affix the mounting template(supplied) to
the mounting surface.
2)
Drill holes (diameter 5mm, more than
35mm deep) on the ceiling by matching to
the holes on the case bed, and insert
plastic anchors (HUD 5) fully into the holes.
Fix the case bed on the ceiling by using
Tapping Screws (TH M4xL30). (4 places)
3) Connect power and video cables and
arrange cable running not to damage or
squeeze them, and assemble the camera
unit in the reverse way.
4)
Pass the power and BNC cable through the
hole you want to pass them when
mounting the main body on the mounting
bracket.
5) Secure the camera on its mounting bracket
with the four screws.
Ø5 tapping screw x 4 (supplied)
M4 machine screw x 3
1) Secure the mounting bracket on the place you
want to mount it after combining the mounting
bracket with the pipeline.
2) Connect power input and video output cables with
the each cable from pipeline.
3) Secure the main body on mounting bracket.
M4 machine screw x 3
Ø5 tapping screw x 4 (supplied)
Hole for 3/4° pipe
(JIS B 0202-1966)
8765
CONNECTION
3. OPTIONAL ACCESSORIES FOR INSTALLATION
Output of the adaptor should be either one of AC 24 V, 1.5 A or DC 12 V, 1.0 A. Note
that using DC 12 V may cause lower heater temperature.
•Connecting to Power
P/No. : Z6806-1323-01A
MEMO
1) Adjust the lens in a desired direction.
2)
Secure the inner cover to the main unit.
3)
Assemble the Dome Cover.
For waterproof purpose, fix and secure
the bolt using L-wrench provided.
Case
Main Body (Camera)
Inner cover
Dome Cover
Reinstall the dome cover to the main body
2. ADJUSTING THE MONITORING DIRECTION OF THE CAMERA
1) WALL MOUNT ADAPTOR(SCX-300WM)/HANGING
MOUNT(SCX-300HM) This adaptor is used when
installing the dome camera onto a wall.
For your easier installation, you can purchase appropriate optional accessories.
2) CEILING MOUNT ADAPTOR(SCX-300CM)/ HANGING
MOUNT(SCX-300HM) This adaptor is used when
installing the dome camera on a concrete ceiling.
3) POLE MOUNT ADAPTOR(SCX-300PM) This is an adaptor
for WALL MOUNT ADAPTOR (SCX-300WM) installation
on a pole whose diameter is bigger than 80mm.
4) CORNER MOUNT ADAPTOR (SCX-300KM) This is an
adaptor for WALL MOUNT ADAPTOR (SCX-300WM)
installation on the corner of wall joint.
---- Power Input Terminal
1)
You can adjust the camera direction only when the camera is fixed on the ceiling.
Then, turning the camera to the left or right is referred to as "Panning", while moving the camera
angle up or down is "Tilting". For panning, the panning limit is 220° for the clockwise, and 135°
for the counter-clockwise, a total of 355° enabled; further rotation is prevented by the stopper.
•
Adjust the panning angle so that the camera settles in the right horizontal position. You can adjust
the panning up to 135° in each one direction, and 220° in the other direction, a total of 355°.
• Adjust the tilting angle so that the camera settles in the right vertical position. You can adjust the
tilting between 0° and 90°.
•
The total rotation range is 355°. You can make adjustment in one direction up to 125°, and 230°
in the other direction.
2) Methods of adjustment
• The case of wall installation
➊After mounting the camera on the wall, adjust the panning angle so that the camera faces a
desired direction when tilting.
➋Adjust the Rotate position to fit the video to the screen borders.
➌Then, adjust the tilting angle so that the camera faces the monitoring direction.
• The case of ceiling installation
➊After mounting the camera on the ceiling, adjust the panning angle according to the
monitoring direction. You should adjust the panning angle lest that the video be displayed
upside down on the monitor.
➋Adjust the Rotate position to fit the video to the screen borders.
➌Then, adjust the tilting angle so that the camera faces the monitoring direction.
Panning
Tilting
Lens rotation
60˚ ~ 80˚
0˚
• For smoother Rotate adjustment, set the Tilt position between 60˚ ~ 80˚.
Notes

Other manuals for SCV-2080

2

Other Samsung Security Camera manuals

Samsung SCC-B5342 User manual

Samsung

Samsung SCC-B5342 User manual

Samsung iPolis SND-3082 User manual

Samsung

Samsung iPolis SND-3082 User manual

Samsung SVD-4120AW User manual

Samsung

Samsung SVD-4120AW User manual

Samsung SNH-1011 User manual

Samsung

Samsung SNH-1011 User manual

Samsung SPD-2200 Series User manual

Samsung

Samsung SPD-2200 Series User manual

Samsung SDC-415 Series User manual

Samsung

Samsung SDC-415 Series User manual

Samsung SCC-C6453N User manual

Samsung

Samsung SCC-C6453N User manual

Samsung SDC-5340BC User manual

Samsung

Samsung SDC-5340BC User manual

Samsung SCC-C6323N User manual

Samsung

Samsung SCC-C6323N User manual

Samsung SCC-C6407 User manual

Samsung

Samsung SCC-C6407 User manual

Samsung SCO-2080N User manual

Samsung

Samsung SCO-2080N User manual

Samsung COMPACT SPD-1000 User manual

Samsung

Samsung COMPACT SPD-1000 User manual

Samsung SCC-643(P) User manual

Samsung

Samsung SCC-643(P) User manual

Samsung SNC-B2335P User manual

Samsung

Samsung SNC-B2335P User manual

Samsung iPOLiS SNP-3120 User manual

Samsung

Samsung iPOLiS SNP-3120 User manual

Samsung SNC-550 iPOLiS User manual

Samsung

Samsung SNC-550 iPOLiS User manual

Samsung SCC-B5354 User manual

Samsung

Samsung SCC-B5354 User manual

Samsung SCC-C7455P User manual

Samsung

Samsung SCC-C7455P User manual

Samsung SHC-721N User manual

Samsung

Samsung SHC-721N User manual

Samsung SCZ-2250P User manual

Samsung

Samsung SCZ-2250P User manual

Samsung SCC-641 - 22x Zoom Smart Dome Camera User manual

Samsung

Samsung SCC-641 - 22x Zoom Smart Dome Camera User manual

Samsung SND-6084R User manual

Samsung

Samsung SND-6084R User manual

Samsung SNC-C6225 User manual

Samsung

Samsung SNC-C6225 User manual

Samsung C4303(P) User manual

Samsung

Samsung C4303(P) User manual

Popular Security Camera manuals by other brands

NDI BirdDog P100 user guide

NDI

NDI BirdDog P100 user guide

Ultrak KC-3P installation instructions

Ultrak

Ultrak KC-3P installation instructions

Kogan SMARTERHOME KASMBMPT09A user guide

Kogan

Kogan SMARTERHOME KASMBMPT09A user guide

COP-USA CM258EZTVI-ZM manual

COP-USA

COP-USA CM258EZTVI-ZM manual

Interlogix TruVision 4 IP Series Configuration manual

Interlogix

Interlogix TruVision 4 IP Series Configuration manual

Lorex CVC6991 Specifications

Lorex

Lorex CVC6991 Specifications

Axis Q6042-S PTZ user manual

Axis

Axis Q6042-S PTZ user manual

Illustra Pro PTZ 30x Configuration user guide

Illustra

Illustra Pro PTZ 30x Configuration user guide

Dahua IPC-HDB3202 Series user manual

Dahua

Dahua IPC-HDB3202 Series user manual

Allied GC2450 Technical manual

Allied

Allied GC2450 Technical manual

Optika Italy OPTIKAM PRO COOL5 instruction manual

Optika Italy

Optika Italy OPTIKAM PRO COOL5 instruction manual

Fortinet FortiCam FD40 quick start guide

Fortinet

Fortinet FortiCam FD40 quick start guide

Novus NVC-402V/IR user manual

Novus

Novus NVC-402V/IR user manual

Hamamatsu Photonics C5909 SERIES manual

Hamamatsu Photonics

Hamamatsu Photonics C5909 SERIES manual

Sony Ipela SNC-DH210 Specifications

Sony

Sony Ipela SNC-DH210 Specifications

ZMODO CM-S38901SV user guide

ZMODO

ZMODO CM-S38901SV user guide

Dahua N45EFNZ quick start guide

Dahua

Dahua N45EFNZ quick start guide

MRMC MRMC-2104-00 quick start guide

MRMC

MRMC MRMC-2104-00 quick start guide

manuals.online logo
manuals.online logoBrands
  • About & Mission
  • Contact us
  • Privacy Policy
  • Terms and Conditions

Copyright 2025 Manuals.Online. All Rights Reserved.