3
GB
Precautions
Ensure that the AC p wer supply in y ur h use c mplies with the identificati n sticker l cated n the back f y ur player. Install
y ur player h riz ntally, n a suitable base (furniture), with en ugh space ar und it f r ventilati n (7.5~10cm). Make sure
the ventilati n sl ts are n t c vered. D n t stack anything n t p f the amplifier. In rder t disc nnect the player c mpletely
fr m the p wer supply, rem ve the mains plug fr m the wall utlet, especially when left unused f r a l ng peri d f time.
Pr tect the player fr m m isture(i.e. vases) , and excess
heat(e.g.fireplace) r equipment creating str ng magnetic
r electric fields (i.e.speakers...). Disc nnect the p wer
cable fr m the AC supply if the player malfuncti ns. Y ur
player is n t intended f r industrial use.
Use f this pr duct is f r pers nal use nly.
C ndensati n may ccur if y ur player r disc have been
st red in c ld temperatures.
If transp rting the player during the winter, wait
appr ximately 2 h urs until the unit has reached r m
temperature bef re using.
During thunderst rms, disc nnect AC main plug fr m
the wall utlet.
V ltage peaks due t lightning c uld damage the unit.
D n t exp se the unit t direct sunlight r ther heat
s urces.
This c uld lead t verheating and malfuncti n f
the unit.
The battery used with this pr duct c ntain chemicals
that are harmful t the envir nment.
D n t disp se f batteries in the general h useh ld
trash.
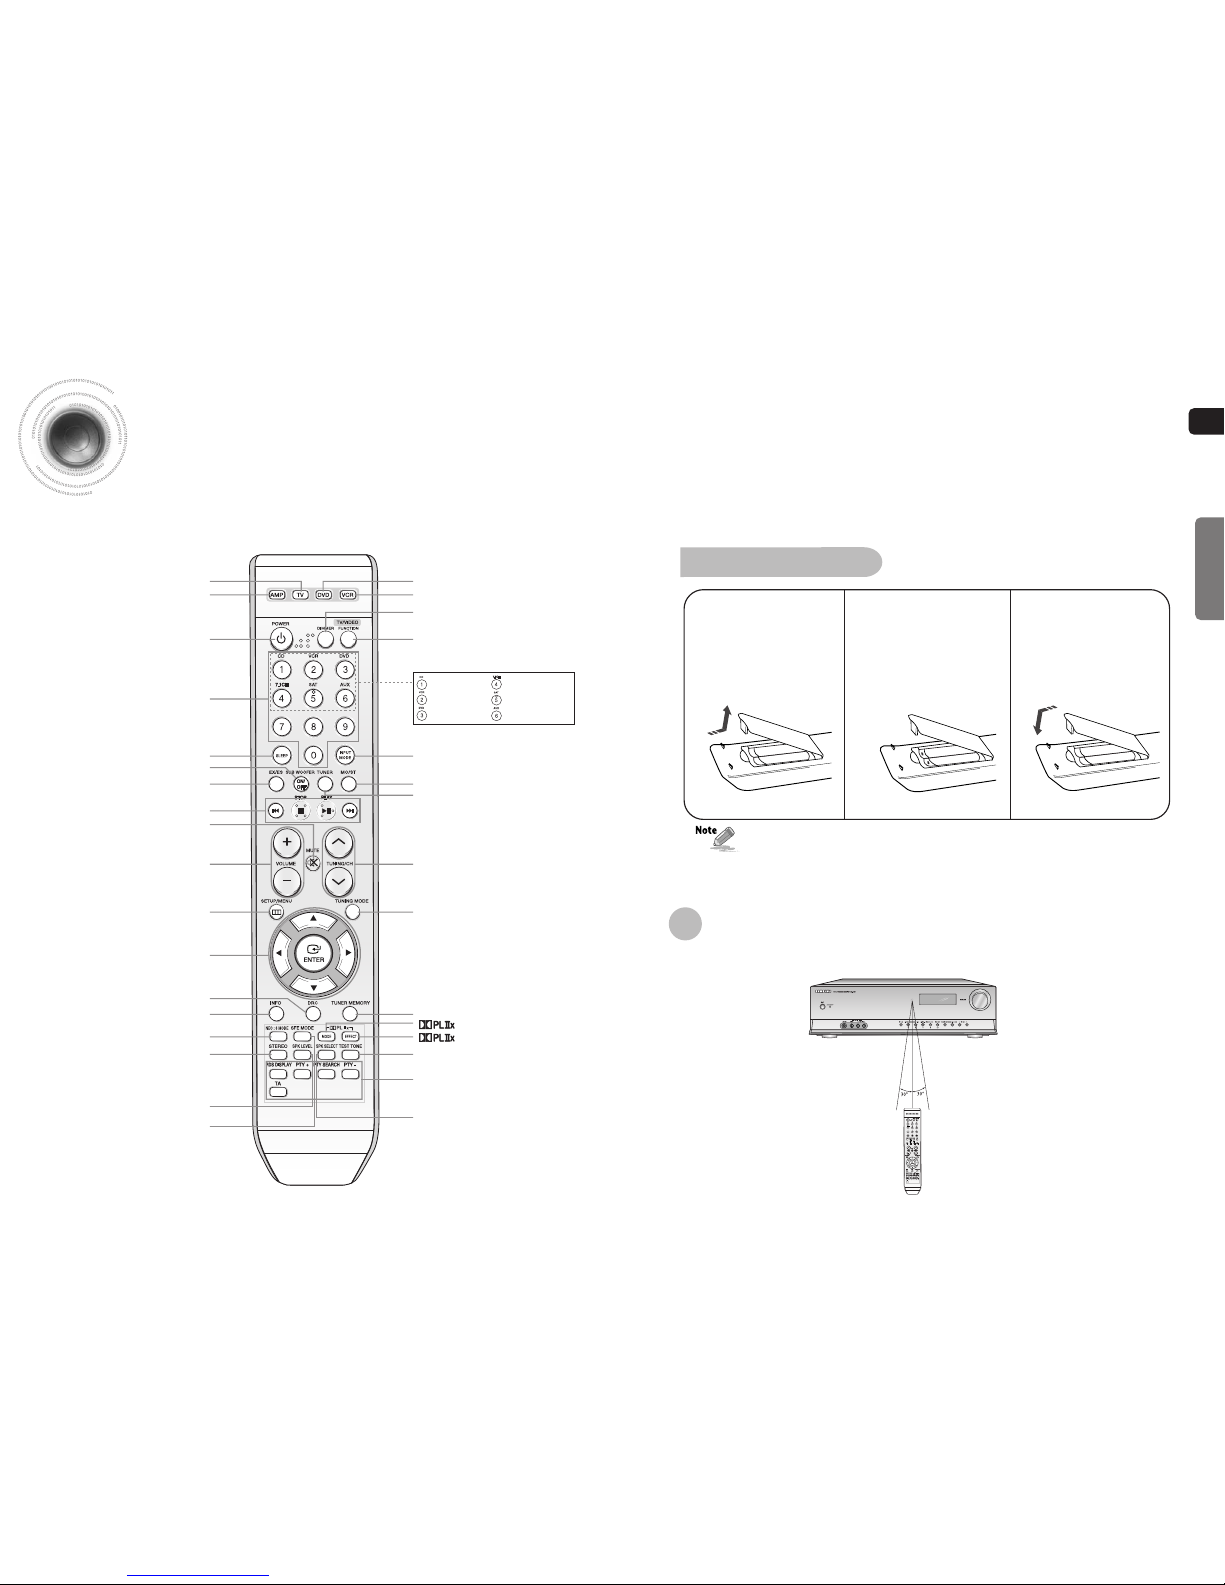
PREPARATION
2
Sa ety Warnings
Use f c ntr ls, adjustments r perf rmance f pr cedures ther than
th se specified herein may result in hazard us radiati n exp sure.
CAUTION-INVISIBLE LASER RADIATION WHEN OPEN
AND INTERLOCKS DEFEATED, AVOID
EXPOSURE TO BEAM.
This symb l indicates that danger us v ltage which
can cause electric sh ck is present inside this unit.
This symb l alerts y u t imp rtant perating and
maintenance instructi ns acc mpanying the unit.
WARNING: T reduce the risk f fire r electric sh ck, d n t
exp se this appliance t rain r m isture.
CAUTION: TO PREVENT ELECTRIC SHOCK, MATCH WIDE
BLADE OF PLUG TO WIDE SLOT, FULLY INSERT.
Wiring the Main Power Supply Plug(UK Only)
IMPORTANT NOTICE
The main lead n this equipment is supplied with a m ulded plug inc rp rating a fuse. The value f the fuse is indicated n the pin face f the plug
and if it requires replacing, a fuse appr ved t BS1362 f the same rating must be used.
Never use the plug with the fuse c ver rem ved. If the c ver is detachable and a replacement is required, it must be f the same c l ur as the fuse
fitted in the plug. Replacement c vers are available fr m y ur dealer.
If the fitted plug is n t suitable f r the p wer p ints in y ur h use r the cable is n t l ng en ugh t reach a p wer p int, y u sh uld btain a suitable
safety appr ved extensi n lead r c nsult y ur dealer f r assistance.
H wever, if there is n alternative t cutting ff the plug, rem ve the fuse and then safely disp se f the plug. D n t c nnect the plug t a main
s cket as there is a risk f sh ck hazard fr m the bared flexible c rd.
Never attempt t insert bare wires directly int a main s cket. A plug and fuse must be used at all times.
IMPORTANT
The wires in the main lead are c l ured in acc rdance with the f ll wing c de:–
BLUE = NEUTRAL BROWN = LIVE
As these c l urs may n t c rresp nd t the c l ured markings identifying the terminals in y ur plug, pr ceed as f ll ws:–
The wire c l ured BLUE must be c nnected t the terminal marked with the letter N r c l ured BLUE r BLACK. The wire c l ured
BROWN must be c nnected t the terminal marked with the letter L r c l ured BROWN r RED.
WARNING: DO NOT CONNECT EITHER WIRE TO THE EARTH TERMINAL WHICH IS MARKED WITH THE
LETTER E OR BY THE EARTH SYMBOL , OR COLOURED GREEN OR GREEN AND YELLOW.
CLASS 1 LASER PRODUCT
KLASSE 1 LASER PRODUKT
LUOKAN 1 LASER LAITE
KLASS 1 LASER APPARAT
PRODUCTO LASER CLASE 1
RISK OF ELECTRIC SHOCK.
DO NOT OPEN
CAUTION:
TO REDUCE THE RISK OF ELECTRIC SHOCK, DO
NOT REMOVE REAR COVER. NO USER
SERVICEABLE PARTS INSIDE. REFER SERVICING TO
QUALIFIED SERVICE PERSONNEL.
CLASS 1 LASER PRODUCT
This C mpact Disc player is classified as a CLASS 1 LASER pr duct.
•
This apparatus shall always be c nnected t a AC utlet with a pr tective gr unding c nnecti n.
•
T disc nnect the apparatus fr m the mains, the plug must be pulled ut fr m the mains s cket, theref re the mains
plug shall be readily perable.
CAUTION
This marking sh wn n the pr duct r its literature, indicates that it sh uld n t
be disp sed with ther h useh ld wastes at the end f its w rking life.
T prevent p ssible harm t the envir nment r human health fr m unc ntr lled
waste disp sal, please separate this fr m ther types f wastes and recycle it
resp nsibly t pr m te the sustainable reuse f material res urces.
H useh ld users sh uld c ntact either the retailer where they purchased this
pr duct, r their l cal g vernment ffice, f r details f where and h w they
can take this item f r envir nmentally safe recycling.
Business users sh uld c ntact their supplier and check the terms and
c nditi ns f the purchase c ntract.
This pr duct sh uld n t be mixed with ther c mmercial wastes f r disp sal.