Samsung MM-89 User manual

3CD CHANGER
MICRO AUDIO SYSTEM
MM-89
Owner’s Instructions

Contents
GB
3
Safety Warnings
GB
2
INSTALLING YOUR MICRO COMPONENT SYSTEM
Safety Warnings ........................................................................................................... 2
Connecting the Loudspeakers...................................................................................... 4
Connecting Your System to the Power Supply ............................................................ 4
Inserting the Batteries in the Remote Control .............................................................. 4
Connecting the MW/LW Aerial...................................................................................... 5
Connecting the FM Aerial ............................................................................................. 5
Setting the Clock .......................................................................................................... 6
CD PLAYER
Listening to a Compact Disc ........................................................................................ 6
Precautions When Using Compact Discs .................................................................... 7
CD Repeat Function..................................................................................................... 7
Programming CD Tracks .............................................................................................. 7
Programming the Order of Playback............................................................................ 8
Checking and Changing the Programmed Tracks ....................................................... 8
TUNER
Searching for and Storing the Radio Stations.............................................................. 9
Selecting a Stored Radio Station ................................................................................. 9
Improving Radio Reception .......................................................................................... 9
About RDS broadcasting(OPTION)..............................................................................10
About RDS DISPLAY function(OPTION)......................................................................10
PTY(Program Type) indication and PTY-SEARCH function (OPTION) .......................11
CD Digital Out Jack (Option)........................................................................................11
TAPE DECK
Listening to a Cassette.................................................................................................12
Maintaining the Sound Quality .....................................................................................12
Recording a Radio Programme....................................................................................13
Recording a CD with the CD Synchro Feature ............................................................13
Recommendations for Recording.................................................................................13
OTHER FEATURES
Timer Function-Playback..............................................................................................14
AI Sleep Timer..............................................................................................................15
Mute Funtion ................................................................................................................15
Bass Amplification System (Super Bass) .....................................................................15
Equalizer.......................................................................................................................15
Connecting Headphones..............................................................................................16
MIC Function (option)...................................................................................................16
Connecting to an External Source ...............................................................................16
Front Panel View ..........................................................................................................17
Rear Panel View...........................................................................................................18
Remote Control ............................................................................................................19
Technical Specifications ...............................................................................................20
CLASS 1 LASER PRODUCT
This Compact Disc player is classified as a
CLASS 1 LASER product.
Use of controls, adjustments or performance of
procedures other than those specified herein
may result in hazardous radiation exposure.
CAUTION-INVISIBLE LASER RADIATION
WHEN OPEN AND INTER LOCKS DEFEATED,
AVOID EXPOSURE TO BEAM.
This symbol indicates that
dangerous voltage which can cause
electric shock is present inside this
unit.
This symbol alerts you to important
operating and maintenance
instructions accompanying the unit.
WARNING: To reduce the risk of fire or electric
shock, do not expose this
appliance to rain or moisture.
CAUTION: TO PREVENT ELECTRIC SHOCK,
MATCH WIDE BLADE OF PLUG
TO WIDE SLOT, FULLY INSERT.
CAUTION:
TO REDUCE THE RISK OF ELECTRIC
SHOCK, DO NOT REMOVE REAR COVER, NO
USER SERVICEABLE PARTS INSIDE, REFER
SERVICING TO QUALIFIED SERVICE
PERSONNEL.
RISK OF ELECTRIC
SHOCK. DO NOT OPEN
CAUTION
Wiring the Mains Power Supply Plug(UK Only)
IMPORTANT NOTICE
The main lead on this equipment is supplied with a moulded plug incorporating a fuse. The value of the fuse is indicated on
the pin face of the plug and if it requires replacing, a fuse approved to BS1362 of the same rating must be used.
Never use the plug with the fuse cover removed. If the cover is detachable and a replacement is required, it must be of the
same colour as the fuse fitted in the plug. Replacement covers are available from your dealer. If the fitted plug is not
suitable for the power points in your house or the cable is not long enough to reach a power point, you should obtain a
suitable safety approved extension lead or consult your dealer for assistance. However, if there is no alternative to cutting
off the plug, remove the fuse and then safely dispose of the plug. Do not connect the plug to a main socket as there is a risk
of shock hazard from the bared flexible cord.
Never attempt to insert bare wires directly into a main socket. A plug and fuse must be used at all times.
IMPORTANT
The wires in the main lead are coloured in accordance with the following code:–
BLUE = NEUTRAL BROWN = LIVE
As these colours may not correspond to the coloured markings identifying the terminals in your plug, proceed as follows:–
The wire coloured BLUE must be connected to the terminal marked with the letter N or coloured BLUE or BLACK. The wire
coloured BROWN must be connected to the terminal marked with the letter L or coloured BROWN or RED.
WARNING: DO NOT CONNECT EITHER WIRE TO THE EARTH TERMINAL WHICH IS MARKED WITH THE LETTER E
OR BY THE EARTH SYMBOL , OR COLOURED GREEN OR GREEN AND YELLOW.
CLASS 1 LASER PRODUCT
KLASSE 1 LASER PRODUKT
LUOKAN 1 LASER LAITE
KLASS 1 LASER APPARAT
PRODUCTO LASER CLASE 1

GB
5
GB
4
The MW/LW aerial (for long and medium waves) can be:
Placed on a stable surface
Fixed to the wall (you must first remove the base)
The MW/LW aerial connector terminals are located on the rear of
the system and are marked MW/LW ANT.
To avoid noise interference, check that the
loudspeaker wires do not run close to the aerial
wires. Always keep them at least 2 inches (5 cm)
away.
There are 3 types of aerials, depending on the SET OPTION.
1How to connect a WIRE TYPE aerial.
Spread the FM aerial out and attach the ends to a wall, in
the position providing the best reception.
If reception is poor (e.g. distance from transmitter too great,
walls blocking the radio waves, etc.), install an outdoor
aerial.
2How to connect a COAXIAL TYPE aerial.
Connect a 75Ωantenna to the FM antenna terminal.
Plug the connector on the FM aerial supplied into the
coaxial socket (75Ω) marked FM on the rear of the system.
Follow the instructions given on Page 8 to tune into a radio
station, and determine the best position for the aerial.
If reception is poor, you may need to install an outdoor
aerial.
To do so, connect an outdoor FM aerial to the FM socket on
the rear of the system using a 75Ωcoaxial cable
(not supplied).
Connecting the FM Aerial (OPTION)
L
MW/LW
GND LOOP
AC IN~
MW/LW
GND LOOP
The loudspeaker connector terminals are located on the rear of both
the system and the loudspeakers (red and black tabs in both cases).
There are four terminals:
Two for the left speaker (marked L on the system)
Two for the right speaker (marked R on the system)
To achieve the correct sound quality, connect the:
Red cable to the + terminal
Black cable to the - terminal
1To connect a cable to a terminal, push the tab as far as it will go:
To the left on the system
2Insert the cable up to the plastic sheathing, in the opening.
3Release the tab.
To the left on the system, until it clicks into place
Result: The cable is pinched and held firmly in place.
4Repeat the operation for each end of the cables.
1Plug mains lead into an appropriate wall socket.
2To... Press POWER ON/STANDBY...
Switch the system on Once
Switch the system off Once again
To avoid running the risk of electric shock:
Check regularly that the mains lead is in good
condition
Never pull on the lead itself when unplugging it;
always pull on the plastic plug
Never plug the system in or unplug it with wet
hands
You must insert or replace the batteries in the remote control when you:
Purchase the micro component system
Find that the remote control is no longer operating
correctly
1Place your thumb on the position marked on the battery
compartment cover (rear of the remote control) and push the
cover in the direction of the arrow.
2Insert two AAA, LR03 or equivalent batteries, taking care to
respect the polarities:
+ on the battery against + on the remote control
- on the battery against - on the remote control
3Replace the cover by sliding it back until it clicks into position.
When replacing the batteries, use a new set.
To achieve optimum performance, make sure
that the batteries are of the same type.
Connecting the Loudspeakers
Connecting Your System to the Power Supply
Inserting the Batteries in the Remote Control
AC IN~
AM
GND LOOP
(Option)
(Option)
Connecting the MW/LW Aerial
FM FM
FM AERIAL
(supplied)
75 ΩCOAXIAL
CABLE (not supplied)

GB
7
GB
6
0To guarantee hours of enjoyable listening with your compact
discs:
Always hold them by the edges to avoid leaving
fingerprints on the shiny surface
Always replace them in their cases after listening to
them
Do not fix paper or adhesive tape to the discs and do
not write on the label
Clean the player with a special cleaning disc
You can repeat:
A specific track on a compact disc
All tracks on the compact disc
All tracks on all compact discs (NO. 1,2,3)
1Place a compact disc in a desired CD deck.
2Press PLAY/PAUSE( ) button.
Result: REP. is no longer displayed.
3Press the CD REPEAT button.
Result: The first track on the disc is played and the track
number is displayed. It displays the following
options in the order as below.
DISC ALL : Plays all the tracks on all the discs once.
DISC : Turns off the CD REPEAT function.
REPEAT 1: Plays one selected track repeatedly.
DISC REPEAT: Plays all the tracks on one selected disc.
DISC ALL REPEAT: Plays all the tracks on all the discs
repeatedly.
You can program your desired tracks on all compact discs up to 24.
1
Press DISC CHANGE button to select the desired disc.
Programming cannot be done in the Play mode.
Press STOP button if CD is being played.
2
Press PROG./SET button.
Result: The numbers of the program, the disc, and the
track are displayed.
3
Select a desired track by pressing
and
.
4
Press PROG/SET button.
Result: This stores the selected track in the memory.
5
Select another desired track by pressing
and
.
6
Press PROG/SET button.
Result: This stores the selected track in the memory.
7
Press DISC CHANGE button to select another disc.
8
Follow the steps 3~6 to program the desired tracks on any
disc.
You can program up to 24 tracks.
9
Press CD STOP( ) button once.
You can check the programmed tracks by pressing
PROG/SET button continuously as you wish.
The program function is cancelled if you press
STOP( ) button once when in the Pause mode, or
press twice when in the Play mode.
Pressing the +10 button jumps the track number up
to 10 without the need to press
or
10 times.
10 Press
PLAY/PAUSE ( ) button if you want to listen to the
programmed tracks.
Precautions When Using Compact Discs
CD Repeat Function
Programming CD Tracks
For each step, you have a few seconds to set the
required options. If you exceed this time, you must
start again.
1Switch the system on by pressing POWER.
Result: The various indicators and LCD light up.
2Press the TIMER/CLOCK button once.
3PROG/SET twice
4Set desired hour by using or button.
To... Press...
Increase the hours
Decrease the hours
You can hold the and buttons down to scroll
rapidly through the figures.
5Press PROG./SET.
Result: The minutes flash.
6Set desired minute by using or button.
To... Press...
Increase the minutes
Decrease the minutes
You can hold the and buttons down to scroll
rapidly through the figures.
7When the correct time is displayed, press PROG./SET.
Result: The clock starts and is displayed, even when the
system is in standby mode.
You can adjust the time whenever you want, even
when you are using another function, the system
is in standby mode, or when power is off.
You must set the clock before you can
programme the system to switch on
automatically at a given time.
You can play 12 cm or 8 cm compact discs without an adapter.
1Press the desired DISC OPEN button among 3 disc holders.
2Place your disc in the selected holder with the label on the disc
facing upwards.
3Press the DISC OPEN button again to close the compartment .
Result: It clicks into place. Put more discs into No. 2
or No. 3 disc holders if needed. The display
indicates the number of the selected disc and
the number of tracks on the disc.
4Press the PLAY/PAUSE ( ) button.
Result: The display indicates the number of tracks on the
disc.
5Press CD REPEAT button.
Result: The first track on the disc is played and the track
number is displayed. It displays the following
options in the order as below. (Refer to the
section titled “CD Repeat Function”in page 7.)
DISC ALL/DISC/REPEAT 1/DISC REPEAT/DISC ALL REPEAT
6To stop playback temporarily, press the PLAY/PAUSE ( )
button.
Press PLAY/PAUSE ( ) again to continue playing
the disc.
7To start playing at the Press...
beginning of...
The next track SKIP/SEARCH once
The current track SKIP/SEARCH once
The previous track SKIP/SEARCH twice
The track of your choice SKIP/SEARCH or
the appropriate number of times
8To search through Press and hold down...
the tracks...
Forwards SKIP/SEARCH until you
reach the required point
Backwards SKIP/SEARCH until you
reach the required point
You are advised to turn the volume down before using
this function.
9Press the STOP ( ) button when you have finished.
Setting the Clock
Listening to a Compact Disc
2
1
3
2
4
6
10
1
7
9
5
3
3
5
3
2
9
5
7
8
7
8
4
6
1
5
3
4
6
4
1
2
6

GB
9
GB
8
You can store up to:
15 FM stations
8 MW stations
7 LW stations (optional)
1
Switch the system on by pressing POWER.
2Select the required frequency band by pressing TUNER.
3
Press TUNING MODE to select AUTO or MANUAL/PRESET.
Result: The appropriate indication is displayed:
FM Frequency Modulation
MW Medium Wave or AM (Amplitude Modulation)
LW Long Wave (optional)
4
Press PROG/SET button.
To search for a station Press the appropriate button...
Manually One or more times.
Result: The station changes each time
you press the button.
Automatically And hold it down for at least one second.
Result: The next station is found auto-
matically.
The automatic search function may stop on a frequency that
does not correspond to a radio station. If this happens, use the
manual search function.
Result:TUNED is displayed when a station is received.
5
Press and to select desired station to store.
6
If there is noise interference on an FM stereo station, press the
MONO/ST button once to select the mono mode. This may improve the
reception. Press the MONO/ST button again to return to the stereo
mode.
If a preset station is displayed when you are searching for a radio
station, press TUNING MODE to select the MANUAL mode and
continue searching.
7
If you do not want to store the radio station found, revert to Step 2to
search for another station. Otherwise, go over to next step.
8
Press PROG/SET button.
Result: The programme number 1 and Pare displayed for a
few seconds.
9
Press and to assign a programme number between 1 and 15.
Result: The programme number is displayed. For the FM
frequency band, the over symbol is displayed to
indicate two-digit station numbers.
10
Press PROG/SET to store the radio station.
Result:P is no longer displayed and the station is stored.
11
To store any other radio stations required, repeat Steps 2to 10.
This function can be used to assign a new station to an existing
programme number.
You can listen to a stored radio station as follows:
1Switch the system on by pressing POWER.
2Press TUNER to select the frequency band.
3Select the radio station by pressing TUNING MODE.
Select the radio station as follows.
To listen to... Press...
A stored station aTUNING MODE to select the
PRESET mode.
band to select
the required programme.
Another station and to increase or decrease
the frequency respectively
until the required station is found.
Press TUNING MODE again to exit the stored station
selection function.
You can improve the quality of radio reception by:
Rotating the FM or MW (AM), LW (optional) aerial
Testing the positions of the FM and MW (AM) , LW
(optional) aerials before fixing them to the wall
If reception from a specific FM radio station is poor, press
MONO/ST button to switch from stereo mode to mono.
The quality of the sound will be improved.
Selecting a Stored Radio Station
Improving Radio Reception
You can decide for yourself:
The order in which you listen to the tracks
The tracks to which you do not wish to listen
This feature can be combined with the Repeat function.
1If necessary, stop the player by pressing STOP ( ).
2Press PROG/SET.
Result: PROGRAM and P-01-- are displayed.
3Select the required track by pressing the CD buttons as below.
to move backwards through the tracks
to move forwards through the tracks
4Press PROG/SET.
Result: P-02-- is displayed.
5To select other tracks, repeat Steps 3and 4.
You can programme up to 15 tracks.
6When you have finished selecting the tracks, press
PLAY/PAUSE ( ) to start listening to the selection, in the
order in which the tracks were programmed.
7Press STOP ( ) twice to cancel the selection when the disc is
playing.
You can check and change your selection of tracks at any time.
You must have selected at least one track.
1Press STOP ( ) once if you have started listening to the
selection.
2Press PROG/SET.
Each time you press PROG/SET, the next selection is
displayed.
3Press PROG/SET one or more times until the track to be
changed is displayed.
4Press SKIP or to select the new track.
5Press PLAY/PAUSE ( ) to start listening to the selection.
Result: The first track selected is played.
You can change one or more tracks in your initial
selection.
Programming the Order of Playback
Checking and Changing Programmed Tracks
Searching for and Storing the Radio Stations
4
2
6
7
1
3
3
6
2
5
9
5
9
2
1
3
3
3
4
8
10
3
3
2
5
4
1
4

GB
11
GB
10
This unit has the RDS(Radio Data System) function, which enables
for the various information such as broadcasting station, radio text,
time and 17 types of programs(News, Rock, Classic, etc.) to be
received from the FM RDS station together with normal radio signal.
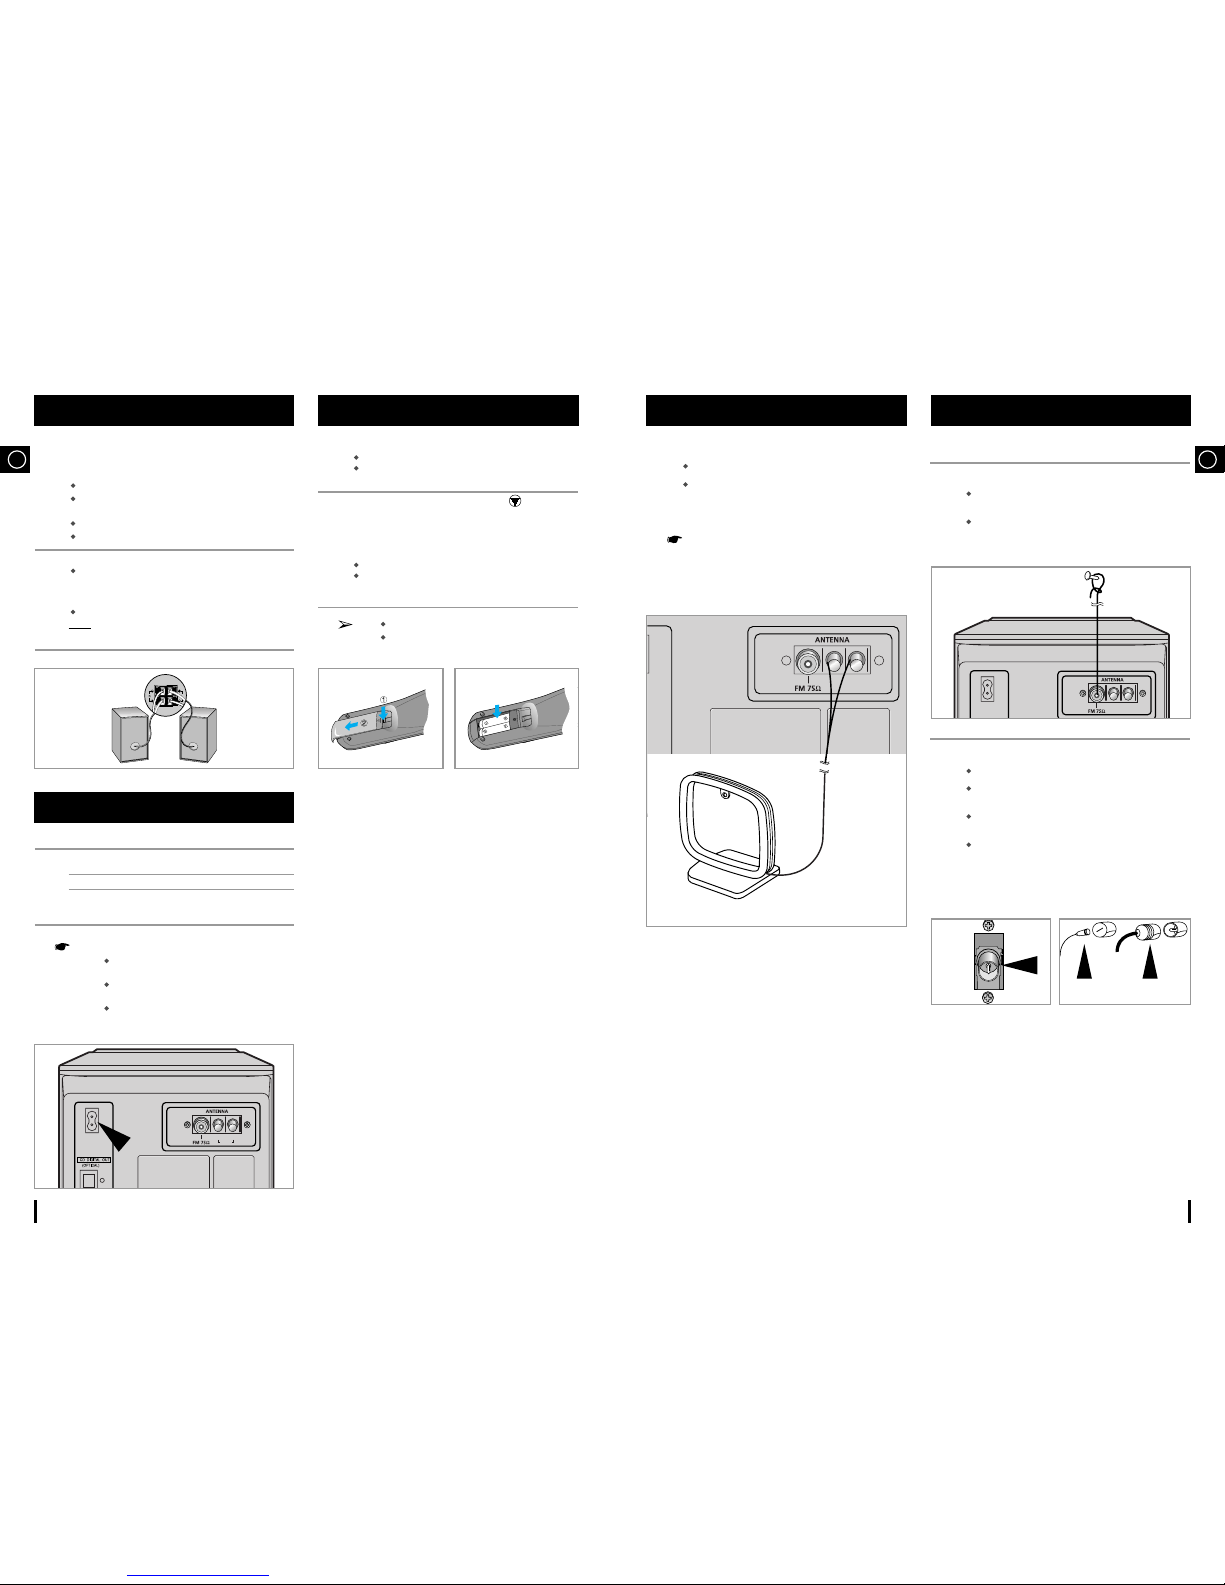
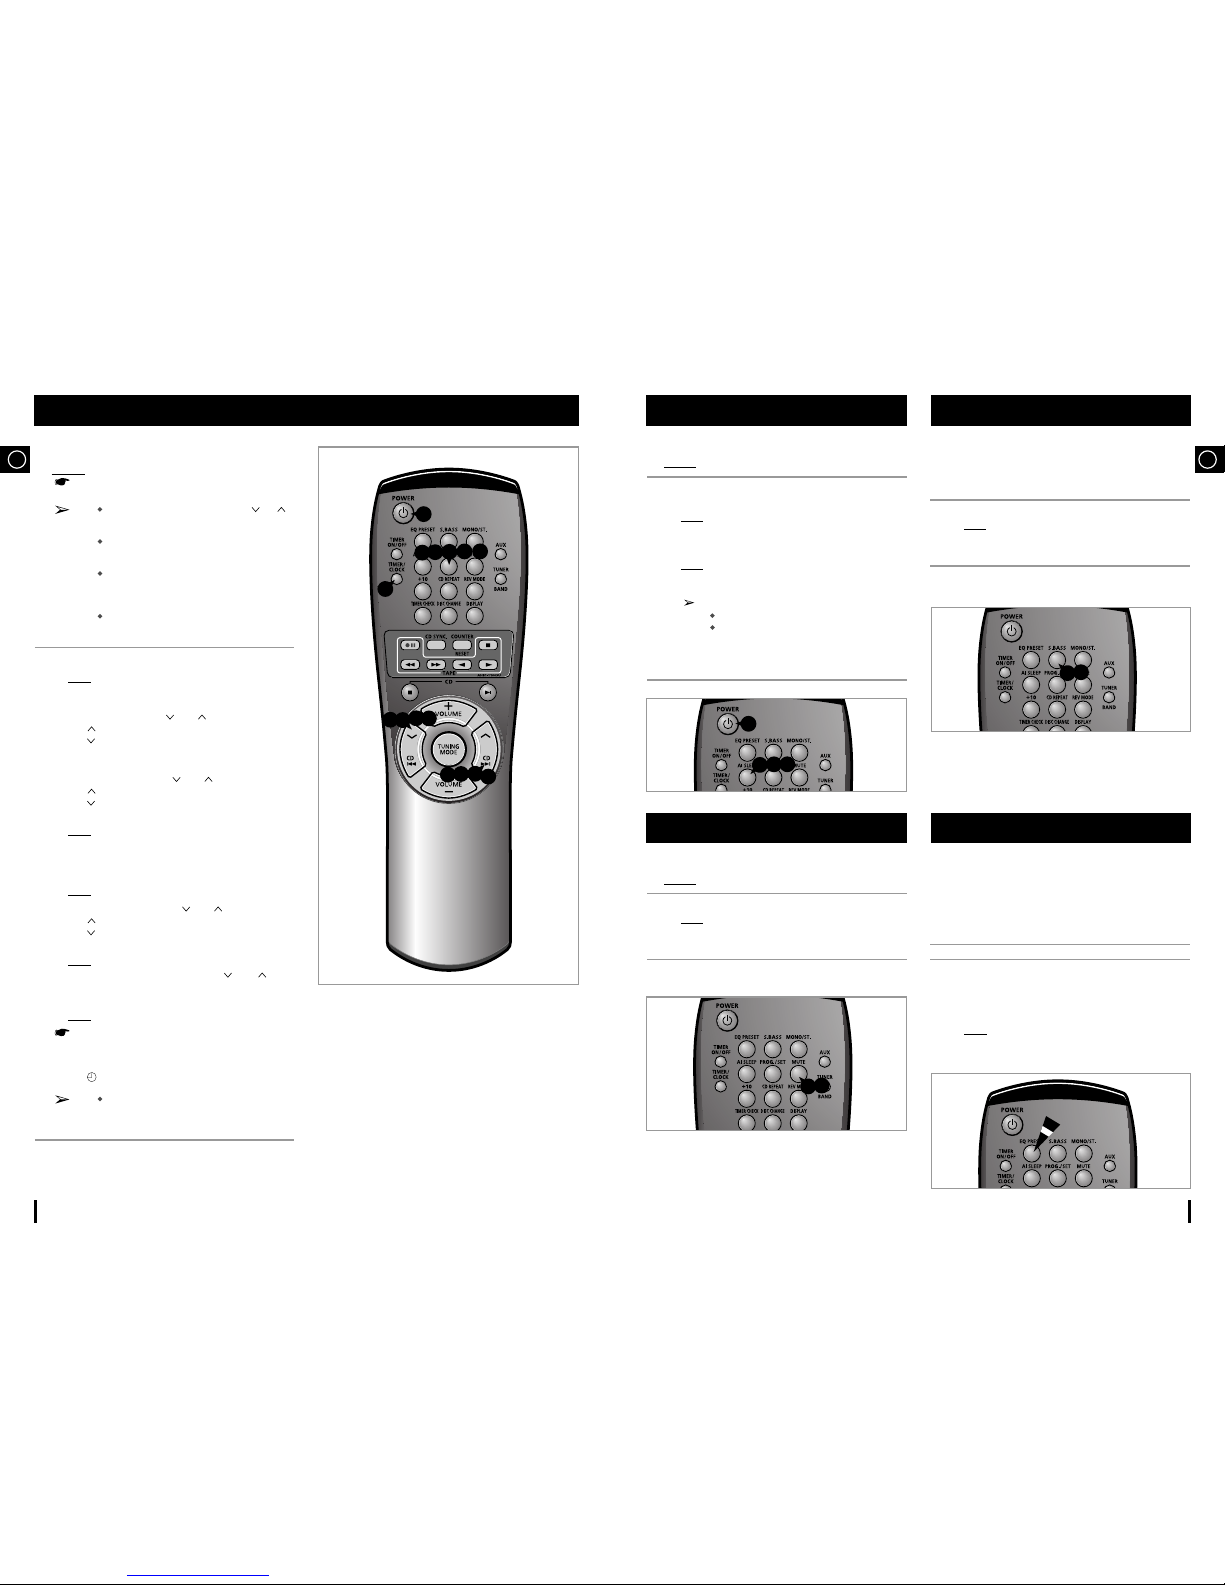
1Press the POWER button.
2Receive the FM radio.
See the radio receiving method on the page 9.
FM and frequency are shown on the display
If the received station transmits the RDS information, 'RDS'
appears automatically on the display.
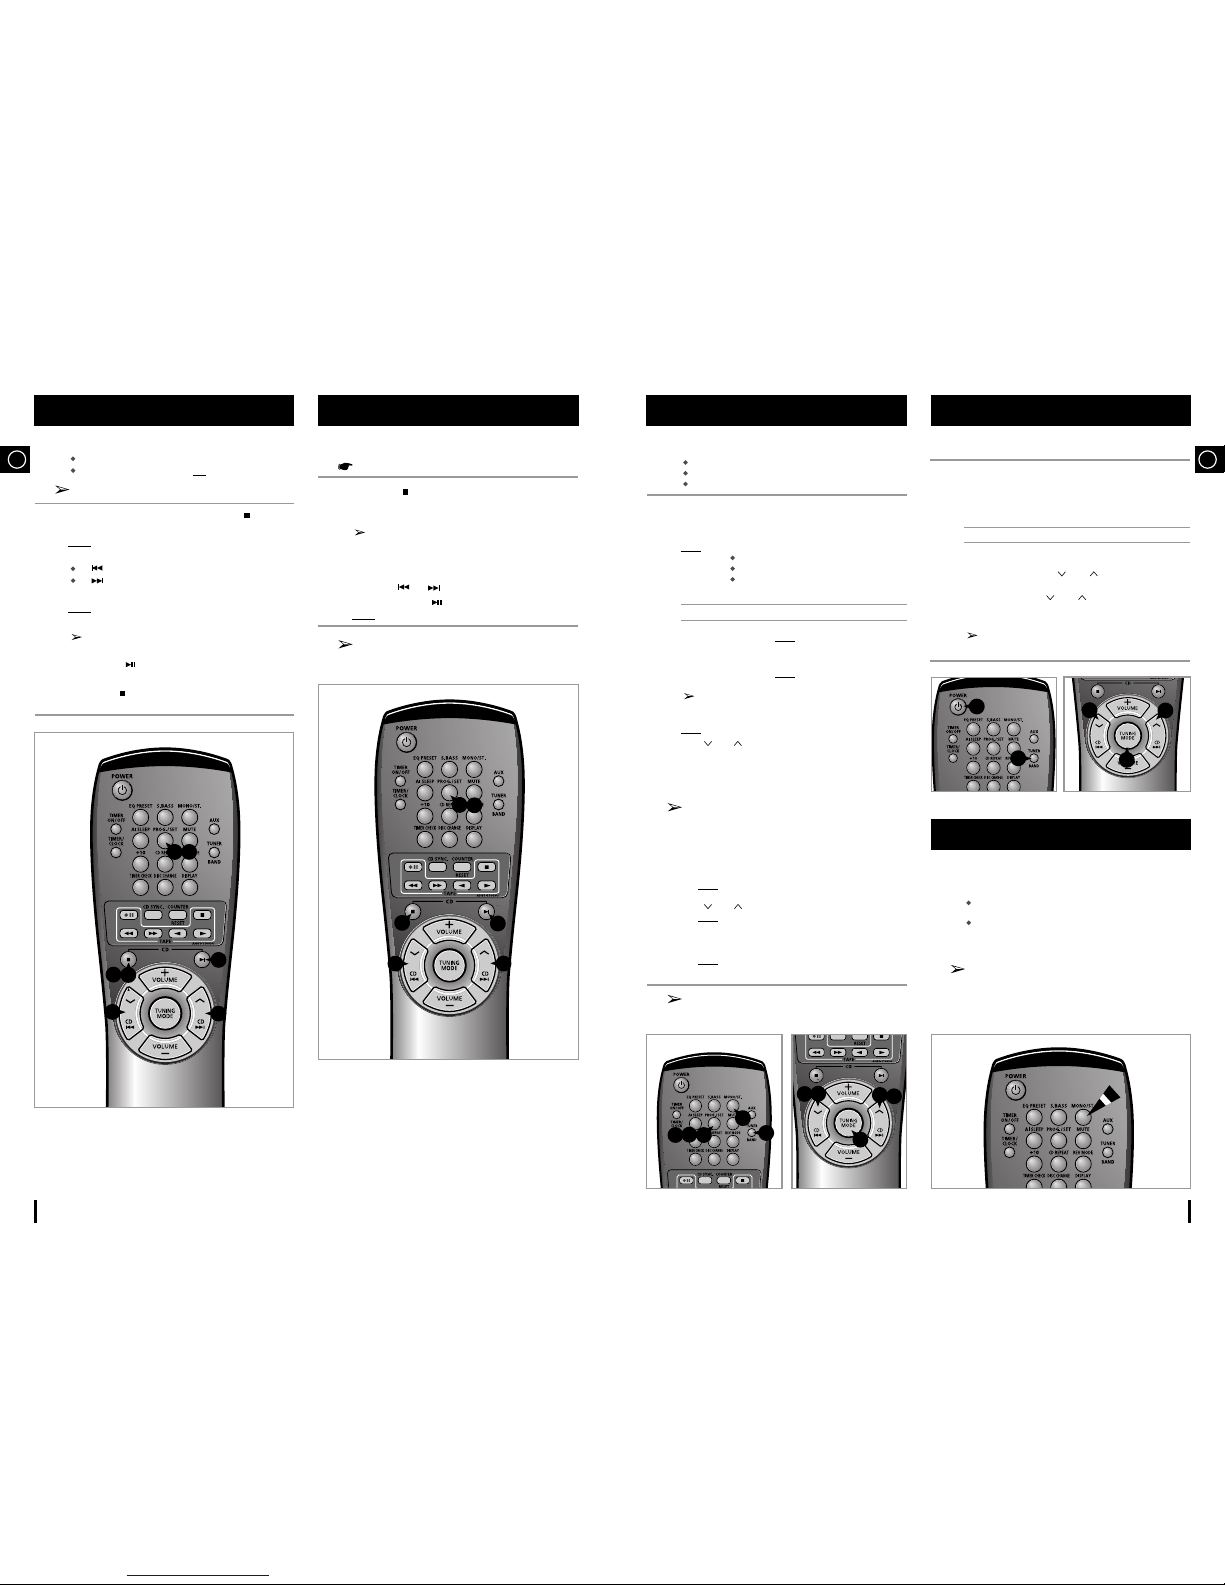
3Press the DISPLAY button to select the desired RDS mode.
Whenever the button is pressed, RDS mode changes as
follows.
The RDS function is available only on FM broadcasts.
Description on RDS function
1. PTY(Program Type) : Displays the type of programme
currently being broadcast.
2. PS NAME(Program Service Name) : Indicates the name of
broadcasting station and is composed of 8 characters.
3. RT(Radio Text) : Decodes the text broadcast by a station
(if any) and is composed of maximum 64 characters.
4. CT(Clock Time) : Decodes the real time clock from the FM
frequency.
Some stations may not transmit PTY, RT or CT
information therefore this may not be displayed in all
cases.
5. TP(Traffic Program) : Indicates that the turned station is
capable of transmitting traffic broadcosts.
6. TA(Traffic Announcement) : When this symbol flashes it
shows that the traffic announcement is in progress.
7. EON(Enhanced Other Networks Information) : Offers the
RDS information on other networks.
The PTY information is composed of an identification symbol, which
helps the FM radio to recognize the program type of each FM
station.
The 17 PTY modes are shown in the display by pressing the PTY
button.
If the PTY MODE isn’t found it is retuned to the original station
frequency at beginning the PTY SEARCH and auto-search and
PTY SEARCH are suspended.
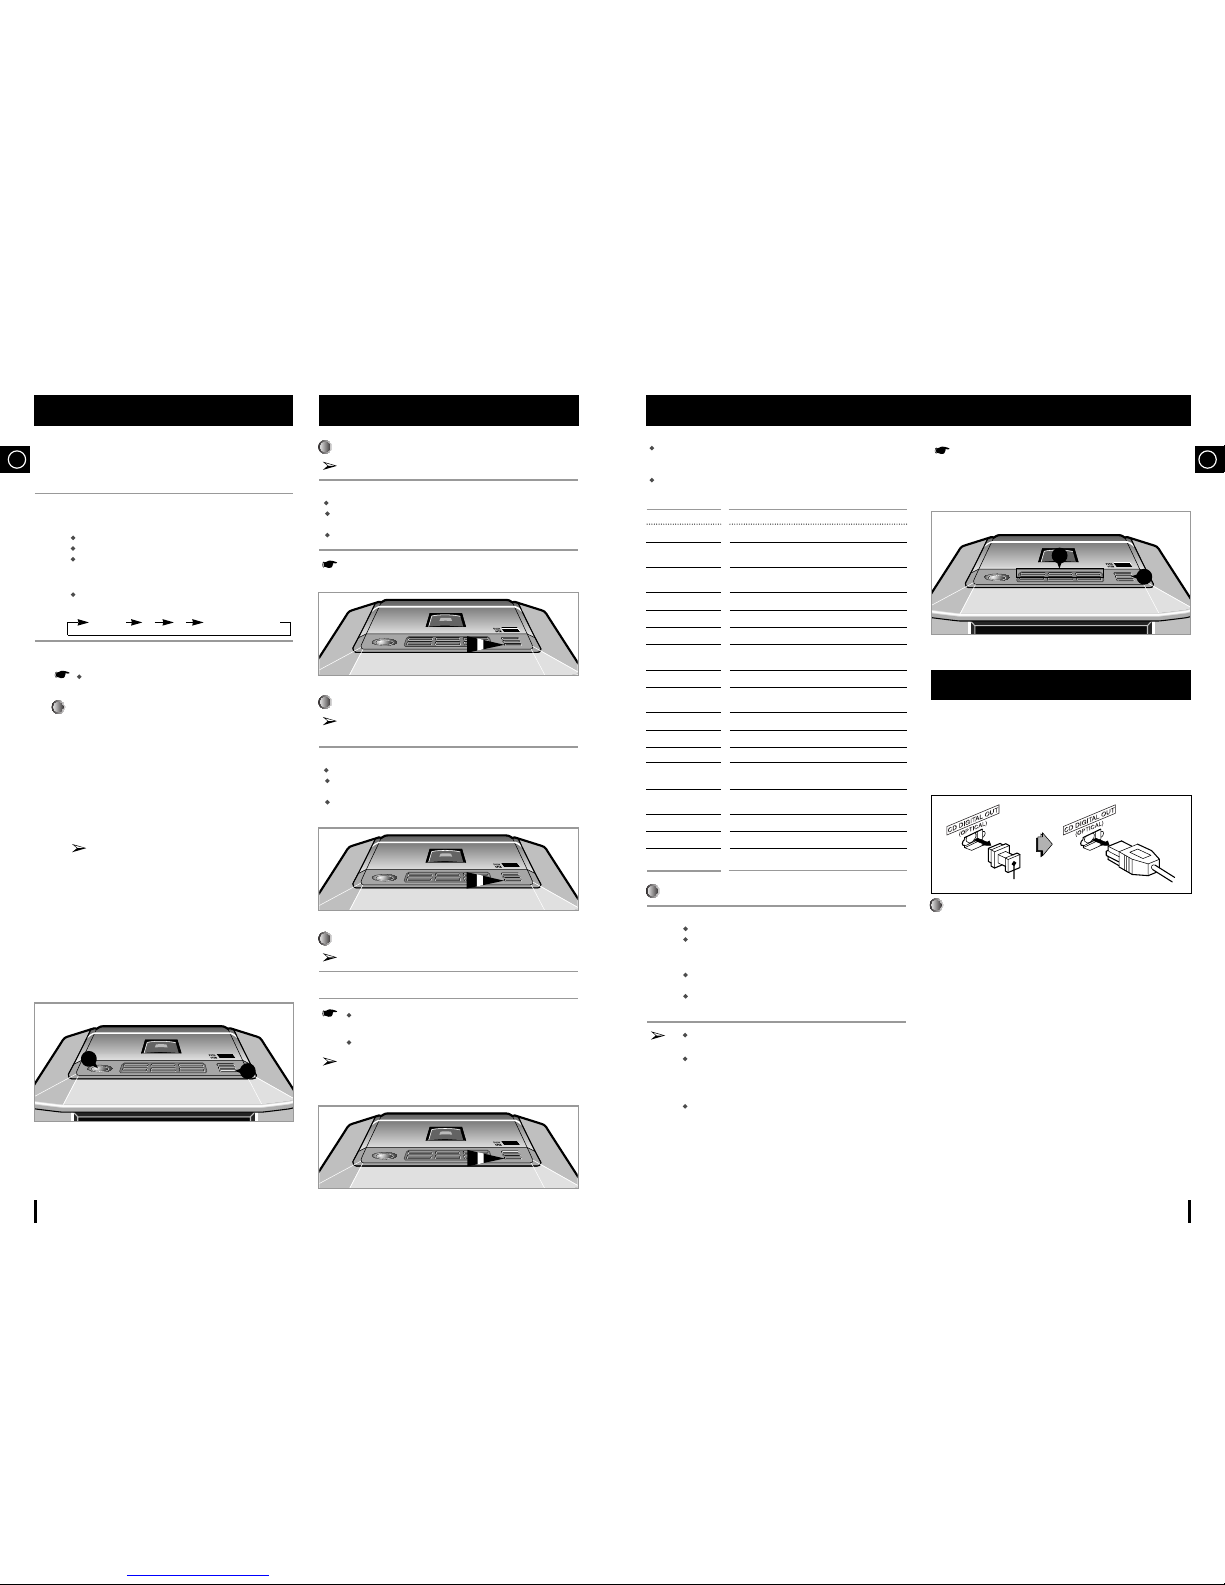
This unit can output DVD/CD digital sound signals through this jack.
Use an optical cable to connect digital audio equipment.
(DAT deck, MD recorder, etc.).
Remove the dust cap (1) from the CD DIGITAL OUT jack. Then,
connect an optical cable plug(not supplied) to the CD DIGITAL
OUT jack.
When the CD DIGITAL OUT jack is not being used.
Attach the supplied dust cap.
About PTY-SEARCH
1Tuned to an FM station broadcosting a PTY MODE.
See the FM receiving method on the page 9.
If the received station is transmitting the RDS information,
“RDS”lights up.
2Press the PTY button.
The PTY MODE(NEWS, AFFARIS, etc.) appears on the
display.
Press the PRESET/MANUAL DOWN or UP button to select the
desired PTY MODE.
If the station is transmitting no PTY information, 'NO PTY'
shows on the display.
When the PTY MODE is selected(The PTY MODE is
shown in the display), press the PTY KEY once again to
convert into PTY-SEARCH MODE and auto-search the
station sequentially.
If a station is found broadcasting required PTY MODE then
the search station and the stop is selected.
PTY(Program Type) indication and PTY-SEARCH function (OPTION)
CD Digital Out Jack (Option)
PS NAME RT CT Current FM frequency
About "PS NAME" MODE
Displays the name of broadcasting station.
Press the DISPLAY button to select the PS NAME.
"PS NAME”appears on the display.
If the PS information is being received, the PS name(BBC, AFO, NDR,
etc.) is shown on the display.
If the PS information isn't received, the original FM frequency is shown.
Even though no RDS DISPLAY button is pressed, the reception
of PS information ensues the PS name is displayed.
About 'RT' MODE
Displays the character transmitted from the broadcasting
station
Press the RDS DISPLAY button to select the RT MODE.
"RT" appears on the display.
If the RT information is being received, the received information is shown
on the display.
If the RT information isn't received, the "NO RT" is shown on the
display.
About CT(Clock Time)
Sets the time of RDS clock.
To select the CT time, set the DISPLAY button to CT MODE.
The CT information will take up to 2 minutes to be decoded
therefore the clock isn’t displayed immediately.
If there is no available CT information, "NO CT"is displayed.
The CT RDS clock does not update the system clock.
Display
NEWS
AFFARIS
INFO
SPORT
EDUCATE
DRAMA
CULTURE
SCIENCE
VARIED
POP M
ROCK M
M.O.R.M
LIGHT M
CLASSIC
OTHER M
ALARM
TRAFFIC
Program Type
• News including an announced opinion and report
• Several matters including current incident, documentary,
discussion and analysis
•
Information including weights and measures, returns and forecast,
matters interesting the customer, medical information, etc.
• Sports
• Education
• Drama - Radio serial, etc.
• Culture - National or local culture including the religious problem,
social science, language, theater, etc.
• Natural science and technology
• Others - Speech, amusing program(quiz, game), interview,
comedy and satirical play, etc.
• Pop music
• Rock music
• M.O.R -Comfortable music, occasionally vocal
• Light classical music - Classical music and instrumental and
chorus music.
• Heavy classical music - Orcastra music, symphony, chamber
music and opera
• Other music - Jazz, R&B, folk, country music
• Alarm
• Traffic information
(1)
3
1
2
2
About RDS broadcasting (OPTION)
About RDS DISPLAY function (OPTION)

GB
13
You can record a radio programme of your choice and listen to it
at a later date.
1Insert a blank cassette in the cassette deck.
2Select the radio station that you wish to record.
3Press REV MODE button.
4To start recording, press the REC/PAUSE ( II) button.
5Press PLAY( or ) button.
Result: Recording starts immediately.
6
To stop recording temporarily, press the REC/PAUSE ( II) button.
7When you wish to stop recording, press the STOP ( ) button.
You can record a compact disc on a cassette.
1Press the DISC CHANGE button to select the desired disc.
2Stop playing CD by pressing the CD STOP( ) button.
3Insert a blank cassette in the cassette deck.
4Press REV MODE.
5Press the CD SYNC button.
Result: The first track on the disc is played and the player
starts recording automatically (synchronised
recording).
If you wish to record a specific track, select it before
pressing the CD SYNC button. Recording is then
synchronised with the start of the track.
6If you wish to stop recording, press the CD STOP( ) button.
Record on normal bias cassettes only.
To prevent erasing a cassette that you wish to keep,
remove the safety tabs on the upper edge of the
cassette. To re-record a cassette, where the tabs have
been broken, simply cover the openings with
adhesive tape.
It is an infringement of copyright laws to copy
records and pre-recorded cassettes or to re-record
them in any form without the permission of the
owners of the corresponding copyright.
Recording a Radio Programme
Recording a CD with the CD Synchro Feature
Recommendations for Recording
3
4
6
5
5
7
4
1
6
2
5
GB
12
You can listen to any type of audio cassette with this player.
1Open the cassette deck by pressing the PUSH OPEN button.
2Insert the pre-recorded cassette with the open edge of the tape
facing downwards and close the deck by pushing on it until it
clicks into place.
3Press the PLAY ( or ) button.
Result: The cassette starts playing.
Pressing button plays backward. Pressing button
plays forward.
4To stop the playback temporarily, press the STOP ( ) button.
Press the PLAY ( or ) button to continue listening to
the cassette.
5To... Press the...
Rewind the cassette REW/SKIP ( ) button
Fast-forward the cassette F.FWD/SKIP ( ) button
Stop the player STOP ( ) button
The rewind or fast-forward functions stop automatically
when the beginning or end of the cassette is reached.
SKIP does not work for a blank interval less than 4 sec.
6To open the deck, press the PUSH OPEN button.
To obtain the best possible results from your cassette player, you
must clean it regularly (heads, roller and drive capstan).
Open the deck by pressing the PUSH OPEN button. Use a cotton bud
and a special cassette cleaning agent to clean the:
Heads ( )
Roller ( )
Drive capstan ( )
To guarantee hours of enjoyable listening with your cassettes:
Check that the tape in the cassette is always sufficiently
taut
Store your cassettes in a clean place, out of direct
sunlight, where they will not be exposed to high
temperatures.
Avoid using 120-minute cassettes as they are extremely
fragile.
Listening to a Cassette Maintaining the Sound Quality
1
6
5
4
5
5
3
3

GB
15
GB
14
You can set the system to switch off automatically.
Example: You wish to go to sleep listening to music.
1Switch your system on by pressing POWER.
2Press the AI SLEEP button on the remote control.
Result: The following indication is displayed:
AI SLEEP
3Press AI SLEEP one or more times to indicate how long the system
should continue playing before it switches off.
Result: The length of time is decreased as below each time
you press AI SLEEP.
AI SLEEP -> 90 -> 60 -> 45 -> 30 -> 15 -> OFF
At any time, you can:
Check the remaining time by pressing AI SLEEP.
Change the remaining time by repeating Steps 2
and 3.
4To cancel the sleep timer function, press AI SLEEP one or more
times until the sleep indicator shows ‘OFF’.
You can turn the sound off temporarily on your system.
Example: You wish to answer a telephone call.
1Press MUTE on the remote control.
Result:The sound is switched off.
2To switch the sound back ON to the same volume as before, press
MUTE again.
Your micro component system is equipped with a bass amplification
system called SUPER BASS. This function makes the sound more
powerful and true-to-life.
1Press S. BASS on the front panel.
Result: The bass sound is boosted.
2To cancel this function, press S. BASS again.
Your micro component system is equipped with a preset
equalizer that enables you to choose the most appropriate
balance between treble and bass frequencies, according to
the type of music to which you are listening.
Press the EQ PRESET button one or more times until the required option
is selected.
To obtain a... Select...
Standard balance (linear) FLAT
Balance suitable for pop music POP
Balance suitable for rock music ROCK
Balance suitable for classical music CLASSIC
Result: The corresponding indication is displayed.
(FLAT is not displayed)
AI Sleep Timer
Equalizer
Mute Function
Bass Amplification System (Super Bass)
1
2
1
2
4
1
3
2
The timer enables you to switch the player on and/or off at specific
times.
Example: You wish to wake up to music every morning.
The timer can be used to start the radio, the compact disc
player or the cassette deck.
The timer is set by pressing the CD or
buttons. You can hold them down to scroll
rapidly through the figures.
You can set the timer even when the player is in
standby mode (check, however, that the current
time is correct).
You can adjust the time whenever you want,
even when you are using another function, the
system is in standby mode, or when power is
off.
You must set the clock before you can
programme the system to switch on
automatically at a given time.
1Press the TIMER/CLOCK button on the remote control three
times.
Result: ON is displayed and the hour flashes; you can now
set the timer switch-on time.
2Press PROG/SET button.
3Set the hours by pressing and .
to increase the hour
to decrease the hour
4Press PROG/SET .
5Set the minute by pressing and .
to increase the minute
to decrease the minute
6Press PROG/SET.
Result: OFF is displayed and the hour flashes; you can set
the switch-off time.
7Set the switch-off time by Repeating Steps 3 to 5.
8Press PROG/SET.
Result: VOL is displayed.
9Adjust the volume by pressing and .
to increase the volume
to decrease the volume
10 Press PROG/SET.
Result:
Function is displayed.
11 Set the Adjust the Fucntion by Pressing and desired
Function(FM.CD.TAPE etc)
12 Switch the player off by pressing POWER.
Result: The player will start at the time that you have set.
If you no longer want the player to switch on or off
automatically, you must cancel the timer function. To do
so, press TIMER ON/OFF.
Result: ( is no longer displayed and the timer is deactivated).
If the timer switch on and off times are identical,
the word ERROR is displayed. You must set the
timer again.
Timer Function-Playback
1
2
4
6
8
10
3
5
3
9
9
7
5
11
12

GB
17
GB
16
Front Panel View
1
2
3
4
5
6
7
8
9 10
11
12
13
14
15
16
17
18
19
20
1. TUNING MODE/STOP
2. TUNING DOWN/REWIND/PLAY
FORWARD/AUTO TRACK
3. POWER ON/OFF
4. AUX
5. TUNER(FM/MW/LW) SELECT
6. TAPE PLAYBACK
7. REMOTE CONTROL SIGNAL SENSOR
8. DISC CHANGE
9. HEADPHONES JACK
10. MICROPHONE JACK
11. DISC COMPARTMENTS
12. CD PLAY/PAUSE
13. DISC OPEN/CLOSE
14. VOLUME CONTROL
15. DISPLAY
16. SUPER BASS
DISPLAY(OPTION)
17. EQUALIZER PRESET SELECT
PTY(OPTION)
18. REC/PAUSE
19. CASSETTE DOOR OPEN
20. TUNING UP/PLAY BACKWARD/FAST
FORWARD/AUTO TRACK
You can connect a set of headphones to your micro component
system so that you can listen to music or radio programmes without
disturbing other people in the room. The headphones must have a 3.5
mm jack or appropriate adapter.
Connect the headphones to the PHONES connector on the front panel
(bottom left corner).
Result: The loudspeakers are no longer used for sound output .
Prolonged use of headphones at a high volume may
damage your hearing.
Preparation
Plug the microphone with a 3.5mm phono jack into microphone
terminal.
The auxiliary input can be used to take advantage of the sound
quality of your micro component system when listening to other
sources.
Example: A television
A video disc player
A DAT or DCC cassette player
A Hi-Fi stereo video cassette recorder
To connect an external source, the source to be connected
must have an audio output. In addition, you must have an
RCA connection cable.
1Before connecting the external source, set the system to standby
mode and disconnect it and the external source from the mains.
2Connect the audio cable to the rear of the system.
Connect the... To the connector marked...
Red jack R(right)
White jack L(left)
For optimum sound quality, do not invert the right and left
channels.
3Press POWER switch ON.
4Press AUX.
Result:AUX is displayed.
5Switch the external source on.
6Adjust the volume and balance as required:
Volume
Equalizer
S. BASS
Example: You can watch a film and take advantage of stereo
sound as if you were at the cinema (provided that the
original sound track is in stereo).
Connecting Headphones
MIC Function (option)
Connecting to an External Source
RL
R
AUX
L
3
4

GB
19
Remote Control
1
2
3
4
5
6
7
8
9
10
11
12
13
14
15
16
17
18
19
20
21
22
23
24
25
26
27
28
29
30
31
1. POWER
2. EQUALIZER MODE SELECTION
3. TIMER ON/OFF
4. AI SLEEP
5. TIMER/CLOCK
6. +10
7. CD PASSAGE REPEAT
8. TIMER CHECK
9. DISC CHANGE
10. RECORD/PAUSE
11. CD SYNC RECORDING
12. FAST FORWARD/SKIP
13. CD STOP
14. VOLUME INCREASE
15. TRACK OR RADIO STATION
SEARCH/SKIP/FREQUENCY
OR TIMER DECREASE
16. VOLUME DECREASE
17. TUNING MODE
18. TRACK OR RADIO STATION SEARCH/
SKIP/FREQUENCY OR TIME INCREASE
19. CD PLAY/PAUSE
20. CASSETTE PLAYBACK/ DIRECTION SWITCH
21. CASSETTE STOP
22. COUNTER RESET
23. DISPLAY(DISC TIME CHECK)
24. REVERSE MODE
25. TUNER (FM/MW/LW)
26. SOUND CUT-OFF
27. PROG./SET
28. AUXILIARY
29. FREQUENCY BAND SELECTION(MONO/STEREO)
30. SUPER BASS
31. INFRA-RED SIGNAL TRANSMITTER
GB
18
Rear Panel View
1
5
6
2
3
4
1. MAINS LEAD CONNECTION SOCKET
2. CD DIGITAL OUT JACK(OPTION)
3. AUXILIARY SOURCE CONNECTORS
4. LOUDSPEAKERS CONNECTOR TERMINALS
5. MW/LW(OPTION)
6. FM CONNECTION

GB
20
ELECTRONICS
THIS APPLIANCE IS MANUFACTURED BY:
AH68-00131B
Technical Specifications
SAMSUNG strives to improve its products at all times. Both the design specifications and these user instructions are thus subject to
change without notice.
RADIO
Long and Medium Wave
FM
Signal/noise ratio 55 dB
Usable sensitivity 12 dB
Total harmonic distortion 1.0%
AM (MW)
Signal/noise ratio 35 dB
Usable sensitivity 55 dB
Total harmonic distortion 2%
LW (optional)
Signal/noise ratio 28 dB
Usable sensitivity 63 dB
Total harmonic distortion 2%
COMPACT DISC PLAYER
Sampling frequency 44.1 KHz
Frequency range 20 Hz - 20 KHz
Signal/noise ratio 85 dB (at 1 KHz) with filter
D/A conversion 16-bit
Wow and flutter Outside measurable limits
Error correction system Cross Interleave Reed Solomon Code (CIRC)
Laser type AIGaAS semiconductor
Laser wave length 780 nm
Disc sizes Diameter: 120 or 80 mm. Thickness: 1.2 mm
Scanning velocity 1.2 - 1.4m/sec.
Rotation speed 200 to 500 rpm
CASSETTE PLAYER
Playing speed Normal speed: 4.75 cm/sec.
Recording system AC Bias
GENERAL
Output power 2 x 20 Watts (musical)
Power supply AC mains: See the label
Net weight 5.5 Kg
Dimensions 170 (W) x 250 (H) x 293 (D) mm.
Table of contents
Other Samsung Stereo System manuals

Samsung
Samsung MX-J730 User manual

Samsung
Samsung DA F60 User manual

Samsung
Samsung MM-D430D User manual

Samsung
Samsung MM-B3 User manual

Samsung
Samsung MAX-N75 User manual

Samsung
Samsung MM-X5 User manual

Samsung
Samsung MM-G25 User manual

Samsung
Samsung MAX-X55 User manual

Samsung
Samsung MM-KT8 User manual

Samsung
Samsung DA-E750 User manual

Samsung
Samsung MAX-VJ550 User manual

Samsung
Samsung MAX-DA54 User manual

Samsung
Samsung MAX-DS9250 User manual

Samsung
Samsung DA-F680 User manual

Samsung
Samsung HW-J370 User manual

Samsung
Samsung MX-H830 User manual

Samsung
Samsung MX-F630DB User manual

Samsung
Samsung MM-B3 User manual

Samsung
Samsung MM-D330 User manual

Samsung
Samsung MM-KG36 User manual