Sandia Plastics Hipster Hip Series Guide

© 2012 Copy Rights Reserved Sandia Products, Inc.
Returned Material Authorization (RMA) Procedure
Original purchaser must contact the manufacturer to follow correct RMA/warranty
procedures. Must include a copy of RMA Sheet enclosed in the box with returned item.
No returns shall be authorized unless the proper RMA procedures are followed. It is the
responsibility of the distributor to repair the customer’s equipment as soon as possible. If
the distributor does not have the facilities to repair the equipment, it may be shipped or
taken to an authorized service center for repair.
Customer must contact the manufacturer prior to working on or changing out any
parts, etc. Manufacturer must issue an RMA Sheet containing approved labor time and
replacement parts. Do not send parts or equipment back to manufacturer without an RMA
Number and approval. No labor will be paid for, nor part costs paid for or reimbursed that
have not been previously approved by manufacture. All warranty work must be approved
and authorized to qualify and appropriate warranty procedures must be followed.
15571 Container Lane, Huntington Beach, CA 92649
Phone: 714-901-8400 | Toll Free: 800-983-5834 | Fax: 714-901-8404
Please ll out the following information:
Model No:
Serial No:
Distributor Name:
Distributor Phone No:
Date of Purchase:
Hipster Hip Vacuum Series
By Sandia Products
Safety, Operation and Maintenance
Manual with Parts List
Please read before use!
1.5 HP, 115 Volt
Important Information and Safety Instructions
Register your Machine at www.sandiaplastics.com/registration.aspx
Serial No:
Hipster Hip Vacuum Series
REGISTER
YOUR
MACHINE
ONLINE!
Reliable Power
Fastest Pick-Up
Maximum Airow
Innovative Design
Lightweight
HEPA Filtration

(2) 6-Quart Hip Vacuum
Dear Valued Customer,
Congratulations on the purchase of your 6-Quart Hipster Hip Vacuum! The world of
carpet cleaning is becoming more high-tech and competitive and we strive to provide
you with the most innovative products. Our hip vacuum is yet another example of
this, bringing a new dimension to carpet and upholstery cleaning with its cutting-edge
features, quality and value.
Please review this manual, paying careful attention to the Safety Instructions section.
Keep in mind that any unnecessary damage, neglect or abuse of this machine will void
your warranty. You can be condent that simple maintenance will ensure that your hip
vacuum provides quality performance for many years to come.
If warranty questions arise, please consult your manual or contact your distributor.
Should you have any questions regarding maintenance, replacing parts or ordering parts,
please call an authorized distributor.
Before you begin using your hip vacuum, please thoroughly review the Owner’s Manual.
Again, congratulations on the purchase of your 6-Quart Hipster Hip Vacuum!
6-Quart Hip Vacuum (11)
7.0 Machine Parts List
Item No. Item Description Qty.
10-0003 Lid Latch 4
10-0004 Lid Rivet 2
10-0007-6 Cloth Bag 1
10-0008-B Dome Filter with Bag Support 1
10-0013 Super Motor - Super Models Only 1
10-0346 D-P Motor - D-P Models Only 1
10-0199 Vacuum Motor Gasket 1
10-0014 Motor Screw 4
10-0015 1/4” Flat Washer 4
10-0017 DeectorScrew 1
10-0024 1-1/2” Black Vacuum Hose 4
10-0025 On/Off Switch 1
10-0026 17” Power Cord 1
10-0027 Pigtail Strain Relief 1
10-0027-A Strain Relief Nut 1
10-0028 50-Foot Electrical Cord 1
10-0050-B Vac Rivet 6
10-0055-L Hipster Waist Belt Screw 3
10-0165 Copper Ring 1
10-0195 Swivel Cuff 1
10-0197 6-Quart Paper Bags/10 Pack 0.1
10-0197-HEPA 6-Quart HEPA Paper Bag/10 Pack - HEPA Models Only 0.1
10-0219-6 HEPA Filter with Bag Support - HEPA Models Only 1
10-0202 Grommet for Hipster Lid 1
10-0216 Allen Head Screw for Backpack 4
10-0217 Hipster Waist Belt Washer 1
10-0223-A 2-Piece Head Attachment 1
10-0421 Hipster Waist Belt 1
90-1024 Back-Up Washer 6
HP-6-B-BLKGRAN Black Granite Hipster Base 1
HP-6-D-GRYGRAN Grey Granite Hipster Door 1
HP-6-L-GRYGRAN Grey Granite Hipster Lid 1
HP-6-T-GRYGRAN Grey Granite Hipster Tank 1
Item No.
10-0031
10-0032
10-0033
10-0037
10-0029
Item Description
5” Upholstery Tool
14” Scalloped Floor Tool
17” Crevice Tool
3” Round Dust Brush
2 PC 2 Bend Button Lock Wand
Qty.
1
1
1
1
1
5-Piece Standard Tool Kit
Table of Contents
New Equipment Warranty................................................................................
1.0 Safety Instructions...................................................................................
2.0 Grounding Instructions............................................................................
3.0 Care of your Hip Vacuum Cleaner...........................................................
4.0 Operation and Assembly Instructions......................................................
5.0 Troubleshooting Guide.............................................................................
6.0 Machine Cut-Out and Features.................................................................
7.0 Machine Parts List...................................................................................
3
4
5
6
7
9
10
11

(10) 6-Quart Hip Vacuum 6-Quart Hip Vacuum (3)
6.0 Machine Cut-Out and Features New Equipment Warranty
Lifetime on polyethylene plastic body, 5-years on motor and all electrical, 1-year on
tools.
Warranty Policy
All equipment is inspected and tested before shipping from the manufacturer. All
parts are warranted to be new and free from defects in workmanship and material,
under normal use to the original retail purchaser. This warranty limits manufacturer’s
liability for defects in workmanship or materials for replacement of defective parts only.
Manufacturer accepts no liability for incidental or consequential damages arisen from
the use of any equipment, defective or not. This warranty is in lieu of all expressed or
implied warranties and is extended only to the original retail purchaser. Manufacturer
sales and service representatives are not authorized to waive or alter the terms of this
warranty, or to increase the obligations of the manufacturer under the warranty. Parts
replaced or repaired under this warrant are warranted for the remainder of the original
warranty period.
Freight charges and travel charges to and from the service provider shall be covered for
ninety (90) days from the purchase date. After the ninety (90) day period, these freight
charges shall be paid by the equipment owner, subject to manufacturer discretion. Certain
circumstances may require additional consideration. No travel charges shall be covered
after ninety (90) days.
Manufacturer covers up to 1-year (365 days) of service labor at manufacturer’s calculated
hourly labor rate/repair time when performed by a manufacturer’s authorized-service
provider. Ultimately, labor reimbursement costs are at the discretion of the manufacturer.
After 1-year, original retail purchaser is responsible for all labor costs with no
manufacturer reimbursement.
Manufacturer charges a 15% restocking fee for any items that are being returned to stock.
Items must be new, unused and free of damage. Only good for up to 1-year (365 days).
After 1-year, manufacturer does not accept the return of any item(s) for a reimbursed
price.
Authorized warranty replacement parts need to come directly from the manufacturer.
Any use of any other parts will void warranty. Sandia Products, Inc. does not reimburse
for parts used by the customer that were not supplied directly for the machine under
warranty.
Hoses
Includes a 1-1/2” Standard or
1-1/2” Super Flex Hose.
Four-Way Belt
Four-Way Belt Tensioner
ensures maximum adjustability
and comfort.

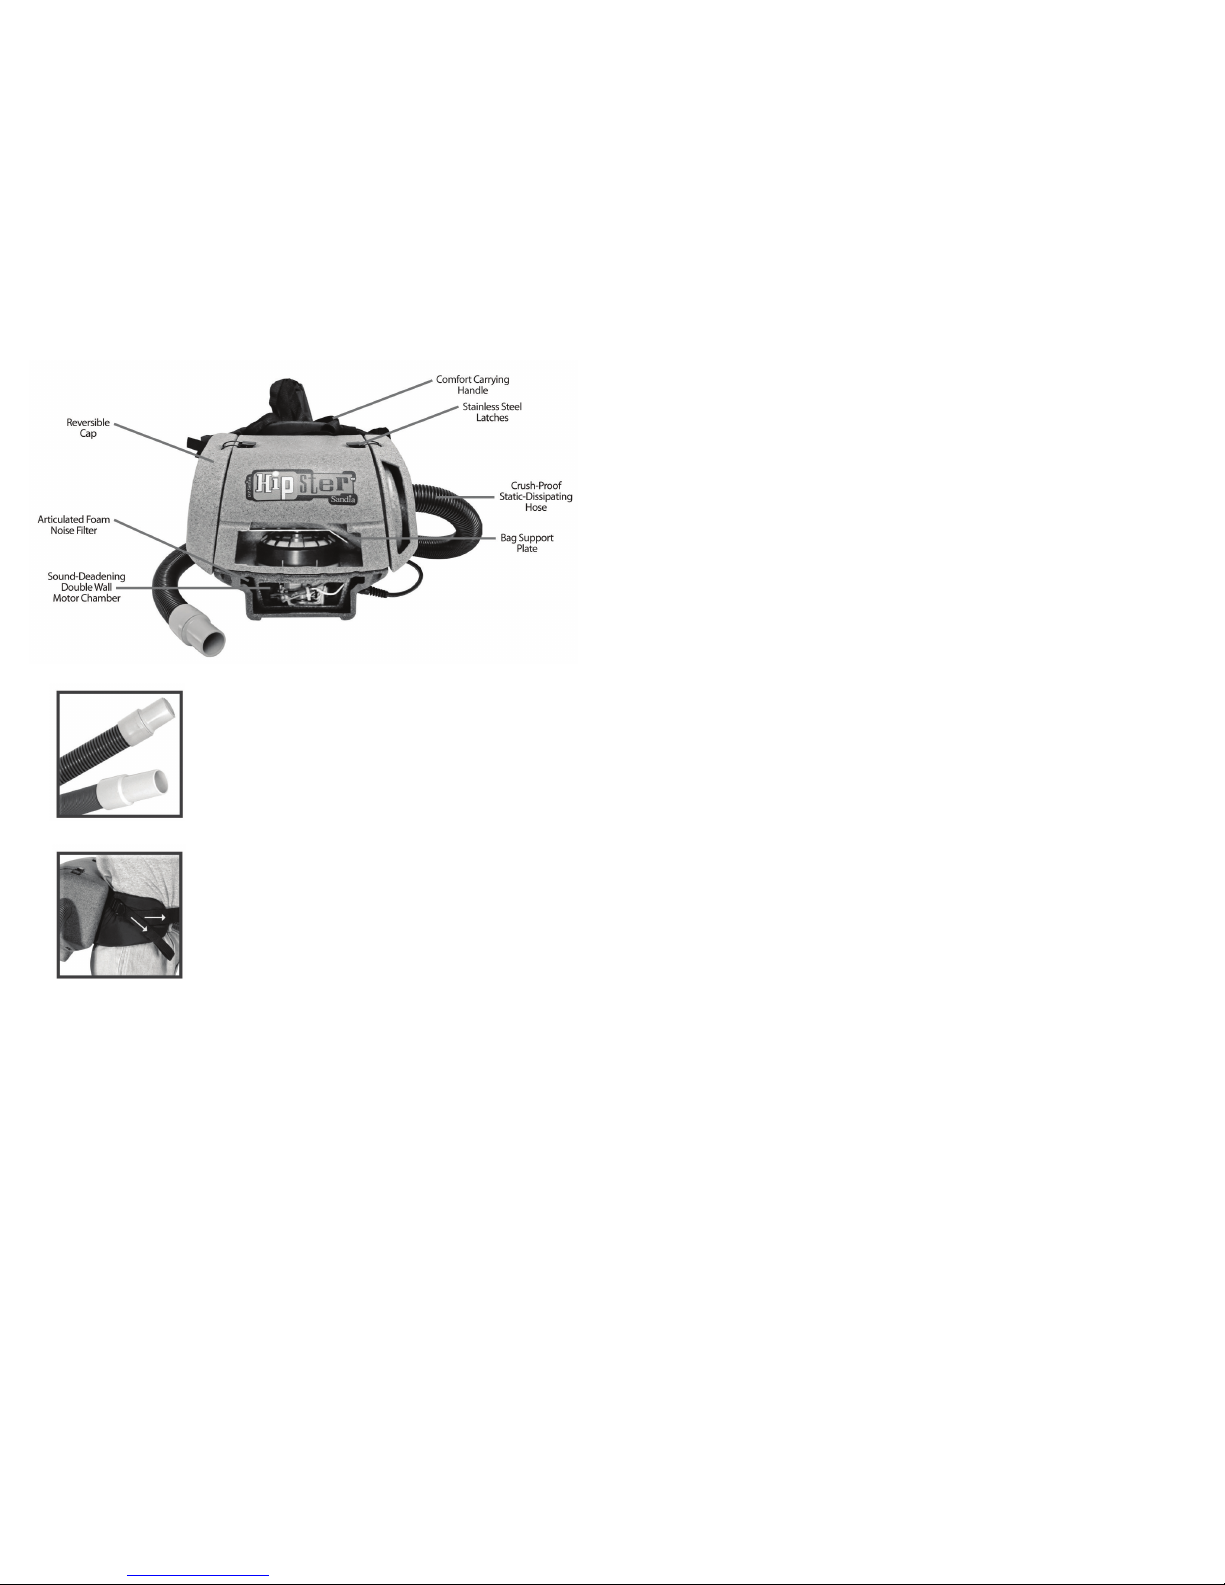
(4) 6-Quart Hip Vacuum 6-Quart Hip Vacuum (9)
1.0 Safety Instructions
READ THIS MANUAL BEFORE OPERATING. KNOW THE PROPER
OPERATION, CORRECT APPLICATIONS AND THE LIMITATIONS OF THIS
EQUIPMENT BEFORE USE.
This hip vacuum will afford you many years of trouble free operating satisfaction,
provided it is given the proper care. All parts have passed rigid quality control standards
prior to being assembled to produce the nished product. Prior to packaging, your hip
vacuum was again inspected for assurance of awless assembly.
This hip vacuum is protectively packed to prevent damage in shipment. We recommend
that upon delivery, unpack the unit and inspect it for any possible damage. Only a visual
inspection will reveal damage that may have occurred.
If damage is discovered, immediately notify the transportation company that delivered
your vacuum. As a shipper, we are unable to report any claim for damage. You must
originate any claim within ve (5) days.
This manual is for your protection and information. Please read carefully since failure to
follow precautions could result in discomfort or injury.
Reduce the Risk of Fire, Electric Shock or Injury
DO NOT USE ON WET SURFACES. DO NOT EXPOSE TO RAIN. STORE
INDOORS.
• DO NOT leave the vacuum when plugged in. Unplug from the outlet when not in use
and before servicing.
• DO NOT vacuum up any liquids. This vacuum is for dry use only! To avoid electric
shock, DO NOT expose to rain. Store indoors. DO NOT use on wet surfaces.
• This is not a toy. Close attention is necessary when used around or near children.
• Use only as described in this safety manual. Use only manufacturer’s recommended
attachments, accessories, replacement parts and lters.
• DO NOT use this vacuum with damaged cord or plug. If the vacuum is not working as
it should because it has been dropped, damaged, left outdoors or dropped into water,
contact an authorized service center or factory.
• DO NOT pull or carry by the cord, use cord as a handle, close a door on the cord, or
pull the cord around sharp edges or corners. Keep cord away from heated surfaces.
• DO NOT unplug the vacuum by pulling the cord. To unplug, grasp the plug, not the
cord.
• DO NOT handle the plug of the vacuum with wet hands.
• DO NOT put objects into openings. DO NOT use with any opening blocked. Keep
free of dust, lint, hair and anything that may reduce air ow.
• Keep hair, loose clothing, ngers, and all body parts away from opening and moving
parts.
• DO NOT pick up anything that is burning or smoking such as cigarettes, matches or
hot ashes.
5.0 Troubleshooting Guide
CAUTION: Always disconnect power cord before servicing vacuum.
WARNING: Repairs should only be performed by an authorized service center.
PROBLEM: Loss of vacuum
CAUSE SOLUTION
Cap is damaged Inspect and replace if needed
Faulty vacuum motor Call manufacturer or service center
Full paper bag lter Replace paper lter bag
Clogged hose or wand Remove obstruction
Loose or broken fan Call manufacturer or service center
PROBLEM: Motor is not running
CAUSE SOLUTION
Faulty on/off switch Call manufacturer or service center
Power cord defective Call manufacturer or service center
Loose connection or wiring Call manufacturer or service center
Motor defective Call manufacturer or service center
Blown fuse or tripped circuit breaker Replace fuse or reset circuit breaker
PROBLEM: Dust blowing from vacuum when running
CAUSE SOLUTION
Full paper bag Replace lter bag
Paper lter bag not installed properly Reinstall or replace paper lter bag properly
Cloth lter bag is dirty Clean cloth lter bag
Cloth or paper lter bag is torn Replace

(8) 6-Quart Hip Vacuum 6-Quart Hip Vacuum (5)
Reduce the Risk of Fire, Electric Shock or Injury Continued
• DO NOT use without the proper cloth ltration bag, paper lter bag and other lters in
place.
• DO NOT use the vacuum to pick up ammable or combustible liquids such as
gasoline or use in areas where they may be present.
• Use extra care when cleaning on stairs.
• DO NOT use where oxygen or anesthetics are used.
• Turn off all controls before unplugging. Make sure the on/off switch is in the OFF
position.
• The extension cord provided with this unit is 50-foot, 16/3-gauge wire and MUST be
used with this unit to ensure grounding protection.
• Replace damaged or worn parts immediately with genuine, original equipment parts to
maintain safety and to protect your limited warranty.
• DO NOT lubricate the motor.
• DO NOT tie extension cord to pigtail cord. This will damage the cord and will not be
covered under warranty.
• DO NOT overstretch the safety power cord between the vacuum and the electrical
outlet in the wall.
• DO NOT use without all lters correctly secured in place.
• When using the vacuum with a powerhead tool and connection, always turn off the
vacuum and nozzle tool before connecting or disconnecting either the hose or power
nozzle. Depending on your vacuum model, the hose may contain electrical wires.
DO NOT use when damaged, cut or punctured.
Always turn OFF the vacuum before connecting, disconnecting or working on the
vacuum. This vacuum must be connected to a properly grounded outlet only (see
grounding instructions).
2.0 Grounding Instructions
DANGER: IMPROPER GROUNDING METHOD CAN RESULT IN A RISK OF
ELECTRIC SHOCK.
Electrical equipment must be grounded. If it should malfunction or breakdown,
grounding provides a path of least resistance for electrical current to reduce the risk of
electric shock. The vacuum is equipped with a cord containing a grounding conductor
and grounding plug. The plug must be inserted into an appropriate outlet that is properly
installed and grounded in accordance with all local codes and ordinances.
If repair or replacement of the cord or plug is necessary, DO NOT connect the grounded
wire to a at bed terminal. The wire with insulation having an outer surface that is green
with or without yellow stripes is the grounding wire.
4.0 Operation and Assembly Instructions Continued
HEPA Models:
When the white disk inside your dome lter is discolored, replace it with a new HEPA
lter with bag support. Replacement time frame of the HEPA lter depends on the
frequency and application of use. For best results, replace every six (6) months.
IMPORTANT:
Following the instructions above is critical in prolonging the life of your vacuum. All
lters must be used at all times.
The vacuum comes assembled you will need to install the hose to the wand, and the wand
to the attachment.
Assembly of Attachments:
Wand Assembly (for 2-Piece Wand Only):
• Align the button lock of the upper wand section with the opening
for the button lock on the lower wand section.
• Push the sections together until the button lock slides into place
and the lock is secured.
To Connect Wand to Hose:
• Connect the tapered end of the wand to the swivel cuff at the end
of the hose.
To Connect Wand to Attachments:
• Turn wand nut counterclockwise approximately four (4)
complete turns.
• Insert the tool into wand and coupling.
• While holding the tool in place, turn nut clockwise until wand
nut is fully locked.

(6) 6-Quart Hip Vacuum 6-Quart Hip Vacuum (7)
Grounding Method
This electric equipment is for use on a normal 120 volt circuit. It has a grounded plug that
looks like a the plug illustrated in (Fig A). A temporary adapter that looks like the adapter
illustrated in (Fig B and C) may be used to connect this plug into a 2-pole receptacle as
shown in (Fig B) if a properly grounded outlet is not available.
The temporary adapter should be used only until a properly grounded outlet (Fig A) can
be installed by a qualied electrician. The green color rigid ear lug or the like extending
from the adapter must be connected to a permanent ground such as a properly grounded
outlet box cover. Whenever the adapter is used, it must be held in place by a metal screw.
WARNING:
Improper connection of the equipment grounding conductor can result in a risk of electric
shock. Check with a qualied electrician or service person if you are in doubt as to
whether the outlet is properly grounded. DO NOT modify the plug provided with the
equipment. If it will not t into the outlet, have a proper outlet installed by a qualied
electrician.
NOTE: In Canada, the use of a temporary adapter is not permitted by the Canadian
Electrical Code.
3.0 Care of your Hip Vacuum Cleaner
Treat your vacuum cleaner as you would any other high grade, precision made product.
Dropping, unreasonable bumping across thresholds and other misuses may result in a
damaged unit which will not be covered under warranty.
When not in use, the power cord should be wrapped around the molded-in cord wrap
for storage. After each use, wipe the vacuum body, accessories and power cord with a
slightly damp cloth.
4.0 Operation and Assembly Instructions
PREPARATION AND OPERATION. DRY ONLY!
This vacuum is equipped with an air-thru motor and is designed for dry pickup only.
Unpack the carton and remove the vacuum and attachments (if purchased with tools).
Getting Started:
1. Make sure your on/off switch is in the OFF position.
2. Remove lid (side with hose) and check to make sure you have both a cloth lter
bag and paper lter bag in place. Secure lid back onto the vacuum body, tightening
securely. Both bags must be used at all times. Any damage resulting from the lack of
using both bags will not be covered under warranty.
3. Do not tie or loop the pigtail cord with the extension cord.
4. Loosen the shoulder and waist belt straps and slide vacuum on.
5. Connect and tighten waist belt ensuring that majority of the weight is on your hips,
not your shoulders.
6. Adjust the shoulder straps for comfort.
7. Connect the sternum straps for added support and ideal t.
8. Plug your vacuum into a properly installed outlet.
9. Turn unit on and proceed with vacuuming.
10. Always store vacuum, safety power cord and tools in a cool dry place indoors.
NOTE: The weight of the vacuum should be distributed on your hips. Adjust any strap as
needed for your custom t.
To Change Paper Filter Bag:
1. Unscrew lid from body.
2. Remove full paper bag from the tank and dispose of
properly.
3. Take new paper lter bag and set inside cloth lter bag,
expanding it to the sides of the cloth lter bag.
4. Reinstall the lid, clamping the lid latches down tightly.
Cloth Filter Maintenance:
The cloth lter should be inspected and cleaned each time you empty the tank. DO NOT
wash the cloth lter. It could cause shrinkage of the cloth and damage to the gasket.
Simply shake off any dust or loose particles and brush the exposed surface with a soft
bristle brush.
CAUTION: Always exercise caution when handling the vacuum. Dropping the vacuum
could cause permanent damage to the internal components.
Table of contents
Other Sandia Plastics Vacuum Cleaner manuals

Sandia Plastics
Sandia Plastics 220 Raven User manual

Sandia Plastics
Sandia Plastics Hipster Hip Vacuum Series Guide

Sandia Plastics
Sandia Plastics Force 14 User manual

Sandia Plastics
Sandia Plastics Raven Series Guide

Sandia Plastics
Sandia Plastics Raven Series Guide

Sandia Plastics
Sandia Plastics Raven Series Guide

Sandia Plastics
Sandia Plastics Force 14 User manual

Sandia Plastics
Sandia Plastics 220 Raven User manual

Sandia Plastics
Sandia Plastics Spot-Xtract User manual

Sandia Plastics
Sandia Plastics Aviation Hipster User manual