Sansui DFTV270 User manual

O
WNER’S MANUA
L
27” MTS STERE
O
FLAT
CO
L
O
R TELEVISI
ON
W
ITH DI
G
ITAL T
U
NE
R
DFTV270
B
e
f
ore operatin
g
the unit, please read this manual thorou
g
hly
.
IF CONTACT WITH CUSTOMER SERVICE IS REQUIRE
D
PLEASE HAVE THE MODEL NUMBER READY PRIOR TO THE CAL
L
C
USTOMER SERVICE – 1-800-289-0980
O
RI
O
N WEBSITE
FOR INFORMATION ON OUR OTHER PRODUCTS, PLEASE VISIT OUR WEBSITE A
T
w
ww.
o
ri
o
n
s
al
es
in
c
.
com
T
V/
C
ABLE M
O
DE SELE
C
TI
O
N
When shipped from the factory, the TV/CABLE menu option is set to the “CABLE” (Cable Television) mode. If not usin
g
Cable TV, set this menu option to the “TV” position.
A
TTENTI
ON
I
f
y
ou purchase a universal remote control
f
rom
y
our local retailer, please contact the remote manu
f
acturer
f
or the required
pro
g
rammin
g
co
d
e
.
J30J0401B.indb1J30J0401B.indb1 07.4.261:13:57PM07.4.261:13:57PM

2
C
AUTION
:
Chan
g
es or modifications not expressly approved by the party responsible for compliance with the FCC
Rules coul
d
voi
d
t
h
e user's aut
h
ority to operate t
h
is equipment
.
W
ARNIN
G
:T
O
PREVENT FIRE
O
R
S
H
OC
K HAZARD
,
D
O
N
O
T EXP
OS
E THI
S
APPLIAN
C
E T
O
RAIN
O
R
M
O
I
S
TURE
.
IMP
O
RTANT SAFEGUARDS
The lightning
fl
ash with arrowhead symbol, within an equilateral
t
riangle is intended to alert the user to the presence o
f
uninsulated
dan
g
erous volta
g
e within the product’s enclosure that may be o
f
su
ffi
cient ma
g
nitude to constitute a risk o
f
electric shock
.
T
h
e exclamation point wit
h
in an equilateral trian
g
le is inten
d
e
d
to alert
t
he user to the presence o
f
important operating and maintenance
(servicing) instructions in the literature accompanying the appliance
.
CAUTI
ON
:
T
O
REDU
C
E THE RI
S
K
O
F
ELECTRI
C
SHOCK
,
DO NOT REMOVE
COVER
(
OR BACK
)
. NO USER-SERVICEABL
E
PARTS INSIDE. REFER SERVICING
T
O
Q
UALIFIED
S
ERVI
C
E PER
SO
NNEL
.
1. READ INSTRU
C
TI
O
NS
A
ll the sa
f
ety and operating instructions should be read be
f
ore the unit is operated
.
2. RETAIN INSTRUCTIONS
The sa
f
ety and operating instructions should be retained
f
or
f
uture re
f
erence
.
3. HEED WARNIN
GS
A
ll warnin
g
s on t
h
e unit an
d
in t
h
e operatin
g
instructions s
h
oul
d
b
e a
dh
ere
d
to
.
4. F
O
LL
O
W INSTRU
C
TI
O
NS
A
ll operating and use instructions should be
f
ollowed
.
5.
C
LEANIN
G
U
nplug this unit
f
rom the wall outlet be
f
ore cleaning. Do not use liquid cleaners or aerosol cleaners. Use a damp cloth
f
or
c
leaning t
h
e exterior ca
b
inet only
.
6. ATTACHMENTS
The manu
f
acturer o
f
this unit does not make any recommendations
f
or attachments, as they may cause hazards
.
7. WATER AND M
O
I
S
TURE
D
o not use t
h
is unit near water. For example, near a
b
at
h
tu
b
, was
hb
owl, kitc
h
en sink, laun
d
r
y
tu
b
, in a wet
b
asement, or near
a sw
i
mm
i
n
g
poo
l.
8. A
CC
E
SSO
RIE
S
D
o not place t
h
is unit on an unsta
b
le cart, stan
d
, tripo
d
,
b
racket, or ta
b
le
.
The unit may
f
all, causin
g
serious injury, and serious dama
g
e to the unit
.
8
A.
An appliance and cart combination should be moved with care. Quick stops, excessive force,
and uneven sur
f
aces ma
y
cause the appliance and cart combination to overturn
.
9. VENTILATIO
N
S
lots and openings in the cabinet back or bottom are provided for ventilation, to ensure reliable operation of the unit and
t
o protect it
f
rom overheatin
g
. These openin
g
s must not be blocked or covered. The openin
g
s should never be blocked by
placin
g
the unit on a bed, so
f
a, ru
g
, or other similar sur
f
ace. This unit should never be placed near or over a radiator or
h
eat source. T
h
is unit s
h
oul
d
not
b
e place
d
in a
b
uilt-in installation, suc
h
as a
b
ookcase, or rack unless proper ventilation is
provided or the manu
f
acturers instructions have been adhered to
.
10. P
O
WER S
O
UR
C
E
This unit should be operated only
f
rom the type o
f
power source indicated on the rating plate. I
f
you are not sure o
f
the type o
f
power suppl
y
to
y
our home, consult
y
our appliance dealer or local power compan
y
. For units intended to operate
f
rom batter
y
power, or other sources, re
f
er to the operating instructions
.
11. GR
O
UNDING
O
R P
O
LARIZATI
O
N
This unit is equipped with a polarized alternatin
g
current line plu
g
(a plu
g
havin
g
one blade wider than the other). This plu
g
w
ill
fi
t into the power outlet only one way. This is a sa
f
ety
f
eature. I
f
you are unable to insert the plug
f
ully into the outlet,
t
ry reversing the plug. I
f
the plug should still
f
ail to
fi
t, contact your electrician to replace your obsolete outlet. Do not de
f
eat
t
he sa
f
ety purpose o
f
the polarized plu
g
. I
f
your unit is equipped with a 3-wire
g
roundin
g
-type plu
g
, a plu
g
havin
g
a third
(grounding) pin, this plug will only fit into a grounding-type power outlet. This too, is a safety feature. If you are unable to insert
t
he plug into the outlet, contact your electrician to replace your obsolete outlet. Do not de
f
eat the sa
f
ety purpose o
f
the grounding
-
t
ype plu
g.
12. P
O
WER-
CO
RD PR
O
TE
C
TI
O
N
Power-supply cor
d
s s
h
oul
d
b
e route
d
so t
h
at t
h
ey are not likely to
b
e walke
d
on or pinc
h
e
d
b
y items place
d
upon or against
t
hem, payin
g
particular attention to cords at plu
g
s, convenience receptacles, and the point where they exit
f
rom the appliance
.
P
O
RTABLE CART WARNIN
G
(symbol provided by RETA
C)
S
312
6A
J30J0401B.indb1J30J0401B.indb1 07.4.261:14:07PM07.4.261:14:07PM

3
G
R
O
UND
C
LAM
P
ELE
C
TRI
C
S
EVICE
EQUIPMEN
T
A
NTENNA LEAD IN WIR
E
A
A
NTENNA DI
SC
HAR
G
E UNI
T
A
N
EC SECTION 810-20
)
(
N
G
R
O
UNDING C
O
NDUCT
O
R
S
G
N
E
C
S
E
C
TI
O
N 810-21
)
(N
R
S
ERVICE GR
O
UNDING ELECTR
O
DE
S
Y
S
TEMP
O
WE
R
(NEC ART 250, PART H)
(NEC A
N
EC-NATION
A
A
L ELECTRICAL COD
E
N
D CLAMP
S
GROU
N
S
2898A
EXAMPLE OF ANTENNA GROUNDING AS PER NATIONAL ELECTRICAL COD
E
1
3
. LI
G
HTNIN
G
To protect your unit during a lightning storm, or when it is le
f
t unattended and unused
f
or long periods o
f
time, unplug it
f
rom
th
e wall outlet an
d
d
isconnect t
h
e antenna or ca
b
le system. T
h
is will prevent
d
ama
g
e to t
h
e unit
d
ue to li
gh
tnin
g
an
d
power
li
ne sur
g
es
.
14. P
O
WER LINE
S
An outside antenna system should not be located in the vicinity o
f
overhead power lines, other electric li
g
ht or power circuits,
o
r where it can
f
all into such power lines or circuits. When installin
g
an outside antenna system, extreme care should be taken
t
o keep
f
rom touching such power lines or circuits as contact with them might be
f
atal
.
15. OVERLOADING
D
o not overload wall outlet
s
and exten
s
ion cord
s
a
s
thi
s
can re
s
ult in a ri
s
k o
f
fi
re or electric
s
hock
.
16.
O
BJE
C
T AND LI
Q
UID ENTR
Y
D
o not pus
h
o
b
jects t
h
rou
gh
any openin
g
s in t
h
is unit as t
h
ey may touc
h
d
an
g
erous volta
g
e points or s
h
ort out parts t
h
at
c
ould result in
fi
re or electric shock. Never spill or spray any type o
f
liquid into the unit
.
17.
O
UTD
OO
R ANTENNA GR
O
UNDING
I
f
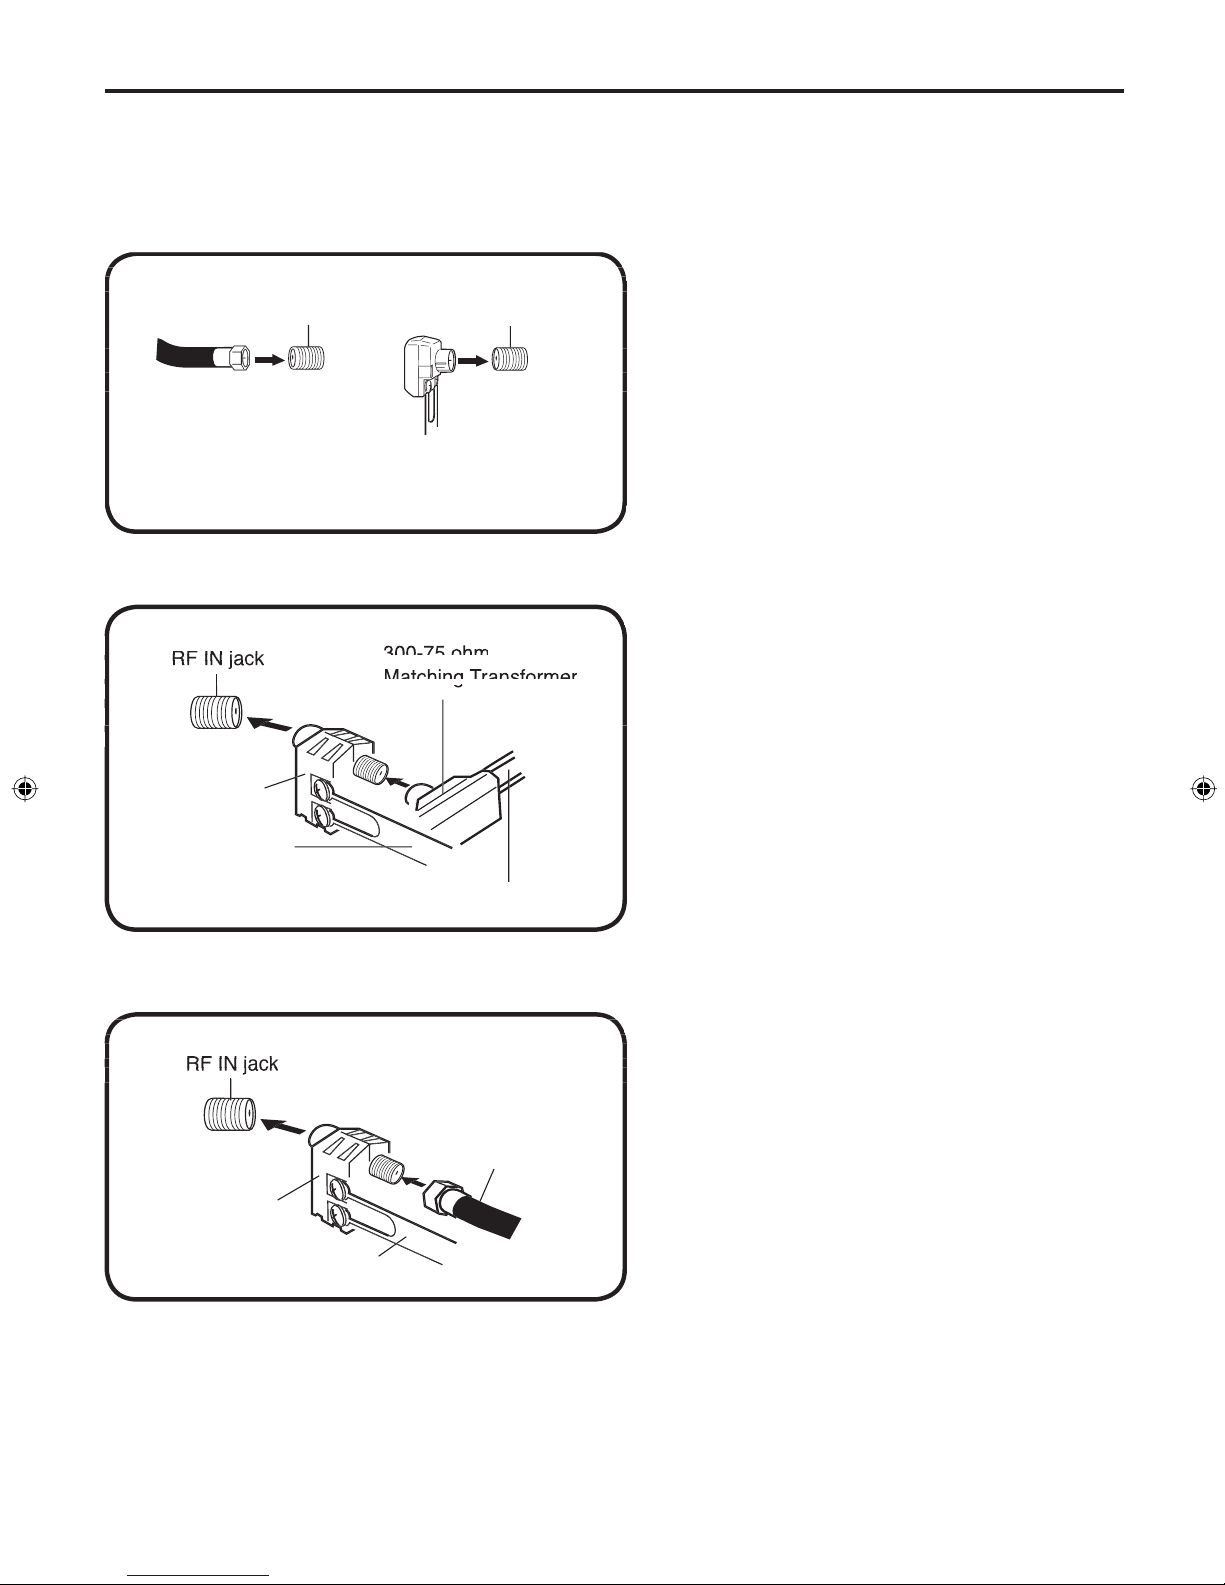
an outside antenna or cable system is connected to the unit, be sure the antenna or cable system is
g
rounded to provide
some protection against voltage surges and built-up static charges. Section 810 of the National Electrical Code, ANSI/NFPA
7
0, provides in
f
ormation with respect to proper grounding o
f
the mast and supporting structure, grounding o
f
the lead-in wire
t
o an antenna dischar
g
e unit, size o
f
g
roundin
g
conductors, location o
f
antenna dischar
g
e unit, connection to
g
roundin
g
electrodes, and requirements
f
or the grounding electrode
.
18. SERVI
C
ING
D
o not attempt to service this unit yoursel
f
as opening or removing covers may expose you to dangerous voltage or other
hazards. Re
f
er all servicin
g
to quali
fi
ed service personnel
.
19. DAMAGE REQUIRING SERVICE
U
nplug this unit
f
rom the wall outlet and re
f
er servicing to quali
fi
ed service personnel under the
f
ollowing conditions:
a. W
h
en t
h
e power-supply cor
d
or plu
g
is
d
ama
g
e
d.
b. I
f
liquid has been spilled, or objects have
f
allen into the unit
.
c. I
f
the unit has been exposed to rain or water
.
d. I
f
the unit does not operate normally by
f
ollowin
g
the operatin
g
instructions. Adjust only those controls that are
c
overed by the operatin
g
instructions, as an improper adjustment o
f
other controls may result in dama
g
e and will o
f
ten
r
equire extensive work b
y
a quali
fi
ed technician to restore the unit to its normal operation
.
e. I
f
the unit has been dropped or the cabinet has been dama
g
ed
.
f
. When the unit exhibits a distinct change in per
f
ormance, this indicates a need
f
or service
.
20. REPLACEMENT PARTS
W
hen replacement parts are required, be sure the service technician uses replacement parts speci
fi
ed b
y
the manu
f
acturer or
th
ose t
h
at
h
ave t
h
e same c
h
aracteristics as t
h
e original part.
Unauthorized substitutions ma
y
result in
fi
re, electric shock or other hazards
.
21. SAFETY
C
HE
C
K
U
pon completion o
f
any service or repairs to this unit, ask the service technician to per
f
orm sa
f
ety checks to determine that
th
e unit is in proper operating con
d
ition.
22.
HEAT
The product should be situated away from heat sources such as radiators, heat registers, stoves, or other products (including
amplifiers) that produce heat
.
23. N
O
TE T
O
C
ATV SYSTEM INSTALLE
R
This reminder is provided to call the CATV system installerʼs attention to Article 820-40 of the NEC that provides guidelines for
proper grounding and, in particular, speci
fi
es that the cable ground shall be connected to the grounding system o
f
the building,
as close to the point o
f
cable entr
y
as practical.
J30J0401B.indb2J30J0401B.indb2 07.4.261:14:12PM07.4.261:14:12PM

4
TV operation................................................................................17
Setting the V-Chip .......................................................................19
Setting the clock ..........................................................................23
Setting the picture size ................................................................24
Picture control adjustment/Resetting your picture adjustment ....25
Closed Caption............................................................................26
CC advanced...............................................................................28
Selecting Stereo/Second Audio Program (SAP) .........................29
Selecting the audio language (DIGITAL MODE) .........................30
Checking the Digital-signal strength (DIGITAL MODE) ..............31
Using the auto shut off feature ....................................................32
IMPORTANT SAFEGUARDS........................................................2
Contents ........................................................................................4
Features ........................................................................................5
Power source ................................................................................5
Parts and functions........................................................................6
Remote control ..............................................................................7
Antenna connections.....................................................................8
Cable TV connections ...................................................................9
Connections to other equipment .................................................10
Selecting the VIDEO INPUT source............................................12
Setting the language ...................................................................13
Memorizing channels ..................................................................14
P
REPARATIONS
Troubleshooting...........................................................................33
SPECIFICATIONS.......................................................................34
LIMITED WARRANTY.................................................................35
O
THERS
O
PERATI
ON
C
ontent
s
J30J0401B.indb3J30J0401B.indb3 07.4.261:14:17PM07.4.261:14:17PM

5
Features
H
i
g
h Quality Picture Horizontal Resolution more than 500 lines exceeds Super VHS (400 lines) or Laser
Disc (430 lines) in resolution.
•
I
nte
g
rated Di
g
ital Tuner
-
You can view di
g
ital broadcasts without usin
g
a Di
g
ital TV
S
et-Top Box
.
•
C
losed
C
a
p
tion Decoder With Full Text Mode
-
Displa
y
s text captions or
f
ull screen text on the screen
f
or
h
earin
g
impaire
d
viewers
.
•
P
icture Adjustments Usin
g
The Remote
C
ontrol
-
The On-Screen displa
y
allows precise remote control
ad
j
ustment of BRIGHTNESS, CONTRAST, COLOR, TINT and SHARPNESS
.
•
P
ro
g
rammable TV Sleep Timer
-
Operable from the remote control, the TV can be pro
g
rammed for up to
120 minutes to turn o
ff
automaticall
y.
•
V-
C
hi
p
-
The V-Chip function can read the ratin
g
of a TV pro
g
ram or movie content if the pro
g
ram is encoded
with this in
f
ormation. V-chip will allow
y
ou to set a restriction level
.
•
Stereo/SAP Rece
p
tion
-
This TV is desi
g
ned to receive stereo and second audio pro
g
ram (
S
AP) broadcasts
w
he
r
e
availa
b
l
e.
•
S-Video/Component Video
j
acks
-
A VCR, DVD pla
y
er, satellite receiver or other audio/video component
can
b
e connecte
d
to t
h
i
s
unit
.
•
V
i
deo
I
n
p
ut Jacks
-
This unit is equipped with 3 t
y
pes o
f
video input jacks. The component video in jacks
and
S
-video in jack enable you to watch the DVD player or the video devices with a hi
g
h quality picture
.
•
On-Screen 3 Lan
g
ua
g
e Display
-
You can select one of 3 lan
g
ua
g
es, En
g
lish,
S
panish or French for on-
screen pro
g
ramm
i
n
g.
TO
USE A
C
P
O
WER S
O
UR
C
E
U
se the AC polarized line cord provided for operation on AC. Insert
the AC cord plu
g
into a standard 120V 60Hz polarized AC outlet
.
N
OTES:
•
Never connect the AC line cord plug to other than the specifie
d
volta
g
e (120V 60Hz). Use the attached power cord only
.
•
If the polarized A
C
cord does not fit into a non-polarized A
C
outlet, do not attempt to
fi
le or cut the blade. It is the user’s
responsi
b
ilit
y
to
h
ave an electrician replace t
h
e o
b
solete outlet
.
•
I
f
you cause a static discharge when touching the unit and th
e
unit fails to function, simply unplu
g
the unit from the AC outlet
an
d
plug it
b
ack in. T
h
e unit s
h
oul
d
return to normal operation
.
Polarized AC Cord Plug
olarized AC Cord Plug
(O
ne blade is wider than the other
)
AC O l
AC
O
ut
l
e
t
W
i
d
er H
o
le
an
d
Bla
de
Po
wer s
o
ur
c
e
J30J0401B.indb4J30J0401B.indb4 07.4.261:14:19PM07.4.261:14:19PM

6
P
arts and
f
un
c
ti
o
n
s
Fr
o
n
t
R
ea
r
* To
d
isplay t
h
e menu screen
.
Press
b
ot
h
V
O
LUME
▲
/
▼
b
uttons
at t
h
e same time to
d
isplay t
h
e menu screen
.
C
HANNE
L
▲
/
▼
b
uttons an
d
VO
LUME
▲
/
▼
b
uttons can
b
e use
d
to select t
h
e
d
esire
d
setting
d
uring t
h
e menu
screen operat
i
ons
.
AC
power cor
d
S
-VIDE
O
IN jack
COMPONENT IN
j
acks
A
UDIO (L/R)/VIDEO IN
j
acks
(
VIDEO1
)
R
F IN (VHF/UHF)
j
ack
A
UDI
O
(L/R)
O
UT jacks
P
O
WER butto
n
R
emote
s
en
s
or
*CHANNE
L
▲
/
▼
b
utton
s
*VOLUME
▲
/
▼
b
utton
s
J30J0401B.indb5J30J0401B.indb5 07.4.261:14:21PM07.4.261:14:21PM

7
R
em
o
te
co
ntr
ol
w
ill display the analo
g
in
f
ormation on-screen. To remove
the display
f
rom the screen, press this button a
g
ain. This
button is also the
“
–” button used when selecting digital
ch
annel
s.
4. SLEEP Button
-
To set the TV to turn o
ff
a
f
ter a preset
a
mount of time, press the
S
LEEP button. The clock will
c
ount up 10 minutes eac
h
time t
h
e
b
utton is presse
d
in t
he
o
rder o
f
0, 10, 20, ...100, 110, 120. A
f
ter the sleep time is
pro
g
ramme
d
, t
h
e
d
isplay will
d
isappear t
h
en reappear
momentaril
y
ever
y
ten minutes to remin
d
y
ou t
h
e sleep timer
f
unction is operatin
g
. To con
fi
rm the sleep time settin
g
,
press the
S
LEEP button once and the remaining time will
b
e momentarily
d
isplaye
d
. To cancel sleep time, press t
h
e
S
LEEP button repeatedl
y
until the displa
y
turns to 0
.
5. VOL
(
VOLUME
)
+ / – Buttons
-
Press t
h
e +
b
utton to
increase
,
or the
“
–” button to decrease the volume level.
U
se to select t
h
e
d
esire
d
setting
d
uring t
h
e menu screen
o
perat
i
on
.
6
. MEN
U
/ENTER Butt
o
n
-
Press to
d
ispla
y
t
h
e menu screen.
Wh
ile in t
h
e on-screen menu, press to enter or select
o
pt
i
ons
.
7. EX
I
T Butt
o
n
-
Pre
ss
to exit t
h
e menu
s
creen
.
8. TV/AV Button
-
Press this button to displa
y
SOURCE
S
ELE
C
TI
O
N menu to select the video input source
.
9. QUICK VIEW Button
-
T
h
is
b
utton allows you to
g
o
b
ack t
o
the previous channel selected by pressing the QUICK VIEW
b
utton. Press t
h
is
b
utton a
g
ain to return to t
h
e c
h
annel you
w
ere watc
h
in
g
.
10. M
U
TE Butt
o
n
-
To turn o
ff
the sound, press this button once
.
The TV will be silenced and the s
y
mbol
“
MUTE” will appear
o
n the screen. The mutin
g
f
eature can be released by pressin
g
the MUTE button a
g
ain or one of the V
O
L + or – buttons
.
11.
C
H
(C
HANNEL
)
/
B
utt
o
ns
-
Press t
he
b
utt
o
n t
o
c
h
ange to a
h
ig
h
er num
b
ere
d
c
h
annel set into memory
.
Pre
ss
t
he
b
utton to c
h
ange to a lower num
b
ere
d
c
h
annel
s
et into memory. Use to select t
h
e
d
esire
d
settin
g
d
urin
g
t
h
e menu screen operation
.
12. PICTURE SIZE Button
-
Press to c
h
an
g
e t
h
e picture size
.
13. AUDI
O
Button
-
Press to select t
h
e
d
esire
d
au
d
io setting
.
14.
C
L
OS
ED
C
APTI
O
N Button
-
Press t
h
is
b
utton to
d
isplay
C
L
OS
ED
C
APTI
O
N menu.
15. ANALOG/DIGITAL Button -
Press to select analog/digital mode.
-
1. P
O
WER Button
-
Press to turn the power on/o
ff
to the
TV
.
2. Direct Channel Selection Buttons
(
0-9
)
-
All
o
w
d
ir
e
ct
a
ccess to an
y
c
h
annel
.
3. –
/
DI
S
PLAY Butt
o
n
-
W
h
en t
h
e TV is receiving an analog
s
i
g
nal pressin
g
t
h
is
b
utton will
d
isplay t
h
e current
in
f
ormation on-screen. When the TV is receivin
g
a
d
i
g
ital si
g
nal, pressin
g
t
h
is
b
utton once will
d
isplay t
h
e
digital in
f
ormation on-screen; pressing it a second time
B
e
f
ore using the remote control, batteries must
fi
rst be installed
.
HO
W T
O
INSTALL BATTERIES
1
.
O
pen the batter
y
compartment cover
.
2. Install two “AAA” batteries (not supplied)
.
3. Replace t
h
e
b
atter
y
compartment cover
.
U
se two “AAA” size batteries (not supplied). The batteries
may last approximately one year
d
epen
d
in
g
on
h
ow muc
h
the remote control is used. For best per
f
ormance, it is
recommen
d
e
d
t
h
at
b
atteries s
h
oul
d
b
e replace
d
on a yearly
b
asis, or w
h
en t
h
e remote operation
b
ecomes erratic. Do not
mix old and new batteries or di
ff
erent t
y
pes.
B
ATTERY PRE
C
AUTI
O
NS
These precautions should be
f
ollowed when using batteries
in t
h
i
s
d
evice
:
•
Use onl
y
the size and t
y
pe o
f
batteries speci
fi
ed.
•
Be sure to
f
ollow the correct polarity when installin
g
the
b
atteries as in
d
icate
d
in t
h
e
b
attery compartment.
R
everse
d
b
atteries may cause
d
ama
g
e to t
h
e
d
evice
.
•
Do not mix different types of batteries to
g
ether (e.
g
. Alkaline
a
nd
C
arbon-zinc
)
or old batteries with fresh ones.
•
I
f
the device is not to be used
f
or a long period o
f
time,
r
emove the batteries to prevent damage or injury
f
rom
possi
b
le
b
attery leakage
.
•
Do not try to rec
h
ar
g
e
b
atteries not inten
d
e
d
to
b
e rec
h
ar
g
e
d
;
t
he
y
can overheat and rupture (follow batter
y
manufacturer’s
directions
).
9
1
2
3
4
5
6
7
8
10
12
11
13
14
15
J30J0401B.indb6J30J0401B.indb6 07.4.261:14:24PM07.4.261:14:24PM

8
I
f you are usin
g
an indoor or outdoor antenna, follow the instructions below that correspond to your
a
ntenna system.
I
f you are usin
g
a cable TV service (
C
ABLE), see pa
g
e 9 for
C
able TV connections.
C
ombination VHF/UHF Antenna (Sin
g
le 75 ohm Cable or 300 ohm Twin-lead Wire)
Connect the 75 ohm Cable from the Combination
VHF/UHF Antenna to the RF IN Jack.
If your Combination VHF/UHF Antenna has a 300
ohm Twin-lead Wire, the use of the 300-75 ohm
Matching Transformer may be necessary.
C
ombination VHF/UHF Antenna (Se
p
arate VHF and UHF 300 ohm Twin-lead Wires)
Connect the UHF 300 ohm Twin-lead Wire to the
Combiner (not supplied). Connect the VHF 300
ohm Twin-lead Wire to the 300-75 ohm Matching
Transformer. Attach the Transformer to the
Combiner, then attach the Combiner to the RF IN
Jack.
Se
p
arate VHF/UHF Antennas (75 ohm VHF Cable and 300 ohm UHF Twin-lead Wires)
Connect the VHF 75 ohm cable and UHF 300
ohm Twin-lead Wire to the Combiner. Attach the
Combiner to the RF IN Jack.
U
HF
300
oh
m
RF IN jack
C
ombiner
300-75
ohm
Matching
Transformer
g
VHF 300 ohm
VHF 300 h
A
ntenna
co
nne
c
t
io
n
s
U
HF 300 o
h
m
VHF 75
oh
m
RF IN jack
Co
mbiner
75
oh
m
Coaxial Cabl
e
300 75
ohm
300
-
75 ohm
M
atchin
g
Trans
f
ormer
RF IN jack
R
F IN
j
ack
J30J0401B.indb7J30J0401B.indb7 07.4.261:14:29PM07.4.261:14:29PM

9
T
his unit has an extended tunin
g
ran
g
e and can tune most cable channels without usin
g
a
C
able
T
V Converter box. Some Cable TV companies offer “premium pay channels” in which the si
g
nal is
scrambled. Descramblin
g
these si
g
nals for normal viewin
g
requires the use of a descrambler device
which is
g
enerally provided by the
C
able TV company.
F
O
R SUBS
C
RIBERS T
O
BASI
C
C
ABLE TV SERVI
C
E
For basic cable service not requiring a Converter/Descrambler
box, connect the 75 ohm Coaxial Cable directly to the RF IN
Jack on the back of the unit.
F
O
R SUBS
C
RIBERS T
O
S
C
RAMBLED
C
ABLE TV SERVI
C
E
If
y
ou subscribe to a Cable TV service which requires the use of a Converter/Descrambler box, connect the
incomin
g
75 ohm Coaxial Cable to the Converter/Descrambler box. Usin
g
another 75 ohm Coaxial Cable, connect
the output
j
ack of the Converter/Descrambler box to the RF IN Jack on the unit. Follow the connections shown
below. Set the unit to the output channel of the Converter/Descrambler box (usuall
y
channel 3 or 4) and use the
Converter/De
s
crambler box to
s
elect channel
s.
FOR SUBSCRIBERS TO UNSCRAMBLED BASIC CABLE TV SERVICE WITH
SCRAMBLED PREMIUM CHANNELS
If
y
ou subscribe to a Cable TV service in which basic channels are unscrambled and premium channels require
the use of a Converter/Descrambler box, you may wish to use a si
g
nal Splitter and an A/B Switch box (available
f
rom the Cable TV compan
y
or an electronics suppl
y
store). Follow the connections shown below. With the
switch in the “B” position,
y
ou can directl
y
tune an
y
nonscrambled channels on
y
our unit. With the switch in the
“A” position, tune
y
our unit to the output of the Converter/Descrambler box (usuall
y
channel 3 or 4) and use the
Converter/De
s
crambler box to tune
s
crambled channel
s.
C
able TV connections
S
plitter
B
A
Incomin
g
75 o
h
m
CABLE TV Cabl
e
A
/B
S
witc
h
75
o
hm Cable
t
o
uni
t
C
onverter/
D
e
s
cram
b
ler
c
kRF IN
j
a
c
Incoming 75 o
h
m
CABLE TV Cable
CABLE
TV
Cable
75 h C bl t it
75
o
h
m
C
a
bl
e
t
o un
it
RF IN jack
C
onverter/
D
e
s
cram
b
ler
7
5
oh
m
C
oaxial
C
abl
e
RF IN jack
J30J0401B.indb8J30J0401B.indb8 07.4.261:14:32PM07.4.261:14:32PM

10
T
h
e exact arran
g
ement you use to interconnect various vi
d
eo an
d
au
d
io components to t
h
e TV is
d
epen
d
ent
o
n the model and features of each component. Check the Ownerʼs Manual provided with each component for
the location o
f
video and audio inputs and outputs
.
The connection dia
g
rams below are o
ff
ered as su
gg
estions. You may need to modi
f
y them to accommodate
your particular assortment o
f
components. The dia
g
rams are intended to show component video and audio
i
nterconnect
i
ons on
ly.
T
o connect the TV to a V
CR
T
o connect the TV to a VCR with an S-Video cor
d
If
y
ou connect a VCR with a S-VIDEO cord to the S-VIDEO IN jack on the rear of the TV,
y
ou must also connect
the audio cords to the AUDIO IN jacks on the rear of the TV. The S-VIDEO cord only carries the video si
g
nal.
T
h
e au
d
io signal is separate
.
NO
TE
:
When the
S
-video cord and the video cord are connected to each jack at the same time, the
S
-video cord takes
prece
d
ence over t
h
e vi
d
eo cor
d.
To connect the TV to a DVD player
/Satellite receiver
r
r
If
y
our DVD pla
y
er or
S
atellite receiver has a
S
-Video out jack, connect cords as shown
.
To
S
-VIDE
O
O
U
T
A
UDIO cord (not supplied
)
To AUDI
O
O
U
T
To AUDI
O
I
N
R
ear
o
f the T
V
S
-VIDEO cord (not supplied
)
To
S
-VIDE
O
I
N
Re
ar
o
f th
e
T
V
To
S
-VIDE
O
O
U
T
To AUDI
O
O
U
T
A
UDIO cord (not supplied
)
S
-VIDEO cord (not supplied
)
To
S
-VIDE
O
I
N
To AUDI
O
I
N
R
ear
of
the T
V
To AUDI
O
/VIDE
O
O
U
T
A
UDIO/VIDEO cord (not supplied
)
To AUDI
O
/VIDE
O
I
N
C
onnections to other equipmen
t
J30J0401B.indb1J30J0401B.indb1 07.4.261:14:36PM07.4.261:14:36PM

11
To C
O
MP
O
NENT
O
U
T
To AUDI
O
O
U
T
A
UDIO cord (not supplied
)
V
IDEO cord (not supplied
)
To COMPONENT I
N
R
ear
o
f the T
V
A
UDI
O
cord (not supplied
)
A
mpli
fi
er
To AUDI
O
I
N
To AUDI
O
O
U
T
Re
ar
o
f th
e
T
V
T
o connect the TV to a DVD player with component video
I
f
your DVD player has component video out jacks, connect your TV to a DVD player usin
g
a component video
c
ord. It can
g
reatly enhance picture quality and per
f
ormance
.
NO
TE
:
This unit is only capable o
f
displayin
g
480i interlaced si
g
nal when connected to a di
g
ital device with component video
outputs. If you input a 480p, 720p or 1080i si
g
nal to the component video inputs, “COMPONENT” and “NO SIGNA
L
O
R NOT SUPPORTED VIDEO RESOLUTION” will be displayed on a black screen. If this screen appears, set the
d
i
g
ital
d
evice’s component output to 480i
.
T
o connect the TV to a set-to
p
bo
x
I
f
you connect a set-top box, connect your TV to it by usin
g
a component video cord
.
NO
TE
:
This unit is only capable o
f
displayin
g
480i interlaced si
g
nal when connected to a di
g
ital device with component video
outputs. If you input a 480p, 720p or 1080i si
g
nal to the component video inputs, “COMPONENT” and “NO SIGNA
L
O
R NOT SUPPORTED VIDEO RESOLUTION” will be displayed on a black screen. If this screen appears, set the
d
i
g
ital
d
evice’s component output to 480i
.
T
o connect an audio s
y
ste
m
YPBPR
R
ear
of
the T
V
To COMPONENT OU
T
To AUDIO OU
T
A
UDI
O
cord (not supplied)
VIDEO cord (not supplied)
To COMPONENT I
N
C
onnections to other equipment (continued)
J30J0401B.indb2J30J0401B.indb2 07.4.261:14:41PM07.4.261:14:41PM

1
2
To
co
nne
c
t the TV t
o
a
c
am
co
rde
r
To pla
y
back
f
rom a camcorder, connect the camcorder to the TV as shown
.
To
co
nne
c
t the TV t
o
a
G
ame
The TV can also be used as a display device
f
or many video
g
ames. However, due to the wide variety o
f
si
g
nals
g
enerate
d
b
y t
h
ese
d
evices an
d
su
b
sequent
h
ook-up variations require
d
, t
h
ey
h
ave not all
b
een inclu
d
e
d
in
the su
gg
ested connection dia
g
rams. You’ll need to consult each component’s Owner’s Manual for additional
in
fo
rmati
o
n.
S
electin
g
the VIDE
O
input source
Pre
ss
TV/AV
to view a si
g
nal from another device connected to your TV, such as a VCR or DVD player. You can
select “ANALOG”, “DIGITAL”, “VIDEO1”, “VIDEO2” (on the front panel), or “COMPONENT” dependin
g
on which
input jacks
y
ou use
d
to connect
y
our
d
evices
.
Pressin
g
TV/AV
on the remote control displays the current signal source.
V
Pre
ss
/
o
r t
he
number buttons (0-4) to
s
elect
d
e
s
ire
d
mo
d
e
.
C
onnections to other equipment (continued)
TV
G
AME
To AUDI
O
/VIDE
O
O
U
T
A
UDI
O
/VIDE
O
cord (not supplied
)
Front of the TV
Front
of
the
TV
A
UDIO/VIDEO cord (not supplied
)
To AUDI
O
/VIDE
O
O
U
T
Front of the TV
Front
of
the
TV
J30J0401B.indb3J30J0401B.indb3 07.4.261:14:46PM07.4.261:14:46PM

1
3
Y
o
u
c
an
c
h
oos
e fr
o
m three differen
t
l
an
g
ua
g
es (En
g
lish, French and
Spanish) for the on-screen displa
y
s.
NO
TE
:
If
no buttons are pressed
f
or more
t
h
an 60 secon
d
s
,
t
h
e MENU screen
w
ill return to normal TV-operation
a
utomat
i
ca
lly.
1
2
3
4
5
Pre
ss
M
EN
U
/ENTE
R
. T
h
e menu screen will appear
.
Pre
ss
o
r
t
o
s
e
l
ect
(S
ETUP
)
m
enu.
Pre
ss
o
r to
s
e
l
ect
“LANGUAGE/IDI
O
MA/LANGUE”
.
T
h
en press to
d
ispla
y
t
h
e
LANGUAGE/IDI
O
MA/LANGUE menu
.
Pre
ss
o
r to
s
elect t
h
e
d
e
s
ire
d
l
an
g
ua
g
e: En
g
lish (ENGLISH), French
(FRANÇAIS) or Spanish (ESPA
Ñ
OL)
.
Pre
ss
M
EN
U
/ENTE
R
repeate
d
l
y
until t
h
e menu screen is cleare
d.
Otherwise, press
EXIT
to return to t
h
e normal screen imme
d
iatel
y.
Settin
g
the lan
g
ua
g
e
J30J0401B.indb1J30J0401B.indb1 07.4.261:14:49PM07.4.261:14:49PM

14
C
ABLE
C
HART
The chart below is t
y
pical o
f
man
y
cable s
y
stem channel allocations
.
T
V/CABLE selection
1
2
3
4
5
Press MEN
U
/ENTE
R
. T
h
e menu screen will appear
.
Press
o
r to se
l
ect
(S
ETUP
)
m
enu.
Press
o
r to select “TV/CABLE”
.
Press
o
r to select
“
TV” or
“CABLE”
.
Press MEN
U
/ENTE
R
repeate
d
l
y
until t
h
e menu screen is cleare
d.
Otherwise, press
E
X
I
Tto return to t
h
e normal screen imme
d
iatel
y.
N
O
TE:
It may take a
f
ew seconds
f
or a digital
ch
annel picture to appear on screen
a
f
ter bein
g
selected
.
M
emor
i
z
i
n
g
channel
s
TV
- VHF/UHF c
h
annel
s
C
ABLE - CABLE TV channel
s
This TV is equipped with a channel memor
y
f
eature which allows channels to skip up or down to the next channel set
into memory, skippin
g
over unwanted channels. Be
f
ore selectin
g
channels, they must be pro
g
rammed into the TV’s
memor
y
. To use this TV with an antenna, set the TV/CABLE menu option to the TV mode. When shipped from the
f
actor
y
, this menu option is in the CABLE mode
.
J30J0401B.indb2J30J0401B.indb2 07.4.261:14:52PM07.4.261:14:52PM

15
A
utomat
i
c memory tun
i
n
g
T
o add or delete channels (ANALOG MODE)
Pre
ss
MEN
U
/ENTE
R
. T
h
e menu screen will appear
.
Pre
ss
o
r to
s
e
l
ect
(S
ETUP
)
menu, t
h
en press
o
r to
s
e
l
ect
“AUT
O
CH MEM
O
RY”.
Pre
ss
. T
h
e TV will
b
e
g
in
memorizin
g
all t
h
e c
h
annels
avaia
b
le in
y
our area.
Af
ter
fi
nishin
g
Analo
g
Tunin
g
,
Di
g
ital Tunin
g
starts automatically
.
• It ma
y
take
f
rom 15 minutes to 30
m
i
nutes to comp
l
ete memor
i
z
i
n
g
d
i
g
ital ca
b
le c
h
annels. Depen
d
in
g
on t
h
e reception con
d
ition,
a BAR displa
y
ma
y
not advance
f
or several minutes
.
Pre
ss
A
NAL
O
G/DIGITAL to select t
h
e analo
g
mo
d
e
.
Pre
ss
MEN
U
/ENTER. T
h
e menu screen appears
.
Pre
ss
o
r to
s
e
l
ect
(
OPTION
)
menu, t
h
en press
o
r to
s
e
l
ect
“
ADD/DELETE
”
.
Pre
ss
. T
he
ADD/DELETE m
e
nu
appears
.
S
elect the desired channel to be
memorize
d
or
d
elete
d
usin
g
o
r
.
Pre
ss
o
r to
s
elect
“
ADD” or
“
DELETE”
.
Repeat steps 5-6
f
or other channels
y
ou want to add or delete
.
Pre
ss
MEN
U
/ENTE
R
repeate
d
l
y
until t
h
e menu screen is cleare
d
.
Otherwise, press
EXIT
to return to t
h
e normal screen imme
d
iatel
y.
1
2
3
1
2
3
4
5
6
7
8
NO
TE
S:
• Memorizing c
h
annels is
b
est
accomplis
h
e
d
d
urin
g
evenin
g
“
PRIMETIME” hours
,
as more stations
are
b
roa
d
casting
d
igital signals.
Memorizin
g
c
h
annels can only
b
e
accomplis
h
e
d
w
h
ile a station is
b
roa
d
castin
g
a
d
i
g
ital si
g
nal to set
t
h
at c
h
annel into memor
y
.
• I
f
you are unsure o
f
the di
g
ital channels
availa
b
le in
y
our area
y
ou ma
y
visit
w
ww.antennawe
b
.or
g
to receive a list
b
ase
d
on your a
dd
ress or zip co
d
e.
S
hould
y
ou require further assistance
y
ou ma
y
call our toll-
f
ree customer
s
erv
i
ce
li
ne at 1-
8
00-2
8
9-09
8
0.
• New
d
igital c
h
annels may
b
e a
dd
e
d
to
y
our area perio
d
icall
y
, it is
r
ecommended that you per
f
orm the
“AUT
O
C
H MEM
O
RY” procedure
r
e
g
u
l
ar
l
y
.
M
emorizing channels (continued)
L
ANGUAGE /
I
DI
O
M
A
/
LAN
GU
E
C
L
O
CK
S
ET
TV
/
CABLE
C
ABL
E
AUTO CH MEMORY
/ / / MENU
J30J0401B.indbSec1:3J30J0401B.indbSec1:3 07.4.261:14:57PM07.4.261:14:57PM

1
6
M
emorizin
g
channels (continued)
T
o add or delete channels (DIGITAL MODE)
T
o add a d
igi
tal channel you are watch
i
n
g
S
elect the di
g
ital channel you want to add. Press
o
r to se
l
ect
“ADDING CHANNEL” as in step 6 above, then press
.
Pre
ss
A
NAL
O
G/DIGITAL to select t
h
e
d
i
g
ital mo
d
e
.
Pre
ss
MEN
U
/ENTE
R
. T
h
e menu screen appears
.
Pre
ss
o
r to
s
e
l
ect (OPTION)
menu, t
h
en press
o
r to se
l
ect
“
D
IGITAL SETU
P
”
.
Press . The DIGITAL SETUP menu
appears
.
Press
o
rto se
l
ect “
A
DD/DELET
E
”
,
t
h
en press
.
The ADD/DELETE
(
DTV
)
menu appears
.
Pre
ss
o
r to
s
e
l
ect “
A
DD/DELET
E
”, t
h
en press
.
S
elect the desired channel to be memorized or deleted usin
g
o
r
.
Press
o
r to se
l
ect “
A
D
D
”
o
r “
D
ELET
E
”
.
Repeat steps 7-8
f
or other channels
y
ou want to add or delete
.
Press MEN
U
/ENTE
R
repeate
d
l
y
until t
h
e menu screen is cleare
d.
1
2
3
4
5
6
7
8
9
10
J30J0401B.indbSec1:4J30J0401B.indbSec1:4 07.4.261:15:03PM07.4.261:15:03PM

17
NO
TE
S:
• I
f
a channel with no broadcast is
s
electe
d
, t
h
e soun
d
will automaticall
y
be
mut
ed.
• I
f
a station being viewed stops
b
roa
d
castin
g
, t
h
e TV will automatically
s
hut it
s
el
f
o
ff
a
f
ter 15 minute
s.
• It ma
y
take a
f
ew seconds
f
or a
d
i
g
ital c
h
annel picture to appear on
s
creen a
f
ter bein
g
selected
.
1
2
3
4
To turn on t
h
e TV, press
PO
WE
R
.
Ad
just t
h
e volume level
b
y pressin
g
VO
L
+
o
r
–
. The volume level will be indicated
–
on t
h
e screen
b
y
g
reen
b
ars. As t
h
e
v
olume level increases
,
so
d
o t
h
e num
b
er
o
f
bars. I
f
the volume decreases
,
the
number o
f
g
reen bars also decreases
.
S
et the
T
V/
C
ABLE menu opt
i
on to
the appropriate position (see pa
g
e
14
).
Press the Direct Channel
S
election
b
utton
s
to
s
elect t
h
e c
h
annel
.
T
o select analo
g
channels
Whe
n t
he
T
V/
C
ABLE menu opt
i
on
i
s
in t
h
e TV position, all c
h
annels can
b
e
instantly selecte
d
b
y usin
g
two
b
uttons
.
(For example, to select channel 2, press
“0”, then “2”. I
f
y
ou press onl
y
“2”, channel selection will be dela
y
ed
for a few seconds.
)
For c
h
annels 10 an
d
a
b
ove, press t
h
e 2
d
igits in or
d
er
.
Whe
n t
he
T
V/
C
ABLE menu option is in the CABLE position,
channel
s
can be
s
elected a
s
f
ollow
s
:
1-9: Press
0
twice
,
t
h
en 1-9 as nee
d
e
d.
Example, to select c
h
annel 2, press
002
.
10-12: Pre
ss
0
,
t
h
en remainin
g
2
d
i
g
its
.
Example, to select c
h
annel 12, press
0
1
2
.
13-99: Press t
h
e 2
d
i
g
its in or
d
er
.
Example, to select c
h
annel 36, press 3
6
.
100-125: Press t
h
e 3
d
i
g
its in or
d
er
.
Example, to select c
h
annel 120, press 12
0
.
T
o select d
igi
tal channel
s
Press t
h
e c
h
annel num
b
er in or
d
er
.
W
hen “–” is contained in the channel number, press the
fi
rst di
g
its,
t
h
en press “–/DI
S
PLAY”, followed by the remainin
g
3 di
g
its
.
(Example, to select channel 015-001, press 01
5
– 00
1
.
)
• If a channel is selected with onl
y
audio content, “AUDIO ONLY”
will
b
e
d
isplaye
d
on t
h
e screen
.
• If a channel is selected with a weak di
g
ital si
g
nal, “DIGITAL
C
HANNEL
S
I
G
NAL
S
TREN
G
TH I
S
L
O
W” will be displa
y
ed on
t
h
e
s
creen
.
I
f
the di
g
ital channel has the same analo
g
channel, you may be
a
b
le to watc
h
t
h
e same c
h
annel wit
h
analo
g.
• I
f
a channel is selected to which
y
ou have not subscribed,
“DI
G
ITAL
C
HANNEL I
S
EN
C
RIPTED” will be displayed on the
s
creen
.
V
HF/UHF/CABLE CHANNELS
T
V o
p
erat
i
o
n
T
V- VHF/UHF c
h
annels
C
ABLE - CABLE TV channels
TV
C
ABLE
V
HF
2
-13
U
H
F
14-
69
V
H
F
2-1
3
S
TD/HRC/IRC
14-36
(
A
)
(
W
)
37-59
(
AA
)
(
WW
)
60-85 (AAA) (ZZZ)
86-94
(
86
)
(
94
)
95-99 (A-5) (A-1)
100-125
(
100
)
(
125
)
01 (5A
)
J30J0401B.indb1J30J0401B.indb1 07.4.261:15:07PM07.4.261:15:07PM

1
8
C
H
/
Pre
ss
an
d
relea
s
e
CH
o
r
.
T
h
e c
h
annel automaticall
y
stops at t
h
e next
c
h
annel set into memor
y
.
For proper operation, be
f
ore selectin
g
c
h
annels, t
h
e
y
s
h
oul
d
b
e set into t
h
e
memory.
S
ee pa
g
es 14 - 16
“Memorizin
g
channels”
.
DI
S
PLA
Y
Pre
ss
–
/DI
S
PLA
Y
to
d
ispla
y
t
h
e current
in
f
ormation on the
s
creen
.
Wh
en t
h
e TV receives a
d
i
g
ital si
g
nal,
the di
g
ital in
f
ormation will appear
.
• Broa
d
cast pro
g
ram nam
e
•
S
tation name
•
Remainin
g
tim
e
• Au
d
io lan
g
ua
g
e • Pro
g
ram nam
e
• V-CHIP RATING • V-Chip mark
Wh
en t
h
e TV receives an Analo
g
si
g
nal,
press
–
/DISPLAY
–
a
g
ain, t
h
e analo
g
in
f
ormation will appear
.
• Cl
o
ck
•
Channel number or VIDE
O
mode selecte
d
•
S
tereo or
S
AP (second audio pro
g
ram
)
au
d
io
s
tatu
s
• Picture
s
iz
e
Pre
ss
–
/DISPLAY
–
a
g
ain to clear t
h
e call
d
isplay
.
QUICK VIEW
T
h
is
b
utton allows you to
g
o
b
ack to t
h
e
last c
h
annel selecte
d
b
y pressin
g
QUICK
VIEW
. Pre
ss
Q
UICK VIEW a
g
a
i
n to return
to t
h
e last c
h
annel you were watc
h
in
g.
MUTE
Pre
ss
MU
TE to
s
witch o
ff
the
s
ound.
T
h
e unit’
s
s
oun
d
will
b
e
s
ilence
d
an
d
“MUTE” will appear on the screen.
T
he
soun
d
can
b
e switc
h
e
d
b
ack on
by
pressin
g
this button a
g
ain or one o
f
the
VO
L
+
o
r
–
buttons.
–
S
LEE
P
To set the unit to turn o
ff
a
f
ter a preset amount
o
f
time, press
S
LEE
P
o
n t
he
r
e
m
o
t
e
c
o
ntr
o
l.
The clock will count up 10 minutes
f
or each
press o
f
the
S
LEE
P
button
(
0, 10, 20, ...100,
1
10, 120
)
.
Af
ter the sleep time is pro
g
rammed, the
displa
y
will appear brie
fl
y
ever
y
ten minutes to
remin
d
you t
h
at t
h
e sleep timer is operatin
g
.
To con
fi
rm the sleep timer settin
g
, press
S
LEE
P
an
d
t
h
e remainin
g
time will be displa
y
ed
f
or a
f
ew seconds. To cancel the sleep timer,
press
S
LEE
P
repeate
d
l
y
until t
h
e
d
ispla
y
turns to 0
.
NO
TE
:
A
fter 10 seconds, DI
S
PLAY screen
w
ill return to normal TV-operation
automatically, w
h
en a Di
g
ital si
g
nal is
re
c
e
iv
ed.
A
fter 4 seconds
,
DI
S
PLAY screen
w
ill return to normal TV-operation
automatically, w
h
en an Analo
g
si
g
nal is
re
c
e
iv
ed.
TV operation (continued)
J30J0401B.indb2J30J0401B.indb2 07.4.262:12:14PM07.4.262:12:14PM

1
9
NO
TES
:
• I
f
you
f
or
g
et the password, contact
Customer
S
ervice at 1-800-289-0980
f
or assistance. Your ori
g
inal remote
control will
b
e require
d.
• To avoid
f
or
g
ettin
g
the password, write
it down and keep it in a sa
f
e place.
Settin
g
the V-Chip
A
n a
g
e limitation can be set to restrict children
f
rom viewin
g
or hearin
g
violent scenes or pictures that you may
c
hoose to exclude. The restriction applies to “TV RATING” and “MOVIE RATING” if this data is transmitted.
You may set this restriction separately. To use the V-Chip function, you must re
g
ister a password.
Pre
ss
MEN
U
/ENTE
R
. T
h
e menu screen appears.
Press
o
r to se
l
ect (OPTION)
menu, t
h
en press
o
r to se
l
ect
“V-CHIP”
.
Press . T
h
e passwor
d
enterin
g
s
c
reen appears
.
S
elect and enter a password (4 di
g
its)
u
sin
g
t
h
e
n
umber buttons (0-9)
,
t
h
en
press
M
EN
U
/ENTE
R
.
Enter t
h
e same passwor
d
a
g
ain to
con
fi
rm, then press
M
EN
U
/ENTE
R
.
T
h
e passwor
d
is now set an
d
t
h
e
V
-CHIP menu appears on the screen
.
T
o set a
p
asswor
d
1
2
3
4
5
“
” appears instead o
f
the number
.
J30J0401B.indb3J30J0401B.indb3 07.4.261:15:14PM07.4.261:15:14PM

20
1
2
3
4
5
6
7
8
9
10
11
Pre
ss
M
EN
U
/ENTE
R
. T
h
e menu screen appears
.
Pre
ss
o
r to
s
e
l
ect
(
OPTION
)
m
enu.
Pre
ss
o
r to
s
elect “V-CHIP”
.
Pre
ss
to
d
ispla
y
t
h
e passwor
d
enterin
g
mo
d
e. Use
n
umber butt
o
n
s
(0-9
)
to enter
y
our passwor
d
, t
h
en
press
M
EN
U
/ENTE
R
. The V-CHIP
menu appears
.
Pre
ss
o
r to select “V-CHIP SET”
,
t
h
en press
o
r. The V-CHIP
S
E
T
menu appears
.
Pre
ss
o
r to select “TV RATING”
,
t
h
en press
o
r to
d
ispla
y
t
h
e
d
esire
d
r
at
i
n
g.
OFF : TV RATIN
G
is not se
t
TV
-
Y
: All c
h
il
d
r
en
TV
-
Y7
: 7
y
ears ol
d
an
d
a
b
ov
e
T
V-
G
:
G
eneral audienc
e
T
V-P
G
: Parental gui
d
anc
e
TV
-1
4
: 14
y
ears ol
d
an
d
a
b
ov
e
T
V-M
A
: 17
y
ears ol
d
an
d
a
b
ov
e
•
When
y
ou select TV-Y7, TV-PG,
TV-14, or TV-MA, press
–
/DI
S
PLA
Y
to
f
urther de
fi
ne the ratin
g
.
Press
o
r to select t
h
e
d
esire
d
ratin
g
you want.
Press
o
r to select the settin
g
“ON” or “OFF”
.
Press
o
r to select “MOVIE
RATING”, then press
.
The RATING SET menu appears
.
Press
o
r to select t
h
e ratin
g
,
t
h
en press
o
r to select “ON” or
“OFF” for each ratin
g.
G
: All a
g
es
PG
: Parental
g
ui
d
anc
e
PG
-1
3
: Parental
g
ui
d
ance less t
h
an 13 years ol
d
R
: Un
d
er 17 years ol
d
parental
g
ui
d
ance su
gg
este
d
NC
-17 : 17
y
ears ol
d
an
d
a
b
ov
e
X
: A
d
ult onl
y
Pre
ss
M
EN
U
/ENTE
R
twice to return to the V-CHIP menu
,
then
press
o
r
t
o
s
elect “V-CHIP”
.
Pre
ss
o
r to select “ON”. Your settin
g
s are now set into
mem
o
r
y.
Pre
ss
M
EN
U
/ENTE
R
repeate
d
l
y
until t
h
e menu screen is cleare
d
.
Otherwise, press
E
X
I
Tto return to t
h
e normal screen imme
d
iatel
y.
T
o use the TV after the TV is
p
rotected.
Wh
en a program is receive
d
t
h
at is
b
locke
d
by
the V-Chip, enter the password, then press
MEN
U
/ENTE
R
. W
h
en t
h
e passwor
d
is entere
d
c
orrectl
y
t
h
e protection will
b
e temporaril
y
o
v
e
rri
dde
n.
I
f
the TV is turned o
ff
, or the channel is chan
g
ed
the V-Chi
p
restriction will be reactivated.
NOTES
:
•
The V-Chip function is activated onl
y
o
n
pro
g
rams an
d
input sources t
h
at inclu
d
e a
rat
i
n
g
s
ig
na
l.
•
The V-CHIP SET (DTV) will onl
y
be selectabl
e
w
h
en t
h
e unit receives a
d
i
g
ital
b
roa
d
cast usin
g
t
h
e new ratin
g
system. It may take several
minutes for the intial V-Chi
p
Set-u
p
to com
p
lete
.
At t
h
i
s
time some stations are still
d
evelopin
g
this si
g
nal, in those cases the V-
C
HIP
S
ET
(DTV) will not function
.
S
etting the V-
C
hip (continued)
T
o set the V-
C
H
IP
J30J0401B.indb4J30J0401B.indb4 07.4.261:15:18PM07.4.261:15:18PM
Table of contents
Other Sansui TV manuals

Sansui
Sansui DTV1900 User guide

Sansui
Sansui HDTV3000 User manual

Sansui
Sansui DTV2700 User manual

Sansui
Sansui DTV1300 User guide

Sansui
Sansui SATVOMV01 User manual

Sansui
Sansui DTV2798A User manual

Sansui
Sansui SLEDVD226 User manual

Sansui
Sansui SMX24Z1SMB User manual

Sansui
Sansui HDLCD3200C User manual

Sansui
Sansui HDLCD3200C User manual

Sansui
Sansui DTV3200 User manual

Sansui
Sansui DTV2760A User manual

Sansui
Sansui DTV2750A User manual

Sansui
Sansui HDLCD2600A User manual

Sansui
Sansui DTV1900 User manual

Sansui
Sansui DTV2760A User manual

Sansui
Sansui DTV3250 User manual

Sansui
Sansui HDTV2600 User manual

Sansui
Sansui DTV3200A User manual

Sansui
Sansui SV3215 LCD User manual