Sanyo CLT-136 User manual

-
FILE NO. [
Service manual
SPECIFICATIONS
Transmitting frequency
Base station:..
Handset: ........
Receiving frequency
Base station: ..
Handset: ........
Noise Reduction .................
Memory Dia l......................
Channel Access .................
Security Codes ...................
Continuous Stanby .............
Auto Standby/
Quick Recieved ..................
Paging .......................
Flash .......................
Hearing-Aid Compatible .....
Redial/Pause ......................
30.075-30.300 MHz
39.775-40.000 MHz
39.775-40.000MHZ
30.075-30.300 MHz
Super-Compander
10 ch,16 digits
10 ch(auto scan)
65,536(random)
3-weeks
yes
yes
yes
yes
yes
Specifications subject to change without notice.
Cordless Telephone CLT-I 36 (NZ) 1
CLT-I 36 (WH)(NZ)
Tone/Pulse . .. ..
Antenna ......................
Power SourceBase station:
Handset:
Dimensions Base station:
Handset:
Accessories ......................
PRODUCT CODE No.
163058 97( BLACK)
163058 94(WHITE)
yes
Rod(Base Station), Rubber(Handset)
AC adaptor
AC 230-240V, 50Hz,
DC9V
Ni-Cd battery: 3.6V, 270 mAH
116 (W) x53 (H) x239 (D) mm
58 (W) x205 (H) x51 (D) mm
AC adaptor
Telephone line cord
Instruction manual
Number Memory Index Sheet
Battery Pack
REFERENCE No. SM900057

OPERATION
c
.—
v
w
v
-1-

(((
BASE STATION LOCATION
For maximum operating range, extend the
base station antenna to full length, In most
cases, the best location for the base station
is at the highest point in the house. Avoid
places near electrical appliances and metal
structures such as arefrigerator and filing
cabinets that can reduce operating range
and performance.
Caution
The cordless telephone operates at a
frequency that may cause interference to
nearby TVs and VCRs; the base station
should not be placed near or on top of aTV
or VCR; and, if interference is experienced,
moving the cordless telephone farther away
~from the TV or VCR will often reduce or
1eliminate the interference.
INITIAL HANDSET BATTERY CHARGE
Install the handset battery (supplied) in the handset and charge the handset for a
full 12 hours before using the cordless phone for the first time.
IMPORTANT: Never attempt to use the cordless phone before this initial battery
charge.
INSTALLING THE HANDSET BAITERY
1.
2.
Slide the lid off the battery
compartment.
Plug the battery cord into the connector
inside the compartment.
Black
3. Place the battery in the compartment.
4/
4. Replace the lid.

CHARGING THE HANDSET
1. Place the handset on the base station for
12 hours.
The CHARGE indicator lights.
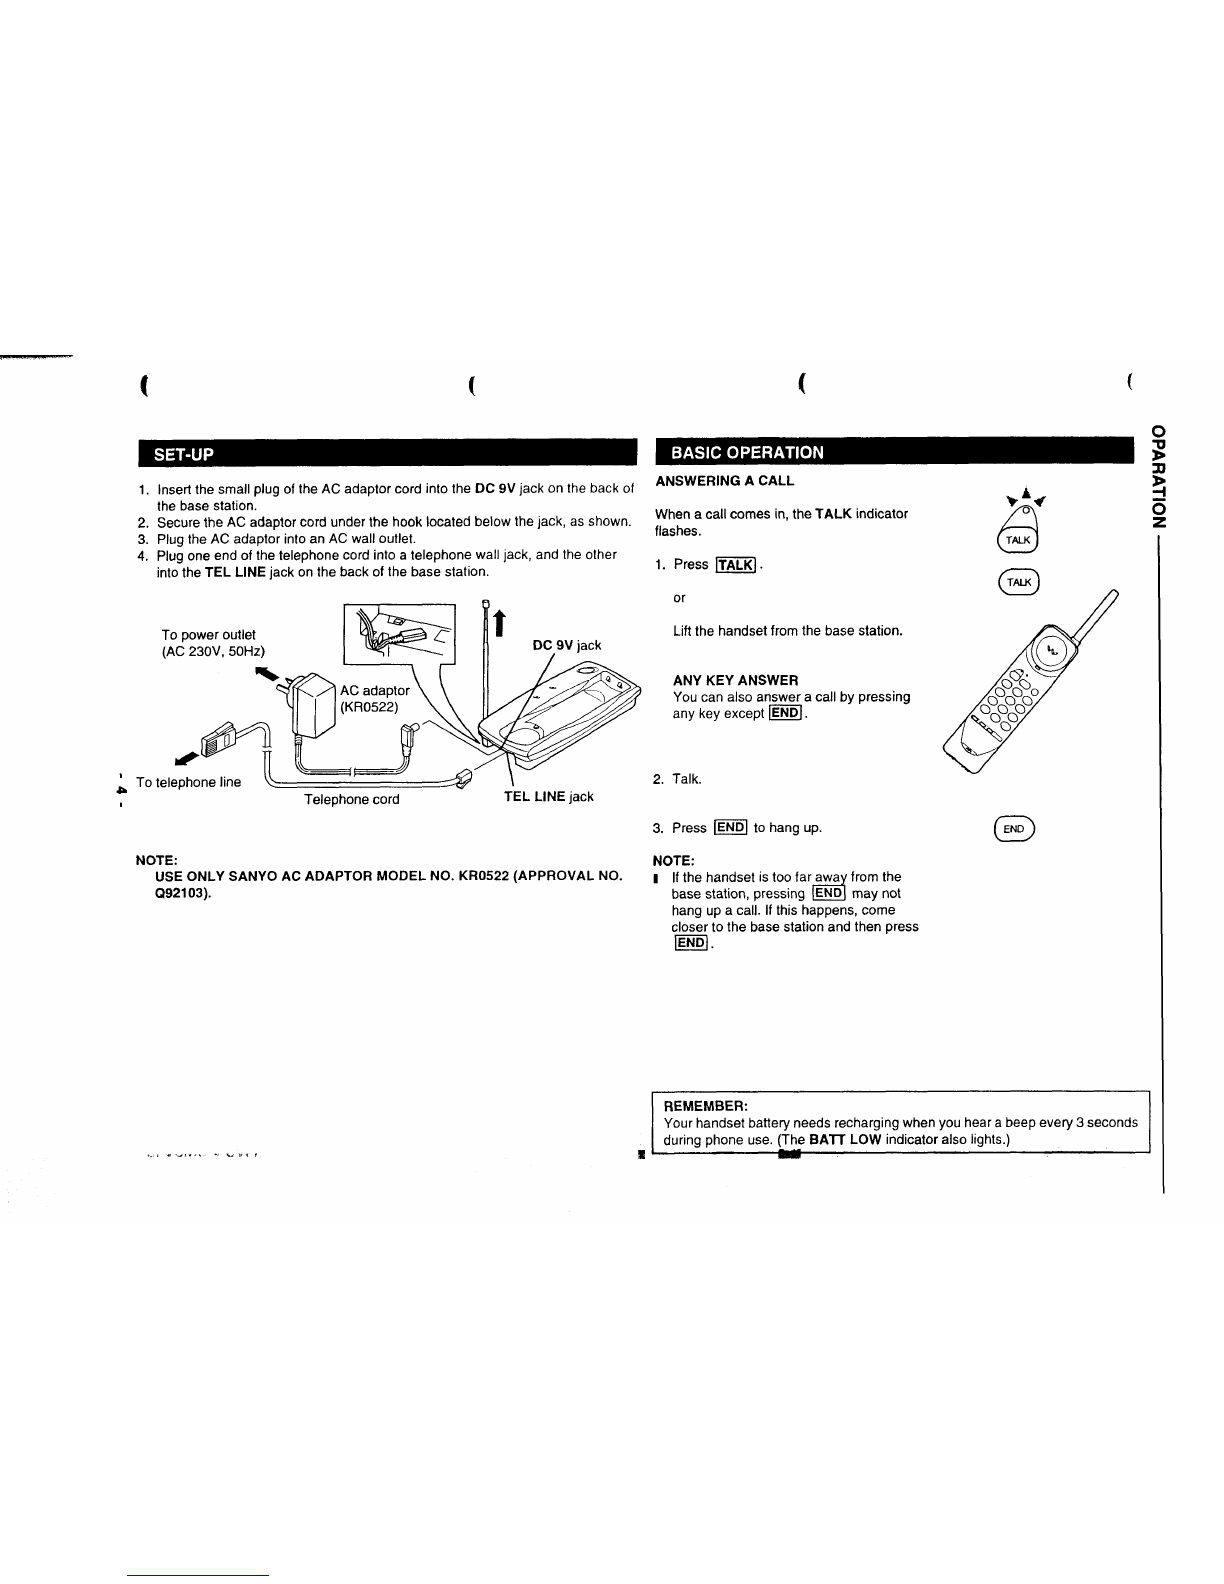
●The base station must be connected to
AC power. (See page 11.)
2. Remove the handset from the base
station. Your telephone is now ready to
use.
When the BAIT LOW indicator lights,
recharge the handset for acontinuous 12
hours.
REPLACEMENT BAITERY
CHARGE
indicator
‘If the battery fails, replacement batteries are available from an authorized Sanyo
~service center.
(Replacement battery: SANYO 3N-270AA)
STANDBY TIME
When the handset battery is fully charged, your Sanyo cordless phone offers up
to 3weeks of continuous standby time. (Listed standby time is measured
under asituation in which the handset is kept in standby mode only–no phone
calls are made or received). Under normal usage conditions, recharging is
required more often.
1O-CHANNEL ACCESS/AUTO SCAN
This cordless telephone automatically selects, CHANNEL
every time you answer or place acall using
the handset, aclear channel from 10 frequen- 0
ties available to transmit signals between the
base station and handset. If you notice
interference durina acall, simcrlv mess the
CAUTION
This telephone is for use “tone dialing
system” only.
If you have apulse dialing line, you can’t
use this cordless telephone.
SECURITY CODES
Your cordless telephone works only when the same security code is selected,
from 65,536 possibilities, for both the handset and base station. This prevents
unauthorized use of your telephone line by another cordless telephone.
IMPORTANT:
The following events may cause the security code to be erased and require
resetting:
IAfter the handset battery is replaced or exhausted
iAfter apower interruption
To reset your security code
1.
2.
Place the handset in the base station
cradle.
Within 8seconds, press ~1
on the base station.
The IN USE indicator blinks. Abeep
sounds and the security code is set.
The IN USE indicator then goes off.
If the security code cannot be set, the
fN USE indicator continues to blink for
about 4minutes. When this occurs,
repeat the steps above.
If you experience difficulty in resetting the
security code, first disconnect the AC
adaptor from the unit, reconnect it, and
then try again.
PAGE.$ No
Q
aclear channel.
4(4

((
1. Insert the small plug of the AC adaptor cord into the DC 9V jack on the back of
the base station.
2. Secure the AC adaptor cord under the hook located below the jack, as shown.
3. Plug the AC adaptor into an AC wall outlet.
4. Plug one end of the telephone cord into atelephone wall jack, and the other
into the TEL LINE jack on the back of the base station.
To power outlet k-/ c
(AC 230V, 50Hz)
-
~y
AC adaptor
(KR0522)
tel$l?!ll[ ~‘>
Telephone cord
NOTE:
tDC 9V jack
TEL LINE jack
USE ONLY SANYO AC ADAPTOR MODEL NO. KR0522 (APPROVAL NO.
Q921 03).
..!....!...-. ..,, {,
ANSWERING ACALL
When acall comes in, the TALK indicator
flashes.
1. Press ~].
or
Lift the handset from the base station.
ANY KEY ANSWER
You can also answer acall by pressing
any key except ~.
2. Talk.
3. Press ~to hang up.
NOTE:
I If the handset is too far awa from the
d
base station, pressing END may not
o
TALK
o
END
hang up a call. if this happens, come
closer to the base station and then press
m.
IREMEMBER:
Your handset battery needs recharging when you hear a beep every 3seconds
during phone use. (The BAll LOW indicator also lights.)
!E~
:
i,

,=... ..
PLACING ACALL
1. Press ml o
TALK
n
FLASH BUTTON
You can use the -l button to access special services offered by your phone
or /company (call waiting and PBX, for example).
Lift the handset from
then press ~[ the base station, 6*
TALK
If you subscribe to call waiting...
1
2.
The TALK indicator lights. .3.
2. Dial the number you want to call.
,DG-C3
ul If you make an error in dialing the
1number, press ~and then ~@@@l
to get anew dial tone. D@@
‘@:@:@”
----
3. Press ~to hang up. o
ENO
If acall comes in when you are already
on the phone, a beep sounds.
Press PI. FIAsH
The first call is placed on hold, and you
can talk to the second caller.
Press Im] again.
The second caller is dated on hold, and
NOTE: The [~] button may also be used to get anew dial tone without
pressing ~or replacing the handset in the base station cradle. However, if
your telephone line has special service features (like call waiting), the -]
button may not operate in this way.
PAG13FIND BUTTON
you can talk to the first caller. ~
You can page the handset user from the base station.
also be used as ahandset locator.
1. Press the ~~ button on the
base station.
2. The handset produces an audible tone.
REMEMBER:
Your handset battery needs recharging when you hear a beep every 3seconds
during phone use. (The BATT LOW indicator also lights.)
The paging feature can
PAGE,+ WD
Q
-“
l’s

REMOVAL AND INSTALLATION
w
●All wiring should be returned to the original position after work is completed.
●BASE UNIT SECTION
a. REMOVAL OF BOITOM CABINET AND ANTENNA b. REMOVAL OF ANTENNA AND MAIN P.C.BOARD
(1) Remove three of screw 1from the bottom cabinet. (1) After removing screw 1, it removes Lug 2 and an antenna 3.
(2) Remove the bottom cabinet 2. (2) After removing two of screw 4, it removes aSW P.C. board 5.
(3) After removing two of screw 6, it removes aMain P.C. board 7.
5
44
1Ii
1
-6-

REMOVAL AND INSTALLATION
.HANDSET SECTION
The procedure for disassembly the handset is as follows
a.
(1)
(2)
(3)
(4)
(5)
REMOVAL OF REAR CABINET
Remove the battery compartment lid 1.
Remove the battery pack and take off the plug 2.
Remove the two screws 3.
While pressing the shaded area to release the hooks on both
sides of the cabinet 4, gently open the bottom of the cabinet 5.
While gently opening the handle, lift and remove 6 and 7.
Push Push Press
b.
(1)
(2)
c.
(1)
(2)
(2)
REMOVAL OF MAIN P.C, BOARD
Remove the solder between the antenna lead pin and the
Main P.C. board.
Remove the six of screw 1to remove the Main P.C. board 2.
IUnsolders I
REMOVAL OF ANTENNA
Remove the DEC window 1.
Remove the three screws 2.
Remove the antenna in the direction of arrows 3 and 4.
-7-

ADJUSTMENT
w
●HANDSET SECTION
NOTE: Dutingalignment, disconnect theantenna wire from the set.
For test mode condition, please refer to Remarks.
PARTS LOCATION
@a~
VR351 @j
VR651 T351H ~
❑
CT151 T253 T152
@@j T251
fi~
~
TEST POINT LOCATION
@MIC IN(H)
-@M\C IN (E)
@sP ouT (a @vco (E) ANT. OPEN @ANT IN (H)
\ \ \
@dCC+B @SP OtiT (H) @TX VCO{H) @)R/ VCO(H) @AN; IN (E)
-8-

ADJUSTMENT u
1-1. Tx/Rx VCO (See FIG-1, TABLE-1)
Test Equipment
●RF Electrical Voltmeter ●Dummy Load
●DC Power Supply (DC 3.8V) ●Linear Detector
●Frequency Counter
Unit Condition
a) Disconnect Ni-Cd battery feed 3.8V from power supply terminal.
b) Connect power supply that keep on pressing”1” and ‘(9 keys.
c) Push “O followed by “*” key to set unit to channel 10.
d) Connect digital voltmeter to 14pin (IC151 )for Tx, and 3pin (IC151 )for Rx.
e) Align T253 (Tx) andT152 (Rx) to obtain 1.8V f0.1 VDC from read of digital voltmeter respectively.
Adjustment
Unit
IC101 @pin Tx VCO ‘x
ANT @(H) L3pin Rx VCO oDigital
Rx Voltmeter
ANT @(E) GND
,(FIG-1)
STEP CONDITION ADJUST ADJUSTED VALUE SPECIFICATION
1. Tx VCO Tx VCO side T253 1.8V 1.8V+O.l V
2. Rx VCO Rx VCO side T152 1.8V 1.8V*0.1 V
(TABLE-1)
1-2. TRANSMITTING (See FIG-2, TABLE-2, FIG-3, TABLE-3)
Test Equipment
●RF Electronic Voltmeter ●Frequency Counter
●Linear Detector ●AF Oscillator
●Dummy Load (50s2)
Unit Condition
a) From the mode mentioned in 1-1, change toTEST CH ’4’ by pushing”4 +‘x” key.
b) Disconnect frequency counter, and connect RF electronic voltmeter to ANT 1 and 2 pin. (50Q probe)
c) Tx POWER ●
d) Tx FREQUENCY “
e) Tx MODULATION ●
●
●
Align T251 to obtain 8.0A 3.0 dBm from read of RF voltmeter.
Connect frequency counter to ANT 1 and 2 pin.
Align CT151 to obtain 39.925 MHz f0.5kHz from the read of frequency counter.
Connect Linear detector to ANT 1 and 2 pin.
Connect AF oscillator (1kHz, 10mV) to TEL line.
Align VR651 to obtain 1.5kHz *O. 1kHz dev. from the read of linear detector.
*
And confirm at the AF oscillator to MIC input.
300 Hz, 10mV the read of linear detector 1.4kHz &0.3kHz dev.
3kHz, 10mV the read of linear detector 2.35kHz *0.5kHz dev
f) Tx DATA MODULATION.After Tx modulation alignment, Push “TALK key. (Tx DATA is sent)
+0.8kHz dev,
cCheck the read of linear detector is 4.OkHz _, .okHz
-9-

ADJUSTMENT
U*
Adjustment (T-1)
Unit
ANT@(H) -
?
‘CARR 50Q RF Electronic
FREQ dummy Voltmeter
ANT @(E) TIFrequency
Counter
(FIG-2)
STEP CONDITION ADJUST ADJUSTEDVALUE SPECIFICATION
1. Tx LEVEL CARR side 8.0 dBm 8.OdBm A3dB
2. Tx FREQUENCY FREQ side CT151 39.925 MHz 39.925MHz &0.5kHz
Adjustment (T-2)
Output Impedance
600Q
AF
Oscillator
L
(TABLE-2)
Unit
MIC@ ANT @(H) Linear
Detector
MIC@ ANT @(E)
(FIG-3)
STEP CONDITION ADJUST ADJUSTED VALUE SPECIFICATION
3. MIC Mod. OSC OUTPUT 1kHz VR651 1.5kHz dev. 1.5 f0.1 kHz dev. (at 7th)
1OmV 300Hz ----- ----- 1.4 t0.3kHz dev.
3kHz ----- ----- 2.35 +0.5kHz dev
w
4. DATA Mod. ----- ----- 4.OkHz dev. 4’0 %K@v”
(at 7kHz)
(TABLE-3)
-1o-

&
1-3. RECEIVING (See FIG-4, TABLE-4)
Test Equipment
●FM SSG (50Q :OPEN TYPE) ●Distortion Meter
●AF Voltmeter (AFVM) ●Dummy Load (150(2)
●DC Power Supply (DC 3.8V)
Unit Condition
a)
b)
c)
d)
e)
f)
From the mode mentioned in 1-2, change to change toTEST CH ’8’ by pushing”8 +“#’ key.
Disconnect Linear detector to ANT 1 and 2 pin and connect FM SSG (1kHz mod. 2.OkHz dev., 30.200MHz, 46dBp) to ANT 1 and
2pin.
Connect AF and distortion meter in parallel and terminate a150Q dummy load across the speaker terminal.
Rx IF ●Align T351 to obtain maximum deflection and minimum distortion from the read of AF voltmeter and distortion
meter respectively.
Rx RF ●Reduce output level of FM SSG from 46dBp to 5dBp.
●Align T151 to obtain minimum distortion at the distortion meter (less than 10°/0)
AF LEVEL ●Change output level of FM SSG from 5dBp to 46dBp.
●Align VR351 to obtain 50mV A5mV from read of AF voltmeter, and confirm at the FM SSG input of
300Hz: the output of AFVM 60mV k3dB
3kHz: the output of AFVM 10mV +3dB
Adjustment
SSG
IFM SSG
Mod.: 1kHz
Dev.: 2.OkHz
Unit
ANT@(H) SP OUT@ (H) AF
Voltmeter
ANT@(E) SP OUT@ (H) -7v— —
Distortion
Meter
(FIG-4)
STEP CONDITION ADJUST ADJUSTED VALUE SPECIFICATION
1.IF SSG OUTPUT 46dBp T351 Maximum distortion -----
2. RF SSG OUTPUT 5dBp T151 Minimum distortion Less than 107.
SSG :46dBp (1kHz) VR351 50mV 50mV +5mV
3. AF LEVEL (300Hz) ----- -.-.- 60mV f3dB
(3kHz) ----- -.-.- 10mV A3dB
(TABLE-4)
-11-

●BASE UNIT SECTION
NOTE :During alignment, disconnect the antenna wire from the set.
For test mode condition, please refer to Remarks.
PARTS LOCATION
CT101
@
VR601
I@
TEST POINT LOCATION
kR302 @ @
❑
T301 @
T202
❑
wr301 ❑
=TIOI
CNIO1
CN90’
RF IN(E) RF IN(H)
I
+220p/lov
mRX VCO TX VCO AUTO SCAN
Q(Clll +side) (C213,+ side) (C,D)
-12-

ADJUSTMENT
Tx/Rx VCO (See FIG-1. TABLE-1) k
1-1.
Test Equipment
●AF Oscilattor .Linear Detector
●DC Power Supply (DC9.OV ...... CENTER MINUS) ●Dummy Load
●Frequency Counter ●RF Electrical Wltmeter
Unit Condition
a)
b)
c)
d)
e)
f)
Set unit to “TEST” mode. (as refer to Table 1)or by shorting “TEST” point (IC401 18 pin) to ground.
Connect the AC Adapter into the DC Jack.
Connect Frequency counter to CNI 01.
Select channel 10 by pushing “PAGE key.
Connect digital voltmeter to TtiRx VCO TEST POINT.
Align T201 (Tx) and TI 02 (Rx) to obtain 2.5V *0.1 VDC from read of digital voltmeter respectively.
Adjustment Unit
11
Iclol @pi. T. Vco TX (C215 +SIDE)
Frequency CN101 (H) b3pin Rx VCO oDigital
Counter Voltmeter
—CN101 (E) Rx
GND (C101 +SIDE)
(FIG-1)
STEP CONDITION ADJUST ADJUSTED VALUE SPECIFICATION
1. Tx VCO Tx VCO side T202 2.5V 2.5V *0.1 V
2. Rx VCO Rx VCO side T102 2.5V 2.5V kO.l V
(TABLE-1)
Remarks: (“TEST” mode)
Connect IC401 18pin and ground.
Connect IC401 23pin and ground. (refer to page 46.)
IL
-13-

ADJUSTMENT
&1-2. TRANSMITTING (See FIG-2, TABLE-2, FIG-3, TABLE-3)
Test Equipment
●RF Electronic Voltmeter ●Frequency Counter
●Linear Detector ●AF Oscillator
●AC Adaptor (DC 9.OV ....... CENTER MINUS) ●Dummy Load (50Q)
Unit Condition
a)
b)
c)
d)
e)
f)
*9)
From the mode mentiond in 1-1, change TEST CH ’4’ by pushing “PAGE” key.
Disconnect frequency counter from CNI 01, and connect RF electronic voltmetertoCN101 (50Q probe).
Connect IC401 23pin and ground. TX: “ON”
Tx POWER ●Align T201 and T202 to obtain 6.0 *3.OdBm from read of RF voltmeter.
Tx FREQUENCY ●Connect frequency counter to CN 101.
●Align CT101 to obtain 30.2250 MHz *0.5 kHz from the read of frequency counter.
Tx MODULATION ●Connect Linear detector to CN1 01.
●Connect AF oscillator (1kHz, –20dBm) to TEL line.
●Align VR601 to obtain 2.OkHz fO.1kHz dev. from the read of linear detector. And confirm at the AF oscillator
to TEL line, 300 Hz, –20dBm: the read of linear detector 1.4kHz f0.3kHz dev.
3kHz, –20dBm: the read of linear detector 3.OkHz f0.5kHz dev.
Tx DATA MODULATION
●After Tx modulation alignment, disconnect DC 9V from the unit and open 18pin (IC401 )from ground. Then
connect DC 9V to the unit, and push “PAGE” key. (Tx DATA is sent.)
●Check the read of linear detector is 3.8kHz t1.OkHz dev.
●After transmitting alignment, shori 18pin (IC401 )to ground.
Adjustment (T-1)
Unit
CN101 (H)
FREQO RF Electronic
Voltmeter
CN101 (E) T50Q dummy
~
(FIG-2)
STEP CONDITION ADJUST ADJUSTED VALUE SPECIFICATION
1. Tx LEVEL CARR side 6.OdBm 6.OdBm +3dB
2. Tx FREQUENCY FREQ side CT101 30.2250 MHz 30.2250 MHz *0.5kHz
(TABLE-2)
-14-

ADJUSTMENT
k
Adjustment (T-2)
600!2 Unit 7
RF IN CNIOI (H)
AF Loop (TEL line) Linear
Oscillator Simulator Detector
CN101 (E)
IIC301 17pin GND
Power +w– J
w
supply 2201JF/10V
48V~C
I I
(FIG-3)
STEP CONDITION ADJUST ADJUSTED VALUE SPECIFICATION
I11
3. LINE Mod. OSC OUTPUT: 1kHz VR601 2.OkHz dev. 2.0 *0.1 kHz dev.
I77.5mV (at 7th)
I(-20dBm) I300Hz I----- I----- I1.4 A0.3kHzdev
1!
1’ 3kHz ...-. ----- 3.0 *0.5kHz dev.
III1 1
4. DATA Mod. ----- ----- ----- 3.8 k1.OkHz dev.
(at 7th)
(TABLE-3)
1-3. RECEVING (See FIG-4, TABLE-4)
Test Equipment
●FM SSG (50Q :OPEN TYPE) ●
●AF Voltmeter (AFVM) ●
●AC Adaptor (DC 9.OV ..... CENTER MINUS)
Unit Condition
a)
b)
c)
d)
e)
f)
9)
h)
Distortion Meter
Dummy Load (600Q)
Disconnect IC401 pin23 and ground.
Select TEST CH ’8’ by pushing “PAGE key.
Disconnect AF oscillator from TEL line, and connect AF voltmeter in &
Disconnect Linear detector from CN101 and connect FM SSG (1kHz, 2.5kHz dev., 39.9000MHz, 46dBp) to CN1 01.
EWE ●
EbLBE ●
●
N= IEVEL ●
●
Align T301 to obtain maximum deflection and minimum distortion from the read of AC voltmeter and distortion
meter respectively.
Change output level of FM SSG from 46dBp to 12dBp.
Align T101 to obtain minimum distortion at the distortion meter. (less than 107.)
Change output level of FM SSG from 12dBp to 46dBp.
Align VR302 to obtain –6dBm *ldB from read of AC voltmeter, and confirm at the FM SSG
input of 300Hz :the output of AFVM –10.OdBm A3dB
3kHz :the output of AFVM –10.OdBm *3dB
Auto scan level Adjustment
●Change output level of FM SSG to 15dBp.
●Align VR301 the output of AFVM changes from low level to high level.
●Change output level of FM SSG to 10dBp, and confirm the output of AFVM is low level.
●Change output level of FM SSG to 20dBp, and confirm the output of AFVM is high level.
G&
-15-

ADJUSTMENT
._&
Adjustment
SSG Unit 600Q
CN101 (H) RF IN Loop
FM SSG (TEL Line) AF
Simulator Voltmeter
CN101 (E) T
ItI1I I I
Mod.: lkHz
Dev.: 1.5kHz dev.
(FIG-4)
k
3. AF LEVEL
4. AUTO SCAN LEVEL
+Power
supply I
48VDC
1
CONDITION ADJUST ADJUSTED VALUE SPECIFICATION
SSG OUTPUT: 46dBp T301 Maximum Level -.-.-
SSG OUTPUT: 12dBp T101 Minimum Distortion Less Than 107.
1I1
SSG :46dBp (1 kHz) VR302 6.OdBm 6.OdBm *ldB
(300 Hz) I----- I....- 1-10.OdBm f 3dB
(3kHz) I----- I-.--- I -10.OdBm +3dB
SSG OUTPUT: 15dBp VR301 CHANGE OF OUTPUT-
LEVEL
SSG OUTPUT: 10dBp OUTPUT LEVEL “LOW (CD: ON)
SSG OUTPUT: 20dBp OUTPUT LEVEL “HIGH” (CD:OFF)
(TABLE-4)
FREQUENCY LIST of CORDLESS TELEPHONE for AUSTRALIA
CH BASE CH REMOTE
No. No.
TX FREQ RX FREQ RX LOCALFREQ. TX FREQ RX FREQ RX LOCALFREQ,
30.075 MHz 39.775 MHz 29.080 MHz
:30.100 MHz 39.800 MHz 39.775 MHz 30.075 MHz 19.380MHz
229.105 MHz A39.800 MHz
30.125 MHz 39.825 MHz 30.100 MHz 19.405 MHz
29.130 MHz 2
730.150 MHz 39.825 MHz
39.850 MHz 30.125 MHz 19.430 MHz
29.155 MHz 7
330.175 MHz 39.850 MHz 30,150 MHz 19.455 MHz
39.875 MHz 29.180 MHz 3
30.200 MHz 39.875 MHz 30.175 MHz 19.480 MHz
39.900 MHz
:29.205 MHz 8
30.225 MHz 39.925 MHz 39.900 MHz 30.200 MHz 19.505 MHz
29.230 MHz 4
930.250 MHz 39,925 MHz 30.225 MHz 19.530 MHz
39.950 MHz 29.255 MHz 9
30.275 MHz 39.950 MHz 30.250 MHz 19.555 MHz
39.975 MHz 29.280 MHz
1: 30.300 MHz 39.975 MHz 30.275 MHz
29.305 MHz 1% 19.580 MHz
40.000 MHz 40.000 MHz 30.300 MHz 19.605 MHz
1st IF=1O.695MHZ, 2nd lF=455kHz Ist IF=1O.695MHZ, 2nd lF=455kHz
#:When the Test MODE, follow the “TESTCH”
-16-

TEST MODE k
●HANDSET SECTION
1. Overview
By operating the Keyboard SW on the remote, pass/fail of the completion process can be determined through the status of the LEDs,
operation of the key monitor sounds, etc.
2.
(1)
(2)
(3)
(4)
(5)
3.
Types of test modes
VCO ADJUSTMENT mode
TX ADJUSTMENT mode s(High frequency adjustment mode/battery low detection)
RX ADJUSTMENT mode
Key monitor inspection mode
Ignore security code mode
Startup
The Test Mode is started up by pressing two keys simultaneously at power on.
(The keys pressed simultaneously differ for the startup of each mode in order to distinguish between them.)
When the Test Mode begins, a beep (completion signal) is sounded.
4. VCO ADJUSTMENT mode/lX ADJUSTMENT mode/RX ADJUSTMENT mode
(1)Initial status (Simultaneously pressed)
TX POWER TX MUTE RX POWER RX MUTE CH pressed
VCO ADJUSTMENT mode ON OFF ON OFF 10 1 and 6
TX ADJUSTMENT mode ON OFF ON ON 7 1 and 9
RX ADJUSTMENT mode ON ON ON OFF 2 1 and #
At aforementioned three any mode the following item, from (2) to (7), can operate it.
(2)
(3)
(4)
(5)
PLL Channel setting/TX POWER off
1. Setting by the numeric keys
●The numeric key is pressed, then the TX power is turned off TX and RX channels will be set.
●The channels range from 1ch to 10ch and are designated by one numeric key.
10ch is designed by the Okey.
If the xkey is pressed, the TX power will be turned on.
TX power can be turned off by pressing either numeric key.
TX data send
By pressing the TALK key, TX DATA SEND mode is set. At the same time, TX and RX MUTE ON is set (sound modulation mute is
set).
TX DATA send can be terminated by pressing either numeric key.
RX MUTE ON/OFF
RX MUTE ON/OFF switch over each time the CHANNEL key is pressed.
(Effective only under TX POWER ON)
Battery low detection
The BATT LOW LED and buzzer is set on for 500msec.
The BATT LOW LED is operated by integrated circuit (ICO02).
-17-

TEST MODE
*(6) Key Monitor detection
Each time akey is pressed, the TALK LED lights and the key monitor sounds.
(7) Return to the usual mode
By turning off the power and retry, usual mode will start.
5. Key monitor inspection mode
Keys are pressed disorderly, and if after all keys except INT key have been pressed at least once the TALK LED and BATT LED lights
for approximately one second and a buzzer sounds.
(1) Initial status (Simultaneously pressed)
TX POWER TX MUTE RX POWER RX MUTE CH pressed
Key monitor mode OFF ON ON ON 10 1 and O
(2) Battery low detection
The BATT LOW LED and buzzer is set on for 500msec.
&The BATT LOW LED is operated by Integrated circuit (ICO02).
(3) Charge detection
When CHARGE is detected, the TALK LED is lit.
(4) Return to the usual mode
By turning off the power and retry, the usual mode will start.
6. Ignore security code mode
Through the base receiving aspecific security code and channel (security: AC34H, channel: 10ch), this mode allows linking of the
remote and base without security registration by the remote. Other operations perform as usual.
(1) Startup
The REMOTE enters this mode by simultaneously pressing the 1 and 8 keys.
(2) Return to the usual mode
By turning off the power and retry, the usual mode will start.
<Frequency table>
A
channel No.
1(1)
2(3)
3(5)
4(7)
5(9)
6(2)
7(4)
8(6)
9(8)
10(10)
Base TX (MHz)
30.075
30.125
30.175
30.225
30.275
30.100
30.150
30.200
30.250
30.300
Remote TX (MHz)
39.775
39.825
39.875
39.925
39.975
39.800
39.850
39.900
39.950
40.000
NOTE: ( ) means New channel (AS/NZS 4281: 1995)
J
-18-

TEST MODE k
QBASE UNIT SECTION
1. Overview
By operating the connecting IC401 pin23 and groung, and PAGE SW on the base, pass/fail of the completion process can be
determined through the status of the LEDs, operation of the device, etc.
2. Switchover of the Usual Mode and the Test Mode
After Test mode, RAM DATA will be Initialized.
(1) Switchover by operation of Microcomputer ports
This way, the microcomputer ports, P42 (17pin) and P43 (18pin), are used, and the switchover (Test mode and Usual Mode) can
be performed anytime.
P42 (17pin) P43(18pin) MODE
(TP2) (TP1)
HIGH Usual Mode
HIGH LOW Test Mode (Remote Unit Call)
HIGH Test Mode (DTMF Output)
LOW LOW Test Mode (PULSE Output)
(2) Switchover by operation of Power ON
When power on, connect IC401 pin23 and ground ,and keep pressing the PAGE key.
Then disconnect IC401 pin23 and ground, and the PAGE key keep off.
Test mode will be Remote Unit Call Status.
In case of Test mode in this way, to switchover the usual mode is either one of the following ways.
1. detect charge
2. turn off the power, retry
3. Types of test modes
Test mode has the following 3states. Description of state is explained in below table.
State Name Description LED
1Remote Unit Call IN USE
2DTMF Output Output”1”, “5”, “9 and”# of DTMF repeatedly. CHARGE
3PLUSE Output Output “l”, “2 and “PAUSE” of PLUSE repeatedly. IN USE
CHARGE
4. PLL Channel setting
How to set up PLL Channel below.
Range of channel is 1to 10 ch for both TX and RX.
When setting the channel, IN USE LED put out 40msec.
(1) When power on, both Tx and Rx Channel are setting 10 ch.
(2) Press the PAGE key, both Tx and Rx Channel are setting 7ch.
Moreover, RX MUTE will be on.
(3) Next pressingthe PAGE key, both Tx and Rx Channel are setting 2ch.
(4) Next pressing the PAGE key, both Tx and Rx Channels are setting 1ch.
(5) Since pressing the PAGE key, both Tx and Rx Channels change as below.
1+3+5+7+9+10+8+6+4 +2 +1+3--- -19-
%_
f-
‘%
Other manuals for CLT-136
2
Other Sanyo Cordless Telephone manuals

Sanyo
Sanyo CLT-J30 User manual

Sanyo
Sanyo CLT-2422 User manual

Sanyo
Sanyo CLT-E30 User manual

Sanyo
Sanyo CLT-2418 User manual

Sanyo
Sanyo CAS-A900 User manual

Sanyo
Sanyo CLT-136 User manual

Sanyo
Sanyo CLT-2402 User manual

Sanyo
Sanyo CLT-9960 User manual

Sanyo
Sanyo CLT-538 User manual

Sanyo
Sanyo CLA-837X User manual

Sanyo
Sanyo CLT-9910 User manual

Sanyo
Sanyo CLT-2435 User manual

Sanyo
Sanyo CLT-U12 User manual

Sanyo
Sanyo CLT-138X User manual

Sanyo
Sanyo CLT-656 User manual

Sanyo
Sanyo CLT-9950 User manual

Sanyo
Sanyo CLT-138X User manual

Sanyo
Sanyo CLT-5200AUS User manual

Sanyo
Sanyo CLT-E22 User manual

Sanyo
Sanyo LNS-W10 - Wide-angle Zoom Lens User manual