Sanyo CLT2054 User manual

Model Nos.:
Nos. de Modelo:
Nos de modele:
Printed in U.S.A. SMC, August 2006
Impreso en U.S.A. SMC,Agosto 2006
Imprimé aux É.-U. SMC, août 2006
Part No. / No. de Parte /
Node pièce : 1AA6P1P5071B–
LLCCDDTTVV
Owner’s Manual
ENGLISH
Table of Contents . . . . . . . . . 3
Manual Del Propietario
ESPAÑOL
Contenido . . . . . . . . . . . . . . 22
Manuel d’instructions
FRANÇAIS
Table des matières . . . . . . . 43
“Read this manual before
assembling (or using) this
product.”
Need assistance?
Visit our Web site at
www.sanyoctv.com
or
Call toll free 1-800-877-5032
We Can Help!
Importado Por :
Comercializadora México
Americana, S. DE R.L. DE C.V.
Nextengo Nº 78
Col. Santa Cruz Acayucan
Del. Azcapotzalco, México D.F. C.P.
02770, RFC CMA 9109119L0
Telefono: 55-5328-3500
“As an ENERGY STAR®Partner, Sanyo
Manufacturing Corporation has determined
that this product meets the ENERGY STAR®
guidelines for energy efficiency.”
CLT1554
CLT2054
CLT1554
CLT2054
© 2006 Sanyo Manufacturing Corporation

Important Safety Instructions for LCD TV
1. Read these instructions.
2. Keep these instructions.
3. Heed all warnings.
4. Follow all instructions.
5. Do not use this apparatus near water.
6. Clean only with dry cloth.
7. Do not block any ventilation openings. Install in
accordance with the manufacturer’s instructions.
8. Do not install near any heat sources such as radiators,
heat registers, stoves, or other apparatus (including
amplifiers) that produce heat.
9. Do not defeat the safety purpose of the polarized or
grounding-type plug. A polarized plug has two blades
with one wider than the other. A grounding-type plug has
two blades and a third grounding prong. The wide blade
or the third prong are provided for your safety. If the pro-
vided plug does not fit fully into your outlet, consult an
electrician for replacement of the obsolete outlet.
10. Protect the power cord from being walked on or
pinched particularly at plugs, convenience receptacles,
and the point where they exit from the apparatus.
11. Only use attachments/accessories specified by the
manufacturer.
12. Use only with the cart, stand, tripod, bracket, or table
specified by the manufacturer, or sold with
the apparatus. When a cart is used, use
caution when moving the cart/apparatus
combination to avoid injury from tip-over.
13. Unplug this apparatus during lightning storms or when
unused for long periods of time.
14. Refer all servicing to qualified service personnel. Ser-
vicing is required when the apparatus has been
damaged in any way, such as power-supply cord or
plug is damaged, liquid has been spilled or objects
have fallen into the apparatus, the apparatus has been
exposed to rain or moisture, does not operate nor-
mally, or has been dropped.
15. If an outside antenna is connected to the television
equipment, be sure the antenna system is grounded so
as to provide some protection against voltage surges
and built up static charges. In the U.S. Selection 810-
21 of the National Electrical Code provides
information with respect to proper grounding of the
mast and supporting structure, grounding of the lead-
in wire to an antenna discharge unit, size of grounding
conductors, location of antenna discharge unit, con-
nection to grounding electrodes, and requirements for
the grounding electrodes.
16. An outside antenna system should not be located in the
vicinity of overhead power lines or other electrical
light or power circuits, or where it can fall into such
power lines or circuits. When installing an outside
antenna system, extreme care should be taken to keep
from touching such power lines or circuits as contact
with them might be fatal.
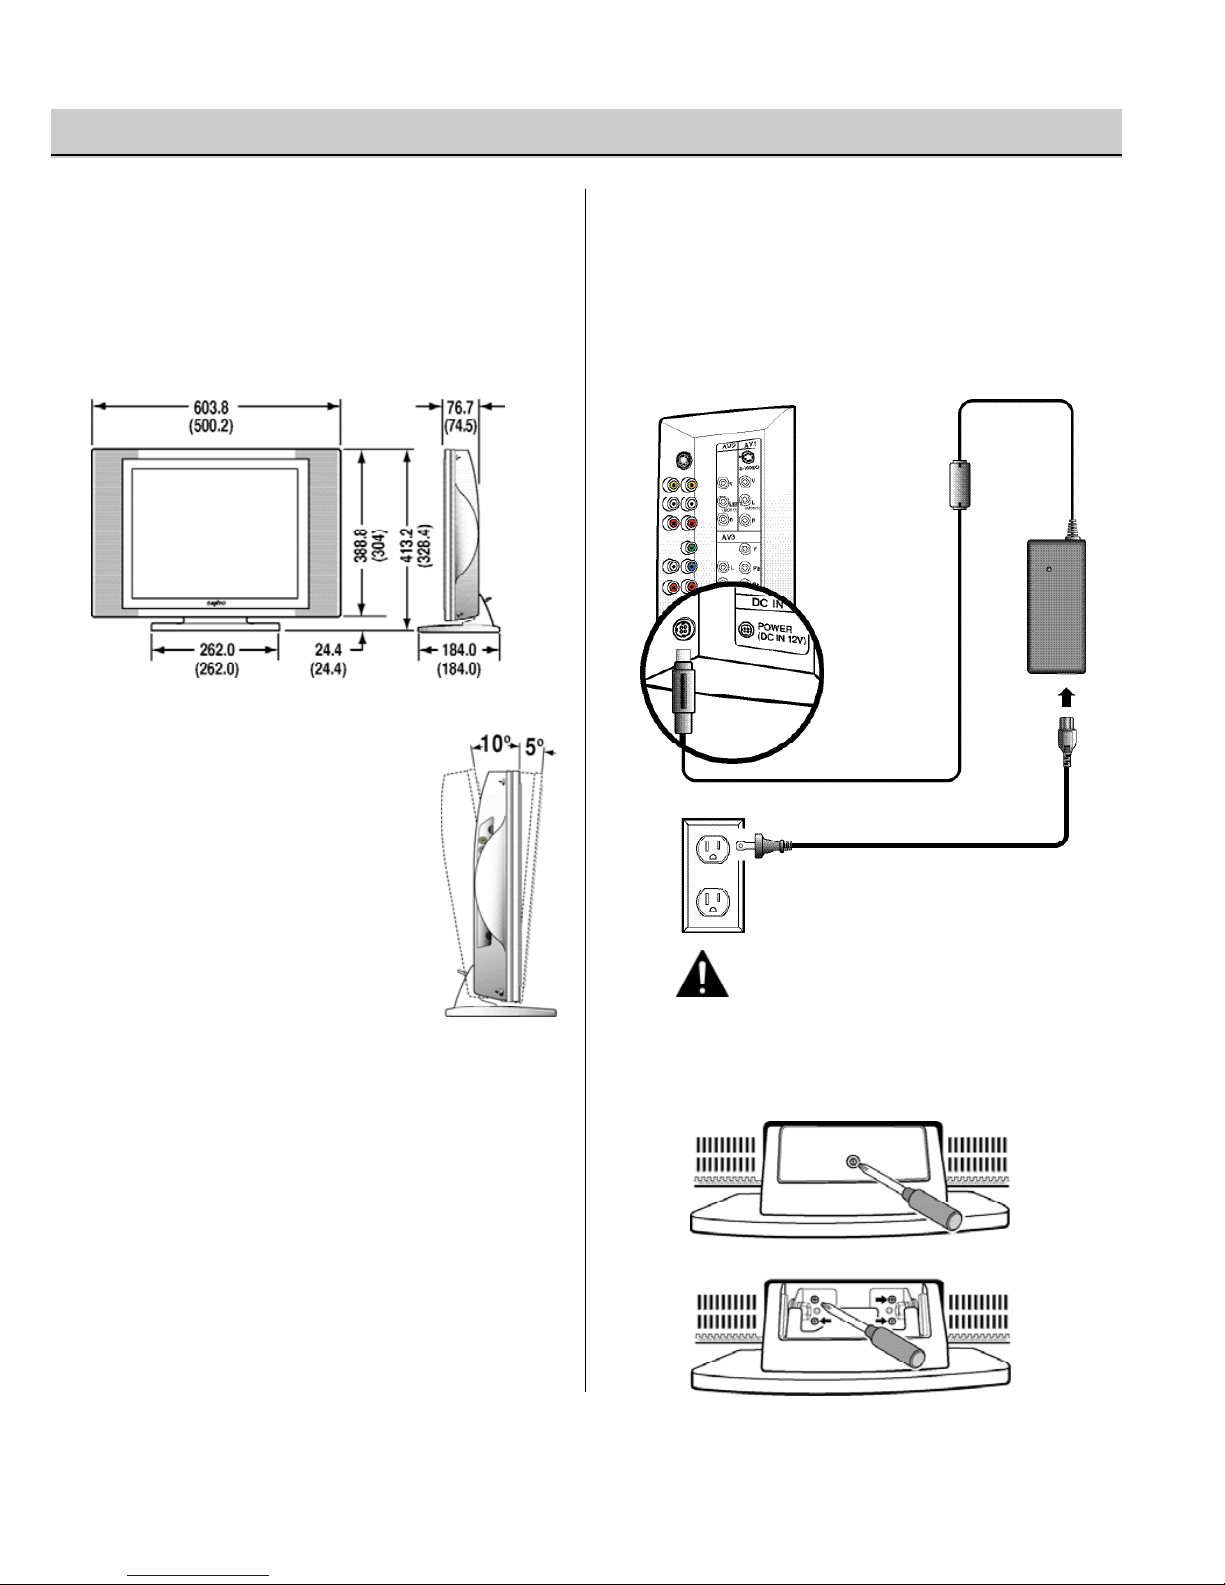
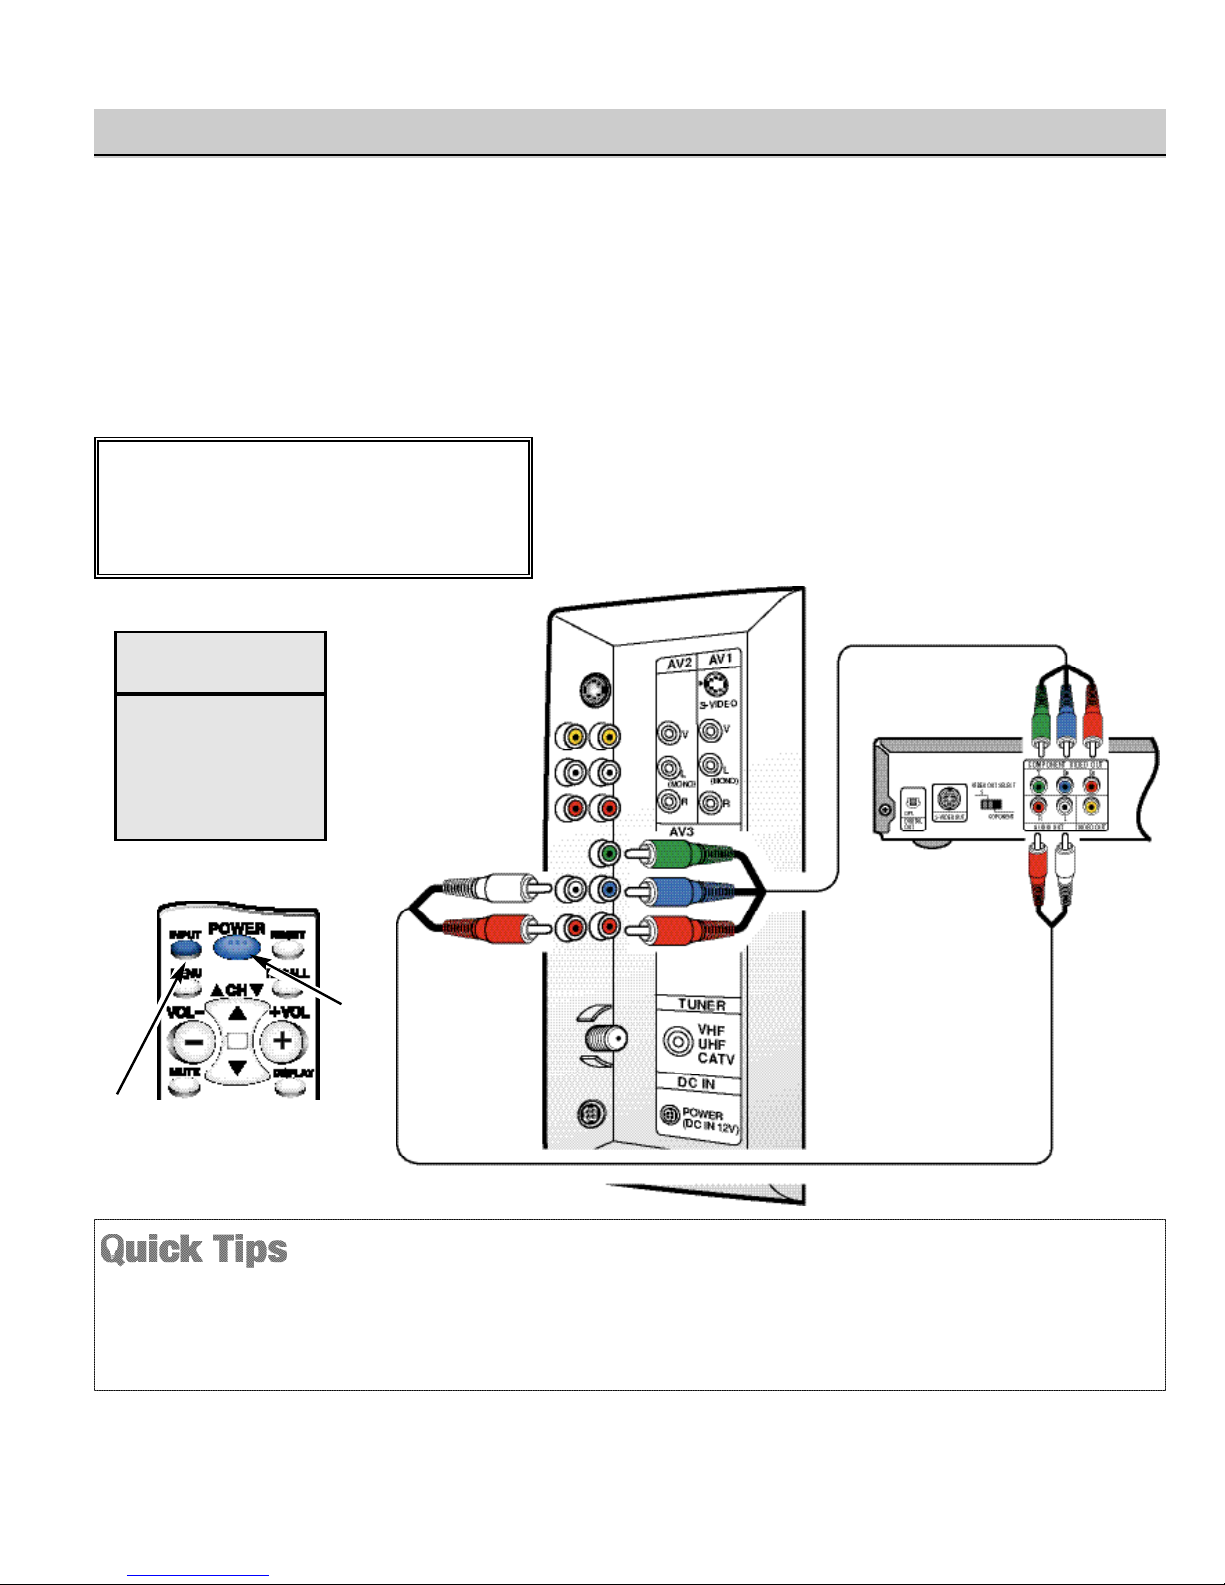
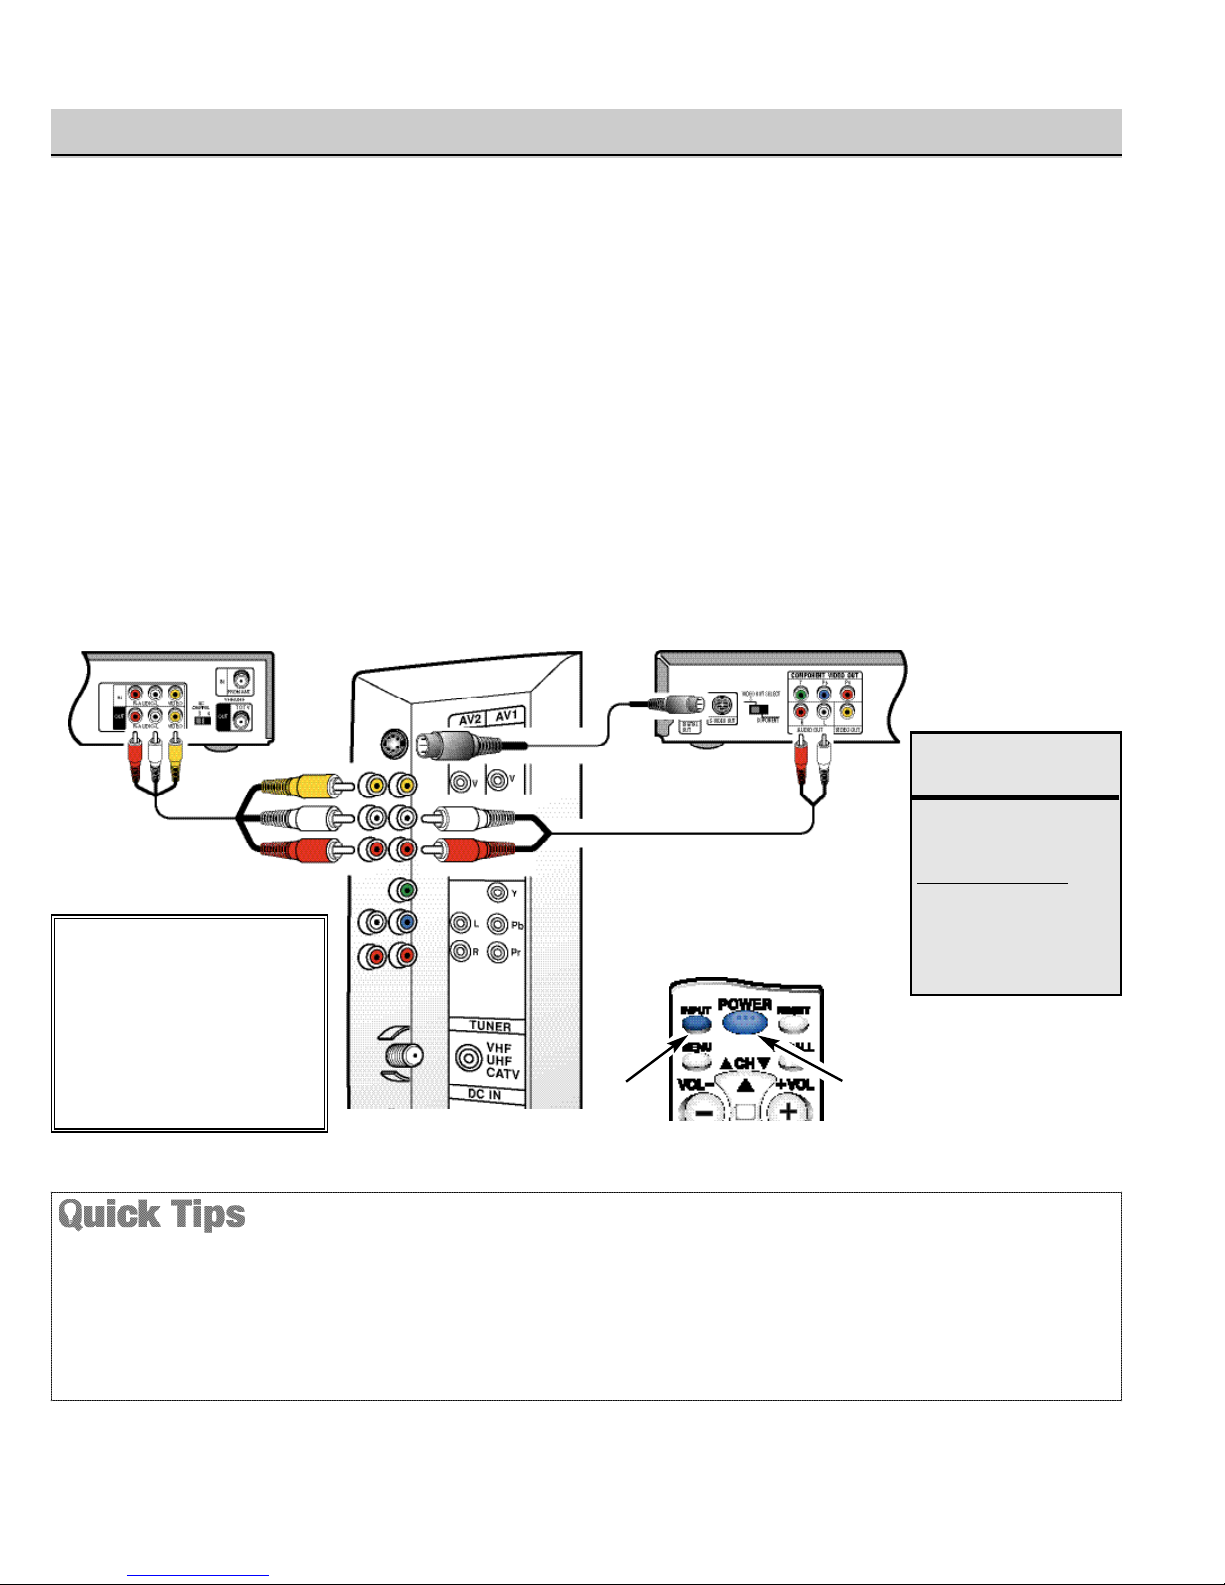
17. The AC Adapter power supply should not be placed in a
confined area. Proper ventilation is required to ensure
reliable operation and to protect it from overheating
18. "Apparatus shall not be exposed to dripping or splash-
ing and no objects filled with liquids, such as vases,
shall be placed on the apparatus."
EXAMPLE OF ANTENNA GROUNDING ACCORDING TO NATIONAL
ELECTRICAL CODE, ANSI/NFPA 70
CAUTION
RISK OF ELECTRIC SHOCK DO NOT OPEN
CAUTION: TO REDUCE THE RISK OF ELECTRIC SHOCK, DO NOT REMOVE COVER (OR
BACK). NO USER-SERVICEABLE PARTS INSIDE. REFER SERVICING TO QUALIFIED
SERVICE PERSONNEL.
THIS SYMBOL INDICATES THAT DANGEROUS VOLTAGE CONSTITUTING A
RISK OF ELECTRIC SHOCK IS PRESENT WITHIN THIS UNIT.
THIS SYMBOL INDICATES THAT THERE ARE IMPORTANT OPERATING AND
MAINTENANCE INSTRUCTIONS IN THE LITERATURE ACCOMPANYING THIS
UNIT.
WARNING: TO REDUCE THE RISK OF FIRE OR ELECTRIC SHOCK, DO NOT EXPOSE THIS APPLIANCE TO
RAIN OR MOISTURE.
IMPORTANT SAFETY INSTRUCTIONS
“Note to CATV system installer:
This reminder is provided to call the CATV system installer’s attention to Article 820-40
of the NEC that provides guidelines for proper grounding and, in particular, specifies that
the cable ground shall be connected to the grounding system of the building, as close to
the point of cable entry as practical.”
2
Need help?
Visit our Web site at www.sanyoctv.com or Call 1-800-877-5032

CONTENTS
Important Safety Instructions . . . . . . . . . . . . . . . . . . . 2
Care and Cleaning . . . . . . . . . . . . . . . . . . . . . . . . . . . . 3
Features . . . . . . . . . . . . . . . . . . . . . . . . . . . . . . . . . . . . . 4
Specifications . . . . . . . . . . . . . . . . . . . . . . . . . . . . . . . . . 4
Getting Started . . . . . . . . . . . . . . . . . . . . . . . . . . . . 5 ~ 6
Positioning the LCD TV . . . . . . . . . . . . . . . . . . . . . . 5
Using the Tilt Stand . . . . . . . . . . . . . . . . . . . . . . . . . 5
Removing the TV Tilt Stand . . . . . . . . . . . . . . . . . . . 5
Power Connection . . . . . . . . . . . . . . . . . . . . . . . . . . . 5
Installing Batteries in the Remote Control . . . . . . . . 6
Connecting Cable, RF Antenna, or a Satellite
Receiver to the TV 75-Ohm jack . . . . . . . . . . . . . . . 6
Top and Back Panels . . . . . . . . . . . . . . . . . . . . . . . . . . 7
Optional Feature – Wall Mounting . . . . . . . . . . . . . . . 7
Using the Component Video and
Audio Input Jacks . . . . . . . . . . . . . . . . . . . . . . . . . . . . 8
Connecting a DVD Player . . . . . . . . . . . . . . . . . . . . 8
Using the Audio / Video Input Jacks . . . . . . . . . . . . . . 9
Connecting a VCR or DVD Player . . . . . . . . . . . . 9
Using the Remote Control . . . . . . . . . . . . . . . . . . . . . 10
TV Adjustment and Setup . . . . . . . . . . . . . . . . . 11 ~ 14
How to Operate the On-Screen Menu . . . . . . . . . . 11
Adjusting Picture: Auto / Game / Manual . . . . . . . 11
Adjusting Sound: Audio / Bass / Treble /
Surround . . . . . . . . . . . . . . . . . . . . . . . . . . . . . . 12
Adjusting the Channel: Antenna
CH. Search . . . . . . . . . . . . . . . . . . . . . . . . . . . . 13
Channel Scan Memory . . . . . . . . . . . . . . . . . . . 14
Selecting a Display Language . . . . . . . . . . . . . . . . .15
Closed-Captioning . . . . . . . . . . . . . . . . . . . . . . . . . . . 15
V-Guide Operation (Parental Control) . . . . . . 16 ~ 18
Helpful Hints (Problems / Solutions) . . . . . . . . . . . . 19
Warranty (Mexico) . . . . . . . . . . . . . . . . . . . . . . . . . . . 20
Warranty (U.S.A. and Canada) . . . . . . . . . . . . . . . . . 21
Child Safety Matters . . . . . . . . . . . . . . . . . . Back cover
The surface of the cabinet can be damaged if not prop-
erly maintained. Many common household aerosol
sprays, cleaning agents, solvents, and polishes will
cause permanent damage to the fine surface.
11..UUnnpplluuggtthheeppoowweerrccoorrddbbeeffoorreecclleeaanniinnggtthhee
tteelleevviissiioonn..
2..Gently wipe the screen and cabinet with a dry soft
cloth.
The screen is likely to be damaged if it is not main-
tained properly. DO NOT use hard objects such as hard
cloth or paper. DO NOT use excessive pressure when
cleaning the LCD screen; excessive pressure can cause
permanent discoloration or dark spots.
N
ote: Never spray liquids on the screen
because they can run down and
enter the cabinet. This may cause
component failure not covered
under Warranty.
CARE AND CLEANING
3
Need help?
Visit our Web site at www.sanyoctv.com or Call 1-800-877-5032
Welcome to the World of Sanyo
Thank you for purchasing this Sanyo LCD Television. You
made an excellent choice for Performance, Reliability,
Features, Value, and Styling.
Important Information
Before installing and operating this TV, read this manual
thoroughly. This TV provides many convenient features and
functions. Operating the TV properly enables you to
manage those features and maintain it in good condition for
many years to come.
If your TV seems to operate improperly, read this manual
again, check operations and cable connections and try the
solutions in the “Helpful Hints” section, page 19 of this
manual. If the problem still persists, visit our website at
www.sanyoctv.com or call 1.800.877.5032. We can help!

15 inch & 20 inch flat-screen
Detachable tilt Stand—tilts TV down 5º up 10º
Wall Mountable
3-DY/C Digital Comb Filter
AC Adaptor
V-chip for Movies and TV guidelines rating limits
Closed-Captioning
MTS stereo/SAP decoder
Integrated front speaker 5 x 9 cm (two)
Surround Sound
Bass / Treble
Factory preset adjustments for Picture
Automatic Channel Search
Color Enhancer
Receives 181 Channels: VHF 2~13;UHF 14~69;
Cable TV 1, 14~125
Component video input for the best picture signal
from your VCR or DVD
Rear AV input (2 sets R/L)
S-Video Input
Trilingual Menu Options
Sleep Timer
24-Key Remote Control
LCD Panel Size (Measured Diagonally):
CLT1554 . . . . . . . . . . . . .15-inch flat screen EDTV monitor
CLT2054 . . . . . . . . . . . . 20-inch flat screen EDTV monitor
Picture Resolution: CLT1554—1024x768 (XGA)
CLT2054—640x480 (VGA)
Scanning Format . . . . . . . . . . . . . . 480p (All signals are
converted to 480p)
Jacks and Connectors:
RF Antenna Input (75 ohm)
AV1 Input: S-Video, Composite, Audio L/R
AV2 Input: Composite, Audio L/R
AV3 Input: Component (Y/Pb/Pr), Audio L/R
DC power input
Antenna Input . . . . . . . . . . . . . . . . . UHF/VHF/CATV 75 ohm
Power Requirement . . . . . . . . . . . . Source: AC 120V, 60Hz
AC Power Consumption (average) . . . . CLT1554—26 watts
. . . . . . . . . . . . . . . . . . . . . . . . . . . . . . . .CLT2054—44 watts
Size and Weight (approximately):
CLT1554 Horizontal Dim. (Width) . . . . 19.7 in. (500mm)
Vertical Dim. (Height) . . . . . 12.9 in. (328mm)
Depth Dim. (Thickness) . . . . 7.2 in. (184mm)
CLT2054 Horizontal Dim. (Width) . . . . 23.8 in. (604mm)
Vertical Dim. (Height) . . . . . 16.3 in. (413mm)
Depth Dim. (Thickness) . . . . 7.2 in. (184mm)
Weight: CLT1554 . . . . . . . . . . . . . . 12.7 (lbs), 5.8 (Kg)
CLT2054 . . . . . . . . . . . . . . 20.3 (lbs), 9.2 (Kg)
Specifications are subject to change without notice.
CAUTION: FCC Regulations state that improper modifica-
tions or unauthorized changes to this unit may
void the user’s authority to operate the unit.
This symbol on the nameplate means the product is
Listed by Underwriters’ Laboratories Inc. It is designed
and manufactured to meet rigid U.L. safety standards
against risk of fire, casualty and electrical hazards.
SPECIFICATIONS
FEATURES
4
Need help?
Visit our Web site at www.sanyoctv.com or Call 1-800-877-5032

GETTING STARTED
POSITIONING THE LCD TV
Always use an appropriate table or stand when posi-
tioning your TV. Allow enough space to tilt the TV.
For best viewing, avoid locating the TV where direct
sunlight or indoor lighting will fall on the screen.
Note: CLT1554 measurements are in the parenthe-
sis. All dimensions are in millimeters (mm).
USING THE DETACHABLE TV TILT
STAND
To change the viewing angle of your
LCD TV, position your hand on the
top and hold the stand firmly, then tilt
the LCD screen forward or backward.
CAUTION: Do not position hand
under the screen while tilting the TV
forward.
Note: Maximum tilt is 5º to the front
and 10º to the back.
REMOVING THE TV TILT STAND
Tools Needed: Phillips screwdriver
Important Note: Position TV face down on a pad-
ded or cushioned surface to protect the screen and
finish.
1Remove the screw from the stand back cover.
2Remove four (4) screws from the metal bracket.
CAUTION: Hold the stand firmly as you remove
the last screw.
3Carefully remove the TV stand.
POWER CONNECTION
1Insert AC Adaptor into the DC input terminal on
the TV.
2Insert AC power cord into Adaptor; then insert
the plug fully into a 120V, 60Hz, AC power
outlet.
BACK OF TV DC
POWER INPUT
TERMINAL
AC
ADAPTOR
AC CORD 2
POWER OUTLET
(HOUSEHOLD)
5
Need help?
Visit our Web site at www.sanyoctv.com or Call 1-800-877-5032
Warning: This 12V AC/DC product is
intended for indoor home use only. It
is not to be exposed to high outdoor ambient
temperatures found in automotive, marine, and
aviation environments.
1
1
2

CATV FRANCHISE NOTE: Cable companies, like public
utilities, are franchised by local government authorities. To
receive cable programs, even with equipment which is
capable of receiving cable channels, the consumer must
subscribe to the cable company’s service.
CONNECTING CABLE SERVICE, RF ANTENNA,
OR SATELLITE RECEIVER TO THE TV
CABLE SERVICE RF ANTENNA
SATELLITE RECEIVER
TV BACK
INSTALLING BATTERIES IN THE REMOTE
CONTROL
Use 2 “AAA” batteries (Not supplied).
Be sure batteries are installed correctly.
Note: Do not mix old batteries with new ones or mix differ-
ent types of batteries together.
VCR BACK
Operational Tip for No
Signal Connection:
If the TV is used as a monitor only,
with a DVD player or some other type
of external equipment, and no cable or
antenna signal is available, the follow-
ing setup is necessary:
Your TV is designed to automatically
search for available channels. There-
fore, the initial start up requires that
you press the CH key, enabling the
TV to automatically go through the
channel search process before you can
operate the TV. After the initial channel
search is completed, you must press the
CH key again to complete the
channel search process. This may take
several minutes.
After the channel search process is
complete (2 searches), you can press
the INPUT key on the remote control
to use the TV as a monitor.
TV will automatically select the correct Antenna mode
for the type of Analog RF signal connected automatically.
Use “Antenna Selection” in the Setup menu to change the
Antenna Mode.
TV will switch off automatically after 15 minutes if there is no
signal reception (cable out or station not broadcasting).
Exception—When the Video mode is selected, the TV will not
automatically switch off when signal reception has stopped
for 15 minutes.
If you move the TV to a new location, press the RESET key
twice after connecting the signal and turning on the TV.
6
Need help?
Visit our Web site at www.sanyoctv.com or Call 1-800-877-5032
GETTING STARTED

TOP AND BACK PANELS
OPTIONAL FEATURE—WALL MOUNTING
TOP VIEW
Note: The Channel (up) /
(down), Volume +(up) / –(down),
and Power keys function exactly
like the keys on your remote
control.
S-Video Input Jack
To enhance video detail use the
S-Video AV1 jack instead of the
Video jack, if available on your
external equipment. (S-Video
connections will override con-
nections to the AV1 input
jacks.) (See page 9.)
BACK VIEW
Antenna Input Terminal
Connect an RF antenna, cable,
or satellite receiver to this jack
as shown on page 6.
Audio/Video Input Jacks
(AV1/AV2)
Connect video equipment here (see
page 9).
Note: S-Video connection overrides
the AV1 video connection.
480i/p Component Video / Audio
Input Jacks (AV3)
Connect external equipment to the
Y, Pb, Pr and Audio L/R jacks. (See
page 8.)
DC Power Input Jack
Connect the supplied AC Adaptor to
this terminal.
This LCD TV is designed so that it may be mounted on a wall, if desired.
Use the slots on the back of your TV to secure it using a wall mounting kit.
Notes: Wall Mounting kit is not supplied, check with your local electronic
supply store.
LCD Mounting screws should be M4 thread with a minimum
length of 9mm. Screws must not exceed 20mm in length.
BACK VIEW
7
Need help?
Visit our Web site at www.sanyoctv.com or Call 1-800-877-5032
Optional Accessories: Extra
cables are needed for advance
connections. Reference the con-
nections accessories list on
pages 8~9.
Warning: This 12V AC/DC
product is intended for indoor
home use only. It is not to be exposed to
high outdoor ambient temperatures found
in automotive, marine, and aviation
environments.

REMOTE CONTROL
Switch off TV and external equipment before con-
necting cables. (Cables are not supplied.)
1Connect a DVD Player or other equipment’s
Component Video Out to the TV Component
Video In (Y-Pb-Pr) Jacks.
2Connect the DVD Player’s Audio Out to the TV
Component L/R Jacks.
3Press POWER to turn on the TV. Turn on external
equipment also.
4Press the INPUT key to select COMPONENT3.
DVD PLAYER
USING THE COMPONENT AUDIO/VIDEO INPUT JACKS
TV COMPONENT3
JACKS
TV BACK
1
A solid Blue screen with COMPONENT3 displayed means
that the Video mode is selected, but no signal is being
detected at the Component jacks. Check connection, and
turn on external equipment.
Press the INPUT key after connecting cables to access
the A/V Inputs. There is NO need to tune to a blank
channel.
What you will need
for connections:
1 Component Video
Cable – 1
2Audio Cable – 1
8
Need help?
Visit our Web site at www.sanyoctv.com or Call 1-800-877-5032
2
3
4
CONNECTING A DVD PLAYER OR OTHER EQUIPMENT
IMPORTANT NOTE FOR MONITOR USE:
If you did not connect an antenna, you
must
run All Channel Search twice before
you can select the AV inputs.

Switch off TV and external equipment before con-
necting cables. (Cables are not supplied.)
1Connect VCR, DVD Player, or other equipment’s
Audio Video Out to the TV Audio Video Input.
For Mono VCR (Single Audio Jack) connect
VCR Audio Out to TV Audio (L) Input.
Optional (11/ 22)
Connect DVD Player or other equipment’s
S-Video Out to the TV S-Video In Jack.
Using the S-Video jack overrides the Video (AV1)
jack.
Connect DVD Player or other equipment’s Audio
Out to the TV Audio In Jacks.
2Press POWER to turn on the TV. Turn on exter-
nal equipment also.
3Press the INPUT key to select VIDEO1 or
VIDEO2.
USING THE AUDIO/VIDEO INPUT JACKS
BACK VIEW OF VCR TV AV INPUT JACKS DVD PLAYER
Press the INPUT key after connecting cables to access the
A / V Inputs. There is NO need to tune to a blank channel.
Make sure all cable connectors are fully seated on jacks.
Always match A/V cables according to the colors; red for
right audio, white for left audio and yellow for video.
A solid Blue screen with the word VIDEO1 or VIDEO2,
displayed means that the Video mode is selected, but
no signal is being detected at the Video jacks. Check
connections, turn on external equipment.
What you will need
for connections:
1 A/V Cable – 1
OPTIONAL CONNECTION
1S-Video Cable – 1
2 Audio Cable – 1
9
Need help?
Visit our Web site at www.sanyoctv.com or Call 1-800-877-5032
11
22
1
CONNECTING A VCR OR DVD PLAYER
IMPORTANT NOTE FOR
MONITOR USE:
If you did not connect an
antenna, you
must
run All
Channel Search twice
before you can select the
AV inputs.
REMOTE CONTROL
32

Input Key—Press to select the program source to
watch: TV signal or signal from the DVD Player
or other equipment you have connected to the
A/V jacks.
Menu Key—Use this key with the /and
––/++keys to navigate and adjust features of the on-
screen menu system (see pages 11 ~ 13).
Channel Scanning (CH /) and Volume
(VOL ––/++) Keys—Press to scan through the
channels in memory and to adjust the volume.
Mute Key—Press once to minimize the volume.
Press again to restore.
Number Keys—Two keys must be pressed to
select a channel. Example: Press 0then 6to select
channel 6. For cable channels 100 through 125,
press and hold the 1key until C1–– appears.
Then press the other two numbers.
Caption Key (See page 15.)
V-Guide Key (See page 16 ~ 18.)
Reset Key—Press this key twice to restore
factory settings. The TV will automatically start
Channel Search and clear all customized settings.
These features will automatically reset:
•Picture Controls: Auto, Game, and Manual:
Color, Tint, Contrast, Brightness, Sharpness, and
Color Enhancer
•Sound Controls: Audio, Bass, Treble, and
Surround
•Channel Controls: Antenna, CH. Search, and
Memory
•Caption to OFF
•V-Guide to OFF
•Language to English
•Sleep Timer to OFF (if previously set)
•Video to TV (if previously set)
If desired, personal settings can be made again
using the menu options.
Power Key—Press to turn TV on or off.
Recall Key—Select a channel then select another
channel using the number keys. Press Recall to
switch between the channels.
Display Key—Press once to display the channel
number. Press again to remove the display.
Sleep Key—Press this key, then press the “0” key
to set the Sleep Timer. The desired time can be set
from 30 minutes up to 3 hours in 30 minutes incre-
ments. Sleep Timer will switch off the TV
automatically.
Note: The Sleep Timer cancels when the TV is
turned off or if a power failure occurs.
USING THE REMOTE CONTROL
11
12
Points toward TV
11
12
Be sure batteries are installed correctly.
Point the remote control toward the TV you want to
operate. Objects between the remote control and the TV
may cause misoperation of the remote control function.
10
Need help?
Visit our Web site at www.sanyoctv.com or Call 1-800-877-5032

HOW TO OPERATE THE ON-SCREEN
MENU
1Press MENU key to display main menu
options. The menu will display on the screen for
approximately 20 seconds. Press
MENU
again
to redisplay.
2Use the /keys to choose desired option and
sub-menu options. (Selected item is highlighted
in yellow.)
3Use the –/+keys to adjust options. (A graphic
bar is highlighted in yellow when adjusted.)
4Press the MENU key to select other options
from the main menu or to exit.
ADJUSTING PICTURE
1Press MENU key to display main menu.
2Use the /keys to highlight Picture.
3Press +key to access the sub-menu options.
4Use the /keys to select Preset.
ADJUST PICTURE AUTOMATICALLY
5Use the –/+keys to select Auto (factory preset
settings) from the Picture Preset menu options.
FOR AUTOMATIC GAME SETTING
5Use the –/+keys to select Game from the
Picture Preset menu options. The screen will
automatically change to factory preset settings.
ADJUST PICTURE MANUALLY
5Use the –/+keys to select Manual from the
Picture Preset menu options.
6Use the /keys to select the picture setting
you want to change.
7Use the –/+keys to adjust settings.
8To adjust the other features: Tint, Contrast,
Brightness, Sharpness and Color Enhancer,
simply follow steps 5 ~ 7 above.
The on-screen menu provides the viewer with easy access to adjustments and settings. Just use the keys on
the remote control and follow the on-screen instructions.
TV ADJUSTMENT AND SETUP
(Continued on page 12.)
11
Need help?
Visit our Web site at www.sanyoctv.com or Call 1-800-877-5032
Note: Select the input jacks by pressing
the
INPUT
key on the remote
control.

TV ADJUSTMENT AND SETUP (Continued)
ADJUSTING SOUND
Select desired sound setting: Audio, Bass, Treble or
Surround.
1Press MENU key to display main menu.
2Use the /keys to highlight Sound.
3Press +key to access the sub-menu options.
4Use the /keys to select Audio from the
Sound menu options. (Selected option will be
highlighted yellow.)
5Use the –/+keys to adjust settings: Stereo,
Mono, or SAP.
Notes: Stereo and SAP must be part of the
broadcast signal.
The TV will automatically reset to stereo
if unplugged or a power failure occurs.
6To adjust the other sound features: Bass, Treble,
or Surround, simply follow steps 4~5 above.
ADJUSTING THE CHANNEL TUNING
RESETTING THE ANTENNA MODE
Use this feature to switch between off-air and cable
channels.
1Press MENU key to display main menu.
2Use the /keys to highlight Channel.
3Press +key to access the sub-menu options.
4Use the /keys to select Antenna from the
Channel menu options.
5Use the +keys to select VHF/UHF or Cable.
(Selected option will be highlighted yellow.)
12
Need help?
Visit our Web site at www.sanyoctv.com or Call 1-800-877-5032

13
Need help?
Visit our Web site at www.sanyoctv.com or Call 1-800-877-5032
Under weak stereo signal conditions, you may receive
better quality sound in the “Mono” position.
Surround sound expands the sound effect while
receiving MTS stereo signals.
Pressing the RESET key will clear all customized settings.
The TV will automatically start Channel Search
and clear settings.
CH. (CHANNEL) SEARCH
Use CH. (Channel) Search to replace existing
Channel Scan database, such as, if you move to
another city.
1Press MENU key to display main menu.
2Use the /keys to highlight Channel.
3Press +key to access the sub-menu options.
4Use the /keys to select CH. Search from
the Channel menu options.
5Press the +key. The TV will automatically start
searching for your channels. It will take the TV
several minutes to complete the search.

14
Need help?
Visit our Web site at www.sanyoctv.com or Call 1-800-877-5032
CHANNEL SCAN MEMORY
When Channel menu option is selected, the current
Channel number will appear in the on-screen menu
display. If this channel is included in the channel
scan memory database the word “Delete?” will
appear on the screen, if it is not in the channel
database list, the word “Add?” will display.
TO DELETE CHANNELS FROM THE
CHANNEL SCAN MEMORY
1Press MENU key to display main menu.
2Use the /keys to highlight Channel.
3Press +key to access the sub-menu options.
4Use the /keys to highlight Channel No.
5Use the / or numerical 0~9 keys to select
desired channel.
For cable channels above 99, press and hold
the 1key until
C1– –
appears. Then enter the
other two numbers.
6Use the /keys to choose Memory from the
Channel menu.
7Press the +key to delete the channel. HINT:
“Delete?” will change to “Add?”.
8To chose other channels to delete, simply follow
steps 5~6 above,or press MENU key to return
to the Main menu.
Channels deleted from scan memory can be selected with
the number keys.
Restoring deleted channels, use the on-screen menu to
manually add channels or start CH. Search from the menu.
It may take a few minutes to search through the available
channels, or press the RESET key.
TO ADD CHANNELS TO THE CHANNEL
SCAN MEMORY
5Use the numerical 0~9 keys to select desired
channel.
For cable channels above 99, press and hold
the 1key until
C1– –
appears. Then enter the
other two numbers.
6Use the /keys to choose Memory from the
Channel menu.
7Press the +key to add channel. HINT: “Add?”
will change to “Delete?”.
8To chose other channels to add, simply follow
steps 5~6 above,or press MENU key to return
to the main menu.
TV ADJUSTMENT AND SETUP (Continued)

Closed-Captioning is hidden textual information
transmitted along with the picture and sound. Turning
Captioning ON causes the TV to open these captions
and superimpose them on the screen. Because differ-
ent types of captions can be transmitted with the TV
signal, separate captioning modes are provided. The
captioning modes recognized by this model are:
Caption1 through Caption4. Local broadcasters
decide which caption signals to transmit.
SETTING CAPTIONS
1Press the CAPTION key on the remote control.
2Press the 0key to select options: OFF,
CAPTION1, CAPTION2, CAPTION3, CAP-
TION4, or QUIKCAP.
Note: Channel number will not display continuously
when captioning is on.
QUIKCAP: Allows captions to toggle on and off
with the Mute function. Press the MUTE key on the
remote control to block the TV sound; the captions
display automatically. Press the MUTE key again to
restore the sound, the captions will disappear.
Quikcap displays program captions in the Caption1
mode.
CAPTION1
CLOSED-CAPTIONING
15
Need help?
Visit our Web site at www.sanyoctv.com or Call 1-800-877-5032
SELECTING THE DISPLAY
LANGUAGE
1Press MENU key to display main menu.
2Use the /to choose Language from the
menu option.
3Press +key to access the sub-menu options.
4Use the / keys to select English, Français,
or Español.

NOTE: THIS FEATURE IS DESIGNED TO COMPLY
WITH THE UNITED STATES OF
AMERICA’S FCC V-CHIP REGULATIONS.
THEREFORE, IT MAY NOT FUNCTION
WITH BROADCASTS THAT ORIGINATE IN
OTHER COUNTRIES.
This Sanyo television is equipped with an electronic
V-Chip to interpret MPAA (Motion Picture Association
of America) and TV Parental Guidelines rating codes.
When these codes are detected, the TV will automati-
cally display or block the program, depending upon
choices you make when setting up the V-Guide system.
Content ratings are represented by the initials D (Sug-
gestive Dialog), L (Adult Language), S (Sexual
Situations), V (Violence), and FV (Fantasy Violence).
When programming contains any or all of these con-
ditions, these letters become part of the icon that is
displayed on the TV screen. A rating icon will gener-
ally appear in the upper left hand corner of the TV
screen (see page 18.)
This television can be set to automatically block pro-
grams with content you deem as inappropriate for your
children to view.
SETTING A RATING
1Press the V-GUIDE key on the remote control to
display menu.
2Press the –/+keys to switch V-Guide ON.
3Use the CH /to access Ratings: MPAA
Ratings or TV Ratings. (Selected option will be
highlighted in yellow.)
V-GUIDE (PARENTAL CONTROL) OPERATION
When in the V-Guide menu system, the
–/+
keys allow
you to navigate between the ratings and the options
menu.
Blocking TVY7 does not block higher ratings.
Y
ou can block a content rating such as TVPG-V and still
be able to watch TVPG programs with ratings of S-L-D
provided TVPG is unblocked (U).
To temporarily unblock or view Blocked (B) programs,
set V-GUide to OFF, or press the RESET key twice to
clear all Blocked (B) ratings and other customized
settings.
16
Need help?
Visit our Web site at www.sanyoctv.com or Call 1-800-877-5032
SETTING A MPAA (MOVIE) RATING
4Press the +key to access MPAA Ratings.
5Use the /to select rating options: G, PG,
PG-13, R, NC-17, and X. (Selected rating will be
highlighted in yellow.)
6Press MENU key to set the BLOCKED rating.
(Check [√] mark indicates Blocked rating.)

Note:The TV will automatically block (B) ratings
above or unblock (U) ratings below selection.
For example, if you block rating R, NC17 and X
will be blocked as well.
TO CLEAR MPAA MOVIE RATINGS
7Press the +key to access MPAA Ratings.
8Use the / keys to highlight Clear.
9Press the MENU key to clear all blocked ratings.
SETTING TV RATINGS
10Press the +key to access TV Ratings.
11Use the / keys to block TV ratings: TV-Y,
TV-Y7, TV-G, TV-PG, TV-14, or TV-MA.
(Selected rating will be highlighted in yellow.)
12Press the MENU key to set the BLOCKED
rating. (Check [√] mark indicates Blocked
rating.)
SETTING CONTENT-BASED
GUIDELINES
13Use the / keys to chose TV content ratings:
TV-Y7, TV-PG, TV-14, or TV-MA. (Selected
rating will be highlighted in yellow.)
14Press the +key to select the TV Content Rating
Options: FV (Fantasy Violence), V(Violence), S
(Sexual Situations), L(Adult Language), or D
(Dialog).
15Press the MENU key to block the TV Content
Rating. (Check [√] mark indicates Blocked
rating.)
16Use the / and –/+keys to highlight another
rating to block or unblock other categories.
Repeat steps 13 ~ 15 above.
Note: Networks and local stations may
or may not include the content
ratings portion of the TV Parental
Guidelines.
17
Need help?
Visit our Web site at www.sanyoctv.com or Call 1-800-877-5032

TO CLEAR TV/CONTENT-BASED
RATINGS
17Press the +keys to access TV Ratings.
18Use the / keys to highlight Clear.
19Press the MENU key to clear all blocked
ratings.
TURNING OFF THE V-GUIDE
1Press the V-GUIDE key on the remote control.
2Use the / keys to select V-Guide. Then
press –/+keys to select OFF.
ALL CHILDREN—Program is designed to be
appropriate for children ages 2-6.
DIRECTED TO OLDER CHILDREN—Program is
designed for children 7 and above. Material may
include mild fantasy violence (FV) or comedic
violence.
GENERAL AUDIENCE—Program suitable for all
ages. Contain little or no violence, no strong
language or sexual dialogue or situations.
PARENTAL GUIDANCE SUGGESTED—Program
contains material that may be unsuitable for
younger children. Material contains one or more
for the
following: moderate violence (V), some sexual sit-
uations (S), infrequent coarse language (L), or
some suggestive dialogue (D).
PARENTS STRONGLY CAUTIONED—Some mater-
ial is unsuitable for children under 14 years of age.
Parents are strongly urged to use caution against
letting children under age 14 watch unattended.
Material contains intense violence (V), intense
sexual situations (S), strong coarse language (L),
or intensely suggestive dialogue (D).
MATURE AUDIENCE ONLY—Program is designed
to be viewed by adults and therefore may be
unsuitable for children under 17 years of age.
TV RATINGS (AGE/CONTENT-BASED)
G GENERAL AUDIENCES—All ages admitted.
PG PARENTAL GUIDANCE SUGGESTED—Some
material may not be suitable for children.
PG-13 PARENTAL GUIDANCE CAUTIONED—Some
material may be inappropriate for children
under 13.
R RESTRICTED—Under 17 requires accompa-
nying parent or adult guardian
NC17 NO ONE 17 AND UNDER ADMITTED
MPAA MOVIE RATINGS
(AGE-BASED)
18
Need help?
Visit our Web site at www.sanyoctv.com or Call 1-800-877-5032
V-GUIDE OPERATION (Continued)

Problem: Check these Conditions: Try these Solutions: Page No.
TV turns off
automatically.
Check signal (Cable/Ant.) connection. Press POWER key.
The sleep timer may have been set.
Unplug TV momentarily.
5
No picture, poor
picture, or wavy
lines in picture.
Check antenna connections.
May be station trouble.
Brightness or Contrast misadjusted.
Possible interference from household
appliance.
Adjust antenna.
Try a different channel.
Select AUTO from Picture
on-screen menu or press RESET key.
Turn off Mixer, Drill, Blender, etc.
6, 11
No sound, poor
sound.
No sound on
some channels.
May be station trouble.
May be MUTE function.
Check Audio/ Video connections
Try a different channel.
Adjust Volume.
8~9
11
No Captioning. Check if station is broadcasting a
Closed-Caption signal.
Press CAPTION key to select
Captioning. 15
Poor color or
no color.
Check if program is in color.
Check antenna connections.
Color or Tint misadjusted.
May be station trouble.
Try a different channel.
Adjust antenna.
Press RESET key to restart channel
search.
11
Blue Screen with
Video1, Video2, or
Component3
displayed.
Check Audio/Video connections.
Check external equipment.
Check external equipment setting.
Check DVD setting.
Press INPUT key.
Switch on external equipment.
Set external equipment output con-
nections to match input connections.
8~10
No TV Stereo or
SAP sound.
Check if station is broadcasting a true
MTS stereo signal or a SAP signal.
Select STEREO or SAP from Audio
on-screen menu.
12
Cannot select or
scan some
channels.
Channel may be removed from
memory.
Check antenna connections.
V-Guide is set to block programming.
Select MEMORY and manually add
channels or start CH. (channel) search.
Set V-GUIDE to OFF or press RESET
key to clear all setting.
14
16~18
Remote Control
will not work TV.
Check batteries.
Check if TV is plugged in.
Replace batteries.
Aim remote control at front of TV.
6, 10
Menu System
words seem
misspelled.
May be a different language is
selected.
Reselect menu language choice using
the on-screen menu. 15
Cabinet makes
popping sound.
This is a normal condition during
warm-up and cool down of the plastic
cabinet parts.
HELPFUL HINTS (Problems/Solutions)
19
Need help?
Visit our Web site at www.sanyoctv.com or Call 1-800-877-5032
Because of the Quality we build into our
product, very few problems are actual TV
defects. Most problems only involve simple
hookup or setup changes that can be solved by
the customer. Please check the chart below
and try the solutions listed for your problem. If
the problem still persists, before returning
your TV, please visit our website at
www.sanyoctv.com or call us toll free at
1.800.877.5032.
We can Help!

20
Need help?
Visit our Web site at www.sanyoctv.com or Call 1-800-877-5032
IMPORTADOR:
COMERCIALIZADORA MEXICO
AMERICANA, S.DE R.L. DE C.V.
AV. NEXTENGO No78
COL. SANTA CRUZ ACAYUCAN
DEL. AZCAPOTZALCO, MÉXICO, D.F. C.P. 02770
RFC: CMA9109119L0
GUARANTEE
THE APPARATUS THAT YOU HAVE ACQUIRED HAS A ONE YEAR GUARANTEE FOR MANUFACTURING DEFECTS AND
A ONE YEAR SERVICE WARRANTY FROM THE DATE OF PURCHASE GRANTED BY:
COMERCIALIZADORA MEXICO-AMERICANA, S. DE R.L. DE C.V.
UNDER THE FOLLOWING CONDITIONS:
1. TO MAKE THE GUARANTEE EFFECTIVE, SIMPLY SHOW THIS POLICY FILLED OUT BY THE STORE OR SUPPLIER
UNIT OR THIS SALES INVOICE, WITH THE APPARATUS IN ANY OF THE SERVICE CENTERS INDICATED ON THIS
GUARANTEE.
2. IF THE FAULT IS ATTRIBUTED TO A MANUFACTURING DEFECT, THE APPARATUS WILL BE REPLACED OR YOUR
MONEY REFUNDED. DURING THE 30 DAYS SUBSEQUENT TO THE PURCHASE THE GUARANTEE WILL BE VALID
AT THE STORE WERE THE APPARATUS WAS PURCHASED, PRESENTING THE ABOVE DOCUMENTS.
3. REPAIR TIME WILL NEVER BE MORE THAN 30 DAYS. IF THIS TIME HAS ELAPSED, AND THE PRODUCT ISN’T
REPAIRED, COMERCIALIZADORA MEXICO AMERICANA, S. DE R.L. DE C.V. WILL PROCEED TO EFFECTUATE
THE EXCHANGE FOR AN EQUIVALENT APPARATUS OR THE RETURN OF THE BUYING-SALE COST
RESPECTIVELY.
4. THIS GUARANTEE WILL COVER ITS TOTALITY OF PIECES, COMPONENTS AND SERVICE REPAIR OF PRODUCT,
AND THE RESPECTIVE COST OF TRANSPORTATION.
THIS GUARANTEE WILL BE NULL AND VOID IN THE FOLLOWING CIRCUMSTANCES:
*WHEN PRODUCT HAS BEEN USED IN A DIFFERENT CONDITION THAN ITS NORMAL USE.
*WHEN PRODUCT HASN’T BEEN OPERATING CORRECTLY ACCORDING TO THE INSTRUCTIONS IN THIS MANUAL.
*WHEN PRODUCT HAS BEEN CHANGED OR REPAIRED BY PERSONS NOT AUTHORIZED FROM THE
MANUFACTURER, IMPORTER, OR MERCHANT RESPONSIBLE RESPECTIVE.
CENTRO DE SERVICIO Y LUGAR DONDE OBTENER PARTES,
COMPONENTES, CONSUMIBLES Y ACCESORIOS:
SUCURSAL VALLEJO SUCURSAL MINERVA
Poniente 126 No288 B Silos No135, Col. Minerva
Col. Nueva Vallejo Deleg. Iztapalapa
México, D.F. México, D.F. 09810
Tels. 5567-5378 Tels. 5646-4551
5368-0105, 8589-8033 5646-4550
DESCRIPTION: ________________________________ BRAND: __________________ MODEL:__________________
CLIENT’S NAME: __________________________________________________________________________________
ADDRESS: ______________________________________________________________________________________
EXTERIOR NUMBER: _______________________ INTERIOR NUMBER: _______________________
SUB DIVISION: ____________________________________________ STATE/DELEGATION: _______________________
TELEPHONE: _____________________________________________
STAMP, DATE AND SIGNATURE
OF
STORE
DESCRIPTION: Television
BRAND: SANYO
MODELS: CLT1554
CLT2054
MEXICO GUARANTEE
TELEVISION SANYO
This manual suits for next models
2
Table of contents
Languages:
Other Sanyo LCD TV manuals

Sanyo
Sanyo AVL-3210 User manual

Sanyo
Sanyo LED-22XR11F User manual

Sanyo
Sanyo DP32647 User manual

Sanyo
Sanyo LCD-32K30 User manual

Sanyo
Sanyo FVM4612 User manual

Sanyo
Sanyo LCD-40XZ11F User manual

Sanyo
Sanyo LCD-27XR1/AU User manual

Sanyo
Sanyo LCD-32K30TD User manual

Sanyo
Sanyo DP42142 Instruction Manual

Sanyo
Sanyo AVL-209 User manual

Sanyo
Sanyo LCD-32K40 User manual

Sanyo
Sanyo LCD-32XH8T User manual

Sanyo
Sanyo FW40D48F User manual

Sanyo
Sanyo LCD-40XZ10F User manual

Sanyo
Sanyo LCD-19K40 User manual

Sanyo
Sanyo LCD-23XL2 User manual

Sanyo
Sanyo AVL-191 User manual

Sanyo
Sanyo LCD-19E3 User manual

Sanyo
Sanyo LCD55L4 User manual

Sanyo
Sanyo DP42841 User manual