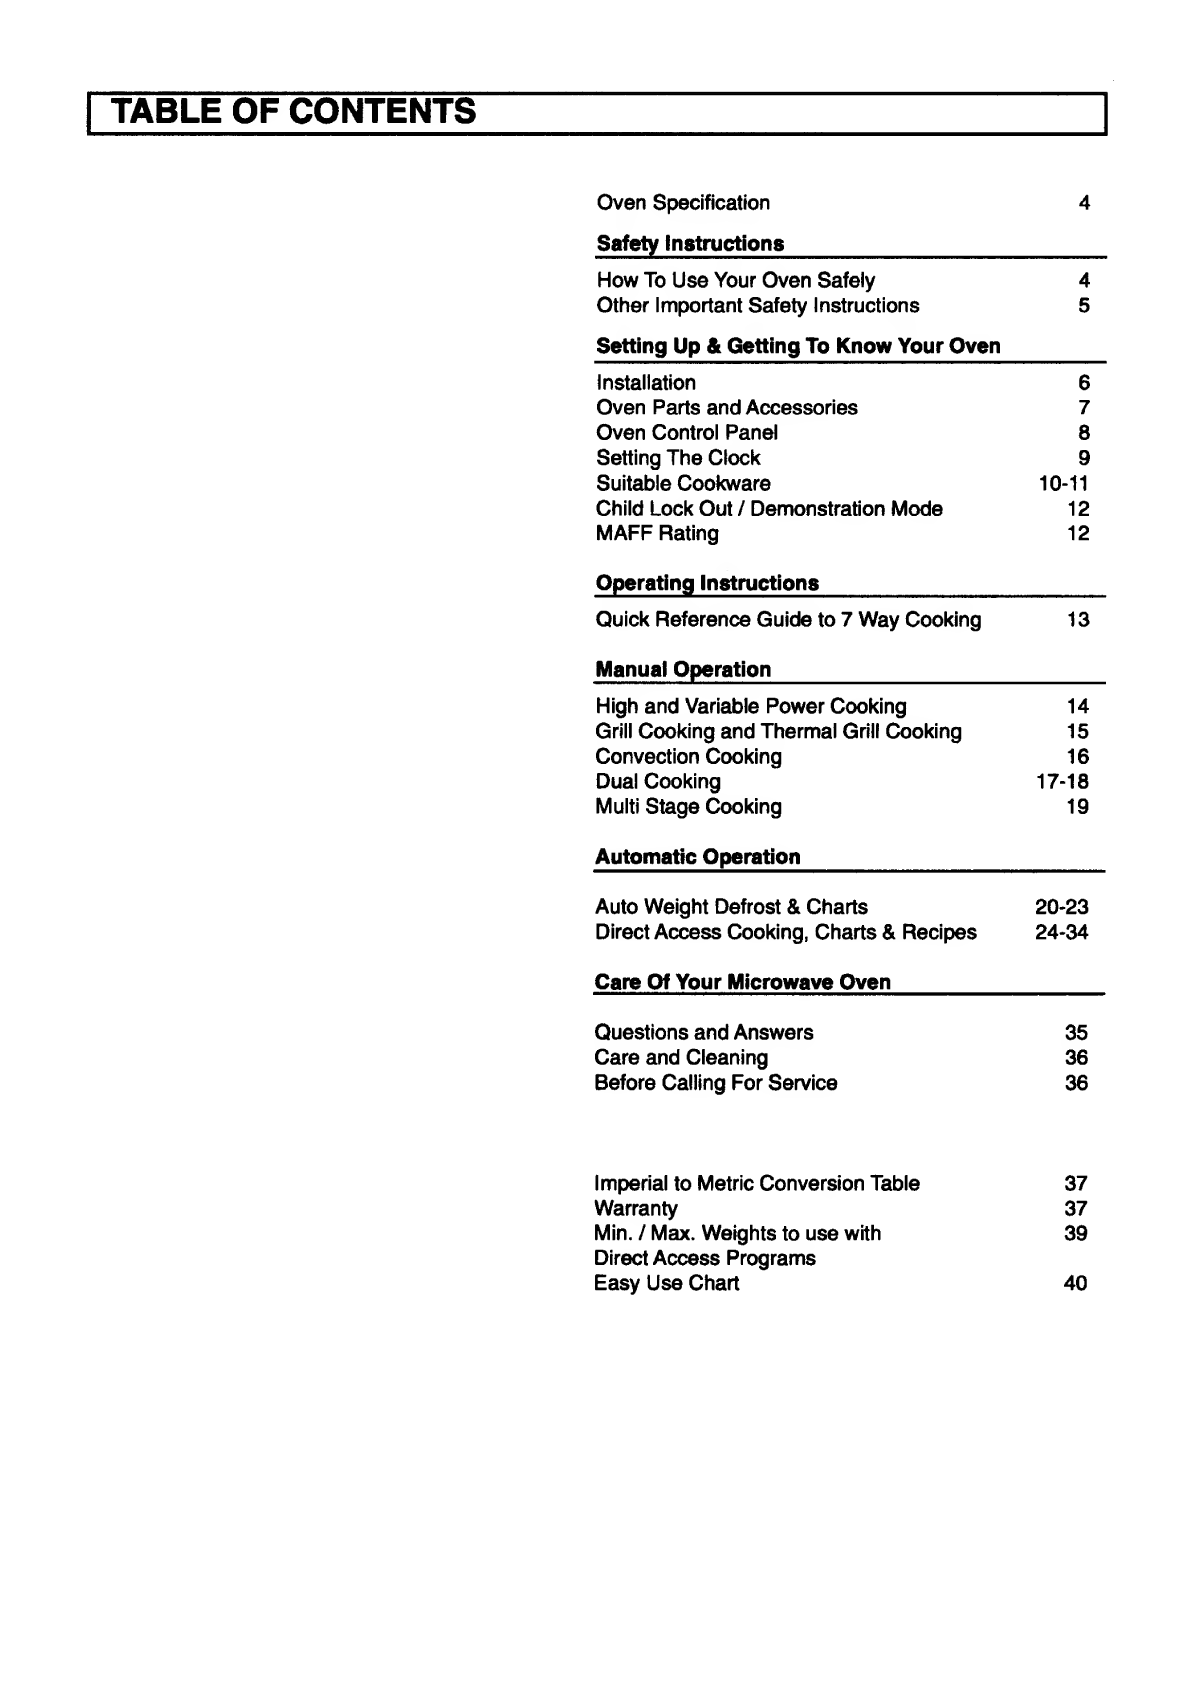
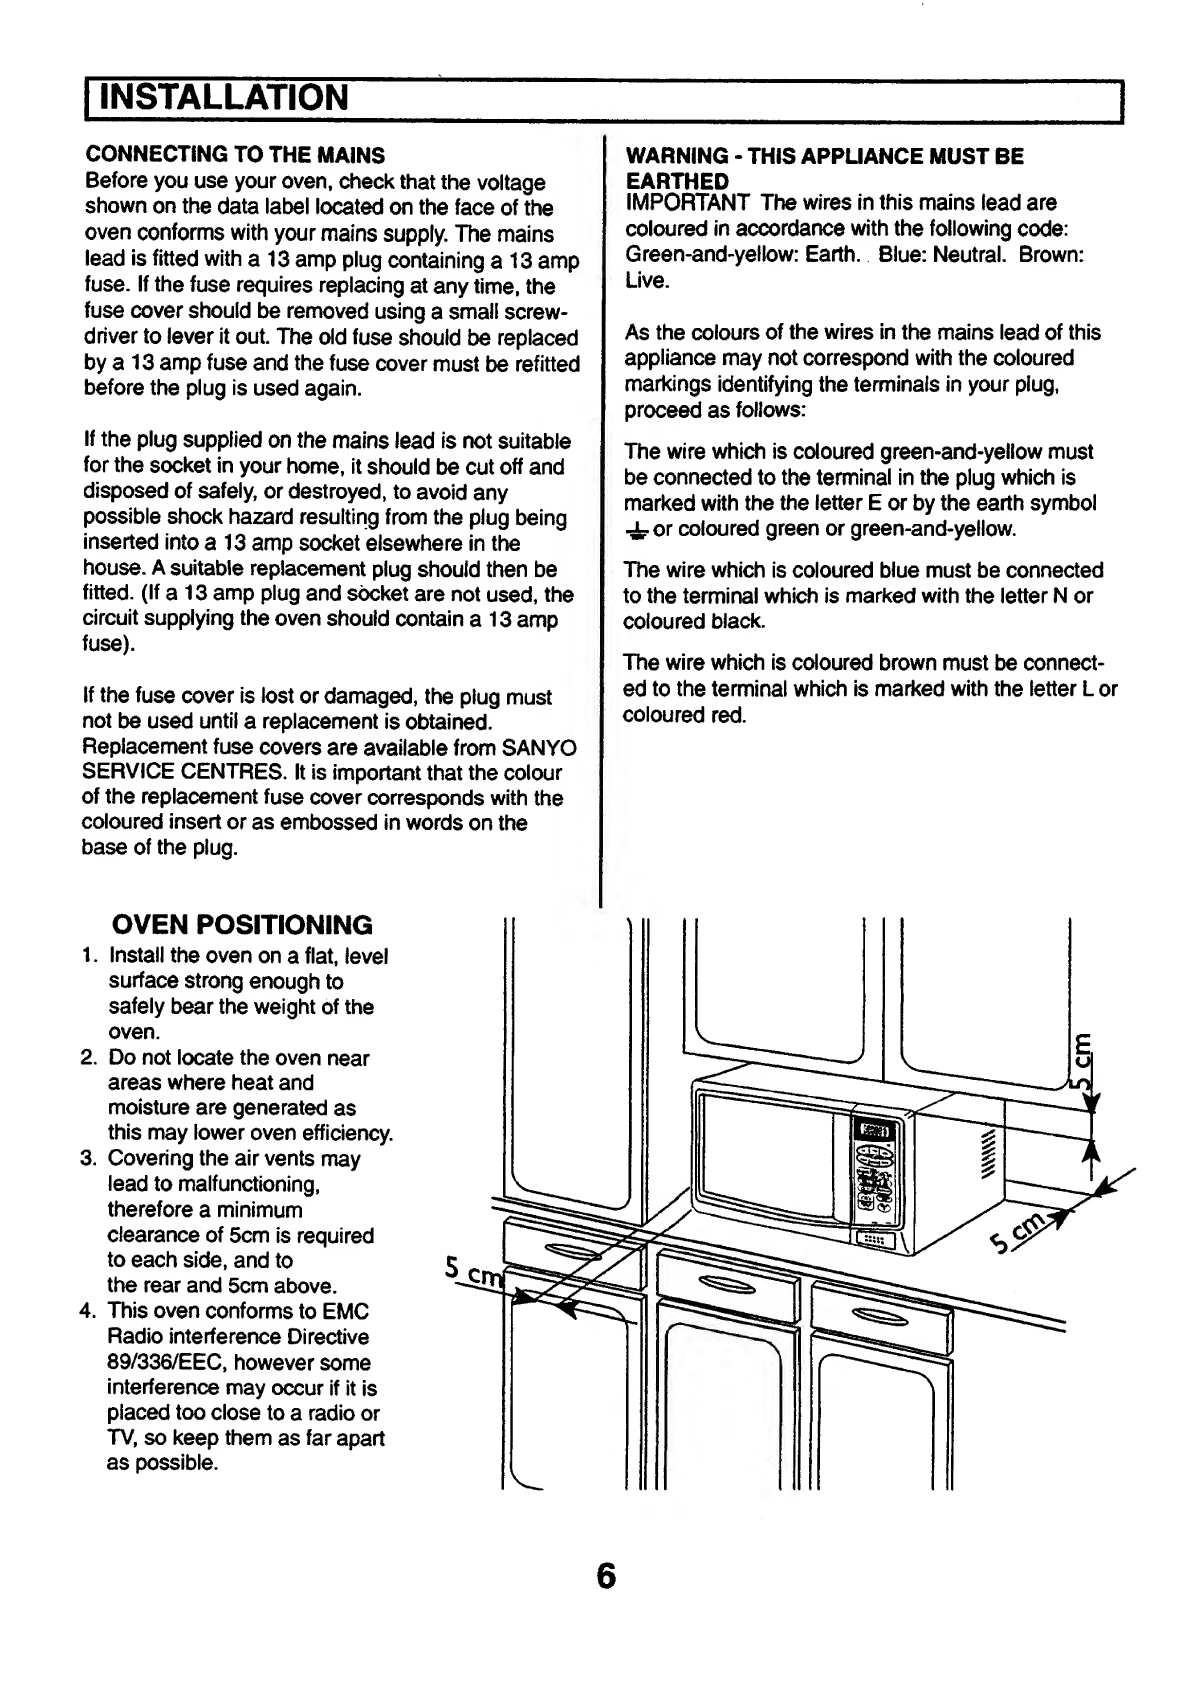
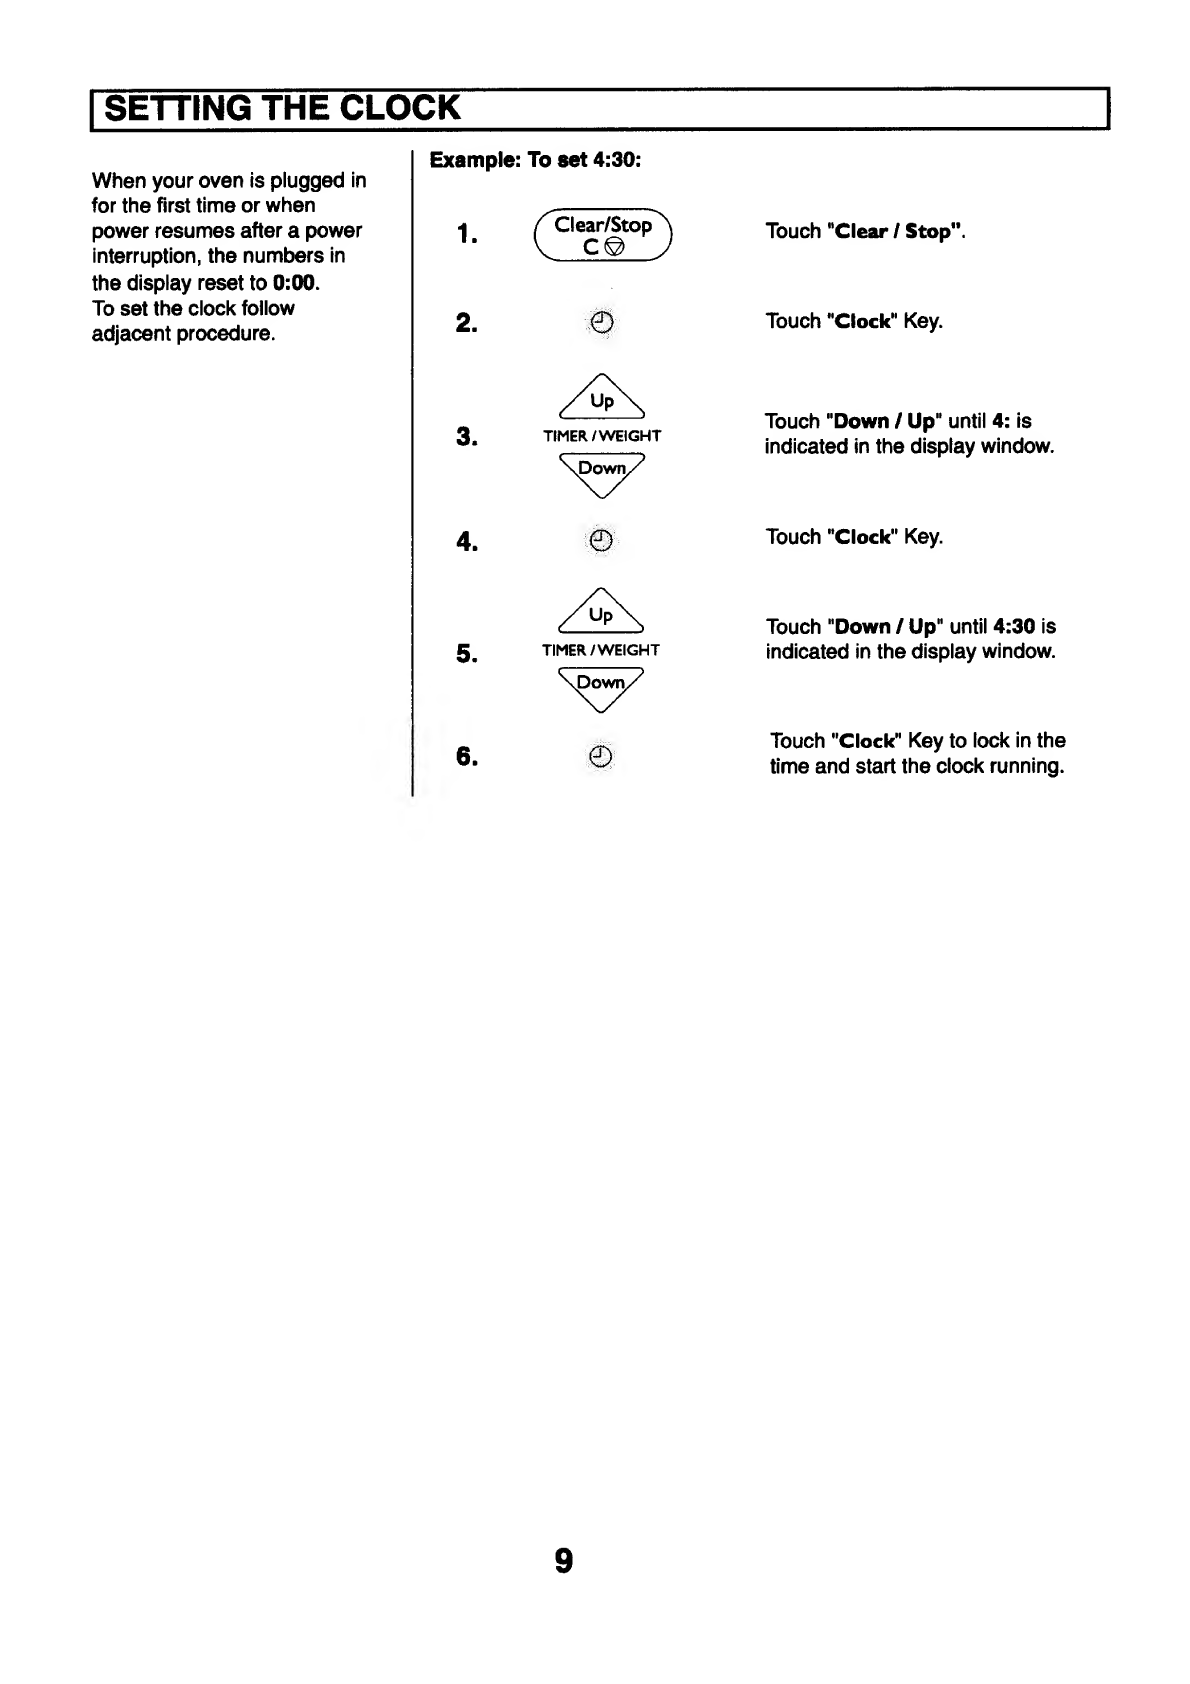
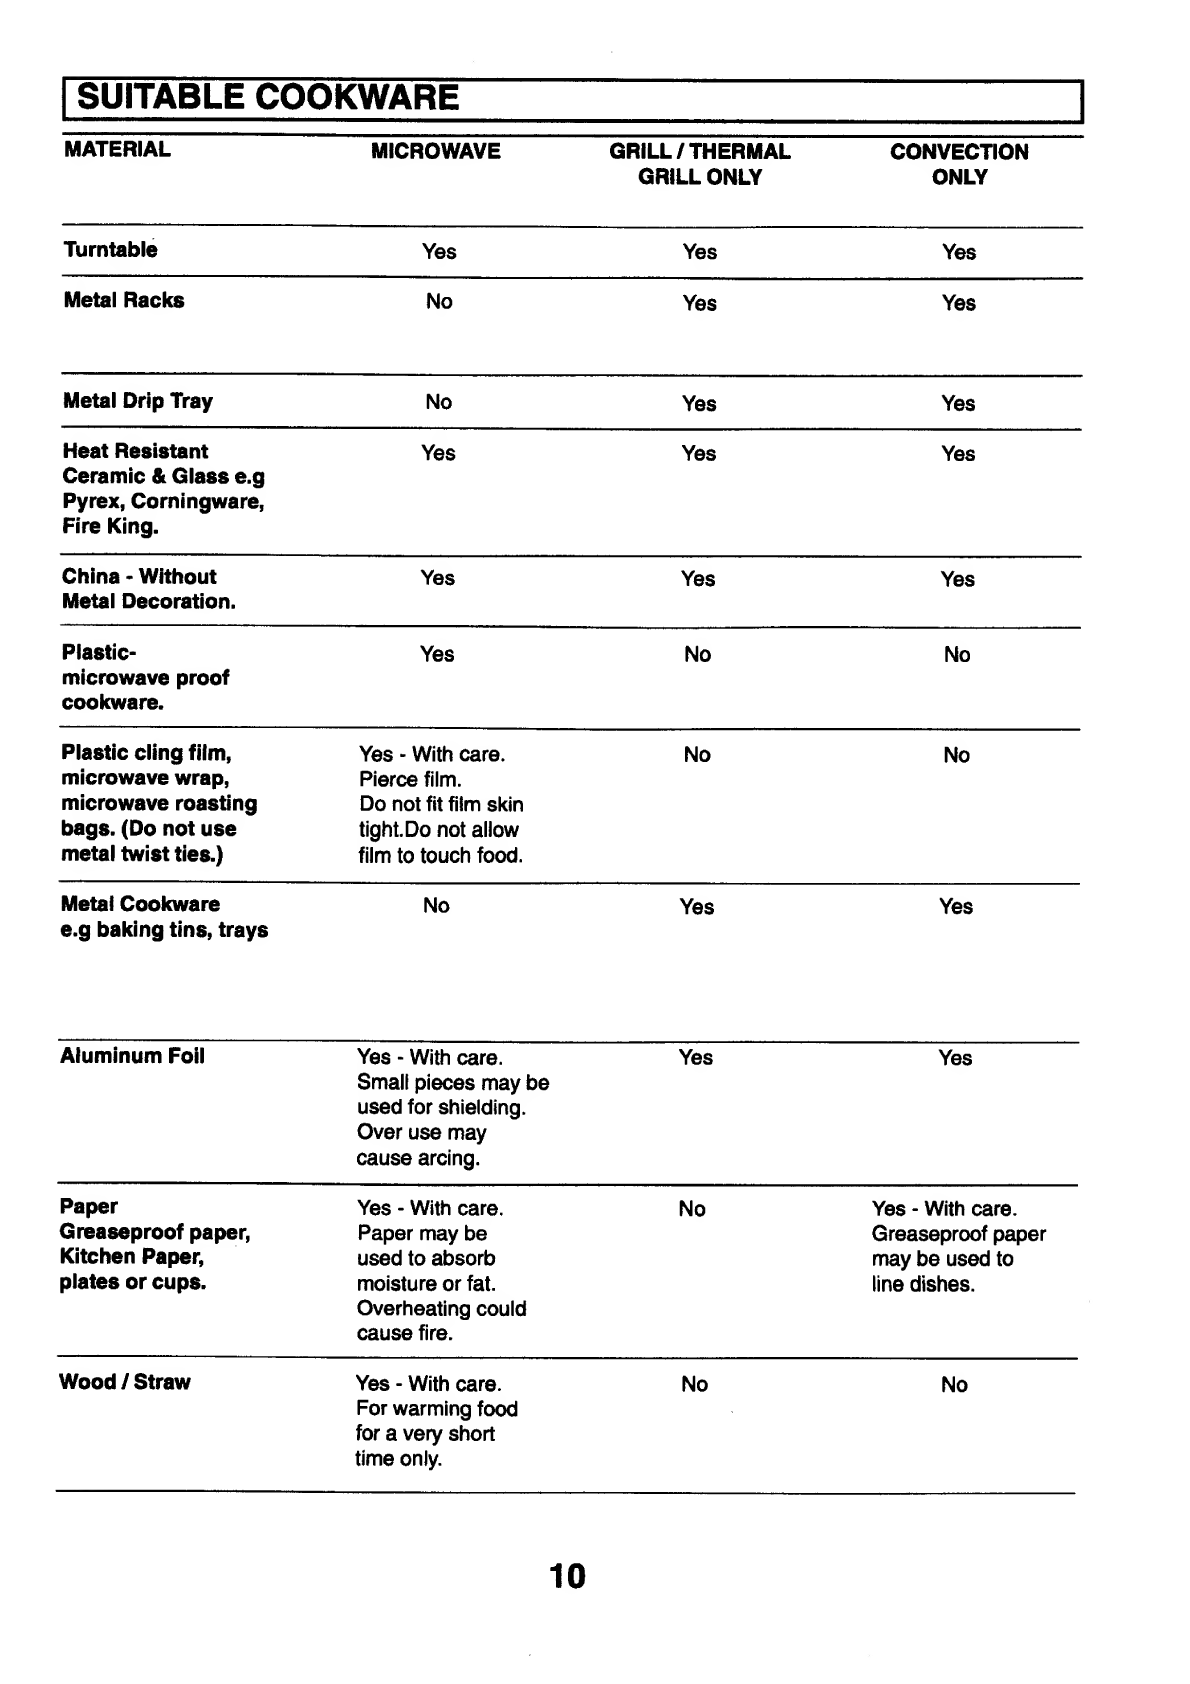
Sanyo EM-D754 User manual

SAtlYO
INSTRUCTION
MANUAL
EM-D754
Microwave
Oven
with
Convection
&
Grill
Read
these
instructions
carefully
before
use.
If
you
follow
these
instructions,
your
Microwave
Oven
will
serve
you
long
and
well.
EUK
English


TABLE
OF
CONTENTS
Oven
Specification
4
Safety
instructions
How
To
Use
Your
Oven
Safely
Other
Important
Safety
Instructions
Setting
Up
&
Getting
To
Know
Your
Oven
4
5
Installation
6
Oven
Parts
and
Accessories
7
Oven
Control
Panel
8
Setting
The
Clock
9
Suitable
Cookware
10-11
Child
Lock
Out
/
Demonstration
Mode
12
MAFF
Rating
12
Operating
Instructions
Quick
Reference
Guide
to
7
Way
Cooking
13
Manual
Operation
High
and
Variable
Power
Cooking
14
Grill
Cooking
and
Thermal
Grill
Cooking
15
Convection
Cooking
16
Dual
Cooking
17-18
Multi
Stage
Cooking
19
Automatic
Operation
Auto
Weight
Defrost
&
Charts
20-23
Direct
Access
Cooking,
Charts
&
Recipes
24-34
Care
Of
Your
Microwave
Oven
Questions
and
Answers
35
Care
and
Cleaning
36
Before
Calling
For
Service
36
Imperial
to
Metric
Conversion
Table
37
Warranty
37
Min.
/
Max.
Weights
to
use
with
39
Direct
Access
Programs
Easy
Use
Chart
40

SPECIFICATIONS
Power
Source
Maximum
Output
Power
Quartz
Grill
Convection
Heater
Oven
Capacity
Outside
Dimensions
(W
x
D
x
H)
Net
Weight
MAFF
Rating_
EM-D754
230
-
240
V
900
W*
1300
W
1200
W
0.8
cu.
ft.
570
x
482
x
378
24
Kg
900/E
'According
to
I
EC
705
test
procedures.
HOW
TO
USE
YOUR
OVEN
SAFELY
(MICROWAVE)
1.
When
boiling
water
or
other
liquids,
be
sure
to
use
a
wide
mouthed
container,
this
will
allow
air
bubbles
to
escape
freely
and
prevent
boiling
over.
Overheating
the
liquid
beyond
boiling
point
can
occur
without
the
evidence
of
bubbling.
This
could
result
in
a
sudden
boil
over
of
the
hot
liquid.
2.
Do
not
attempt
to
operate
the
oven
while
empty
as
this
will
cause
damage.
3.
Do
not
deep
fry
in
the
microwave
oven
as
the
temperature
of
the
oil
cannot
be
controlled
and
It
may
overheat.
4.
Never
completely
seal
containers
in
the
microwave
oven.
Coverings
are
necessary
but
containers
must
not
be
airtight.
5.
Small
quantities
of
food
with
low
moisture
content
or
high
fat
or
sugar
content
can
burn,
dry
out
or
catch
fire
if
cooked
or
re-heated
too
long.
Please
note
that
the
heating
/
cooking
period
required
is
extremely
short:
for
example
it
only
takes
approximately
15
seconds
to
heat
one
mince
pie
or
similar.
ALTHOUGH
YOUR
OVEN
IS
PROVIDED
WITH
SAFETY
FEATURES,
IT
IS
IMPORTANT
TO
OBSERVE
THE
FOLLOWING:
a.
Do
not
tamper
with
safety
interlocks.
b.
Do
not
place
any
object
between
the
oven
and
the
door
or
allow
any
food
residue
to
accumulate
on
sealing
surfaces.
Wipe
the
door
sealing
area
frequently
with
a
mild
detergent,
rinse
and
wipe
dry.
Never
use
abrasive
powders
or
pads.
c.
When
opened,
the
door
must
not
be
subjected
to
strain,
for
example,
a
child
hanging
on
an
opened
door
may
cause
the
oven
to
fall
forward
resulting
in
injury.
d.
If
any
damage
is
apparent,
do
not
operate
the
oven.
Contact
your
nearest
SANYO
SERVICE
CENTRE.
6.
Always
pierce
food
which
has
a
skin
or
membrane,
for
example,
eggs,
potatoes,
tomatoes,
apples,
sausages
etc.
If
you
don't
pierce
them
steam
will
build
up
inside
and
they
may
explode.
7.
When
disposable
containers
of
plastic,
paper
or
other
combustible
materials
are
used
to
reheat
food,
it
is
advisable
to
check
from
time
to
time
during
the
cooking
cycle.
NOTE
It
is
quite
normal
for
steam
to
be
emitted
around
the
door,
for
misting
to
occur
on
the
door,
or
even
for
water
droplets
to
appear
below
the
door
during
the
cooking
cycle.
This
is
merely
condensation
from
the
heat
of
the
food
and
does
not
affect
the
safety
of
your
oven.The
door
is
not
intended
to
seal
the
oven
cavity
completely
but
its
special
SANYO
design
contributes
to
the
complete
safety
of
the
appliance.

OTHER
IMPORTANT
SAFETY
INSTRUCTIONS
The
following
safety
precautions
should
be
followed
when
using
this
appliance:
1.
Read
all
instructions
before
first
use.
2.
When
using
the
grill
and
/
or
convection
function
for
the
first
time,
smoke
and
odour
may
be
given
off
for
a
few
minutes.
This
is
normal
during
first
operation,
and
is
no
cause
for
alarm.
3.
As
with
most
cooking
appliances,
close
supervision
is
necessary.
If
a
fire
should
start:
*
Keep
the
oven
door
closed.
*
Turn
the
oven
off.
*
Disconnect
the
power
cord
or
shut
off
the
power
at
the
mains.
Other
important
safety
points
to
remember
are:
WHEN
COOKING
BY
MICROWAVE:
1.
Do
not
use
wire
ties
in
the
oven.
Be
sure
to
inspect
purchased
items
for
wire
ties
and
remove
before
placing
food
in
the
oven.
2.
It
is
important
to
keep
the
oven
interior
clean.
Food
particles
left
on
the
oven
walls
reduce
the
efficiency
of
the
microwaves.
3.
Do
not
heat
foods
or
liquids
in
bottles
or
jars
with
lids
on.
Air
must
be
allowed
to
escape
from
the
container.
4.
Milk
or
food
for
babies
should
be
heated
on
400W.
it
should
then
be
stirred
thoroughly
and
tested
to
ensure
that
it
is
at
the
correct
temperature
before
giving
it
to
the
baby.
5.
Care
must
be
taken
when
removing
cups
of
hot
liquid
from
the
turntable.
Cups
should
be
lifted
not
slid
to
the
edge
of
the
turntable
to
prevent
tipping.
6.
Never
microwave
eggs
in
the
shell
since
they
may
explode.
The
egg
yolk
may
pop
because
of
a
build-up
of
steam
inside
the
membrane.
To
prevent
this,
pierce
the
membrane
before
cooking
it.
WHEN
COOKING
BY
GRILL
/
CONVECTION:
1.
Take
care
not
to
spill
water
on
the
glass
viewing
window
during
or
immediately
after
cooking
as
it
may
crack.
2.
Be
sure
to
use
an
oven
glove
when
loading
and
unloading
the
oven.
3.
Be
careful
not
to
touch
the
viewing
window
when
loading
or
unloading
the
oven.
4.
The
top
of
the
cabinet
gets
very
hot,
therefore
do
not
place
items
on
the
oven.
WARNING
(a)
Do
not
adjust
or
repair
microwave
oven
yourself.
Do
not
operate
the
oven
if
it
is
damaged,
until
it
has
been
repaired
by
a
service
engineer
trained
by
the
manufacturer.
(b)
It
is
dangerous
for
anyone
other
than
a
properly
qualified
engineer
trained
by
the
manufacturer
to
carry
out
adjustments
or
repairs.
(c)
If
the
power
supply
cord
is
damaged,
it
must
be
replaced
by
the
manufacturer,
as
a
specially
prepared
cord
is
required.
(d)
On
no
account
remove
or
interfere
with
any
parts
or
screws.
THIS
COULD
PROVE
VERY
DANGEROUS.
SAVE
THESE
INSTRUCTIONS
5

|
INSTALLATION
CONNECTING
TO
THE
MAINS
Before
you
use
your
oven,
check
that
the
voltage
shown
on
the
data
label
located
on
the
face
of
the
oven
conforms
with
your
mains
supply.
The
mains
lead
is
fitted
with
a
13
amp
plug
containing
a
13
amp
fuse.
If
the
fuse
requires
replacing
at
any
time,
the
fuse
cover
should
be
removed
using
a
small
screw¬
driver
to
lever
it
out
The
old
fuse
should
be
replaced
by
a
13
amp
fuse
and
the
fuse
cover
must
be
refitted
before
the
plug
is
used
again.
If
the
plug
supplied
on
the
mains
lead
is
not
suitable
for
the
socket
in
your
home,
it
should
be
cut
off
and
disposed
of
safely,
or
destroyed,
to
avoid
any
possible
shock
hazard
resulting
from
the
plug
being
inserted
into
a
13
amp
socket
elsewhere
in
the
house.
A
suitable
replacement
plug
should
then
be
fitted.
(If
a
13
amp
plug
and
socket
are
not
used,
the
circuit
supplying
the
oven
should
contain
a
13
amp
fuse).
If
the
fuse
cover
is
lost
or
damaged,
the
plug
must
not
be
used
until
a
replacement
is
obtained.
Replacement
fuse
covers
are
available
from
SANYO
SERVICE
CENTRES.
It
is
important
that
the
colour
of
the
replacement
fuse
cover
corresponds
with
the
coloured
insert
or
as
embossed
in
words
on
the
base
of
the
plug.
WARNING
-
THIS
APPLIANCE
MUST
BE
EARTHED
IMPORTANT
The
wires
in
this
mains
lead
are
coloured
in
accordance
with
the
following
code:
Green-and-yellow:
Earth.
Blue:
Neutral.
Brown:
Live.
As
the
colours
of
the
wires
in
the
mains
lead
of
this
appliance
may
not
correspond
with
the
coloured
markings
identifying
the
terminals
in
your
plug,
proceed
as
follows:
The
wire
which
is
coloured
green-and-yellow
must
be
connected
to
the
terminal
in
the
plug
which
is
marked
with
the
the
letter
E
or
by
the
earth
symbol
^
or
coloured
green
or
green-and-yellow.
The
wire
which
is
coloured
blue
must
be
connected
to
the
terminal
which
is
marked
with
the
letter
N
or
coloured
black.
The
wire
which
is
coloured
brown
must
be
connect¬
ed
to
the
terminal
which
is
marked
with
the
letter
L
or
coloured
red.
OVEN
POSITIONING
1.
Install
the
oven
on
a
flat,
level
surface
strong
enough
to
safely
bear
the
weight
of
the
oven.
2.
Do
not
locate
the
oven
near
areas
where
heat
and
moisture
are
generated
as
this
may
lower
oven
efficiency.
3.
Covering
the
air
vents
may
lead
to
malfunctioning,
therefore
a
minimum
clearance
of
5cm
is
required
to
each
side,
and
to
the
rear
and
5cm
above.
4.
This
oven
conforms
to
EMC
Radio
interference
Directive
89/336/EEC,
however
some
interference
may
occur
if
it
is
placed
too
close
to
a
radio
or
TV,
so
keep
them
as
far
apart
as
possible.
6

OVEN
PARTS
AND
ACCESSORIES
Your
oven
is
supplied
with
the
following
accessories:
Turntable
1
Instruction
manual
Turntable
roller
rest
1
Cookbook
Metal
rack
2
Drip
tray
1
1
1
Vents
Roller
Rest
Keyboard
Vents
Door
Release
Button
Metal
Rack
(High)
Metal
Rack
(Low)
TURNTABLE
INSTALLATION
Tumtab
Roller
Rest
1.
Place
the
roller
rest
on
the
cavity
bottom.
2.
Place
the
turntable
on
top
of
the
roller
rest
as
shown
in
the
diagram.
Make
sure
the
turntable
hub
is
securely
locked
in
the
turntable
shaft.
Never
place
the
turntable
upside
down.
•
Both
turntable
and
roller
rest
must
always
be
used
during
cooking.
•
All
food
and
containers
of
food
are
always
placed
on
this
turntable
for
cooking.
•
This
turntable
rotates
clockwise
and
anticlockwise;
this
is
normal.
Turntable
Shaft
This
turntable
returns
to
its
original
starting
position
when
cooking
is
finished.

OVEN
CONTROL
PANEL
1.
DISPLAY
WINDOW.
2.
INDICATORS:
Auto
/
Def./
Grill
/
Convec.
-
Cooking
mode
indicators.
Time
/
Start
/
Kg
-
A
flashing
indicator
that
prompts
you
to
enter
the
desired
cooking
time,
start
the
oven,
or
enter
food
weight.
100,150,400,650,750,900
-
Power
level
indicators.
KEYS:
3.
Clock
Set
4.
Direct
Access
menu
keypad.
5.
Auto
Defrost
6.
More
/
Less
key:-
Allows
you
to
slightly
increase
or
decrease
cooking
time
of
automatic
programs.
7.
Micro
Power.
8.
Convection
Temperature.
9.
Grill.
10.
Dual
Cook.
11.
Clear/Stop.
12.
Start
13.
Time
and
Weight
set

SETTING
THE
CLOCK
When
your
oven
is
plugged
in
for
the
first
time
or
when
power
resumes
after
a
power
interruption,
the
numbers
in
the
display
reset
to
0:00.
To
set
the
clock
follow
adjacent
procedure.
Example:
To
set
4:30:
1
f
Cl
ear/Stop
'
■
V
C@
J
2
.
#
/vp\
3.
TIMER/WEIGHT
6
.
m
Touch
"Clear
/
Stop”.
Touch
"Clock"
Key.
Touch
"Down
/
Up*
until
4:
is
indicated
in
the
display
window.
Touch
"Clock"
Key.
Touch
"Down
/
Up"
until
4:30
is
indicated
in
the
display
window.
Touch
"Clock"
Key
to
lock
in
the
time
and
start
the
clock
running.
9

SUITABLE
COOKWARE
MATERIAL
MICROWAVE
GRILL/THERMAL
GRILL
ONLY
CONVECTION
ONLY
Turntable
Yes
Yes
Yes
Metal
Racks
No
Yes
Yes
Metal
Drip
Tray
No
Yes
Yes
Heat
Resistant
Ceramic
&
Glass
e.g
Pyrex,
Corningware,
Fire
King.
Yes
Yes
Yes
China
-
Without
Metal
Decoration.
Yes
Yes
Yes
Plastic-
microwave
proof
cookware.
Yes
No
No
Plastic
cling
film,
microwave
wrap,
microwave
roasting
bags.
(Do
not
use
metal
twist
ties.)
Yes
-
With
care.
Pierce
film.
Do
not
fit
film
skin
tight.
Do
not
allow
film
to
touch
food.
No
No
Metal
Cookware
e.g
baking
tins,
trays
No
Yes
Yes
Aluminum
Foil
Yes
-
With
care.
Small
pieces
may
be
used
for
shielding.
Over
use
may
cause
arcing.
Yes
Yes
Paper
Greaseproof
paper,
Kitchen
Paper,
plates
or
cups.
Yes
-
With
care.
Paper
may
be
used
to
absorb
moisture
or
fat.
Overheating
could
cause
fire.
No
Yes
-
With
care.
Greaseproof
paper
may
be
used
to
line
dishes.
Wood
/
Straw
Yes
-
With
care.
For
warming
food
for
a
very
short
time
only.
No
No
10

SUITABLE
COOKWARE
(CONT.)
MATERIAL
DUAL
COOKING
GRILL
&
MICROWAVE
DUAL
COOKING
CONVECTION
&
MICROWAVE
DUAL
COOKING
CONVECTION
&
GRILL
Turntable
Yes
Yes
Yes
Metal
Racks
Yes
Yes
Yes
Metal
Drip
Tray
Yes
Yes
Yes
Heat
Resistant
Ceramic
&
Glass
e.g
Pyrex,
Comingware,
Fire
King.
Yes
Yes
Yes
China
-
Without
Metal
Decoration.
Yes
Yes
Yes
Plastic-
microwave
proof
cookware.
No
No
No
Plastic
cling
film,
microwave
wrap,
microwave
roasting
bags.
(Do
not
use
metal
twist
ties.)
No
No
No
Metal
Cookware
e.g
baking
tins,
trays
Yes
-
With
care.
Do
not
place
metal
cookware
on
metal
racks
or
on
metal
drip
tray.
Yes
-
With
care.
Do
not
place
metal
cookware
on
metal
racks
or
on
metal
drip
tray.
Yes
Aluminum
Foil
Yes
-
With
care.
Small
pieces
may
be
used
for
shielding.
Over
use
may
cause
arcing.
Yes
-
With
care.
Small
pieces
may
be
used
for
shielding.
Over
use
may
cause
arcing.
Yes
Paper
Greaseproof
paper
Kitchen
Paper,
plates
or
cups.
No
Yes
-
With
care.
Greaseproof
paper
may
be
used
to
line
dishes.
No
Wood
/
Straw
No
No
No
11

CHILD
LOCK-OUT
/
DEMONSTRATION
MODE
This
oven
has
a
safety
feature
which
prevents
the
accidental
running
of
the
oven
by
a
child.
Note:
After
the
child
lock
has
been
set,
the
oven
will
appear
to
operate
normally
if
the
keys
are
pressed.
However
the
oven
will
produce
NO
actual
microwave
power.
Demonstration
Mode:
When
in
child
lock
mode,
you
can
work
through
the
cooking
procedures
without
the
microwave
oven
operating.
To
cancel
Child
Lock
/
Demonstration
Mode
simply
repeat
setting
procedure.
Indicator
L
disappears
and
clock
display
reappears.
To
set:
1.
(Clffip)
Touch
"Clear
/
Stop".
2
.
Touch
"Clock"
Key.
TIMER/WEIGHT
Touch
"Down
/
Up"
until
11
:
is
indicated
in
the
display
window.
4
.
Touch
"Clock”
Key.
5
.
TIMER/WEIGHT
Touch
"Down
/
Up"
until
11:11
is
indicated
in
the
display
window.
6
.
Touch
"Start"
Key.
Indicator
L
lights
up
and
clock
display
reappears.
MAFF
RATING
_
Explanation
of
the
heating
category
label
for
microwave
ovens
and
small
packs
of
food
(up
to
500g
/1
lb
2oz,
typical
of
ready
meals
for
1
or
2
people)
as
agreed
by
MAFF
(the
Ministry
of
Agriculture,
Fisheries
and
Food)
in
conjunction
with
food
and
microwave
oven
manufacturers.
The
microwave
power
output
of
the
oven
in
watts,based
on
an
international
agreed
standard
(IEC
705).
This
letter
represents
the
heating
category
of
the
oven
to
be
used
when
microwaving
small
food
packs.
MICROWAVE
SYMBOL
oven
heating
catergory
power
output
B
D
650W
750W
6
5
6
5
minutes
minutes
Always
follow
instructions
found
on
food
packaging.
The
higher
the
power
output
and
heating
category
of
the
oven,
the
less
heating
time
is
required.
Always
ensure
that
food
is
piping
hot
before
serving.
12

QUICK
REFERENCE
GUIDE
TO
7
WAY
COOKING
COOKING
MODE
ACCESSORIES
TO
USE
SUGGESTED
USE
Microwave
Only
100,150,
400,
650,
750
&
900W.
Place
dish
directly
on
turntable.
Place
dish
on
low
rack
for
optimum
defrost
results.
Defrosting,
reheating,
cooking
vegetables,
rice,
pasta,
fish,
casserole,
sponge
puddings.
Grill
Only
(1
Setting)
Place
high
rack
on
turntable.
For
toasting
bread,
muffins
etc.
Thermal
Grill
(1
Setting)
Place
high
rack
on
metal
drip
tray
on
turntable.
For
cooking
small
chops,
sausages,
fish
fingers
etc.
Convection
Only
(40
-
250°C)
Place
dish
directly
on
turntable
or
on
low
rack.
For
cooking
meringues,
biscuits,
scones,
bread,
Yorkshire
Puddings,
pastry
items
e.g
pies,
tarts
etc.
Thermal
Grill
&
100,
150,400,650W
Microwave.
Place
high
or
low
rack
on
metal
drip
tray
on
turntable.
For
faster
cooking
of
traditionally
grilled
foods
e.g
chops,
sausages,
chicken
pieces
etc.
Convection
&
Microwave
(Variable
combinations
of
convection
temperature
and
microwave
power.)
100
-
250‘C
convec.
+
100,150,
400,
650W
micro.
Place
dish
directly
on
turntable
or
on
low
rack.
For
faster
cooking
of
many
traditionally
baked
foods
e.g
baked
potatoes,pizza,
roast
poultry
/
joints,
roast
potatoes,
some
cakes,
au
gratin
dishes,
frozen
crispy
crumb
convenience
foods.
For
crisp
reheating
of
pastry
items.
Convection
with
Grill
(210
-
250°C)
Place
metal
drip
tray
on
high
rack.
For
fast
cooking
and
crisping
of
small
items
e.g
frozen
potato
products,
fish
fingers,
chicken
nuggets
etc.
13

HIGH
AND
VARIABLE
POWER
COOKING
This
basic
microwave
cooking
method
allows
you
to
cook
food
for
a
desired
time.
In
addition
to
the
maximum
power
level,
you
can
select
different
microwave
power
from
5
other
levels,
100W
to
750W
for
the
foods
that
require
slower
cooking.
Foods
with
high
moisture
content
should
be
cooked
on
maximum
power,
as
this
is
the
fastest
cooking
method
and
best
maintains
the
natural
flavour
and
texture
of
the
foods.
Example:
To
cook
at
650W
for
1
min
30
secs
1
.
Clear/Stop
CQ
Touch
"Clear/Stop".
2
.
licro
Power
Touch
"Power"
Key
3
times.
The
indicator
above
650
lights
up
and
the
time
prompt
flashes.
3
.
TIMER/WEIGHT
Touch
"Down
/
Up"
until
1.30
is
indicated
in
the
display
window.
The
Start
prompt
flashes.
Manual
Defrosting
For
manual
defrosting
(without
using
Auto
Defrost
features),
use
150W.
To
speed
up
the
defrosting
of
dense
foods
over
450g
(1
lb),
the
oven
may
start
on
full
power
for
1-3
minutes,
then
be
reduced
to
I
SOW
until
defrosting
is
complete.
NOTE:
The
time
increments
for
the
Up
/
Down
keys
are
as
follows:
TIME
INCREMENT
0-5
min.
15
secs.
5-10
min.
30
secs.
10-30
min.
1
min.
30-90
min.
5
min.
4
.
Touch
"Start".
To
set
the
variable
cooking
levels
the
Power
key
should
be
touched
as
follows:
900W
ONCE
750W
2
TIMES
650W
3
TIMES
400W
4
TIMES
150W
5
TIMES
100W
6
TIMES
POWER
SETTING
SUGGESTED
USE
I00W
Softening
cream
cheese.
150
W
Keeping
foods
warm,
defrosting.
400W
Completing
the
cooking
cycle
of
pot
roasts.
Completing
the
cooking
cycle
of
some
casserole
and
stews.
Baked
custards
and
cheese
cakes.
650
W
Roasting
meats.
750
W
Baking
cakes.
Reheating
precooked
foods.
900
W
Boiling
liquids.
Baking
fish,
vegetables.
14

GRILL
COOKING
Grill
1
This
method
is
ideal
for
toasting
bread
or
muffins.
Remember
the
oven
will
be
hot.
Place
all
food
on
high
grilling
rack.
Grill
cooking
time
can
be
set
to
a
maximum
of
90
minutes.
Example:
Set
oven
to
Grill
for
15
minutes.
1.
(
a
t
S
OP
J
Touch
"Clear/Stop".
Touch
"Grill"
key
once.
1
is
indicated.
The
Grill
indicator
lights
up
and
the
time
prompt
flashes.
3
.
Touch
“Down/Up"
until
15.00
is
indicated
in
the
display
window.
The
Start
prompt
flashes.
THERMAL
GRILL
COOKING
During
thermal
grill
cooking,
both
fan
and
grill
element
operate
together
to
circulate
hot
air
around
the
food
to
assist
the
cooking
process.
This
method
is
ideal
for
small
items
such
as
sausages
which
you
would
usually
grill.
Place
food
on
the
high
grill
rack
on
the
metal
drip
tray.
Do
not
use
thermal
grill
for
toasting
bread
as
the
result
will
be
rather
dry.
The
grill
cooking
time
can
be
set
to
a
maximum
of
90
minutes.
Example:
Set
oven
to
Thermal
Grill
for
15
minutes.
1
.
Clear/Stop
C©
Touch
"Clear
/
Stop".
2
.
Touch
"Grill"
key
twice.
2
is
indicated.
The
Grill
indicator
lights
up
and
the
time
prompt
flashes.
3
.
Touch
"Down/Up"
until
15.00
is
indicated
in
the
display
window.
The
Start
prompt
flashes.
15

CONVECTION
COOKING
This
oven
can
be
used
as
a
conventional
oven
by
using
the
fan
assisted
convection
function.
The
temperature
range
is
40
-
250°C.
Best
results
are
obtained
if
the
oven
is
preheated
first.
Example:
Set
oven
to
Preheat
to
200°C.
(The
oven
is
preheated
before
the
food
is
added)
Qagg-Q
Touch
"Clear
/
Stop".
Note:
If
the
cooking
is
not
started
immediately
after
preheating,
the
preheated
oven
temperature
will
continue
to
flash
in
the
display
and
the
temperature
will
be
maintained
for
15
minutes.
The
oven
cannot
be
preheated
to
40*C.
Convection
cooking
is
ideal
for
cooking
meringues,
biscuits,
scones,
bread,
Yorkshire
puddings,
large
fruit
cakes
and
all
pastries.
It
can
also
be
used
for
proving
bread
at
40°C.
The
convection
cooking
time
can
be
set
for
a
maximum
of
90
minutes.
Touch
"ConvectionTemperature"
key
twelve
times.
The
Convection
indicator
lights
up
and
200°C
is
displayed.
._
Touch
"Start".
The
oven
will
Start's
now
preheat.
When
the
correct
<j>
)
temperature
is
reached
the
oven
■
—
■
—^
will
beep
3
times
and
200°C
will
flash
in
the
display.
You
may
now
set
the
convection
cooking
time
as
below
and
begin
cooking.
Convec.Temp.
ffl
Place
heatproof
cookware
directly
on
the
low
rack.
As
previously
stated
best
results
are
obtained
if
the
oven
is
preheated
before
convection
cooking.
However
it
is
possible
to
begin
convection
cooking
without
preheating,
ie
for
proving
bread
at
40*C.
Simply
omit
steps
3.
and
4.
Example:
To
then
set
the
preheated
oven
to
cook
using
Convection
for
15
minutes,
at
200°C.
4
.
Clear/Stop
C©
Touch
"Clear
/
Stop”,
once.
200*C
shows
in
display
place
food
on
the
low
rack
in
the
oven.
As
there
is
no
microwave
energy
being
used
you
can
place
metal
tins
directly
onto
the
metal
racks
with
no
danger
of
arcing.
TIMER/WEIGHT
Touch
"Down/Up"
until
15.00
is
indicated
in
the
display
window.
The
Start
prompt
flashes.
6
.
Touch
"Start".
16

DUAL
COOKING
This
oven
offers
you
s
choice
of
three
methods
of
Duel
cooking;
1.
Convection
+
Microwave
-
For
baking
and
roasting.
2.
Thermal
Grill
+
Convection
-
For
fast
crisping.
3.
Thermal
Grill
+
Microwave
-
For
fast
grilling.
This
function
allows
you
to
combine
convection
operation
(100'C
-
250*C)
with
any
one
of
the
four
(100W,
150W,
400W,
650W)
microwave
power
levels
to
produce
traditional
baked
or
roasted
results
in
less
time.
This
function
has
many
uses,
particularly
roasting
meat
and
poultry,
cooking
pizza,
baked
pota¬
toes,
roast
potatoes,
baking
some
cakes,
frozen
and
crispy
crumb
foods
and
reheating
pastries.
When
cooking
with
dual
convection
+
microwave
it
is
not
necessary
to
preheat
the
oven.
Food
should
be
placed
on
the
low
rack
or
on
the
turntable.
Example:
Set
oven
to
Dual
Convection
+
Microwave
for
IS
minutes,
at
220°C
and
650W
microwave
power.
Clear/Stop
C©
Dual
Cook
Convec.Tanp.
Touch
"Clear
/
Stop".
Touch
"Dual
Cook”
key
once.
The
Convection
and
650W
microwave
power
indicators
light
up.
200°C
is
displayed
and
the
time
prompt
flashes.
Touch
"Convection
Temperature"
key
twice.
220°C
is
displayed
and
the
time
prompt
flashes.
Do
NOT
place
metal
cookware
directly
on
the
low
rack
when
using
this
function
as
arcing
may
occur.
The
Dual
Convection
+
Microwave
function
can
be
set
for
a
maximum
of
90
minutes.
TIMER/WEIGHT
Start
<J>
Touch
"Down/Up"
until
15.00
is
indicated
in
the
display
window.
The
Start
prompt
flashes.
Touch
"Start".
17

DUAL
COOKING
(CONT.)
Thermal
Grill
with
Convection
This
function
allows
you
to
combine
convection
operation
with
the
thermal
grill,
and
is
ideal
for
cooking
small
foods
which
require
crisping
e.g
frozen
potato
products
such
as
oven
chips,
potato
croquettes
or
waffles,
fish
fingers,
chicken
nuggets,
beefburgers
and
sausages.
Food
should
be
placed
on
the
high
rack
which
is
on
the
turntable.
Alternatively
food
maybe
placed
on
the
metal
drip
tray
on
the
high
rack.
Example:
Set
oven
to
Dual
Thermal
Grill
with
Convection
for
15
minutes,
at
230°C.
Clear/StopA
Touch
"Clear/Stop”.
V
c@
J
2
.
Touch
"Dual
Cook"
key
twice.
The
Thermal
Grill
and
Convection
indicators
light
up.
210°C
is
displayed
and
the
time
prompt
flashes.
3
.
Convec.Temp.
ffl
Touch
"Convection
Temperature"
key
twice.
230°C
is
displayed
and
the
time
prompt
flashes.
The
Dual
Convection
+
Thermal
Grill
function
can
be
set
for
a
maximum
of
90
minutes.
4
.
TIMER/WEIGHT
Touch
"Down/Up"
until
15.00
is
indicated
in
the
display
window.
The
Start
prompt
flashes.
Start
\
Touch
"Start".
<£>
J
Example:
Set
oven
to
Dual
Thermal
Grill
with
Microwave
for
15
minutes,
at
150W
microwave
power.
Thermal
Grill
+
Microwave
This
oven
has
four
settings:
Thermal
Grill
+
100W
Thermal
Grill
+
150W
Thermal
Grill
+
400W
Thermal
Grill
+
650W
This
function
allows
you
to
combine
the
speed
of
a
microwave
with
the
browning
and
crisping
of
a
grill,
ideal
for
all
foods
that
would
usually
be
grilled
e.g
sausages,
chops,
chicken
pieces
etc.
The
Dual
Thermal
Grill
+
Microwave
function
can
be
set
for
a
maximum
of
90
minutes.
f
Clear/StopA
V
C©
J
Touch
“Clear/Stop".
Touch
"Dual
Cook"
key
three
times.
The
Thermal
Grill
and
650W
Microwave
power
indicators
light
up.
2
is
displayed
and
the
time
prompt
flashes.
Touch
"Micro
Power"
key
twice.
150W
is
indicated
and
the
time
prompt
flashes.
Touch
"Down/Up"
until
15.00
is
indicated
in
the
display
window.
The
Start
prompt
flashes.
Touch
"Start".
18

MULTI-STAGE
COOKING
Multi
stage
cooking
is
ideal
for
sequential
cooking.
It
allows
you
to
cook
at
different
power
levels
and
with
different
cooking
modes
for
a
set
time.
Up
to
three
stages
may
be
set.
All
the
stages
should
be
set
before
starting
the
oven.
The
following
table
shows
the
combinations
possible
when
cooking
with
multi-stages:
1st
2nd
3rd
Micro
Micro
Micro
Micro
Micro
Micro
Micro
Grill
Micro
Micro
Thermal
grin
Micro
Micro
Convection
Micro
Micro
Dual
Micro
Grill
Micro
Thermal
grill
Micro
Convection
Micro
Dual
NOTE:
Dual
cook
-
This
is
microwave
with
grill
or
convection
at
the
same
time,
or
convection
with
grill
at
the
same
time.
After
grill,
thermal
grill,
convection
or
dual
cooking
it
is
NOT
possible
to
set
microwave.
For
three
stage
cooking,
follow
same
procedure
as
shown,
simply
insert
third
stage
at
step
5,
then
press
start.
Example:
To
set
the
oven
to
microwave
on
650W
for
10
minutes,
and
then
Grill
for
5
minutes.
Clear/Stop
C©
Touch
‘Clear
/
Stop
1
6
.
f
Start
V
<$>
Touch
“Power"
key
3
times.
The
indicator
above
the
650W
lights
up
and
the
Time
prompt
flashes.
Touch
the
"Down
/
Up"
until
10.00
appears
in
the
display
window.
The
Start
prompt
flashes.
Touch
"Grill''
key
once.
The
Grill
indicator
lights
up,
1
is
displayed
and
the
time
prompt
flashes.
Touch
the
"Down
/
Up"
until
5.00
appears
in
the
display
window.
The
Start
prompt
flashes.
Touch
"Start".

AUTO
WEIGHT
DEFROST
This
feature
allows
you
to
accurately
defrost
meat,
poultry,
fish
or
bread.
Simply
enter
the
weight
of
the
food
and
the
oven
will
select
the
correct
defrosting
time.
An
adjust
+/-
key
may
be
used
to
increase
or
decrease
the
defrosting
time
as
necessary.
Defrost
Program
Meat
DEF
1
Poultry
=
DEF
2
Fish
=
DEF
3
Bread
=
DEF
4
Example:
To
Defrost
a
1.0
Kg
Chicken
using
adjust
"+
n
The
chart
below
indicates
the
maximum
/
minimum
weights
for
use
with
Auto
Weight
Defrost
Programs;
Defrost
Program
Min.
Weight
Max.
Weight
1.
Meat
0.1
kg
2.0
kg
2.
Poultry
0.1
kg
2.0
kg
3.
Fish
lOOg
lOOOg
4.
Bread
lOOg
900g
On
page
21
are
some
hints
and
tips
for
getting
the
best
performance
from
these
programs,
however
always
refer
to
the
Auto
Weight
Defrost
Chart
for
full
details.
1
.
2
.
3.
(<*
■
§
*
)
Touch
"Clear
/
Stop".
fmoDefro$t\
LTy
TIMER/WEIGHT
Touch
“Auto
Defrost"
twice
to
select
Poultry
Defrost.
The
word
“DEF
2“
appears
in
the
display
window
and
the
indicators
below
Auto
and
Def
light
up.
The
weight
prompt
flashes.
Touch
"Down
/
Up"
until
1.0
Kg
is
indicated
in
the
display
window.
Important:
WHEN
USING
FOIL
FOR
SHIELDING
IT
IS
IMPORTANT
THAT
THE
4.
FOIL
DOES
NOT
TOUCH
THE
WALLS
OF
THE
OVEN.
Auto
Weight
Defrosting
5.
chart
appears
on
pages
22-23.
Touch
"More"
key
to
increase
defrosting
time
as
desired.
A
A
is
indicated
in
the
display
window
and
the
Start
prompt
flashes.
Touch
"Start".
6.
PAUSE
The
Auto
Weight
Defrost
programs
have
a
built-in
pause
function
to
allow
for
checking
and
rearranging
of
food.
On
commencing
Auto
Weight
Defrosting
the
time
for
the
first
defrost
period
will
countdown
in
the
display.
At
the
pause
rearrange
the
food
as
recommended
in
the
defrost
table,
close
the
door
and
press
"Start".
The
defrost
time
for
the
second
defrost
period
will
countdown
in
the
display.
If
you
do
not
open
the
door
at
the
pause,
the
oven
will
restart
after
approximately
2
minutes
and
commences
the
second
defrost
period.
20
Table of contents
Other Sanyo Microwave Oven manuals

Sanyo
Sanyo EM-G475AS User manual

Sanyo
Sanyo EM-G454EUK User manual

Sanyo
Sanyo EMS-8600S User manual

Sanyo
Sanyo EM-X690S User manual

Sanyo
Sanyo EM-X475S User manual

Sanyo
Sanyo EM-S9000 Use and care manual

Sanyo
Sanyo EM-C8787B UK2 User manual

Sanyo
Sanyo EM-C950 User manual

Sanyo
Sanyo EM-G450 User manual

Sanyo
Sanyo EM-S2298V User manual

Sanyo
Sanyo EM-870F User manual

Sanyo
Sanyo EM-C5779V User manual

Sanyo
Sanyo EM-X470 User manual

Sanyo
Sanyo EM-C8787V User manual

Sanyo
Sanyo EM800TS User manual

Sanyo
Sanyo EM-S7720B User manual

Sanyo
Sanyo EM-G5595S User manual

Sanyo
Sanyo EM-P495WS User manual

Sanyo
Sanyo EM-G7786V User manual

Sanyo
Sanyo EM-C2000 User manual