Sanyo CE21DN6F-C User manual

CE21DN6F-C
CE28DN6F-C
Please read this Instruction book before using your television. We wish you many hours of pleasure from your new television.
Bitte lesen Sie diese Bedienungsanleitung, bevor Sie Ihren Fernseher benutzen.Wir wünschen Ihnen viel Vergnügen mit Ihrem
neuen Fernseher.
Nous vous recommandons de lire attentivement les consignes suivantes avant d’utiliser ce téléviseur et nous vous souhaitons
de nombreuses années d’utilisation sans souci.
Lees deze handleiding door voor u uwTV in gebruik neemt.Wij wensen u veel plezier met uw nieuwe TV.
English Page 2~16
Deutsch Seite 17~31
Français Page 32~46
Nederlands Bladzijde 47~61
Colour Television
Farbfernsehapparat
Téléviseur couleur
Kleurentelevisie
Instruction Manual
Bedienungsanleitung
Manuel d'utilisation
Gebruiksaanwijzing
GB
D
F
NL

2
SAFETY PRECA
SAFETY PRECAUTIONS
UTIONS
Do not allow anything to rest on the
power cord.
Do not locate this television receiver
w
here the cord will be damaged by
people walking on it.
Do not overload wall outlets and
extension cords as this can result in
fire or electric shock.
Slots and openings in the cabinet
and in the back or bottom are
provided for ventilation to ensure
reliable operation and to protect it
from overheating.These openings
must not be blocked or covered.
The opening should never be
covered with a cloth orother material,
and the bottom openings should
not be blocked by placing the
television receiver on a bed, sofa,
rug, or other similar surface.
This television receiver should
never be placed near or over a
radiator or heater.
Do not place your television receiver
on an unstable stand, shelf or table.
Serious injury to an individual, and
damage to the television may result
if it should fall.Your sales person
can recommend approved stands or
shelf and wall mounting instructions.
If the television is built into a unit, or
enclosed, the minimum distances
for ventilation must be maintained.
Heat build up can reduce the life of
your television, and can be
dangerous.
This television receiver should be
operated only from the type of
power source indicated on the
television or as indicated in the
Operating Instructions. If you are
not sure of the type of power
supply in your home, consult your
sales person or your local power
company.
Never add accessories that have
not been specifically designed for
this television.
Do not drop or push objects into
the television cabinet slots or
openings. Some internal parts carry
hazardous voltages and contact
may result in an electric shock
hazard. Never spill liquids of any
kind on the television receiver.
Do not expose the television
receiver to rain or use near water.
For example, near a bathtub,
kitchen sink, in a wet basement,
etc. Before cleaning, unplug the
television receiver from the wall
socket.
Never stand on, lean on or push
suddenly the television or its stand.
You should pay special attention to
children. Serious injury may result
if it should fall.
Do not apply liquid cleaners or
aerosol cleaners directly onto the
television receiver. Use a damp
cloth for cleaning.
MINIMUM DISTANCES
10cm
5cm
20cm
10cm
!
Installation
!
Use
CAUTION: Please read and retain for your safety. This unit has been engineered and manufactured to assure your personal safety.
But improper use can result in potential electric shock or fire hazards. In order not to defeat the safeguards incorporated in this receiver observe
the following basic rules for its installation, use and servicing.
GBGB

INST
INSTALLA
ALLATION / GENERAL OPERA
TION / GENERAL OPERATION
TION
The TV set is prepared for a mains voltage AC220~240V, 50Hz.
Connect the power cord of the TV set to a wall outlet.When the TV
set is not to be used for an extended period of time, it is advisable to
disconnect the power cord from the power outlet.
WARNING! High voltages are used in the operation of this set.
Refer service to qualified service personnel.
This TV set provides a self-automatic tuning function called
“Plug & Play”. The first time you switch on thisTV set, it will
automatically begin to search and store all available channels.
To ensure that this feature works properly please follow the
steps below before you switch on the TV set.
1. Connect your aerial cable socket to the rear of the TV. Don’t worry
about other AV equipment you should add this later referring to the
section “Connecting AV equipment” in the instruction manual.
2. Plug the Mains cable plug into a wall socket.
✐
This TV set is prepared for a mains voltage of AC220~240V 50Hz.
3. You are now ready to switch on. Simply press the Mains ON/OFF
switch on the front of the TV set.
✐
A red power indicator will appear.
A self-automatic tuning system will start as follows;
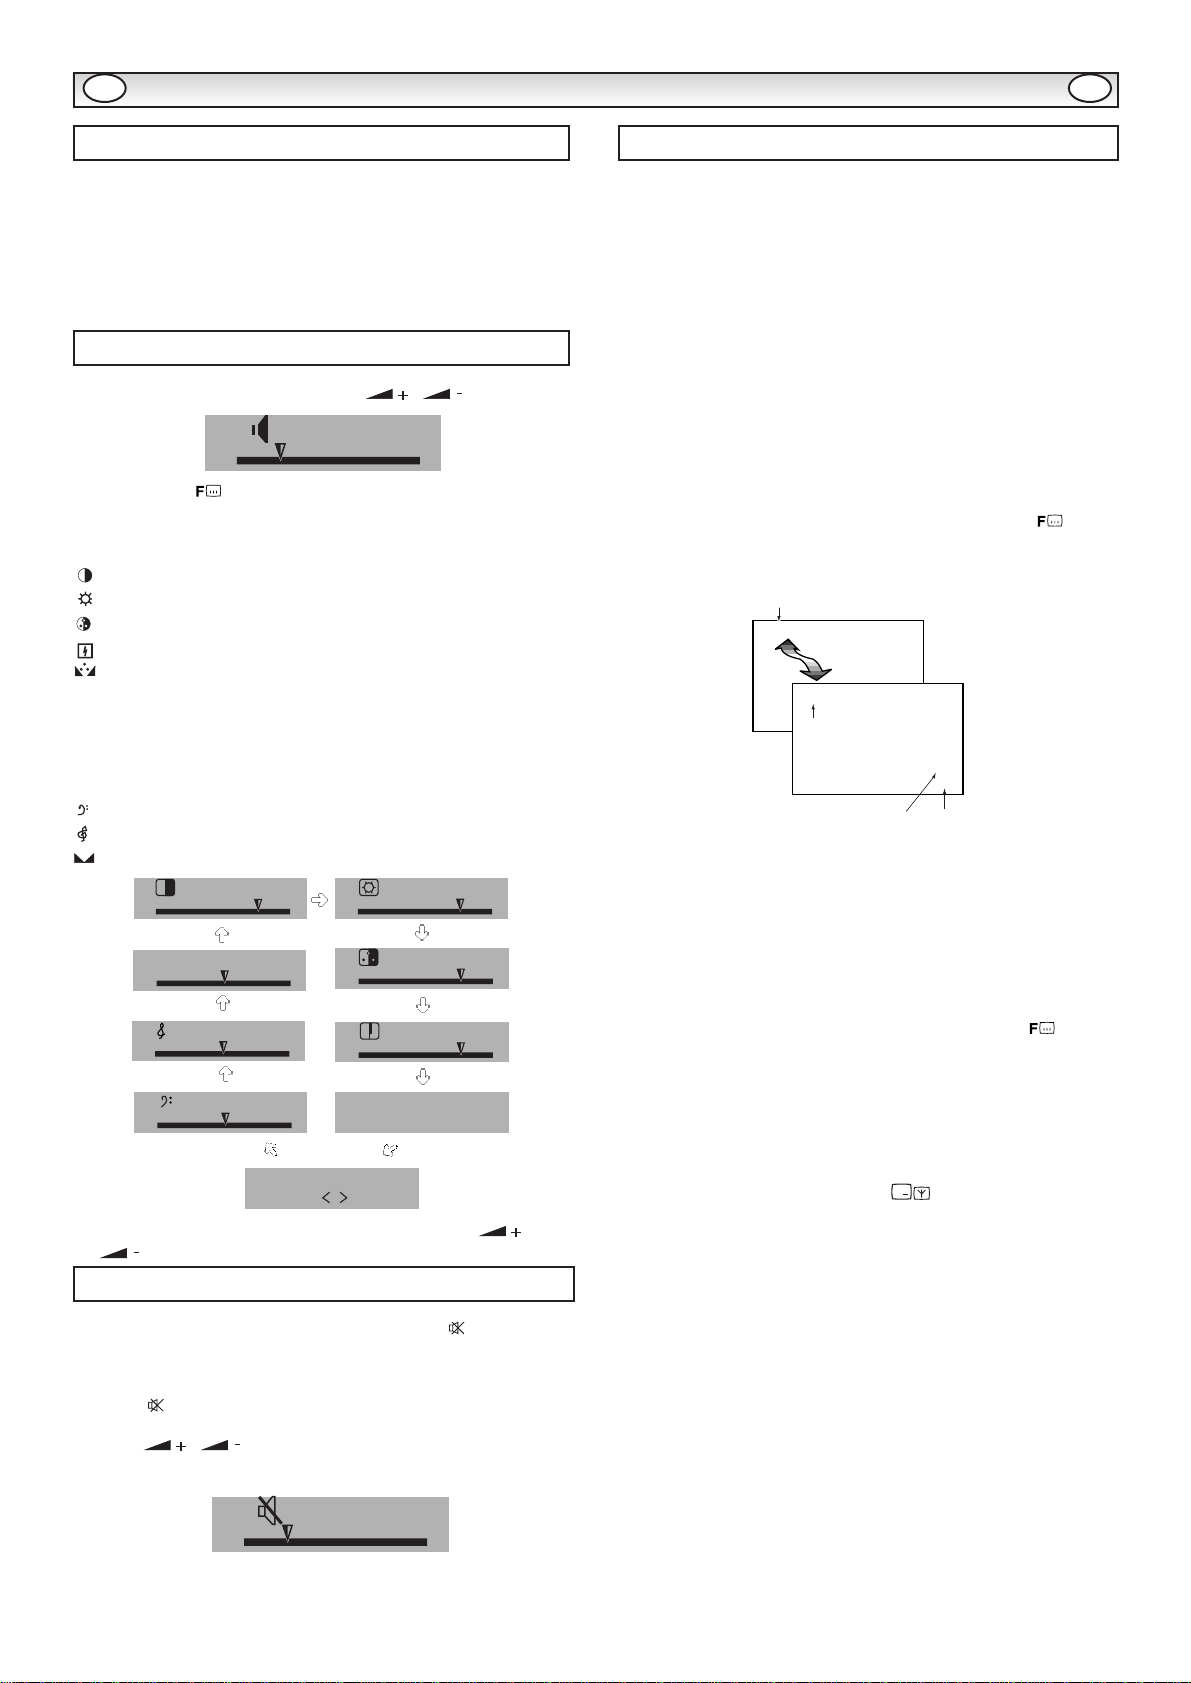
The tuning status and welcome
messages will appear on the
screen in three languages.
The TV scans channels from C1 to C99
and H21 to H41 according to channel
tables on page 16.
After completing this procedure, the pro-
gramme position 1 is selected and the
ending messages appear on the screen.
To make this message disappear,
press any of the control buttons.
Now the installation is completed !
✐ This procedure only appears at the first switch-on time.
✐ If additional channels become available (you move to another city
or cable is installed), please follow the description “PRESETTING”
on page 11 & 12.
1. Remove the battery cover by sliding it
in direction of the arrow.
2. Install two "AA" 1.5 volt batteries so
that the "+" and "-" marks on the
batteries match the "+" and "-" marks
inside the unit.
3. Close the battery cover.
■The aerial socket is located on the back of the TV set.
■For all aerial problems please consult your local dealer.
■The connection to the peripheral AV equipment, refer to section
“Connection of AV equipment” on page 10.
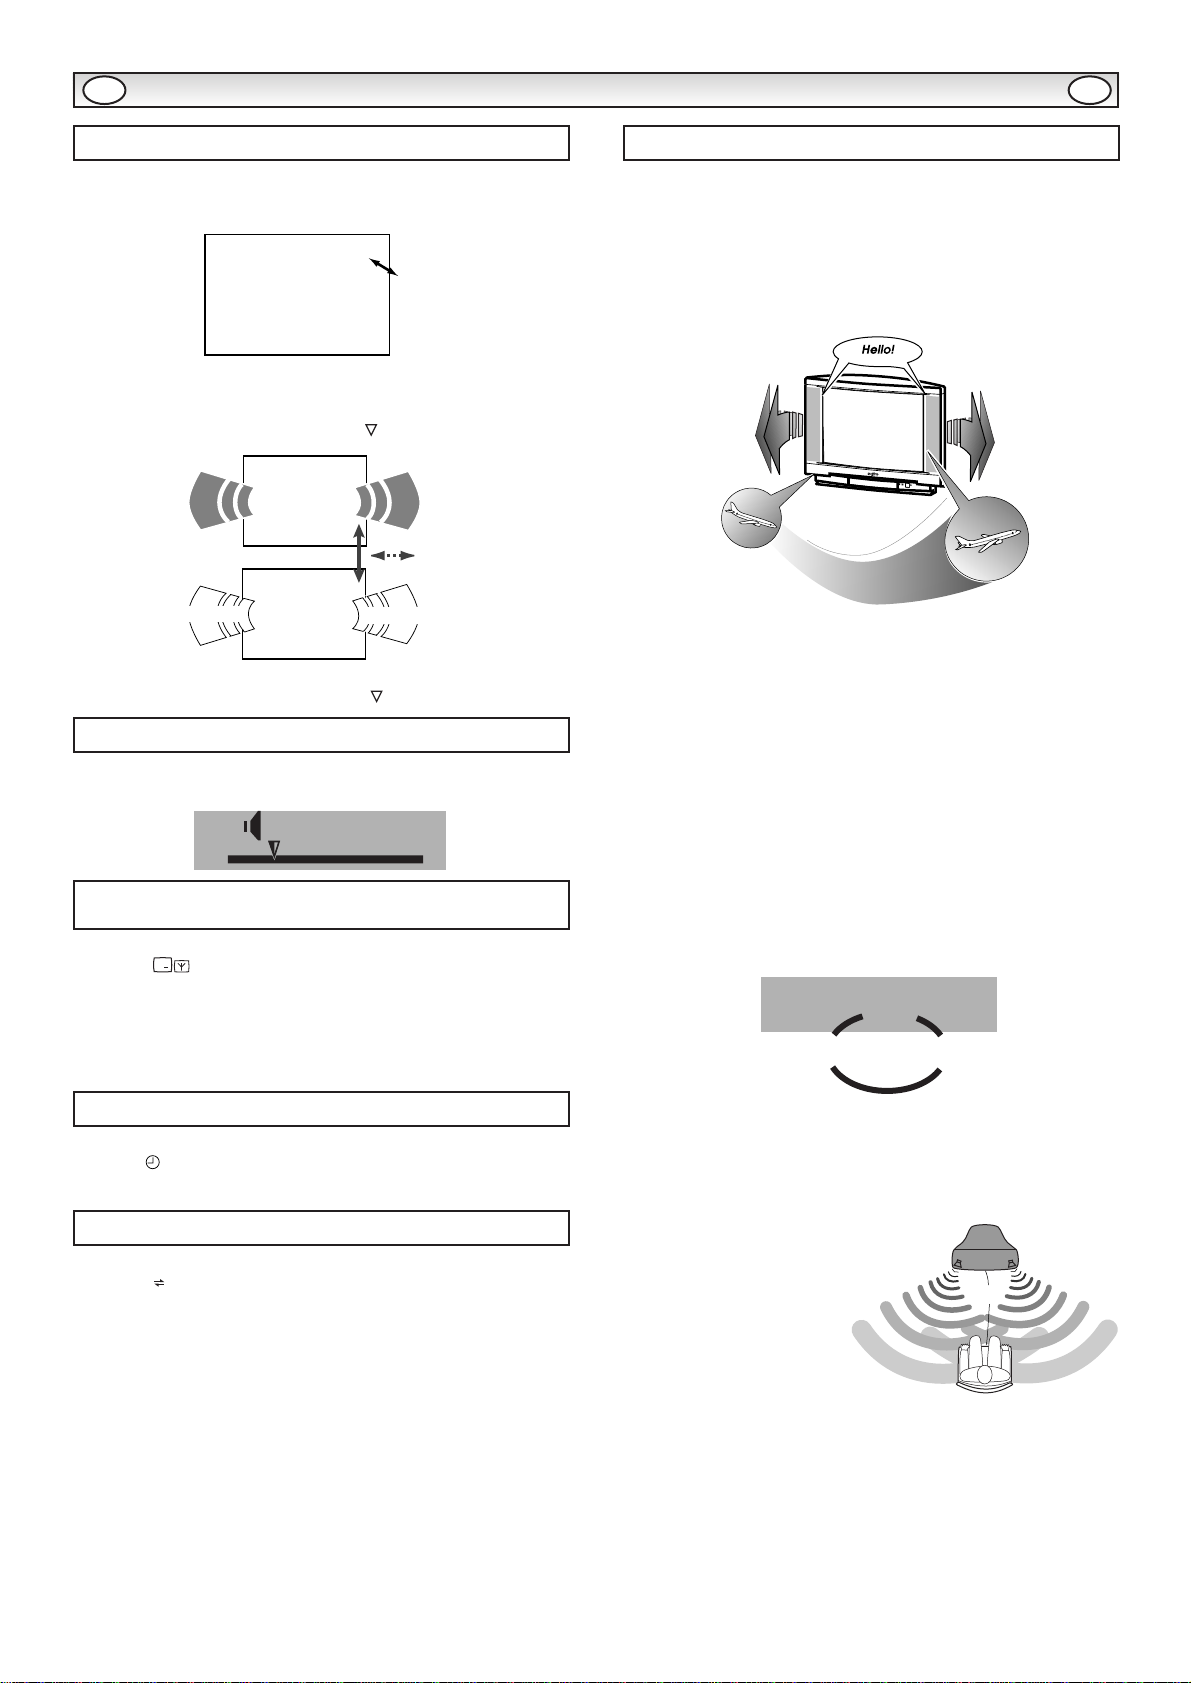
■To turn the TV set ON, press the
Mains ON/OFF switch.The
power indicator illuminates to
show the power is on.
■To turn the TV set OFF, press it
again.
■To turn the TV set into standby mode, press the button. The
power indicator illuminates more brightly.
■To turn the TV set ON from standby mode, Press any of the
following buttons: button, P▲,P▼, 0 to 9 Numeric buttons.
In the Standby mode the TV set is still partially powered, this is
denoted by the red Standby/Power indicator illuminating more
brightly than in Power mode.
This TV set will automatically switch into the standby mode, 10
minutes after a signal is no longer received.The time until the set will
switch off is displayed on the screen.
■If the aerial is removed the TV set will automatically switch into
the standby mode after 10 minutes.
■When the TV set is switched on by using the On-timer function
with no signal being received, the auto-shut off function will be
ignored.
If you found a power indicator flashing, please turn the
TV set off completely with the Mains ON/OFF switch
and contact our Service desk. This warning is a sign to
let you know that the power protection function of this
TV set is now operating.
Be sure to set the Mains ON/OFF switch to the off
position, if a power failure occurs while viewing.
NOTE: It is not possible to turn on with the Mains ON/OFF
switch from the standby mode.
The Mains ON/OFF switch must be in the ON position before
using the remote control transmitter.
AC Outlet
3
Mains Supply
Quick Set Up
Battery Installation
Aerial Connections
GB GB
Merci beaucoup d'avoir acheté ce
téléviseur SANYO.
Je cherche et mémorise tous les
programmes. Attendez S.V.P
Vielen Dank, daß Sie diesen SANYO-
Fernseher gekauft haben.
Ich suche und speichere jetzt alle
Programme. Bitte warten.
Thank you for purchasing your
SANYO TV.
Now I am searching and storing all
programmes. Please wait.
Complete
auto-tuning
Auto set-up completed. Happy viewing !
Programmierung beendet. Viel Spaß !
Recherche automatique terminée !
POS 5
CH. C34
SOUND S-1
Mains ON/OFF
Standby
!
!
If no picture appears but the power indicator is on, press the
button, P▲P▼or 0-9 button as the TV set is in the Standby mode.
Auto Shut Off
OFF 0:10

4
Controls
Standby/Power On
Programme Up/Down
0 to 9 Numeric buttons
Digit
Level Up/Down
Function/OK
Sound attenuation
Picture setting recall
TV/AV Selection
Previous programme selection
Time setting
Programme status
Timer Display
Bass
Menu
Billingual Selector
16:9 Format Signal Selector
Channel Selection mode
Active 3D surround mode selector
P▲
P▼
BASS
TV/
A•B
WIDE
TXT/TV
Y?
PP
F
/OK
MENU/
i
X
0
7
1
4
8
5
23
6
9
-/-- CS
SURROUND
P
-/--
0-9
•
-+
F
P P
TV/
?
BASS
MENU
WIDE
CS
SURROUND
A B
Controls and terminals on the front of the TV
CONTR
CONTROLS
OLS
GBGB
VIDEO L/S R/D
AV3 IN
P
Power/Standby indicator
Programme down/up
Level down/up
Remote Control receiver
Mains On/Off switch
Push to open
Headphone
socket Audio input L/R
AV3
Video input
AV3
AV1
AV
AV2 AV1
/OK

5
GENERAL OPERA
GENERAL OPERATION
TION
■Direct Programme Selection
For selection of programme position 0 to 9, press the corresponding
numeric button. If the required programme is equal or more than
10, for example 23, first press the -/- - button and enter 2then 3.
■Up/Down Programme Selection
Press the P▲button to increase the programme position.
Press the P▼button to decrease the programme position.
1. To adjust the sound volume, press the / button.
2. Each time the /OK button is pressed, the function display
changes as illustrated.
Picture Controls
CONTRAST : To adjust the picture contrast.
BRIGHTNESS : To adjust the picture brightness.
COLOUR : To adjust the picture colour.
SHARPNESS : To adjust the picture sharpness.
TINT: To adjust the colour phase (appears when receiving a
NTSC signal only).
TEXT BRIGHTNESS : To select the teletext brightness level of the
teletext mode.
FINE TUNING :To make fine adjustments to tuning.
Sound Controls
BASS : To adjust low frequency sounds.
TREBLE : To adjust high frequency sounds.
BALANCE : To equalise the output from the left and right speakers.
3. To adjust the level of the selected function, press the
/ button.
This function has two sound mute stages. Press the button once,
the sound from the speakers will be reduced, press it again and it will
be muted completely.
Press the button again to switch the sound back on.
When the
/
button is pressed, the sound attenuation is
cancelled.
■If you know the channel number of the station
1. Press the CS button on the remote control handset. The current
channel number, programme position and channel ID if available
will be displayed on the screen.
2. Enter the channel number using the 0-9 numeric buttons.
For example: To enter channel number 2 enter 0 and 2.
To enter channel number 35 enter 3and 5.
If you wish to select hyper channel, select “H--” by pressing the CS
button.Then enter the hyper channel number. Each time the CS
button is pressed, the channel number changes as follows.
current channel number ➜normal channel mode ➜hyper channel
mode ➜
Please refer to channel table on page 16 for further information of
channel allocation.
3.While the screen display is still on the screen, press the /OK
button on the remote control handset.
The programme and channel number will momentarily flash.
■If you do not know the channel number of the station
1. Press the CS button on the remote control handset.The current
channel number, programme position and channel ID if available
will be displayed on the screen.
2. Press the P▲or P▼button to start channel searching. When a
station is found searching stops automatically.
If this is not desired station repeat until the desired station is found.
3. While the screen display is still on the screen, press the
/OK
button on the remote control handset.
The programme and channel number will momentarily flash.
■Selection of the sound system
If the sound which is being received for the station is not produced, or is
of poor quality, even though the picture is good, it may select the incor-
rect sound system.
To switch the sound system, press the button repeatedly while
the screen display is still on the screen.The sound system will switch as
follows:
S-1 (AUTO) -> S-2 (B/G) -> S-3 (I) -> S-4 (L/L’)
S-1 : AUTO
S-2 : B/G
S-3 : I
S-4 : France SECAM-L/L’
GBGB
Programme Selection
Sound & Picture settings
<
>
Sound Attenuation
SOUND
CONTRAST BRIGHTNESS
COLOUR
SHARPNESS
TEXT BRIGHTNESS
CENTRE
BALANCE
TREBLE
BASS
FINE TUNING
SOUND MUTE
C25
Programme number Sound system
Channel number
H35
Hyper band channel number
3
S-1
Channel Selection

6
1. Press the MENU button to display the main menu.
Use the P▲or P▼button to highlight the
PICTURE menu.
2. Press the /OK button.
3. Use the P▲or P▼button to highlight the desired
control from the menu eg. BRIGHTNESS.
4.When pressing the or button once, the screen display
will change for selected control mode, and then press and keep
button to change desired picture control level.The mode returns to
control selecting mode in 3 seconds if no key pressed.
Repeat steps 3-4 for setting the proper picture levels.
To return to the TV mode, press the MENU button.
1. Press the MENU button to display the main
menu. Use the P▲or P▼button to highlight the
SOUND menu.
2. Press the
/OK
button on the remote control
handset
3. Use the P▲or P▼button to highlight the desired control from the
menu eg. BASS.
4. Press the
or
button to adjust the selected control level up
or down.
To return to the TV mode, press the MENU button.
This TV provides predefined three picture modes and one adjustable
personal picture preference mode.You can choose your preferred pic-
ture mode by pressing the button repeatedly.
PERSONAL : Personal preference mode
STANDARD : Normal viewing mode
ECO : Low contrast, brightness and colour picture setting (Suitable
for dimly lit rooms and gives a cinema-like effect which the
lights are switched off, or Economical mode).
DYNAMIC : High contrast, brightness and colour picture setting
(Suitable for brightly lit rooms).
■To store your personal preference into “PERSONAL” mode
1. Press the MENU button to display the main
menu. Use the
P▲or P▼
button to highlight the
PICTURE menu and press the
/OK
button.
2.
Adjust picture controls to your preferred control
level by using the P▲, P▼or ,
buttons
.
3. Use the P▲or P▼ button to highlight the PERSONAL menu and
press the /OK button.The control window will momentary
blink to show the memorisation.
To return to the TV mode, press the MENU button.
The fine tuning control level will not be memorised into the “PERSONAL”
mode.
We prepare languages for the On-screen display as follows, you can
chose own language in following steps.
1. Press the MENU button to display the main menu.
Use the P▲or P▼button to highlight the
LANGUAGE menu.
2. Press the /OK button.
3. Select the language identification letter by using the or
button.
To return to the TV mode, press the MENU button.
This TV has a child lock function which inhibits the use of the buttons
on the front of the TV set. With this you can prevent small children
unexpectedly pressing buttons.
●SETTING
1. Press the MENU button to display the main
menu. Use the P▲or P▼button to highlight
the SETTING menu.
2. Press the /OK button.
3. Use the P▲or P▼button to highlight the CHILD LOCK menu.
Select “ON” or “OFF” by pressing the or button.
To return to the TV mode, press the MENU button.
To cancel the child lock mode, follow the above procedure and you
should select “OFF” in step 3 or switching off the TV set with the
Mains ON/OFF switch.
GENERAL OPERA
GENERAL OPERATION
TION
GBGB
Picture adjustment using the menu function
BRIGHTNESS
PICTURE
SOUND
SETTING
PRESET
LANGUAGE
TIMER
MENU
OK EXIT : MENU
CONTRAST
BRIGHTNESS
COLOUR
SHARPNESS
PERSONAL MEMORY : OK
FINETUNING
PICTURE
EXIT : MENU
ADJUST:
Sound adjustment using the menu function
VOLUME
BASS
TREBLE
BALANCE
SOUND
EXIT : MENU
ADJUST:
PICTURE
SOUND
SETTING
PRESET
LANGUAGE
TIMER
MENU
OK EXIT : MENU
Picture mode selection and Personal
preference setting
PICTURE
SOUND
SETTING
PRESET
LANGUAGE
TIMER
MENU
OK EXIT : MENU
PERSONAL
ECO
STANDARD
DYNAMIC
--><--
CONTRAST
BRIGHTNESS
COLOUR
SHARPNESS
PERSONAL MEMORY : OK
FINETUNING
PICTURE
EXIT : MENU
ADJUST:
On screen language setting
PICTURE
SOUND
SETTING
PRESET
LANGUAGE
TIMER
MENU
OK EXIT : MENU
DFGBI
OSD LANGUAGE
EXIT : MENU
SELECT :
Child Lock
ON
AV2 VIDEO
CHILD LOCK OFF
SETTING
EXIT : MENU
ADJUST:
PICTURE
SOUND
SETTING
PRESET
LANGUAGE
TIMER
MENU
OK EXIT : MENU

7
GENERAL OPERA
GENERAL OPERATION
TION
■Nicam sound reception
If the TV receives nicam programs, it automatically switches to nicam
sound reception.The word “NICAM” appears on the screen briefly.
■Bilingual reception
If the TV receives bilingual programs, the TV initially selects
language A and displays “A” on the screen briefly. If you want to
switch to language B or Mono, press the button.
If the nicam sound reception is poor in quality, you can switch to
“MONO” sound reception by pressing the button.
To get a emphasis bass sound, press the BASS button.The word
"Bass" appears on the sound display.
Press the button once, the programme information such as
current programme number, stereo status, remaining timer if set
and colour system.To switch the sound system, press the button
repeatedly while the screen display is still on the screen.The
sound system will switch as follows:
S-1 (B/G) -> S-2 (D/K) -> S-3 (I) -> S-4 (L/L’)
In the TV mode, if the receiving programme has a teletext service
when the button is pressed, the present time will be displayed on
the screen for 5 seconds.
Press the button and the TV set will alternately select the current
programme position and the previous programme position viewed.
In traditional stereo sound, left and right channels combine to create a
stereo image. Better speakers can create a larger perceived sound
stage, so sound seems to emanate from a few feet behind the moni-
tor. Sound can have a much wider presence with Active 3D surround
technologies. Music and sound effects appear to come from points in
the room far from the speakers. Objects (such as jets) seem to move
towards and then past the listener, whilst the important channel sound
still appears to come from the centre of the screen.
● Active 3D Surround
This TV provides an active 3D surround processor which can create
an incredible 3 dimensional sound effect when receiving a standard
stereo signal, bilingual signal or monaural signal.
You can choose the following 3D surround modes by pressing the
SURROUND button.
ACTIVE : Normal 3D surround sound, set to give the optimum 3D
surround effect.
MONO :
This mode is specially prepared for Nicam-mono broadcast-
ing. Select this mode, when you can not get the 3D
surround effect because the sound is Nicam mono.
OFF : To switch off 3D surround effect.
■Guidance for the best enjoyment of active 3D surround
Optimum positioning
Sit at a distance of
approximately 2 to 4 meters
from the TV set.
Listen facing the centre of
the TV set.
Remove any obstructions
between you and the TV set.
P P
A•B
A•B
GBGB
Stereo Bilingual Reception
NICAM
MONO
Hello ! Hello !
Bonjour!
Bonjour!
A
B
Mono
Bass Expander
Time Display
Previous Programme Selection
SOUND BASS
Programme information display and sound
system selection
What is Active 3D surround?
ACTIVE
3D
SURROUND
ACTIVE
3D
SURROUND
3D SURROUND
MONO
OFF ACTIVE
2 ~ 4
meters

8
The future trend is towards transmission in a 16:9 picture ratio
instead of the current 4:3 picture ratio. If you receive one of these
transmissions, the vertical scale will be expanded to fill the screen
giving a squashed picture.
Press the WIDE button, the picture will obtain its proper height.
If this button is pressed during a 4:3 transmission, the picture will be
compressed vertically.
This remote control transmitter has been designed to be used in
conjunction with selected SANYO VCR’s. Some SANYO VCR’s may
have their own functions, so please refer to the individual instruction
booklet when using this remote control to ensure compatibility.
POWER On/Off :
Use to turn VCR power on and off.
PLAY :
Use to playback the tape.
STOP :
Use to stop the movement of the tape.
FAST/CUE :
Use to advance the tape at fast speed, or in order to playback the
tape at fast speed.
REWIND/REVIEW :
Use to rewind the tape or in order to playback the tape in reverse at
fast speed.
RECORD :
Use to record on the tape. Press both of the buttons at the same
time.
Timer Button Selection
1. Press the button once, the word "OFF TIMER" will appear on
the screen.
2. Set the time period by pressing the or button.The
display changes in 30 minute steps.
MENU Selection
1. Press the MENU button to display the main menu. Use the P▲or
P▼button to highlight the TIMER menu.
2. Press the /OK button.
3. Use the P▲or P▼button to highlight the OFF TIMER menu.
4. Highlight the time setting column by using the or but-
ton, and using the P▲or P▼button to select a time period from
which the set will switch into the standby mode.
To change to another timer mode, first select timer selection mode
(highlight a row) using the
or
button and then change
desired timer mode by using the
P▲or P▼button
.
To return to the TV mode, press the MENU button.
If you have set a time, then one minute before the TV switches off
the remaining minute (-1) automatically appears on the screen.
To cancel the Off timer, repeat the above procedure and select
timer “--” by pressing the /OK button.
O
OTHER FUNCTIONS
THER FUNCTIONS
GBGB
16:9 Format Signal Reception
Off Timer Setting
Timer Setting
Function Maximum time periods Step
Off Timer 120 minutes 30 minutes
On-Timer 24:00 Hours 15 minutes
Alarm Timer 3:00 Hours 5 minutes
This TV has three timer functions and you can select the following
modes by pressing the button repeatedly.
■Off timer setting You can select a time period from which the set
will switch into the standby mode.
■On-timer setting You can set a time period from which the set
will switch on from the standby mode.
■Alarm timer setting
You can set a time which you want to
display the time up sign on the screen and the alarm will beep.
OFF TIMER - -
ADJUST : OFF:OK
-60
-90
-120
-30
OFF TIMER - -
ADJUST :
PICTURE
SOUND
SETTING
PRESET
LANGUAGE
TIMER
MENU
OK EXIT : MENU
OFFTIMER --
ON-TIMER -- : -- --
ALARMTIMER - : --
TIMER
SELECT :
EXIT : MENU
OFFTIMER --
ON-TIMER -- : -- --
ALARMTIMER - : --
TIMER
-60
-90
-120
-30 -60
-90
-120
-30
ADJUST :
SELECT : OFF : OK
EXIT : MENU
VCR Use

9
O
OTHER FUNCTIONS
THER FUNCTIONS
Timer Button Selection
1. Press the button repeatedly until the word "ON-TIMER"
appears on the screen.
2. Set the time period by pressing the
or button
.
The
display changes in 15 minutes steps.The maximum time period
is 24:00 hours.
3. Set the start up programme position by using the P▲or P▼
button.
4. Press the button to switch into the standby mode.
MENU Selection
1. Press the MENU button to display the main menu. Use the P▲or
P▼button to highlight the TIMER menu.
2. Press the /OK button.
3. Use the P▲or P▼button to highlight the ON-TIMER menu.
4. Highlight the time setting column or start up program setting column
by using the
or
button, and using the
P▲or P▼
button
to set a time or program position which you want to switch
on from the standby mode.
To change to another timer mode, first select timer selection mode
(highlight a row) using the
or
button and then change
desired timer mode by using the
P▲or P▼button
.
5. Return to the TV mode by pressing the MENU button, and press
the button to switch into the standby mode.
When it reaches the set on-time, the TV set will switch on and
select the start-up programme automatically.
To cancel the On-timer,repeat the above procedure and select
timer “--:--” by pressing the / OK button.
Advance
When it reaches the set on-time and the TV set is kept on, the TV
set changes automatically to the programme position which you have
set the start-up programme in the on-timer function.
● When the TV set is switched on by using the on-timer function, the
TV set will automatically switch into the standby mode in 2 hours if
no key control is input.
This function can display the time up sign on the screen as illustrated
to let you know that the time has come when the set alarm time is
reached.This only happens when the TV is on.This may remind you
to do something.
Timer Button Selection
1. Press the button repeatedly until the word "ALARM TIMER"
appears on the screen.
2. Set the time period by pressing the or button.The
display changes in 5 minutes steps.The maximum time period is
3:00 hours.
MENU Selection
1. Press the MENU button to display the main menu. Use the P▲
or P▼button to highlight the TIMER menu.
2. Press the /OK button.
3. Use the P▲or P▼button to highlight the ALARM TIMER menu.
4. Highlight the time setting column by using the or
button, and using the P▲or P▼button to set a time which you
want to display the time up sign on the screen and beep a sound.
To change to another timer mode, first select timer selection mode
(highlight a row) using the
or
button and then change
desired timer mode by using the
P▲or P▼button
.
When it reaches the set alarm time the time up signal will
appear on the screen and the alarm will sound for 15 seconds.
To cancel the Alarm timer,repeat the above procedure and select
timer “-:--” by pressing the / OK button.
● If the set alarm time is reached whilst in teletext mode, the TV set
automatically returns to the TV mode.
● If the TV set is switched off by the Mains Switch or a power
failure occurs, the timer settings will be cancelled.
● You can confirm the remaining time for each timer mode by
pressing the button.
GBGB
On Timer Setting
PICTURE
SOUND
SETTING
PRESET
LANGUAGE
TIMER
MENU
OK EXIT : MENU
ON-TIMER 01:45 12
ADJUST : OFF:OK
ON-TIMER --:-- --
ADJUST :
Start up programme position
OFFTIMER --
ON-TIMER -- : -- --
ALARMTIMER - : --
TIMER
EXIT : MENU
SELECT :
TIMER
ADJUST :
SELECT : OFF : OK
EXIT : MENU
OFFTIMER --
ON-TIMER 01 : 15 12
ALARMTIMER - : --
Alarm Timer Setting
ALARM TIMER 2:15
ADJUST : OFF:OK
ALARM TIMER -:--
ADJUST :
PICTURE
SOUND
SETTING
PRESET
LANGUAGE
TIMER
MENU
OK EXIT : MENU
OFFTIMER --
ON-TIMER -- : -- --
ALARMTIMER - : --
TIMER
EXIT : MENU
SELECT :
OFFTIMER --
ON-TIMER -- : -- --
ALARMTIMER 2 : 15
TIMER
ADJUST :
SELECT : OFF : OK
EXIT : MENU

10
CONNECTION OF A
CONNECTION OF AV EQ
V EQUIPMENT
UIPMENT
You can connect a VCR, S-VHS VCR, Satellite Tuner, PAY TV
Decoder or Camcorder, as this TV has two Scart terminals on the
rear panel and one pair of AV input terminals on the front panel.
●Selection of AV mode
Most AV equipment will automatically switch to the AV mode
(because of the pin 8 function signal) by pressing the PLAY button
on your AV equipment. If not, press the button to select the
desired AV mode manually.
●Setting of AV2 input mode
If you want to use a VCR which is equipped with the S-VHS
capability, to obtain the best performance, you should connect to the
AV2 terminal and select the S-Video mode in the AV2 mode.
●SETTING
1. Press the MENU button to display the main menu. Use the P▲or
P▼button to highlight the SETTING menu.
2. Press the /OK button on the remote control handset.
3. Use the
P▲or P▼button
to highlight the AV2 menu. Select
“S-VIDEO” or “VIDEO” by pressing the
or
button.
To return to the TV mode, press the MENU button.
■Use of front AV3 terminal
This TV provides one pair of AV input terminal on the front panel. It is
very convenient for use as a game or camcorder connection.
Press the button to select the AV3 mode.
●Selection of the sound track from the equipment
By pressing the button repeatedly, you can select the sound
track L (left), R (right) or L/R from the equipment connected to the
scart terminals or the front AV terminal.
■Selection of colour system
This TV provides the multi-colour system decoder.The default mode
of each AV mode is “AUTO”.This mode automatically selects the
correct colour system form the input source signal. If you have the
incorrect colour images on the screen, please switch to PAL,
SECAM, NTSC 3.58 or NTSC 4.43 colour system by pressing the
button repeatedly.
The following are our recommended standard connections for AV
equipment.There are various types of connections depending on
the equipment which you have or its use. For further information
please consult your local dealer. If you have a S-VHS type VCR, to
obtain the best performance it should be connected to the AV2
terminal which has been specially designed for S-VHS.
If you do not have a 21 pin Scart cable, you can connect your VCR
or other AV equipment via the aerial socket.The VCR should be
tuned to programme position 0, this has been especially designed
for VCR use.
USE OF CAMCORDER OR GAME EQUIPMENT
Connection
✔Connect an RCA cable from the front AV terminal(AV3) to a
camcorder or to game equipment.
For monaural units, connect the sound cable to the L/S socket, and
press the button to select L channel.
USE OF HEADPHONES
The 3.5mm mini-stereo jack socket located behind the door of the TV
can be used for headphones.When the headphones are inserted the
sound from the TV speakers is muted.
A•B
A•B
TV/
T
V/
GBGB
Using AV Equipment
PICTURE
SOUND
SETTING
PRESET
LANGUAGE
TIMER
MENU
OK EXIT : MENU
AV2 VIDEO
CHILD LOCK OFF
SETTING
S-VIDEO
EXIT : MENU
ADJUST:
ANT.75Ω
AV1AV2
SET TOP BOX
VCR1 AV2
AV1
VCR2
DVD
(S-VHS)
CABLE
SATELLITE
VIDEO L/S R/D
AV3 IN
VIDEO L/S R/D
AV3 IN
From Camcorder
or video game
equipment
AV2
AUTO PAL
SECAM
NTSC4.43
NTSC3.58
L/R

11
PRESETTING
PRESETTING
Up to 100 broadcast stations in your reception area can be stored in
the electronic memory.
There are two modes of pre-setting channels as follows:
■AUTO-TUNING SYSTEM
All receivable channels are automatically found, stored and sorted.
■PRG. PRESET (Manual tuning)
Used to preset a receivable channel in any desired programme
position.
1. Press the MENU button to display the main menu. Use the P▲or
P▼button to highlight the PRESET menu.
2. Press the /OK button.
3. Use the P▲or P▼button to highlight the AUTO TUNING menu,
then press the /OK button.
■The automatic tuning system will start as follows;
The tuning status will appear on the screen.
The TV scans channels from C1 to C99 and H21 to H41 according
to channel tables on page 16.
After completing the searching operation for all available stations, then
the programme position 1 is selected .
Now the tuning operation is completed !
The automatic tuning operation can be cancelled at any time by
pressing the MENU button.
1. Press the MENU button to display the main menu. Use the P▲or
P▼button to highlight the PRESET menu.
2. Press the /OK button.
3. Use the P▲or P▼button to highlight the PRG.PRESET menu,
then press the /OK button.
4. Select the programme position you wish to preset by using
the or , -/-- or 0-9 numeric buttons.
5. Use the P▲or P▼button to highlight the CH menu, then press
the or button to start channel searching until your
desired station is found.
Or if you know the channel number of the station, enter the channel
number with 2 digits entry, i.e. channel 5, enter 0 and 5. Press the
CS button to change to another channel band.The display of
channel band “H--” or “C--” will be changed, and then enter the 2
digits key numbers.
6. If the sound is not producing correctly, take the following steps.
Use the P▲or P▼button to highlight the SOUND menu, then press
the or button to switch the sound modes as follows;
S-1 : AUTO
S-2 : B/G
S-3 : I
S-4 : France SECAM-L/L’
7. Press the /OK button to store in the memory. The preset
window will blink momentary.
Repeat steps 4 to 7 for other desired channels.
☞ To return to the normal TV mode, press the MENU button.
This completes the Manual presetting.
GBGB
AUTO-TUNING SYSTEM
PICTURE
SOUND
SETTING
PRESET
LANGUAGE
TIMER
MENU
OK EXIT : MENU
AUTOTUNING
PRG. PRESET
CH SWAP
PRESET
OK EXIT : MENU
AUTO TUNING
POS. 2
CH C 5
SOUND S-1
EXIT : MENU
Manual Tuning (PRG.PRESET)
PICTURE
SOUND
SETTING
PRESET
LANGUAGE
TIMER
MENU
OK EXIT : MENU
AUTOTUNING
PRG. PRESET
CH SWAP
PRESET
OK EXIT : MENU
PRG.PRESET
POS. 2
CH C 5
SOUND S-1
ADJUST:
EXIT : MENU
MEMORY : OK
-/-- 0-9
PRG.PRESET
POS. 2
CH C 5
SOUND S-1
ADJUST:
EXIT : MENUMEMORY : OK
CS 0-9
PRG.PRESET
POS. 2
CH C 5
SOUND S-1
ADJUST:
EXIT : MENUMEMORY : OK

12
Use this channel swapping feature to swap the channels between
two stored programme positions.This feature is particularly useful
after automatic presetting.
1. Select one of the TV channels you wish to
swap by using the P▲,P▼or using the (0-9)
numeric buttons.
2. Press the MENU button to display the main
menu. Use the
P▲
or
P▼
button to highlight
the PRESET menu.
3. Press the /OK button.
4. Use the
P▲
or
P▼
button to highlight the CH SWAP menu, then
press the /OK button.
5. Use the
P▲
or
P▼
button to select the target programme position
for swap channels then press the /OK button.The preset
window will blink momentary.
The two TV channels will now have changed places.
Repeat steps 1 to 5 for all otherTV channels you want to swap.
☞ To return to the normal TV mode, press the MENU button.
Press the TXT/TV button, and the screen changes as illustrated.
Picture and Text brightness controls in the teletext mode.
You can not adjust the picture or teletext brightness in the teletext
mode.You must first switch back to the TV mode and then adjust the
picture control or set the teletext brightness level.
How to set the teletext brightness level
1. Press the /OK button repeatedly in the TV mode until the
word "TEXT Brightness" appears on the screen.
2. Press the / button to select one of the 3 teletext
brightness levels either MAXIMUM, CENTRE or MINIMUM.
3. Confirm the selected teletext brightness level by switching to the
teletext mode by pressing the TXT/TV button.
Sound control in the teletext mode.
Only sound volume and muting can be controlled in the teletext
mode but the on-screen display will not appear.
PRESETTING /
PRESETTING / TELETEXT
TELETEXT
GBGB
Channel Swapping
i
P
0 - 9
TEXT/MIX/TV SWITCH
0-9 Numeric Buttons
Page Up/Down
Index page selection
Hold
Size
Cancel
Sub code entry mode
Reveal
Red
Green
Yellow
Blue
X
-/--
?
Teletext Controls
Picture & Sound in teletext mode
Switching to theTeletext mode
MMIIXX
TT
TTVV
VVTT
TTEE
EEXX
XXTT
TT
TT
TT
VV
VVTEXT
TEXT
P▲
P▼
BASS
TV/
A•B
WIDE
TXT/TV
Y?
PP
F
/OK
MENU/
i
X
0
7
1
4
8
5
23
6
9
-/-- CS
SURROUND
TXT/TV
PICTURE
SOUND
SETTING
PRESET
LANGUAGE
TIMER
MENU
OK EXIT : MENU
AUTOTUNING
PRG. PRESET
CH SWAP
PRESET
OK EXIT : MENU
CH SWAP
POS. 5 C 7
POS. 23 C54
current position
target position
POS. : OK EXIT : MENU
TEXT BRIGHTNESS
CENTRE
MINIMUMMAXIMUM

13
TELETEXT
TELETEXT
■Direct page access
A page can be selected with the 0-9 Numeric buttons. eg.To
display page 301, press buttons 3, 0 and then 1.The selected page
number will appear on the screen.
■Up/down page access
When a page is displayed on the screen and you want to read the fol-
lowing page number, press the up (P▲) button instead of selecting the
new page number.To read the previous page, press the (P▼) button.
P▲ : P301 ➙P302 ➙P303 .... P399 ➙P400 ....
P▼: P301 ➙P300 ➙P299 ➙P298 ....P201 ....
Depending on the TV channel, teletext
is transmitted in different systems.The
system utilised can be recognised by
the coloured line at the bottom of the
screen.
Press one of the 4 coloured buttons
to select the topics shown at the bot-
tom of the text screen.
For example the Red topic can be
selected using the Red button, the
Blue topic by the Blue button, and so
on forth with the other colours.
When the teletext service is not trans-
mitting with the TOP or FLOF, 4 coloured
page numbers will appear at the bottom
of the screen instead of the topics.
Receiving TOP teletext system
When you press the button, the classified table will appear on the
screen.To highlight your desired category page by using Red or Blue
button and press Green button to go to it's page directly.
Receiving FLOF or another teletext systems
Press the button to select one of the teletext index pages.
Press the button to stop sub pages changing.The word "Stop"
will appear instead of the page number. Some teletext pages are
made up of several sub pages.These sub pages are automatically
changed. Sub page is shown as P4/8 (sub page 4 of 8 pages) the
location on the text page depends on the text service.
Either the top half or the bottom half of the page can be expanded to
fill the whole screen by pressing the button.
Press the button to reveal hidden items on the text page. Some
pages such as quiz pages have the answers hidden.The button may
have to be held to keep the answer on the screen, or pressed again
to remove the answers.
Sometimes the page access can take some time. While waiting you
can view the TV picture by pressing the button.
1. Enter the new page number. Press the button.
2.The page number selected will appear over the TV picture and
flash until the new page is found then a P will appear at the start
of the page number.
3. Press the TXT/TV button to view the teletext page.
With a text page selected which has sub pages, you may wish to
read a known sub page number.
1. Press the button. "Sub-Code ----" will be displayed on top of
the screen.
2. Enter the sub page number
by using the (0-9) buttons.
For example, to enter the sub
page 4, press buttons 0, 0, 0
and 4.
3. Press the button to
return the normal TV
picture.
Immediately the requested
sub-coded page is found, the
page number will appear
over the TV picture.
4. Press the TXT/TV button to
view
the sub-coded page.
There are teletext pages which are
updated as events progress, such
as sports results, news reports or
traffic information. Select a page
which will be updated.
1. Press the button to return
to the normal TV picture.
Immediately the selected page is
updated, the page number will
appear over the normal TV picture.
2. Press the TXT/TV button to
view the updated page.
Note: If the page has sub pages the number will appear when the
sub page is changed.
X
X
X
X
?
i
i
Page Selection
Coloured Page Access
FOOTBALL
CONTENTS
PP
P
33
3
11
1
00
0
DV1 DV2 PRE SCOT
SPORT
CC
CC
CC
RR
R
II
I
CC
CC
CC
KK
K
EE
E
TT
TT
..
.
..
.
..
.
..
.
..
.
..
.
..
.
..
.
..
.
..
.
..
.
..
.
..
.
..
.
..
.
..
.
TT
TT
TT
EE
E
E
NN
N
N
NN
N
N
II
I
I
SS
SS
SS
...................
FF
F
F
OO
OO
OO
OO
OO
OO
TT
TT
TT
BB
B
B
AA
AA
AA
LL
L
L
LL
L
L
............
RR
R
UU
U
GG
GG
BB
B
YY
YY
...................
HH
H
OO
OO
CC
CC
KK
K
EE
E
YY
YY
..
.
..
.
..
.
..
.
..
.
..
.
..
.
..
.
..
.
..
.
..
.
..
.
..
.
..
.
..
.
..
.
..
.
PP
P
P
33
33
33
00
00
00
11
1
1
CRICKET TENNIS F.BALL RUGBY
PP
P
33
33
33
00
00
00
22
22
PP
P
P
33
33
33
00
00
00
55
55
55
PP
P
P
33
33
33
11
1
1
00
00
00
PP
P
33
33
11
1
55
55
PP
P
33
33
22
22
55
55
Red Green Yellow Blue
GBGB
Index Page Selection
Sub Page Access
Stop
Double Letter Height
ViewingTV while searching for a page
INDEXP
P
P
P
2
2
2
2
0
0
0
0
1
1
1
1
P
P
P
P
2
2
2
2
5
5
5
5
1
1
1
1
P
P
P
3
3
3
0
0
0
1
1
1
P
P
P
3
3
3
5
5
5
1
1
1
P
P
P
4
4
4
0
0
0
1
1
1
P
P
P
1
1
1
0
0
0
0
0
0
TOPICS NEWS WEATHERSPORT
T
T
T
T
O
O
O
O
P
P
P
P
I
I
I
IC
C
C
C
S
S
S
S
.
.
..
.
..
.
..
.
..
.
..
.
..
.
..
.
..
.
..
.
..
.
..
.
..
.
..
.
..
.
..
.
..
.
..
.
.
N
N
N
N
E
E
E
E
W
W
W
W
S
S
S
S
.
.
..
.
..
.
..
.
..
.
..
.
..
.
..
.
..
.
..
.
..
.
..
.
..
.
..
.
..
.
..
.
..
.
..
.
..
.
..
.
..
.
.
S
S
S
P
P
P
O
O
O
R
R
R
T
T
T
...................
W
W
W
E
E
E
A
A
A
T
T
T
H
H
H
E
E
E
R
R
R
.............
T
T
T
R
R
R
A
A
A
F
F
F
F
F
F
I
I
IC
C
C
................
AIRLINES
1325
1330
1355
1400
1415
1425
DEPARTURE
ROME
HONGKONG
DUBLIN
VIENNA
SINGAPORE
BONN
IR012
CX501
BA051
SR443
SQ307
LH995
4/8
P401
stop !
AIRLINES
0825
0830
0855
0900
0915
0955
DEPARTURE
LONDON
FRANKFULT
PARIS
GENEVE
CAIRO
TOKYO
BA012
LH335
AF223
SR553
SQ707
JL005
P401 1/8 AIRLINES
0825
0830
0855
0900
0915
0955
DEPARTURE
LONDON
FRANKFULT
PARIS
GENEVE
CAIRO
TOKYO
BA012
LH335
AF223
SR553
SQ707
JL005
S1/8
✶✶✶✶
AIRLINES
0825
0830
0855
0900
0915
0955
DEPARTURE
LONDON
FRANKFULT
PARIS
GENEVE
CAIRO
TOKYO
BA012
LH335
AF223
SR553
SQ707
JL005
S1/8
0004
P401 AIRLINES
1325
1330
1355
1400
1415
1425
DEPARTURE
ROME
HONGKONG
DUBLIN
VIENNA
SINGAPORE
BONN
IR012
CX501
BA051
SR443
SQ307
LH995
P401 4/8
Displaying Concealed Information
QUIZ 33
33
33
PP
P
55
5
55
5
11
1
11
11
11
++
++
++
22
22
22
==
==
QUIZ
PP
P
55
5
55
5
11
1
11
11
11
++
++
22
22
22
==
==
Updated Pages
RUGBY
PP
P
33
3
3
11
1
55
5
International Match
EE
E
NN
N
GG
G
VV
V
SS
S
FF
F
RR
R
AA
A
NN
N
ZZ
Z
DD
D
VV
V
SS
S
JJ
J
PP
P
NN
N
WW
W
W
AA
A
A
LL
L
L
VV
V
V
SS
S
S
AA
A
A
UU
U
U
SS
S
S
11
1
SS
S
TT
T
HH
H
AA
A
LL
L
FF
F
: 55
5
- 77
7
::
:
11
1
22
2
- 44
4
::
:
77
7
7
- 11
1
1
55
5
5
P315
RUGBY
PP
P
33
3
11
1
55
5
International Match
EE
E
E
NN
N
N
GG
G
G
VV
V
V
SS
S
S
FF
F
F
RR
R
R
AA
A
A
NN
N
N
ZZ
Z
Z
DD
D
D
VV
V
V
SS
S
S
JJ
J
J
PP
P
P
NN
N
N
WW
W
AA
A
LL
L
VV
V
SS
S
AA
A
UU
U
SS
S
22
2
NN
N
DD
D
HH
H
AA
A
LL
L
FF
F
::
:
11
1
1
77
7
7
- 11
1
1
55
5
5
::
:
11
1
1
99
9
9
- 22
2
2
11
1
1
::
:
33
3
33
3
--
-
22
2
55
5
UPDATED
●Cancel
When you press the button, the TV picture appears on the
screen. Whilst in this mode you can not select another TV
programme.You should first switch back to TV reception by
pressing the TXT/TV button if required.
●Teletext reception
If your aerial signal is poor, the teletext reception may be poor.
X

14
SPECIAL FUNCTIONS / SPECIFICA
SPECIAL FUNCTIONS / SPECIFICATIONS
TIONS
ThisTV set allows you to set up the following special functions.
■ Maximum volume setting and prohibition of presetting
and CS key entry
ITEM 1
SET➞0NO
SET➞1 YES Maximum volume setting and prohibition of
presetting and CS key entry
■Start up programme position
ITEM 2 Presets the programme position when the set is switched on.
SET➞0 Last programme position start
SET➞1 Programme position "1" start
SET➞2 Programme position "2" start
SET➞3 Programme position "3" start
SET➞4 Programme position "4" start
SET➞5 Programme position "5" start
SET➞6 Programme position "6" start
SET➞7 Programme position "7" start
SET➞8 Programme position "8" start
SET➞9 "AV1" start
1.Press and hold the button on the Remote control
handset and then press the P▲button on the TV set.
2.To select the "ITEM" number, press the /OK button on the
remote control handset.
3.To select the "SET" number, press the / button
repeatedly.
4.To return to the normal TV mode, press the button.
The setting conditions of all items can be confirmed.
Special functions are not cancelled if the TV set is switched off or
the mains disconnected.
Power source AC 220~240V, 50Hz
Television system System B/G, I, L/L’,
Colour system PAL/SECAM/NTSC 4.43
(NTSC 3.58 in AV mode)
Channel Coverage VHF:E2-E12, F2~F10
UHF: 21~69
CATV : X,Y, Z, S1-S41, B-Q
Aerial input impedance 75 ohm
AV terminal
21-Pin Terminal AV1 : CENELEC Standard with RGB
AV2 : CENELEC Standard with S-Inputs
Front AV Terminal AV3 : RCA Terminal, Video and Audio
(L/R) Input
Sound output Main L/R 5 watts x 2
(Continuous)
Picture tube (Diagonal) 21” (CE21DN6F-C)
28” (CE28DN6F-C)
(Visible picture diagonal) 51 cm (CE21DN6F-C)
66 cm (CE28DN6F-C)
Dimensions (W x H x D mm) 612 x 476 x 482 (CE21DN6F-C)
736 x 597 x 494 (CE28DN6F-C)
Weight 21 Kg (CE21DN6F-C)
32 Kg (CE28DN6F-C)
Specification subject to change without notice.
?
?
GBGB
TV Specifications
Scart Specifications
Pin Signal function Level AV1 AV2
Pin 1 Audio output (right channel) 0.5V/ 1 K ohm ✔✔*monitor out
Pin 2 Audio Input (right channel) 0.5V/10 K ohm ✔✔
Pin 3 Audio output (left channel) 0.5V/ 1 K ohm ✔✔*monitor out
Pin 4 Audio earth
Pin 5 Earth (blue)
Pin 6 Audio Input (left channel) 0.5V/10 K ohm ✔✔
Pin 7 Blue (B) input 0.7Vpp/75 ohm ✔
Pin 8 Remote switch input L:0-2V H:10-12V ✔✔
Pin 9 Earth (green)
Pin 10
Pin 11 Green (G) input 0.7Vpp/75 ohm ✔
Pin 12
Pin 13 Earth (red)
Pin 14 Earth
Pin 15 Red (R) or C(chrominance) input 0.7Vpp/75 ohm ✔ *Red input ✔ *C-input
Pin 16 Fast blanking L:0-0.4V H:1-3V ✔
Pin 17 Earth(video)
Pin 18 Earth
Pin 19 Video output 1 Vpp/75 ohm ✔*TV output ✔*monitor output
Pin 20 Video/sync *1 orY (luminance) input 1 Vpp/75 ohm ✔ *Video/sync-input ✔*Video/Y-input
Pin 21 Connector shield
Special Functions

15
SER
SERVICING & HELPFUL HINTS
VICING & HELPFUL HINTS
GBGB
■If the power cord or plug is damaged.
■If liquid has been spilt into the television receiver.
■If television receiver has been exposed to rain or water.
■If the television receiver has been dropped or the cabinet has
been damaged.
■If the television receiver exhibits a distinct change in performance.
■If the television receiver does not operate normally by following the
operating instructions.
Adjust only those controls that are covered in the operating instructions
as improper adjustment of other controls may result in damage.This
will often require extensive work by a qualified technician to restore the
television receiver to normal operation.
When replacement parts are required, have the service technician
verify that the replacements he uses have the same safety
characteristics as the original parts. Use of manufacturers specified
replacements can prevent fire, shock or other hazards.
■NO PICTURE, NO SOUND
●Check if TV is plugged in.
●Try a different channel, if OK, probably
station trouble.
■POOR PICTURE, SOUND OK
●Adjust BRIGHTNESS control.
●Adjust FINE TUNING control.
●Check aerial connections.
■NO COLOUR, PICTURE OK
●Adjust COLOUR control.
●Adjust FINE TUNING control.
●Is the programme in colour ?
■WEAK PICTURE
●Check aerial connections on back of
set.
●Check aerial for broken wires.
●Re-orient aerial.
The following faults are not caused by the receiver:
"GHOSTS"
Reflections of signals from mountains or
high buildings will cause multiple
images, called "Ghosts".These
abnormal conditions can be reduced to
minimum by repositioning aerial or by
installing new one suited for your area.
"INTERFERENCE"
Interference may be caused by electrical
appliances, car ignition systems, etc.
This should normally be a temporary
condition, but should this interference
persist, contact your dealer.
Your television is fully transistorised and does not contain
any user serviceable components.
Removal of the cabinet cover may expose you to dangerous
voltages. Refer all servicing to qualified service personnel.
Unplug the television receiver from the wall outlet and refer
servicing to qualified service personnel under the following
conditions:
Servicing Helpful Hints
?
?

16
CHANNEL
CHANNEL T
TABLE
ABLE
GBGB
Displayed
channel no.
Irish
channels
UK
channels
C 1 43.25
C 2 A A F2 E2 R1 48.25
C 3 B A F3 E3 55.25
C 4 C B F4 E4 R2 62.25
C 5 D D F5 E5 R6 175.25
C 6 E E F6 E6 R7 182.25
C 7 F F F7 E7 R8 189.25
C 8 G/F F8 E8 R9 196.25
C 9 /G G F9 E9 205.25
C10 H H F10 E10 R10 210.25
C11 I H1 E11 R11 217.25
C12 J H2 E12 R12 224.25
C21 21 21 21 F21 E21 E21 471.25
C22 22 22 22 F22 E22 E22 479.25
C23 23 23 23 F23 E23 E23 487.25
C24 24 24 24 F24 E24 E24 495.25
C25 25 25 25 F25 E25 E25 503.25
C26 26 26 26 F26 E26 E25 511.25
C27 27 27 27 F27 E27 E27 519.25
C28 28 28 28 F28 E28 E28 527.25
C29 29 29 29 F29 E29 E29 535.25
C30 30 30 30 F30 E30 E30 543.25
C31 31 31 31 F31 E31 E31 551.25
C32 32 32 32 F32 E32 E32 559.25
C33 33 33 33 F33 E33 E33 567.25
C34 34 34 34 F34 E34 E34 575.25
C25 35 35 35 F35 E35 E35 583.25
C36 36 36 36 F36 E36 E36 591.25
C37 37 37 37 F37 E37 E37 599.25
C38 38 38 38 F38 E38 E38 607.25
C39 39 39 39 F39 E39 E39 615.25
C40 40 40 40 F40 E40 E40 623.25
C41 41 41 41 F41 E41 E41 631.25
C42 42 42 42 F42 E42 E42 639.25
C43 43 43 43 F43 E43 E43 647.25
C44 44 44 44 F44 E44 E44 655.25
C45 45 45 45 F45 E45 E45 663.25
C46 46 46 46 F46 E46 E46 671.25
C47 47 47 47 F47 E47 E47 679.25
C48 48 48 48 F48 E48 E48 687.25
C49 49 49 49 F49 E49 E49 695.25
C50 50 50 50 F50 E50 E50 703.25
C51 51 51 51 F51 E51 E51 711.25
C52 52 52 52 F52 E52 E52 719.25
C53 53 53 53 F53 E53 E53 727.25
C54 54 54 54 F54 E54 E54 735.25
C55 55 55 55 F55 E55 E55 743.25
C56 56 56 56 F56 E56 E56 751.25
C57 57 57 57 F57 E57 E57 759.25
C58 58 58 58 F58 E58 E58 767.25
C59 59 59 59 F59 E59 E59 775.25
C60 60 60 60 F60 E60 E60 783.25
C61 61 61 61 F61 E61 E61 791.25
C62 62 62 62 F62 E62 E62 799.25
C63 63 63 63 F63 E63 E63 807.25
C64 64 64 64 F64 E64 E64 815.25
C65 65 65 65 F65 E65 E65 823.25
C66 66 66 66 F66 E66 E66 831.25
C67 67 67 67 F67 E67 E67 839.25
C68 68 68 68 F68 E68 E68 847.25
C69 69 69 69 F69 E69 E69 855.25
VHF band
UHF band
OIRT
Channels
CCIR
channels
French
channels*1
Italian
channels
Displayed
channel no.
Irish
channels
UK
channels
C75 X X 69.25
C76 Y Y R3 76.25
C77 C C/Z Z R4 83.25
C78 Z+1 Z+1 R5 90.25
C79 Z+2 Z+2 97.25
C80 S1 S1 105.25
C81 S2 B S2 112.25
C82 S3 B S3 119.25
C83 S4 C S4 126.25
C84 S5 S5 133.25
C85 S6 D S6 140.25
C86 S7 S7 147.25
C87 S8 E S8 154.25
C88 C2 S9 F S9 161.25
C89 C3 S1S F S10 168.25
C90 13 S11 S11 231.25
C91 14 S12 L S12 238.25
C92 S13 M S13 245.25
C93 15 S14 M S14 252.25
C94 16 S15 N S15 259.25
C95 17 S16 S16 266.25
C96 18 S17 O S17 273.25
C97 19 S18 S18 280.25
C98 20 S19 P S19 287.25
C99 21 S20 Q S20 294.25
H21 S21 S21 303.25
H22 S22 S22 311.25
H23 S23 S23 319.25
H24 S24 S24 327.25
H25 S25 S25 335.25
H26 S26 S26 343.25
H27 S27 S27 351.25
H28 S28 S28 359.25
H29 S29 S29 367.25
H30 S30 S30 375.25
H31 S31 S31 383.25
H32 S32 S32 391.25
H33 S33 S33 399.25
H34 S34 S34 407.25
H35 S35 S35 415.25
H36 S36 S36 423.25
H37 S37 S37 431.25
H38 S38 S38 439.25
H39 S39 S39 447.25
H40 S40 S40 455.25
H41 S41 S41 463.25
VHF band (CATV)
VHF-hyper band (CATV)
Vision
Frequency
[MHz]
CCIR
channels
French
channels*1
Italian
channels
*1)The actual frequency of French channels inVHF-low band may differ
slightly from shown in the above frequency table.
Vision
Frequency
[MHz]
OIRT
Channels
The below table shows the receivable channels and channel allocation for this TV set.

17
SICHERHEITSMAßNAHMEN
Stellen Sie keine Gegenstände auf
das Anschlußkabel. Stellen Sie
diesen Fernseher nirgendwo hin, wo
Personen über das Kabel laufen und
es dadurch beschädigen können.
Überlasten Sie Steckdosen und
Verlängerungskabel nicht, da dies
zu Feuer oder elektrischem Schlag
führen kann.
Im Gehäuse und auf der Rück- oder
Unterseite des Gerätes sind Schlitze
und Öffnungen zur Ventilation
angebracht, um einen zuverlässigen
Betrieb zu garantieren und um das
Gerät vor Überhitzung zu schützen.
Diese Öffnungen dürfen nicht
blockiert oder abgedeckt werden. Die
Öffnungen sollten niemals mit
einem Tuch oder einem anderen
Material abgedeckt werden, und die
Öffnungen auf der Unterseite sollten
nicht blockiert werden, indem der
Fernsehempfänger auf ein Bett, ein
Sofa, einen Teppich oder auf eine
ähnliche Oberfläche gestellt wird.
Dieser Fernsehempfänger sollte
niemals in die Nähe oder auf einen
Heizkörper oder Heizofen gestellt
werden. Dieser Fernseher sollte
nicht in eine Einbauvorrichtung, wie
zum Beispiel in einen Bücherschrank
gestellt werden, es sei denn, es ist
für ausreichende Ventilation gesorgt.
Stellen Sie Ihren Fernsehempfänger
nicht auf instabile Ständer, Regale
oder Tische. Falls der Fernseher
herunterfällt, kann dies zu schweren
Verletzungen von Personen und zur
Beschädigung des Fernsehers führen.
Ihr Verkäufer kann Ihnen zugelassene
Ständer oder Regale empfehlen und
Anleitungen zur Anbringung an der
Wand geben.
Wenn das Fernsehgerät in eine
Einheit eingebaut oder
eingeschlossen ist, müssen die
Mindestabstände zum Zweck der
Belüftung eingehalten werden. Ein
Temperaturanstieg kann die
Lebensdauer des Fernsehgeräts
reduzieren und außerdem gefährlich
sein.
Für diesen Fernsehempfänger
sollte nur die Art von
Stromanschluß verwendet werden,
die auf dem Gerät oder in den
Bedienungsanleitungen angegeben
ist.Wenn Sie nicht sicher sind,
welche Art von Stromversorgung
Sie in Ihrem Haus haben, wenden
Sie sich an Ihren Verkäufer oder an
Ihre zuständige Elektrizitätsgesell-
schaft.
Verwenden Sie niemals
Zubehörteile, die nicht speziell für
diesen Fernseher entworfen wurden.
Lassen Sie keine Gegenstände in
die Schlitze oder Öffnungen des
Gehäuses fallen und stecken Sie
keine Gegenstände hinein. Einige
interne Teile sind einer hohen
Spannung ausgesetzt, und eine
Berührung kann zu elektrischem
Schlag führen. Gießen Sie niemals
Flüssigkeiten irgendwelcher Art auf
den Fernsehempfänger.
Setzen Sie den Fernseher nicht
Regen aus und benutzen Sie ihn
nicht in der Nähe von Wasser.
Zum Beispiel nahe einer
Badewanne, einem Spülbecken, in
einem feuchten Keller, usw. Ziehen
Sie den Stecker vor der Reinigung
des Fernsehers aus der Steckdose.
Steigen Sie nie auf den Fernseher
oder seinen Standfuß, lehnen Sie
sich nicht dagegen und stoßen Sie
nicht dagegen. Achten Sie
besonders darauf, daß auch Kinder
dies nicht tun. Ein umfallender
Fernseher kann ernsthafte
Verletzungen verursachen.
Tragen Sie flüssige Reinigungsmittel
oder Sprays nicht direkt auf den
Fernseher auf.Verwenden Sie zur
Reinigung ein feuchtes Tuch.
!
Anschluß
!
Gebrauch
ACHTUNG: Bitte lesen und zu Ihrer Sicherheit aufbewahren. Dieses Gerät wurde so konstruiert und hergestellt, daß Ihre persönliche Sicherheit
gewährleistet ist. Unsachgemäßer Gebrauch kann jedoch zu elektrischem Schlag oder zu Feuergefahr führen. Beachten Sie die folgenden
Grundregeln für den Anschluß, den Gebrauch und die Wartung, um die in diesen Fernsehempfänger eingebauten Schutzvorrichtungen nicht außer
Kraft zu setzen.
DD
MINIMUM DISTANCES
10cm
5cm
20cm
10cm
STROMVERSORGUNG

18
Dieser Fernseher ist auf eine Spannung von 220~240V/50Hz
Wechselstrom eingestellt. Stecken Sie den Stecker des Netzkabels
in eine Steckdose. Wenn das Fernsehgerät für längere Zeit nicht
benutzt wird, ziehen Sie das Netzkabel aus der Steckdose.
WARNUNG! Beim Betrieb dieses Fernsehgeräts werden hohe
elektrische Spannungen verwendet. Das Gerät darf nur durch
qualifizierte Techniker geöffnet werden.
Dieses Fernsehgerät enthält eine vollautomatische
Einstellfunktion, die “Plug & Play” genannt wird.Wenn Sie
dieses Fernsehgerät zum ersten Mal einschalten, beginnt sie
automatisch, alle erhältlichen Kanäle zu suchen und zu speichern.
Damit diese Funktion ordnungsgemäß funktioniert, befolgen Sie
bitte die unten aufgeführten Schritte, bevor Sie Ihr Fernsehgerät
einschalten.
1. Schließen Sie den Stecker Ihres Antennenkabels an der Rückseite
des Fernsehers an. Lassen Sie weitere AV-Geräte zunächst außer
acht. Sie können diese später hinzufügen und die Anweisungen
dafür im Bedienungshandbuch unter dem Abschnitt “Anschluß von
AV-Geräten” nachsehen.
2. Stecken Sie den Netzstecker in eine Steckdose.
✐
Dieses Fernsehgerät ist für eine Stromspannung von AC220-240V
50Hz eingerichtet.
3. Sie können den Fernseher jetzt einschalten. Drücken Sie dazu
einfach den EIN-/AUS Netzschalter an der Vorderseite des
Fernsehgerätes.
✐
Eine rote Leuchtanzeige erscheint.
Ein selbsttätiges Abstimmsystem beginnt wie folgt:
Auf dem Bildschirm erscheinen der
Abstimmstatus und eine Begrüßungs-
meldung in drei Sprachen.
Das Fernsehgerät sucht Sender zwischen
C1 und C99 und H21 bis H41 ab, wie in den
Sendertabellen auf Seite 31 aufgeführt.
Danach wird die Programmposition 1
gewählt, worauf Abschlußmeldungen auf
dem Bildschirm erscheinen.
Nach dem Drücken auf eine der
Bedientasten verschwindet diese Meldung
wieder.
Die Installation ist jetzt abgeschlossen!
✐ Dieser Vorgang erscheint nur beim ersten Einschalten.
✐ Wenn weitere Kanäle verfügbar werden (entweder weil Sie
umgezogen sind oder weil Kabelfernsehen installiert wird), dann
verfahren Sie bitte wie im Abschnitt “PROGRAMMEINSTELLUNG”
auf Seite 26-27 beschrieben.
1. Entfernen Sie die Batterieabdeckung,
indem Sie sie in Pfeilrichtung
schieben.
2. Legen Sie zwei 1,5
Mignonzellen so ein, daß die
"+" und "-" Zeichen auf den
Batterien mit den "+" und "-"
Zeichen im Batteriefach
übereinstimmen.
3. Schließen Sie die
Batterieabdeckung.
■ Der Antennenanschluß befindet sich an der Rückseite des
Fernsehgeräts.
■ Für alle Antennenprobleme wenden Sie sich bitte an Ihre
Verkaufsstelle.
■ Anschluß einer externen Anlage - siehe Abschnitt "Anschluß von
Externen AV-Geräten" auf Seite 25.
■Einschalten: EIN/AUS
Hauptschalter drücken. Die
Ein/Aus-Anzeige leuchtet.
■Ausschalten: Schalter erneut
drücken.
■ Drücken Sie die Taste auf der Fernbedienung, um auf
Bereitschaftsbetrieb zu schalten. Die Betriebsanzeige leuchtet heller.
■ Um das Fernsehgerät im Bereitschaftsbetrieb einzuschalten,
drücken Sie eine der folgenden Tasten auf der Fernbedienung:
Taste, P▲/P▼, Nummerntasten 0 bis 9.
Ihr Fernseher verbraucht auch im Bereitschaftsbetrieb Strom.
Dieses Fernseher verfügt über eine automatische Ausschaltfunktion.
Ist der Fernseher noch nach Sendeschluß eingeschaltet, schaltet er
auf Bereitschaftsbetrieb, wenn er 10 Minuten lang kein
Antennensignal mehr empfangen hat.
■Wenn die Antenne entfernt wird, schaltet sich das
Fernsehgerät automatisch ab.
■Diese Funktion ist außer Betrieb, wenn das Fernsehgerät
über den Timer eingeschaltet wird.
Bei blinkender Einschaltanzeige liegt eine Störung des Fernsehers
vor. Schalten sie das Gerät mit dem Hauptschalter aus und setzen
Sie sich mit unserem Kundendienst in Verbindung.
Die Fernbedienung funktioniert nur, wenn der Fernseher am
Hauptschalter eingeschaltet ist.
BITTE BEACHTEN: Bei Bereitschaftsbetrieb kann der Fernseher
nur mit der Fernbedienung gestartet werden.
Der EIN/AUS-Hauptschalter muß auf EIN gestellt sein,
bevor die Fernbedienung benutzt werden kann.
Steckdose
ANSCHLUß
ANSCHLUß
Netzanschluß
Fernbedienung/Einbau der Batterien
Antennenanschluß
Kurze Bedienungsanleitung
DD
Merci beaucoup d'avoir acheté ce
téléviseur SANYO.
Je cherche et mémorise tous les
programmes. Attendez S.V.P
Vielen Dank, daß Sie diesen SANYO-
Fernseher gekauft haben.
Ich suche und speichere jetzt alle
Programme. Bitte warten.
Thank you for purchasing your
SANYO TV.
Now I am searching and storing all
programmes. Please wait.
Complete
auto-tuning
Auto set-up completed. Happy viewing !
Programmierung beendet. Viel Spaß !
Recherche automatique terminée !
POS 5
CH. C34
SOUND S-1
Hauptschalter EIN/AUS
Bereitschaftsbetrieb
!
!
Erscheint kein Bild, obwohl die Stromanzeigelampe brennt, dann
drücken Sie die Taste , P▲/P▼(Programm auf/ab) oder 0-9, da
sich der Fernseher im Standby-Modus befindet.
Automatische Ausschaltfunktion
OFF 0:10

19
BEDIENT
BEDIENTASTEN
ASTEN
DD
VIDEO L/S R/D
AV3 IN
P
Zum Öffnen
drücken Bereitschaftsbetrieb/Ein/Aus
Programm auf/ab
Regler auf/ab
Fernbedienungsempfänger
Hauptschalter EIN/AUS
Kopfhörer Toneingangsbuchse
Links/Rechts AV3
Videoeingang
AV3
Bedienelemente und Anschlüsse an der Vorderseite des Fernsehers
AV1
AV
AV2 AV1
Bedientasten
Bereitschaftsbetrieb/Ein/Aus
Programm Auf/Ab
Zifferntasten 0 bis 9
2-stellige Nummerneingabe
Regler Auf/Ab
Funktion
Ton Aus
Normaltaste
TV/Video Umschaltung
Vorherige Programmwahl
Timer (Zeitschaltuhr)
Abruf
Zeitanzeige
Baß-Erweiterung
Menu
Stereo/Zweiton
Kompression 16:9
Kanalwahlmodus-Taste
Aktiv-3D-Surround-Wahltaste
P▲
P▼
BASS
TV/
A•B
WIDE
TXT/TV
Y?
PP
F
/OK
MENU/
i
X
0
7
1
4
8
5
23
6
9
-/-- CS
SURROUND
P
-/--
0-9
•
-+
F
P P
TV/
?
BASS
MENU
WIDE
CS
SURROUND
A B
/OK

20
ALLGEMEINE BEDIENUNG
DD
■Direkte Programmwahl
Um die Programme 0 - 9 einzuschalten, drücken Sie die entsprechende
Zifferntaste auf der Fernbedienung. Wenn das gewünschte Programm
10 oder höher ist, zum Bespiel 23, drücken Sie auf der Fernbedienung
zuerst die -/-- Taste und geben dann 2und 3ein.
■Auf/Ab Programmwahl
Drücken Sie die P▲Taste, um auf das nächste Programm zu schalten.
Drücken Sie die P▼Taste, um eine Programmposition herunterz
uschalten.
1. Zur Einstellung der Lautstärke drücken Sie eine der /
tasten.
2. Folgenden Funktionen können Sie durch Drücken der /OK
taste auf der Fernbedienung anwählen (die Anzeige auf dem
Bildschirm
ändert sich bei mehrmaligem Drücken der
/OK
taste
wie abgebildet):
Bildregelung
KONTRAST: Zur Kontrasteinstellung.
HELLIGKEIT: Zur Helligkeitseinstellung.
FARBE: Zur Farbeinstellung.
FARBTON: Zum Einstellen der Farbphase (erscheint, wenn nur
ein NTSC Signal empfangen wird).
SCHÄRFE: Zur Einstellung der Bildschärfe.
HELLIGKEIT VIDEOTEXT: Zur Auswahl des Helligkeitsgrads des
Videotexts im Videotextmodus.
FEINABSTIMMUNG: Zur Feineinstellung des Empfangs.
(Erscheint nur im TV-Modus).
Tonregelung
TIEFEN: Zur Baßeinstellung
HÖHEN: Zur Höheneinstellung
BALANCE: Zur Abstimmung des linken und rechten Kanals
3. Regeln Sie die gewählte Funktion durch Drücken der /
Tasten auf der Fernbedienung.
Diese Funktion hat zwei stufen. Drücken Sie die Taste
(Tonabschaltung) einmal, um die Tonstärke von den Lautsprechern zu
verringern, drücken Sie sie nochmals, um den Ton vollkommen
abzuschalten.
Drücken Sie die Taste nochmals, um den Ton wieder einzuschalten.
Wenn die Taste
/
gedrückt wird, dann wird die
Tondämpfungsfunktion abgeschaltet.
■Wenn die Kanalnummer des Senders bekannt ist
1. Die Taste CS auf dem Fernbedienungsgerät drücken. Die
Nummer des empfangenen Programms und die Kanalnummer
werden angezeigt.
2.Wenn die Kanalnummer des Senders bekannt ist, die
Kanalnummer direkt mit den numerischen Tasten 0-9 eingeben.
Beispiel: Zur Auswahl von Kanal 2 muß 0und anschließend 2
eingegeben werden. Zur Auswahl von Kanal 35 muß 3und
anschließend 5eingegeben werden.
Wenn man den Hyperband-Kanal einstellen möchte, durch Drücken
der Taste CS “H--” auswählen. Anschließend die Kanalnummer
eingeben.
Jedesmal, wenn die Taste CS gedrückt wird, ändert sich die
Kanalnummer wie folgt:
Aktuelle Kanalnummer ➜Normaler Kanalmodus ➜‘Hyper’-
Kanalmodus
Weitere Informationen und die Kanalzuordnung entnehmen Sie bitte
der Kanalübersicht auf Seite 31.
3. Zum Speichern die Taste /OK auf dem Fernbedienungsgerät.
Das Programm und die Kanalnummer blinken nun.
■Wenn die Kanalnummer des Senders nicht bekannt ist:
1. Die Taste CS auf dem Fernbedienungsgerät drücken. Die
Nummer des empfangenen Programms und die Kanalnummer
werden angezeigt.
2.Wenn die Kanalnummer des Senders nicht bekannt ist, die Taste
P▲oder P▼drücken, um die Suche zu beginnen.
Wenn ein Sender gefunden ist, hört die Suche automatisch auf.
3. Zum Speichern die Taste /OK auf dem Fernbedienungsgerät.
Das Programm und die Kanalnummer blinken nun.
■Auswahl des Tons
Wenn der Klang, der für den Sender empfangen wird, nicht
ausgegeben wird oder von schlechter Qualität ist, obwohl das Bild
gut ist, kann es zur Auswahl des falschen Soundsystems kommen.
Um den Ton zu ändern, drücken Sie die Taste wiederholt,
während die Bildschirmanzeige noch angezeigt wird. Der Ton wird
folgendermaßen geschaltet:
S-1 (B/G) ->S-2 (D/K) -> S-3 (I) ->S-4 (L/L´)
System 1 - Deutschland
System 2 - Osteuropa
System 3 - England und Irland
System 4 - Frankreich
Programmwahl
Lautstärke- und Bildeinstellung
<>
Stummschaltung
TON
KONTRAST HELLIGKEIT
FARBE
SCHÄRFE
HELLIGKEIT VIDEOTEXT
MITTE
BALANCE
HÖHEN
TIEFEN
FEINABSTIMMUNG
TON STUMM
C02
Programmnummer
Kanalnummer
H35
Hyperband-Kanalnummer
3
S-1
Ton
Auswahl des Kanals
This manual suits for next models
1
Table of contents
Languages:
Other Sanyo TV manuals

Sanyo
Sanyo CP21EF1 User manual

Sanyo
Sanyo C25PP81S User manual

Sanyo
Sanyo CE25B5-C User manual

Sanyo
Sanyo CP34ST3T User manual

Sanyo
Sanyo CE32W1-C User manual

Sanyo
Sanyo C29LK40S User manual

Sanyo
Sanyo CE28FWN6BK-B User manual

Sanyo
Sanyo C21PM40 User manual

Sanyo
Sanyo CE24WN5-B User manual

Sanyo
Sanyo CP21AF1VA User manual

Sanyo
Sanyo CE28D4-C User manual

Sanyo
Sanyo CA29YS2S User manual

Sanyo
Sanyo C21LF37 User manual

Sanyo
Sanyo HT30746 Product information sheet

Sanyo
Sanyo DP55360 - 55"Class LED LCD HDTV User manual

Sanyo
Sanyo CE21FS2 User manual

Sanyo
Sanyo CE23LC4-C User manual

Sanyo
Sanyo CZP2510 User manual

Sanyo
Sanyo CE42FD17-B User manual

Sanyo
Sanyo FVM4612 User manual